


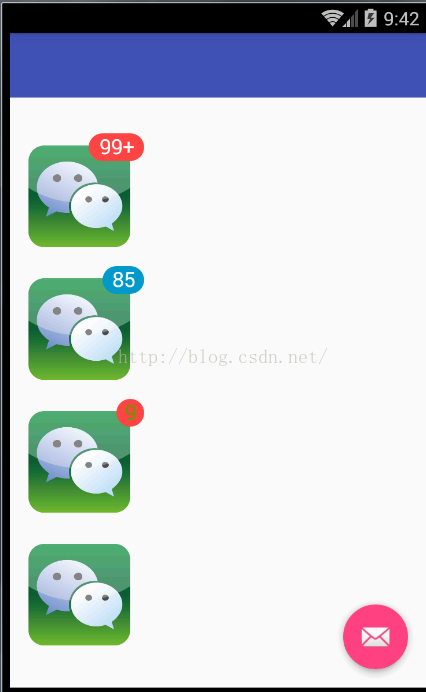
效果:
实现原理:
继承自Button的一个控件,小红点和数字,是直接绘制到Canvas上的,总是在右上角。之看以看起来,角标已经超出了Button,是因为在绘制Button的时候,对Canvas进行了缩放。譬如:
[html] view plain copy
- <com.carlos.notificatoinbutton.library.NotificationButton
- android:id="@+id/button4"
- android:layout_width="100dp"
- android:layout_height="100dp"
- android:layout_marginTop="15dp"
- android:background="@mipmap/wechat"
- notButton:circleBgColor="@android:color/holo_red_light"
- notButton:circleSize="12dp"
- notButton:textColor="@android:color/holo_green_dark" />
这样的一个NotificationButton,设置的宽和高为100dp方形,circleSize,就是小红点的大小,为12dp。这样设置的话,实际上,你看到的Button的大小,只有88dp,是总的宽度减去小红点的大小。
使用方法:
在android studio中引用:
[plain] view plain copy
- compile 'com.carlos.notificatoinbutton:buttonlibrary:1.0.5'
然后在布局文件中:
[html] view plain copy
- <com.carlos.notificatoinbutton.library.NotificationButton
- android:id="@+id/button5"
- android:layout_width="100dp"
- android:layout_height="100dp"
- android:layout_marginTop="15dp"
- android:background="@mipmap/wechat"
- notButton:circleBgColor="@android:color/holo_red_light"
- notButton:circleSize="12dp"
- notButton:textColor="@android:color/holo_green_dark" />
因为它是继承自Button,所有Button的属性,都可以使用。除些之外,还有三个自定义属性:
[html] view plain copy
- <!--小红点的颜色-->
- notButton:circleBgColor="@android:color/holo_red_light"
- <!--小红点大小-->
- notButton:circleSize="12dp"
- <!--小红点上字的颜色-->
- notButton:textColor="@android:color/holo_green_dark"
然后是在java代码中:
[java] view plain copy
- @Override
- protected void onCreate(Bundle savedInstanceState) {
- super.onCreate(savedInstanceState);
- setContentView(R.layout.activity_main);
- button2 = (NotificationButton) findViewById(R.id.button2);
- button3 = (NotificationButton) findViewById(R.id.button3);
- button4 = (NotificationButton) findViewById(R.id.button4);
- button5 = (NotificationButton) findViewById(R.id.button5);
- button2.setNotificationNumber(120);
- button3.setNotificationNumber(85);
- button4.setNotificationNumber(9);
- button5.setNotificationNumber(0);
- }
只有一个方法,setNotificationNumber方法,设置了它,就可以直接显示通知数量了,
大于99的,显示99+,
小于等于0的,不显示。
源代码地址:
https://github.com/ws123/NotificationButton


 503
503

 被折叠的 条评论
为什么被折叠?
被折叠的 条评论
为什么被折叠?
 到【灌水乐园】发言


