


1,传递参数到组件上
每个组件都是相对独立的,因此任何组件所需的数据都需要通过组件的属性把数据传递到组件中。
比如上篇《Ember.js入门指南——组件定义》的第三点“{{component item.pn post=item}}”就是通过属性post把数据传递到组件foo-component或者bar-component上。如果在index.hbs中是如下方式调用组件那么渲染之后的页面是空的。
{{component item.pn}}
请读者自己修改index.hbs的代码后演示效果。
传递到组件的参数也是动态更新的,当传递到组件上的参数变化时组件渲染的HTML也会随之发生改变。
2,位置参数
传递的属性参数不一定要指定参数的名字。你可以不指定属性参数的名称,然后根据参数的位置获取对应的值,但是要在组件对应的组件类中指定位置参数的名称。比如下面的代码:
准备工作:
ember g route passing-properties-to-component
ember g component passing-properties-to-component
调用组件的模板,传入两个位置参数,分别是item.title、item.body。
{{#each model as |item|}}
{{passing-properties-to-component item.title item.body}}
{{/each}}
准备需要显示的数据。
// app/routes/padding-properties-to-component.js
import Ember from 'ember';
export default Ember.Route.extend({
model: function() {
return [
{ id: 1, title: 'Bower: dependencies and resolutions new', body: "In the bower.json file, I see 2 keys dependencies and resolutionsWhy is that so? " },
{ id: 2, title: 'Highly Nested JSON Payload - hasMany error', body: "Welcome to the Ember.js discussion forum. We're running on the open source, Ember.js-powered Discourse forum software. " },
{ id: 3, title: 'Passing a jwt to my REST adapter new ', body: "This sets up a binding between the category query param in the URL, and the category property on controller:articles. " }
];
}
});
在组件类中指定位置参数的名称。
// app/components/padding-properties-to-component.js
import Ember from 'ember';
export default Ember.Component.extend({
// 指定位置参数的名称
positionalParams: ['title', 'body']
});
注意:属性positionalParams指定的参数不能在运行期改变。
组件直接使用组件类中指定的位置参数名称获取数据。
{{title}}
{{body}}
注意:获取数据的名称必须要与组件类指定的名称一致,否则无法正确获取数据。
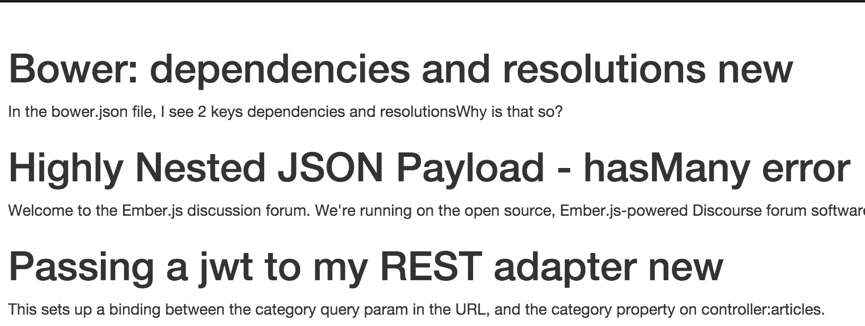
显示结果如下:
Ember还允许你指定任意多个参数,但是组件类获取参数的方式就需要做点小修改。比如下面的例子:
调用组件的模板
{{#each model as |item|}}
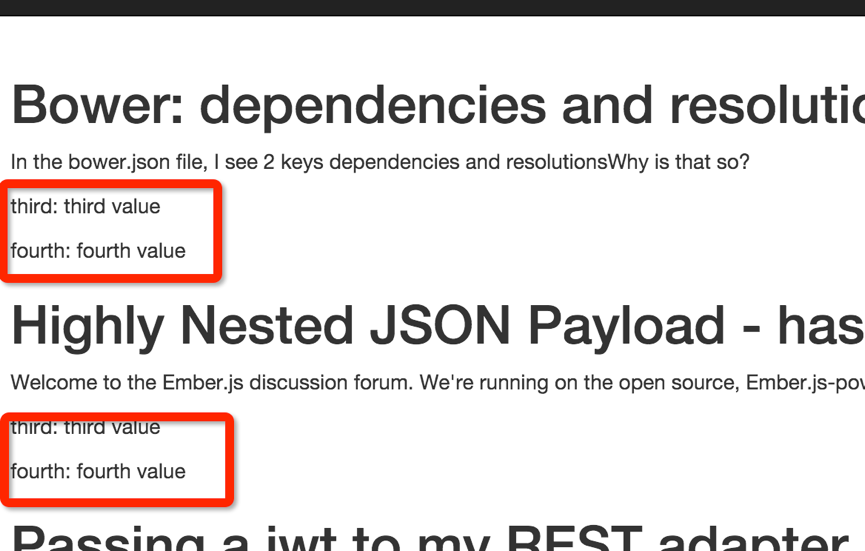
{{passing-properties-to-component item.title item.body 'third value' 'fourth value'}}
{{/each}}
指定参数名称的组件类,获取参数的方式可以参考这章。
// app/components/padding-properties-to-component.js
import Ember from 'ember';
export default Ember.Component.extend({
// 指定位置参数为参数数组
positionalParams: 'params',
title: Ember.computed('params.[]', function() {
return this.get('params')[0]; //获取第一个参数
}),
body: Ember.computed('params.[]', function() {
return this.get('params')[1]; //获取第二个参数
}),
third: Ember.computed('params.[]', function() {
return this.get('params')[2]; //获取第三个参数
}),
fourth: Ember.computed('params.[]', function() {
return this.get('params')[3]; //获取第四个参数
})
});
下面看组件是怎么获取传递过来的参数的。
{{title}}
{{body}}
third: {{third}}
fourth: {{fourth}}
显示结果如下:
到此组件参数传递的内容全部介绍完毕。总的来说没啥难度。Ember中参数的传递与获取方式基本是相似的,比如link-to助手、action助手。


 1415
1415


 被折叠的 条评论
为什么被折叠?
被折叠的 条评论
为什么被折叠?
 到【灌水乐园】发言


