


JNI静态(static)载入OpenCV
本文地址: http://blog.csdn.net/caroline_wendy
步骤:
1. 准备OpenCV-Android库
复制OpenCV的sdk至工作目录.
下载OpenCV的最新android-sdk: OpenCV-2.4.9-android-sdk;
把当中的sdk目录, 复制到工作目录; sdk目录里包括native, java, etc. 三个目录.
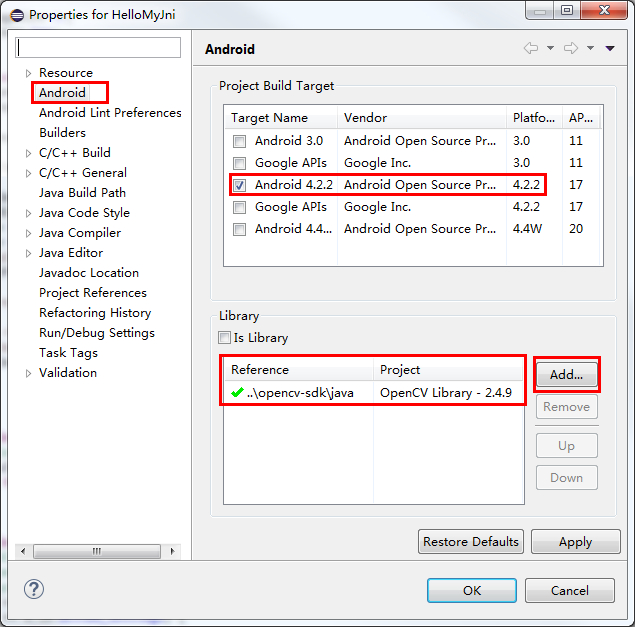
2. 载入OpenCV-Android库
导入(import)工作目录的java目录, 设置为当前项目的库.
[项目名]右键点击->Android->Add Library->选择加入的库. 就可以. 不须要选择Is Library.
3. 创建JniClient类.
包括须要使用的方法(method), 能够多个.
/**
 *
 */
package com.example.hellomyjni;

/**
 * @author Administrator
 *
 */
public class JniClient {
	static public native String sayName();
	static public native int[] grayImage(int[] pixels, int w, int h);
}
使用命令行, 生成头文件.
进入项目目录, 生成JNI的头文件, 使用命令:
"javah -classpath bin/classes -d jni com.example.hellomyjni.JniClient"
或javah -classpath D:/eclipse-android/android-sdk/platforms/android-17/android.jar;bin/classes -d jni com.example.mycamera.CartoonifierView
包括Android库.
命令解析:
javah 生成头文件;
-classpath 使用类的位置(bin/classes), 都是.class文件;
-d jni 须要生成JNI的类(com.example.hellomyjni.JniClient), 包括[package].[classname].

其余參考: http://blog.csdn.net/caroline_wendy/article/details/39032551
4. 改动JNI配置文件
须要在jni目录内创建Application.mk, 主要负责C++标准的使用(APP_STL), 和须要编译的库.
APP_STL := gnustl_static
APP_CPPFLAGS := -frtti -fexceptions
APP_ABI := armeabi-v7a
改动Android.mk, 不须要使用OPENCV_LIB_TYPE:=STATIC
LOCAL_PATH := $(call my-dir)

include $(CLEAR_VARS)

#OPENCV_LIB_TYPE:=STATIC
OPENCV_INSTALL_MODULES:=on

include C:/Users/Administrator/android-workspace/opencv-sdk/native/jni/OpenCV.mk

LOCAL_MODULE    := HelloMyJni
LOCAL_SRC_FILES := HelloMyJni.cpp
LOCAL_LDLIBS +=  -llog -ldl
#LOCAL_C_INCLUDES += ./
LOCAL_SRC_FILES += ./sayname.cpp

include $(BUILD_SHARED_LIBRARY)
5. JNI函数
#include <jni.h>
#include <opencv2/opencv.hpp>

using namespace cv;

#include "com_example_hellomyjni_JniClient.h"

#include "sayname.h"

JNIEXPORT jstring JNICALL Java_com_example_hellomyjni_JniClient_sayName
  (JNIEnv *env, jclass) {
	string str = sayname();
	return env->NewStringUTF(str.c_str());
}

JNIEXPORT jintArray JNICALL Java_com_example_hellomyjni_JniClient_grayImage
  (JNIEnv *env, jclass, jintArray buf, jint w, jint h ) {

	jint *cbuf;
	cbuf = env->GetIntArrayElements(buf, false);
	if (cbuf == NULL) {
		return 0;
	}

	Mat imgData(h, w, CV_8UC4, (unsigned char*) cbuf);

	uchar* ptr = imgData.ptr(0);
	for (int i = 0; i < w * h; i++) {
		int grayScale = (int) (ptr[4 * i + 2] * 0.299 + ptr[4 * i + 1] * 0.587
				+ ptr[4 * i + 0] * 0.114);
		ptr[4 * i + 1] = grayScale;
		ptr[4 * i + 2] = grayScale;
		ptr[4 * i + 0] = grayScale;
	}

	int size = w * h;
	jintArray result = env->NewIntArray(size);
	env->SetIntArrayRegion(result, 0, size, cbuf);
	env->ReleaseIntArrayElements(buf, cbuf, 0);
	return result;
}
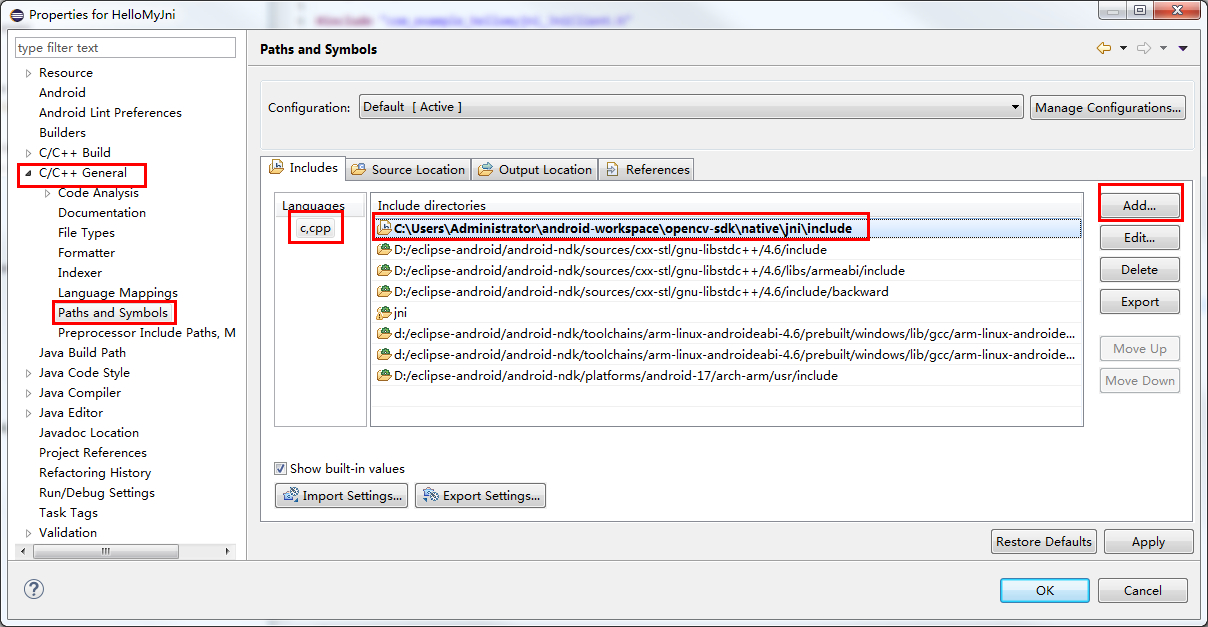
在项目中加入OpenCV头文件的检查, 能够避免文件报错.
6. 改动MainActivity
调用JNI的函数.
package com.example.hellomyjni;

import org.opencv.android.OpenCVLoader;

import android.app.Activity;
import android.graphics.Bitmap;
import android.graphics.BitmapFactory;
import android.graphics.Bitmap.Config;
import android.os.Bundle;
import android.view.Menu;
import android.view.MenuItem;
import android.widget.ImageView;
import android.widget.TextView;

public class MainActivity extends Activity{

	private ImageView iv;
	private Bitmap bmp;

	@Override
	protected void onCreate(Bundle savedInstanceState) {
		super.onCreate(savedInstanceState);
		setContentView(R.layout.activity_main);

		TextView tv = (TextView) findViewById(R.id.text_view);

		tv.setText(JniClient.sayName()); //recall JNI

		iv = (ImageView) findViewById(R.id.image_view);
		bmp = BitmapFactory.decodeResource(getResources(), R.drawable.shoes);
		int w = bmp.getWidth();
		int h = bmp.getHeight();
		int[] pixels = new int[w * h];
		bmp.getPixels(pixels, 0, w, 0, 0, w, h);

		int[] resultInt = JniClient.grayImage(pixels, w, h); //recall JNI

		Bitmap resultImg = Bitmap.createBitmap(w, h, Config.ARGB_8888);
		resultImg.setPixels(resultInt, 0, w, 0, 0, w, h);
		iv.setImageBitmap(resultImg);

	}

	@Override
	public boolean onCreateOptionsMenu(Menu menu) {
		// Inflate the menu; this adds items to the action bar if it is present.
		getMenuInflater().inflate(R.menu.main, menu);
		return true;
	}

	@Override
	public boolean onOptionsItemSelected(MenuItem item) {
		// Handle action bar item clicks here. The action bar will
		// automatically handle clicks on the Home/Up button, so long
		// as you specify a parent activity in AndroidManifest.xml.
		int id = item.getItemId();
		if (id == R.id.action_settings) {
			return true;
		}
		return super.onOptionsItemSelected(item);
	}

	static {
		if (!OpenCVLoader.initDebug()) {
	    } else {
	        System.loadLibrary("HelloMyJni");
	    }
	}
}


 266
266


 被折叠的 条评论
为什么被折叠?
被折叠的 条评论
为什么被折叠?
 到【灌水乐园】发言


