


CentOS5.4下配置PXE+Kickstart无人值守安装
PXE工作过程
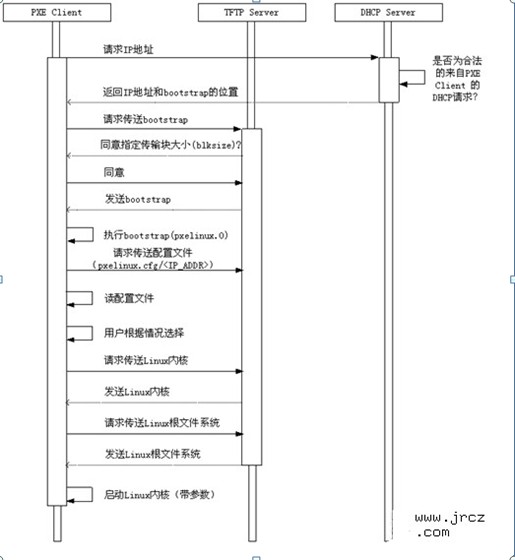
在上图中,PXE client是需要安装Linux的计算机,TFTP Server和DHCP Server运行在另外一台Linux Server上。Bootstrap文件、配置文件、Linux内核以及Linux根文件系统都放置在Linux Server上TFTP服务器的根目录下。PXE client在工作过程中,需要三个二进制文件:bootstrap、Linux内核和Linux根文件系统。Bootstrap文件是可执行程序,它向用户提供简单的控制界面,并根据用户的选择,下载合适的Linux内核以及Linux根文件系统。
操作步骤:
要实现一个PXE+Kickstart无人值守安装,从上面的理论解说中,我们知道,至少需要DHCP与TFTP服务来完成引导。要进行网络安装的话,我们则需要NFS或者HTTP或者FTP服务。这里,我们选择NFS。TFTP要工作的话,我们又要安装xinetd。加上要生成bootstrap文件要安装的syslinux。我们要安装的软件包一共如下:
dhcp
tftp-server
xinetd
syslinux
nfs-utils
DCHP
安装dhcp:
yum install -y dhcp
安装完成之后,把dhcp.conf.sample文件拷贝到/etc下面
cp /usr/share/doc/dhcp-3.0.5/dhcp.conf-sample/etc/dhcpd.conf
编辑/etc/dhcp.conf。
找到:
ignore client-updates;
在后面添加上:
next-server 192.168.1.152;
filename "pxelinux.0";
找到:
option nis-domain "domain.org";
option domain-name "domain.org";
option domain-name-server 192.168.1.1;
将其注释
配置你的网卡,将其IP改为192.168.1.152编辑/etc/sysconfig/network-scripts/ifcfg-eth0
找到:
BOOTPROTO=dhcp
改为:
BOOTPROTO=static
并在其下加上两行:
IPADDR=192.168.1.152
NETMASK=255.255.255.0
重启网络并启动dhcp
/etc/init.d/network restart
/etc/ini.d/dhcpd start
tftp-server安装tftp-server服务:
yum install -y xinetd tftp-server
配置tftp-server
Tftp默认是绑定在xinetd服务下的,因此,要修改tftp文件就要到/etc/xinetd.d下完成,修改后的tftp文件如下所示,其中“disable“选项由“yes“修改为”no“,在server_args选项增加了” -u nobody“参数,以让任何用户均可访问。编辑/etc/xinetd.d/tftp
找到:
disable = yes
将其改为
disable = no
启动tftp-server
/etc/init.d/xinetd start
pxelinux.0pxelinux.0,我们在配置dhcp的时候,就已经用到了,其实,就是上面提到的bootstrap。在CentOS中,它是由syslinux来生成的。我们只要安装了syslinux,就会生成一个pxelinux.0,我们只需要将其拷贝到/tftpboot下面即可。
yum install -y syslinux
cp /usr/lib/syslinux/pxelinux.0 /tftpboot/
启动文件找到CentOS 5.4的DVD安装盘或者ISO镜像,将其mount到/mnt下面。
mount -o loop /root/CentOS-5.4-i386-bin-DVD.iso /mnt
拷贝内核文件vmlinuz以及根文件系统initrd.img到/tftpboot
cp /mnt/images/pxeboot/vmlinuz /mnt/images/pxeboot/initrd.img /tftpboot
创建/tftpboot/pxelinux.cfg目录
mkdir /tftpboot/pxelinux.cfg
创建/tftpboot/pxelinux.cfg/default文件
touch /tftpboot/pxelinux.cfg/default
文件内容如下:
default linux
prompt 0
label linux
kernel vmlinuz
append ks=nfs:192.168.1.152:/netinstall/ks.cfg initrd=initrd.img
配置nfs网络安装拷贝整个安装光盘到/netinstall
mkdir /netinstall
cp -r /mnt/* /netinstall
安装nfs服务,并将/netinstall发布出去
yum install -y nfs-utils
/etc/init.d/portmap start
/etc/init.d/nfs start
exportfs *:/netinstall
关于ks.cfg文件
# rpm –ivh /mnt/Centos/system-config-kickstart-2.6.19.8-2.el5.rpm
#system-config-kickstart
运行图形化配置工具,进行相关配置,最后,保存成ks.cfg文件即可。
#cp ks.cfg/netinstall/ks.cfg
注意:ks.cfg文件可以用system-config-kickstart生成,内容可以根据自己的需求而定。
1.配置文件ks.cfg内容如下:
[root@lvgoo-test-02 netinstall]# cat ks.cfg
#platform=x86, AMD64, or Intel EM64T
# System authorization information
auth--useshadow--enablemd5
# System bootloader configuration
bootloader --location=mbr
# Partition clearing information
#clearpart --none
autopart
clearpart --all --drives=sda --initlabel
# Use graphical install
graphical
# Firewall configuration
firewall --disabled
# Run the Setup Agent on first boot
firstboot --disable
# System keyboard
keyboard us
# System language
lang en_US
# Installation logging level
logging --level=info
# Use NFS installation media
nfs --server=192.168.1.152 --dir=/netinstall
# Network information
network --bootproto=dhcp --device=eth0 --onboot=on
# Reboot after installation
reboot
#Root password
rootpw --iscrypted $1$UIAU9bh9$l2yHRsQRSo0jwGAzcqOH1.
# SELinux configuration
selinux --disabled
# System timezone
timezoneAmerica/New_York
# Install OS instead of upgrade
install
# X Window System configuration information
xconfig--defaultdesktop=GNOME --depth=32 --resolution=1024x768
# Disk partitioning information
part /boot --bytes-per-inode=4096 --fstype="ext3" --size=100
part swap --bytes-per-inode=4096 --fstype="swap" --size=16384
part / --bytes-per-inode=4096 --fstype="ext3" --size=112640
part /data --bytes-per-inode=4096 --fstype="ext3" --size=778240
%packages
@base
@chinese-support
@core
@development-libs
@development-tools
@editors
@gnome-desktop
@games
@graphical-internet
@graphics
@legacy-software-development
@legacy-software-support
@office
@sound-and-video
@system-tools
@text-internet
@base-x
keyutils
trousers
fipscheck
device-mapper-multipath
imake
java-1.6.0-openjdk
libsane-hpaio
festival
audit
net-snmp-utils
sysstat
xorg-x11-server-Xnest
xorg-x11-server-Xvfb
2.配置文件default内容如下:
# cat /tftpboot/pxelinux.cfg/default
default linux
prompt 0
label linux
kernel vmlinuz
append ks=nfs:192.168.1.152:/netinstall/ks.cfg initrd=initrd.img
3.配置文件dhcpd.conf内容如下:
[root@lvgoo-test-02 netinstall]# cat /etc/dhcpd.conf
ddns-update-style interim;
ignore client-updates;
subnet 192.168.1.0 netmask 255.255.255.0 {
option routers192.168.1.152;
option subnet-mask255.255.255.0;
option nis-domain"lvgoo.com";
option domain-name"lvgoo.com";
option domain-name-servers192.168.1.152;
option time-offset -18000;
range 192.168.1.240 192.168.1.250;
default-lease-time 21600;
max-lease-time 43200;
server-name "192.168.1.152";
next-server 192.168.1.152;
filename "/pxelinux.0";
host server1 {
server-name "192.168.1.152";
next-server 192.168.1.152;
hardware ethernet A4:BA:DB:36:10:41;
fixed-address 192.168.1.241;
filename "/pxelinux.0";
}
}
4.配置文件tftp内容如下:
[root@lvgoo-test-02 netinstall]# cat /etc/xinetd.d/tftp
# default: off
# description: The tftp server serves files using the trivial file transfer \
#protocol.The tftp protocol is often used to boot diskless \
#workstations, download configuration files to network-aware printers, \
#and to start the installation process for some operating systems.
service tftp
{
socket_type= dgram
protocol= udp
wait= yes
user= root
server= /usr/sbin/in.tftpd
server_args=-u nobody-s /tftpboot
disable= no
per_source= 11
cps= 1002
flags= IPv4
}


 3786
3786


 被折叠的 条评论
为什么被折叠?
被折叠的 条评论
为什么被折叠?
 到【灌水乐园】发言


