


转载自[https://medium.com/@ali_oguzhan/how-to-use-scrapy-with-django-application-c16fabd0e62e]
How to use Scrapy with Django Application
There are couple of articles on how to integrate Scrapy into a DjangoApplication (or vice versa?). But most of them don’t cover a full complete example that includes triggering spiders from Django views. Since this is a web application, that must be our main goal.
What do we need ?
Before we start, it is better to specify what we want and how we want it. Check this diagram:
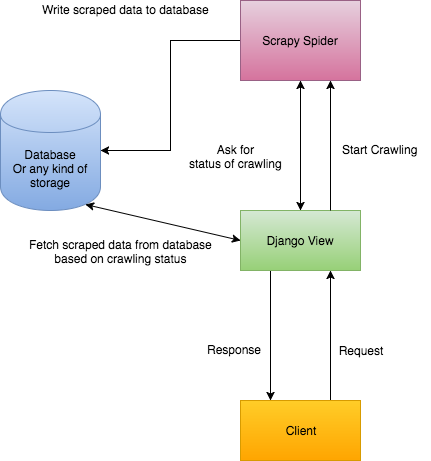
It shows how our app should work:
Clientsends a request with a URL to crawl it. (1)DjangotriggersScrapyto run a spider to crawl that URL. (2)Djangoreturns a response to tell Client that crawling just started. (3)Scrapycompletes crawling and saves extracted data into database. (4)Djangofetches that data from database and return it toClient. (5)
Looks great and simple so far.
A note on that 5th statement
Djangofetches that data from database and return it toClient. (5)
Neither Django nor client don’t know when Scrapy completes crawling. There is a callback method named pipeline_closed, but it belongs to Scrapy project. We can’t return a response from Scrapy pipelines. We use that method only to save extracted data into database.
Well eventually, in somewhere, we have to tell the client :
Hey! Crawling completed and i am sending you crawled data here.
There are two possible ways of this (Please comment if you discover more):
We can either use web sockets to inform client when crawling completed.
Or,
We can start sending requests on every 2 seconds (more? or less ?) from client to check crawling status after we get the "crawling started" response.
Web Socket solution sounds more stable and robust. But it requires a second service running separately and means more configuration. I will skip this option for now. But i would choose web sockets for my production-level applications.
Let’s write some code
It’s time to do some real job. Let’s start by preparing our environment.
Installing Dependencies
Create a virtual environment and activate it:
$ python3.5 -m venv venv
$ source venv/bin/activate
Then install required dependencies with:
$ pip install django scrapy scrapyd python-scrapyd-api
Scrapyd is a daemon service for running Scrapy spiders. You can discover its details from here.
python-scrapyd-api is a wrapper allows us to talk scrapyd from our Python progam.
Note: I am going to use Python 3.5 for this project.
Creating Django Project
Create a django project with an app named main :
$ django-admin startproject iCrawler
$ cd iCrawler && python manage.py startapp main
We also need a model to save our scraped data. Let’s keep it simple:
Add main app into INSTALLED_APPS in settings.py And as a final step, migrations:
$ python manage.py makemigrations
$ python manage.py migrate
Let’s add a view and url to our main app:
I tried to document the code as much as i can.
But the main trick is,unique_id.Normally, we save an object to database, then we get itsID. In our case, we are specifying itsunique_idbefore creating it. Once crawling completed and client asks for the crawled data; we can create a query with thatunique_idand fetch results.
And an url for this view:
Creating Scrapy Project
It is better if we create Scrapy project under (or next to) our Django project. This makes easier to connect them together. So let’s create it under Django project folder:
$ cd iCrawler
$ scrapy startproject scrapy_app
Now we need to create our first spider from inside scrapy_app folder:
$ cd scrapy_app
$ scrapy genspider -t crawl icrawler
i name spider as icrawler. You can name it as anything. Look -t crawl part. We specify a base template for our spider. You can see all available templates with:
$ scrapy genspider -l
Available templates:
basic
crawl
csvfeed
xmlfeed
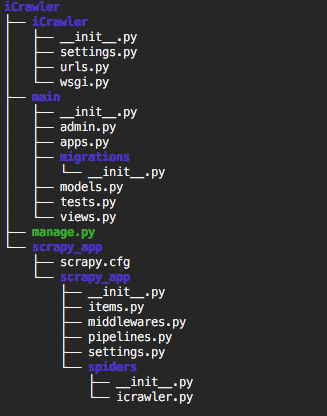
Now we should have a folder structure like this:
Connecting Scrapy to Django
In order to have access Django models from Scrapy, we need to connect them together. Go to settings.py file under scrapy_app/scrapy_app/ and put:
Scrapy settings file
That’s it. Now let’s start scrapyd to make sure everything installed and configured properly. Inside scrapy_app/ folder run:
$ scrapyd
This will start scrapyd and generate some outputs. Scrapyd also has a very minimal and simple web console. We don’t need it on production but we can use it to watch active jobs while developing. Once you start the scrapyd go to http://127.0.0.1:6800 and see if it is working.
Configuring Our Scrapy Project
Since this post is not about fundamentals of scrapy, i will skip the part about modifying spiders. You can create your spider with official documentation. I will put my example spider here, though:
Our spider file
Above is icrawler.py file from scrapy_app/scrapy_app/spiders. Attention to __init__ method. It is important. If we want to make a method or property dynamic, we need to define it under __init__ method, so we can pass arguments from Django and use them here.
We also need to create a Item Pipeline for our scrapy project. Pipeline is a class for making actions over scraped items. From documentation:
Typical uses of item pipelines are:
cleansing HTML data
validating scraped data (checking that the items contain certain fields)
checking for duplicates (and dropping them)
storing the scraped item in a database
Yay! Storing the scraped item in a database. Now let’s create one. Actually there is already a file named pipelines.py inside scrapy_project folder. And also that file contains an empty-but-ready pipeline. We just need to modify it a little bit:
And as a final step, we need to enable (uncomment) this pipeline in scrapy settings.py file:
# Configure item pipelines
# See
ITEM_PIPELINES = {
    'scrapy_app.pipelines.ScrapyAppPipeline': 300,
}
Don’t forget to restart
scraypd if it is working.
This scrapy project basically,
Crawls a website (comes from Django view)
Extract all URLs from website
Put them into a list
Save the list to database over Django models.
And that’s all for the back-end part. Django and Scrapy are both integrated and should be working fine.
Notes on Front-End Part
Well, this part is so subjective. We have tons of options. Personally I have build my front-end with React . The only part that is not subjective is usage of setInterval . Yes, let’s remember our options: web sockets and to send requests to server every X seconds.
To clarify base logic, this is simplified version of my React Component:
My main React Component
You can discover the details by comments i added. It is quite simple actually.
Oh, that’s it. It took longer than i expected. Please leave a comment for any kind of feedback.
转载于:https://blog.51cto.com/12963400/2166397


 1万+
1万+


 被折叠的 条评论
为什么被折叠?
被折叠的 条评论
为什么被折叠?
 到【灌水乐园】发言


