


Java中的ClassLoader
java.lang.ClassLoader类的基本职责就是根据一个指定的类的名称,找到或者生成其对应的字节代码,然后从这些字节代码中定义出一个 Java 类,即 java.lang.Class类的一个实例。除此之外,ClassLoader还负责加载 Java 应用所需的资源,如图像文件和配置文件等,无论是 JVM 还是 Dalvik 都是通过 ClassLoader 去加载所需要的类。
对于任意一个类,都需要由他的类加载器和这个类本身一同确定其在Java虚拟机的唯一性。比较两个类是否相等,只有在这两个类是由同一个类加载器加载的前提下才有意义,否则,即使两个雷来源于同一个class文件,被同一个虚拟机加载,只要加载的ClassLoader不同,两个类就必定不相等。
在ClassLoader类中提供了几个重要的方法:
方法说明
- getParent(): 返回该类加载器的父类加载器。
- loadClass(String name): 加载名称为 name的类,返回的结果是 java.lang.Class类的实例。
- findClass(String name): 查找名称为 name的类,返回的结果是 java.lang.Class类的实例。
- findLoadedClass(String name): 查找名称为 name的已经被加载过的类,返回的结果是 java.lang.Class类的实例。
- defineClass(String name, byte[] b, int off, int len): 把字节数组 b中的内容转换成 Java 类,返回的结果是 java.lang.Class类的实例。这个方法被声明为 final的。
- resolveClass(Class c): 链接指定的 Java 类。
表示类名称的 name参数的值是类的二进制名称。需要注意的是内部类的表示,如 com.example.Sample$1和com.example.Sample$Inner等表示方式。
类加载器的结构
在Java中的类加载器主要有两种类型的,一种是系统提供的,另外一种则是由Java应用开发人员编写的,系统主要提供的类加载器有三个:
- 引导类加载器(bootstrap class loader):它用来加载 Java 的核心库,是用原生代码来实现的,并不继承自 java.lang.ClassLoader。
- 扩展类加载器(extensions class loader):它用来加载 Java 的扩展库。Java 虚拟机的实现会提供一个扩展库目录。该类加载器在此目录里面查找并加载 Java 类。
- 系统类加载器(system class loader):它根据 Java 应用的类路径(CLASSPATH)来加载 Java 类。一般来说,Java 应用的类都是由它来完成加载的。可以通过 ClassLoader.getSystemClassLoader()来获取它。
bootstrap class loader是所有的类加载器的父类,然后是extensions class loader,然后是system class loader,然后才是开发人员自主编写的ClassLoader,关系如下:

每一个类都有自己的ClassLoader,我们可以通过如下代码来查看所有的类加载器的引用:
public static void main(String[] args) {
        ClassLoader loader = Test.class.getClassLoader();
        while (loader != null) {
            System.out.println(loader.toString());
            loader = loader.getParent();
        }
    }

结果:
sun.misc.Launcher$AppClassLoader@4554617c  -->SystemClassLoader
sun.misc.Launcher$ExtClassLoader@677327b6  -->ExtensionClassLoader
在结果中可以看到两个Loader的存在,AppClassLoader即system class loader,可以通过 ClassLoader.getSystemClassLoader()来进行测试获取是否为系统类加载器。ExtClassLoader则是引导类classloader。从上面的结果可以看出,并没有获取到ExtClassLoader的父Loader,原因是Bootstrap Loader(启动类加载器)是用C语言实现的,ExtClassLoader找不到一个确定的返回父Loader的方式,于是就返回null。
如果我们调用ClassLoader来加载一个类,都会调用到loadClass(String)来进行加载,这里就从这里j简单跟踪一下ClassLoader的源码:
 protected Class<?> loadClass(String name, boolean resolve)
        throws ClassNotFoundException
    {
        synchronized (getClassLoadingLock(name)) {
            // First, check if the class has already been loaded
            Class<?> c = findLoadedClass(name);
            if (c == null) {
                long t0 = System.nanoTime();
                try {
                    if (parent != null) {
                        c = parent.loadClass(name, false);
                    } else {
                        c = findBootstrapClassOrNull(name);
                    }
                } catch (ClassNotFoundException e) {
                    // ClassNotFoundException thrown if class not found
                    // from the non-null parent class loader
                }

                if (c == null) {
                    // If still not found, then invoke findClass in order
                    // to find the class.
                    long t1 = System.nanoTime();
                    c = findClass(name);

                    // this is the defining class loader; record the stats
                    sun.misc.PerfCounter.getParentDelegationTime().addTime(t1 - t0);
                    sun.misc.PerfCounter.getFindClassTime().addElapsedTimeFrom(t1);
                    sun.misc.PerfCounter.getFindClasses().increment();
                }
            }
            if (resolve) {
                resolveClass(c);
            }
            return c;
        }
    }
从上面的注释都可以看明白loadClass()的作用:
- 调用findLoadedClass(name)来判断该类是否已经加载过了,如果加载过了则返回Class。
- 如果findLoadedClass(name)等于false,则调用父类进行加载Class,直至找到对应的Class。
- 如果父类ClassLoader中也没找到,则调用当前ClassLoader的findClass(name)来寻找Class。
- 上述过程如果找到了Class则返回,否则最终返回null。
从loadClass方法中可以很明确的看出来ClassLoader的设计是__双亲委托模型__。,每个ClassLoader实例都有一个父类加载器的引用(不是继承的关系,是一个包含的关系),Bootstrap ClassLoader本身没有父类加载器,但可以用作其它ClassLoader实例的的父类加载器。当一个ClassLoader实例需要加载某个类时,它会试图亲自搜索某个类之前,先把这个任务委托给它的父类加载器,这个过程是由上至下依次检查的,首先由最顶层的类加载器Bootstrap ClassLoader试图加载,如果没加载到,则把任务转交给Extension ClassLoader试图加载,如果也没加载到,则转交给App ClassLoader 进行加载,如果它也没有加载得到的话,则返回给委托的发起者,由它到指定的文件系统或网络等URL中加载该类。如果它们都没有加载到这个类时,则抛出ClassNotFoundException异常。否则将这个找到的类生成一个类的定义,并将它加载到内存当中,最后返回这个类在内存中的Class实例对象。
为啥使用双亲委托模型
因为这样可以避免重复加载,当父亲已经加载了该类的时候,就没有必要子ClassLoader再加载一次。考虑到安全因素,我们试想一下,如果不使用这种委托模式,那我们就可以随时使用自定义的String来动态替代java核心api中定义的类型,这样会存在非常大的安全隐患,而双亲委托的方式,就可以避免这种情况,因为String已经在启动时就被引导类加载器(Bootstrcp ClassLoader)加载,所以用户自定义的ClassLoader永远也无法加载一个自己写的String,除非你改变JDK中ClassLoader搜索类的默认算法。
显式装载和隐式装载
- 隐式装载, 程序在运行过程中当碰到通过new 等方式生成对象时,隐式调用类装载器加载对应的类到jvm中。
- 显式装载, 通过class.forname()等方法,显式加载需要的类。
关于Class.forName()和使用ClassLoader.loadClass()的区别
-
Class.forName(className)方法,其实调用的方法是Class.forName(className,true,classloader);注意看第2个boolean参数,它表示的意思,在loadClass后必须初始化。可以查阅这篇文章,这里类加执行初始化这一步骤会进行后,目标对象的static块代码执行,static参数也被初始化。
-
ClassLoader.loadClass(className)方法,其实他调用的方法是ClassLoader.loadClass(className,false);还是注意看第2个 boolean参数,该参数表示目标对象被装载后不进行连接,就自然不会去执行初始化的操作,这就意味这不会去执行该类静态块中间的内容。因此2者的区别就显而易见了。
代码操作
这里只是做个简单的Demo来测试,首先写一个CLTest类:
package test;
public class CLTest{
 	public void sys(){
		System.out.println("hello classloader");
	}
}
使用javac命令生成一个对应的.class文件,并放在项目根目录下。然后编写自己的ClassLoader类:
package test;

import java.io.BufferedInputStream;
import java.io.ByteArrayInputStream;
import java.io.ByteArrayOutputStream;
import java.io.File;
import java.io.FileInputStream;
import java.io.FileNotFoundException;
import java.io.IOException;

public class Test extends ClassLoader{
   @Override

protected Class<?> findClass(String name) {
   Class clazz=null;
  try {
    byte[] by=toByteArray("CLTest.class");
    clazz=defineClass(name,by,0,by.length);

} catch (IOException e) {
    // TODO Auto-generated catch block
    e.printStackTrace();
    System.out.println(e.toString());
}

    return clazz;
}
    public static void main(String[] args) {
      Test test=new Test();
      try {
        Class clazz= test.loadClass("test.CLTest");
        if (clazz!=null) {
          clazz.getMethod("sys").invoke(clazz.newInstance(), null);
        }
    } catch (Exception e) {
       System.out.println(e.toString());
    }
    }
    public static byte[] toByteArray(String filename) throws IOException{

        File f = new File(filename);
        if(!f.exists()){
            throw new FileNotFoundException(filename);
        }

        ByteArrayOutputStream bos = new ByteArrayOutputStream((int)f.length());
        BufferedInputStream in = null;
        try{
            in = new BufferedInputStream(new FileInputStream(f));
            int buf_size = 1024;
            byte[] buffer = new byte[buf_size];
            int len = 0;
            while(-1 != (len = in.read(buffer,0,buf_size))){
                bos.write(buffer,0,len);
            }
            return bos.toByteArray();
        }catch (IOException e) {
            e.printStackTrace();
            throw e;
        }finally{
            try{
                in.close();
            }catch (IOException e) {
                e.printStackTrace();
            }
            bos.close();
        }
    }

}
//输出结果:hello classloader
Android中的ClassLoader机制
再看下android中的classloader:
ClassLoader loader = DebugActivity.class.getClassLoader();
        Log.e("dsdads","system class loader="+      ClassLoader.getSystemClassLoader().getClass().getSimpleName()+"\n");
while (loader != null) {
            Log.e("dsdads", "loader="+loader.getClass().getSimpleName()+"\n");
            loader = loader.getParent();
        }


//输出结果
system class loader=PathClassLoader
    loader=PathClassLoader
    loader=BootClassLoader
由于android本身虚拟机不同,android自身实现了一套与java基本相同的加载机制,BootClassLoader是系统启动时创建的,相当于引导类加载器,PathClassLoader则是系统类加载器。这两个类的关系可以在Android源码中直接得以体现:
  private static ClassLoader createSystemClassLoader() {
        String classPath = System.getProperty("java.class.path", ".");
        String librarySearchPath = System.getProperty("java.library.path", "");
        return new PathClassLoader(classPath, librarySearchPath, BootClassLoader.getInstance());
    }
	...
    public static synchronized BootClassLoader getInstance() {
        if (instance == null) {
            instance = new BootClassLoader();
        }

        return instance;
    }
BootClassLoader是PathClassLoader的parent。
查看ClassLoader对应的实现类有:
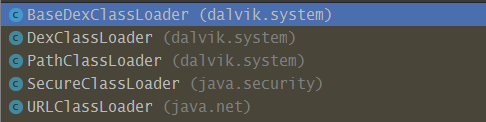
这里面URLClassLoader又是SecureClassLoader的子类,用于加载jar包文件,在android上是不能使用的。DexClassLoader和PathClassLoader是BaseDexClassLoader子类,用于加载Dex文件。
先看下ClassLoader的loadClass()方法吧:
protected Class<?> loadClass(String name, boolean resolve)
        throws ClassNotFoundException
    {
            // First, check if the class has already been loaded
            Class<?> c = findLoadedClass(name);
            if (c == null) {
                try {
                    if (parent != null) {
                        c = parent.loadClass(name, false);
                    } else {
                        c = findBootstrapClassOrNull(name);
                    }
                } catch (ClassNotFoundException e) {
                    // ClassNotFoundException thrown if class not found
                    // from the non-null parent class loader
                }

                if (c == null) {
                    // If still not found, then invoke findClass in order
                    // to find the class.
                    c = findClass(name);
                }
            }
            return c;
    }
这里可以看到Android中的ClassLoader基本遵循了Java的模式,使用双亲委托模式进行处理文件,只不过区别在于resolve变量在Android中并没有处理。我们还是直接看BaseDexClassLoader吧:
public class BaseDexClassLoader extends ClassLoader {
    private final DexPathList pathList;

    /**
     * Constructs an instance.
     *
     * @param dexPath the list of jar/apk files containing classes and
     * resources, delimited by {@code File.pathSeparator}, which
     * defaults to {@code ":"} on Android
     * @param optimizedDirectory directory where optimized dex files
     * should be written; may be {@code null}
     * @param libraryPath the list of directories containing native
     * libraries, delimited by {@code File.pathSeparator}; may be
     * {@code null}
     * @param parent the parent class loader
     */
    public BaseDexClassLoader(String dexPath, File optimizedDirectory,
            String libraryPath, ClassLoader parent) {
        super(parent);
        this.pathList = new DexPathList(this, dexPath, libraryPath, optimizedDirectory);
    }

    @Override
    protected Class<?> findClass(String name) throws ClassNotFoundException {
        List<Throwable> suppressedExceptions = new ArrayList<Throwable>();
        Class c = pathList.findClass(name, suppressedExceptions);
        if (c == null) {
            ClassNotFoundException cnfe = new ClassNotFoundException("Didn't find class \"" + name + "\" on path: " + pathList);
            for (Throwable t : suppressedExceptions) {
                cnfe.addSuppressed(t);
            }
            throw cnfe;
        }
        return c;
    }
	...
BaseDexClassLoader继承自ClassLoader,主要实现了findClass()方法,首先查看构造方法:
- 参数一:传入dex对应的路径(jar or jdk),如果是多个文件则以:作为分隔符。
- 参数二:优化dex后存储odex的路径,可以为null
- 参数三:native lib的路径
- 参数四:父类ClassLoader
使用上述的参数去实例化DexPathList类。这里在findClass()方法中可以看到,主要调用DexPathList方法去获得Class对象,因此我们转向先研究一下DexPathList类。首先查看一下构造方法:
private final Element[] dexElements;

    /** List of native library path elements. */
private final Element[] nativeLibraryPathElements;

    /** List of application native library directories. */
private final List<File> nativeLibraryDirectories;

    /** List of system native library directories. */
private final List<File> systemNativeLibraryDirectories;

...
public DexPathList(ClassLoader definingContext, String dexPath,
          String libraryPath, File optimizedDirectory) {
		...
       this.definingContext = definingContext;

       ArrayList<IOException> suppressedExceptions = new ArrayList<IOException>();
       // save dexPath for BaseDexClassLoader
       this.dexElements = makePathElements(splitDexPath(dexPath), optimizedDirectory,
                                           suppressedExceptions);//构造dex的数组

       // Native libraries may exist in both the system and
       // application library paths, and we use this search order:
       //
       //   1. This class loader's library path for application libraries (libraryPath):
       //   1.1. Native library directories
       //   1.2. Path to libraries in apk-files
       //   2. The VM's library path from the system property for system libraries
       //      also known as java.library.path
       //
       // This order was reversed prior to Gingerbread; see http://b/2933456.
       this.nativeLibraryDirectories = splitPaths(libraryPath, false);
       this.systemNativeLibraryDirectories =
               splitPaths(System.getProperty("java.library.path"), true);
       List<File> allNativeLibraryDirectories = new ArrayList<>(nativeLibraryDirectories);
       allNativeLibraryDirectories.addAll(systemNativeLibraryDirectories);//构造native的List

       this.nativeLibraryPathElements = makePathElements(allNativeLibraryDirectories, null,
                                                         suppressedExceptions);//构造native的Elements数组
		...
   }
这里一步一步看,可以知道首先生成dexElments,先从splitPaths()方法入手:
private static List<File> splitPaths(String searchPath, boolean directoriesOnly) {
      List<File> result = new ArrayList<>();

      if (searchPath != null) {
          for (String path : searchPath.split(File.pathSeparator)) {//File.pathSeparator在Linux系统上为:
              if (directoriesOnly) {
                  try {
                      StructStat sb = Libcore.os.stat(path);
                      if (!S_ISDIR(sb.st_mode)) {
                          continue;
                        }
                    } catch (ErrnoException ignored) {
                        continue;
                    }
                }
                result.add(new File(path));
            }
        }

        return result;
    }

	  private static ArrayList<File> splitPaths(String path1, String path2,
            boolean wantDirectories) {
        ArrayList<File> result = new ArrayList<File>();

        splitAndAdd(path1, wantDirectories, result);
        splitAndAdd(path2, wantDirectories, result);
        return result;
    }

	private static void splitAndAdd(String searchPath, boolean directoriesOnly,
            ArrayList<File> resultList) {
        if (searchPath == null) {
            return;
        }
        for (String path : searchPath.split(":")) {
            try {
                StructStat sb = Libcore.os.stat(path);
                if (!directoriesOnly || S_ISDIR(sb.st_mode)) {
                    resultList.add(new File(path));
                }
            } catch (ErrnoException ignored) {
            }
        }
    }
上述方法不难看出只是把我们传入的dex文件记录到List当中。返回继续查看makePathElements()方法:
 private static Element[] makePathElements(List<File> files, File optimizedDirectory,
                                              List<IOException> suppressedExceptions) {
        List<Element> elements = new ArrayList<>();
        /*
         * Open all files and load the (direct or contained) dex files
         * up front.
         */
        for (File file : files) {
            File zip = null;
            File dir = new File("");
            DexFile dex = null;
            String path = file.getPath();
            String name = file.getName();

            if (path.contains(zipSeparator)) {
                String split[] = path.split(zipSeparator, 2);
                zip = new File(split[0]);
                dir = new File(split[1]);
            } else if (file.isDirectory()) {
                // We support directories for looking up resources and native libraries.
                // Looking up resources in directories is useful for running libcore tests.
                elements.add(new Element(file, true, null, null));
            } else if (file.isFile()) {//step this
                if (name.endsWith(DEX_SUFFIX)) {//直接为dex文件
                    // Raw dex file (not inside a zip/jar).
                    try {
                        dex = loadDexFile(file, optimizedDirectory);
                    } catch (IOException ex) {
                        System.logE("Unable to load dex file: " + file, ex);
                    }
                } else {//为jar或者apk文件
                    zip = file;

                    try {
                        dex = loadDexFile(file, optimizedDirectory);
                    } catch (IOException suppressed) {
                        /*
                         * IOException might get thrown "legitimately" by the DexFile constructor if
                         * the zip file turns out to be resource-only (that is, no classes.dex file
                         * in it).
                         * Let dex == null and hang on to the exception to add to the tea-leaves for
                         * when findClass returns null.
                         */
                        suppressedExceptions.add(suppressed);
                    }
                }
            } else {
                System.logW("ClassLoader referenced unknown path: " + file);
            }

            if ((zip != null) || (dex != null)) {
                elements.add(new Element(dir, false, zip, dex));
            }
        }

        return elements.toArray(new Element[elements.size()]);
    }
这里将传进来的file文件调用loadDexFile()加工成DexFile,这里假设我们传进来的都是Dex文件,不是apk或者jar,所以只会走step this这一步的判断,接下来查看loadDexFile()方法:
 private static DexFile loadDexFile(File file, File optimizedDirectory)
           throws IOException {
       if (optimizedDirectory == null) {//optimizedDirectory传入是否为空
           return new DexFile(file);
       } else {
           String optimizedPath = optimizedPathFor(file, optimizedDirectory);
           return DexFile.loadDex(file.getPath(), optimizedPath, 0);
       }
   }
这里可以看到如果我们在optimizedDirectory传空值,则直接生成了一个DexFile,在DexFile的构造方法中执行了native方法,这里就到这里为止,native做的操作猜想是保存对应的Dex以及解析出Class。
回到makePathElements()方法中,loadDexFile()方法执行完毕后,向List中添加Element节点,到此makePathElements()就完成了。
关于native的list这里就不研究了,有兴趣的查看源码吧。
DexPathList的构造方法分析好了,然后继续回到对应的BaseDexClassLoader的findClass()方法中:
@Override
    protected Class<?> findClass(String name) throws ClassNotFoundException {
        List<Throwable> suppressedExceptions = new ArrayList<Throwable>();
        Class c = pathList.findClass(name, suppressedExceptions);
        if (c == null) {
            ClassNotFoundException cnfe = new ClassNotFoundException("Didn't find class \"" + name + "\" on path: " + pathList);
            for (Throwable t : suppressedExceptions) {
                cnfe.addSuppressed(t);
            }
            throw cnfe;
        }
        return c;
    }
可以看到又回到了DexPathList中:
 public Class findClass(String name, List<Throwable> suppressed) {
        for (Element element : dexElements) {
            DexFile dex = element.dexFile;

            if (dex != null) {
                Class clazz = dex.loadClassBinaryName(name, definingContext, suppressed);
                if (clazz != null) {
                    return clazz;
                }
            }
        }
        if (dexElementsSuppressedExceptions != null) {
            suppressed.addAll(Arrays.asList(dexElementsSuppressedExceptions));
        }
        return null;
    }
	//DexFile.class
 public Class loadClassBinaryName(String name, ClassLoader loader, List<Throwable> suppressed) {
       return defineClass(name, loader, mCookie, suppressed);
   }

   private static Class defineClass(String name, ClassLoader loader, Object cookie,
                                    List<Throwable> suppressed) {
       Class result = null;
       try {
           result = defineClassNative(name, loader, cookie);//调用native方法
       } catch (NoClassDefFoundError e) {
           if (suppressed != null) {
               suppressed.add(e);
           }
       } catch (ClassNotFoundException e) {
           if (suppressed != null) {
               suppressed.add(e);
           }
       }
       return result;
   }
这里最终通过DexFile.defineClass()方法获取到Class对象,native怎么调用的我们不关心,我们可以知道在DexPathList初始化的时候会在native记录下dex中的Class,然后在调用BaseDexClassLoader.findClass()时候会从native取到对应的Class就行ok了。
研究完BaseDexClassLoader后,基本上PathClassLoader和DexClassLoader就差不多了,PathClassLoader继承自BaseDexClassLoader,简单实现了两个构造方法:
/**
 * Provides a simple {@link ClassLoader} implementation that operates on a list
 * of files and directories in the local file system, but does not attempt to
 * load classes from the network. Android uses this class for its system class
 * loader and for its application class loader(s).
 */
public class PathClassLoader extends BaseDexClassLoader {
    public PathClassLoader(String dexPath, ClassLoader parent) {
        super(dexPath, null, null, parent);
    }
    public PathClassLoader(String dexPath, String libraryPath,
            ClassLoader parent) {
        super(dexPath, null, libraryPath, parent);
    }
}
对于DexClassLoader而言,也实现了一个构造方法:
  **
 * A class loader that loads classes from {@code .jar} and {@code .apk} files
 * containing a {@code classes.dex} entry. This can be used to execute code not
 * installed as part of an application.
 *
 * <p>This class loader requires an application-private, writable directory to
 * cache optimized classes. Use {@code Context.getDir(String, int)} to create
 * such a directory: <pre>   {@code
 *   File dexOutputDir = context.getDir("dex", 0);
 * }</pre>
 *
 * <p><strong>Do not cache optimized classes on external storage.</strong>
 * External storage does not provide access controls necessary to protect your
 * application from code injection attacks.
 */
public class DexClassLoader extends BaseDexClassLoader {
    public DexClassLoader(String dexPath, String optimizedDirectory,
            String libraryPath, ClassLoader parent) {
        super(dexPath, new File(optimizedDirectory), libraryPath, parent);
    }
}
可以看到两个不同的ClassLoader唯一的区别在于传入的第二个参数是否为空,而上述分析BaseDexClassLoader也是假设optimizedDirectory的File==null的情况,即分析了本身PathClassLoader的情况,那看来还是得继续分析一下optimizedDirectory的File!=null的情况:
//DexPathList.java
 private static DexFile loadDexFile(File file, File optimizedDirectory)
            throws IOException {
        if (optimizedDirectory == null) {
            return new DexFile(file);
        } else {
            String optimizedPath = optimizedPathFor(file, optimizedDirectory);
            return DexFile.loadDex(file.getPath(), optimizedPath, 0);
        }
    }

    /**
     * Converts a dex/jar file path and an output directory to an
     * output file path for an associated optimized dex file.
     */
    private static String optimizedPathFor(File path,
            File optimizedDirectory) {
        String fileName = path.getName();
        if (!fileName.endsWith(DEX_SUFFIX)) {
            int lastDot = fileName.lastIndexOf(".");
            if (lastDot < 0) {
                fileName += DEX_SUFFIX;
            } else {
                StringBuilder sb = new StringBuilder(lastDot + 4);
                sb.append(fileName, 0, lastDot);
                sb.append(DEX_SUFFIX);
                fileName = sb.toString();
            }
        }
        File result = new File(optimizedDirectory, fileName);
        return result.getPath();
    }

	   static public DexFile loadDex(String sourcePathName, String outputPathName,
        int flags) throws IOException {

        /*
         * TODO: we may want to cache previously-opened DexFile objects.
         * The cache would be synchronized with close().  This would help
         * us avoid mapping the same DEX more than once when an app
         * decided to open it multiple times.  In practice this may not
         * be a real issue.
         */
        return new DexFile(sourcePathName, outputPathName, flags);
    }
上述代码可以看到,通过optimizedDirectory将所有的dex保存到了我们指定的optimizedDirectory目录下,然后再生成一个DexFile。
总体来看来个ClassLoader的区别就在于去哪缓存我们需要加载的dex文件,如果使用PathClassLoader则使用系统默认的文件夹,如果使用DexClassLoader则是使用我们自定义的文件夹,DexClassLoader可以指定自己的optimizedDirectory,所以它可以加载外部的dex,因为这个dex会被复制到内部路径的optimizedDirectory;而PathClassLoader没有optimizedDirectory,所以它只能加载内部的dex,这些大都是存在系统中已经安装过的apk里面的。
代码操作
首先写个类:
package com.lin;

public class Heelo {

    public String getHello() {
        return "Hello Dex";
    }
}
把这个类打包成jar,在eclipse中可以使用export->Java->JAR File来导出jar包,然后通过dx命令把jar转换成dex,接下来就直接在代码中获取类即可:
  private void testDex() {
        File file = new File(getPath() + File.separator + "sayhello_dex.jar");
        if (!file.exists()) {
            Log.e("dasd", "dasd");
        }
        DexClassLoader classLoader = new DexClassLoader(file.getAbsolutePath(), getCacheDir().getAbsolutePath(),
                null, getClassLoader());
        try {
            Class clazz = classLoader.loadClass("com.lin.Heelo");
           String text= (String) clazz.getMethod("getHello").invoke(clazz.newInstance(),null);
            Log.e("1111", text);

        } catch (ClassNotFoundException e) {
            e.printStackTrace();
        } catch (NoSuchMethodException e) {
            e.printStackTrace();
        } catch (IllegalAccessException e) {
            e.printStackTrace();
        } catch (InstantiationException e) {
            e.printStackTrace();
        } catch (InvocationTargetException e) {
            e.printStackTrace();
        }
    }

//输出结果:
 E/1111: Hello Dex
资料参考:
https://www.ibm.com/developerworks/cn/java/j-lo-classloader/index.html
https://jaeger.itscoder.com/android/2016/08/27/android-classloader.html


 180
180

 被折叠的 条评论
为什么被折叠?
被折叠的 条评论
为什么被折叠?
 到【灌水乐园】发言


