


本文目录:
(一)背景
(二)数据库数据导入到Excel的方法比较
(三)SSIS的简介
(四)数据库中存储过程示例(SSIS应用需要)
(五)Excel模板的制作(这步这么简单,稍微介绍一下)
(六)SSIS操作过程(生成Package,用来调用)(下一篇随笔将详细讲解制作Package包的过程,图片太多,篇幅过长,因此本文将直接采用生成的Package包进行应用)
(七)C#中如何调用SSIS创建的Package和Excel模板(可以自己编写逻辑代码进行重复利用),用来生成Excel数据
(八)总结
(一)背景
如何将数据库中的数据导入到EXCEL文件中,我们经常会碰到。本文将比较常用的几种方法,并且将详细讲解基于SSIS的用法。笔者认为,基于SSIS的方法,对于海量数据来说,应该是效率最好的一种方法。个人认为,这是一种值得推荐的方法,因此,本人决定将本人所知道的、以及自己总结的完整的写出来,一是提高一下自己的写作以及表达能力,二是让更多的读者能够在具体的应用中如何解决将海量数据导入到Excel中的效率问题。
(二)方法的比较
方案一:SSIS(SQL Server数据集成服务),追求效率,Package制作过程复杂一点(容易出错)。
方案二:采用COM.Excel组件。一般,对于操作能够基本满足,但对于数据量大时可能会慢点。下面的代码,本人稍微修改了下,如下所示:该方法主要是对单元格一个一个的循环写入,基本方法为 excel.WriteValue(ref vt, ref cf, ref ca, ref chl, ref rowIndex, ref colIndex, ref str, ref cellformat)。当数据量大时,肯定效率还是有影响的。


{
COM.Excel.cExcelFile excel = new COM.Excel.cExcelFile();
// 当文件大于10的时候 清空所有文件!!!
ClearFile(FilePath);
// 文件名
string filename = strTitle + DateTime.Now.ToString( " yyyyMMddHHmmssff " ) + " .xls " ;
// 生成相应的文件
excel.CreateFile(FilePath + filename);
// 设置margin
COM.Excel.cExcelFile.MarginTypes mt1 = COM.Excel.cExcelFile.MarginTypes.xlsTopMargin;
COM.Excel.cExcelFile.MarginTypes mt2 = COM.Excel.cExcelFile.MarginTypes.xlsLeftMargin;
COM.Excel.cExcelFile.MarginTypes mt3 = COM.Excel.cExcelFile.MarginTypes.xlsRightMargin;
COM.Excel.cExcelFile.MarginTypes mt4 = COM.Excel.cExcelFile.MarginTypes.xlsBottomMargin;
double height = 2.2 ;
excel.SetMargin( ref mt1, ref height);
excel.SetMargin( ref mt2, ref height);
excel.SetMargin( ref mt3, ref height);
excel.SetMargin( ref mt4, ref height);
// 设置字体!!
COM.Excel.cExcelFile.FontFormatting ff = COM.Excel.cExcelFile.FontFormatting.xlsNoFormat;
string font = " 宋体 " ;
short fontsize = 14 ;
excel.SetFont( ref font, ref fontsize, ref ff);
byte b1 = 1 , b2 = 12 ;
short s3 = 12 ;
excel.SetColumnWidth( ref b1, ref b2, ref s3);
string header = " 页眉 " ;
string footer = " 页脚 " ;
excel.SetHeader( ref header);
excel.SetFooter( ref footer);
COM.Excel.cExcelFile.ValueTypes vt = COM.Excel.cExcelFile.ValueTypes.xlsText;
COM.Excel.cExcelFile.CellFont cf = COM.Excel.cExcelFile.CellFont.xlsFont0;
COM.Excel.cExcelFile.CellAlignment ca = COM.Excel.cExcelFile.CellAlignment.xlsCentreAlign;
COM.Excel.cExcelFile.CellHiddenLocked chl = COM.Excel.cExcelFile.CellHiddenLocked.xlsNormal;
// 报表标题
int cellformat = 1 ;
int rowIndex = 1 ; // 起始行
int colIndex = 0 ;
foreach (System.Data.DataTable dt in dts)
{
colIndex = 0 ;
// 取得列标题
foreach (DataColumn colhead in dt.Columns)
{
colIndex ++ ;
string name = colhead.ColumnName.Trim();
object namestr = ( object )name;
excel.WriteValue( ref vt, ref cf, ref ca, ref chl, ref rowIndex, ref colIndex, ref namestr, ref cellformat);
}
// 取得表格中的数据
foreach (DataRow row in dt.Rows)
{
rowIndex ++ ;
colIndex = 0 ;
foreach (DataColumn col in dt.Columns)
{
colIndex ++ ;
if (col.DataType == System.Type.GetType( " System.DateTime " ))
{
object str = ( object )(Convert.ToDateTime(row[col.ColumnName].ToString())).ToString( " yyyy-MM-dd " ); ;
excel.WriteValue( ref vt, ref cf, ref ca, ref chl, ref rowIndex, ref colIndex, ref str, ref cellformat);
}
else
{
object str = ( object )row[col.ColumnName].ToString();
excel.WriteValue( ref vt, ref cf, ref ca, ref chl, ref rowIndex, ref colIndex, ref str, ref cellformat);
}
}
}
rowIndex += 3 ;
}
int ret = excel.CloseFile();
return FilePath + filename;
}
方案三:采用Excel组件。一般,对于操作能够基本满足,但对于数据量大时可能会慢点。下面的代码,本人在原有基础上稍微修改了下,如下所示:
2 {
3 beforeTime = DateTime.Now;
4 Excel.Application excel;
5 Excel._Workbook xBk;
6 Excel._Worksheet xSt;
7 int rowIndex = 1 ;
8 int colIndex = 1 ;
9 excel = new Excel.ApplicationClass();
10 xBk = excel.Workbooks.Add( true );
11 xSt = (Excel._Worksheet)xBk.ActiveSheet;
12 int add = 0 ;
13 foreach (System.Data.DataTable dt in dtList)
14 {
15 colIndex = 1 ;
16 // 取得整个报表的标题
17 excel.Cells[rowIndex , 1 ] = smallTitle[add];
18 add ++ ;
19 /// /设置整个报表的标题格式
20 xSt.get_Range(excel.Cells[rowIndex, 1 ], excel.Cells[rowIndex , dt.Columns.Count]).Font.Bold = true ;
21 xSt.get_Range(excel.Cells[rowIndex, 1 ], excel.Cells[rowIndex , dt.Columns.Count]).Font.Size = 22 ;
22 /// /设置整个报表的标题为跨列居中
23 xSt.get_Range(excel.Cells[rowIndex , 1 ], excel.Cells[rowIndex , dt.Columns.Count]).Select();
24 xSt.get_Range(excel.Cells[rowIndex , 1 ], excel.Cells[rowIndex, dt.Columns.Count]).HorizontalAlignment = Excel.XlHAlign.xlHAlignCenterAcrossSelection;
25 rowIndex ++ ;
26 foreach (DataColumn col in dt.Columns)
27 {
28 excel.Cells[rowIndex, colIndex] = col.ColumnName;
29 // 设置标题格式为居中对齐
30 xSt.get_Range(excel.Cells[rowIndex, colIndex], excel.Cells[rowIndex, colIndex]).Font.Bold = true ;
31 xSt.get_Range(excel.Cells[rowIndex, colIndex], excel.Cells[rowIndex, colIndex]).HorizontalAlignment = Excel.XlVAlign.xlVAlignCenter;
32 xSt.get_Range(excel.Cells[rowIndex, colIndex], excel.Cells[rowIndex, colIndex]).Select();
33 xSt.get_Range(excel.Cells[rowIndex, colIndex], excel.Cells[rowIndex, colIndex]).Interior.ColorIndex = titleColorindex;
34 colIndex ++ ;
35 }
36 // 取得表格中的数据
37 foreach (DataRow row in dt.Rows)
38 {
39 rowIndex ++ ;
40 colIndex = 1 ;
41 foreach (DataColumn col in dt.Columns)
42 {
43 if (col.DataType == System.Type.GetType( " System.DateTime " ))
44 {
45 if ( ! string .IsNullOrEmpty(row[col.ColumnName].ToString()))
46 {
47 excel.Cells[rowIndex, colIndex] = (Convert.ToDateTime(row[col.ColumnName].ToString())).ToString( " yyyy-MM-dd " );
48 xSt.get_Range(excel.Cells[rowIndex, colIndex], excel.Cells[rowIndex, colIndex]).HorizontalAlignment = Excel.XlVAlign.xlVAlignCenter; }
49 }
50 else if (col.DataType == System.Type.GetType( " System.String " ))
51 {
52 excel.Cells[rowIndex, colIndex] = " ' " + row[col.ColumnName].ToString();
53 xSt.get_Range(excel.Cells[rowIndex, colIndex], excel.Cells[rowIndex, colIndex]).HorizontalAlignment = Excel.XlVAlign.xlVAlignCenter;r; }
54 else
55 {
56 excel.Cells[rowIndex, colIndex] = row[col.ColumnName].ToString();
57 xSt.get_Range(excel.Cells[rowIndex, colIndex], excel.Cells[rowIndex, colIndex]).HorizontalAlignment = Excel.XlVAlign.xlVAlignCenter; }
58 colIndex ++ ;
59 }
60 }
61 rowIndex ++ ;
62 }
63 afterTime = DateTime.Now;
64 xSt.Name = strTitle;
65 string filename = typeName + DateTime.Now.ToString( " yyyyMMdd " ) + " .xls " ;
66 // excel.Save(FilePath+filename);
67 excel.ActiveWorkbook.SaveCopyAs(FilePath + filename);
68 #region 结束Excel进程
69 xBk.Close( null , null , null );
70 excel.Workbooks.Close();
71 excel.Quit();
72 #endregion
73 return filename;
74 }
方法四:采用DataGrid,GridView自带的属性。如下:
{
Response.ClearHeaders();
Response.Clear();
Response.Expires = 0 ;
Response.Buffer = true ;
Response.HeaderEncoding = System.Text.Encoding.UTF8;
// Response.Charset = "utf-8";
Response.AppendHeader( " Content-Disposition " , " attachment;filename= " + Server.UrlEncode(filename));
Response.ContentEncoding = System.Text.Encoding.Default; // 设置输出流为简体中文
// Response.ContentType = "application/ms-excel"; // 设置输出文件类型为excel文件。
Response.ContentType = " Application/octet-stream " ;
this .EnableViewState = false ;
System.Globalization.CultureInfo myCItrad = new System.Globalization.CultureInfo( " zh-CHS " , true );
System.IO.StringWriter oStringWriter = new System.IO.StringWriter(myCItrad);
System.Web.UI.HtmlTextWriter oHtmlTextWriter = new System.Web.UI.HtmlTextWriter(oStringWriter);
ToExcelGrid.RenderControl(oHtmlTextWriter);
Response.Write(oStringWriter.ToString());
Response.End();
}
(三)SSIS的简介
SQL Server 2005 提供的一个集成化的商业智能开发平台,主要包括:
*SQL Server Analysis Services(SQL Server数据分析服务,简称SSAS)
*SQL Server Reporting Services(SQL Server报表服务,简称SSRS)
*SQL Server Integration Services(SQL Server数据集成服务,简称SSIS)
SQL Server 2005 Integration Services (SSIS) 提供一系列支持业务应用程序开发的内置任务、容器、转换和数据适配器。可以创建 SSIS 解决方案来使用 ETL 和商业智能解决复杂的业务问题,管理 SQL Server 数据库以及在 SQL Server 实例之间复制 SQL Server 对象。
(四)数据库中存储过程示例(SSIS应用过程中需要的,最好拿个本子把需要的内容记下)
在SQL SERVER 2005中,以SSISDataBase数据库作为应用,仅包括2张表City,Province.(主要是为了简单,便于讲解)
其中存储过程如下:
(
@provinceId int = 0
)
as
begin
select P.EName as 省份拼音 ,P.CName as 省份名 ,C.CName as 城市名 from City C left join Province P
on C.ProvinceId = P.ProvinceId
where C.ProvinceId = @provinceId and @provinceId is not null or @provinceId is null or @provinceId = 0
end
其中,在这一步中我们必须要记住相关的内容,如上标识(红色);为什么这么做?主要是在制作SSIS包的时候很容易混淆,建议拿个本子把需要的内容写好。

这一步是最主要的过程,当然,也是很容易出错的一步。 笔者会另外详细介绍制作Package包的过程,本文将直接将生成的包放到VS项目中进行运用。
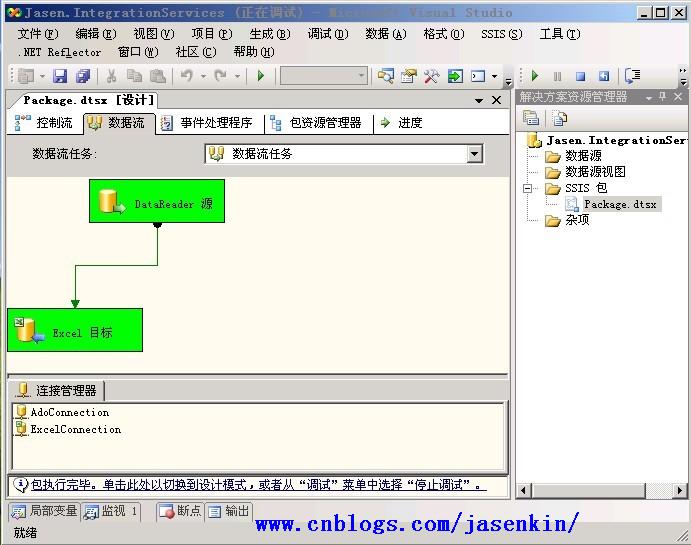
利用SQL Server 2005数据库自带的SQL Server Business Intelligence Development Studio(SQL Server商业智能开发平台),最终生成的项目如下图所示:
2 {
3 // 构造sql语句 作为参数传递给数据包
4 string sqlParams = Jasen.SSIS.Core.SsisToExcel.BuildSql( " dbo.ProvinceSelectedCityInfo " , " @provinceId " , int .Parse(ddlProvice.SelectedValue));
5 Jasen.SSIS.Core.SsisToExcel ssis = new Jasen.SSIS.Core.SsisToExcel();
6 string rootPath = Request.PhysicalApplicationPath;
7 string copyFilePath;
8 // 执行SSIS包的操作 生成EXCEL文件
9 bool result = ssis.ExportDataBySsis(rootPath, sqlParams, out copyFilePath, " Package.dtsx " , " ProviceCityInfoExcel.xls " , " ProviceCityInfo " );
10 if (result == false ){
11 if (System.IO.File.Exists(copyFilePath)) System.IO.File.Delete(copyFilePath);
12 }
13 else
14 {
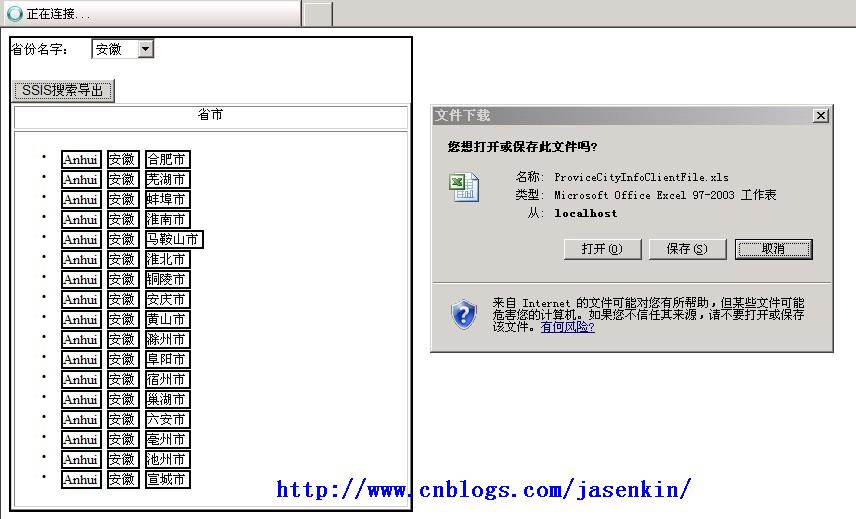
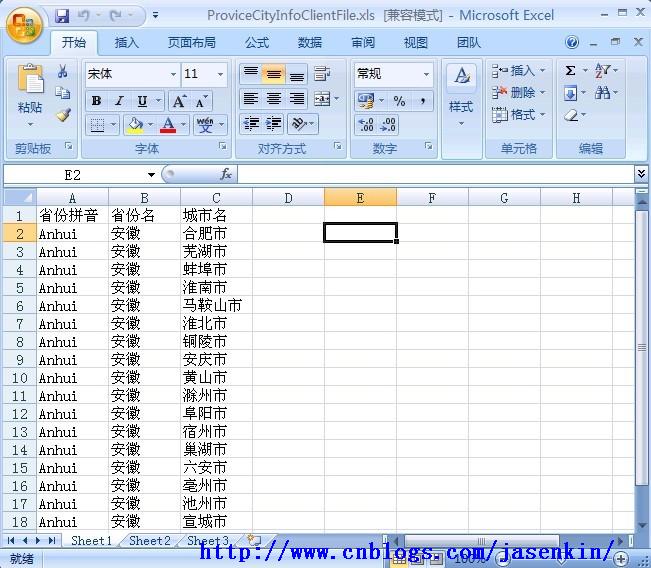
15 ssis.DownloadFile( this , " ProviceCityInfoClientFile.xls " , copyFilePath, true );
16 }
17 }
你肯定会说:“哥,你这个也太简单了吧?”。就是这么简单,不就是多写一个类给你调用就可以了吗。调用接口,这个你总会吧。不过你得了解各个参数才行。
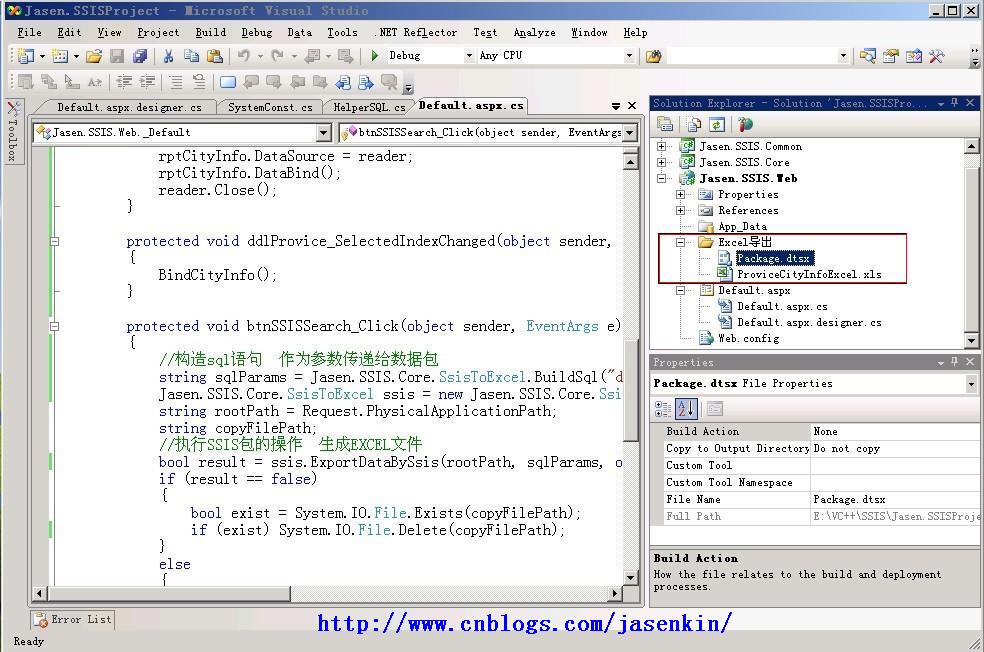
首先,我们必须引用2个DLL,Microsoft.SQLServer.ManagedDTS.dll和Microsoft.SqlServer.DTSPipelineWrap.dll(系统自带的)。先看下我们生成Excel文件数据的步骤,如下:
/// 导出数据到EXCEL文件中
/// </summary>
/// <param name="rootPath"></param>
/// <param name="sqlParams"> 执行包的传入参数 </param>
/// <param name="copyFile"> 生成的Excel的文件 </param>
/// <param name="packageName"> SSIS包名称 </param>
/// <param name="execlFileName"> SSIS EXCEL模板名称 </param>
/// <param name="createdExeclPreName"> 生成的Excel的文件前缀 </param>
/// <returns></returns>
public bool ExportDataBySsis( string rootPath, string sqlParams, out string tempExcelName, string packageName, string execlFileName, string createdExeclPreName)
{
// 数据包和EXCEL模板的存储路径
string path = rootPath + @" Excel导出\ " ;
// 强制生成目录
if ( ! System.IO.Directory.Exists(path)) System.IO.Directory.CreateDirectory(path);
// 返回生成的文件名
string copyFile = this .SaveAndCopyExcel(path, execlFileName, createdExeclPreName);
tempExcelName = copyFile;
// SSIS包路径
string ssisFileName = path + packageName;
// 执行---把数据导入到Excel文件
return ExecuteSsisDataToFile(ssisFileName, tempExcelName, sqlParams);
}
代码注释如此清楚,想必也不需要再多做解释了吧,下面就是最最最重要的一步,需要看清楚了----->
2 {
3 Application app = new Application();
4 Package package = new Package();
5 // 加载SSIS包
6 package = app.LoadPackage(ssisFileName, null );
7 // 获取 数据库连接字符串
8 package.Connections[ " AdoConnection " ].ConnectionString = Jasen.SSIS.Common.SystemConst.ConnectionString;
9 // 目标Excel属性
10 string excelDest = string .Format( " Provider=Microsoft.Jet.OLEDB.4.0;Data Source={0};Extended Properties=\ " EXCEL 8.0 ;HDR = YES\ " ; " , tempExcelName);
11 package.Connections[ " ExcelConnection " ].ConnectionString = excelDest;
12 // 给参数传值
13 Variables vars = package.Variables;
14 string str = vars[ " 用户::SqlStr " ].Value .ToString();
15 vars[ " 用户::SqlStr " ].Value = sqlParams;
16 // 执行
17 DTSExecResult result = package.Execute();
18 if (result == DTSExecResult.Success){
19 return true ;
20 }
21 else {
22 if (package.Errors.Count > 0 ){
23 // 在log中写出错误列表
24 StringBuilder sb = new StringBuilder();
25 for ( int i = 0 ; i < package.Errors.Count; i ++ ){
26 sb.Append( " Package error: " + package.Errors[i].Description + " ; " );
27 }
28 throw new Exception(sb.ToString());
29 }
30 else {
31 throw new Exception( " SSIS Unknow error " );
32 }
33 return false ;
34 }
35 }
上面标注为红色的就是最重要的几个步骤了,相对来说,就是(1)加载包,(2)设置包的数据库连接串,(3)设置Excel的连接串,(4)设置参数变量,(5)执行操作
其次是如何巧妙的将Excel模板复制,使模板可以重复利用(当然也要注意将生成的文件下载到客户端后,将服务器上生成的Excel临时文件删除,你也可以写自己的算法进行清理不必要的Excel临时文件),如下代码所示,方法将复制模板,然后返回生成的临时文件的路径,如果需要删除该文件,System.IO.File.Delete(filePath)就可以删除文件了:
2 {
3 string copyFile = sourcePath + createdExeclPreName + DateTime.Now.ToString( " yyyyMMddHHMMss " ) + " .xls " ;
4 if (File.Exists(copyFile)) File.Delete(copyFile);
5 File.Copy(sourcePath + execlFileName, copyFile, true );
6 return copyFile;
7 }
效率最高的Excel数据导入---(c#调用SSIS Package将数据库数据导入到Excel文件中【附源代码下载】)
效率最高的Excel数据导入续---SSIS Package包制作图解全过程
转自:http://www.cnblogs.com/jasenkin/archive/2010/10/06/ssis_package_information.html


 2593
2593

 被折叠的 条评论
为什么被折叠?
被折叠的 条评论
为什么被折叠?
 到【灌水乐园】发言


