


转载:http://www.cnblogs.com/jasenkin/archive/2010/10/06/ssis_package_information.html
本文目录:
(一)背景
(二)数据库数据导入到Excel的方法比较
(三)SSIS的简介
(四)数据库中存储过程示例(SSIS应用需要)
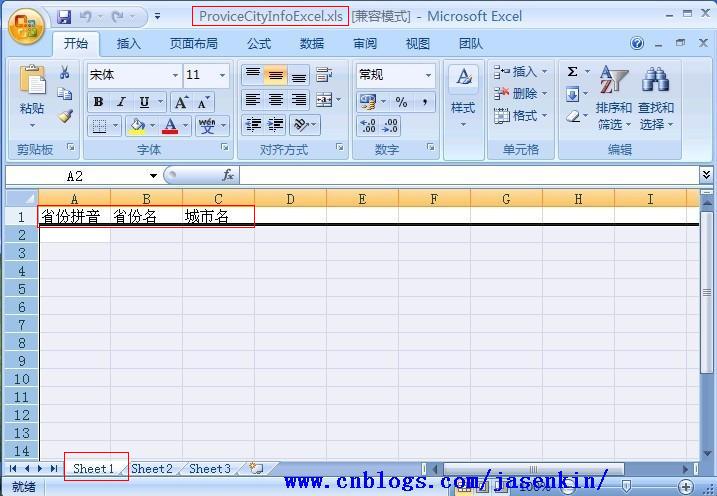
(五)Excel模板的制作(这步这么简单,稍微介绍一下)
(六)SSIS操作过程(生成Package,用来调用)(下一篇随笔将详细讲解制作Package包的过程,图片太多,篇幅过长,因此本文将直接采用生 成的Package包进行应用)
(七)C#中如何调用SSIS创建的Package和 Excel模板(可以自己编写逻辑代码进行重复利用), 用来生成Excel数据
(八)总结
(一)背景
如何将数据库中的数据导入到EXCEL文件中,我们经常会碰到。本文将比较常用的几种方法,并且将详细讲解基于SSIS的用法。笔者认为,基于SSIS的 方法,对于海量数据来说,应该是效率最好的一种方法。个人认为,这是一种值得推荐的方法,因此,本人决定将本人所知道的、以及自己总结的完整的写出来,一 是提高一下自己的写作以及表达能力,二是让更多的读者能够在具体的应用中如何解决将海量数据导入到Excel中的效率问题。
(二)方法的比较
方案一:SSIS(SQL Server数据集成服务),追求效率,Package制作过程复杂一点(容易出错)。
方案二:采用COM.Excel组件。一般,对于操作能够基本满足,但对于数据量大时可能会慢点。下面的代码,本人稍微修改了下,如下所示:该方法主要是 对单元格一个一个的循环写入,基本方法为 excel.WriteValue(ref vt, ref cf, ref ca, ref chl, ref rowIndex, ref colIndex, ref str, ref cellformat)。当数据量大时,肯定效率还是有影响的。


{
COM.Excel.cExcelFile excel = new COM.Excel.cExcelFile();
// 当文件大于10的时 候 清空所有文件!!!
ClearFile(FilePath);
// 文件名
string filename = strTitle + DateTime.Now.ToString( " yyyyMMddHHmmssff " ) + " .xls " ;
// 生成相应的文件
excel.CreateFile(FilePath + filename);
// 设置margin
COM.Excel.cExcelFile.MarginTypes mt1 = COM.Excel.cExcelFile.MarginTypes.xlsTopMargin;
COM.Excel.cExcelFile.MarginTypes mt2 = COM.Excel.cExcelFile.MarginTypes.xlsLeftMargin;
COM.Excel.cExcelFile.MarginTypes mt3 = COM.Excel.cExcelFile.MarginTypes.xlsRightMargin;
COM.Excel.cExcelFile.MarginTypes mt4 = COM.Excel.cExcelFile.MarginTypes.xlsBottomMargin;
double height = 2.2 ;
excel.SetMargin( ref mt1, ref height);
excel.SetMargin( ref mt2, ref height);
excel.SetMargin( ref mt3, ref height);
excel.SetMargin( ref mt4, ref height);
// 设置字体!!
COM.Excel.cExcelFile.FontFormatting ff = COM.Excel.cExcelFile.FontFormatting.xlsNoFormat;
string font = " 宋体 " ;
short fontsize = 14 ;
excel.SetFont( ref font, ref fontsize, ref ff);
byte b1 = 1 , b2 = 12 ;
short s3 = 12 ;
excel.SetColumnWidth( ref b1, ref b2, ref s3);
string header = " 页眉 " ;
string footer = " 页脚 " ;
excel.SetHeader( ref header);
excel.SetFooter( ref footer);
COM.Excel.cExcelFile.ValueTypes vt = COM.Excel.cExcelFile.ValueTypes.xlsText;
COM.Excel.cExcelFile.CellFont cf = COM.Excel.cExcelFile.CellFont.xlsFont0;
COM.Excel.cExcelFile.CellAlignment ca = COM.Excel.cExcelFile.CellAlignment.xlsCentreAlign;
COM.Excel.cExcelFile.CellHiddenLocked chl = COM.Excel.cExcelFile.CellHiddenLocked.xlsNormal;
// 报表标题
int cellformat = 1 ;
int rowIndex = 1 ; // 起始行
int colIndex = 0 ;
foreach (System.Data.DataTable dt in dts)
{
colIndex = 0 ;
// 取得列标题
foreach (DataColumn colhead in dt.Columns)
{
colIndex ++ ;
string name = colhead.ColumnName.Trim();
object namestr = ( object )name;
excel.WriteValue( ref vt, ref cf, ref ca, ref chl, ref rowIndex, ref colIndex, ref namestr, ref cellformat);
}
// 取得表格中的数据
foreach (DataRow row in dt.Rows)
{
rowIndex ++ ;
colIndex = 0 ;
foreach (DataColumn col in dt.Columns)
{
colIndex ++ ;
if (col.DataType == System.Type.GetType( " System.DateTime " ))
{
object str = ( object )(Convert.ToDateTime(row[col.ColumnName].ToString())).ToString( " yyyy-MM-dd " ); ;
excel.WriteValue( ref vt, ref cf, ref ca, ref chl, ref rowIndex, ref colIndex, ref str, ref cellformat);
}
else
{
object str = ( object )row[col.ColumnName].ToString();
excel.WriteValue( ref vt, ref cf, ref ca, ref chl, ref rowIndex, ref colIndex, ref str, ref cellformat);
}
}
}
rowIndex += 3 ;
}
int ret = excel.CloseFile();
return FilePath + filename;
}
方案三:采用Excel组件。一般,对于操作能够基本满足,但对于数据量大时可能会慢点。下面的代码,本人在原有基础上稍微修改了下,如下所示:
2 {
3 beforeTime = DateTime.Now;
4 Excel.Application excel;
5 Excel._Workbook xBk;
6 Excel._Worksheet xSt;
7 int rowIndex = 1 ;
8 int colIndex = 1 ;
9 excel = new Excel.ApplicationClass();
10 xBk = excel.Workbooks.Add( true );
11 xSt = (Excel._Worksheet)xBk.ActiveSheet;
12 int add = 0 ;
13 foreach (System.Data.DataTable dt in dtList)
14 {
15 colIndex = 1 ;
16 // 取得整个报表的标 题
17 excel.Cells[rowIndex , 1 ] = smallTitle[add];
18 add ++ ;
19 /// /设置整个报表的标题格式
20 xSt.get_Range(excel.Cells[rowIndex, 1 ], excel.Cells[rowIndex , dt.Columns.Count]).Font.Bold = true ;
21 xSt.get_Range(excel.Cells[rowIndex, 1 ], excel.Cells[rowIndex , dt.Columns.Count]).Font.Size = 22 ;
22 /// /设置 整个报表的标题为跨列居中
23 xSt.get_Range(excel.Cells[rowIndex , 1 ], excel.Cells[rowIndex , dt.Columns.Count]).Select();
24 xSt.get_Range(excel.Cells[rowIndex , 1 ], excel.Cells[rowIndex, dt.Columns.Count]).HorizontalAlignment = Excel.XlHAlign.xlHAlignCenterAcrossSelection;
25 rowIndex ++ ;
26 foreach (DataColumn col in dt.Columns)
27 {
28 excel.Cells[rowIndex, colIndex] = col.ColumnName;
29 // 设置标题格式为居中对齐
30 xSt.get_Range(excel.Cells[rowIndex, colIndex], excel.Cells[rowIndex, colIndex]).Font.Bold = true ;
31 xSt.get_Range(excel.Cells[rowIndex, colIndex], excel.Cells[rowIndex, colIndex]).HorizontalAlignment = Excel.XlVAlign.xlVAlignCenter;
32 xSt.get_Range(excel.Cells[rowIndex, colIndex], excel.Cells[rowIndex, colIndex]).Select();
33 xSt.get_Range(excel.Cells[rowIndex, colIndex], excel.Cells[rowIndex, colIndex]).Interior.ColorIndex = titleColorindex;
34 colIndex ++ ;
35 }
36 // 取得表格中的数 据
37 foreach (DataRow row in dt.Rows)
38 {
39 rowIndex ++ ;
40 colIndex = 1 ;
41 foreach (DataColumn col in dt.Columns)
42 {
43 if (col.DataType == System.Type.GetType( " System.DateTime " ))
44 {
45 if ( ! string .IsNullOrEmpty(row[col.ColumnName].ToString()))
46 {
47 excel.Cells[rowIndex, colIndex] = (Convert.ToDateTime(row[col.ColumnName].ToString())).ToString( " yyyy-MM-dd " );
48 xSt.get_Range(excel.Cells[rowIndex, colIndex], excel.Cells[rowIndex, colIndex]).HorizontalAlignment = Excel.XlVAlign.xlVAlignCenter; }
49 }
50 else if (col.DataType == System.Type.GetType( " System.String " ))
51 {
52 excel.Cells[rowIndex, colIndex] = " ' " + row[col.ColumnName].ToString();
53 xSt.get_Range(excel.Cells[rowIndex, colIndex], excel.Cells[rowIndex, colIndex]).HorizontalAlignment = Excel.XlVAlign.xlVAlignCenter;r; }
54 else
55 {
56 excel.Cells[rowIndex, colIndex] = row[col.ColumnName].ToString();
57 xSt.get_Range(excel.Cells[rowIndex, colIndex], excel.Cells[rowIndex, colIndex]).HorizontalAlignment = Excel.XlVAlign.xlVAlignCenter; }
58 colIndex ++ ;
59 }
60 }
61 rowIndex ++ ;
62 }
63 afterTime = DateTime.Now;
64 xSt.Name = strTitle;
65 string filename = typeName + DateTime.Now.ToString( " yyyyMMdd " ) + " .xls " ;
66 // excel.Save(FilePath+filename);
67 excel.ActiveWorkbook.SaveCopyAs(FilePath + filename);
68 #region 结束Excel进程
69 xBk.Close( null , null , null );
70 excel.Workbooks.Close();
71 excel.Quit();
72 #endregion
73 return filename;
74 }
方法四:采用DataGrid,GridView自带的属性。如下:
{
Response.ClearHeaders();
Response.Clear();
Response.Expires = 0 ;
Response.Buffer = true ;
Response.HeaderEncoding = System.Text.Encoding.UTF8;
// Response.Charset = "utf-8";
Response.AppendHeader( " Content-Disposition " , " attachment;filename= " + Server.UrlEncode(filename));
Response.ContentEncoding = System.Text.Encoding.Default; // 设置输出流为简体中文
// Response.ContentType = "application/ms-excel"; // 设置输出文件类型为excel文件。
Response.ContentType = " Application/octet-stream " ;
this .EnableViewState = false ;
System.Globalization.CultureInfo myCItrad = new System.Globalization.CultureInfo( " zh-CHS " , true );
System.IO.StringWriter oStringWriter = new System.IO.StringWriter(myCItrad);
System.Web.UI.HtmlTextWriter oHtmlTextWriter = new System.Web.UI.HtmlTextWriter(oStringWriter);
ToExcelGrid.RenderControl(oHtmlTextWriter);
Response.Write(oStringWriter.ToString());
Response.End();
}
(三)SSIS的简介
SQL Server 2005 提供的一个集成化的商业智能开发平台,主要包括:
*SQL Server Analysis Services(SQL Server数据分析服务,简称SSAS)
*SQL Server Reporting Services(SQL Server报表服务,简称SSRS)
*SQL Server Integration Services(SQL Server数据集成服务,简称SSIS)
SQL Server 2005 Integration Services (SSIS) 提供一系列支持业务应用程序开发的内置任务、容器、转换和数据适配器。可以创建 SSIS 解决方案来使用 ETL 和商业智能解决复杂的业务问题,管理 SQL Server 数据库以及在 SQL Server 实例之间复制 SQL Server 对象。
(四)数据库中存储过程示例( SSIS应用过程中需要的 ,最好拿个本子把需要的内容记下)
在SQL SERVER 2005中,以SSISDataBase数据库作为应用,仅包括2张表City,Province.(主要是为了简单,便于讲解)

其中存储过程如下:
(
@provinceId int = 0
)
as
begin
select P.EName as 省份拼音 ,P.CName as 省份名 ,C.CName as 城市名 from City C left join Province P
on C.ProvinceId = P.ProvinceId
where C.ProvinceId = @provinceId and @provinceId is not null or @provinceId is null or @provinceId = 0
end
其中,在这一步中我们必须要记住相关的内容,如上标识(红色);为什么这么做?主要是在制作SSIS包的时候很容易混淆,建议拿个本子把需要的内容写好。
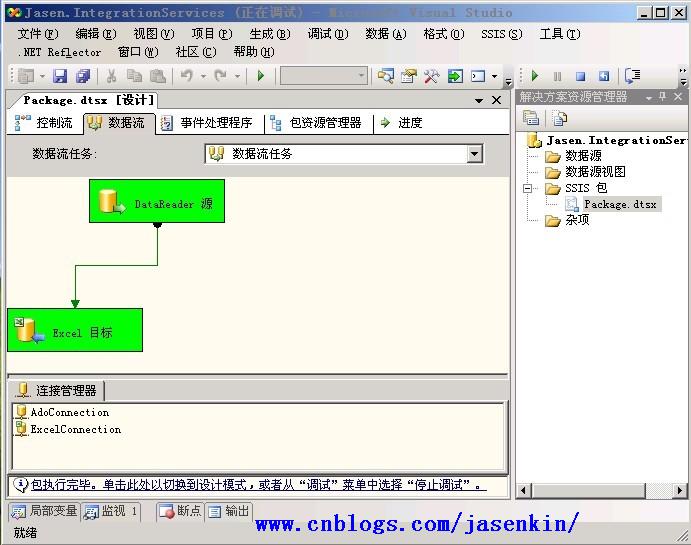
这一步是最主要的过程,当然,也是很容易出错的一步。 笔者会另外详细介绍制作Package包的 过程,本文将直接将生成的包放到VS项目中进行运用。
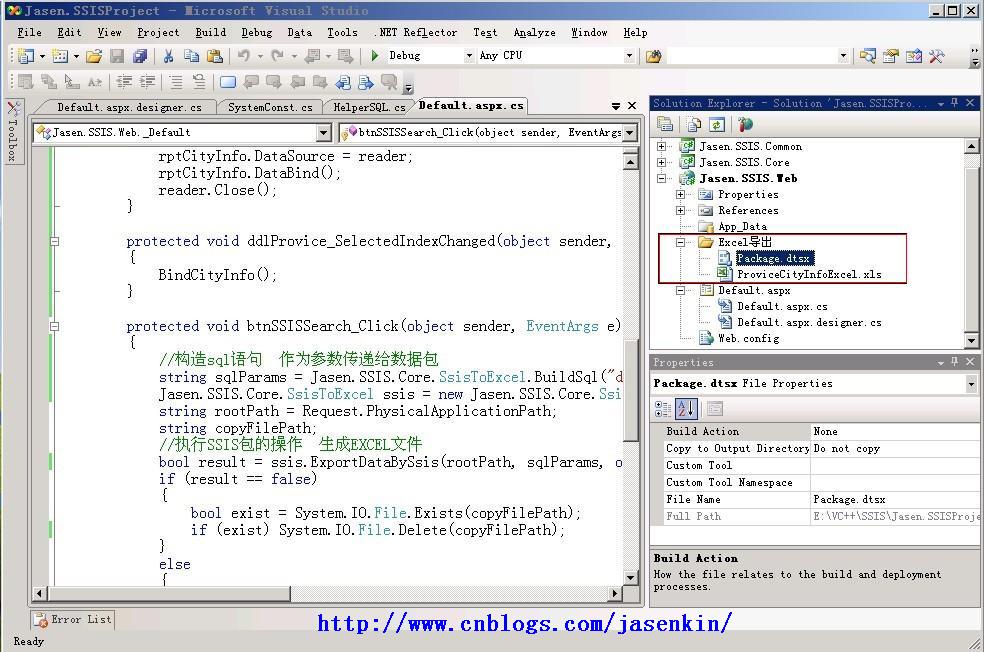
利用SQL Server 2005数据库自带的SQL Server Business Intelligence Development Studio(SQL Server商业智能开发平台),最终生成的项目如下图所示:

2 {
3 // 构造sql语句 作为参数传递给数据包
4 string sqlParams = Jasen.SSIS.Core.SsisToExcel.BuildSql( " dbo.ProvinceSelectedCityInfo " , " @provinceId " , int .Parse(ddlProvice.SelectedValue));
5 Jasen.SSIS.Core.SsisToExcel ssis = new Jasen.SSIS.Core.SsisToExcel();
6 string rootPath = Request.PhysicalApplicationPath;
7 string copyFilePath;
8 // 执行SSIS包的操作 生成EXCEL文件
9 bool result = ssis.ExportDataBySsis(rootPath, sqlParams, out copyFilePath, " Package.dtsx " , " ProviceCityInfoExcel.xls " , " ProviceCityInfo " );
10 if (result == false ){
11 if (System.IO.File.Exists(copyFilePath)) System.IO.File.Delete(copyFilePath);
12 }
13 else
14 {
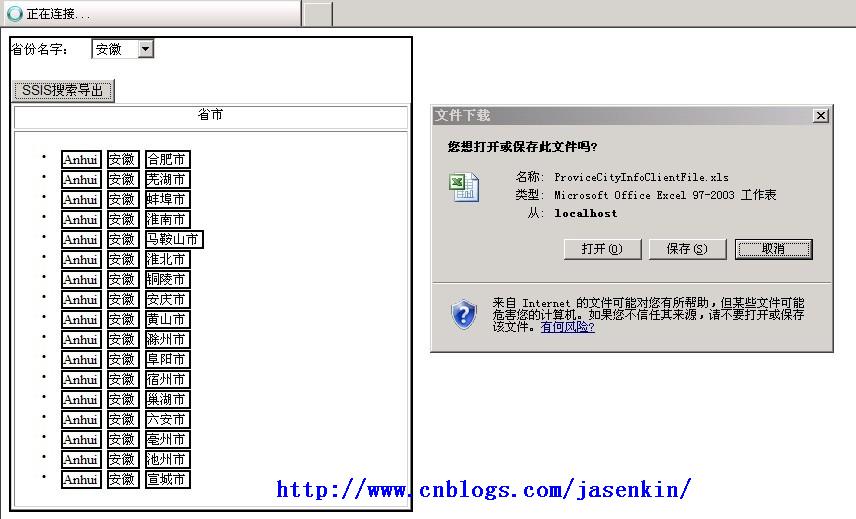
15 ssis.DownloadFile( this , " ProviceCityInfoClientFile.xls " , copyFilePath, true );
16 }
17 }
你肯定会说:“哥,你这个也太简单了吧?”。就是这么简单,不就是多写一个类给你调用就可以了吗。调用接口,这个你总会吧。不过你得了解各个参数才行。
首先,我们必须引用2个DLL,Microsoft.SQLServer.ManagedDTS.dll和 Microsoft.SqlServer.DTSPipelineWrap.dll(系统自带的)。先看下我们生成Excel文件数据的步骤,如下:
/// 导出数 据到EXCEL文件中
/// </summary>
/// <param name="rootPath"></param>
/// <param name="sqlParams"> 执行包的传入参数 </param>
/// <param name="copyFile"> 生成的Excel的文件 </param>
/// <param name="packageName"> SSIS包名称 </param>
/// <param name="execlFileName"> SSIS EXCEL模板名称 </param>
/// <param name="createdExeclPreName"> 生成的Excel的文件前缀 </param>
/// <returns></returns>
public bool ExportDataBySsis( string rootPath, string sqlParams, out string tempExcelName, string packageName, string execlFileName, string createdExeclPreName)
{
// 数据包和EXCEL模板的存储路径
string path = rootPath + @" Excel导出/ " ;
// 强制生成目录
if ( ! System.IO.Directory.Exists(path)) System.IO.Directory.CreateDirectory(path);
// 返回生成的文件名
string copyFile = this .SaveAndCopyExcel(path, execlFileName, createdExeclPreName);
tempExcelName = copyFile;
// SSIS包路径
string ssisFileName = path + packageName;
// 执行---把数据导入到Excel文件
return ExecuteSsisDataToFile(ssisFileName, tempExcelName, sqlParams);
}
代码注释如此清楚,想必也不需要再多做解释了吧,下面就是最最最重要的一步,需要看 清楚了----->
2 {
3 Application app = new Application();
4 Package package = new Package();
5 // 加载SSIS 包
6 package = app.LoadPackage(ssisFileName, null );
7 // 获取 数据库连接字符串
8 package.Connections[ " AdoConnection " ].ConnectionString = Jasen.SSIS.Common.SystemConst.ConnectionString;
9 // 目标Excel属性
10 string excelDest = string .Format( " Provider=Microsoft.Jet.OLEDB.4.0;Data Source={0};Extended Properties=/ " EXCEL 8.0 ;HDR = YES/ " ; " , tempExcelName);
11 package.Connections[ " ExcelConnection " ].ConnectionString = excelDest;
12 // 给参数传值
13 Variables vars = package.Variables;
14 string str = vars[ " 用户::SqlStr " ].Value .ToString();
15 vars[ " 用户::SqlStr " ].Value = sqlParams;
16 // 执行
17 DTSExecResult result = package.Execute();
18 if (result == DTSExecResult.Success){
19 return true ;
20 }
21 else {
22 if (package.Errors.Count > 0 ){
23 // 在log中写出错误列表
24 StringBuilder sb = new StringBuilder();
25 for ( int i = 0 ; i < package.Errors.Count; i ++ ){
26 sb.Append( " Package error: " + package.Errors[i].Description + " ; " );
27 }
28 throw new Exception(sb.ToString());
29 }
30 else {
31 throw new Exception( " SSIS Unknow error " );
32 }
33 return false ;
34 }
35 }
上面标注为红色的就是最重要的几个步骤了,相对来说,就是(1)加载包,(2)设置包的数据库连接串,(3)设置Excel的连接串,(4)设置参数变 量,(5)执行操作
其次是如何巧妙的将Excel模板复制,使模板可以重复利用(当然也要注意将生成的文件下载到客户端后,将服务器上生成的Excel临时文件删除,你也 可以写自己的算法进行清理不必要的Excel临时文件),如下代码所示,方法将复制模板,然后返回生成的临时文件的路径,如果需要删除该文 件,System.IO.File.Delete(filePath)就可以删除文件了:
2 {
3 string copyFile = sourcePath + createdExeclPreName + DateTime.Now.ToString( " yyyyMMddHHMMss " ) + " .xls " ;
4 if (File.Exists(copyFile)) File.Delete(copyFile);
5 File.Copy(sourcePath + execlFileName, copyFile, true );
6 return copyFile;
7 }


 2393
2393

 被折叠的 条评论
为什么被折叠?
被折叠的 条评论
为什么被折叠?
 到【灌水乐园】发言


