


环境
首先保证已经安装了java,sdk,ndk 相关的一些包,并有类似如下的配置:
export NDK_ROOT=/home/develop/android-ndk-r9c
export SDK_ROOT=/home/develop/adt-bundle-linux-x86_64-20131030/sdk
PATH=$PATH:$SDK_ROOT/tools
PATH=$PATH:$NDK_ROOT
export JAVA_HOME=/usr/lib/jvm/java-7-openjdk-amd64
android SDK的使用
命令行下创建工程
mkdir proj.android
cd proj.android
android create project -k wy.first -a helloandroid -n chinease -t android-17 -p ./
其中 -k 指定包名(必选)
-a 指定activity名(必选)
-t指定target(必选),例如此处android-17对于android4.2
-n指定工程名(可选) ,若不指定该选项,则默认使用activity名字作为工程名字。
-p 指定工程目录(必选)
运行完毕会自动生成src/wy/first/helloandroid.java源文件:
package wy.first;
import android.app.Activity;
import android.os.Bundle;
public class helloandroid extends Activity
{
    /** Called when the activity is first created. */
    @Override
    public void onCreate(Bundle savedInstanceState)
    {
        super.onCreate(savedInstanceState);
        setContentView(R.layout.main);
    }
}
编译java并打包成apk
ant debug将编译出的debug版的apk包安装到目标设备上
ant installd上面两个命令也可以ant debug install一次完成,ant的命令部分不在赘述,可自行键入ant help查看:
kimo@debian-desktop:~/proj.android$ ant help
Buildfile: /home/kimo/proj.android/build.xml
help:
     [echo] Android Ant Build. Available targets:
     [echo]    help:      Displays this help.
     [echo]    clean:     Removes output files created by other targets.
     [echo]               This calls the same target on all dependent projects.
     [echo]               Use 'ant nodeps clean' to only clean the local project
     [echo]    debug:     Builds the application and signs it with a debug key.
     [echo]               The 'nodeps' target can be used to only build the
     [echo]               current project and ignore the libraries using:
     [echo]               'ant nodeps debug'
     [echo]    release:   Builds the application. The generated apk file must be
     [echo]               signed before it is published.
     [echo]               The 'nodeps' target can be used to only build the
     [echo]               current project and ignore the libraries using:
     [echo]               'ant nodeps release'
     [echo]    instrument:Builds an instrumented package and signs it with a
     [echo]               debug key.
     [echo]    test:      Runs the tests. Project must be a test project and
     [echo]               must have been built. Typical usage would be:
     [echo]                   ant [emma] debug install test
     [echo]    emma:      Transiently enables code coverage for subsequent
     [echo]               targets.
     [echo]    install:   Installs the newly build package. Must either be used
     [echo]               in conjunction with a build target (debug/release/
     [echo]               instrument) or with the proper suffix indicating
     [echo]               which package to install (see below).
     [echo]               If the application was previously installed, the
     [echo]               application is reinstalled if the signature matches.
     [echo]    installd:  Installs (only) the debug package.
     [echo]    installr:  Installs (only) the release package.
     [echo]    installi:  Installs (only) the instrumented package.
     [echo]    installt:  Installs (only) the test and tested packages (unless
     [echo]               nodeps is used as well.
     [echo]    uninstall: Uninstalls the application from a running emulator or
     [echo]               device. Also uninstall tested package if applicable
     [echo]               unless 'nodeps' is used as well.
手机上的运行效果:
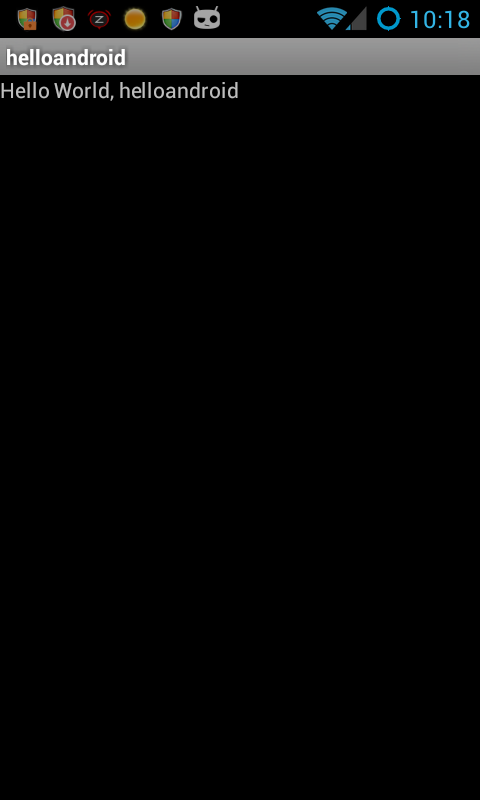
哇塞,居然自带hello world,不明觉厉有木有,看来以后我们这种只会写hello world的人都没法混了,不行,作为一个专注hello world 30年的无脑码农,一定要把这个主动权夺回来!!!搜索了一番才知道其实是刚刚android create project的时候,创建了一个默认的xml界面布局文件res/layout/main.xml,默认代码如下
新建工程的默认ui布局
<?xml version="1.0" encoding="utf-8"?>
<LinearLayout xmlns:android="http://schemas.android.com/apk/res/android"
    android:orientation="vertical"
    android:layout_width="fill_parent"
    android:layout_height="fill_parent"
    >
<TextView
    android:layout_width="fill_parent"
    android:layout_height="wrap_content"
    android:text="Hello World, helloandroid"
    />
</LinearLayout>
所以为了能在代码中控制那个TextView控件,我们在TextView节点中给它加上一行id属性
android:id="@+id/myTextView"然后修改src/wy/first/helloandroid.java文件
package wy.first;
import android.app.Activity;
import android.os.Bundle;
import android.widget.TextView;                                                    //add
public class helloandroid extends Activity
{
    /** Called when the activity is first created. */
    @Override
    public void onCreate(Bundle savedInstanceState)
    {
        super.onCreate(savedInstanceState);
        setContentView(R.layout.main);
        TextView myTextView = (TextView) findViewById(R.id.myTextView); //add
        myTextView.setText("不写可以么"); //add
    }
}
再次ant debug install,运行效果如下,恩,这才是真正的hello world嘛

android NDK的使用
在类中声明本地方法
为了个java代码增加本地jni调用,再次修改src/wy/first/helloandroid.java
package wy.first;

import android.app.Activity;
import android.os.Bundle;

import android.widget.TextView;

public class helloandroid extends Activity
{
    /** Called when the activity is first created. */
    @Override
    public void onCreate(Bundle savedInstanceState)
    {
        super.onCreate(savedInstanceState);
        setContentView(R.layout.main);
        TextView myTextView = (TextView) findViewById(R.id.myTextView);
        myTextView.setText(stringFromJNI());//modify
    }
    public native String stringFromJNI();//add
    static {
         System.loadLibrary("testso");   //add
    }
}
编译java源文件
键入ant debug 即可自动编译
生成jni头文件
然后使用javah工具自动生成jni调用的c代码头文件
javah -classpath bin/classes   -d jni wy.first.helloandroid
  错误: 无法访问android.app.Activity
  找不到android.app.Activity的类文件
神马情况,居然又给我报错,折腾半小时后终于有了点眉目,总之就是找不到android.app.Activity包,需要手动指定一个参数,我这里以target为android-17为例:
javah -classpath bin/classes -bootclasspath /home/develop/adt-bundle-linux-x86_64-20131030/sdk/platforms/android-17/android.jar -d jni wy.first.helloandroid果断执行成功,此时我们的当前目录下自动生成了一个jni目录,以及jni/wy_first_helloandroid.h头文件。
实现jni调用的c函数
现在要做的就是用c实现该头文件中申明的函数,so,创建 jni/wy_first_helloandroid.c文件
#include <string.h>
#include <jni.h>
#include "wy_first_helloandroid.h"
JNIEXPORT jstring JNICALL Java_wy_first_helloandroid_stringFromJNI(JNIEnv *env, jobject obj)
{
    return (*env)->NewStringUTF(env, "hello ,么以可写不");
}
ndk-build编译生成so
创建jni/Android.mk文件,其中LOCAL_MODULE的值应与java代码中的一致
LOCAL_PATH := $(call my-dir)
include $(CLEAR_VARS)
LOCAL_MODULE    := testso
LOCAL_SRC_FILES := wy_first_helloandroid.c
include $(BUILD_SHARED_LIBRARY)
然后就可以编译so了,键入ndk-build回车
kimo@debian-desktop:~/proj.android$ ndk-build
[armeabi] Install        : libtestso.so => libs/armeabi/libtestso.so
果断so就生成好了,再次ant debug install,运行效果如下

恩,正是我们期待的效果,so,收工吃饭
参考链接
http://www.cnblogs.com/eddy-he/archive/2012/08/08/2628676.html
http://blog.csdn.net/furongkang/article/details/6857610
http://www.cnblogs.com/hoys/archive/2010/10/28/1863612.html
http://blog.csdn.net/zyz1985/article/details/7432901
http://bbs.csdn.net/topics/370236601


 4587
4587


 被折叠的 条评论
为什么被折叠?
被折叠的 条评论
为什么被折叠?
 到【灌水乐园】发言


