


PyTorch 2.0 中引入了 AOTAutograd,用户可以获取反向传播计算图、甚至是正向传播和反向传播联合的计算图,用不同的后端编译器分别编译正向传播和反向传播计算图等功能。本文作者详解了各个模块以及核心逻辑代码,手把手教你学会使用AOTAutograd。
在 PyTorch 2.0 以前,用户通过 PyTorch 可以直接捕获到正向传播的计算图,比如 JIT trace 和 TorchFX 的 symbolic trace。虽然 PyTorch 的每个算子都包含正向传播和反向传播的实现,但用户并不能直接在反向传播的计算图上面做优化,也无法把正向传播和反向传播的计算图合并在一张计算图中。PyTorch 2.0 中引入了 AOTAutograd,它的出现解决了这个问题,从而使得一些针对 training 的优化变得可能。
有了 AOTAutograd,用户可以做以下事情:
- 获取反向传播计算图、甚至是正向传播和反向传播联合的计算图;
- 用不同的后端编译器分别编译正向传播和反向传播计算图;
- 针对训练 (training) 做正向传播、反向传播联合优化,比如通过在反向传播中重算 (recompute) 来减少正向传播为反向传播保留的 tensor,从而削减内存需求;
用法
截止目前为止,使用 AOTAutograd 的方式有几种,但最为基础的是 aot_function。以下面的代码片段为例:
因为 AOTAutograd 现阶段还是 functorch 的一部分,所以要先从 functorch 中导入 aot_function。函数 fn(a, b, c, d) 是我们待优化的函数,compiler_fn() 是自定义的后端编译器,接受一张 fx.Graph,这里只是打印出来 fx.GraphModule 对应的 Python 函数。使用 aot_function 优化 fn,并在 run_func() 中执行正向传播和反向传播。执行上面的代码片段,我们得到以下输出:
可以看到,自定义的编译器 compiler_fn() 被调用了两次,分别打印了正向传播和反向传播计算图对应的 Python 代码,cos 和 add_2 被保留给了反向传播。其中的 primals 和 tangents 是微分几何中的概念,这里可以把 primals 理解为用户函数的输入,它是正向传播的输入,把 tangents 理解为用户函数输出的梯度,它是反向传播的输入。两张计算图是 FX Graph,其中包含的是 ATen 算子,它们是 low-level 算子,而不是 Torch 级别的算子,例如 Linear。
我们还可以使用 PyTorch 2.0 内置的编译器,比如 ts_compile:
AOTAutograd 还提供了 min_cut_rematerialization_partition,它的作用是针对正向传播计算图和反向传播计算图做联合优化,从而 降低内存需求:
为了简化上述过程,AOTAutograd 提供了 memory_efficient_fusion,它合并了 aot_function 和 min_cut_rematerialization_partition:
除此之外,用户还可以从 torch.compile 调用 AOTAutograd,默认的 inductor 后端会调用 AOTAutograd,backend 包含 aot_ 字段的编译器也会调用 AOTAutograd,例如 aot_ts_nvfuser:
原理
为什么叫 AOTAutograd?因为 PyTorch 反向传播的计算图是在执行正向传播的过程中动态构建的,反向传播的计算图在正向传播结束时才能确定下来。AOTAutograd 以 Ahead-of-Time 的方式同时 trace 正向传播和反向传播,从而在函数真正执行之前拿到正向传播和反向传播的计算图。
总的来说,AOTAutograd 的工作流程 如下:
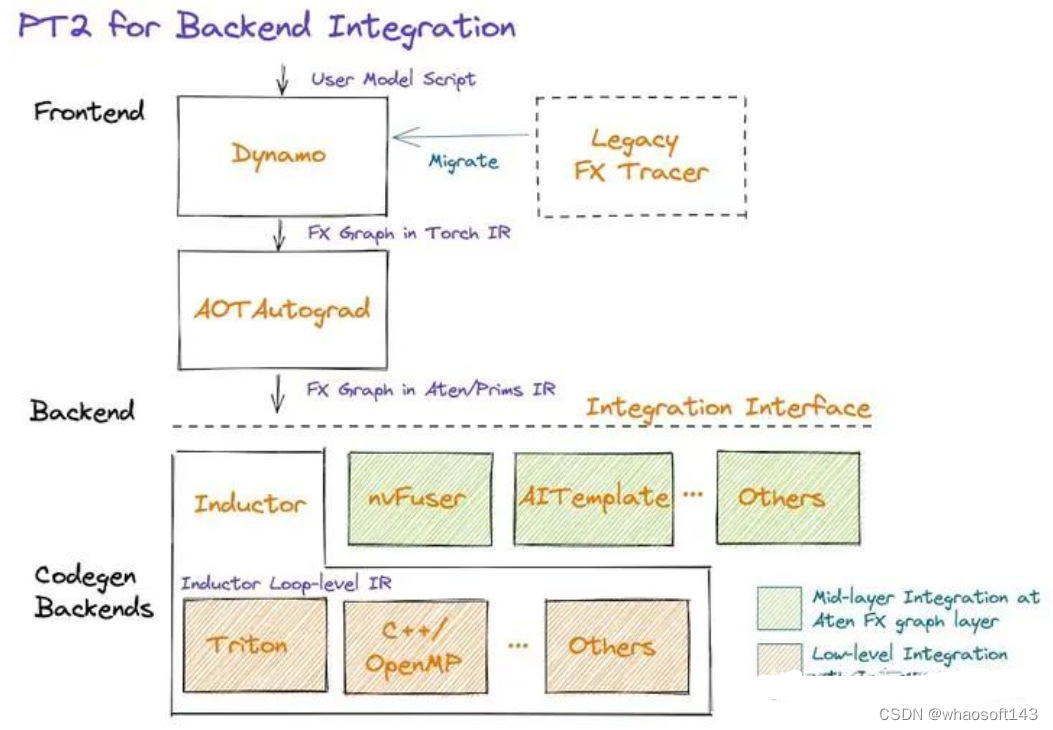
- 以 AOT 方式通过
__torch_dispatch__机制 trace 正向传播和反向传播,生成联合计算图 (joint forward and backward graph),它是包含 Aten/Prim 算子的 FX Graph; - 用
partition_fn把 joint graph 划分为正向传播计算图和反向传播计算图; - 可选: 通过
decompositions把 high-level 算子分解、下沉到粒度更小的算子; - 调用
fw_compiler和bw_compiler分别编译正向传播计算图和反向传播计算图,通过 TorchFX 生成编译后的 Python 代码,并整合为一个torch.autograd.Function;
对于上面的案例 fn,tracing 得到的 joint graph 为:
在上述 joint graph 的基础上,通过 partition_fn 将其划分为正向传播计算图和反向传播计算图。
Torch Dispatch
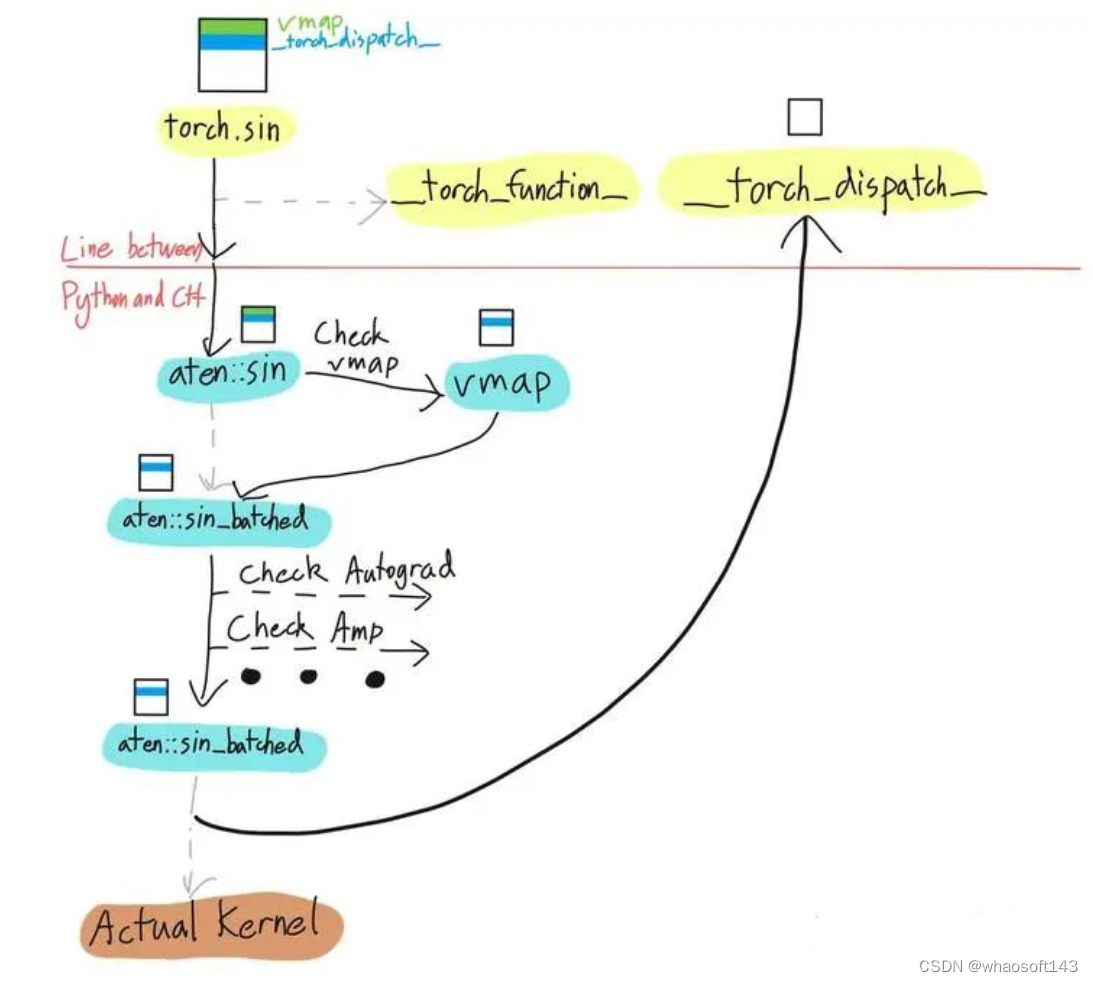
AOTAutograd 得以工作的核心是 __torch_dispatch__。PyTorch 的核心是一个 dispatcher,它的功能是根据输入 tensor 的属性把算子 dispatch 到具体的 kernel 上,比如根据 tensor 的 device 属性决定是调用 CUDA kernel 还是 CPU 函数执行该算子。
一个算子在 PyTorch 中往往要经过多次 dispatch,__torch_dispatch__ 给了用户提供了一个入口,使得用户能够在算子最终 dispatch 前获取对应的算子和输入。比如 torch.sin 在经过多次 dispatch 之后会调用 __torch_dispatch__:
torch-dispatch
使用 __torch_dispatch__ 的方法有两种,以下面的代码片段为例,PyTensor 继承了 torch.Tensor,并定制了类方法 __torch_dispatch__,其中可以获取要执行的 ATen 算子和对应的参数:
执行上面的代码片段,x * 2 会触发 __torch_dispatch__:
此处的原理是: PyTorch 每个的 Tensor 都包含一组 dispatch key (参考 TensorImpl 中的 DispatchKeySet),初始化 Tensor 的时候,如果存在定制的类属性 __torch_dispatch__ (check_has_torch_dispatch()),则给该 tensor 添加 DispatchKey::Python 和 DispatchKey::PythonTLSSnapshot。在执行算子时,dispatcher 从 Tensor 中收集 DispatchKeySet,dispatcher 看到 DispatchKey::Python 时会执行 Tensor 的 __torch_dispatch__ 函数。
在上面的例子中,为了使用 __torch_dispatch__ 而不得不继承 torch.Tensor 实现子类是比较麻烦的,好在 PyTorch 提供了另一种更优雅的方式 TorchDispatchMode。在 TorchDispatchMode 的 context 里,执行算子会调用 TorchDispatchMode.__torch_dispatch__,从而避免用户自定义 Tensor 类。例如下面的代码:
执行该代码片段时会触发 TorchDispatchMode.__torch_dispatch__,它需要用户自己实现:
此处的原理是: PyTorch 的每个线程有一个 DispatchKeySet,TorchDispatchMode (https://github.com/pytorch/pytorch/blob/fe05266/torch/utils/_python_dispatch.py%23L14) 往 DispatchKeySet 中添加了 DispatchKey::Python 和 DispatchKey::PythonTLSSnapshot,在 C++ 中把 torchDispatchModeState 压栈。执行具体的算子时,dispatcher 把当前线程的 DispatchKeySet 与 Tensor 的 DispatchKeySet 合并,然后根据合并后的 DispatchKeySet 来 dispatch 该算子,并根据 DispatchKey::Python 优先调用 TorchDispatchMode 的 __torch_dispatch__ 方法。
通过 __torch_dispatch__,用户有机会在 kernel 执行前获取算子和参数,从而可以做很多事情,基于 __torch_dispatch__ 的 tracing 正是其中之一。
去重
TorchFX 中实现了 make_fx (https://github.com/pytorch/pytorch/blob/fe05266/torch/fx/experimental/proxy_tensor.py%23L660),与常规的 symbolic tracing 不同,make_fx 是通过 __torch_dispatch__ 实现的,AOTAutograd 的 tracing 正是用的 make_fx。以下面的代码为例:
执行上面的代码片段,可以看到 make_fx 成功 trace 了函数 f 的计算图,并保存在 FX Graph 中:
作为对比,使用 symbolic trace 得到的计算图包含的是高层次的算子:
可见 symbolic_trace 得到的是 operator.add,而 make_fx 得到的是 torch.ops.aten.add.Tensor:
make_fx 并不是完美的,特别是当用于 tracing 的 输入参数中包含重复的 tensor 时,例如:
可以看到,make_fx(f)(x, x) trace 出来的是 y + y 而不是预期中的 x + y:
除此之外,如果我们使用 torch.autograd.grad(f(x, y), (x, y)) 计算函数 f(x, y) 对 (x, y) 的梯度,但如果 x 和 y 是相同的 tensor,trace 出来的梯度就是错的:
把函数参数 去重 (deduplicate) 可以得到正确的梯度:
为什么基于 __torch_dispatch__ 的 tracing 机制会存在这样的问题?因为使用 __torch_dispatch__ 进行 tracing 时使用的是 tensor,而要建立的是 fx.Graph,怎么把 tensor 映射到 fx.Graph 中的节点?答案是通过 tensor 的 ID,相同的 tensor 会被映射到 fx.Graph 中的同一个 Proxy,因而给被 trace 的函数实际参数去重就很有必要。
AOTAutograd 在开始 tracing 前会给输入函数去重,它依次尝试下面两个策略:
- 通过
detach把待 trace 函数的重复参数变为 leaf tensor: 缺点是待 trace 函数不能改变重复参数,例如在重复 tensor 上调用 in-place 算子; - 把重复的参数从函数签名中移除: 捕获的计算图是针对重复参数特化的版本;
Joint Graph
有了基于 __torch_dispatch__ 的 tracing 机制,AOTAutograd 就可以 trace 联合正向传播和反向传播计算图。这里的逻辑比较直接,如果用户要想优化的正向传播函数是 fn,AOTAutograd 则构建并 trace 一个 joint_forward_backward 函数,其中调用正向传播函数 fn 之后,再调用 torch.autograd.grad 执行反向传播。核心逻辑如 forward_or_joint() (https://github.com/pytorch/pytorch/blob/fe05266/torch/_functorch/aot_autograd.py%23L920) 所示:
AOTAutograd 通过 make_fx 来 trace 该 joint_forward_backward 函数,对于其中的每个算子,都会触发 __torch_dispatch__,从 tensor 获取 proxy,在 fx.Graph 中创建算子对应的 proxy,类型为 call_function,目标是算子本身,然后以真实 tensor 运行算子,并把结果 tensor 绑定到 proxy 上:
如此往复,直到 AOTAutograd trace 完正向传播和反向传播中的所有算子,得到一张完整的 joint graph。
Partition
AOTAutograd 用 partition_fn 把 joint graph 划分为正向传播计算图和反向传播计算图,目前内置了两种 partition_fn:
- default_partition (https://github.com/pytorch/pytorch/blob/fe05266/torch/_functorch/partitioners.py%23L128): 模拟了 PyTorch 的默认行为,找出从 forward 的输入到 forward 的输出的所有算子输出,其中被 backward 用到的 tensor 也作为 forward 的输出,是 forward 保留给 backward 的 tensor;
- min_cut_rematerialization_partition (https://github.com/pytorch/pytorch/blob/fe05266/torch/_functorch/partitioners.py%23L275): 通过在 backward 中引入重算,减少 forward 给 backward 保留的 tensor,这种重算的思路与 gradient/activation checkpointing 一致;
此前所述案例对应的 joint graph 为:
其中必须由 backward 计算的节点是 mul 和 mul_1,因为它们直接依赖于 tangents,也就是 backward 的输入,因此它们也叫做 tangent’s closure。在此基础上,我们可以有很多种切分 joint graph 的方法,比如:
- forward 给 backward 保留
{neg, neg_1},从而 backward 计算{mul, mul_1}就可以得到最终结果; - forward 给 backward 保留
{primals_1, primals_2, primals_3, primals_4},从而 backward 需要计算 joint graph 中的所有节点;
那么如何选择 forward 保留给 backward 的算子,从而使内存需求最小?答案是通过求解 最大流最小割(max-flow/min-cut) 问题,流程如下:
- 在源节点 (source) 和 primals 之间各添加一条边,在所有的 tangent’s closure 和目标节点 (sink) 之间各添加一条边,它们组成了一张从 source 到 sink 的有向图,边上的权重是 tensor size;
- 我们需要找到一个合适的切分方法,把这个有向图分成两部分,使得 source 子图到 target 子图之间边上的权重之和最小,这是一个最小割问题;
- 最小割问题的对等问题是最大流问题,已经有标准的解法,直接在该有向图上运行 max-flow 算法即可得到最佳划分方法;
关于最大流最小割的更多细节,可以参考 最大流最小割(Max-flow min-cut)定理(https://zhuanlan.zhihu.com/p/65793018)。
通过解最大流最小割问题,我们找到了最佳切分方法,即 forward 为 backward 保留 {add_2},需要的内存是最少的,最终生成的正向传播与反向传播为:
可以看到,使用 default_partition 时正向传播为反向传播保留了 cos 和 add_2,使用 min_cut_rematerialization_partition 时正向传播只为反向传播保留了 add_2,反向传播中通过重算获得 cos,从而降低了内存需求。
AOTAutograd 的最后是调用用户指定的编译器分别编译正向传播计算图和反向传播计算图,这里不再赘述。
AOTAutograd 默认 static shape。此外,aot_function 内置 编译缓存 (compilation cache),根据输入张量的特性决定是否需要重新编译 (recompilation),现阶段缓存只有一个条目。
控制语句
不是所有的函数都可以被 AOTAutograd 优化,这主要受限于 make_fx 的 tracing 机制。比如,data-dependent control flow 在 tracing 中是不支持的,下面的代码在 tracing 过程中会抛出异常,因为 if 语句依赖于 tensor 的值:
常规的循环在 tracing 的过程中被展开:
使用 AOTAutograd 优化上面这个函数会得到:
函数调用在 tracing 的过程中也被展开,例如下面的例子:
使用 AOTAutograd 优化上面这个函数会得到:
调用栈
下面是 AOTAutograd 通过 __torch_dispatch__ 为算子创建 FX Node 的函数调用栈 (省略了 C/C++ 部分的 dispatch),有兴趣的朋友可以参考其中的关键实现:
- [P103] > [torch/fx/proxy.py#L150]
(https://github.com/pytorch/pytorch/blob/fe05266/torch/fx/proxy.py%23L150) - [P102] > [torch/fx/experimental/proxy_tensor.py#L238]
(https://github.com/pytorch/pytorch/blob/fe05266/torch/fx/experimental/proxy_tensor.py%23L238) [New] - [P101] > [torch/fx/experimental/proxy_tensor.py#L523]
(https://github.com/pytorch/pytorch/blob/fe05266/torch/fx/experimental/proxy_tensor.py%23L523) - [P100] > [torch/fx/experimental/proxy_tensor.py#L502]
(https://github.com/pytorch/pytorch/blob/fe05266/torch/fx/experimental/proxy_tensor.py%23L502) - [P099] > [torch/utils/_stats.py#L15]
(https://github.com/pytorch/pytorch/blob/fe05266/torch/utils/_stats.py%23L15) - [P017] > test.py#L26:fn
- [P016] > [torch/_functorch/aot_autograd.py#L2684]
(https://github.com/pytorch/pytorch/blob/fe05266/torch/_functorch/aot_autograd.py%23L2684) - [P015] > [torch/_functorch/aot_autograd.py#L920]
(https://github.com/pytorch/pytorch/blob/fe05266/torch/_functorch/aot_autograd.py%23L920) [New] - [P014] > [torch/_functorch/aot_autograd.py#L1052]
(https://github.com/pytorch/pytorch/blob/fe05266/torch/_functorch/aot_autograd.py%23L1052) [New] - [P013] > [torch/_functorch/aot_autograd.py#L1077]
(https://github.com/pytorch/pytorch/blob/fe05266/torch/_functorch/aot_autograd.py%23L1077) [New] - [P012] > [torch/_functorch/aot_autograd.py#L1115]
(https://github.com/pytorch/pytorch/blob/fe05266/torch/_functorch/aot_autograd.py%23L1115) [New] - [P011] > [torch/_functorch/aot_autograd.py#L1172]
(https://github.com/pytorch/pytorch/blob/fe05266/torch/_functorch/aot_autograd.py%23L1172) [New] - [P010] > [torch/fx/experimental/proxy_tensor.py#L452]
(https://github.com/pytorch/pytorch/blob/fe05266/torch/fx/experimental/proxy_tensor.py%23L452) [New] - [P009] > [torch/fx/_symbolic_trace.py#L650]
(https://github.com/pytorch/pytorch/blob/fe05266/torch/fx/_symbolic_trace.py%23L650) [New] - [P008] > [torch/fx/_symbolic_trace.py#L663]
(https://github.com/pytorch/pytorch/blob/fe05266/torch/fx/_symbolic_trace.py%23L663) [New] - [P007] > [torch/fx/experimental/proxy_tensor.py#L439]
(https://github.com/pytorch/pytorch/blob/fe05266/torch/fx/experimental/proxy_tensor.py%23L439) [New] - [P006] > [torch/fx/experimental/proxy_tensor.py#L666]
(https://github.com/pytorch/pytorch/blob/fe05266/torch/fx/experimental/proxy_tensor.py%23L666) [New] - [P005] > [torch/_functorch/aot_autograd.py#L2070]
(https://github.com/pytorch/pytorch/blob/fe05266/torch/_functorch/aot_autograd.py%23L2070) [New] - [P004] > [torch/_functorch/aot_autograd.py#L1687]
(https://github.com/pytorch/pytorch/blob/fe05266/torch/_functorch/aot_autograd.py%23L1687) [New] - [P003] > [torch/_functorch/aot_autograd.py#L2444]
(https://github.com/pytorch/pytorch/blob/fe05266/torch/_functorch/aot_autograd.py%23L2444) [New] - [P002] > [torch/_dynamo/utils.py#L158]
(https://github.com/pytorch/pytorch/blob/fe05266/torch/_dynamo/utils.py%23L158) [New] - [P001] > torch/_functorch/aot_autograd.py#L2672
(https://github.com/pytorch/pytorch/blob/fe05266/torch/_functorch/aot_autograd.py%23L2672) [New] - [P000] > test.py#L30:run_func [New]
总结
- AOTAutograd 利用了
__torch_dispatch__机制通过 tracing 提前得到联合正向传播和反向传播计算图; - 经过
__torch_dispatch__trace 得到的是最内层的 ATen 算子,AOTAutograd 将其保存在 FX Graph 中; - 如果用于 tracing 的 tensors 中有重复,那么通过
make_fx得到的计算图与预期不符,AOTAutograd 会在 tracing 前去重; - AOTAutograd 用
partition_fn把 trace 得到的 joint graph 划分为 foward graph 和 backward graph; min_cut_rematerialization_partition通过求解最大流/最小割问题最小化正向传播保留给反向传播的 tensor;make_fx的 tracing 不支持 data-dependent control flow,循环、函数调用在 tracing 后被展开;


 265
265

 被折叠的 条评论
为什么被折叠?
被折叠的 条评论
为什么被折叠?
 到【灌水乐园】发言


