


开发工具与关键技术:MyEclipse 10、JAVA
作者:曾浩源
撰写时间:2019年04月22日
做任何程序都离不开良好的封装,封装好自己代码,到时候传变量到方法,即可一步到位。像太阳系,虽然它有八大行星,但这八大行星是否有一些共同的特点?
一、中心点皆是太阳;
二、在模型中都是以椭圆轨迹运转;
三、它们都需要几个相同的参数:长轴、短轴、速度、角度
虽然,太阳只有一个,但假如有一天你需要扩展到银河系,和养成封装的良好习惯,所以也为太阳封装一个类。
太阳和行星有什么共同之处?
做太阳系时:有中心点(x和y),和图片的显示。
首先封装太阳,太空万物皆星星,所以创建一个类交Star,声明成员变量:
Image image;//图片 double x; double y;//坐标
double width,height;//图片宽高,用于减少误差
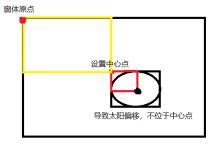
所以在设置中心点时需要相对应的减去宽或高除以2,才能真正的设置中心点位置
有了x、y和宽高,就可以设置画出太阳图片了。
画出图片使用
g.drawImage(image, (int)x,(int)y, null);
public Star(){
}
public Star(Image image){
this.image=image;
}
public Star(Image image,double x,double y){
this(image);
this.width=image.getWidth(null);
this.height=image.getHeight(null);
this.x=x-width/2;
this.y=y-height/2;
}
public Star(String imagepath,double x,double y){
this(GameUtil.getImage(imagepath), x, y);
}
获取图片可以根据图片路径进行获取,
创建一个属于自己的工具类;
public class GameUtil {
private GameUtil(){};
public static Image getImage(String path){
URL url=GameUtil.class.getClassLoader().getResource(path);
BufferedImage image=null;
try {
image=ImageIO.read(url);
} catch (IOException e) {
// TODO Auto-generated catch block
e.printStackTrace();
}
return image;
}
}
获取完图片后,创建一个画图方法:
public void draw(Graphics g){
g.drawImage(image, (int)x,(int)y,null);
}
这样就完成了对太阳的封装,接下来就是在main方法的实例窗口模板、在paint方法对draw方法的调用和在类里实例化有参构造器;
public class MainFrame extends SolarFrame {
Star sun = new Star("Image/sun.jpg", Constant.MAIN_WIDTH / 2, Constant.MAIN_HEIGHT / 2);//实例化Star类,并赋值
public static void main(String[] args) {
new MainFrame().frame();//实例化主窗口模板并调用显示窗口模板
}
public void paint(Graphics g) {
sun.draw(g);//调用Star类的方法画出太阳
repaint();// 重画
}
}
八大行星,都有相同的属性,也有Star类的属性,但又比它多了一些属性,所以新创建一个Planet类(行星类)继承Star类;
里面的属性:
double longAxis; //长轴
double shortAxis; //短轴
double speed; //速度
double degree; //环绕角度
Star center; //环绕中心点
有了属性,就应该添加构造器了。
public Planet(Star center, String imagepath, double longAxis,
double shortAxis, double speed) {
super(GameUtil.getImage(imagepath));//调用父类的获取图片方法
this.center = center;//环绕中心
this.x = center.x + center.width / 2 + longAxis;//环绕初始位置x
this.y = center.y + center.height / 2;//环绕初始位置y
this.longAxis = longAxis;
this.shortAxis = shortAxis;
this.speed = speed;
}
最后就是画图方法,和父类Star一样,可以直接调用父类的,现在写不写都可以。
public void draw(Graphics g) {
super.draw(g);
}
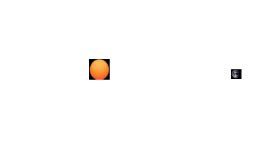
和太阳的实例一样。在主窗口类里,实例化有参构造器和在paint方法对draw方法的调用
Planet earth=new Planet(sun, "Image/Earth.jpg", 190, 130, 0.00888);//地球
//在paint方法里:
earth.draw(g);
效果图,要添加背景图片就调用获取图片的方法,和在paint方法里画图即可:
//获取图片
Image bg = GameUtil.getImage("Image/bg.jpg");
//在paint方法里:
g.drawImage(bg, 0, 0, null);//画图
地球是绕着太阳,椭圆转动的,而且对于太阳来说是行星特有的:所以需要写一个移动的方法给行星类,再在画图的方法里调用。
public void draw(Graphics g) {
super.draw(g);
move(g);
}
public void move(Graphics g) {
//地球x坐标=环绕中心(即太阳)x,它的一半(除以2)-地球图片长度的一半(除以2)+长轴*cos(旋转角度);
x = center.x + center.width / 2-this.width/2 + longAxis*Math.cos(degree);
y = center.y + center.height / 2-this.height/2 + shortAxis*Math.sin(degree);
degree += speed;
}
虽然这样旋转了,但是没有一个他的轨迹,不好看,所以可以在move方法里直接画椭圆出来。更改一个蓝色。注意:每一次更换颜色都必须修改会默认颜色。
public void move(Graphics g) {
x = center.x + center.width / 2-this.width/2 + longAxis*Math.cos(degree);
y = center.y + center.height / 2-this.height/2 + shortAxis*Math.sin(degree);
degree += speed;
Color color = g.getColor();
g.setColor(Color.BLUE);
//为了减少误差,所以获取太阳的中心点,就是太阳坐标-太阳宽高除以2
g.drawOval((int) (center.x - longAxis + center.width / 2),
(int) (center.y - shortAxis + center.height / 2),
(int) longAxis * 2, (int) shortAxis * 2);
g.setColor(color);
}
现在,无论想添加哪个行星,是不是都只需要打上两句代码即可实现了,简洁又方便。
例如添加火星:在主窗口MainFrame类内实例化Planet
Planet mars=new Planet(sun, "Image/Mars.jpg", 220, 160, 0.00764);//火星
//再在该类的paint方法内画出火星:
mars.draw(g);
现在就差一个我们最熟悉月亮了,月亮是地球的卫星,所以绕着地球转,其他卫星也是这个道理,所以行星和卫星没有什么太大的差异。直接调用行星构造器:
Planet moon=new Planet(earth, "Image/moon.jpg", 20, 10, 0.03);//月球
//在paint里直接画出月亮:
moon.draw(g);
这样是可以,但是卫星也会有一个椭圆的轨迹了,卫星那么多,那么密集,都有椭圆轨迹很难看,所以,在Planet类内添加一个boolean属性,用于判断是否是卫星
boolean satellite;
写一个专属于卫星的构造器:
public Planet(Star center, String imagepath, double longAxis,
double shortAxis, double speed,boolean satellite) {
this(center,imagepath,longAxis,shortAxis,speed);
this.satellite=satellite;
}
再在draw方法内判断一下是否为卫星,不是卫星才画出椭圆轨迹。
public void move(Graphics g) {
x = center.x + center.width / 2-this.width/2 + longAxis*Math.cos(degree);
y = center.y + center.height / 2-this.height/2 + shortAxis*Math.sin(degree);
degree += speed;
if (!satellite) {
Color color = g.getColor();
g.setColor(Color.BLUE);
g.drawOval((int) (center.x - longAxis + center.width / 2),
(int) (center.y - shortAxis + center.height / 2),
(int) longAxis * 2, (int) shortAxis * 2);
g.setColor(color);
}
}
在主窗口类里,一个简单的实例:
Planet moon=new Planet(earth, "Image/moon.jpg", 20, 10, 0.03, true);//月球
//和在paint方法画出月球:
moon.draw(g);
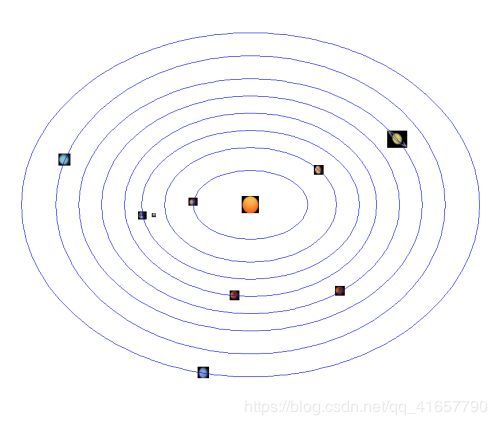
不加背景图片的八大行星样式:


 1387
1387


 被折叠的 条评论
为什么被折叠?
被折叠的 条评论
为什么被折叠?
 到【灌水乐园】发言


