


点击上方“前端公虾米”,选择“置顶或者星标”
你的关注意义重大!
前言
最近团队需要做一个智能客服悬浮窗功能,需要支持拖动、放大缩小等功能,因为这个是全局插件,为了兼容性考虑全部使用原生 JS 实现,不引用任何第三方库或者插件。开发过程中遇到的一些问题及解决方法,在这里和大家分享交流一下。
“注:下文出现的“采宝”二字,为这个功能的产品名。
先看效果
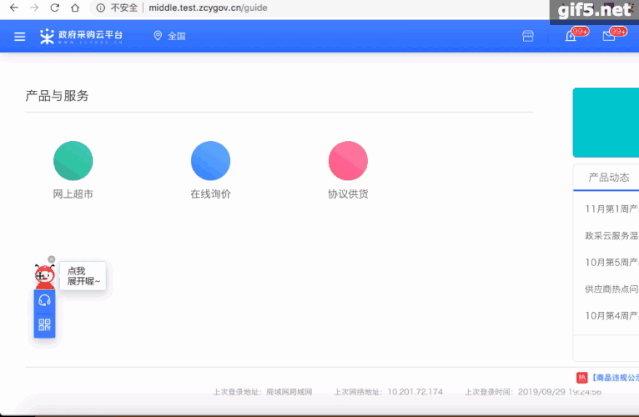
看这个效果,相信大部分开发都会觉得实现起来比较容易。在实际开发中,笔者总结了三个主要的坑点,及其解决方案。
三个坑点
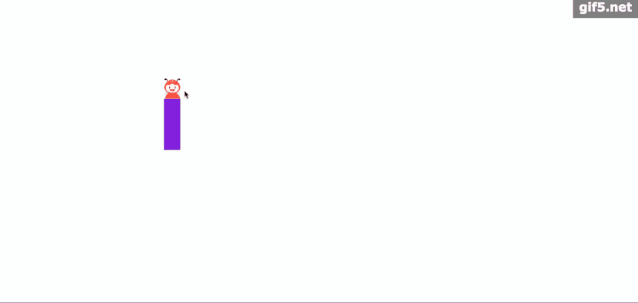
- 拖拽采宝时会导致采宝放大缩小
- 采宝显示在屏幕边界时被遮挡显示不全
- 采宝放大和缩小后,位置发生变化
(一)拖拽时会导致采宝放大缩小
我们在操作采宝时,不管是鼠标拖动还是点击放大缩小,我们的事件都需要绑定在采宝头部的图标上,这样我们就需要在图标上同时绑定点击和拖拽事件。但是当我们直接添加 click 事件和 mousedown 事件的时候,我们发现在触发 mousedown 事件的时候,也会去触发 click 事件。这样就会出现在拖动采宝的时候,采宝会放大和缩小。
这个效果是我们不想看到的,所以我们就需要区分开采宝上的 click 事件和 mousedown 事件,想办法使两个事件的触发相互不影响。
所以我们在同一个 DIV 上同时绑定 mousedown 事件和 click 事件,然后通过控制台输出每个事件,查看过程中的每个事件的触发顺序。const moveBox = document.querySelector('.move');
moveBox.onmousedown = function (evt) { console.log('触发鼠标按下')
moveBox.onmousemove = function (evt) {console.log('触发鼠标拖动')
}
}function moveBoxClick(e) { console.log('触发click')
}
moveBox.onmouseup = function () { console.log('触发鼠标抬起')
}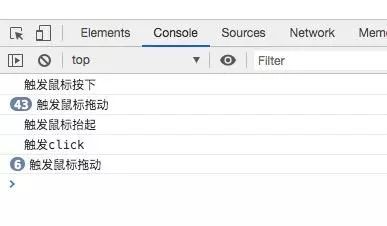 通过控制台的输出情况,我们就可以看到鼠标点击后的各个事件触发情况:
首先执行的是 mousedown 事件,然后是 mousemove 事件,再然后是 mouseup 事件,最后是 click 事件。
通过控制台的输出情况,我们就可以看到鼠标点击后的各个事件触发情况:
首先执行的是 mousedown 事件,然后是 mousemove 事件,再然后是 mouseup 事件,最后是 click 事件。
知道了事件的触发顺序,我们就可以通过设置一个变量 isMove 来区分开鼠标的拖动事件和点击事件,每次鼠标按下的时候我们将 isMove 复原,鼠标移动的时候将 isMove 的状态改变。
因为每次触发 click 事件的时候也都会去先去触发 mousedown 事件,所以我们在 click 事件里增加一个判断,鼠标移动时,不触发 click 事件。这样就可以把 click 事件和 mousedown 事件区分开来,实现 mousedown 和 click 事件的隔离。
click 事件增加判断function moveBoxClick(e) {
// 点击采宝
const target = document.querySelector(".move");
const smallImg = document.querySelector(".small-img");
const magnifyImg = document.querySelector(".magnify-img");
// 点击move盒子
if (!isMove) {
if (isBig) {
smallImg.style.display = "block";
magnifyImg.style.display = "none";
target.style.width = "32px";
} else {
smallImg.style.display = "none";
magnifyImg.style.display = "block";
target.style.width = "130px";
}
isBig = !isBig;
}
}
mousedown 事件重置 isMove 和 mousemove 改变 isMove
let isMove = false; // 是否是拖动
let isBig = false; // 是否是变大的盒子
let isMove = false; // 判断是否移动采宝
smallImg.onmousedown = magnifyImg.onmousedown = function(evt) {
  isMove = false; // 每次鼠标按下时,重置isMove
document.onmousemove = function(e) {
    isMove = true; // 每次鼠标移动时,改变isMove
  };
};
(二)采宝显示在屏幕边界时被遮挡显示不全
我们在拖动采宝时,判断采宝拖动的当前定位坐标是否超出了当前显示屏的高度和宽度,我们需要限制采宝拖动的最大距离。小采宝在点击放大时,也需要做一下处理,把采宝全部显示出来。
拖动时const moveBox = document.querySelector(".move");
const smallImg = document.querySelector(".move .small-img");
const magnifyImg = document.querySelector(".move .magnify-img");
let isMove = false; // 是否是拖动
let isBig = false; // 是否是变大的盒子
smallImg.onmousedown = magnifyImg.onmousedown = function(evt) {
// 拖动div盒子
const clientX = evt.clientX;
const clientY = evt.clientY;
const pageX = moveBox.offsetLeft;
const pageY = moveBox.offsetTop;
const x = clientX - pageX;
const y = clientY - pageY;
document.onmousemove = function(e) {
// 拖动后采宝的坐标
let _x = e.clientX - x;
let _y = e.clientY - y;
const boxWidth = moveBox.offsetWidth;
const boxHeight = moveBox.offsetHeight;
if (_x < 0) {
_x = 0;
}
// X坐标的最大值
if (_x > window.screen.width - boxWidth) {
_x = window.screen.width - boxWidth;
}
if (_y < 0) {
_y = 0;
}
// Y坐标的最大值
if (_y > document.documentElement.clientHeight - boxHeight) {
_y = document.documentElement.clientHeight - boxHeight;
}
};
};
小采宝在边界放大时
// 点击时,判断采宝是否超出显示屏
function autoPotion () {
let x = moveBox.offsetLeft;
let y = moveBox.offsetTop;

if (x < 0) {
    x = 0;
  } else if (x > document.documentElement.clientWidth - moveBox.offsetWidth) {
    x = document.documentElement.clientWidth - moveBox.offsetWidth;
  }

if (y < 0) {
    y = 0;
  } else if (y > document.documentElement.clientHeight - moveBox.offsetHeight) {
    y = document.documentElement.clientHeight - moveBox.offsetHeight;
  }

  moveBox.style.left = x + "px";
  moveBox.style.top = y + "px";
}
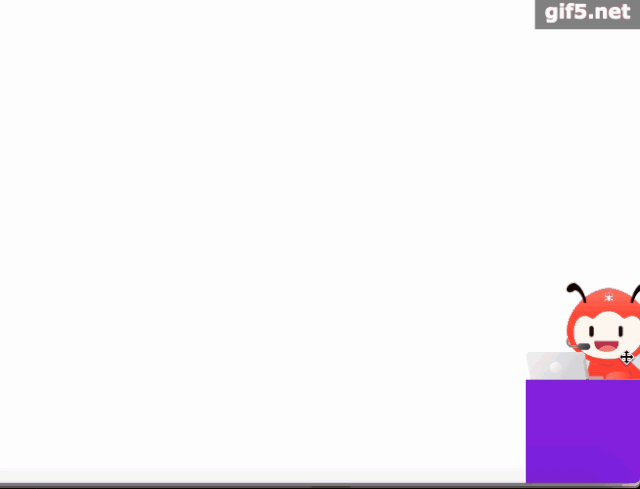
(三)采宝放大和缩小后,位置发生变化
通过上图,我们可以看到,当小采宝处在显示屏边界时,点击放大后再点击缩小,我们发现采宝的位置发生了变化。这个是因为采宝是根据左上角的坐标来定位的,当小采宝移动到右下角时,点击放大以后,采宝左上角的坐标发生了变化,这样就使得采宝在放大缩小时,位置在发生变化。所以,我们在采宝移动完成时需要记录采宝左上角的坐标,在点击时,需要将采宝上次移动完成的坐标重新赋值给采宝,这样就使得采宝在放大缩小时,位置不会发生变化。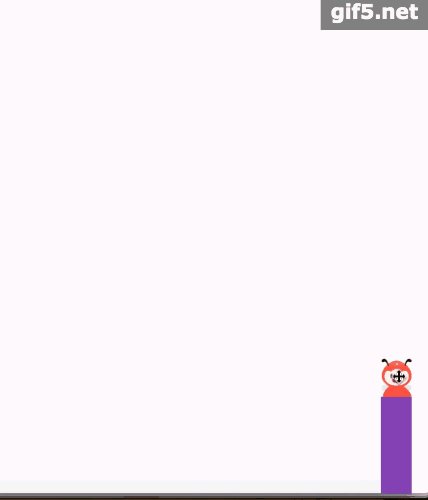
这样,我们把每次 mouseup 事件的时候记录下采宝的位置,这样我们解决了采宝放大缩小时位置发生变化的问题。
完整的代码
HTML:<div class="box">
<div class="move">
<imgonclick="moveBoxClick()"class="small-img"draggable="false"src="https://zcy-cdn.oss-cn-shanghai.aliyuncs.com/f2e-assets/103bbf76-6248-421c-a3d6-28a525c459db.png"alt=""
/>
<imgonclick="moveBoxClick()"class="magnify-img"draggable="false"src="https://zcy-cdn.oss-cn-shanghai.aliyuncs.com/f2e-assets/90e26f49-9824-4443-b4aa-8aa64a3c8690.png"alt=""
/>
<div class="content">div>
div>
div>
JavaScript
const moveBox = document.querySelector(".move");
const smallImg = document.querySelector(".move .small-img");
const magnifyImg = document.querySelector(".move .magnify-img");
var initX = 0; // 记录小采宝的x坐标
var initY = 0; // 记录小采宝的y坐标
let isMove = false; // 是否是拖动
let isBig = false; // 是否是变大的盒子

smallImg.onmousedown = magnifyImg.onmousedown = function(evt) {
// 拖动div盒子
const clientX = evt.clientX;
const clientY = evt.clientY;
const pageX = moveBox.offsetLeft;
const pageY = moveBox.offsetTop;
const x = clientX - pageX;
const y = clientY - pageY;

  isMove = false;

document.onmousemove = function(e) {
const boxWidth = moveBox.offsetWidth;
const boxHeight = moveBox.offsetHeight;
let _x = e.clientX - x;
let _y = e.clientY - y;
if (_x < 0) {
      _x = 0;
    }
if (_x > window.screen.width - boxWidth) {
      _x = window.screen.width - boxWidth;
    }
if (_y < 0) {
      _y = 0;
    }
if (_y > document.documentElement.clientHeight - boxHeight) {
      _y = document.documentElement.clientHeight - boxHeight;
    }

if (isBig) {
      initX = _x;
      initY = _y;
    }

    moveBox.style.left = _x + "px";
    moveBox.style.top = _y + "px";

    isMove = true;
  };
};


document.onmouseup = function() {
if (isMove) {
    initX = moveBox.offsetLeft;
    initY = moveBox.offsetTop;
  }
document.onmousemove = null;
};

function moveBoxClick(e) {
const target = document.querySelector(".move");
const smallImg = document.querySelector(".small-img");
const magnifyImg = document.querySelector(".magnify-img");
// 点击move盒子
if (!isMove) {
if (isBig) {
      smallImg.style.display = "block";
      magnifyImg.style.display = "none";
      target.style.width = "32px";
      target.style.left = initX + 'px';
      target.style.top = initY + 'px';
    } else {
      smallImg.style.display = "none";
      magnifyImg.style.display = "block";
      target.style.width = "130px";
    }
    isBig = !isBig;

    setTimeout(() => {
      autoPotion();
    }, 100)
  }
}

// 点击时,判断采宝是否超出显示屏
function autoPotion () {
let x = moveBox.offsetLeft;
let y = moveBox.offsetTop;

if (x < 0) {
    x = 0;
  } else if (x > document.documentElement.clientWidth - moveBox.offsetWidth) {
    x = document.documentElement.clientWidth - moveBox.offsetWidth;
  }

if (y < 0) {
    y = 0;
  } else if (y > document.documentElement.clientHeight - moveBox.offsetHeight) {
    y = document.documentElement.clientHeight - moveBox.offsetHeight;
  }

  moveBox.style.left = x + "px";
  moveBox.style.top = y + "px";
}
❤️ 最后
如果你觉得这篇内容对你有帮助,点个「在看」,让更多的人也能看到这篇内容(喜欢不点在看,都是耍流氓 -_-)


 2429
2429


 被折叠的 条评论
为什么被折叠?
被折叠的 条评论
为什么被折叠?
 到【灌水乐园】发言


