前言

前一篇实现了OpenCV推理ResNet18, 这一篇采用腾讯的NCNN框架实现ResNet18推理。

一、准备
1、 NCNN编译及安装

同OpenCV推理一样,首先需要准备NCNN,NCNN源码编译及安装可参考:

2、其他环境
Windows10
visual Studio 2019
  • 1.
  • 2.
二、NCNN推理ResNet18
1、模型转换

前面已经讲过如何将训练好的模型转换为ONNX格式,要采用NCNN完成推理,还需要进一步将ONNX格式模型转换成NCNN格式,如*.param, *.bin 。

param相应的格式说明可以参考:


ONNX模型转换为NCNN格式可以参考:


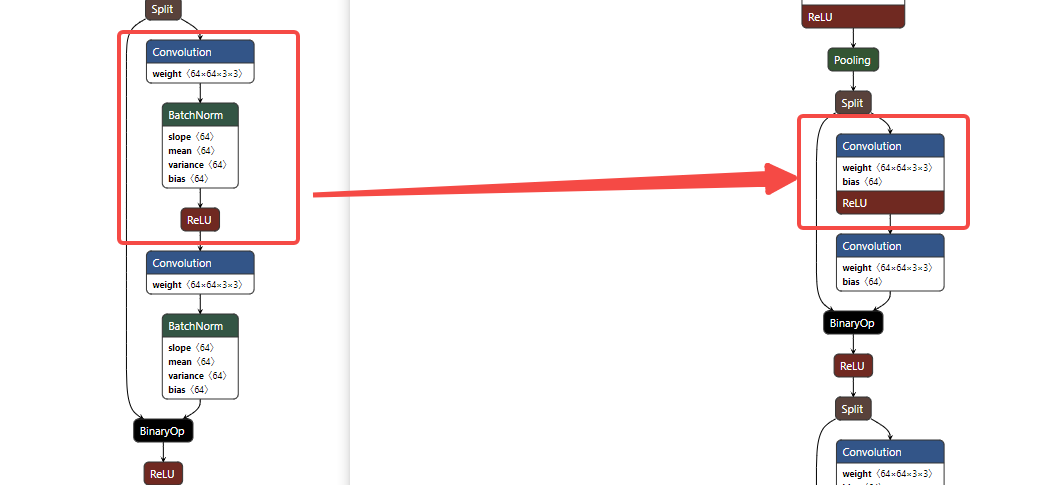
通常转换后都会调用ncnnoptimize对其进行优化,可以看到大小和参数量都会变少,这是因为对ncnn模型中部分算子进行合并优化等

NCNN推理ResNet18_ai

以下是转换为param和简化后param的部分视图

NCNN推理ResNet18_ai_02

2、模型加载
#include "ncnn/net.h"

    ncnn::Net net;
    // net.opt.use_vulkan_compute = true;
	 1.Load model
	 --- method 1 ---
	//net.load_param(paramPath.c_str());
	//net.load_model(binPath.c_str());

	 --- method 2 ---
	//net.load_param_bin(paramBinPath.c_str());
	//net.load_model(binPath.c_str());

	 --- method 3 ---
	// // need #inlucde "test_sim.mem.h"
	//net.load_param(test_sim_param_bin);
	//net.load_model(test_sim_bin);

	 --- method 4 --- 
	// Load Model
	// net.opt.use_vulkan_compute = true;

	FILE* fp = fopen(modelPath.c_str(), "rb");
	net.load_param_bin(fp);
	net.load_model(fp);
	fclose(fp);

	const std::vector<ncnn::Blob>& netBlobs = net.blobs();
	const std::vector<ncnn::Layer*>& netLayers = net.layers();
	std::cout << " blobs: " << netBlobs.size() << " layers: " << netLayers.size() << std::endl;
  • 1.
  • 2.
  • 3.
  • 4.
  • 5.
  • 6.
  • 7.
  • 8.
  • 9.
  • 10.
  • 11.
  • 12.
  • 13.
  • 14.
  • 15.
  • 16.
  • 17.
  • 18.
  • 19.
  • 20.
  • 21.
  • 22.
  • 23.
  • 24.
  • 25.
  • 26.
  • 27.
  • 28.
  • 29.
  • 30.

最后输出的blobs数量和layers数量能对应上param里面的数据,即表示加载成功。

3、数据预处理

还是依照python脚本对数据进行预处理

NCNN推理ResNet18_语言模型_03

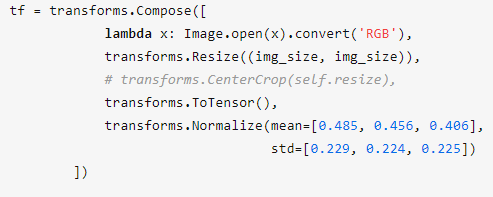
这里采用NCNN自带的一些处理工具,所以预处理转为C++代码如下所示

cv::Mat cvImg= cv::imread("./test.png");
if (cvImg.empty()) {
	// read img failed
	return false;
}
ncnn::Mat in = ncnn::Mat::from_pixels_resize(cvImg.data, ncnn::Mat::PIXEL_BGR2RGB, cvImg.cols, cvImg.rows, targetSize, targetSize);
const float MEANS[3] = { 123.675, 116.28, 103.53 };
const float STD[3] = { 1.0 / 58.395, 1.0 / 57.120, 1.0 / 57.375 }; 
input.substract_mean_normalize(MEANS, STD);
  • 1.
  • 2.
  • 3.
  • 4.
  • 5.
  • 6.
  • 7.
  • 8.
  • 9.

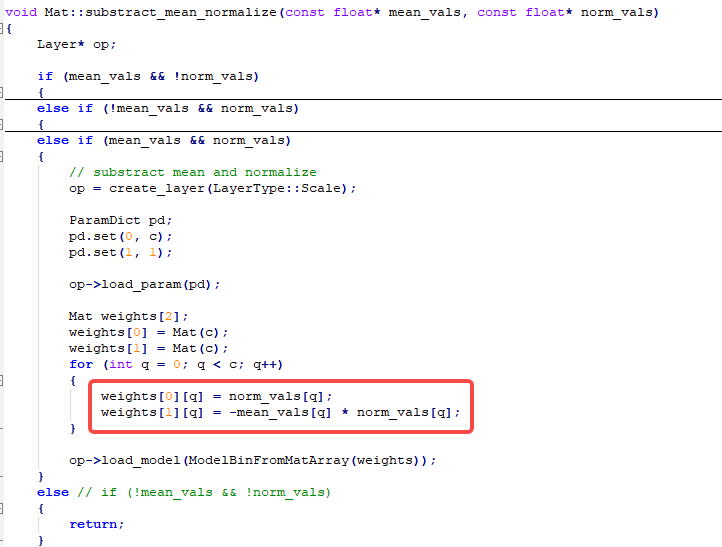
里面from_pixels_resize接口将CV::Mat cvImg 通道格式由BGR转换为RGB,并由(cvImg.cols, cvImg.rows)缩放至(targetSize, targetSize)大小。

后面substract_mean_normalize接口实现归一化, 注意:这里没有先除255.0将像素值归一化到[0, 1],所以相应的值乘了255,而STD这里采用倒数,是该接口里面是采用乘法

NCNN推理ResNet18_ai_04

4、模型推理

前面已经加载好了模型,并且数据进行了转换,接下来进行推理

ncnn::Extractor ex = net.create_extractor();
ex.set_num_threads(4);  
ex.input("input", input);
ncnn::Mat out;
ex.extract("output", out);
  • 1.
  • 2.
  • 3.
  • 4.
  • 5.

模型的推理结果已经存储到ncnn::Mat out里面,接下来对其进行解析即可得到类型。

ncnn::Layer* sigmoid = ncnn::create_layer("Sigmoid");
ncnn::ParamDict pd;
sigmoid->load_param(pd);

sigmoid->forward_inplace(out, net.opt);
float* outPtr = out.channel(0);   // here just deal with 2 class

int classId;
if (outPtr[0] > outPtr[1]) {
   classId = 0;
}
else {
   classId = 1;
}
  • 1.
  • 2.
  • 3.
  • 4.
  • 5.
  • 6.
  • 7.
  • 8.
  • 9.
  • 10.
  • 11.
  • 12.
  • 13.
  • 14.

以上操作对结果进行了sigmoid操作,输出的outPtr及对应类别的置信度。