一.tomcat管理端

tomcat管理端:web页面管理与查看tomcat信息,(生产环境一般都关闭)

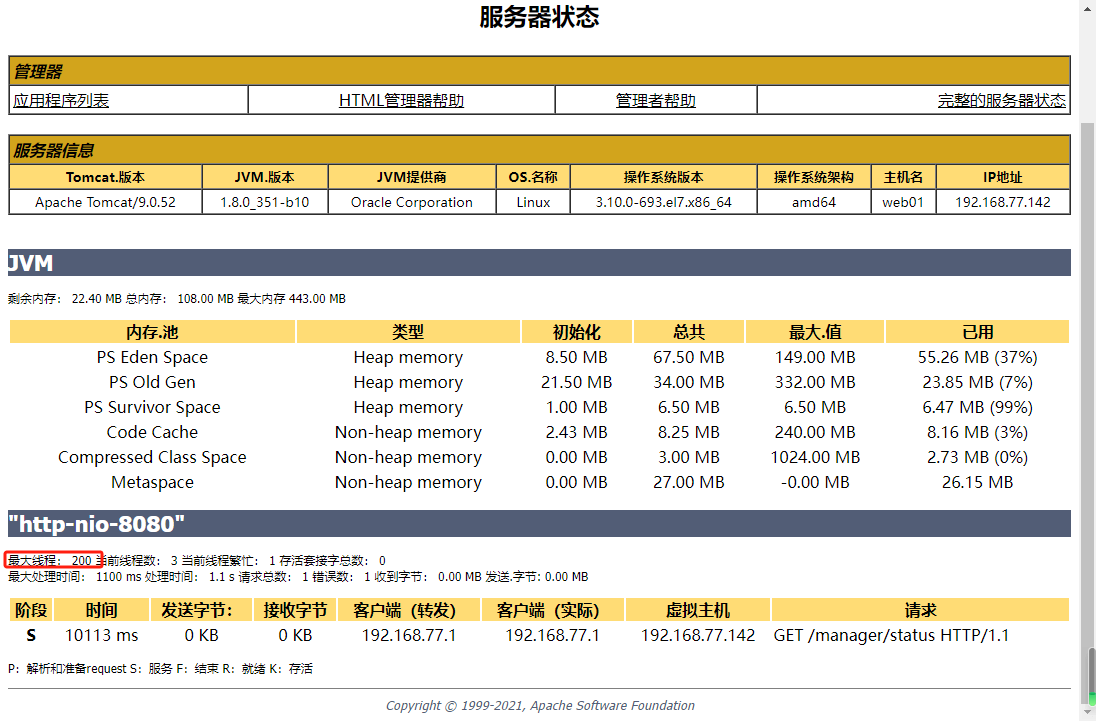
浏览器访问http://192.168.77.142:8080/manager/status会提示权限阻止,需要manager-gui权限,修改conf/tomcat-users.xml 

#修改配置文件,添加一个tomcat用户,权限是admin-gui和manager-gui
cat /app/tools/tomcat/conf/tomcat-users.xml
<?xml version="1.0" encoding="UTF-8"?>
<tomcat-users xmlns="http://tomcat.apache.org/xml"
              xmlns:xsi="http://www.w3.org/2001/XMLSchema-instance"
              xsi:schemaLocation="http://tomcat.apache.org/xml tomcat-users.xsd"
              version="1.0">
   <role rolename="manager-gui"/>
   <role rolename="admin-gui"/>
   <user username="tomcat" password="123456" roles="manager-gui,admin-gui"/>
</tomcat-users>

#重启tomcat
systemctl restart tomcat
  • 1.
  • 2.
  • 3.
  • 4.
  • 5.
  • 6.
  • 7.
  • 8.
  • 9.
  • 10.
  • 11.
  • 12.
  • 13.
  • 14.

tomcat8.5之后默认只允许127.0.0.1访问,测试

curl -u tomcat:123456 http://127.0.0.1:8080/manager/status
  • 1.

解除默认127.0.0.1访问限制

cd /app/tools/tomcat/webapps
sed -i 's#127#\\d+#g' ./host-manager/META-INF/context.xml
sed -i 's#127#\\d+#g' ./manager/META-INF/context.xml  
sed -i 's#127#\\d+#g' ./host-manager/WEB-INF/manager.xml

systemctl restart tomcat
  • 1.
  • 2.
  • 3.
  • 4.
  • 5.
  • 6.

浏览器访问http://192.168.77.142:8080/manager/status

tomcat相关概念与部署(续1)nginx代理tomcat_代理

二.tomcat配置文件

1.tomcat端口说明

8080/8443

web页面默认端口 http8080  https8443

8005

默认只能127.0.0.1访问,是shutdown端口,关闭tomcat使用


8009

ajp协议使用的端口,用于与apache连接使用

2.server.xml

cd /app/tools/tomcat
sed '/<!--.*-->/d;/^$/d;/<!--/,/-->/d' conf/server.xml

<?xml version="1.0" encoding="UTF-8"?>

#8005端口 shutdown端口
<Server port="8005" shutdown="SHUTDOWN">
  <Listener className="org.apache.catalina.startup.VersionLoggerListener" />
  <Listener className="org.apache.catalina.core.AprLifecycleListener" SSLEngine="on" />
  <Listener className="org.apache.catalina.core.JreMemoryLeakPreventionListener" />
  <Listener className="org.apache.catalina.mbeans.GlobalResourcesLifecycleListener" />
  <Listener className="org.apache.catalina.core.ThreadLocalLeakPreventionListener" />
#tomcat管理端配置 
  <GlobalNamingResources>
    <Resource name="UserDatabase" auth="Container"
              type="org.apache.catalina.UserDatabase"
              description="User database that can be updated and saved"
              factory="org.apache.catalina.users.MemoryUserDatabaseFactory"
              pathname="conf/tomcat-users.xml" />
  </GlobalNamingResources>
  
  <Service name="Catalina">
#连接器 用户请求通过连接器计入tomcat,然后经过tomcat处理,8080web默认http端口,8443web默认https端口
    <Connector port="8080" protocol="HTTP/1.1"
               connectionTimeout="20000"
               redirectPort="8443" />
#默认主机网站
    <Engine name="Catalina" defaultHost="localhost">
      <Realm className="org.apache.catalina.realm.LockOutRealm">
        <Realm className="org.apache.catalina.realm.UserDatabaseRealm"
               resourceName="UserDatabase"/>
      </Realm>
#Host name 域名 
#appBase 默认站点目录
#unpackWARs 自解压tar包
#autoDeploy 自动部署
      <Host name="localhost"  appBase="webapps"
            unpackWARs="true" autoDeploy="true">
#配置tomcat访问日志
        <Valve className="org.apache.catalina.valves.AccessLogValve" directory="logs"
#日志文件名的格式 前缀后缀
               prefix="localhost_access_log" suffix=".txt"
#日志里面的内容"表示双引号
               pattern="%h %l %u %t "%r" %s %b" />
      </Host>
    </Engine>
  </Service>
</Server>
  • 1.
  • 2.
  • 3.
  • 4.
  • 5.
  • 6.
  • 7.
  • 8.
  • 9.
  • 10.
  • 11.
  • 12.
  • 13.
  • 14.
  • 15.
  • 16.
  • 17.
  • 18.
  • 19.
  • 20.
  • 21.
  • 22.
  • 23.
  • 24.
  • 25.
  • 26.
  • 27.
  • 28.
  • 29.
  • 30.
  • 31.
  • 32.
  • 33.
  • 34.
  • 35.
  • 36.
  • 37.
  • 38.
  • 39.
  • 40.
  • 41.
  • 42.
  • 43.
  • 44.
  • 45.
  • 46.
  • 47.
  • 48.

3.修改访问日志格式 

记录跳转信息和客户端浏览器

vim /app/tools/tomcat/conf/server.xml
改
pattern="%h %l %u %t "%r" %s %b"
为
pattern="%h %l %u %t "%r" %s %b %D "%{Referer}i" "%{User-Agent}i""
  • 1.
  • 2.
  • 3.
  • 4.
  • 5.

4.tomcat/webapps目录哪些文件可以删除

未运行站点时,所有文件都可以删除。

docs目录:Tomcat介绍和操作文档
examples:程序示例
host-manager:有关host管理的
manager:有关server status、applications、应用启动、重启、关闭、Session、JVM 性能参数等监听并管理等操作
ROOT:根目录
  • 1.
  • 2.
  • 3.
  • 4.
  • 5.

三.部署zrlog博客

 zrlog官方地址

1.db01部署mariadb数据库  db01服务器IP 192.168.77.139
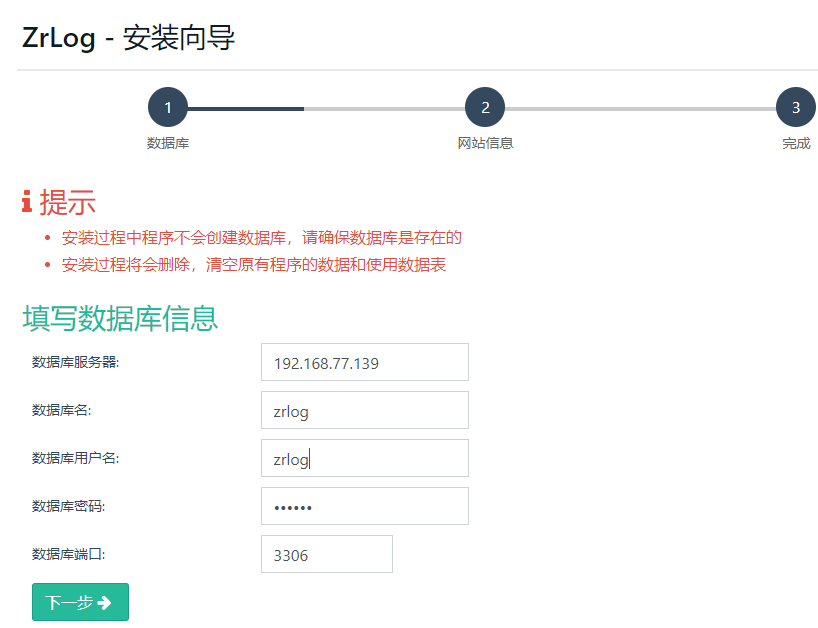
#安装marisdb数据库并启动
yum install -y mariadb-server
systemctl enable mariadb
systemctl start mariadb

#关闭防火墙
systemctl stop firewalld
systemctl disable firewalld

#初始的配置,设置Mysql密码为123456 一路Y
mysql_secure_installation

#进入数据库,创建zrlog数据库
mysql -uroot -p123456
create database zrlog charset utf8;
show databases;

##创建用户zrlog管理所有数据库
grant all on *.* to zrlog@'localhost' identified by '123456';
grant all on *.* to zrlog@'%' identified by '123456';
  • 1.
  • 2.
  • 3.
  • 4.
  • 5.
  • 6.
  • 7.
  • 8.
  • 9.
  • 10.
  • 11.
  • 12.
  • 13.
  • 14.
  • 15.
  • 16.
  • 17.
  • 18.
  • 19.
  • 20.

2.web01服务器上部署zrlog

上传zrlog-2.1.11-99a5759-release.war到/root 并重命名zrlog.war

cd /root
mv zrlog-2.1.11-99a5759-release.war zrlog.war
mv zrlog.war /app/tools/tomcat/webapps/
  • 1.
  • 2.
  • 3.

安装日志在catalina.out中查看

tailf -n100 /app/tools/tomcat/logs/catalina.out
  • 1.

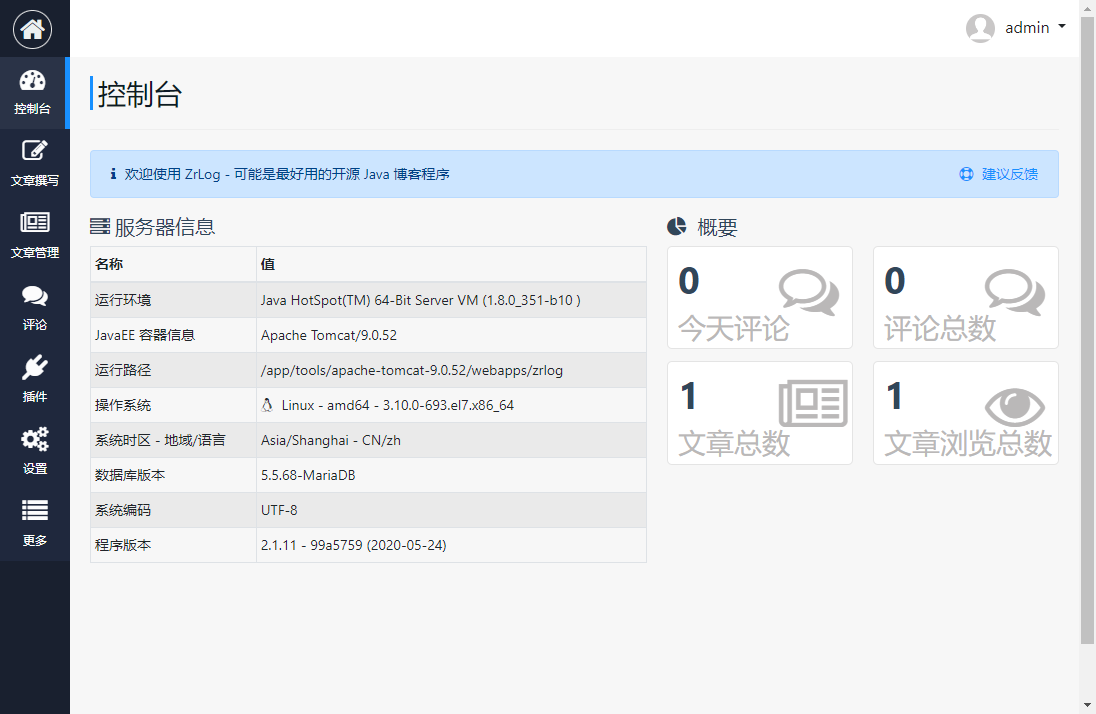
浏览器访问http://192.168.77.142:8080/zrlog

#后台配置数据库文件
cd /app/tools/tomcat/webapps
vim zrlog/WEB-INF/db.properties
  • 1.
  • 2.
  • 3.

tomcat相关概念与部署(续1)nginx代理tomcat_tomcat_02

后台地址http://192.168.77.142:8080/zrlog/admin

tomcat相关概念与部署(续1)nginx代理tomcat_tomcat_03

3.tomcat访问路径配置

访问站点不加端口使用80,而且不加站点名称?


#webapps下除了站点目录,其余全部可以删除
#停止tomcat
systemctl stop tomcat
#更改80端口,增加<Context path="" docBase="zrlog" />
vim /app/tools/tomcat/conf/server.xml
改
69     <Connector port="8080" protocol="HTTP/1.1"
为
69     <Connector port="80" protocol="HTTP/1.1"
改
153             unpackWARs="true" autoDeploy="true">
为
153             unpackWARs="true" autoDeploy="true">
154             <Context path="" docBase="zrlog" />
#zrlog是站点名称
#重启tomcat
systemctl restart tomcat
  • 1.
  • 2.
  • 3.
  • 4.
  • 5.
  • 6.
  • 7.
  • 8.
  • 9.
  • 10.
  • 11.
  • 12.
  • 13.
  • 14.
  • 15.
  • 16.
  • 17.

浏览器测试 http://192.168.77.142

四.nginx代理tomcat

场景:tomcat在内网部署1台或多台,只有一个外网IP,可以外网部署nginx,使用nginx做7层代理。
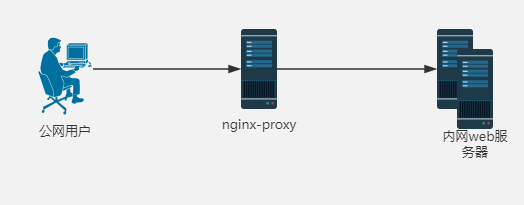
tomcat相关概念与部署(续1)nginx代理tomcat_代理_04

服务器proxy   

192.168.77.143

服务器web01

192.168.77.142

proxy配置nginx的yum源

cat >>/etc/yum.repos.d/nginx.repo<<'EOF'
[nginx]
name=nginx repo
baseurl=https://nginx.org/packages/mainline/centos/$releasever/$basearch/
gpgcheck=0
enabled=1
EOF
yum -y install nginx
systemctl start nginx
systemctl enable nginx
  • 1.
  • 2.
  • 3.
  • 4.
  • 5.
  • 6.
  • 7.
  • 8.
  • 9.
  • 10.

proxy编辑代理配置文件,监听143的80,然后转发给142的80。

#增加代理配置文件,
cd /etc/nginx/conf.d/
mv default.conf /tmp/
cat> zrlog.conf<<'EOF'
server {
  listen 80;
  server_name 192.168.77.143;
  error_log /var/log/nginx/zrlog-error.log notice;
  access_log /var/log/nginx/zrlog-access.log main;
  location / {
      proxy_pass http://192.168.77.142:80;
      proxy_set_header Host $host;
      proxy_set_header X-Real-IP $remote_addr;
      proxy_set_header X-Forwarded-For $proxy_add_x_forwarded_for;
  }
}
EOF
#检查nginx语法重启nginx
nginx -t
nginx -s reload
#关闭防火墙
systemctl stop firewalld
systemctl disable firewalld
  • 1.
  • 2.
  • 3.
  • 4.
  • 5.
  • 6.
  • 7.
  • 8.
  • 9.
  • 10.
  • 11.
  • 12.
  • 13.
  • 14.
  • 15.
  • 16.
  • 17.
  • 18.
  • 19.
  • 20.
  • 21.
  • 22.
  • 23.

另外web服务器有多台可以使用7层代理

#增加代理配置文件,
cd /etc/nginx/conf.d/
mv default.conf /tmp/
cat> zrlog.conf<<'EOF'
upstream zrlog {
    server 192.168.77.142:80;
    server 192.168.77.141:80;
    }
    server {
       listen 80;
       server_name 192.168.77.143;
       error_log /var/log/nginx/zrlog-error.log notice;
       access_log /var/log/nginx/zrlog-access.log main;
       location / {
           proxy_pass http://zrlog;
           proxy_set_header Host $host;
           proxy_set_header X-Real-IP $remote_addr;
           proxy_set_header X-Forwarded-For $proxy_add_x_forwarded_for;
  }
}
EOF
#检查nginx语法重启nginx
nginx -t
nginx -s reload
#关闭防火墙
systemctl stop firewalld
systemctl disable firewalld
  • 1.
  • 2.
  • 3.
  • 4.
  • 5.
  • 6.
  • 7.
  • 8.
  • 9.
  • 10.
  • 11.
  • 12.
  • 13.
  • 14.
  • 15.
  • 16.
  • 17.
  • 18.
  • 19.
  • 20.
  • 21.
  • 22.
  • 23.
  • 24.
  • 25.
  • 26.
  • 27.

浏览器访问http://192.168.77.143/      报502 Bad Gateway

tomcat相关概念与部署(续1)nginx代理tomcat_nginx_05

原因是web01上tomcat没有开启或者web01上防护墙限制或安全组限制访问web01的80端口

#web01开启tomcat
systemctl start tomcat
#web01关闭防护墙
systemctl stop tomcat
#防火墙或安全组限制排查后开启
  • 1.
  • 2.
  • 3.
  • 4.
  • 5.