


文章目录
之前紧凑慢凑强行拼凑出了一个测试文件夹,内含好多函数得测试代码。
现在腾出手来了,发现之前写的,python的测试框架 - pytest 简版教程
阅读之后就是这种感觉:嗯??我是谁?我在哪?我在干什么?
我怎么把测试数据和测试代码写在一块了?
改改改。
提前恭喜通篇看完的你,恭喜你的脑子已经掌握了 pytest 的大部分知识点[撒花]
update: 2021/03/22
之前有一处地方没有很好的理解或者说是解决办法。
就是用 pytest 写正常流测试用例没有问题,但是一旦设计有异常测试流用例呢?
早先的做法是:正常流输出 . (PASSED),异常流流输出 F(Failed)。
接着错误的理解了 xfail 之后:正常流输出 . (PASSED),异常流流输出 x(xfail)。
正确的理解了 xfail 之后,又回到了之前的输出。但是,测试输出不应该是这样。
一旦测试的结果输出是 failed 之后,要么是被测的代码有问题,要么是测试代码有问题。(往往问题出现在前者)
所以,我需要设计的是,手动定义的异常流输出也应该是 . (PASSED)。
好家伙,问题分析透彻了,具体该怎么做?
一直百思不得其解,知道我看到了这个 behavior-driven-python/pytest-bdd/tests/step_defs/test_unit_basic.py :
@then_cukes(parsers.re(r'"(?P<some>\d+)" cucumbers cannot be removed from the basket'))
def cannot_remove_more(basket, some):
    count = basket.count  # 1
    try:
        basket.remove(some)  # some = 2
    except ValueError as e:
        assert str(e) == "Attempted to remove too many cucumbers"
        assert count == basket.count, "Cucumber count changed despite overdraw"
    except:
        assert False, "Exception raised for basket overdraw was not a ValueError"
    else:
        assert False, "ValueError was not raised for basket overdraw"
这是一个捕捉异常的用例,count 为1,some 为2,basket 中只有 1 根黄瓜,想要拿掉 2 根,就会触发异常。
当 basket.remove(some) 触发异常之后,会抛出 ValueError("Attempted to remove too many cucumbers") 的异常。
重点来了,它代码中的 assert 是 assert str(e) == "Attempted to remove too many cucumbers"。
众所周知,assert 后面表达式为 False 的时候,会触发异常。
但是上面的代码不是啊,assert 后面的表达式是 True 啊~~~
这就不会触发异常,测试代码也就完美的预判了我的预判:给定错误的测试用例,判断错误异常等于自己设定好的异常,最后测试通过。

update: 2021/03/11
之前对 pytest 中得 xfail 理解上出现了点问题。
官方:

也就是说,当你得被测代码有问题还没有修复,那么在修复该问题之前,应该使用 xfail, 当你的问题修复了之后,需要将这个标记删除。
0x01 pytest 的进一步学习
1. 初衷
之前的测试用例中,数据和测试函数紧耦合,感觉就像将破碎的盘子强行用胶水粘在一起,
根本没有利用到 pytest 的强大之处 - fixture。也没有符合 python 的美学。。。
这一回抽个时间,好好的捋一捋,如何用 pytest 写项目测试
之前是明白了 pytest 得功能以及使用方法,现在尝试与具体得实际项目结合。
这篇文章主要目的是将测试用例和测试代码分离开,顺便记录一下新学得知识
2. 之前写的代码
该处我用的是折叠手法,但是 csdn 不支持折叠,请各位看官直接往下拉就好
被测函数:download_from_gitlab()
def download_from_gitlab(url, cwd):
    # filename of downloading file
    down_file = os.path.basename(url)
    # compress filename
    zip_name = os.path.join(down_file, "SConscript.zip")

    # if the file is existed, delete it first.
    if os.path.exists(down_file):
        shutil.rmtree(down_file, onerror=readonly_handler)
    cmd = "git clone {}".format(url)
    down_status = subprocess.call(cmd)
    if down_status != 0:
        raise Exception("Failed download from gitlab???")
    logging.info("Download files from gitlab successfully...")

    # unzip, if file have unzipped, the files would be overwritten by the
    # downloaded files and the original file would be retained
    try:
        with zipfile.ZipFile(zip_name, "r") as zip_ref:
            zip_ref.extractall(cwd)
    except Exception:
        raise Exception("Failed to unzip???")

    # remove dir, there is "shared_files"
    shutil.rmtree(down_file, onerror=readonly_handler)
    logging.info("Removing the downloaded files successfully...")
    return
原本的测试函数:
import os
import sys
sys.path.append("..")
import shutil
import pytest
from download_files import download_from_gitlab

def readonly_handler(func, path, ):
    # Change the mode of file, to make it could be used of shutil.rmtree
    os.chmod(path, 128)
    func(path)

def setup_function():
    """ 在测试之前生成 tmp_cwd 文件夹,存放从gitlab中下载的文件"""
    # 在每一个测试函数之前运行
    os.mkdir("tmp_cwd")

def teardown_function():
    """ 在测试之后删除 tmp_cwd 文件夹"""
    shutil.rmtree("tmp_cwd", onerror=readonly_handler)

@pytest.mark.parametrize("url, cwd",
                        [("https://gitee.com/lebhoryi/shared_files", "tmp_cwd")])  # true true
def test_download_from_gitlab(url, cwd):
    # 正常流
     _ = download_from_gitlab(url, cwd)

    file_list = ["Middlewares", "RT-AI", "X-CUBE-AI"]
    for file in file_list:
        assert os.path.exists(os.path.join(cwd, file))

if __name__ == "__main__":
    pytest.main(["-q", "-s", f"{__file__}"])
在原本的测试函数中,仅用到了三个点:
-
setup_function()每一个测试函数之前运行 -
teardown_function()每一个测试函数结束之后运行 -
@pytest.mark.parametrize()传参
3. 想要的几个功能 - 进阶学习
本章节之后都是按照功能先后来排版的
-
将被测代码中的raise或者assert的测试结果显示为xfail,而不是.表示。 - 有一些被测函数运行之前需要另外的函数,比如创建一个文件夹,但是我只想运行一次,而不是每一个测试用例都运行。体现在作用域
- 取消
setup和teardown写法,转用pytest独创写法,利用fixture装饰器 - 测试数据和测试代码分离,我贼想要掌握的一个点
- 共享的
fixture, 举个例子,我有多个测试文件,要共用一个创建文件夹的函数,就需要这个了,利用conftest.py - 利用
pytest.ini
4. pytest 常用的几个参数
| Params | Describe |
|---|---|
| -v | 输出详细的信息,包括 pytest 版本、测试代码、测试数据等 |
| -q | 只输出测试结果,-v 的相反参数,最简化输出 |
| -m | 仅对标记测试代码执行测试,@pytest.mark.xxx 应该出现在代码中 |
| -s | 显示测试用例中的 print 内容 |
| -rs | 显示出背忽略执行的测试代码的详细信息 |
| –tb | no: 不显示任何报错信息; line: 一行显示报错信息; short: 输出assert的一行和系统判断内容;auto: 只打印第一个和最后一个报错信息 |
| -x | 在某个中断测试用例结束后,不继续往下运行测试代码 |
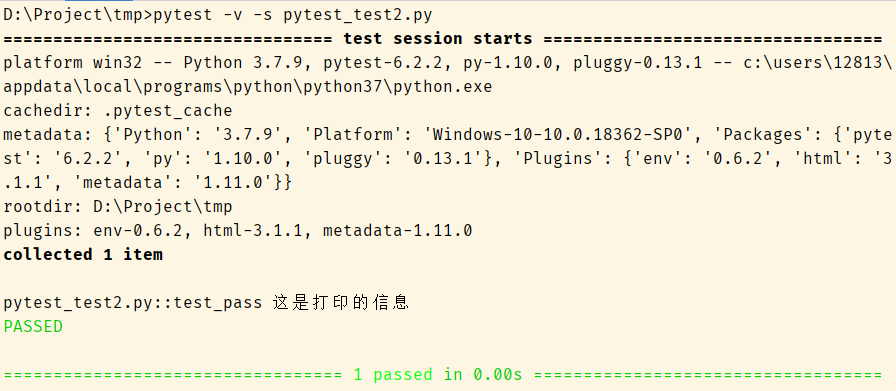
# pytest_test2.py

import pytest

def test_pass():
    print("这是打印的信息")
    assert 5 == 5

0x02 xfail
我需要检测出被测代码中的 assert 或者 raise 异常,并且输出为 xfail,而不是全部输出为 .
1. 六个输出结果
在 xfail 中有六个测试结果输出,分别是:
| Status | Show | Describe |
|---|---|---|
| PASSED | . | 测试成功,也没啥好说的,正常用例测试通过 |
| FAILED | F | 测试失败,也没啥好说的,你的被测代码有问题 |
| xfail | x | 预期测试失败,被测代码有问题尚未修复,@pytest.mark.xfail() |
| SKIPPED | s | 跳过测试用例,@pytest.mark.skip() 或 @pytest.mark.skipif(), 还没用到过 |
| XPASS | X | 预期测试失败,但是测试代码意外通过,见下方代码例子 |
| ERROR | E | 错误,也没啥好说的,你的测试代码或者数据有问题 |
2. 代码
# pytest_test2.py

import pytest

@pytest.mark.xfail()
def test_pass():
    assert 2 == 5

@pytest.mark.xfail()
def test_pass2():
    assert 5 == 5

3. 其他
xfail 的一些参数:详细请看官方文档
-
condition, 必须搭配 reason
只在windows 运行的测试用例:
@pytest.mark.xfail(sys.platform == "win32", reason="bug in a 3rd party library") def test_function(): ... -
reason
-
raises
-
run
-
…
0x03 有些函数只需要运行一次
我有多个测试数据,正常的和异常的测试数据。在测试函数执行之前,我需要先创建一个文件夹来储存测试代码的运行结果。(杠精别问为什么不用临时文件,这是例子,例子,例子)
那么,我想要实现的是:仅创建一个储存的文件夹即可,而非每运行一个测试用例需要创建一次。
用专业的话来说,就是:每个 module 的所有 test 只运行一次,@pytest.fixture(scope=module)
这时候用的是 fixture 中的作用域。
1. fixture 作用域
| Status | Describe |
|---|---|
| function | 每个test都运行,默认是function的scope |
| class | 每个class的所有test只运行一次 |
| module | 每个module的所有test只运行一次 |
| session | 每个session只运行一次 |
2. 代码
# pytest_test2.py

import pytest

@pytest.fixture(scope="module", autouse=True)
def mod_head():
    print(f"module\t: {mod_head.__name__}")


@pytest.fixture(scope="function", autouse=True)
def func_head():
    print(f"func\t: {func_head.__name__}")


@pytest.mark.xfail()
def test_pass():
    print("这是打印的信息")
    assert 2 == 5

def test_pass2():
    assert 5 == 5

autouse=True时会自动调用这个fixture
3. 其他 - 临时文件
你硬要说用临时文件夹,也不是不可以
有时候,在测试得过程中,需要创建临时文件夹,这时候就需要往下看了。
3.1 pytest 中的四个临时文件对象
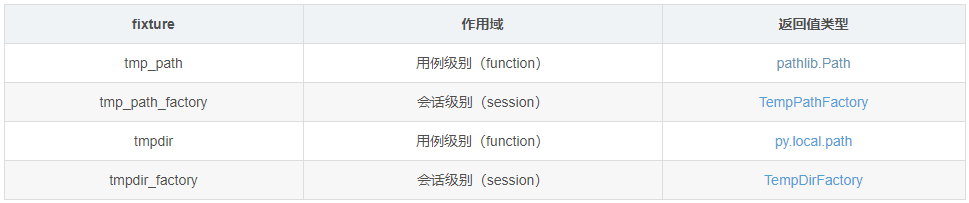
3.2 tmp_path 实例
我常用得是 pathlib.Path,所以关注得 tmp_path 多了点
# pytest_test2.py

import pytest

# 对的,在传入 tmp_path 这个参数得时候,不需要指定,pytest自带
def test_read_ini(tmp_path):
    a_dir = tmp_path / "mytmpdir"
    a_dir.mkdir()
    a_file = a_dir / "tmpfile.txt"
    a_file.write_text("hello, pytest!")

    assert a_file.read_text() == "hello, pytest!"
tmpdir 参考文档: 内置 fixtures 之 tmpdir
3.3 临时文件在哪
pytest 创建临时文件默认为系统的临时目录,Windows 为 %temp% 路径下,也可自己指定, --basetemp
pytest -q -s --basetemp='./tmp' pytest.py
注意:
临时文件最多为三个,最新的临时文件会替换最老的临时文件。
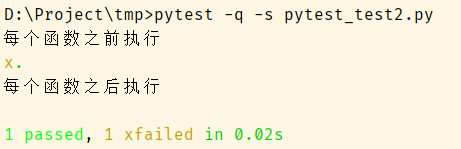
0x04 setup、teardown 转 fixture
为了兼容 unittest ,pytest 保留了 setup_xxx 和 teardown_xxx,其中 xxx 有四个选择:{function,module,method,class}。
这并非 pytest 推荐的写法。
pytest 推荐用的是 fixture + yield
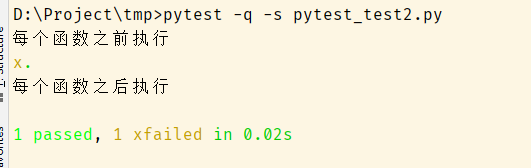
1. 代码
setup 和 teardown 版
# pytest_test.py
import pytest

def setup_module():
    print("每个函数之前执行")

def teardown_module():
    print("\n每个函数之后执行")

@pytest.mark.xfail()
def test_pass():
    assert 2 == 5

def test_pass2():
    assert 5 == 5
fixture + yield 版
# pytest_test2.py

import pytest

@pytest.fixture(scope="module")
def func():
    print("每个函数之前执行")
    yield
    print("\n每个函数之后执行")


@pytest.mark.xfail()
def test_pass(func):
    assert 2 == 5

def test_pass2(func):
    assert 5 == 5
0x05 测试数据和测试代码分离
之前的掌握的两种喂测试数据的方式:
- [pytest.mark.parametrize](##1. mark.parametrize)
- [pytest.fixture(params)](##2. fixture(param=xxx))
1. mark.parametrize
中文:标记参数
将测试数据和测试代码紧密联系
# pytest_test2.py

import pytest

def add(a, b):
    return a+b

@pytest.mark.parametrize("a, b, result",
                         [(1, 2, 3),
                          (10, 20, 30)])
def test_pass(a, b, result):
    assert add(a, b) == result


@pytest.mark.xfail()
@pytest.mark.parametrize("a, b, result",
                   [(1, 2, 5)])
def test_xfail(a, b, result):
    assert add(a, b) == result

进阶:(初级版数据分离)
# pytest_test2.py

import pytest

def add(a, b):
    return a+b

add_list = [(1, 2, 3),
            (10, 20, 30)]

@pytest.mark.parametrize("a, b, result", add_list)
def test_pass(a, b, result):
    assert add(a, b) == result

注意:
1. @pytest.mark.parametrize 中的第一个参数是字符串,不是多个字符串
2. @pytest.mark.parametrize 中的第二个参数是列表,一个测试数据用一个元组表示,有几个测试数据就有几个元组
其他:
@pytest.mark.parametrize(self,argnames, argvalues, indirect=False, ids=None, scope=None))
| 参数 | 说明 |
|---|---|
| argnames | 必传,参数名, 以逗号分隔的字符串,表示一个或多个参数名称(key),或参数字符串的列表/元组 |
| argvalues | 必传,参数值,若 argnames 有一个刚单值列表传入,若argnames有多个,以套用元组的列表展示,无组内与参数名一一对应 |
| indirect | 为true时,那argnames一定是一个fixture函数名称,argvalues值将传入对应的fixture内,相当于@pytest.fixture(params=)的用法,默认False |
| ids | 标记子用例执行名称,与argvalues数量一致,未指定自动生成,默认None |
| scope | 如果指定,则表示参数的范围。范围用于按参数实例对测试进行分组。它还将覆盖任何 fixture 函数定义的范围,允许使用测试上下文或配置设置动态范围 |
2. fixture(param=xxx)
中文:固件参数
# pytest_test2.py

import pytest

def add(a, b):
    return a+b

add_list = [(1, 2, 3),
            (10, 20, 30)]

@pytest.fixture(params=add_list)
def get_param(request):
    return request.param

def test_pass(get_param):
    assert sum(get_param[:2]) == get_param[2]

注意:
1. `request` 是 `pytest` 内置的固件,通过 `request.param` 获取参数,**不可随意命名**
2. 涉及到多个参数值传递,**建议用字典**,而不是列表
3. 用外部文件传递测试数据
pytest 支持多种文件读取:
- JSON
- Yaml
- Excel
- CSV
详细的各种例子请戳:Pytest 实战
本文以 CSV 举例。
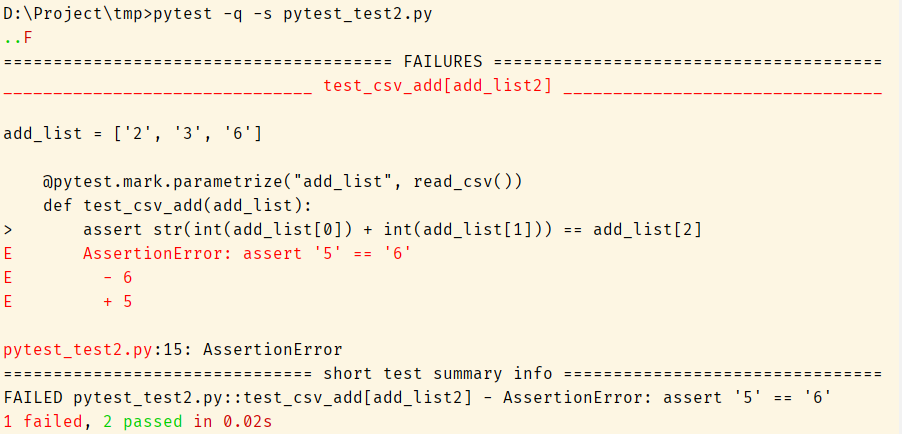
在本地创建 data.csv 文件。注意看最后一个测试数据,是通过不了测试的!

# pytest_test2.py
import pytest
import csv

def read_csv():
    result = list()
    with open("data.csv", "r+") as f:
        reader = csv.reader(f)
        next(reader)  # 为了跳过首行
        result = list(reader)
    return result

@pytest.mark.parametrize("add_list", read_csv())
def test_csv_add(add_list):
    assert str(int(add_list[0]) + int(add_list[1])) == add_list[2]
0x06 共享 fixture
当我拥有多个测试文件的时候,发现有部分函数是重复的,这就很违反 python 的美学了,
这时候,就要祭出 conftest.py 这个大杀器。将重复函数从测试文件中移出去,另成文件,能够被重复使用。
千万不要引用!pytest 将会自动调用!
默认你会注意文件作用域,仅作用当前文件夹以及子文件夹。
代码
拿 [0x04 setup、teardown 转 fixture](##1. 代码) 中的代码举例子
# conftest.py 这是新的文件!
import pytest

@pytest.fixture(scope="module")
def func():
    print("每个函数之前执行")
    yield
    print("\n每个函数之后执行")
# pytest_test2.py
import pytest

@pytest.mark.xfail()
def test_pass(func):
    assert 2 == 5

def test_pass2(func):
    assert 5 == 5
0x07 配置文件
假设有这么个场景,你在测试的时候经常要用到 -q -s ,然后又不想每次测试得时候手动输入这个,
懒人福音来了,在pytest.ini 里面设置即可
1. pytest 运行时命令行参数
[pytest]
addopts = -q -s
# 复杂且常用的命令行参数
# addopts = -rsxX -l --tb=short --strict
--rsxX表示pytest报告所有测试用例被跳过、预计失败、预计失败但实际通过的原因。-l表示pytest报告所有失败测试的堆栈中的局部变量。--tb=short表示简化堆栈回溯信息,只保留文件和行数。--strict选项表示禁止使用未在配置文件中注册的标记。
2. pytest 标记
为了防止你瞎标记、乱标记、输入拼写错误的标记
[pytest]
markers =
    smoke: Run the smoke test functions for tasks project
    get: Run the test functions that test tasks.get()
通过使用 pytest --markers 查看
先设定好标记的内容,配合上面的 --strict 命令,那么,当你输入错误标记或者不认识的标记的时候,会报错
3. 指定测试路径
[pytest]
testpaths = pytest_tmp
4. 其他
-
最低版本号:
minversion = 3.0 -
忽略某些目录:
norecursedirs = build dist -
环境变量配置
[pytest] env = TEST_PATH = tmp_cwd -
禁用 XPASS,让 XPass 显示为 FAILED:
xfail_strict = true拿 [0x05 3. 用外部文件传递测试数据][##3. 用外部文件传递测试数据] 举例子,增加一行代码,


当我在pytest.ini中设置了xfail_strict = true之后的输出结果:

0x08 其他华丽的技巧啊
1. 并发执行
用的是 pytest-xdist 插件
pytest -v -n 4 pytest_test.py
pytest -v -n auto pytest_test.py
2. 输出报告
常规输出报告:
-
JunitXML
pytest -v pytest_test.py --junitxml=report.xml -
log
pytest -v pytest_test.py --resultlog=log.txt
需要安装第三方库的输出报告:
-
html
pip install pytest-html pytest -v pytest_test.py --html=report.html -
Allure


 1391
1391


 被折叠的 条评论
为什么被折叠?
被折叠的 条评论
为什么被折叠?
 到【灌水乐园】发言


