


本次所涉及代码已上传至GitHub:
https://github.com/lgli/lgli-netty-tomcat/tree/master
前面已经对于IO的发展历程和基本原理,及其一些小例子已经说得差不多了,今天需要进入主题了,在这之前,再次回忆下各种版本的聊天小程序小例子,因为今天的Netty入门级也是从聊天室开始的。
传送门:
传统IO方式
NIO方式
AIO方式
从最开始的同步阻塞,同步非阻塞,到最后的异步非阻塞
这里简单总结下几种方式:
传统IO《BIO》:
当客户端发起一个TCP连接,客户端通过java.net.ServerSocket#accept获取到一个java.net.Socket对象,于是在服务端启动一个独立的线程来处理这个java.net.Socket的所有内容,包括读写数据;当启动多个客户端连接的时候,服务端的线程数量等同客户端连接数量,这种Thread Per Request模式带来的问题就是大量的线程将给服务器带来巨大的线程开销,为了避免这个问题,可以采用线程池的方式来解决,但是线程池也会带来一个问题,假定线程池线程数量是500,此时刚好有500个客户端连接好服务端并在进行数据交互,此时第501个客户端的请求也是无法处理的,即这种方式不能较好的解决高并发的问题,模式的方式如下图所示:

NIO
NIO启用了一个多路复用的概念,即将所有连接通道都注册在一个
java.nio.channels.Selector上,然后通过轮询
java.nio.channels.Selector中的状态来进行对应的操作
如下图所示:

java.nio.channels.Selector的底层模型是一个基于Reactor反应堆的一种实现方式,在这里先提醒这么一个概念,后面会详述这个模型
AIO
AIO则是主要针对于在同步阻塞的等待数据读写方式上的一种改变,即不在同步阻塞的等待底层操作系统对数据的操作结果。而是通过传入回调函数来执行成功或者失败之后应该做的事情,其底层主要基于Proactor模型。
基于相对较复杂的NIO操作,Netty诞生了,除了对NIO进行优化和封装之外,Netty还可以随意切换多种不同的网络协议,提供很多标准的协议、安全、编码解码的支持,解决了很多 NIO 不易用的问题,同时应用于多种大型框架内,比如Dubbo、RocketMQ等。
先来一个基于Netty的聊天室改造
服务端
package com.lgli.netty.chart;

import io.netty.bootstrap.ServerBootstrap;
import io.netty.channel.*;
import io.netty.channel.group.ChannelGroup;
import io.netty.channel.group.DefaultChannelGroup;
import io.netty.channel.nio.NioEventLoopGroup;
import io.netty.channel.socket.SocketChannel;
import io.netty.channel.socket.nio.NioServerSocketChannel;
import io.netty.handler.codec.DelimiterBasedFrameDecoder;
import io.netty.handler.codec.Delimiters;
import io.netty.handler.codec.string.StringDecoder;
import io.netty.handler.codec.string.StringEncoder;
import io.netty.util.concurrent.GlobalEventExecutor;

import java.net.InetSocketAddress;


/**
 * ChartNettyServer
 * @author lgli
 */
public class ChartNettyServer {

    public static void main(String[] args){
        //配置服务端的NIO线程组
        EventLoopGroup bossGroup = new NioEventLoopGroup();
        EventLoopGroup workerGroup = new NioEventLoopGroup();
        ServerBootstrap bootstrap = new ServerBootstrap();
        try{
            bootstrap.group(bossGroup,workerGroup)
                    .channel(NioServerSocketChannel.class)
                    //针对主线程的配置,分配最大线程数
                    .option(ChannelOption.SO_BACKLOG,128)
                    //针对子线程的配置 保持长连接
                    .option(ChannelOption.SO_KEEPALIVE,true)
                    .childHandler(new MyChannelInitial());
            //绑定端口,同步等待成功
            ChannelFuture future = bootstrap.bind(new InetSocketAddress("localhost", 8080)).sync();
            //等待服务端监听端口关闭
            future.channel().closeFuture().sync();
        } catch (Exception e) {
            e.printStackTrace();
        } finally {
            //出现异常,则释放资源
            bossGroup.shutdownGracefully();
            workerGroup.shutdownGracefully();
        }
    }


    static class MyChannelInitial extends ChannelInitializer<SocketChannel>{

        protected void initChannel(SocketChannel socketChannel) throws Exception {
            System.out.println("client connection :" + socketChannel.remoteAddress());
            socketChannel.pipeline()
                    .addLast("frame",new DelimiterBasedFrameDecoder(8192, Delimiters.lineDelimiter()))
                    .addLast("decode",new StringDecoder())
                    .addLast("encode",new StringEncoder())
                    .addLast("handler",new MyHandler());
        }
    }


    static class MyHandler extends SimpleChannelInboundHandler<String>{

        /**
         * 保存所有的连接
         */
        private static ChannelGroup channels = new DefaultChannelGroup(GlobalEventExecutor.INSTANCE);

        /**
         * 接收到数据,发送给其他服务端
         * @param channelHandlerContext 发送数据的通道
         * @param s 发送的数据
         * @throws Exception
         */
        protected void channelRead0(ChannelHandlerContext channelHandlerContext, String s) throws Exception {
            Channel inputChannel = channelHandlerContext.channel();
            for(Channel channel : channels){
                if(channel == inputChannel){
                    continue;
                }
                channel.writeAndFlush(inputChannel.remoteAddress()+":"+s+"\n");
            }
        }


        /**
         * 有新的连接连接进来
         * @param ctx
         * @throws Exception
         */
        @Override
        public void handlerAdded(ChannelHandlerContext ctx) throws Exception {
            Channel inChannel = ctx.channel();
            //通知其他服务器有新的上线了
            for(Channel channel : channels){
                channel.writeAndFlush("欢迎"+inChannel.remoteAddress()+"进入聊天室! \n");
            }
            inChannel.writeAndFlush("欢迎您进入聊天室!\n");
            channels.add(inChannel);
        }

        @Override
        public void handlerRemoved(ChannelHandlerContext ctx) throws Exception {
            //通知其他服务器,下线了
            Channel outChannel = ctx.channel();
            for(Channel channel : channels){
                if(outChannel == channel){
                    continue;
                }
                channel.writeAndFlush(outChannel.remoteAddress()+"下线了 \n");
            }
            channels.remove(outChannel);
        }
    }
}
这里对代码做一点解释:
Main方法入口
27-28行:配置服务端主线程和工作线程组
29行:创建启动类
31-37行:方法需要传入配置的2个线程组,设置通道类型为
io.netty.channel.socket.nio.NioServerSocketChannel
根据主线程配置,设置最大线程数
针对子线程配置,保持长连接
传入事件分发Handler

39-40行:绑定服务,端口,等待服务端监听端口关闭

46-47行:出现异常,关闭线程组,释放资源

下面看下事件分发Handler:
需要是io.netty.channel.ChannelHandler类型的对象,
这里选择自定一个对象,com.lgli.netty.chart.ChartNettyServer.MyChannelInitial
继承于io.netty.channel.ChannelInitializer

上图显示了自定义对象和两者之间的关系
56-60行:
TCP数据处理方式
<io.netty.handler.codec.DelimiterBasedFrameDecoder>

这个处理TCP粘包粘包的类,在后续Netty正式篇中会详细说到
加解密方式
<io.netty.handler.codec.string.StringDecoder>

<io.netty.handler.codec.string.StringEncoder>
自定义Handler
<com.lgli.netty.chart.ChartNettyServer.MyHandler>

自定义Handler主要做了3件事:接收数据时候的处理,有新的连接以及客户端下线的处理
com.lgli.netty.chart.ChartNettyServer.MyHandler#channelRead0
78-86行:接收数据的时候,将接收到的数据,发送给除数据来源的所有其他客户端

com.lgli.netty.chart.ChartNettyServer.MyHandler#handlerAdded
95-103行:有新的客户端进入,则通知除新的客户端之外的其他客户端,同时,添加新的客户端保存待用
com.lgli.netty.chart.ChartNettyServer.MyHandler#handlerRemoved
106-116行:有客户端下线,则通知其他还在线的所有客户端

客户端代码:
package com.lgli.netty.chart;

import io.netty.bootstrap.Bootstrap;
import io.netty.channel.*;
import io.netty.channel.nio.NioEventLoopGroup;
import io.netty.channel.socket.SocketChannel;
import io.netty.channel.socket.nio.NioSocketChannel;
import io.netty.handler.codec.DelimiterBasedFrameDecoder;
import io.netty.handler.codec.Delimiters;
import io.netty.handler.codec.string.StringDecoder;
import io.netty.handler.codec.string.StringEncoder;

import java.net.InetSocketAddress;
import java.util.Scanner;

/**
 * ChartNettyClient
 * @author lgli
 */
public class ChartNettyClient {

    public static void main(String[] args) {
        EventLoopGroup eventLoopGroup = new NioEventLoopGroup();
        Bootstrap bootstrap = new Bootstrap();
        try{
            bootstrap.group(eventLoopGroup)
                    .channel(NioSocketChannel.class)
                    .handler(new MyChannelInitial());
            Channel channel = bootstrap.connect(new InetSocketAddress("localhost", 8080)).sync().channel();

            Scanner scanner = new Scanner(System.in);
            while(scanner.hasNextLine()){
                String s = scanner.nextLine();
                if("".equals(s)){
                    continue;
                }
                channel.writeAndFlush(s+"\n");
            }


        }catch (Exception e){
            e.printStackTrace();
        }finally {
            eventLoopGroup.shutdownGracefully();
        }
    }

    static class MyChannelInitial extends ChannelInitializer<SocketChannel>{
        protected void initChannel(SocketChannel socketChannel) throws Exception {
            socketChannel.pipeline()
                    .addLast("frame",new DelimiterBasedFrameDecoder(8192, Delimiters.lineDelimiter()))
                    .addLast("decode",new StringDecoder())
                    .addLast("encode",new StringEncoder())
                    .addLast("handler",new MyChannelHandler());
        }
    }

    static class MyChannelHandler extends SimpleChannelInboundHandler<String>{
        protected void channelRead0(ChannelHandlerContext channelHandlerContext, String o) throws Exception {
            System.out.println(o);
        }
    }
}
同样的,Main方法开始
23-24行:配置客户端线程组和客户端启动类
26-28行:配置相关参数,具体见服务端说明
31-38行:监听客户端键盘数据,向服务端发送数据
44行:出现异常则退出线程组

自定义事件分发Handler和服务端类似
TCP数据处理方式
<io.netty.handler.codec.DelimiterBasedFrameDecoder>
加解密方式
<io.netty.handler.codec.string.StringDecoder>

<io.netty.handler.codec.string.StringEncoder>
自定义Handler
<com.lgli.netty.chart.ChartNettyClient.MyChannelHandler>

自定义Handler,这里选择直接打印输出:

运行服务端和客户端程序,一个基于Netty的聊天室搭建成功
公众号有视频效果,有需要的可以关注看下

基于Netty的简易Tomcat实现
这里实现了一个很简单的Tomcat功能,即监听端口,然后接受请求,根据请求分发请求对应的处理器
基本思路:

启动类:
package com.lgli.netty.tomcat;

import com.lgli.netty.tomcat.http.NettyRequest;
import com.lgli.netty.tomcat.http.NettyResponse;
import com.lgli.netty.tomcat.servlet.NettyServlet;
import io.netty.bootstrap.ServerBootstrap;
import io.netty.channel.*;
import io.netty.channel.nio.NioEventLoopGroup;
import io.netty.channel.socket.SocketChannel;
import io.netty.channel.socket.nio.NioServerSocketChannel;
import io.netty.handler.codec.http.HttpRequest;
import io.netty.handler.codec.http.HttpRequestDecoder;
import io.netty.handler.codec.http.HttpResponseEncoder;

import java.io.InputStream;
import java.net.InetSocketAddress;
import java.util.Enumeration;
import java.util.HashMap;
import java.util.Map;
import java.util.Properties;

/**
 * NettyTomcat
 * @author lgli
 */
public class NettyTomcat {

    private static Map<String, NettyServlet> maps = new HashMap<>(16);

    public NettyTomcat() {
        try{
            //初始化资源信息
            Properties properties = new Properties();
            InputStream in = NettyTomcat.class.getClassLoader().getResourceAsStream("netty-tomcat.properties");
            properties.load(in);
            Enumeration<?> enumeration = properties.propertyNames();
            while(enumeration.hasMoreElements()){
                Object o = enumeration.nextElement();
                if(!(o instanceof String)){
                    continue;
                }
                String url = (String)o;
                if(!url.endsWith("-url")){
                    continue;
                }
                Object urlClass = Class.forName(properties.getProperty(url.replace("url", "class"))).newInstance();
                if(!(urlClass instanceof NettyServlet)){
                    continue;
                }
                maps.put(properties.getProperty(url),(NettyServlet) urlClass);
            }
        }catch (Exception e){
            e.printStackTrace();
        }
    }

    private void monitor() {
        EventLoopGroup bossGroup = new NioEventLoopGroup();
        EventLoopGroup workerGroup = new NioEventLoopGroup();
        ServerBootstrap serverBootstrap = new ServerBootstrap();
        try{
            serverBootstrap.group(bossGroup,workerGroup)
                    .channel(NioServerSocketChannel.class)
                    .option(ChannelOption.SO_BACKLOG,128)
                    .childOption(ChannelOption.SO_KEEPALIVE,true)
                    .childHandler(new NettyTomcatChannelInitial());
            Channel channel = serverBootstrap.bind(new InetSocketAddress("localhost", 8080)).sync().channel();
            channel.closeFuture().sync();
        }catch (Exception e){
            e.printStackTrace();
        }finally {
            bossGroup.shutdownGracefully();
            workerGroup.shutdownGracefully();
        }
    }

    static class NettyTomcatChannelInitial extends ChannelInitializer<SocketChannel>{
        @Override
        protected void initChannel(SocketChannel socketChannel) throws Exception {
            socketChannel.pipeline().addLast("encode",new HttpResponseEncoder())
                    .addLast("decode",new HttpRequestDecoder())
                    .addLast("handler",new NettyTomcatHandler());
        }
    }

    static class NettyTomcatHandler extends SimpleChannelInboundHandler<Object>{

        @Override
        protected void channelRead0(ChannelHandlerContext channelHandlerContext, Object o) throws Exception {
            if(!(o instanceof HttpRequest)){
                return;
            }
            HttpRequest httpRequest = (HttpRequest) o;
            NettyRequest request = new NettyRequest(channelHandlerContext,httpRequest);
            NettyResponse response = new NettyResponse(channelHandlerContext,httpRequest);
            String url = request.getUrl();
            if(maps.containsKey(url)){
                maps.get(url).service(request,response);
            }else{
                response.write("404 Not Found,找不到资源");
            }
        }
    }


    public static void main(String[] args) {
        new NettyTomcat().monitor();
    }


}
com.lgli.netty.tomcat.NettyTomcat构造方法中,主要是初始化资源信息:
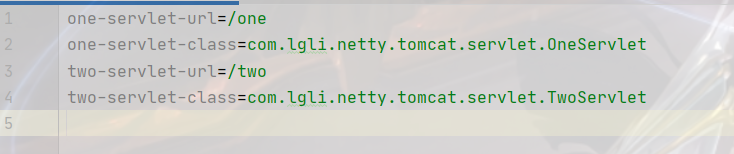
即读取配置资源文件,同时将请求和对应的类的实例保存在一个Map中

初始化线程组和初始化启动对象,前面已经提到,这里也不再过多解释:

需要对这个Handler做一点说明:

当有客户端<即浏览器>发来请求的时候,
90-93行:这里直接根据Netty中的
io.netty.handler.codec.http.HttpRequest
接收
94-95行:用两个类似平常用的比较多的
HttpServletRequest和HttpServletResponse
实现,即
NettyRequest和NettyResponse
96-101行:根据初始化的请求路径和处理对象类,对比这里接收到的请求路径,获取到处理对象类的实例,执行其service方法
最后主类方法则执行完毕
下面看下自定义的NettyRequest和NettyResponse
NettyRequest:
package com.lgli.netty.tomcat.http;

import io.netty.channel.ChannelHandlerContext;
import io.netty.handler.codec.http.HttpRequest;

/**
 * NettyRequest
 * @author lgli
 */
public class NettyRequest {

    private ChannelHandlerContext ctx;

    private HttpRequest request;


    public NettyRequest(ChannelHandlerContext channelHandlerContext, HttpRequest httpRequest) {
        this.ctx = channelHandlerContext;
        this.request = httpRequest;
    }

    public String getRequestMethod() {
        return request.method().name();
    }

    public String getUrl() {
        return request.uri();
    }
}
NettyRequest主要调用
io.netty.handler.codec.http.HttpRequest
的API操作获取请求名和请求uri
NettyResponse
package com.lgli.netty.tomcat.http;

import io.netty.buffer.Unpooled;
import io.netty.buffer.UnpooledDirectByteBuf;
import io.netty.channel.ChannelHandlerContext;
import io.netty.handler.codec.http.*;

import java.io.UnsupportedEncodingException;
import java.nio.charset.StandardCharsets;

/**
 * NettyResponse
 * @author lgli
 */
public class NettyResponse {

    private ChannelHandlerContext ctx;


    public NettyResponse(ChannelHandlerContext channelHandlerContext) {
        this.ctx = channelHandlerContext;
    }


    public void write(String result) {
        if(null == result || "".equalsIgnoreCase(result)
                || "".equalsIgnoreCase(result.trim())){
            return;
        }
        try{
            FullHttpResponse response = new DefaultFullHttpResponse(
                    HttpVersion.HTTP_1_1,
                    HttpResponseStatus.OK,
                    Unpooled.wrappedBuffer(result.getBytes("GBK"))
            );
            response.headers().set("Content-Type","text/html");
            ctx.write(response);
        }catch (Exception e){
            e.printStackTrace();
        }finally {
            ctx.flush();
            ctx.close();
        }
    }
}
看write方法
32-37行:NettyResponse调用了
io.netty.handler.codec.http.FullHttpResponse
封装返回结果
38行:
io.netty.channel.ChannelHandlerContext
输出数据到客户端《即浏览器》
剩下用到的3个Servlet:
总的父类NettyServlet

第一个OneServlet

第二个TwoServlet

执行NettyTomcat主类,开启基于Netty简易版的Tomcat
公众号有视频效果,有需要的可以关注看下
后续,将深入了解Netty底层及其应用,还有比较关注的Netty性能调优!!


 被折叠的 条评论
为什么被折叠?
被折叠的 条评论
为什么被折叠?
 到【灌水乐园】发言


