


 本文详细介绍了如何在Linux内核中使用NFS加载根文件系统rootfs,包括配置NFS服务器、内核参数设置及uboot引导过程。深入解析NFS版本选择、网络参数配置及常见错误排查。
最近一段时间研究了关于linux kernel使用nfs方式加载根文件系统rootfs,这种方式的可以在进行调试阶段不至于每次进行擦除、烧录步骤,在根文件系统比较大的情况可以节约时间。当然,研究这个最主要的原因还是想了解nfs功能的具体应用。
首先简要描述一下kernel使用nfs方式加载根文件系统rootfs前提条件:
(1)在宿主机(PC)上配置nfs服务器
关于在linux环境下配置自己的nfs服务器共享目录,此处不详细说明,参考一下百度,基本上搭建成功是没有什么太大的问题。
我配置的是目录是 /nfs/rootfs,如下:
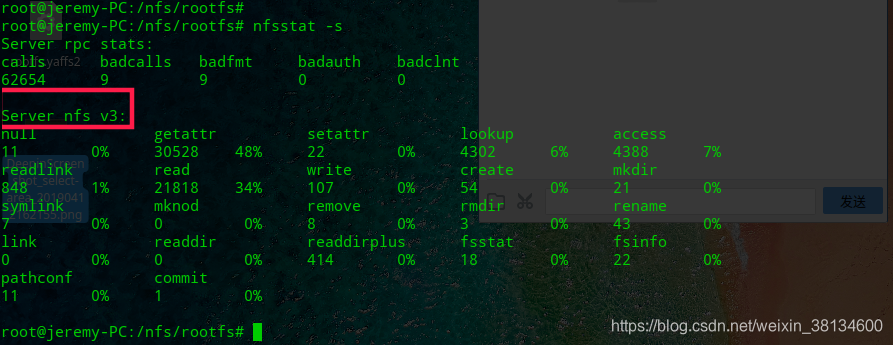
这里需要注意一下,在/nfs/rootfs目录下存放的文件就是一个完整的根文件系统,注意文件权限。nfs服务器nfs版本是nfs v3,这个很重要,我在这个细节部分话费了很多时间。
(2)linux kernel 需要配置支持nfs服务
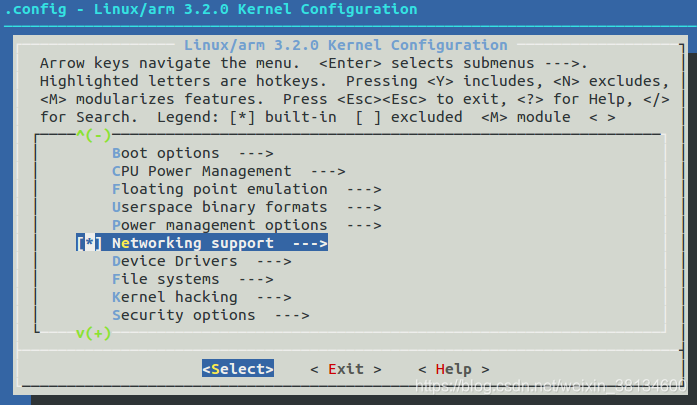
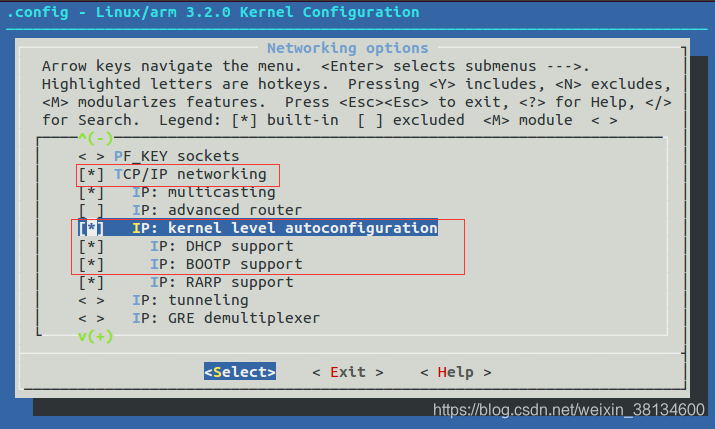
配置网络部分
	Networking support
		Networking options
			TCP/IP networking
			IP: kernel level autoconfiguration
			[*] IP: DHCP support
			[*] IP: BOOTP support
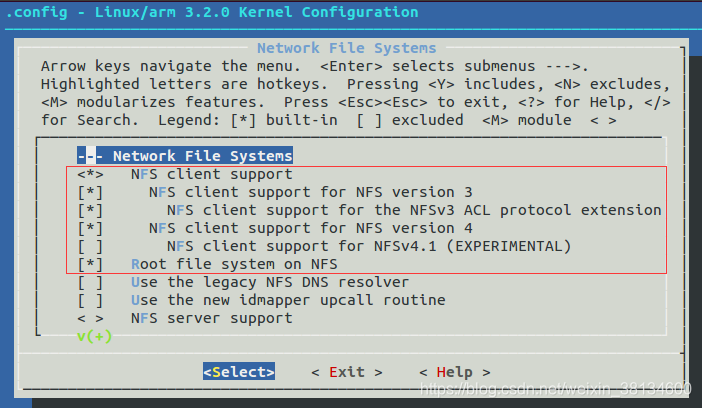
配置开启nfs服务
File systems
	Network File Systems
	<*> NFS client support
	[*] NFS client support for NFS version 3
	[*] NFS client support for the NFSv3 ACL protocol extension
	[*] NFS client support for NFS version 4
	[*] Root file system on NFS
编译内核部分,最后生成uImage文件,将uImage文件放在tftp服务器目录下以方便下文进行更新操作。
接下来就是使用uboot进行设置参数引导控制器启动工作,步骤如下:
首先要清楚自己手中控制器的硬件情况,比如有网卡外设工作情况,内核uImage加载地址等。
uboot中有一些环境变量可以参考,下图截取部分: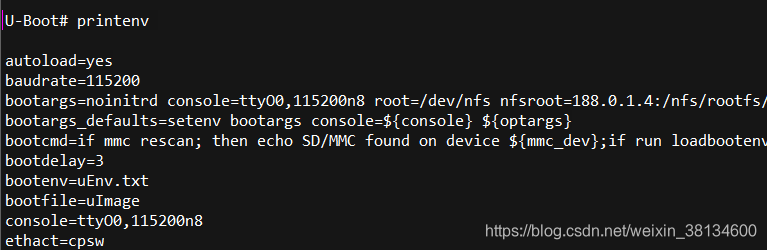
这里先使用tftp下载 uImage文件:
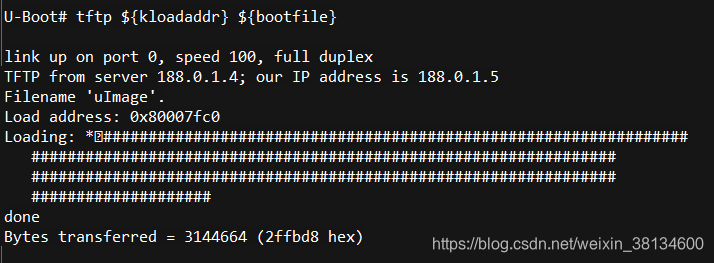
以上指令将uImage下载至指定内存——${kloadaddr},此处是0x80007fc0,此值与uboot运行环境以及硬件有关。
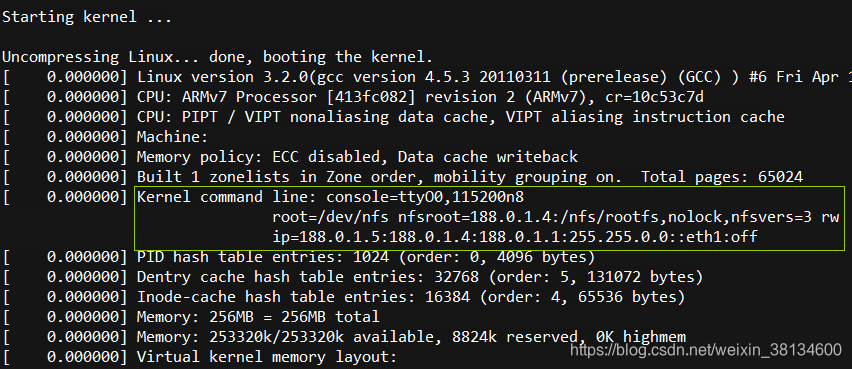
在直接启动内核前,需要设置nfs参数以方便内核去使用nfs方式加载根文件系统,如下: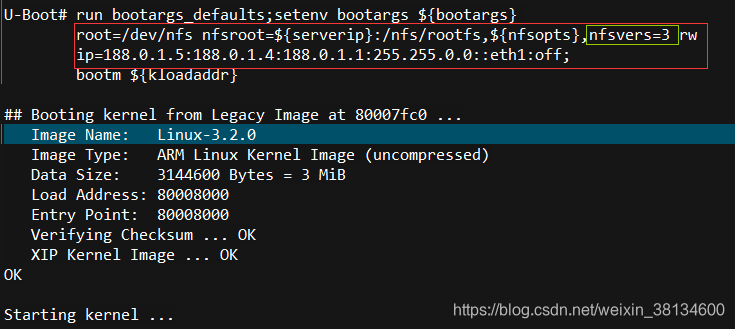
注意红线框是一行而不是两行,为了显示而稍作处理,绿线框中是指定nfs服务器nfs版本为3,还记得特地提到过 宿主机上的 nfs服务器nfs版本是nfs v3,这个地方必须匹配。如果没有nfsvers=3,那么内核启动之后加载根文件系统就会出现如下错误: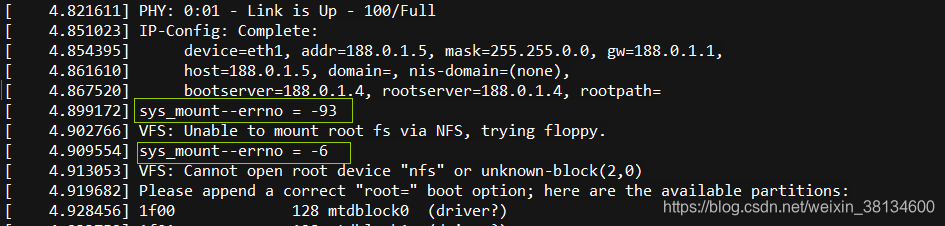
这里原本是没有绿线框的内容,是为了定位问题我特地在内核源码nfs部分所添加的调试信息,错误码-93可以再 内核头文件"include/asm-generic/errno.h"中找到如下宏:
#define EPROTONOSUPPORT 93 /* Protocol not supported */
这个就可以去了解NFS各个版本之间的区别,这里需要指定nfs版本 nfs v3。
参数详细解释如下:
tftp ${kloadaddr} ${bootfile};
		通过tftp从tftp服务器目录下载uImage到指定地址
run bootargs_defaults;
setenv bootargs ${bootargs}
		设置默认参数
接下里关于nfs部分,在内核文档里(Documentation/filesystems/nfs/nfsroot.txt)有详细说明,摘取部分如下:

2.) Kernel command line
    -------------------

When the kernel has been loaded by a boot loader (see below) it needs to be
told what root fs device to use. And in the case of nfsroot, where to find
both the server and the name of the directory on the server to mount as root.
This can be established using the following kernel command line parameters:

root=/dev/nfs
  This is necessary to enable the pseudo-NFS-device. Note that it's not a
  real device but just a synonym to tell the kernel to use NFS instead of
  a real device.

nfsroot=[<server-ip>:]<root-dir>[,<nfs-options>]
  If the `nfsroot' parameter is NOT given on the command line,
  the default "/tftpboot/%s" will be used.

  <server-ip>	Specifies the IP address of the NFS server.
		The default address is determined by the `ip' parameter
		(see below). This parameter allows the use of different
		servers for IP autoconfiguration and NFS.

  <root-dir>	Name of the directory on the server to mount as root.
		If there is a "%s" token in the string, it will be
		replaced by the ASCII-representation of the client's
		IP address.

  <nfs-options>	Standard NFS options. All options are separated by commas.
		The following defaults are used:
			port		= as given by server portmap daemon
			rsize		= 4096
			wsize		= 4096
			timeo		= 7
			retrans		= 3
			acregmin	= 3
			acregmax	= 60
			acdirmin	= 30
			acdirmax	= 60
			flags		= hard, nointr, noposix, cto, ac


ip=<client-ip>:<server-ip>:<gw-ip>:<netmask>:<hostname>:<device>:<autoconf>
  This parameter tells the kernel how to configure IP addresses of devices
  and also how to set up the IP routing table. It was originally called
  `nfsaddrs', but now the boot-time IP configuration works independently of
  NFS, so it was renamed to `ip' and the old name remained as an alias for
  compatibility reasons.

  If this parameter is missing from the kernel command line, all fields are
  assumed to be empty, and the defaults mentioned below apply. In general
  this means that the kernel tries to configure everything using
  autoconfiguration.

  The <autoconf> parameter can appear alone as the value to the `ip'
  parameter (without all the ':' characters before).  If the value is
  "ip=off" or "ip=none", no autoconfiguration will take place, otherwise
  autoconfiguration will take place.  The most common way to use this
  is "ip=dhcp".

  <client-ip>	IP address of the client.
  		Default:  Determined using autoconfiguration.

  <server-ip>	IP address of the NFS server. If RARP is used to determine
		the client address and this parameter is NOT empty only
		replies from the specified server are accepted.

		Only required for NFS root. That is autoconfiguration
		will not be triggered if it is missing and NFS root is not
		in operation.
		Default: Determined using autoconfiguration.
		         The address of the autoconfiguration server is used.

  <gw-ip>	IP address of a gateway if the server is on a different subnet.
		Default: Determined using autoconfiguration.

  <netmask>	Netmask for local network interface. If unspecified
		the netmask is derived from the client IP address assuming
		classful addressing.
		Default:  Determined using autoconfiguration.

  <hostname>	Name of the client. May be supplied by autoconfiguration,
  		but its absence will not trigger autoconfiguration.
		If specified and DHCP is used, the user provided hostname will
		be carried in the DHCP request to hopefully update DNS record.
  		Default: Client IP address is used in ASCII notation.

  <device>	Name of network device to use.

		Default: If the host only has one device, it is used.
			 Otherwise the device is determined using
			 autoconfiguration. This is done by sending
			 autoconfiguration requests out of all devices,
			 and using the device that received the first reply.

  <autoconf>	Method to use for autoconfiguration. In the case of options
                which specify multiple autoconfiguration protocols,
		requests are sent using all protocols, and the first one
		to reply is used.

		Only autoconfiguration protocols that have been compiled
		into the kernel will be used, regardless of the value of
		this option.
        off or none: don't use autoconfiguration
				(do static IP assignment instead)
		  on or any:   use any protocol available in the kernel
			       (default)
		  dhcp:        use DHCP
		  bootp:       use BOOTP
		  rarp:        use RARP
		  both:        use both BOOTP and RARP but not DHCP
		               (old option kept for backwards compatibility)

                Default: any

nfsrootdebug
  This parameter enables debugging messages to appear in the kernel
  log at boot time so that administrators can verify that the correct
  NFS mount options, server address, and root path are passed to the
  NFS client.

rdinit=<executable file>
  To specify which file contains the program that starts system
  initialization, administrators can use this command line parameter.
  The default value of this parameter is "/init".  If the specified
  file exists and the kernel can execute it, root filesystem related
  kernel command line parameters, including `nfsroot=', are ignored.

  A description of the process of mounting the root file system can be
  found in:

    Documentation/early-userspace/README
其实上述参数最终都变成了Kernel command line,传递给linux内核,内核解析Kernel command line的内容,做相应处理:
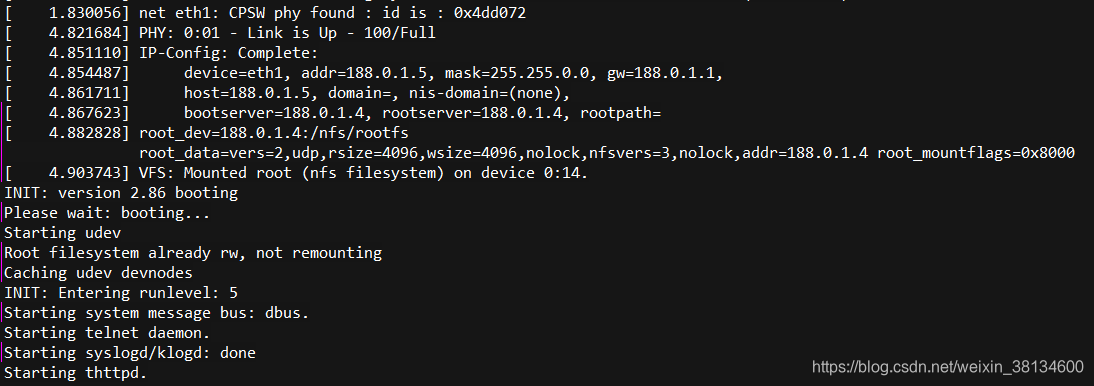
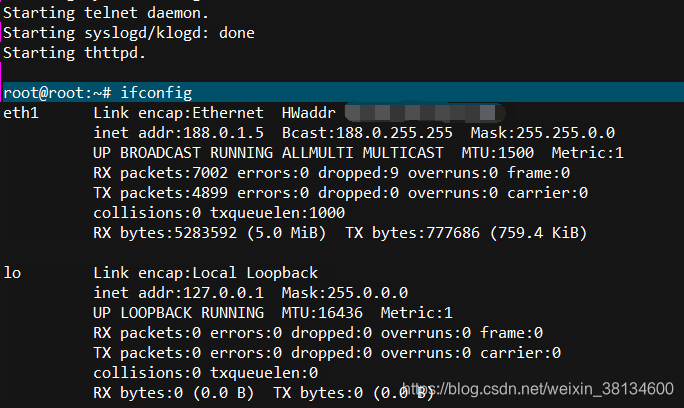
至此,kernel通过nfs方式加载了根文件系统rootfs,此时在rootfs文件是在宿主机上,此时控制器和宿主机之间的网络不能出现故障,否则在控制器终端就不能访问文件系统了,所以在启动脚本中不能修改使用nfs挂载更文件系统的网卡IP地址,即图中eth1的ip地址固定为188.0.1.5。


 530
530

 被折叠的 条评论
为什么被折叠?
被折叠的 条评论
为什么被折叠?
 到【灌水乐园】发言


