


IOC章节:手写MiniSpring—IOC
1 原始MVC
MVC 的基本思路是屏蔽 Servlet 的概念,让程序员主要写业务逻辑代码。
服务请求流程:
浏览器访问的 URL 通过映射机制找到实际的业务逻辑方法。
按照 Servlet 规范,可以通过 Filter 拦截,也可以通过 Servlet 拦截。
MiniSpring 的实现过程中模仿 Spring MVC 通过 Servlet 拦截所有请求,处理映射关系,调用业务逻辑代码,处理返回值回递给浏览器。
程序员写的业务逻辑程序,也可以叫做 Bean。把业务逻辑程序当作Bean去管理。
核心启动类 DispatcherSevlet
其实现机制与IOC类似,扫描包,并实例化Controller,记录mapping注解对应的方法,然后在doGet方法中进行调用并传递结果
Method method = this.mappingMethods.get(sPath);
obj = this.mappingObjs.get(sPath);
objResult = method.invoke(obj);
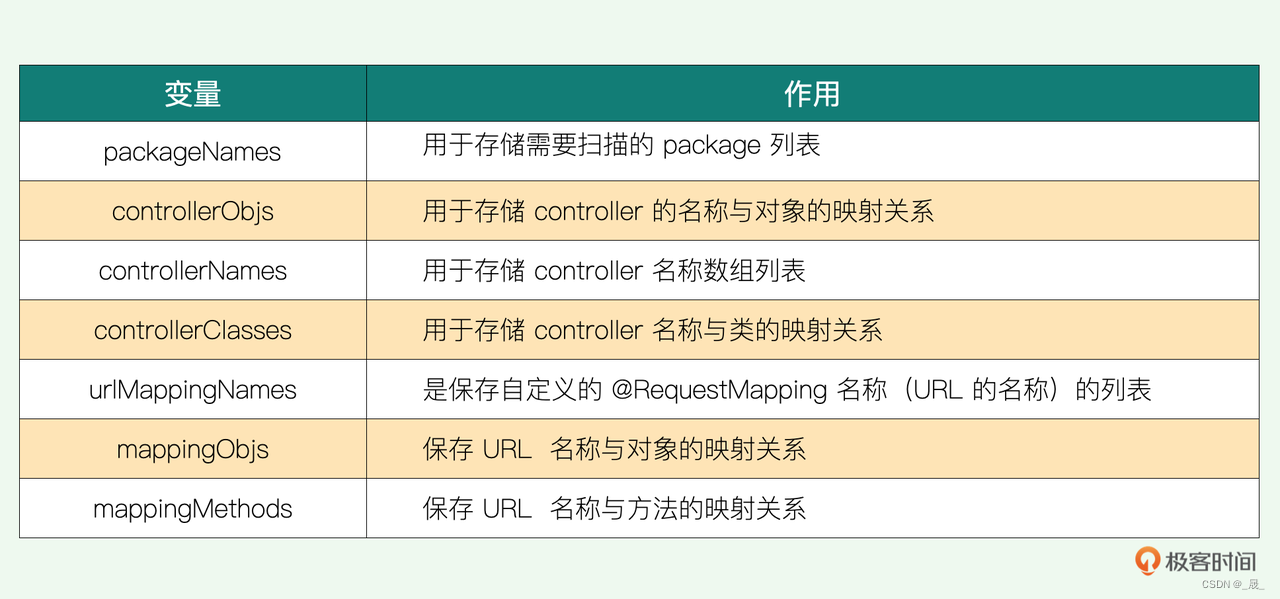
下面是DispatcherSevlet中的变量
private List<String> packageNames = new ArrayList<>();
private Map<String,Object> controllerObjs = new HashMap<>();
private List<String> controllerNames = new ArrayList<>();
private Map<String,Class<?>> controllerClasses = new HashMap<>();
private List<String> urlMappingNames = new ArrayList<>();
private Map<String,Object> mappingObjs = new HashMap<>();
private Map<String,Method> mappingMethods = new HashMap<>();
2 整合IOC和MVC
Tomcat 启动的过程web.xml加载时序
- 先获取全局的参数 context-param 来创建上下文(ServletContext)
- 启动配置文件里定义的 Listener
- 创建 IoC 容器构建 WAC(WebApplicationContext)
- 加载所管理的 Bean 对象,并把 WAC 关联到 ServletContext 里
- 启动配置文件里定义的 Filter
- 最后是 DispatcherServlet。
- 从 sevletContext 里获取属性拿到 WAC, 放到 servlet 的属性中
- 扫描路径下的包,调用 refresh() 方法加载 Bean, 配置 url mapping
// listener启动方法--ContextLoaderListener
private void initWebApplicationContext(ServletContext servletContext) {
    String sContextLocation = servletContext.getInitParameter(CONFIG_LOCATION_PARAM);
    System.out.println("sContextLocation-----------" + sContextLocation);
    WebApplicationContext wac = new AnnotationConfigWebApplicationContext(sContextLocation);
    wac.setServletContext(servletContext);
    this.context = wac;
    servletContext.setAttribute(WebApplicationContext.ROOT_WEB_APPLICATION_CONTEXT_ATTRIBUTE, this.context);
}
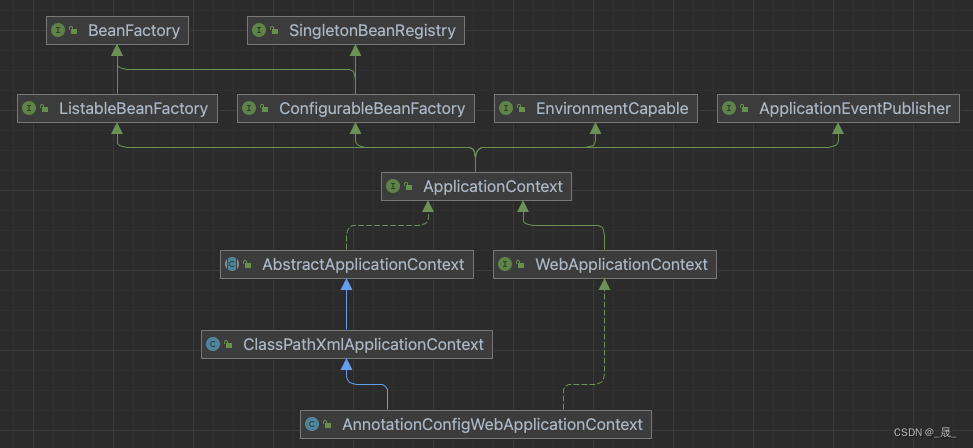
AnnotationConfigWebApplicationContext:从下面继承实现关系图中可以看到,继承了ClassPathXmlApplicationContext,具有我们第一章实现IOC中的全部功能。并且又实现了WebApplicationContext,扩展了获取ServletContext的机制。
另外Spring中有父子容器的概念。
子容器:MVC容器 - webApplicationContext
父容器:Spring容器 - parentApplicationContext
子可以访问父,反过来不行,这是由Spring的体系结构决定的,子容器继承父容器,所以子容器是知道父容器的,所以也就能得到父容器的引用,进而得到父容器中的bean。
3 分解Dispatcher
这一章节核心内容是在已有的 ApplicationConfigWebApplicationContext 和 DispatcherServlet 基础上,把功能做进一步地分解
- Dispatcher 只负责解析 request 请求,
- Context 专门用来管理各个 Bean。
两级 ApplicationContext
- XmlWebApplicationContext(父容器)
- 对应Service,提供服务的类相关Bean
- 由 Listener 负责启动
- AnnotationConfigWebApplicationContext(子容器)
- 对应Controller,请求Controller相关Bean
- 由 DispatcherServlet 负责启动
WebApplicationContext 持有对 parentApplicationContext 的单向引用。
当调用 getBean() 获取 Bean 时,先从 WebApplicationContext 中获取,若为空则通过 parentApplicationContext 获取。
//com.minis.beans.factory.support.DefaultListableBeanFactory
public Object getBean(String beanName) throws BeansException {
    Object result = super.getBean(beanName);
    if (result == null) {
        result = this.parentBeanFactory.getBean(beanName);
    }
    return result;
}
也就是说,我们可以直接往Controller中注入applicationContext.xml中配置的Bean对象
public class HelloWorldBean {
    @AutoWired                       //由 AutowiredAnnotationBeanPostProcessor 解析
    private AService aservice;
    @RequestMapping("/hello")       //由 RequestMappingHandlerMapping 解析
    public String doTest() {        //由 RequestMappingHandlerAdapter 解析执行
        aservice.sayHello();
        return "hello world for doGet!";
    }
}
通过 URL 映射到某个实例方法,RequestMappingHandlerMapping
对方法的调用仿照 Spring 框架,RequestMappingHandlerAdapter
总之,Spring MVC 是在Spring IOC的基础之上构建父子容器,添加mapping 和adapter,核心放在DispatcherServlet中进行配置。
4 数据绑定,参数解析
简单来说,这一章节的目标是实现自动解析参数,并以此搭建起来整个数据绑定的框架
小目标就是解析下面这个请求User并封装对象,具体字段有int, String, Date
//  http://localhost:8080/test4?name=wsy&id=2&birthday=2023-12-02
@RequestMapping("/test4")
public String doTest4(User user) {
    return user.getId() +" "+user.getName() + " " + user.getBirthday();
}
主要功能类是RequestMappingHandlerAdapter
1. 首先定义成员变量WebBindingInitializer,用于注册额外的Editor。本章节所需的只有一个Date相关Editor
// com.test.DateInitializer
public void initBinder(WebDataBinder binder) {
    binder.registerCustomEditor(Date.class, new CustomDateEditor(Date.class,"yyyy-MM-dd", false));
}
- 其次
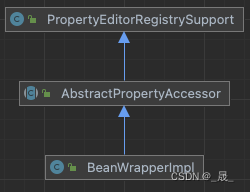
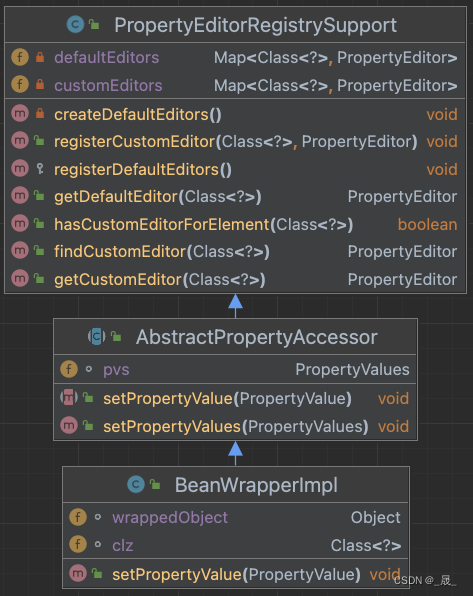
PropertyEditorRegistrySupport:属性编辑器注册支持,支持默认的属性编辑器以及客户编辑器
AbstractPropertyAccessor:抽象属性访问器
BeanWrapperImpl:
参考:


 414
414


 被折叠的 条评论
为什么被折叠?
被折叠的 条评论
为什么被折叠?
 到【灌水乐园】发言


