


文章目录
一、电商系统分析
1、电商系统技术特点
- 技术新
- 技术范围广
- 分布式
- 高并发、集群、负载均衡、高可用
- 海量数据
- 业务复杂
- 系统安全
2、主要电商模式
B2B
B2B ( Business to
Business)是指进行电子商务交易的供需双方都是商家(或企业、公司),她(他)们使用了互联网的技术或各种商务网络平台,完成商务交易的过程。电子商务是现代
B2B marketing的一种具体主要的表现形式。 案例:阿里巴巴、慧聪网
C2C
C2C即 Customer(Consumer) to
Customer(Consumer),意思就是消费者个人间的电子商务行为。比如一个消费者有一台电脑,通过网络进行交易,把它出售给另外一个消费者,此种交易类型就称为C2C电子商务。
案例:淘宝、易趣、瓜子二手车
B2C
B2C是Business-to-Customer的缩写,而其中文简称为“商对客”。“商对客”是电子商务的一种模式,也就是通常说的直接面向消费者销售产品和服务商业零售模式。这种形式的电子商务一般以网络零售业为主,主要借助于互联网开展在线销售活动。B2C即企业通过互联网为消费者提供一个新型的购物环境——网上商店,消费者通过网络在网上购物、网上支付等消费行为。
案例:唯品会、乐蜂网
C2B
C2B(Consumer to
Business,即消费者到企业),是互联网经济时代新的商业模式。这一模式改变了原有生产者(企业和机构)和消费者的关系,是一种消费者贡献价值(Create
Value), 企业和机构消费价值(Consume Value)。 C2B模式和我们熟知的供需模式(DSM, Demand
SupplyModel)恰恰相反,真正的C2B
应该先有消费者需求产生而后有企业生产,即先有消费者提出需求,后有生产企业按需求组织生产。通常情况为消费者根据自身需求定制产品和价格,或主动参与产品设计、生产和定价,产品、价格等彰显消费者的个性化需求,生产企业进行定制化生产。
案例:海尔商城、 尚品宅配
O2O
O2O即Online To
Offline(在线离线/线上到线下),是指将线下的商务机会与互联网结合,让互联网成为线下交易的平台,这个概念最早来源于美国。O2O的概念非常广泛,既可涉及到线上,又可涉及到线下,可以通称为O2O。主流商业管理课程均对O2O这种新型的商业模式有所介绍及关注。
案例:美团、饿了吗F2C
F2C指的是Factory to customer,即从厂商到消费者的电子商务模式。
B2B2C
B2B2C是一种电子商务类型的网络购物商业模式,B是BUSINESS的简称,C是CUSTOMER的简称,第一个B指的是商品或服务的供应商,第二个B指的是从事电子商务的企业,C则是表示消费者。
案例:京东商城、天猫商城 注:我们《畅购电商系统开发》课程采用B2C模式,之后的项目实战《品优购电商系统开发实战》采用B2B2C模式。
3、需求分析
商城属于B2C电商模式,运营商将自己的产品发布到网站上,会员注册后,在网站上将商品添加到购物车,并且下单,完成线上支付,用户还可以参与秒杀抢购
4、系统设计
对于后端java工程师:
把精力放在设计模式,spring+springmvc,linux,mysql事务隔离与锁机制,mongodb,http/tcp,多线程,分布式架构,弹性计算架构,微服务架构,java性能优化,以及相关的项目管理等等。
对于前端工程师:
把精力放在html5,css3,vuejs,webpack,nodejs,Google V8引擎,javascript多线程,模块化,面向切面编程,设计模式,浏览器兼容性,性能优化等等。
5、系统架构图
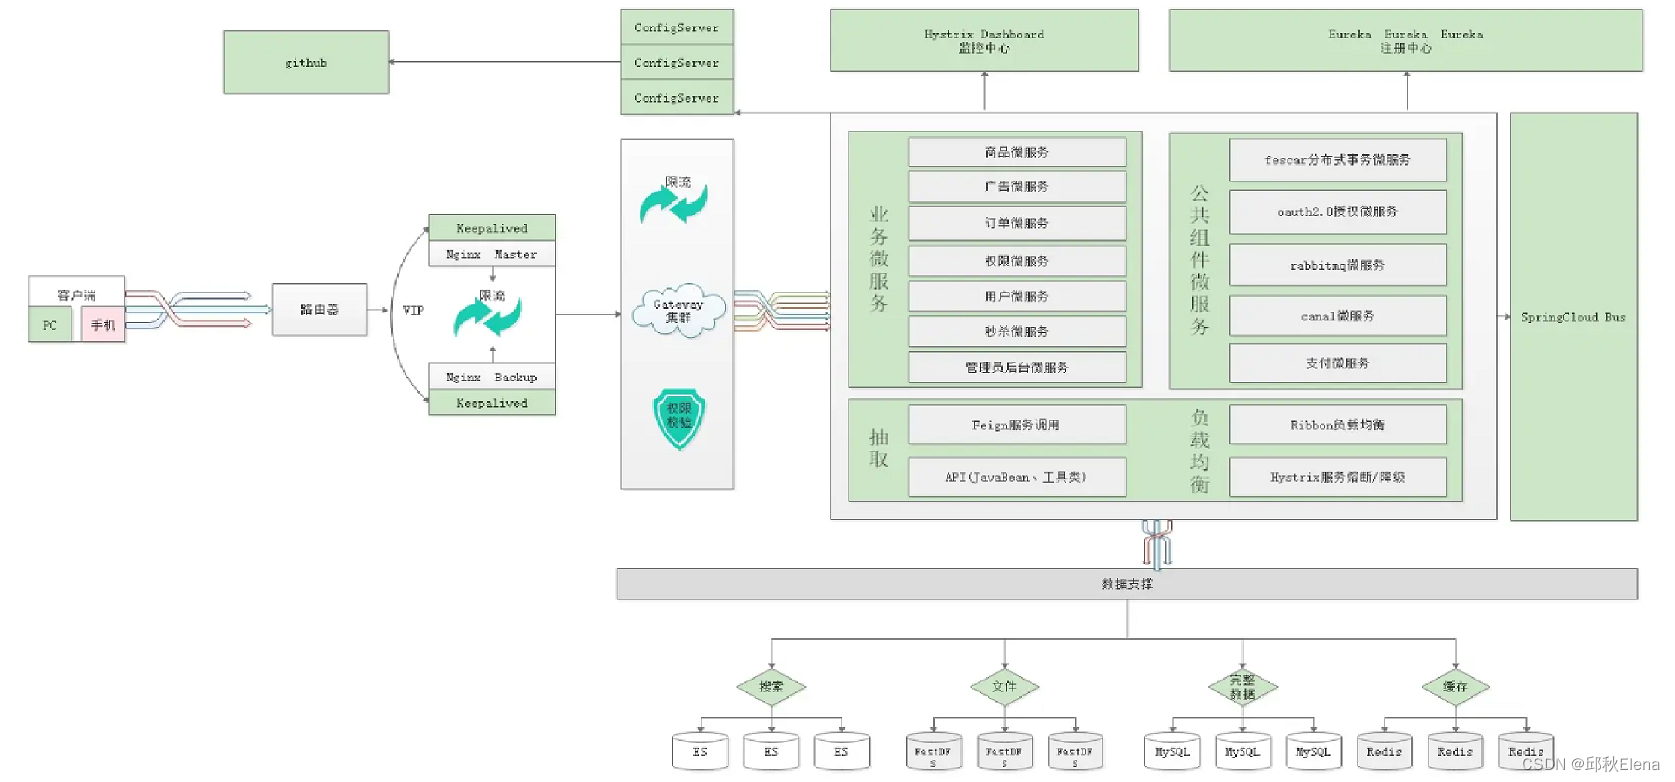
二、框架搭建
1、环境准备
(1)VMware Workstation Pro安装centos7 镜像
(2)安装docker
(3)拉取mySQL镜像,并创建容器
(4)客户端连接mysql容器,建库建表
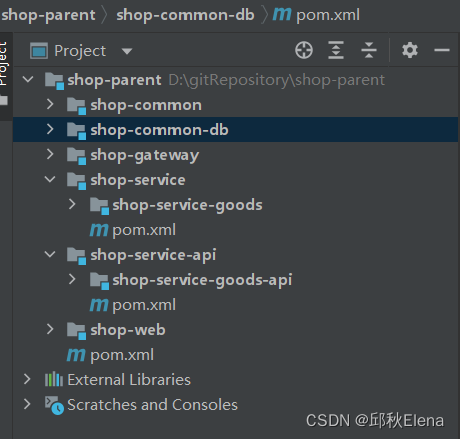
2、项目结构说明
shop-gateway
网关模块,根据网站的规模和需要,可以将综合逻辑相关的服务用网关路由组合到一起。在这里还可以做鉴权和限流相关操作。
shop-service
微服务模块,该模块用于存放所有独立的微服务工程。
shop-service_api
对应工程的JavaBean、Feign、以及Hystrix配置,该工程主要对外提供依赖。
shop-transaction-fescar
分布式事务模块,将分布式事务抽取到该工程中,任何工程如需要使用分布式事务,只需依赖该工程即可。
shop-web
web服务工程,对应功能模块如需要调用多个微服务,可以将他们写入到该模块中,例如网站后台、网站前台等
3、公共工程搭建
1) 父工程搭建
创建父工程shop-parent,删除src文件夹,pom.xml文件中增加配置
<?xml version="1.0" encoding="UTF-8"?>
<project xmlns="http://maven.apache.org/POM/4.0.0"
         xmlns:xsi="http://www.w3.org/2001/XMLSchema-instance"
         xsi:schemaLocation="http://maven.apache.org/POM/4.0.0 http://maven.apache.org/xsd/maven-4.0.0.xsd">
    <modelVersion>4.0.0</modelVersion>

    <groupId>com.buba</groupId>
    <artifactId>shop-parent</artifactId>
    <packaging>pom</packaging>
    <version>1.0-SNAPSHOT</version>
    <modules>
        <module>shop-gateway</module>
        <module>shop-service</module>
        <module>shop-service-api</module>
        <module>shop-web</module>
        <module>shop-common</module>
        <module>shop-common-db</module>

    </modules>

    <properties>
        <maven.compiler.source>11</maven.compiler.source>
        <maven.compiler.target>11</maven.compiler.target>
    </properties>

    <parent>
        <groupId>org.springframework.boot</groupId>
        <artifactId>spring-boot-starter-parent</artifactId>
        <version>2.1.4.RELEASE</version>
    </parent>


    <!--依赖包-->
    <dependencies>
        <dependency>
            <groupId>org.projectlombok</groupId>
            <artifactId>lombok</artifactId>
        </dependency>
        <!--测试包-->
        <dependency>
            <groupId>org.springframework.boot</groupId>
            <artifactId>spring-boot-starter-test</artifactId>
        </dependency>
        <!--fastjson-->
        <dependency>
            <groupId>com.alibaba</groupId>
            <artifactId>fastjson</artifactId>
            <version>1.2.51</version>
        </dependency>
        <!--swagger文档-->
        <dependency>
            <groupId>io.springfox</groupId>
            <artifactId>springfox-swagger2</artifactId>
            <version>2.6.1</version>
        </dependency>
        <dependency>
            <groupId>io.springfox</groupId>
            <artifactId>springfox-swagger-ui</artifactId>
            <version>2.6.1</version>
        </dependency>
        <!--
            http://localhost:9011/swagger-ui.html
        -->
    </dependencies>
    <dependencyManagement>
        <dependencies>
            <dependency>
                <groupId>org.springframework.cloud</groupId>
                <artifactId>spring-cloud-dependencies</artifactId>
                <version>Greenwich.SR1</version>
                <type>pom</type>
                <scope>import</scope>
            </dependency>
        </dependencies>
    </dependencyManagement>
</project>
2) 其他公共模块搭建
创建shop-gateway、shop-service、shop-service-api、shop-web工程,工程全部为pom工程,并将所有工程的src文件删除。
pom.xml中打pom包
3) 公共模块搭建
创建公共子模块shop-common,pom.xml引入依赖
公共子模块引入这些依赖后,其他微服务引入shop-common后也自动引入了这些依赖
<?xml version="1.0" encoding="UTF-8"?>
<project xmlns="http://maven.apache.org/POM/4.0.0"
         xmlns:xsi="http://www.w3.org/2001/XMLSchema-instance"
         xsi:schemaLocation="http://maven.apache.org/POM/4.0.0 http://maven.apache.org/xsd/maven-4.0.0.xsd">
    <parent>
        <artifactId>shop-parent</artifactId>
        <groupId>com.buba</groupId>
        <version>1.0-SNAPSHOT</version>
    </parent>
    <modelVersion>4.0.0</modelVersion>

    <artifactId>shop-common</artifactId>

    <properties>
        <maven.compiler.source>11</maven.compiler.source>
        <maven.compiler.target>11</maven.compiler.target>
    </properties>

    <dependencies>
        <!--web起步依赖-->
        <dependency>
            <groupId>org.springframework.boot</groupId>
            <artifactId>spring-boot-starter-web</artifactId>
        </dependency>
        <!-- redis 使用-->
        <dependency>
            <groupId>org.springframework.boot</groupId>
            <artifactId>spring-boot-starter-data-redis</artifactId>
        </dependency>
        <!--eureka-client-->
        <dependency>
            <groupId>org.springframework.cloud</groupId>
            <artifactId>spring-cloud-starter-netflix-eureka-client</artifactId>
        </dependency>
        <!--openfeign-->
        <dependency>
            <groupId>org.springframework.cloud</groupId>
            <artifactId>spring-cloud-starter-openfeign</artifactId>
        </dependency>
        <!--微信支付-->
        <dependency>
            <groupId>com.github.wxpay</groupId>
            <artifactId>wxpay-sdk</artifactId>
            <version>0.0.3</version>
        </dependency>
        <!--httpclient支持-->
        <dependency>
            <groupId>org.apache.httpcomponents</groupId>
            <artifactId>httpclient</artifactId>
        </dependency>
    </dependencies>

</project>
常用对象
创建entity包 ,在entity包下创建返回状态码实体类==[StatusCode]==
/**
 * 返回码
 */
public class StatusCode {
    public static final int OK = 20000;//成功
    public static final int ERROR = 20001;//失败
    public static final int LOGINERROR = 20002;//用户名或密码错误
    public static final int ACCESSERROR = 20003;//权限不足
    public static final int REMOTEERROR = 20004;//远程调用失败
    public static final int REPERROR = 20005;//重复操作
    public static final int NOTFOUNDERROR = 20006;//没有对应的抢购数据
}
包下建立类Result用于微服务返回结果给前端
/**
* 返回结果实体类
*/
public class Result<T> {
private boolean flag;//是否成功
private Integer code;//返回码
private String message;//返回消息
private T data;//返回数据
public Result(boolean flag, Integer code, String message, Object data) {
this.flag = flag;
this.code = code;
this.message = message;
this.data = (T) data;
}
public Result(boolean flag, Integer code, String message) {
this.flag = flag;
this.code = code;
this.message = message;
}
public Result() {
this.flag = true;
this.code = StatusCode.OK;
this.message = "操作成功!";
}
// getter and setter.....
}
在entity包下建立类用于承载分页的数据结果
/**
* 分页结果类
*/
public class PageResult<T> {
private Long total;//总记录数
private List<T> rows;//记录
public PageResult(Long total, List<T> rows) {
this.total = total;
this.rows = rows;
}
public PageResult() {
}
//getter and setter ......
}
当然,我们还可以将其他工具类都一起倒入到工程中,以后会用到,将资料\工具类中的所有类直接导入到entity包下。
4) 数据访问工程搭建
创建公共模块shop-common-db ,pom文件引入依赖
这个公共模块是连接mysql数据库的公共微服务模块,所以需要连接mysql的微服务都继承自此工程。
<?xml version="1.0" encoding="UTF-8"?>
<project xmlns="http://maven.apache.org/POM/4.0.0"
         xmlns:xsi="http://www.w3.org/2001/XMLSchema-instance"
         xsi:schemaLocation="http://maven.apache.org/POM/4.0.0 http://maven.apache.org/xsd/maven-4.0.0.xsd">
    <parent>
        <artifactId>shop-parent</artifactId>
        <groupId>com.buba</groupId>
        <version>1.0-SNAPSHOT</version>
    </parent>
    <modelVersion>4.0.0</modelVersion>

    <artifactId>shop-common-db</artifactId>

    <properties>
        <maven.compiler.source>11</maven.compiler.source>
        <maven.compiler.target>11</maven.compiler.target>
    </properties>

    <!--依赖-->
    <dependencies>
        <!--对shop-common的依赖-->
        <dependency>
            <groupId>com.buba</groupId>
            <artifactId>shop-common</artifactId>
            <version>1.0-SNAPSHOT</version>
        </dependency>
        <!--通用mapper起步依赖-->
        <dependency>
            <groupId>tk.mybatis</groupId>
            <artifactId>mapper-spring-boot-starter</artifactId>
            <version>2.0.4</version>
        </dependency>
        <!--MySQL数据库驱动-->
        <dependency>
            <groupId>mysql</groupId>
            <artifactId>mysql-connector-java</artifactId>
        </dependency>
        <!--mybatis分页插件-->
        <dependency>
            <groupId>com.github.pagehelper</groupId>
            <artifactId>pagehelper-spring-boot-starter</artifactId>
            <version>1.2.3</version>
        </dependency>
    </dependencies>
</project>
4、Eureka微服务注册中心搭建
1)创建模块shop-eureka ,pom.xml引入依赖
<?xml version="1.0" encoding="UTF-8"?>
<project xmlns="http://maven.apache.org/POM/4.0.0"
xmlns:xsi="http://www.w3.org/2001/XMLSchema-instance"
xsi:schemaLocation="http://maven.apache.org/POM/4.0.0 http://maven.apache.org/xsd/maven-4.0.0.xsd">
<parent>
<artifactId>shop_parent</artifactId>
<groupId>com.shop</groupId>
<version>1.0-SNAPSHOT</version>
</parent>
<modelVersion>4.0.0</modelVersion>
<artifactId>shop_eureka</artifactId>
<dependencies>
<dependency>
<groupId>org.springframework.cloud</groupId>
<artifactId>spring-cloud-starter-netflix-eureka-server</artifactId>
</dependency>
</dependencies>
</project>
2)appliation.yml配置
创建配置文件application.yml
server:
  port: 7001
eureka:
  instance:
    hostname: 127.0.0.1
  client:
    register-with-eureka: false   #是否将自己注册到eureka中
    fetch-registry: false         #是否从eureka中获取信息
    service-url:
      defaultZone: http://${eureka.instance.hostname}:${server.port}/eureka/`
3) 启动类配置
创建包com.buba 包下创建启动类EurekaApplication,代码如下:
@SpringBootApplication
@EnableEurekaServer
public class EurekaApplication {
public static void main(String[] args) {
SpringApplication.run(EurekaApplication.class);
}
}
测试访问http://localhost:7001/,注册中心首页
三、商品微服务搭建
商品微服务主要是实现对商品的增删改查相关操作,以及商品相关信息的增删改查。
1) 公共组件工程搭建
- 创建shop-service-api子模块shop-service-goods-api,并将商品表对应Pojo导入到工程中。
- 修改父工程shop-service-api的pom.xml,添加persistence-api和shop-common的依赖,代码如下:
<?xml version="1.0" encoding="UTF-8"?>
<project xmlns="http://maven.apache.org/POM/4.0.0"
         xmlns:xsi="http://www.w3.org/2001/XMLSchema-instance"
         xsi:schemaLocation="http://maven.apache.org/POM/4.0.0 http://maven.apache.org/xsd/maven-4.0.0.xsd">
    <parent>
        <artifactId>shop-parent</artifactId>
        <groupId>com.buba</groupId>
        <version>1.0-SNAPSHOT</version>
    </parent>
    <modelVersion>4.0.0</modelVersion>

    <artifactId>shop-service-api</artifactId>
    <packaging>pom</packaging>
    <modules>
        <module>shop-service-goods-api</module>
    </modules>

    <properties>
        <maven.compiler.source>11</maven.compiler.source>
        <maven.compiler.target>11</maven.compiler.target>
    </properties>

    <dependencies>
        <!--通用的common-->
        <dependency>
            <groupId>com.buba</groupId>
            <artifactId>shop-common</artifactId>
            <version>1.0-SNAPSHOT</version>
        </dependency>
        <!--每个工程都有Pojo,都需要用到该包对应的注解-->
        <dependency>
            <groupId>javax.persistence</groupId>
            <artifactId>persistence-api</artifactId>
            <version>1.0</version>
            <scope>compile</scope>
        </dependency>
    </dependencies>

</project>
2) 微服务工程搭建
修改shop-service的pom.xml引入shop-common-db的依赖,代码如下:
<!--依赖-->
<dependencies>
    <dependency>
        <groupId>com.buba</groupId>
        <artifactId>shop-common-db</artifactId>
        <version>1.0-SNAPSHOT</version>
    </dependency>
</dependencies>
在shop-service中创建shop-service-goods ,pom.xml引入依赖
<?xml version="1.0" encoding="UTF-8"?>
<project xmlns="http://maven.apache.org/POM/4.0.0"
         xmlns:xsi="http://www.w3.org/2001/XMLSchema-instance"
         xsi:schemaLocation="http://maven.apache.org/POM/4.0.0 http://maven.apache.org/xsd/maven-4.0.0.xsd">
    <parent>
        <artifactId>shop-service</artifactId>
        <groupId>com.buba</groupId>
        <version>1.0-SNAPSHOT</version>
    </parent>
    <modelVersion>4.0.0</modelVersion>

    <artifactId>shop-service-goods</artifactId>

    <properties>
        <maven.compiler.source>11</maven.compiler.source>
        <maven.compiler.target>11</maven.compiler.target>
    </properties>
    <!--依赖-->
    <dependencies>
        <dependency>
            <groupId>com.buba</groupId>
            <artifactId>shop-service-goods-api</artifactId>
            <version>1.0-SNAPSHOT</version>
        </dependency>
    </dependencies>
</project>
在resources下创建配置文件application.yml
server:
  port: 18081
spring:
  application:
    name: goods
  datasource:
    driver-class-name: com.mysql.jdbc.Driver
    url: jdbc:mysql://192.168.211.132:3306/shop_goods?useUnicode=true&characterEncoding=UTF-8&serverTimezone=UTC
    username: root
    password: 123456
eureka:
  client:
    service-url:
      defaultZone: http://127.0.0.1:7001/eureka
  instance:
    prefer-ip-address: true
feign:
  hystrix:
    enabled: true
mybatis:
  configuration:
    map-underscore-to-camel-case: true
  mapper-locations: classpath:mapper/*Mapper.xml
  type-aliases-package: com.shop.goods.pojo
在包com.buba.goods 包下创建启动类GoodsApplication,代码如下:
注意 :@MapperScan是tk.mybatis.spring.annotation包下的,用于扫描Mapper接口
启动shop-service-goods 再访问http://localhost:7001/效果如下:
@SpringBootApplication
@EnableEurekaClient
@MapperScan(basePackages = {"com.buba.goods.dao"})
public class GoodsApplication {
    public static void main(String[] args) {
        SpringApplication.run(GoodsApplication.class);
    }
}


 770
770


 被折叠的 条评论
为什么被折叠?
被折叠的 条评论
为什么被折叠?
 到【灌水乐园】发言


