


若该文为原创文章,转载请注明原文出处。
一、介绍
在B站看到使用CVZone进行虚拟物体拖放,模仿钢铁侠电影里的程序操作!_哔哩哔哩_bilibili
是使用CVZone方式实现的,代码教程来源https://www.computervision.zone,感兴趣可以测试一下
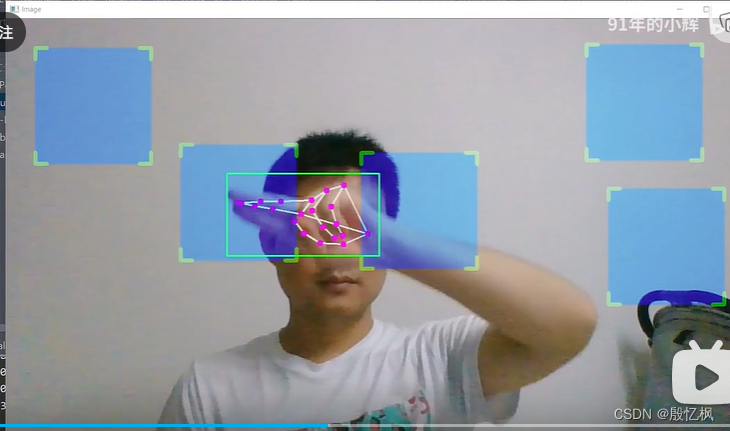
根据这个功能,用mediapipe实现了相同的效果。
二、实现流程
1、opencv 读取视频流
cap = cv2.VideoCapture(0)
2、通过mediapipe库获取手指关节坐标
hands = mp_hands.Hands(
    model_complexity=0,
    min_detection_confidence=0.5,
    min_tracking_confidence=0.5)
# 识别
results = hands.process(frame)
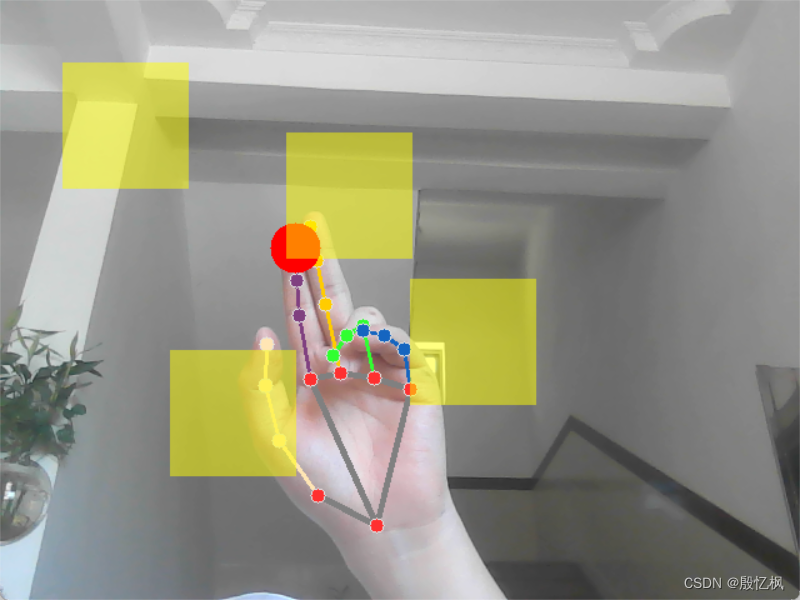
# 获取食指指尖坐标,坐标位置查看:https://google.github.io/mediapipe/solutions/hands

通过图可以看出,获取8点的坐标和12点的坐标
index_finger_x = int(x_list[8] * width)
index_finger_y = int(y_list[8] * height)
# 获取中指坐标
middle_finger_x = int(x_list[12] * width)
middle_finger_y = int(y_list[12] * height)
3、计算两指距离
finger_distance = math.hypot((middle_finger_x - index_finger_x),(middle_finger_y - index_finger_y))
4、判断手指是否在方块上
if (index_finger_x > x1 and index_finger_x < (x1+w1)) and (index_finger_y > y1 and index_finger_y < (y1+h1)):
5、在视频上显示方块
cv2.rectangle(frame,(x1,y1),(x1+w1,y1+h1),square_color1,-1)
cv2.rectangle(frame, (x2, y2), (x2 + w2, y2 + h2), square_color1, -1)
cv2.rectangle(frame, (x3, y3), (x3 + w3, y3 + h3), square_color1, -1)
cv2.rectangle(frame, (x4, y4), (x4 + w4, y4 + h4), square_color1, -1)
流程基本就是,获取视频帧,识别手的关键点,获取食指和中指坐标,计算坐标差值,然后更新坐标显示。
三、代码
# 导入opencv
import cv2
import numpy as np
import math

# 导入mediapipe:https://google.github.io/mediapipe/solutions/hands
import mediapipe as mp

mp_drawing = mp.solutions.drawing_utils
mp_drawing_styles = mp.solutions.drawing_styles
mp_hands = mp.solutions.hands

hands = mp_hands.Hands(
    model_complexity=0,
    min_detection_confidence=0.5,
    min_tracking_confidence=0.5)

# 读取视频流
cap = cv2.VideoCapture(0)

# 获取画面宽度、高度
width = int(cap.get(cv2.CAP_PROP_FRAME_WIDTH))
height = int(cap.get(cv2.CAP_PROP_FRAME_HEIGHT))


# 方块初始数组
x1 = 50
y1 = 50
w1 = 100
h1 = 100

x2 = 160
y2 = 50
w2 = 100
h2 = 100

x3 = 270
y3 = 50
w3 = 100
h3 = 100

x4 = 380
y4 = 50
w4 = 100
h4 = 100

L1 = 0
L2 = 0

on_square1 = False
square_color1 = (0,255,0)

on_square2 = False
on_square3 = False
on_square4 = False

while True:
    ret,frame = cap.read()

    # 镜像
    frame = cv2.flip(frame,1)

    frame.flags.writeable = False
    frame = cv2.cvtColor(frame, cv2.COLOR_BGR2RGB)
    # 识别
    results = hands.process(frame)

    frame.flags.writeable = True
    frame = cv2.cvtColor(frame, cv2.COLOR_RGB2BGR)

    # 如果有结果
    if results.multi_hand_landmarks:

        # 遍历双手
        for hand_landmarks in results.multi_hand_landmarks:
            mp_drawing.draw_landmarks(
                frame,
                hand_landmarks,
                mp_hands.HAND_CONNECTIONS,
                mp_drawing_styles.get_default_hand_landmarks_style(),
                mp_drawing_styles.get_default_hand_connections_style())

            # 使用这两句看一下里面到底是什么?
            # print(type(hand_landmarks))
            # print(hand_landmarks)
            # exit()

            # 21 个关键点的x,y坐标列表
            x_list = []
            y_list = []
            for landmark in hand_landmarks.landmark:
                x_list.append(landmark.x)
                y_list.append(landmark.y)

            # 输出一下长度
            # print(len(x_list))

            # 获取食指指尖坐标,坐标位置查看:https://google.github.io/mediapipe/solutions/hands
            index_finger_x = int(x_list[8] * width)
            index_finger_y = int(y_list[8] * height)

            # 获取中指坐标
            middle_finger_x = int(x_list[12] * width)
            middle_finger_y = int(y_list[12] * height)

            # 计算两指距离
            # finger_distance =math.sqrt( (middle_finger_x - index_finger_x)**2 + (middle_finger_y-index_finger_y)**2)
            finger_distance = math.hypot((middle_finger_x - index_finger_x),(middle_finger_y - index_finger_y))

            # 看一下距离
            # print(finger_distance)

            # 把食指指尖画出来
            cv2.circle(frame,(index_finger_x,index_finger_y),20,(0,0,255),-1)


            # 判断食指指尖在不在方块上

            if finger_distance < 60:

                # X坐标范围 Y坐标范围
                if (index_finger_x > x1 and index_finger_x < (x1+w1)) and (index_finger_y > y1 and index_finger_y < (y1+h1)):
                    if on_square1 == False:
                        print('在')
                        L1 = index_finger_x - x1
                        L2 = index_finger_y - y1
                        square_color1 = (255,0,255)
                        on_square1 = True
                elif (index_finger_x > x2 and index_finger_x < (x2+w2)) and (index_finger_y > y2 and index_finger_y < (y2+h2)):
                    if on_square2 == False:
                        print('在')
                        L1 = index_finger_x - x2
                        L2 = index_finger_y - y2
                        square_color1 = (0,0,255)
                        on_square2 = True
                elif (index_finger_x > x3 and index_finger_x < (x3 + w3)) and (
                        index_finger_y > y3 and index_finger_y < (y3 + h3)):
                    if on_square3 == False:
                        print('在')
                        L1 = index_finger_x - x3
                        L2 = index_finger_y - y3
                        square_color1 = (0, 0, 255)
                        on_square3 = True
                elif (index_finger_x > x4 and index_finger_x < (x4 + w4)) and (
                        index_finger_y > y4 and index_finger_y < (y4 + h4)):
                    if on_square4 == False:
                        print('在')
                        L1 = index_finger_x - x4
                        L2 = index_finger_y - y4
                        square_color1 = (0, 255, 255)
                        on_square4 = True
                else:
                    print('不在')

            else:
                # 解除
                on_square1 = False
                square_color1 = (0,255,0)
                on_square2 = False
                on_square3 = False
                on_square4 = False

            # 更新坐标
            if on_square1:
                x1 = index_finger_x - L1
                y1 = index_finger_y - L2

            if on_square2:
                x2 = index_finger_x - L1
                y2 = index_finger_y - L2

            if on_square3:
                x3 = index_finger_x - L1
                y3 = index_finger_y - L2

            if on_square4:
                x4 = index_finger_x - L1
                y4 = index_finger_y - L2


    # 画一个正方形,需要实心
    # cv2.rectangle(frame,(x,y),(x+w,y+h),(0,255,0),-1)

    # 半透明处理
    overlay = frame.copy()
    cv2.rectangle(frame,(x1,y1),(x1+w1,y1+h1),square_color1,-1)
    cv2.rectangle(frame, (x2, y2), (x2 + w2, y2 + h2), square_color1, -1)
    cv2.rectangle(frame, (x3, y3), (x3 + w3, y3 + h3), square_color1, -1)
    cv2.rectangle(frame, (x4, y4), (x4 + w4, y4 + h4), square_color1, -1)
    frame = cv2.addWeighted(overlay, 0.5, frame, 1 - 0.5, 0)

    # 显示画面
    cv2.imshow('demo',frame)

    if cv2.waitKey(10) & 0xFF == ord('q'):
        break

cap.release()
cv2.destroyAllWindows()
代码相对简单,这里不作过多解析,如果有看不懂,可以自行去补充基础知识。
环境使用的是前篇搭建的mediapipe_env环境,请参考博客AI项目一:mediapipe测试_殷忆枫的博客-CSDN博客
如有侵权,或需要完整代码,请及时联系博主。


 被折叠的 条评论
为什么被折叠?
被折叠的 条评论
为什么被折叠?
 到【灌水乐园】发言


