
目录
本节实践
- 实践:Nexus3安装部署配置(测试成功)-2022.6.5
- 实践:使用Maven代理仓库(测试成功)-2022.6.7
- 实践:创建Maven本地仓库(依赖)(测试成功)-2022.6.10
- 实践:创建Raw本地仓库(制品)(测试成功)-2022.6.10
- 实践:使用maven命令上传(测试成功)-2022.6.11
- 实践:使用插件命令上传(测试成功)-2022.6.11
- 实践:Nexus REST API(测试成功)-2022.6.20
- 实践:GitLabCI的Nexus的CI/CD(测试成功)-2022.6.21
- 实践:harbor CI流水线中制品库集成(测试成功)-2022.6.25
- 实践:Harbor API 实践(批量删除docker镜像)(测试成功)-2022.6.25
实验环境
win10
harborv.2.5.0
sonatype/nexus3:3.34.0
实验软件
链接:https://pan.baidu.com/s/1AqqLJLQhApMAXXKgOj5TPw?pwd=rg0q
提取码:rg0q
2022.6.25-Devops之制品库平台nexus实践-code

1、Nexus制品管理平台实践
工作流定义:
- 集成流水线: 提交代码,构建,单测,代码扫描,上传制品【生成制品】
- 发布流水线: 输入版本号, 输入部署环境.(从对应环境的制品库中取制品)
制品类型: 二进制制品, docker镜像
核心技能点:
- 制品库管理规范(创建)
- 上传制品
- 下载制品
https://help.sonatype.com/repomanager3/release-notes
1.Nexus基本功能简介
从3.x开始,它默认支持许多主流的软件包格式。Docker、Maven、Npm:(nexus制品库还是非常稳定的)
docker镜像仓库也是可以用nexus来搭建的;
jenkins本身也支持收集制品的功能,但不建议这么做,因为jenkins已经够重了;
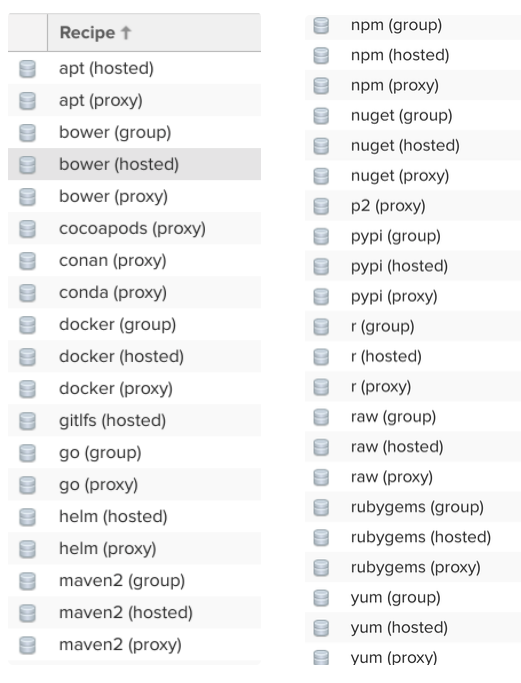
仓库类型:
- proxy 代理仓库。
- hosted 私有仓库。
- group 仓库组,将多个仓库组合在一起,通过同一个URL对外提供。
代理仓库 : Maven、Npm等。用于存储外网公共仓库中的插件和依赖,不可进行修改和私自上传。
2.Nexus3安装部署配置
| 💘 实践:Nexus3安装部署配置(测试成功)-2022.6.5 |
🍀 老师课件内容
## 下载镜像
docker pull sonatype/nexus3:3.34.0

## 创建数据存储目录
mkdir -p /data/cicd3/nexus3/data
chmod 777 -R /data/cicd3/nexus3/


## 启动容器
docker run -itd \
--privileged=true --name=nexus3 \
-p 8081:8081 \
-v /data/cicd3/nexus3/data:/nexus-data \
sonatype/nexus3:3.34.0
查看日志来确定Nexus是否已启动并准备就绪;
docker logs nexus3 -f
在日志中,看到Started Sonatype Nexus OSS 3.30.0-01,这意味着Nexus可以使用了。现在转到浏览器并打开:
http://your-ip-addr:8081
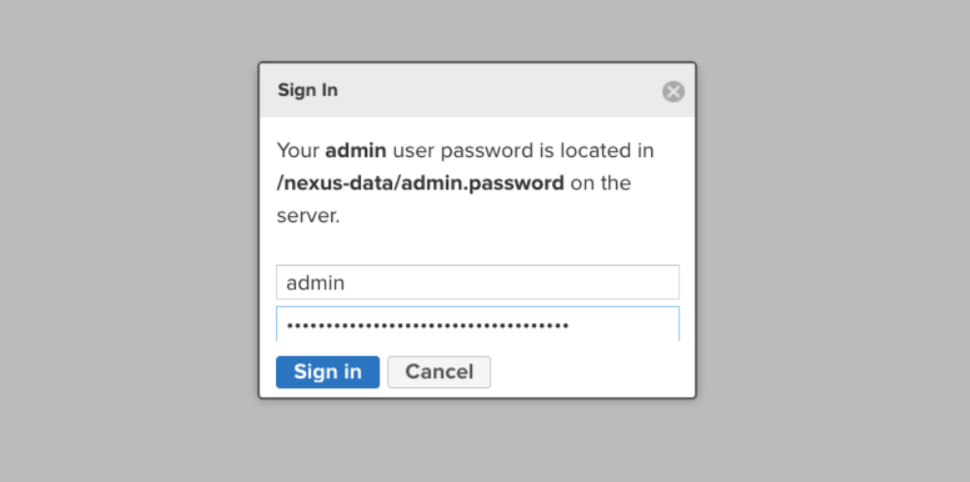
安装完成后, 默认的admin账号密码存储在了数据目录,获取初始化密码:
docker exec -i nexus3 cat /nexus-data/admin.password

登录后需要更新密码 admin/admin123
🍀 自己测试过程
- 来到github获取配置
nexus3.tf文件:
https://github.com/terraform-group/terraform-devops-tools/blob/master/nexus3.tf
resource "docker_image" "nexus3" {
  name         = "sonatype/nexus3"
  keep_locally = true //销毁时不删除本地镜像
}

resource "docker_container" "nexus3" {
  image = docker_image.nexus3.name
  name  = "nexus3"
  user  = "root"
  ports {
    internal = 8081
    external = 8081
  }

  volumes {
    container_path = "/nexus-data"
    host_path      = "/data/devops3/nexus3/data"
  }
}

resource "null_resource" "init" {

  provisioner "local-exec" {
    command = <<-EOF
              until [[ -f /data/devops3/nexus3/data/admin.password ]] ;do
                  sleep 1
              done

              cat /data/devops3/nexus3/data/admin.password
              EOF


  }

  depends_on = [
    docker_container.nexus3
  ]
}
编辑以上文件为如下内容:
并将其在linux服务器上进行创建:
resource "docker_image" "nexus3" {
  name         = "sonatype/nexus3"
  keep_locally = true //销毁时不删除本地镜像
}

resource "docker_container" "nexus3" {
  image = docker_image.nexus3.name
  name  = "nexus3"
  user  = "root"
  ports {
    internal = 8081
    external = 8081
  }

  volumes {
    container_path = "/nexus-data"
    host_path      = "/data/devops4/nexus3/data"
  }
}

resource "null_resource" "init" {

  provisioner "local-exec" {
    command = <<-EOF
              until [[ -f /data/devops4/nexus3/data/admin.password ]] ;do
                  sleep 1
              done

              cat /data/devops4/nexus3/data/admin.password
              EOF
  }

  depends_on = [
    docker_container.nexus3
  ]
}
安装nexus:
[root@devops remote-vscode]#pwd
/root/remote-vscode
[root@devops remote-vscode]#ls
main.tf  snoarqube.tf  terraform.tfstate  terraform.tfstate.backup
[root@devops remote-vscode]#vim nexus3.tf
但是在初始化的时候报错了……😢
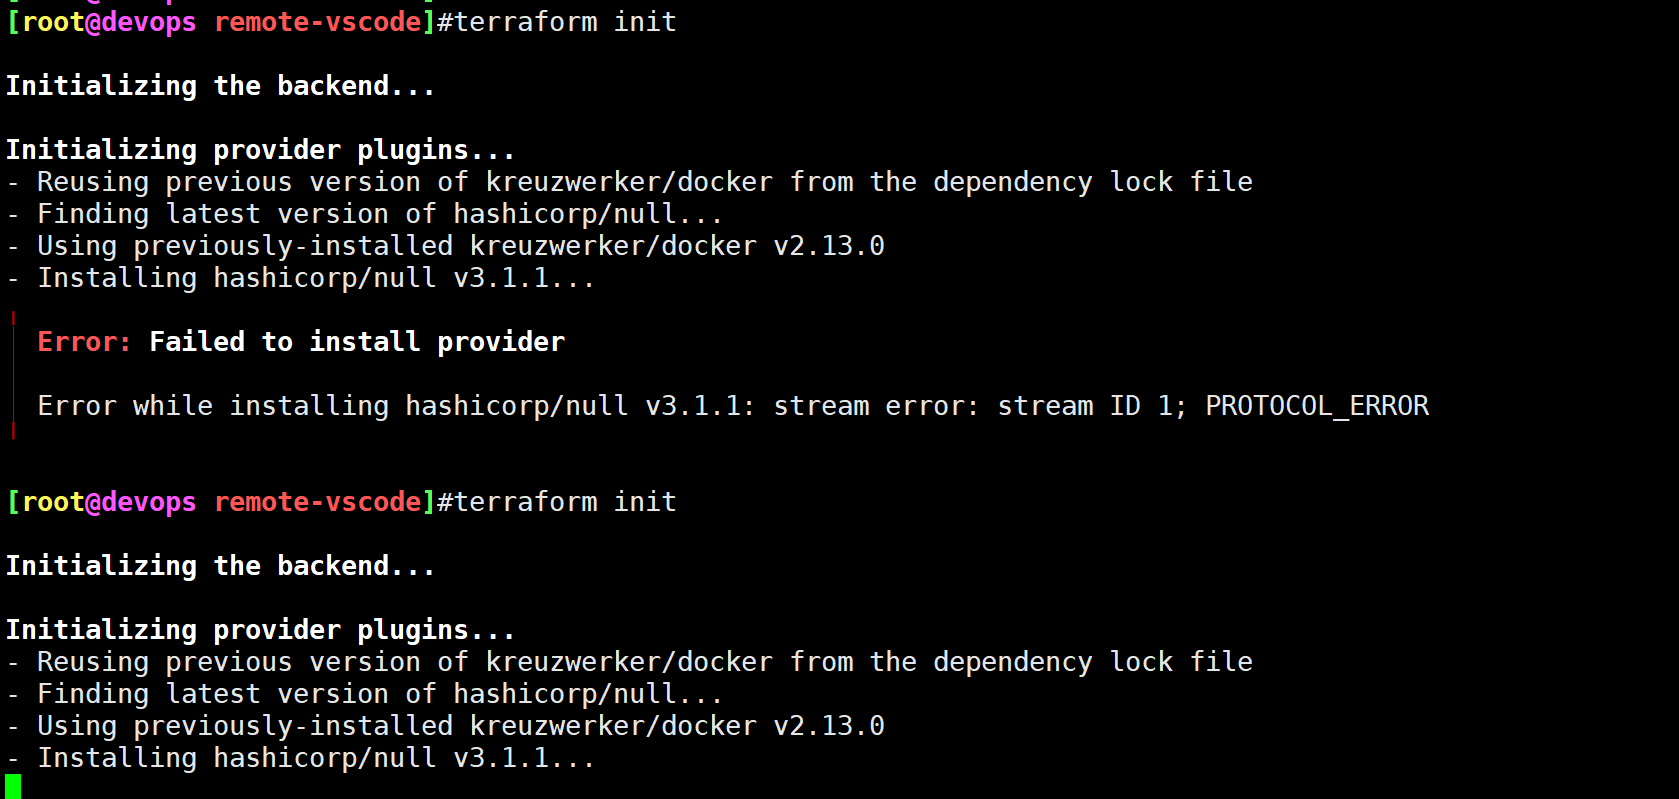

奇怪:
之前都是可以初始化成功的,但是这次为啥又不行了……
本次直接使用docker方式安装吧;
🍀 开始使用docker方式安装:
## (1)下载镜像
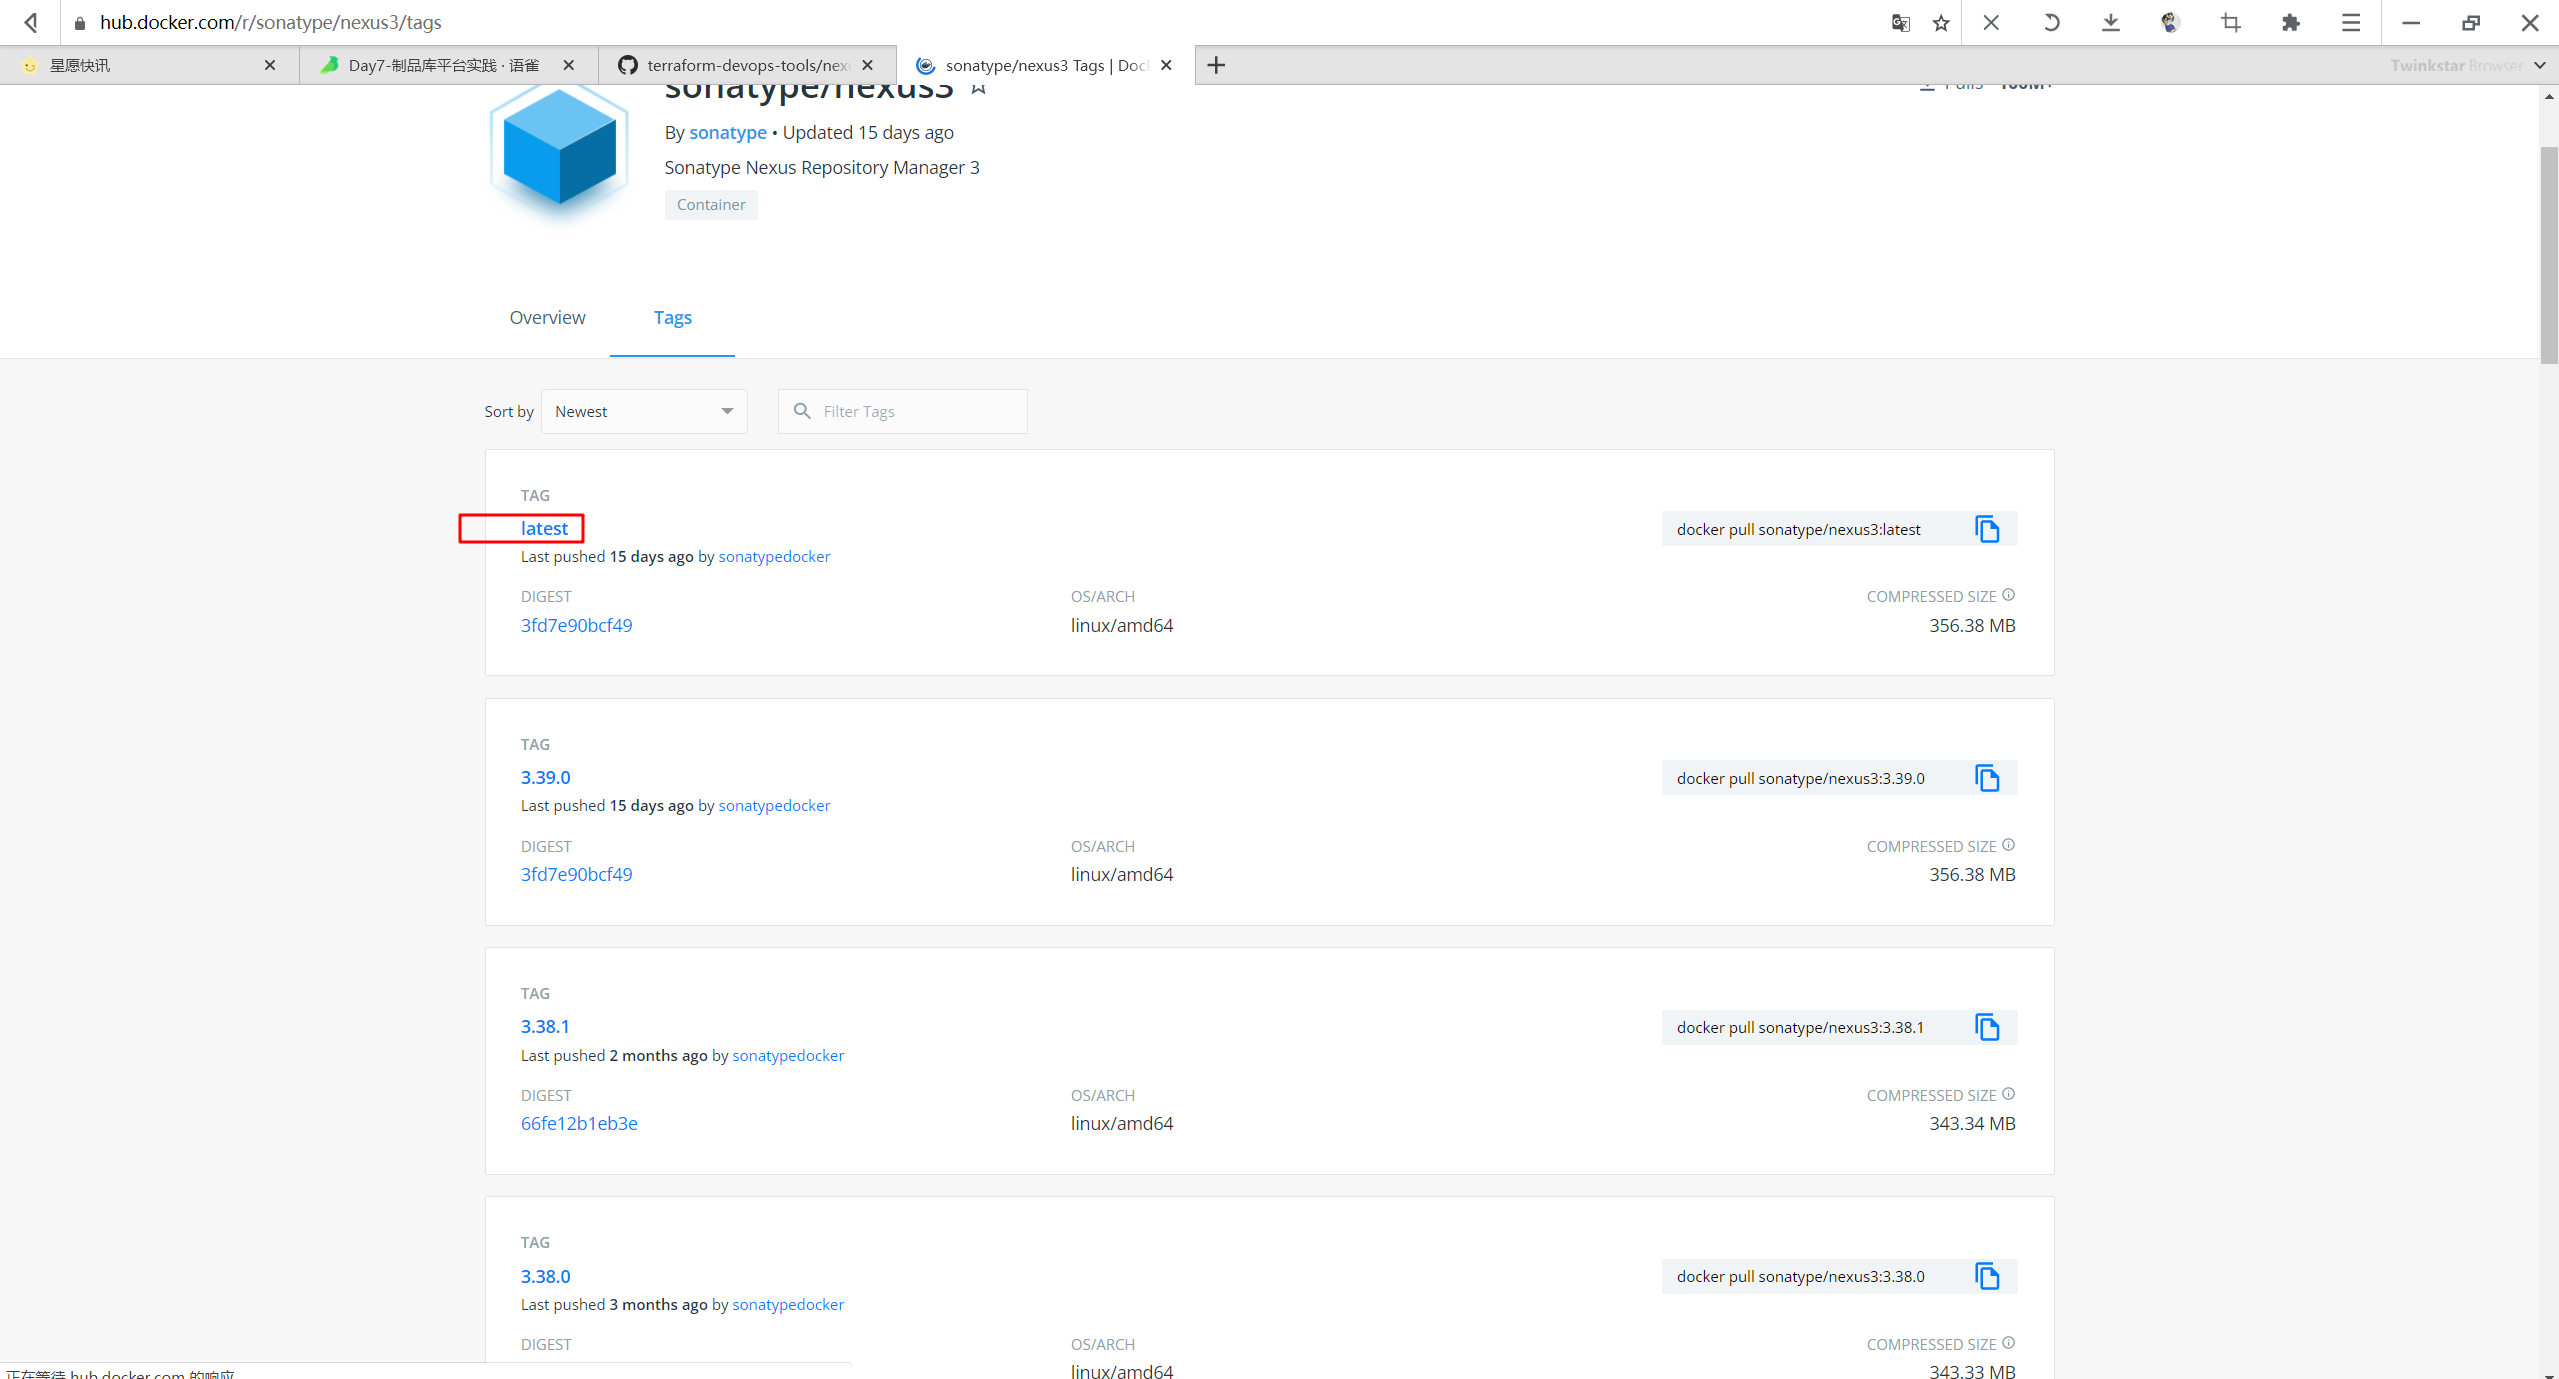
[root@devops ~]#docker pull sonatype/nexus3

## (2)创建数据存储目录
[root@devops ~]#mkdir -p /data/cicd/nexus3/data
[root@devops ~]#chmod 777 -R /data/cicd/nexus3/


## (3)启动容器
docker run -itd \
--privileged=true --name=nexus3 \
-p 8081:8081 \
-v /data/cicd/nexus3/data:/nexus-data \
--restart=always \
sonatype/nexus3
- 查看日志来确定Nexus是否已启动并准备就绪;
docker logs nexus3 -f
在日志中,看到Started Sonatype Nexus OSS 3.30.0-01,这意味着Nexus可以使用了。现在转到浏览器并打开:
http://your-ip-addr:8081
- 安装完成后, 默认的admin账号密码存储在了数据目录,获取初始化密码:
docker exec -i nexus3 cat /nexus-data/admin.password

登录后需要更新密码 admin/admin123

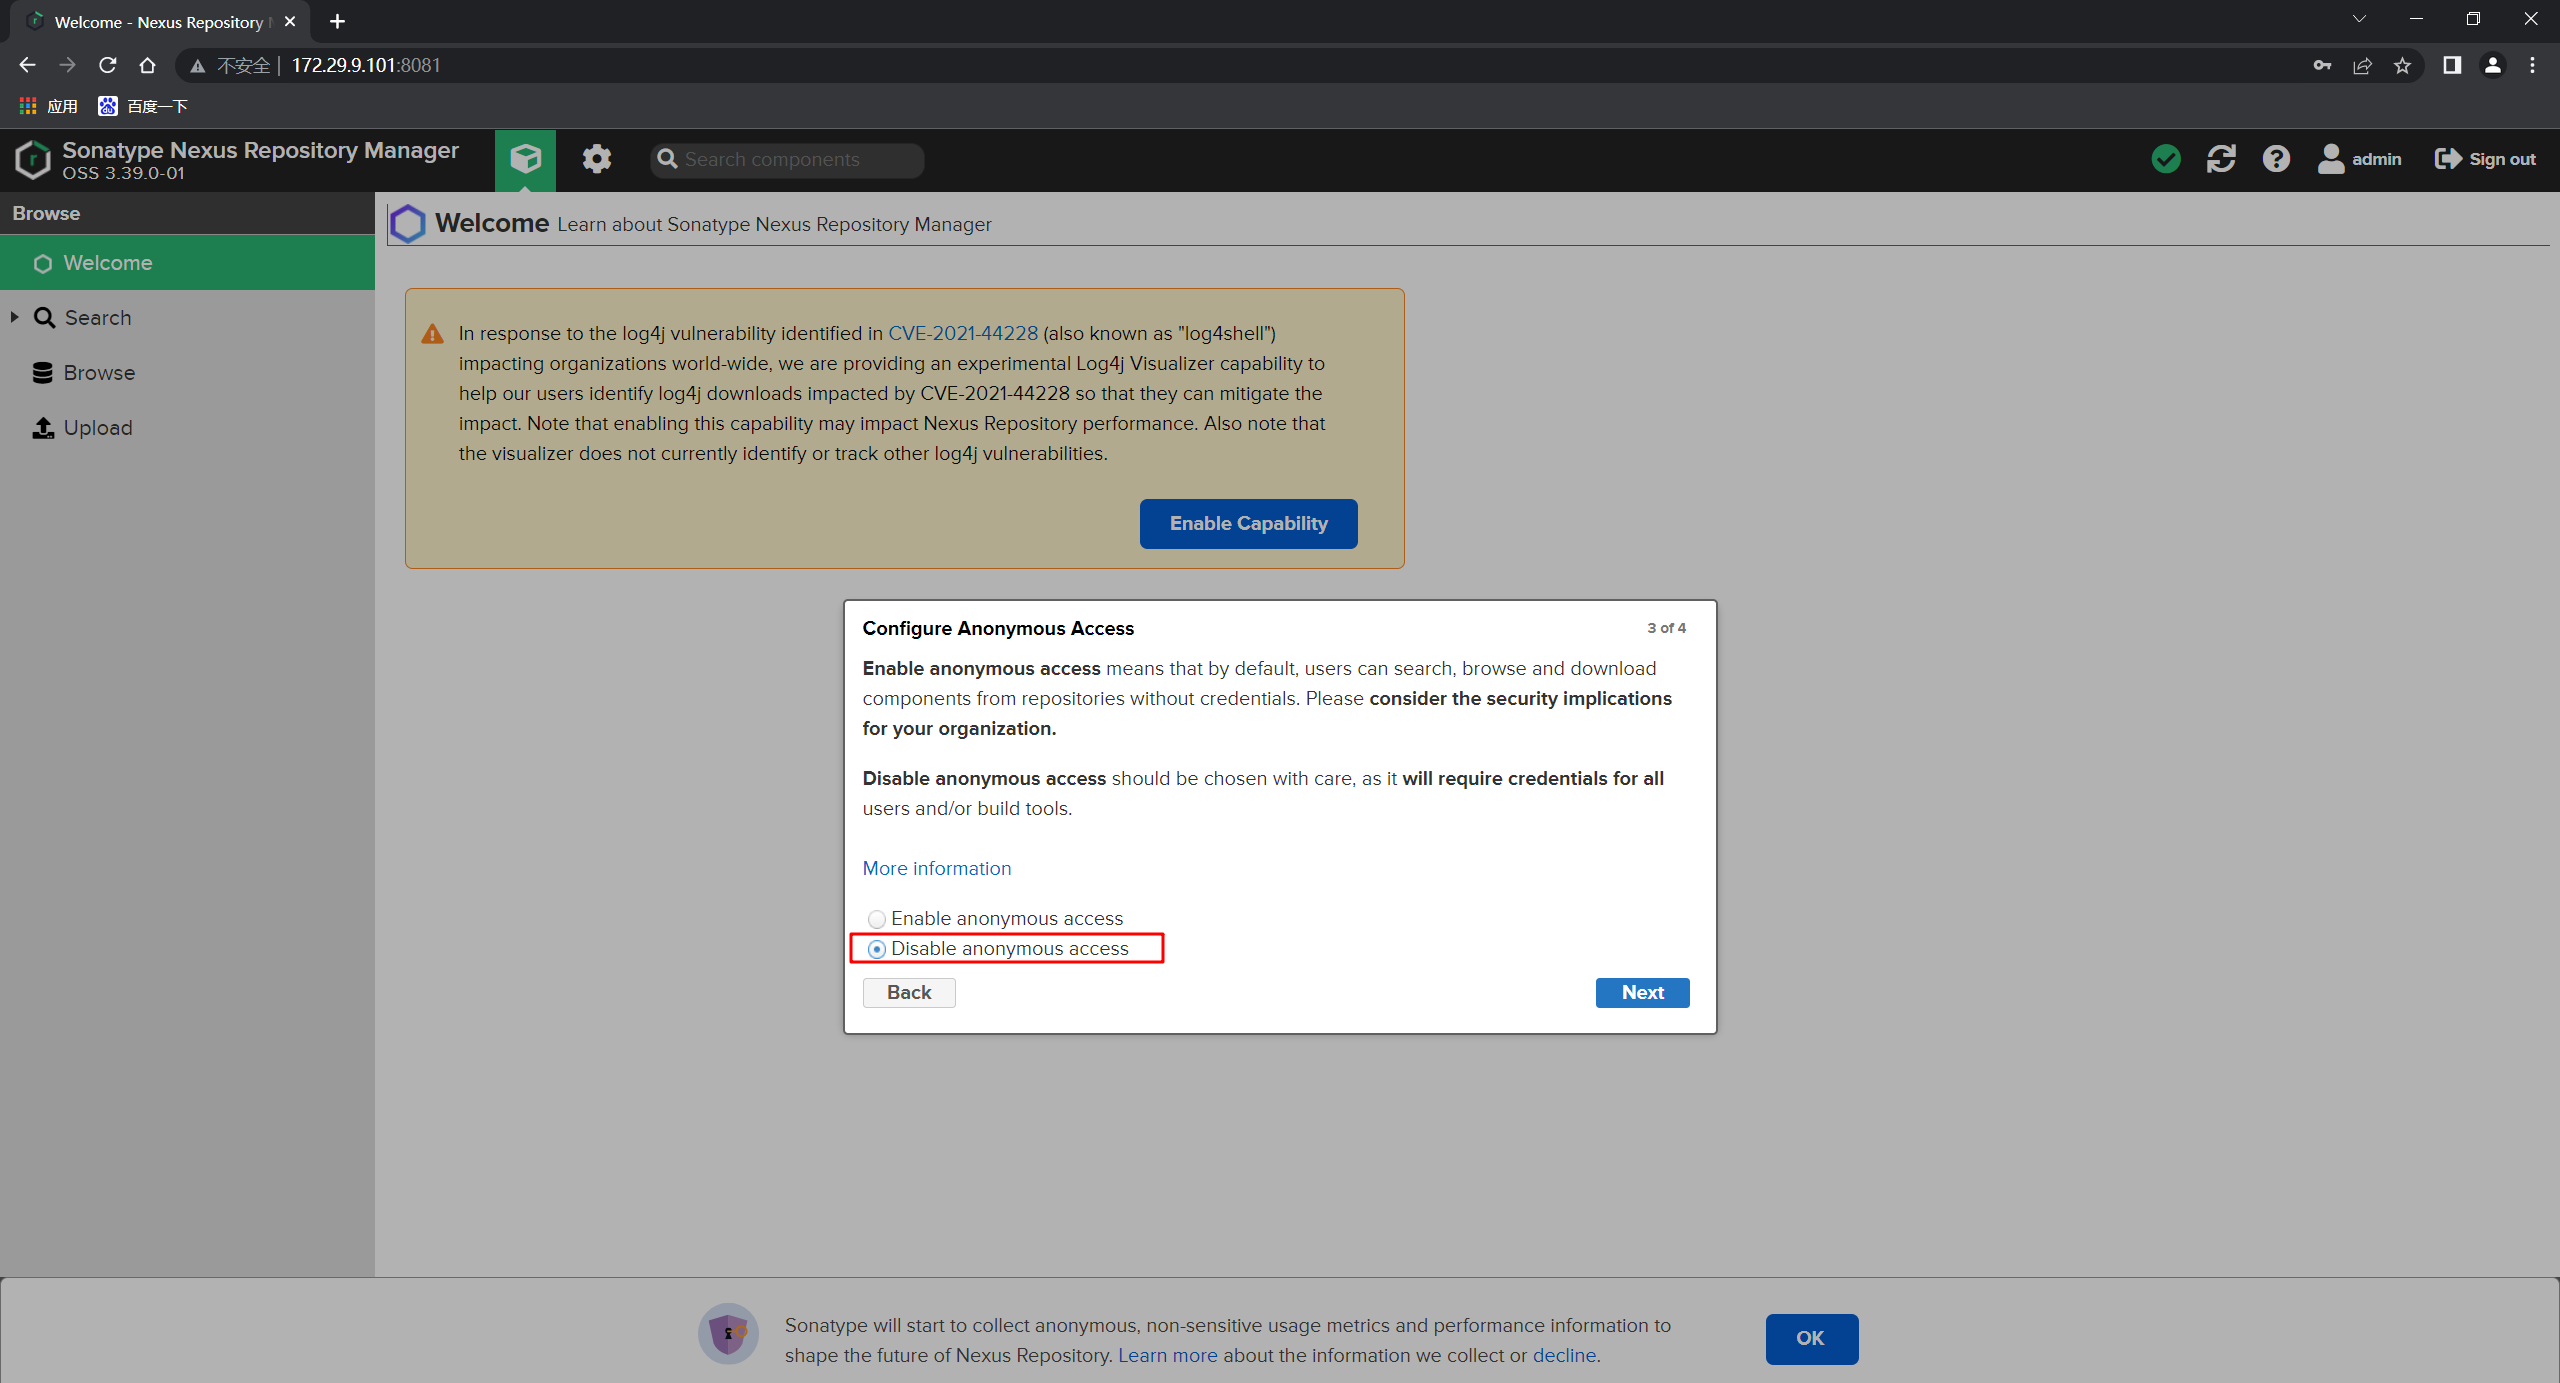
安装成功。😘
3.Nexus制品库应用实践
1.搭建Maven私服(代理仓库)
默认开发同学在进行开发的时候会使用一些包管理工具,例如:maven、ant、gradle这些都是常见项目编译构建工具 。这些工具可以理解为是一个命令行工具, 本身不会存储任何依赖包,而是通过公网官方的仓库中下载当前项目构建所需要的包。 (内网的速度要比公网快,这会直接影响管道的构建速度)
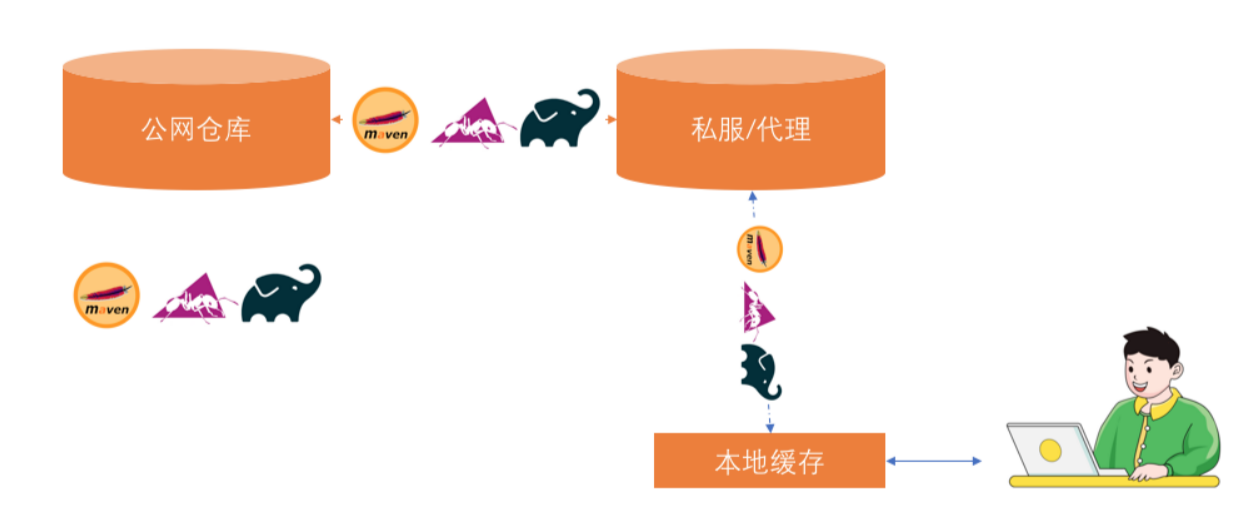
使用私服,就是在企业内部建立单一的可信源, 例如:我们在公司通过nexus创建一个代理仓库, 将公网仓库中的maven包代理到内网仓库中。 这样整个公司的同学就可以直接访问内网的私服进行下载构建依赖包。(减少了引入不信任依赖的风险)
代理仓库不会一下子把公网仓库中的所有包下载到本地,而是按需缓存。 例如: 此时我需要使用aa这个包, 如果代理仓库中没有, 则请求外部服务器下载这个包并进行缓存。第二次访问的时候,就直接访问代理仓库了。、
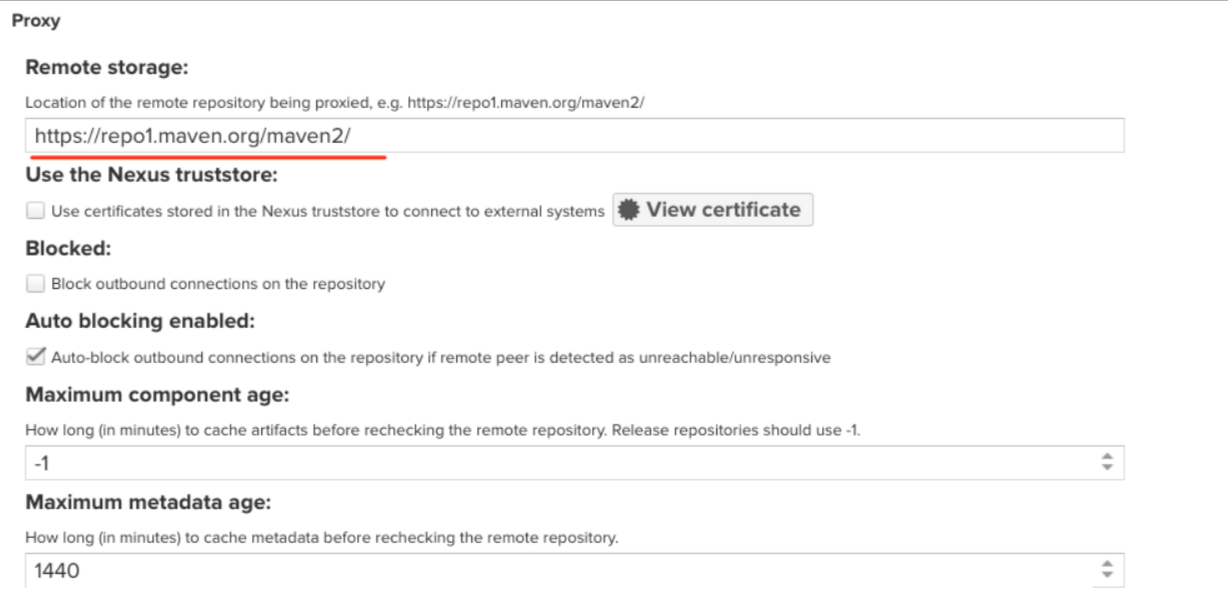
安装nexus后,默认存在以下图中的仓库, 这些仓库是官方默认配置好的maven私服。(可以直接使用)

进入其中一个仓库, 可以看到默认的配置。即: 代理公网repo1中的包到本地;
🍀 自己测试过程:
| 💘 实践:使用Maven代理仓库(测试成功)-2022.6.7 |
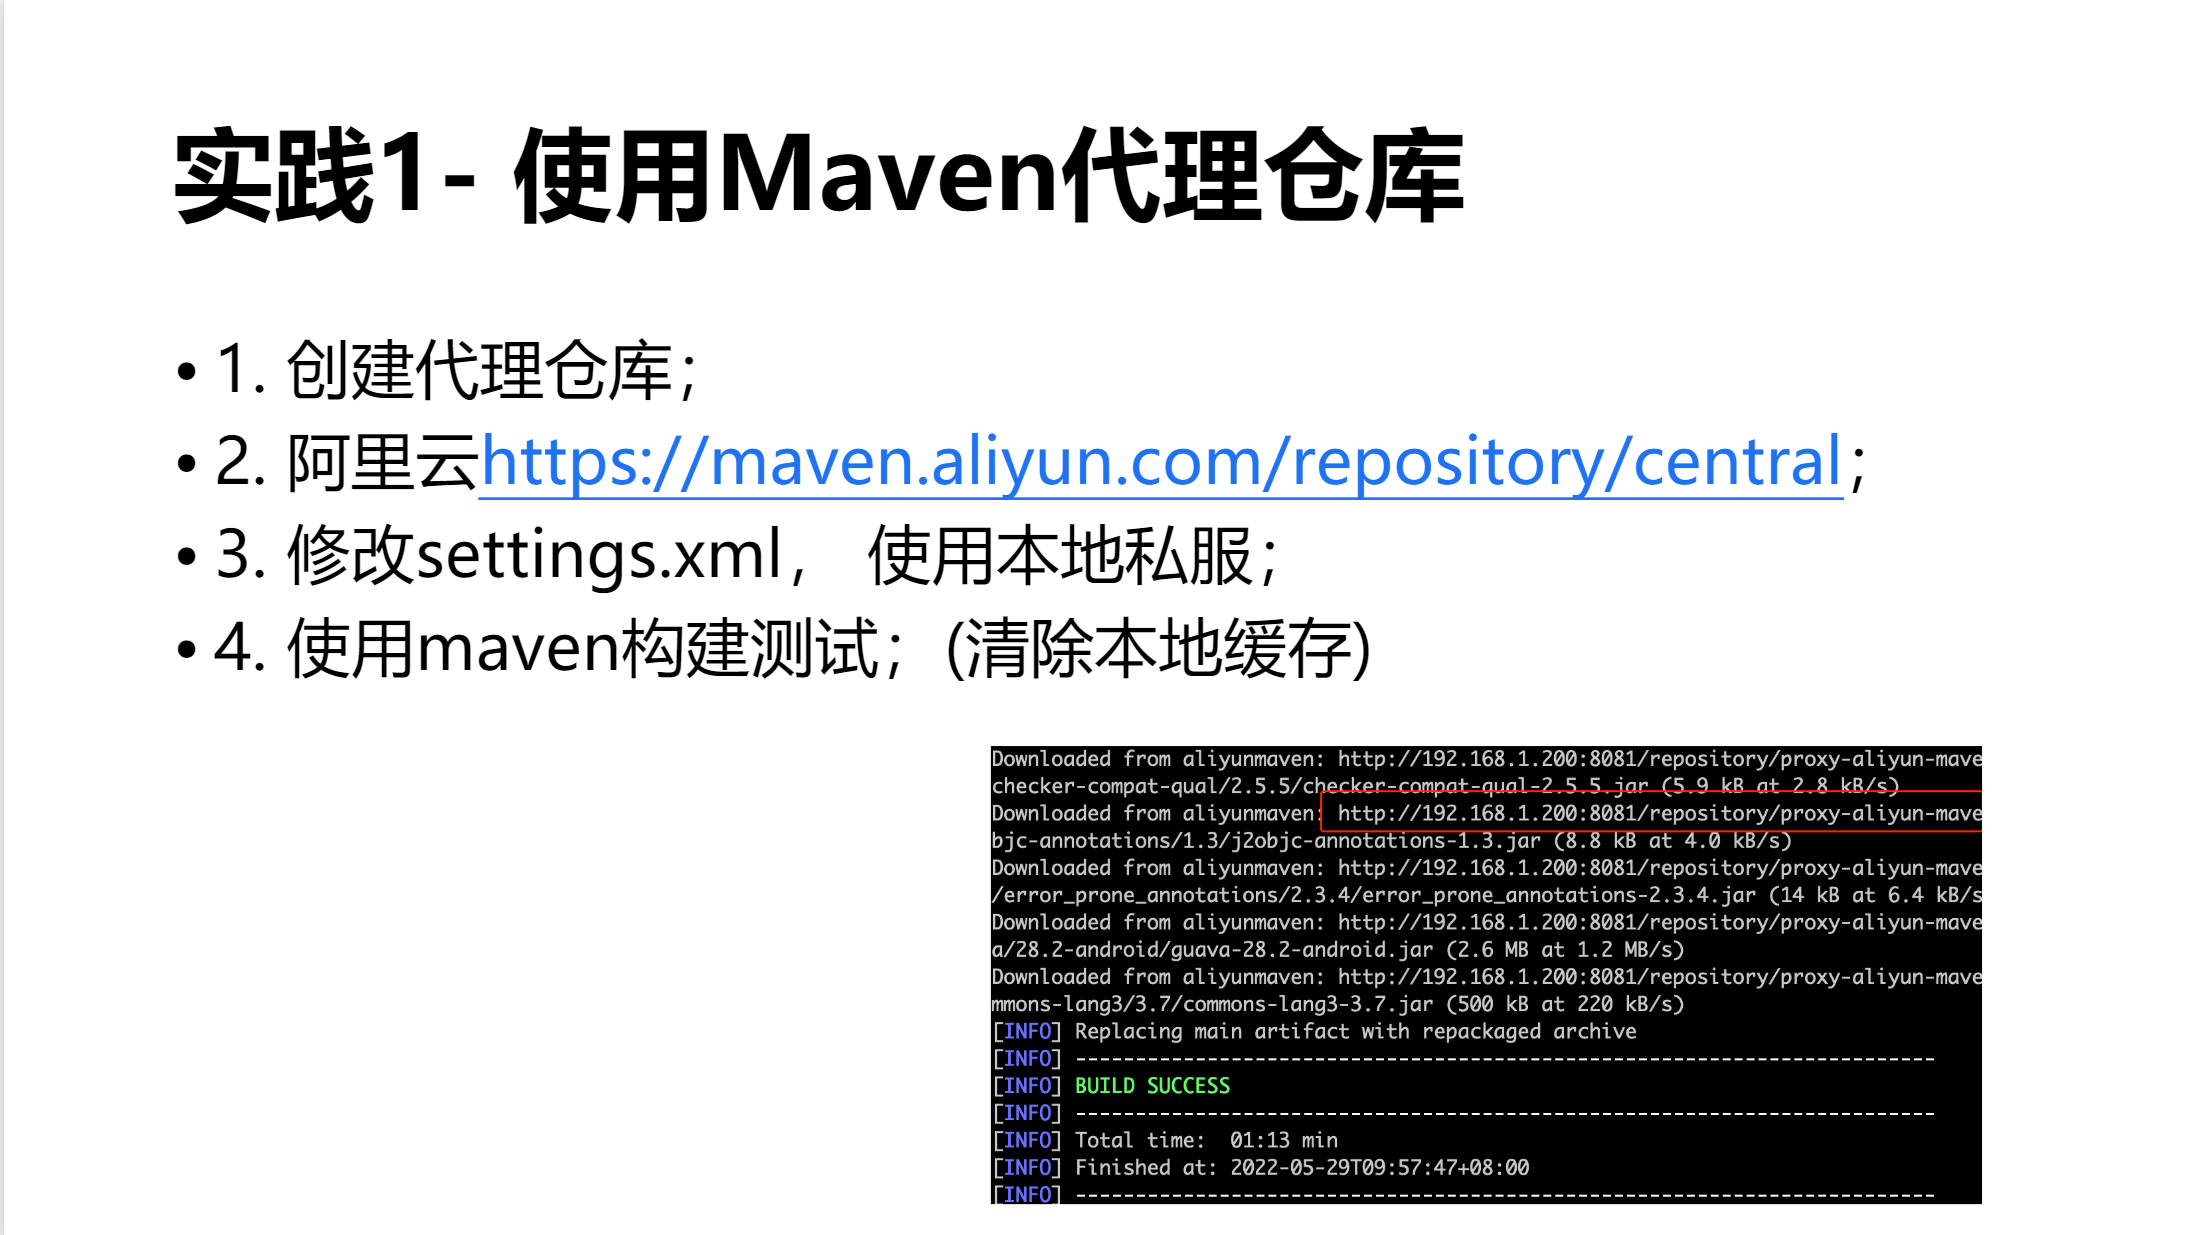
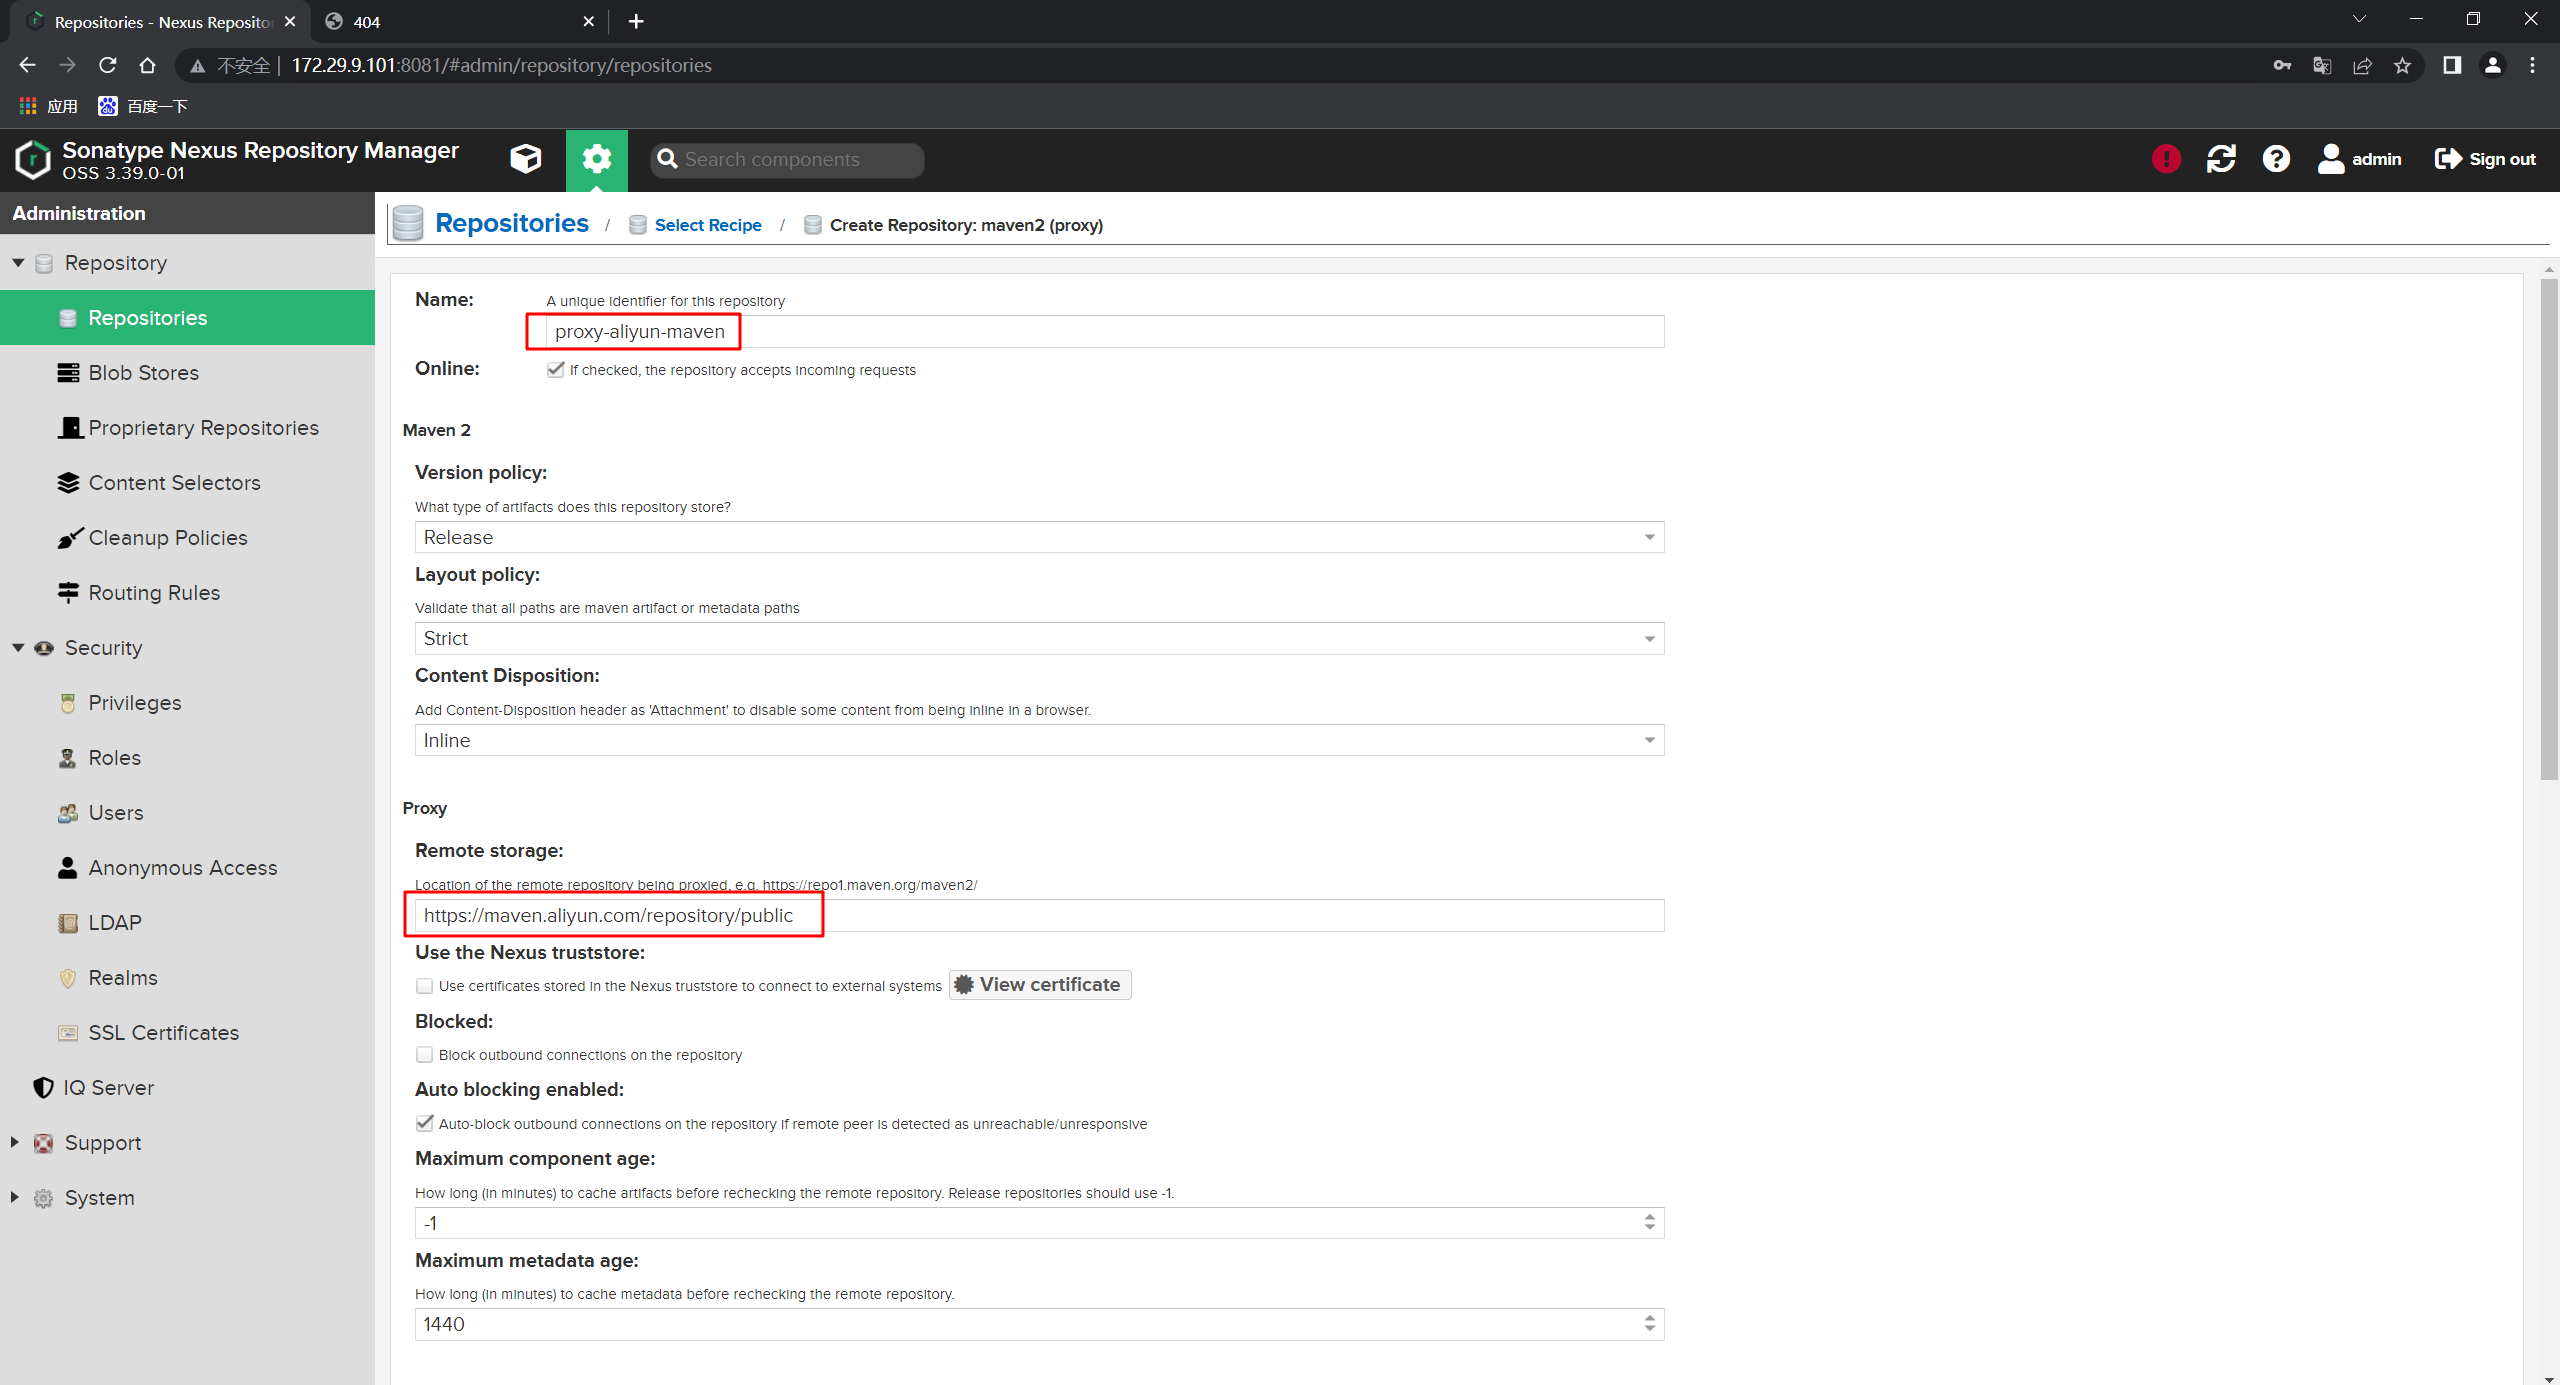
- 创建
proxy-aliyun-maven仓库:

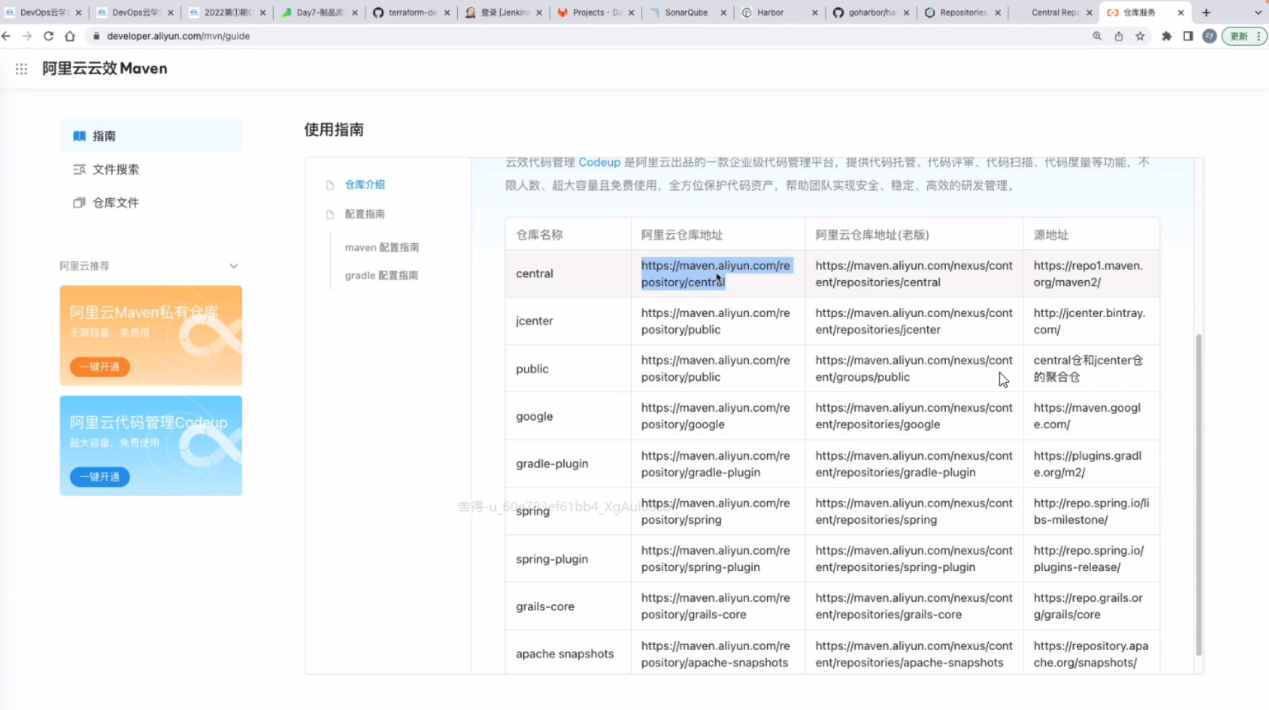
[root@devops conf]#vim /usr/local/apache-maven-3.8.5/conf/settings.xml
https://maven.aliyun.com/repository/public

注意:

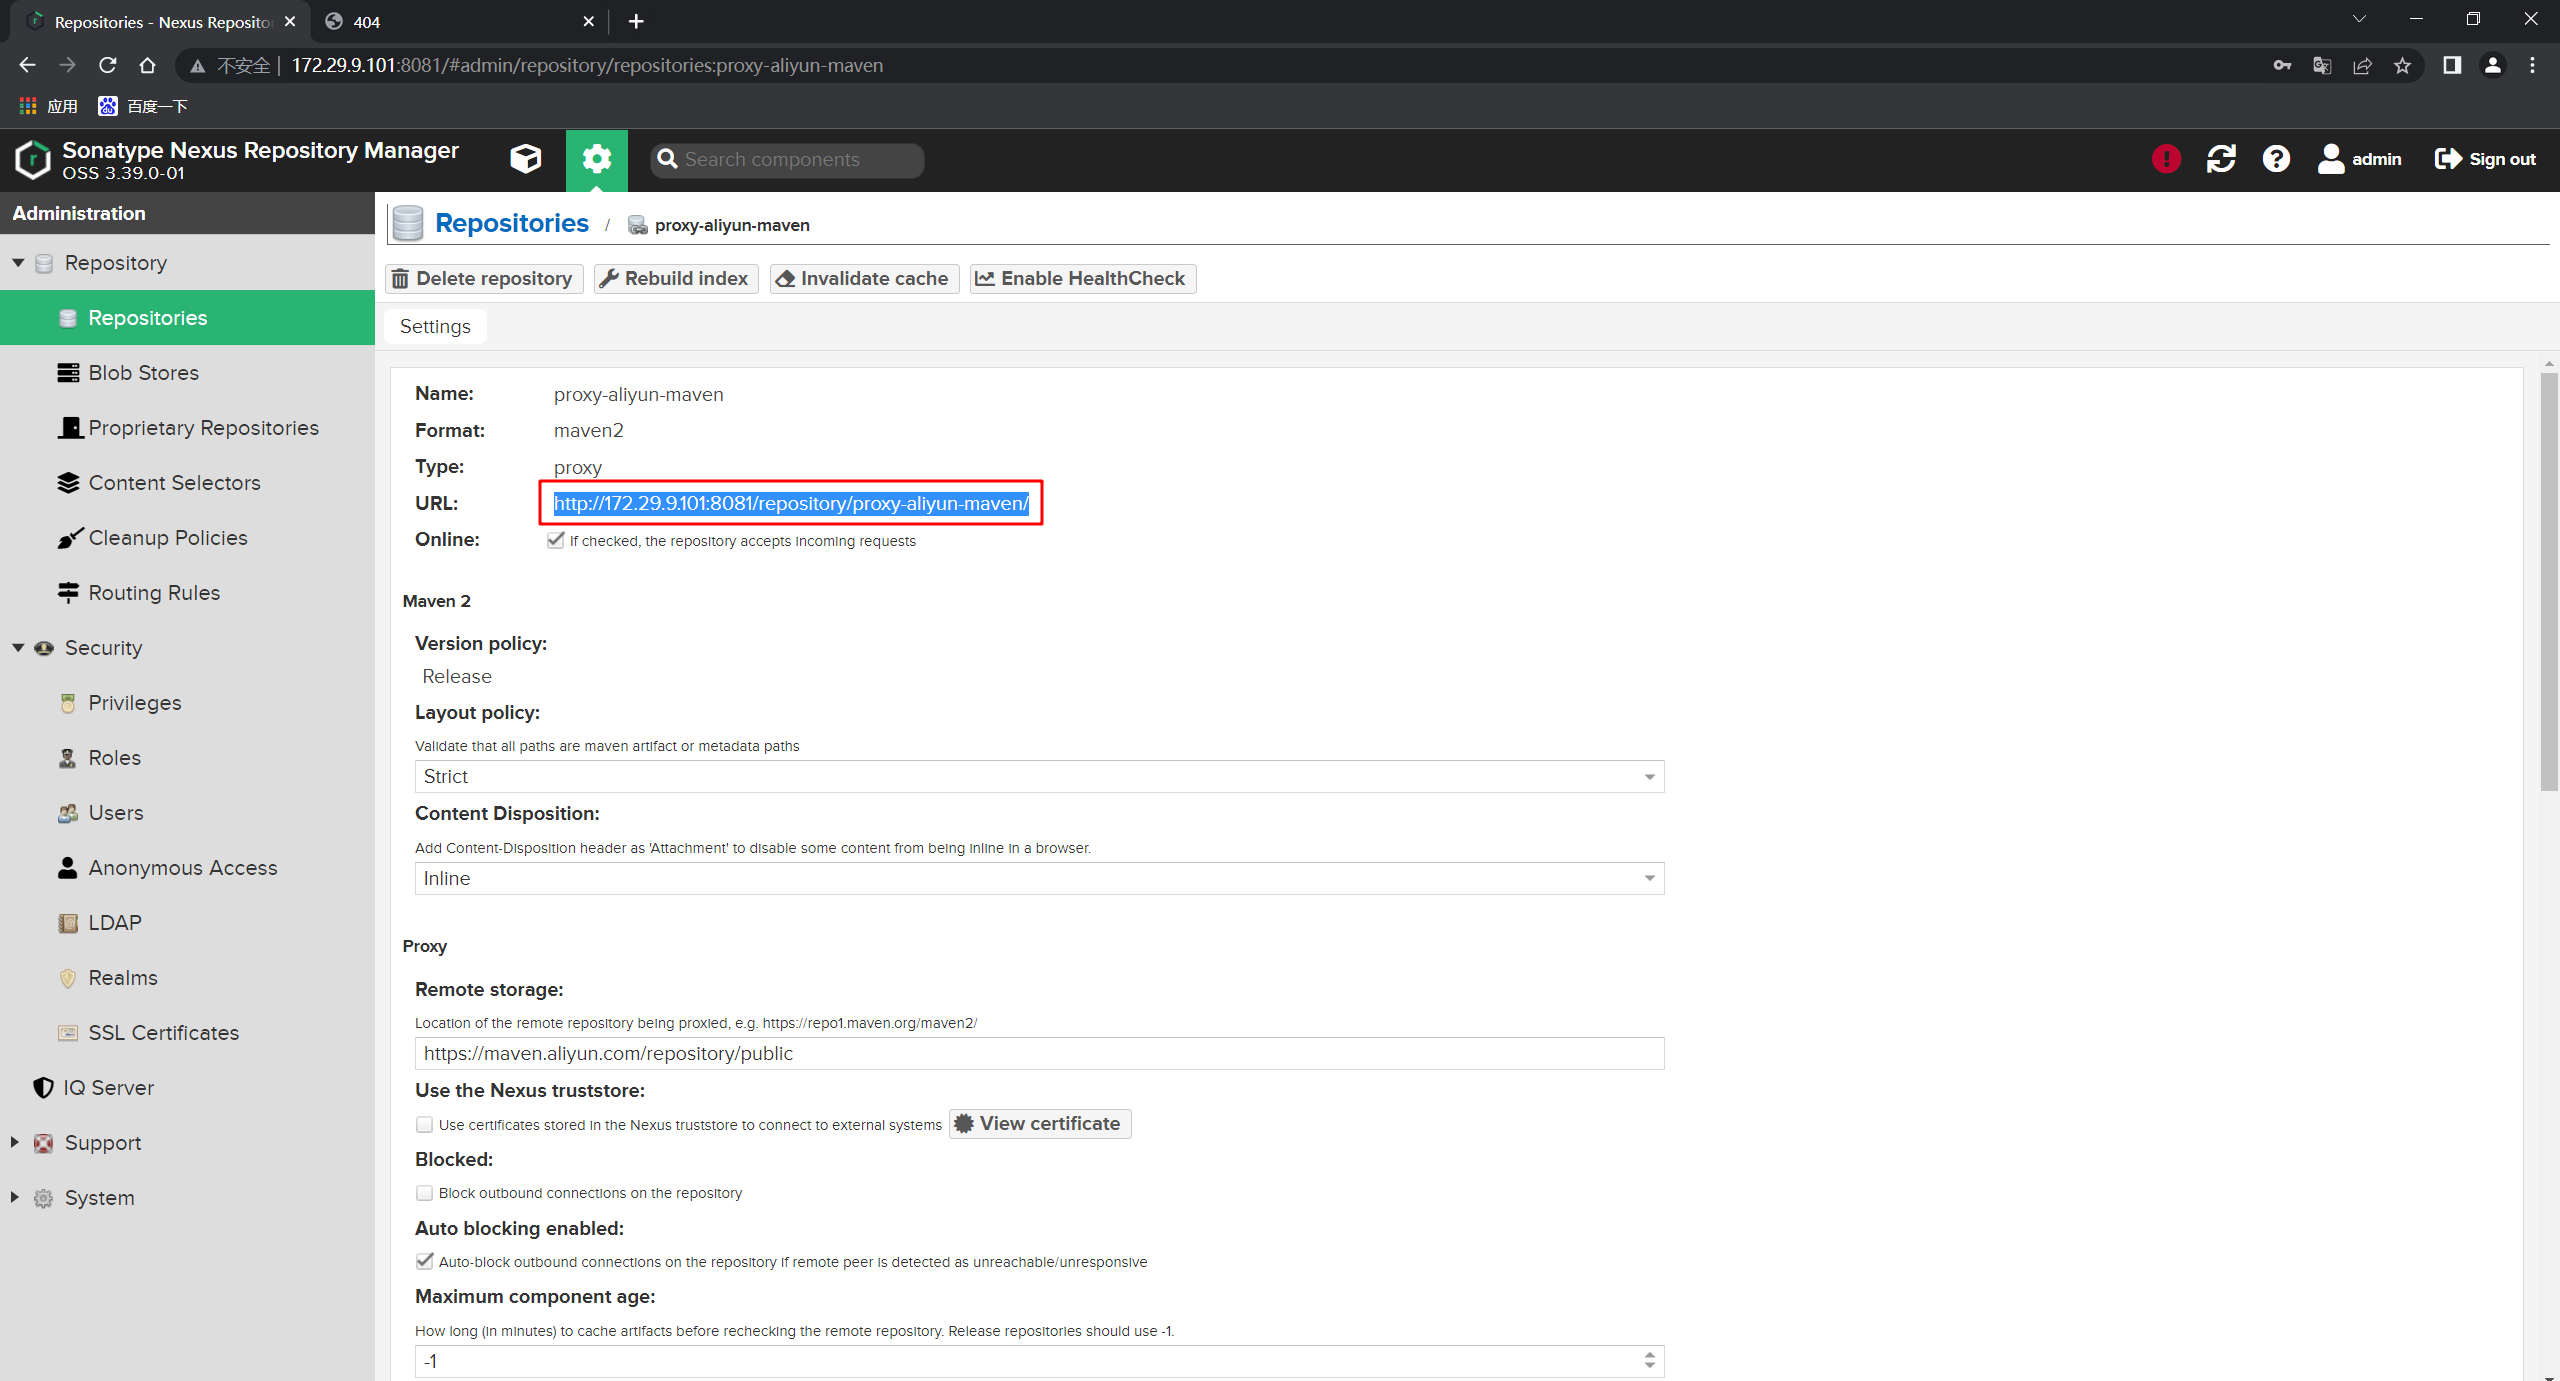
创建完成后如下:

http://172.29.9.101:8081/repository/proxy-aliyun-maven/
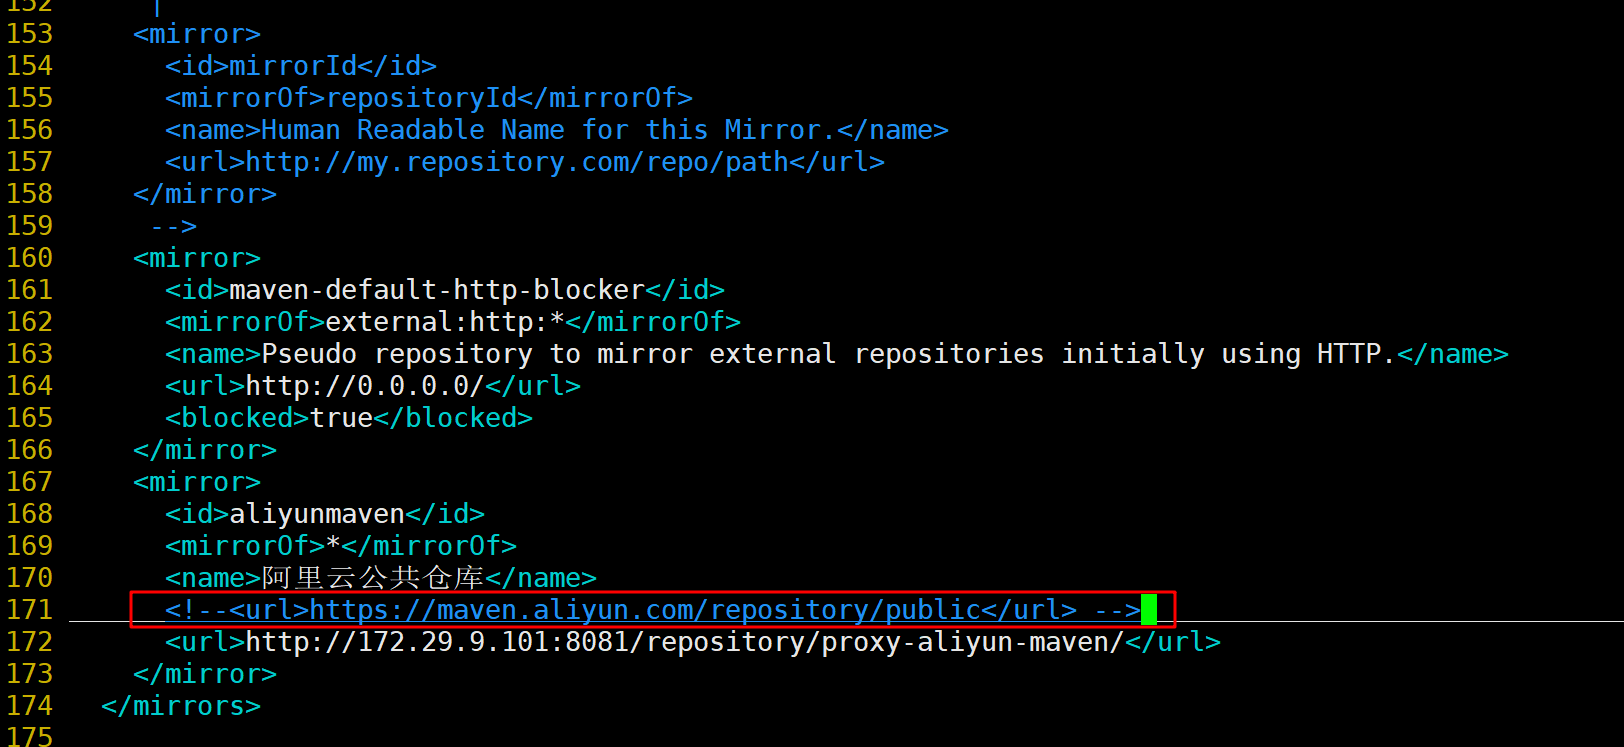
- 配置maven软件的配置文件
[root@devops conf]#vim /usr/local/apache-maven-3.8.5/conf/settings.xml
<url>http://172.29.9.101:8081/repository/proxy-aliyun-maven/</url>
- 删除本地缓存:
[root@devops conf]#rm -rf ~/.m2/
[root@devops conf]#rm -rf /data/maven_build_cache/*
[root@devops conf]#vim /usr/local/apache-maven-3.8.5/conf/settings.xml

- 测试效果:
来到一个java项目里,使用maven进行测试效果:
[root@devops devops4-maven-service-master]#pwd
/root/devops4-maven-service-master
[root@devops devops4-maven-service-master]#ls
build.sh  mvnw  mvnw.cmd  pom.xml  README.md  sonar-project.properties  src
[root@devops devops4-maven-service-master]#mvn clean package
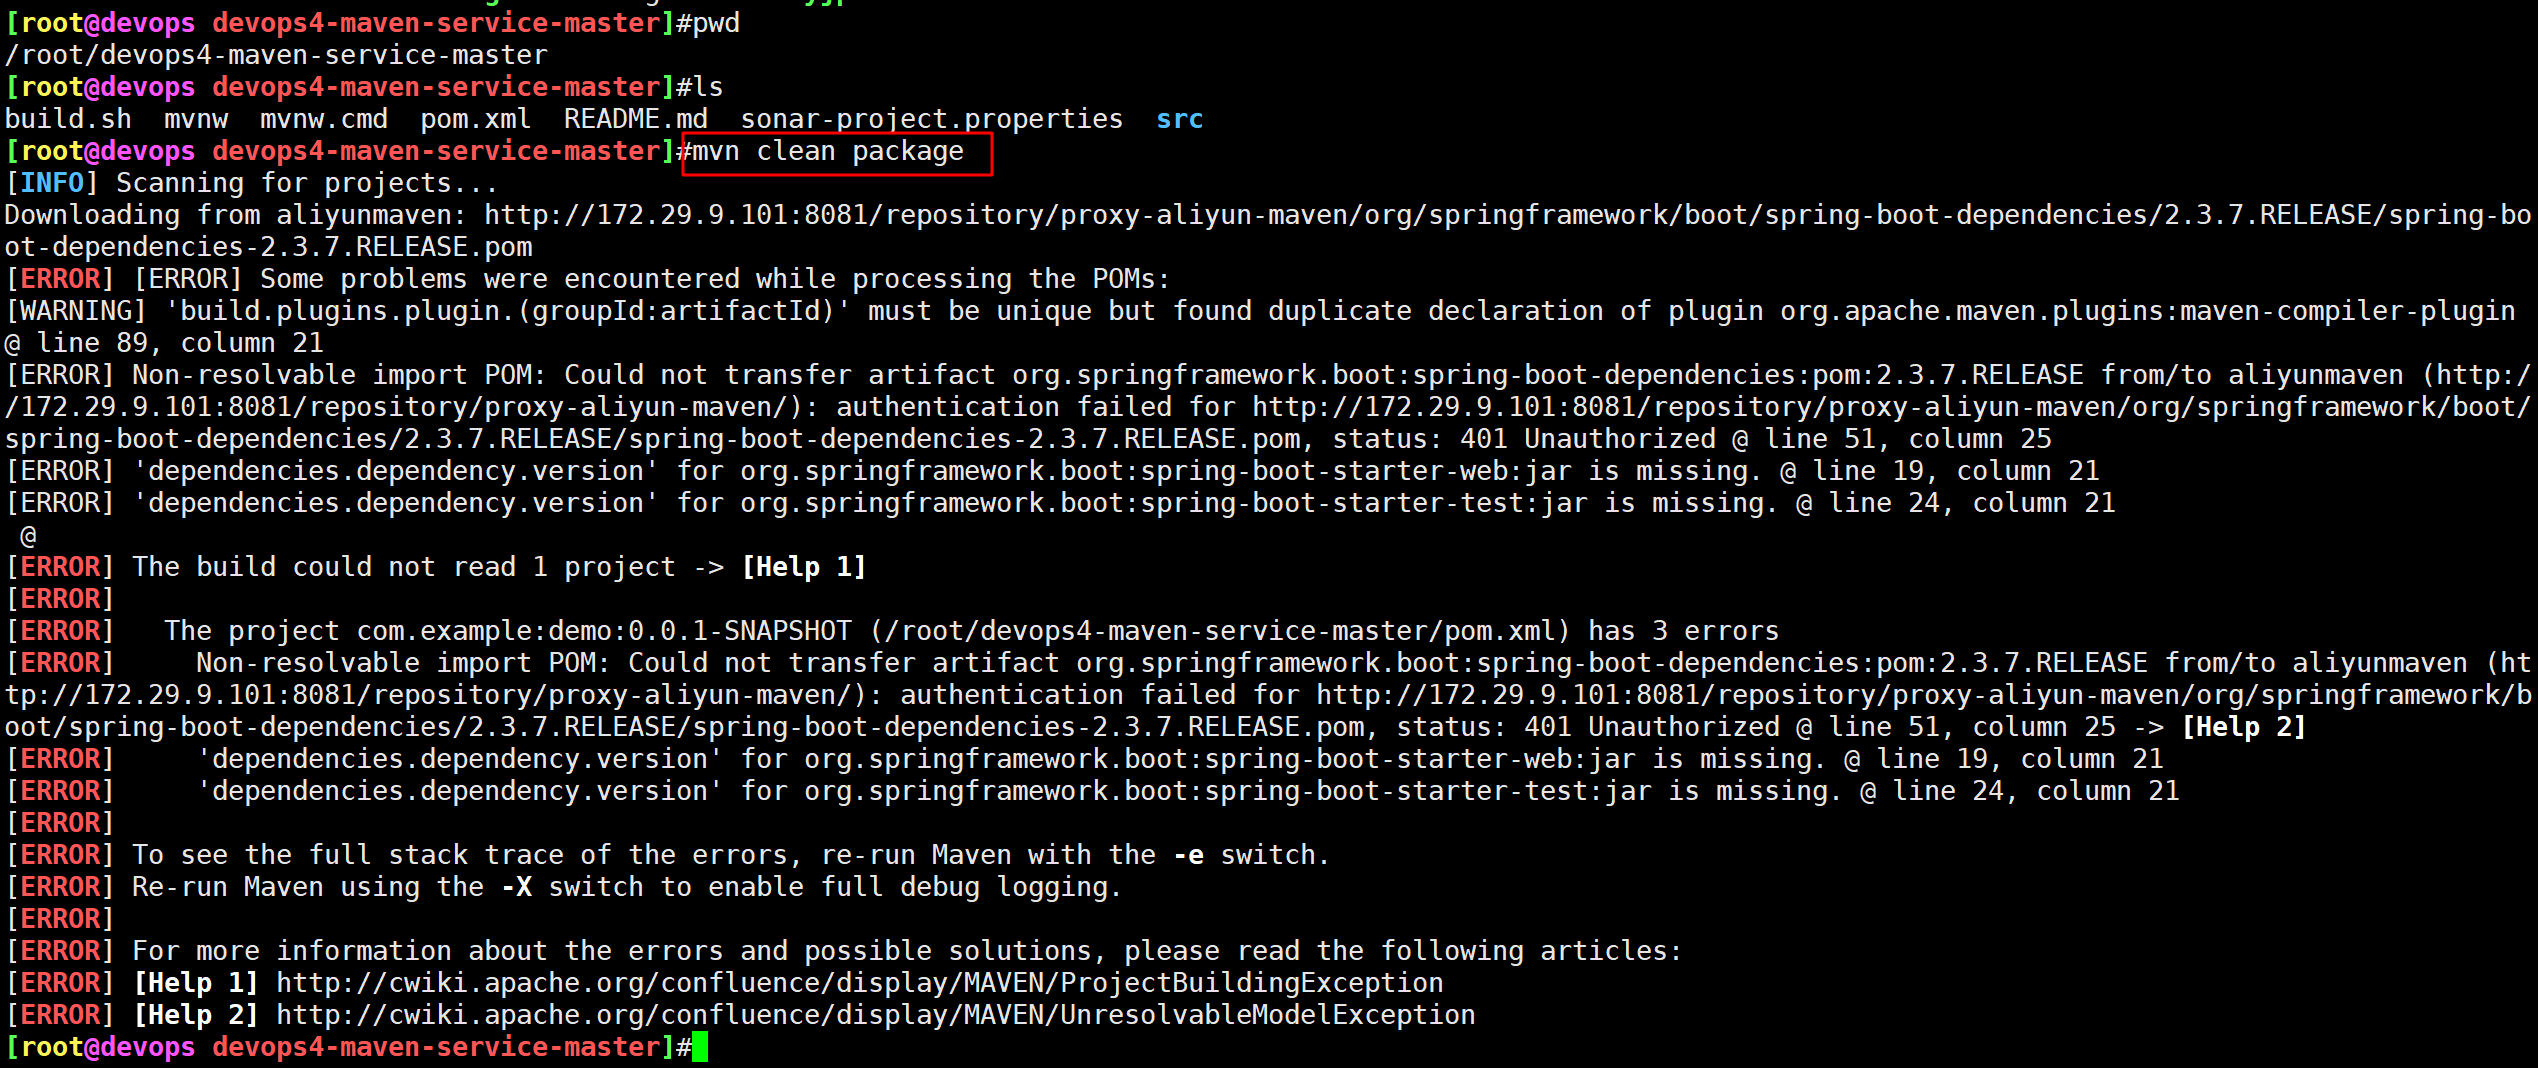
此时会报一个错误的,这里我们要配置下权限:
这种公网的,我们一般不加权限:

再次构建,观察效果:

可以看到能够正常下载。
来到这里也是可以看到下载的包:
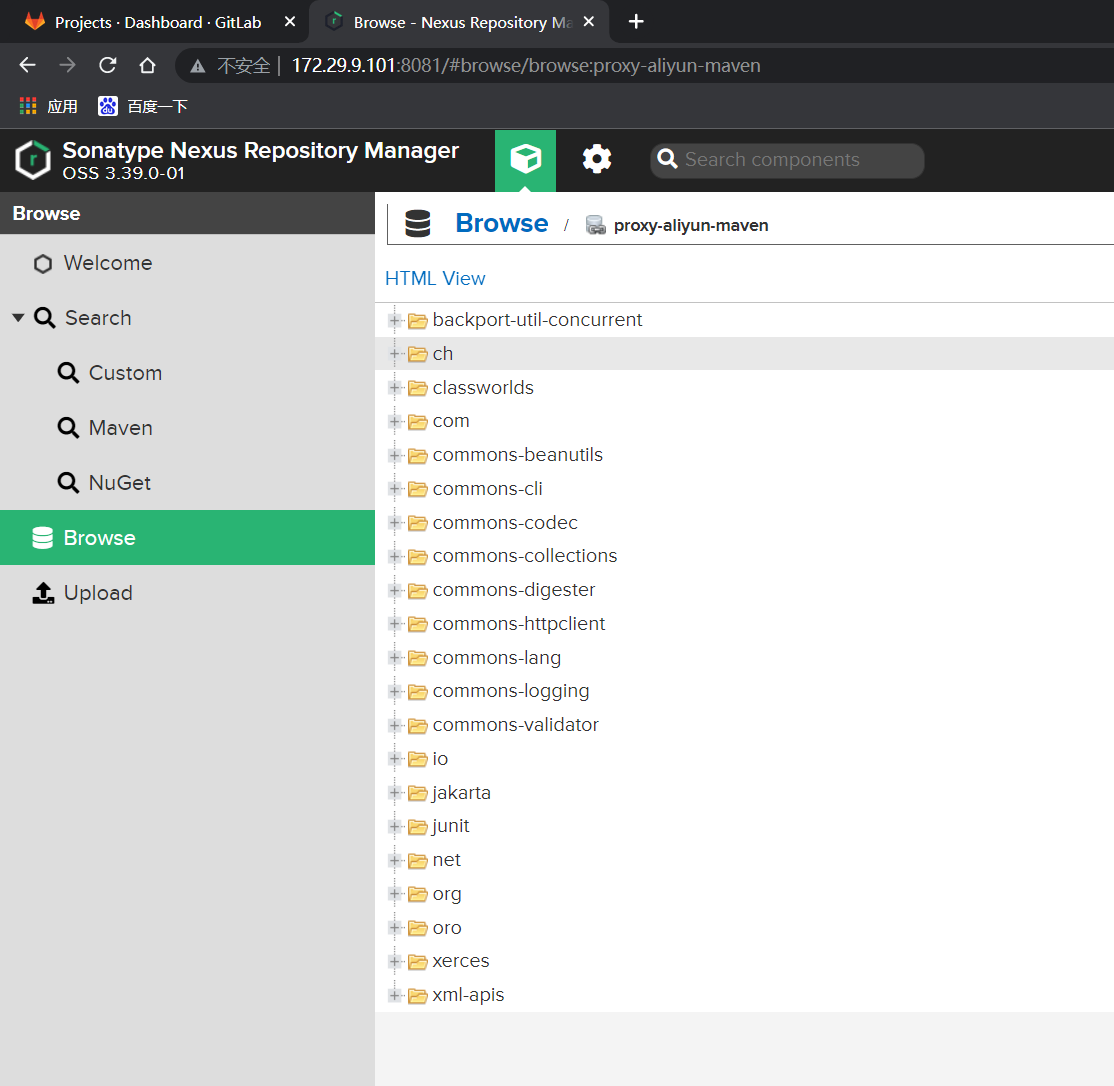
- 注意:这里有个奇怪的问题
使用这个代理仓库源会构建失败的:

但是使用阿里云的仓库源是可以成功构建的:

原因是我的这个nexus3容器为什么一直重启呢?……

最后经排查发现是自己虚机内存不足,导致nexus虚机一直重启:
扩大内存后,再次构建就发现成功了:😘

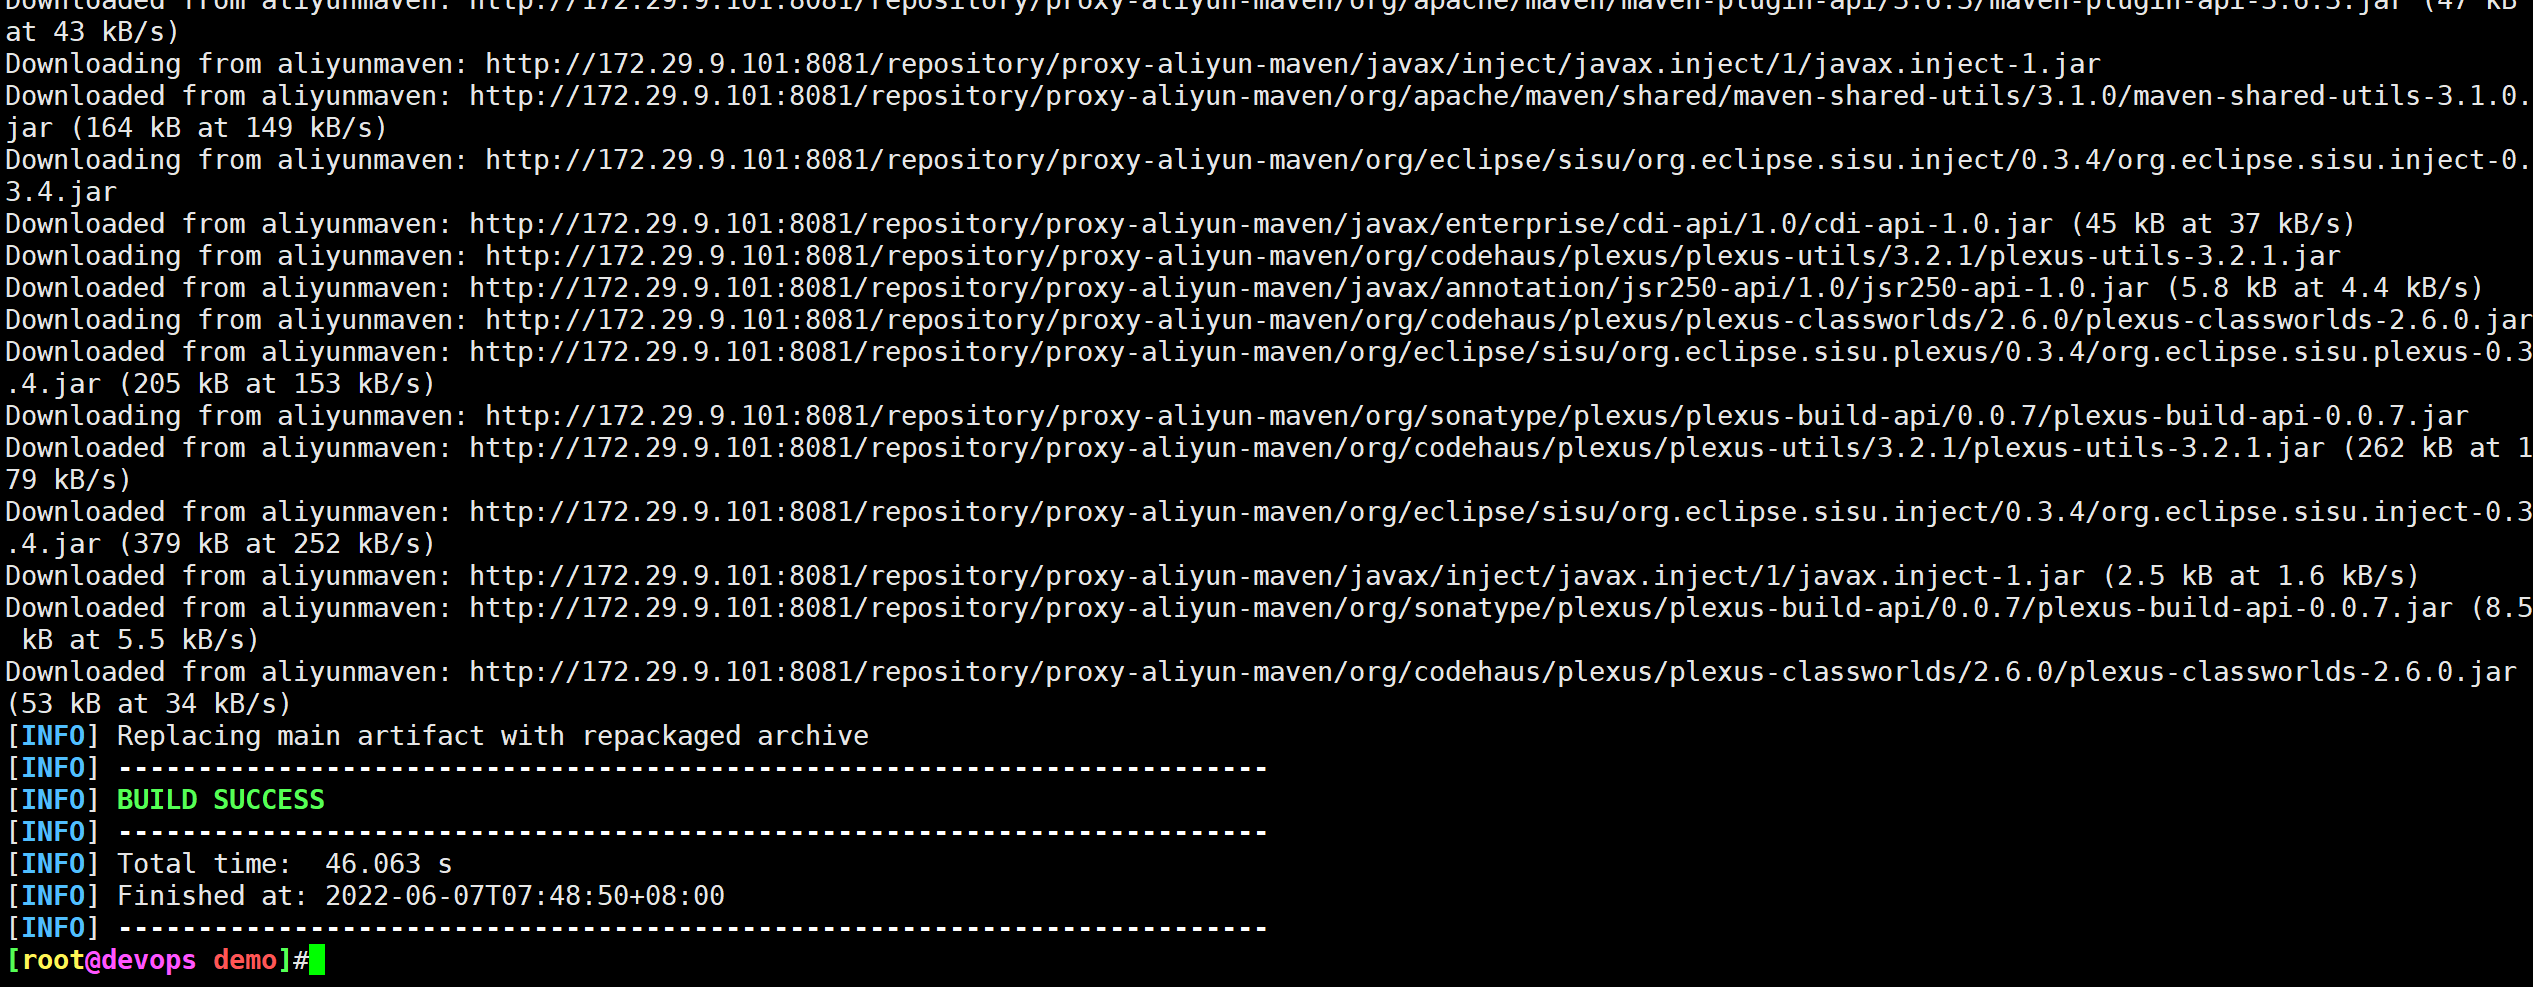
测试成功。😘
2.搭建制品库(本地仓库)
本地仓库:以Maven为例:
- RELEASE类型仓库(存放制品稳定版)
- SNAPSHOT类型仓库(存放制品开发版)
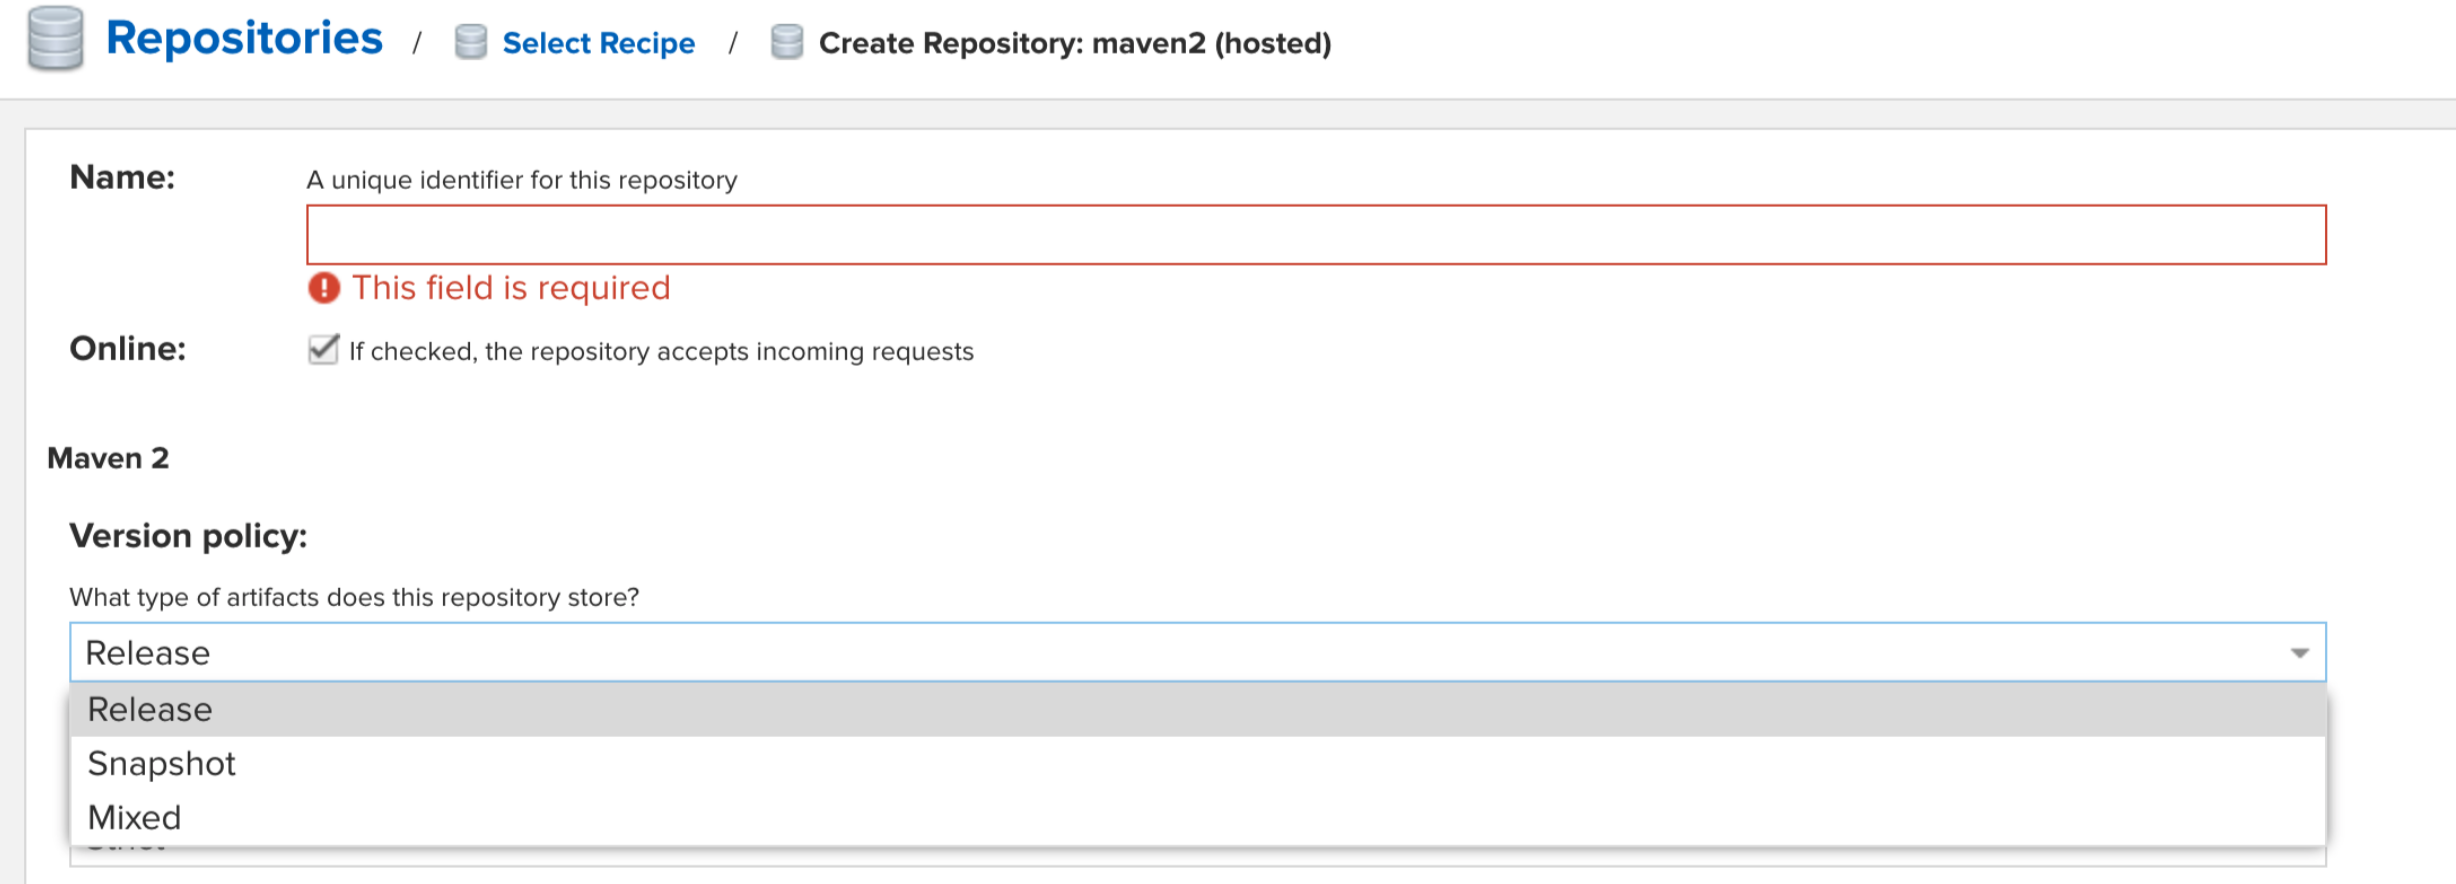
切记:release类型的仓库只能存放release版本的包。不能将release类型的包上传到snapshot仓库,同理snapshot类型的包也不能上传到release类型的仓库中。
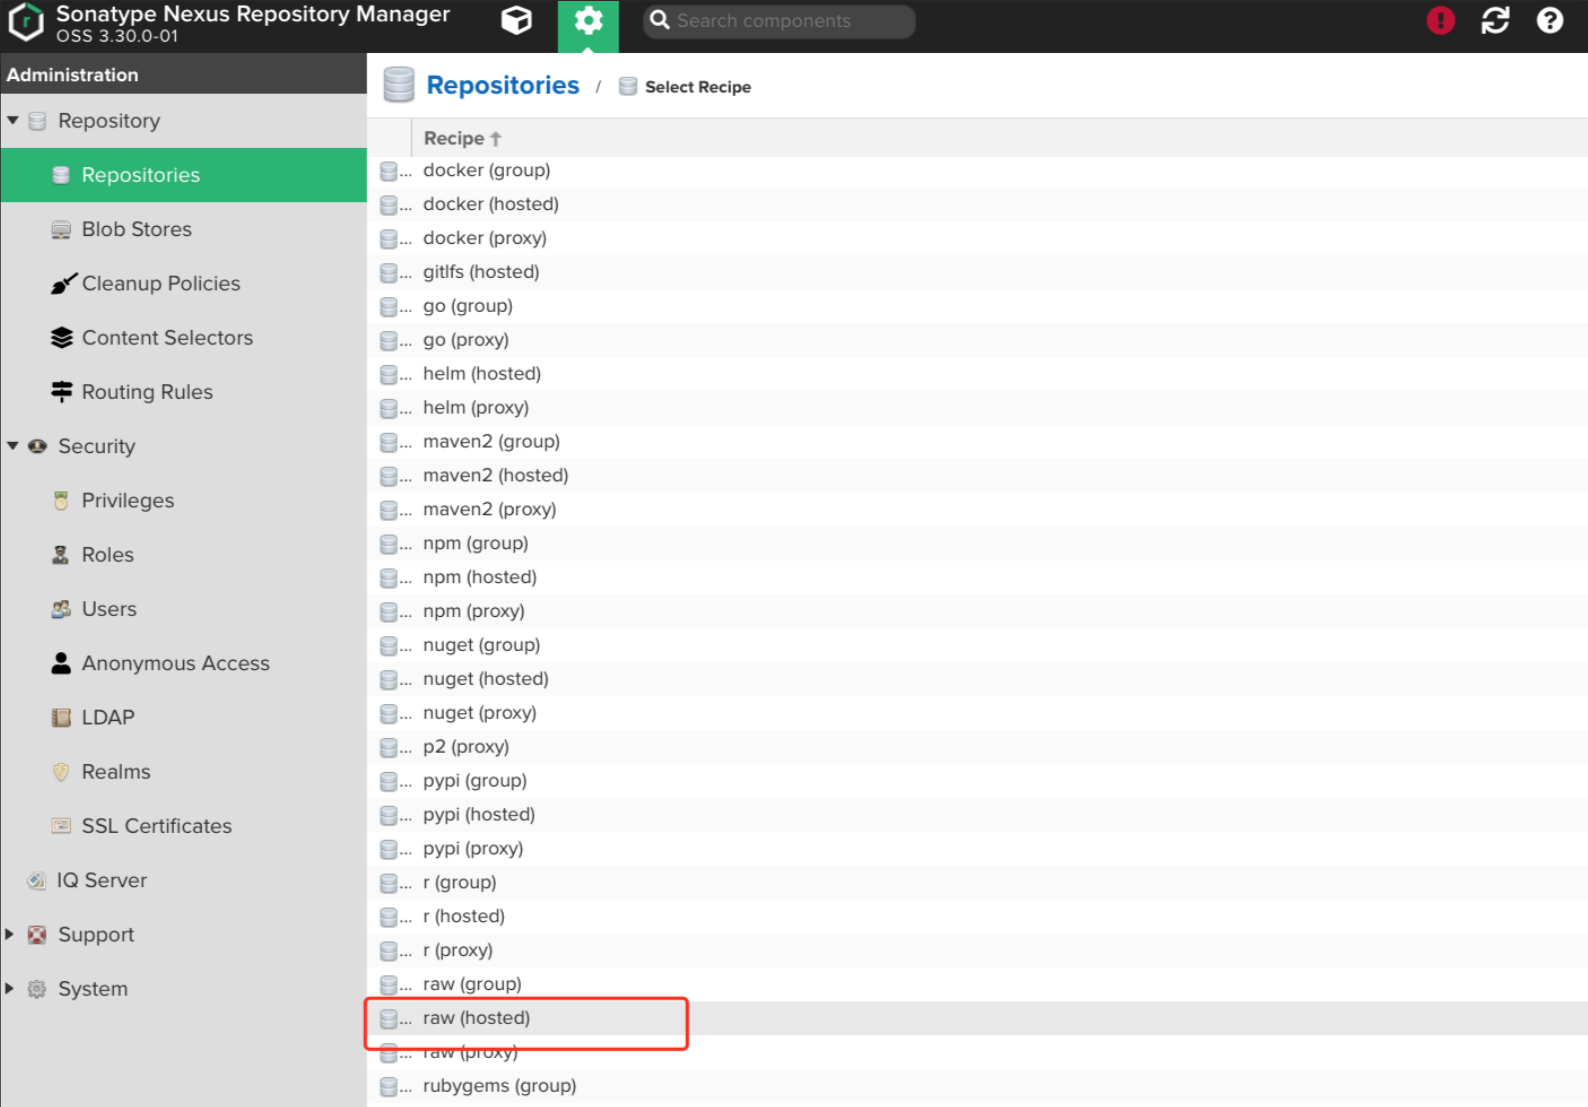
新建raw类型的仓库: raw可以理解为普通的文件存储;
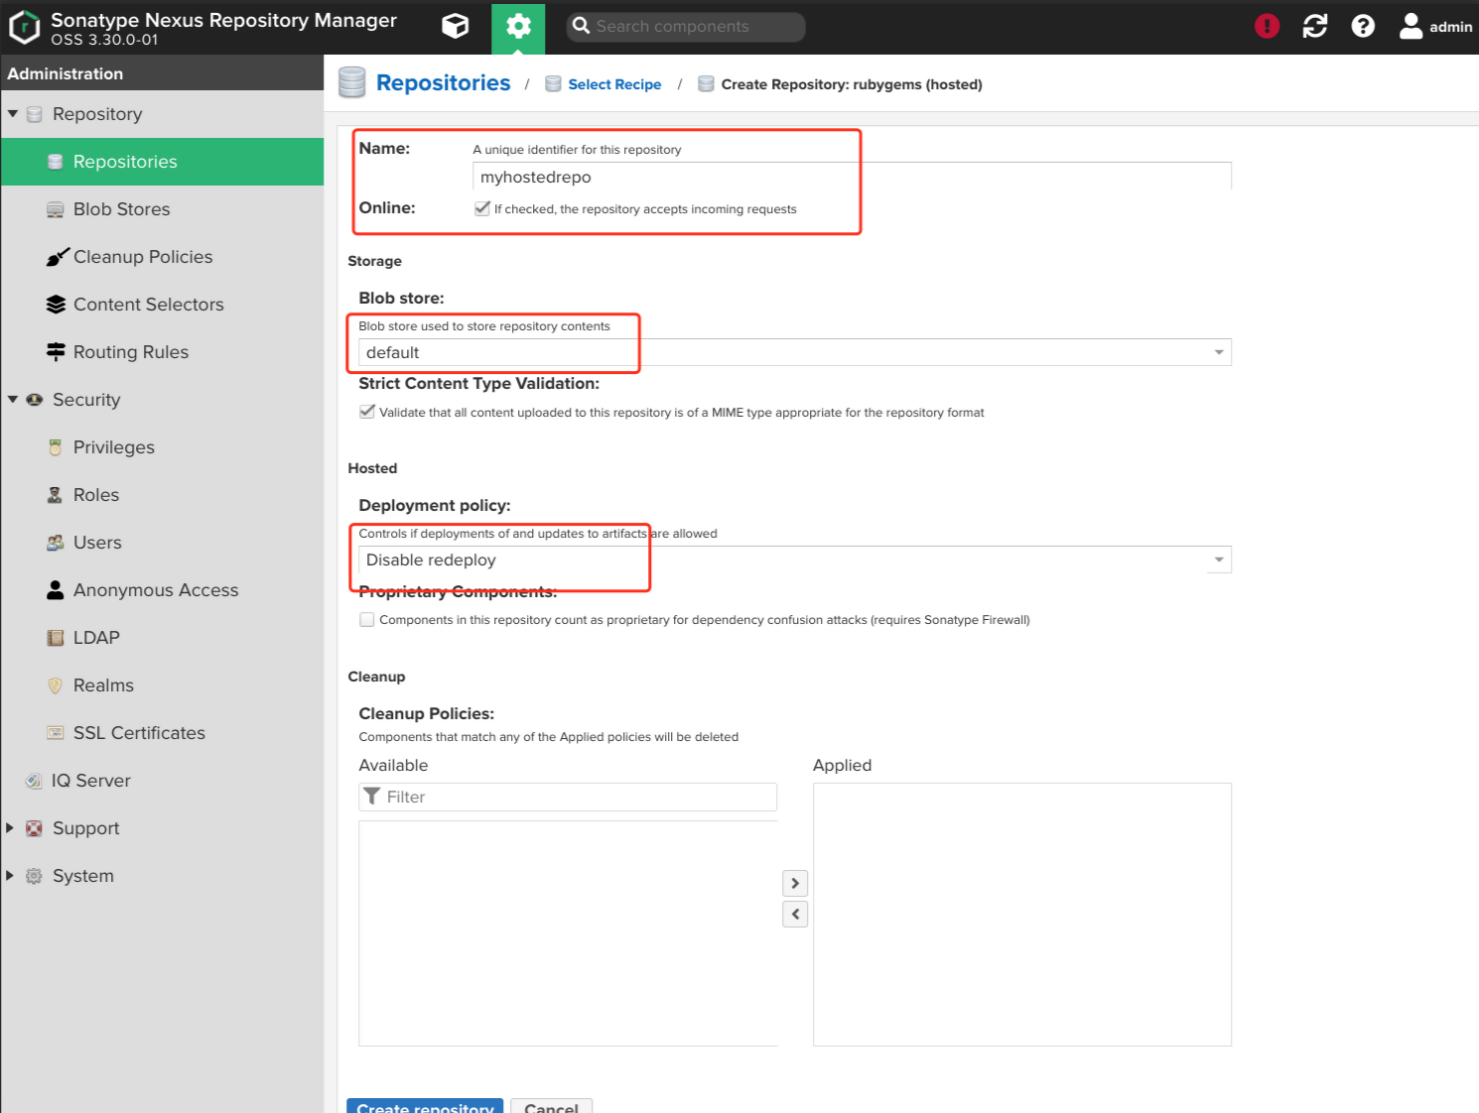
定义和配置仓库的信息: 名称、存储、是否允许重新上传;
🍀 自己配置过程:
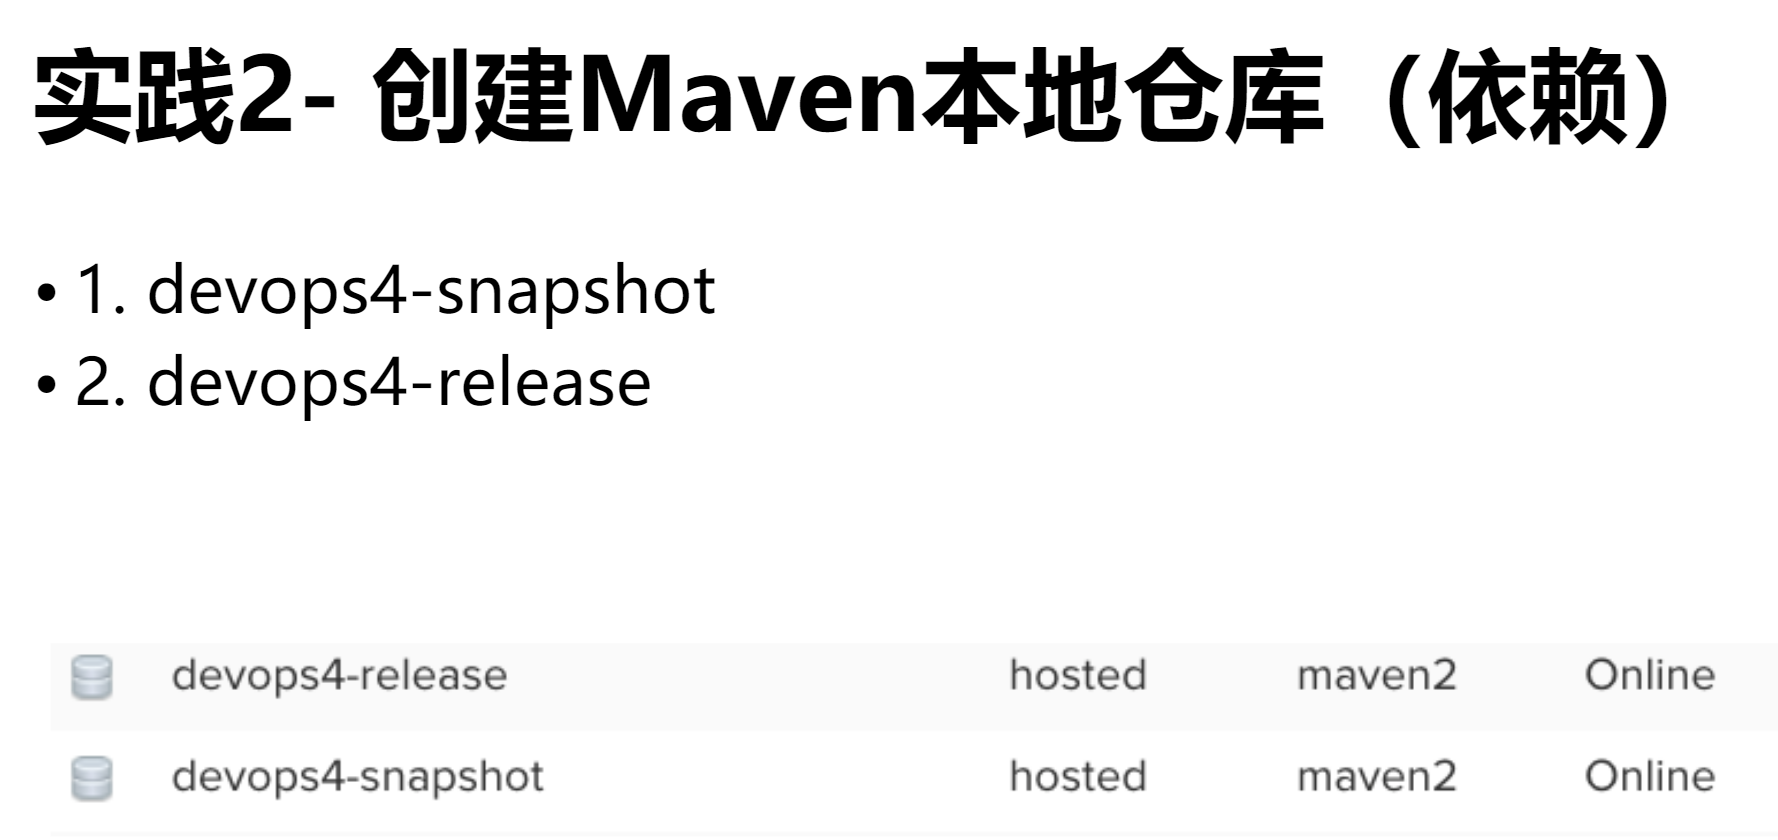
| 💘 实践:创建Maven本地仓库(依赖)-2022.6.10 |
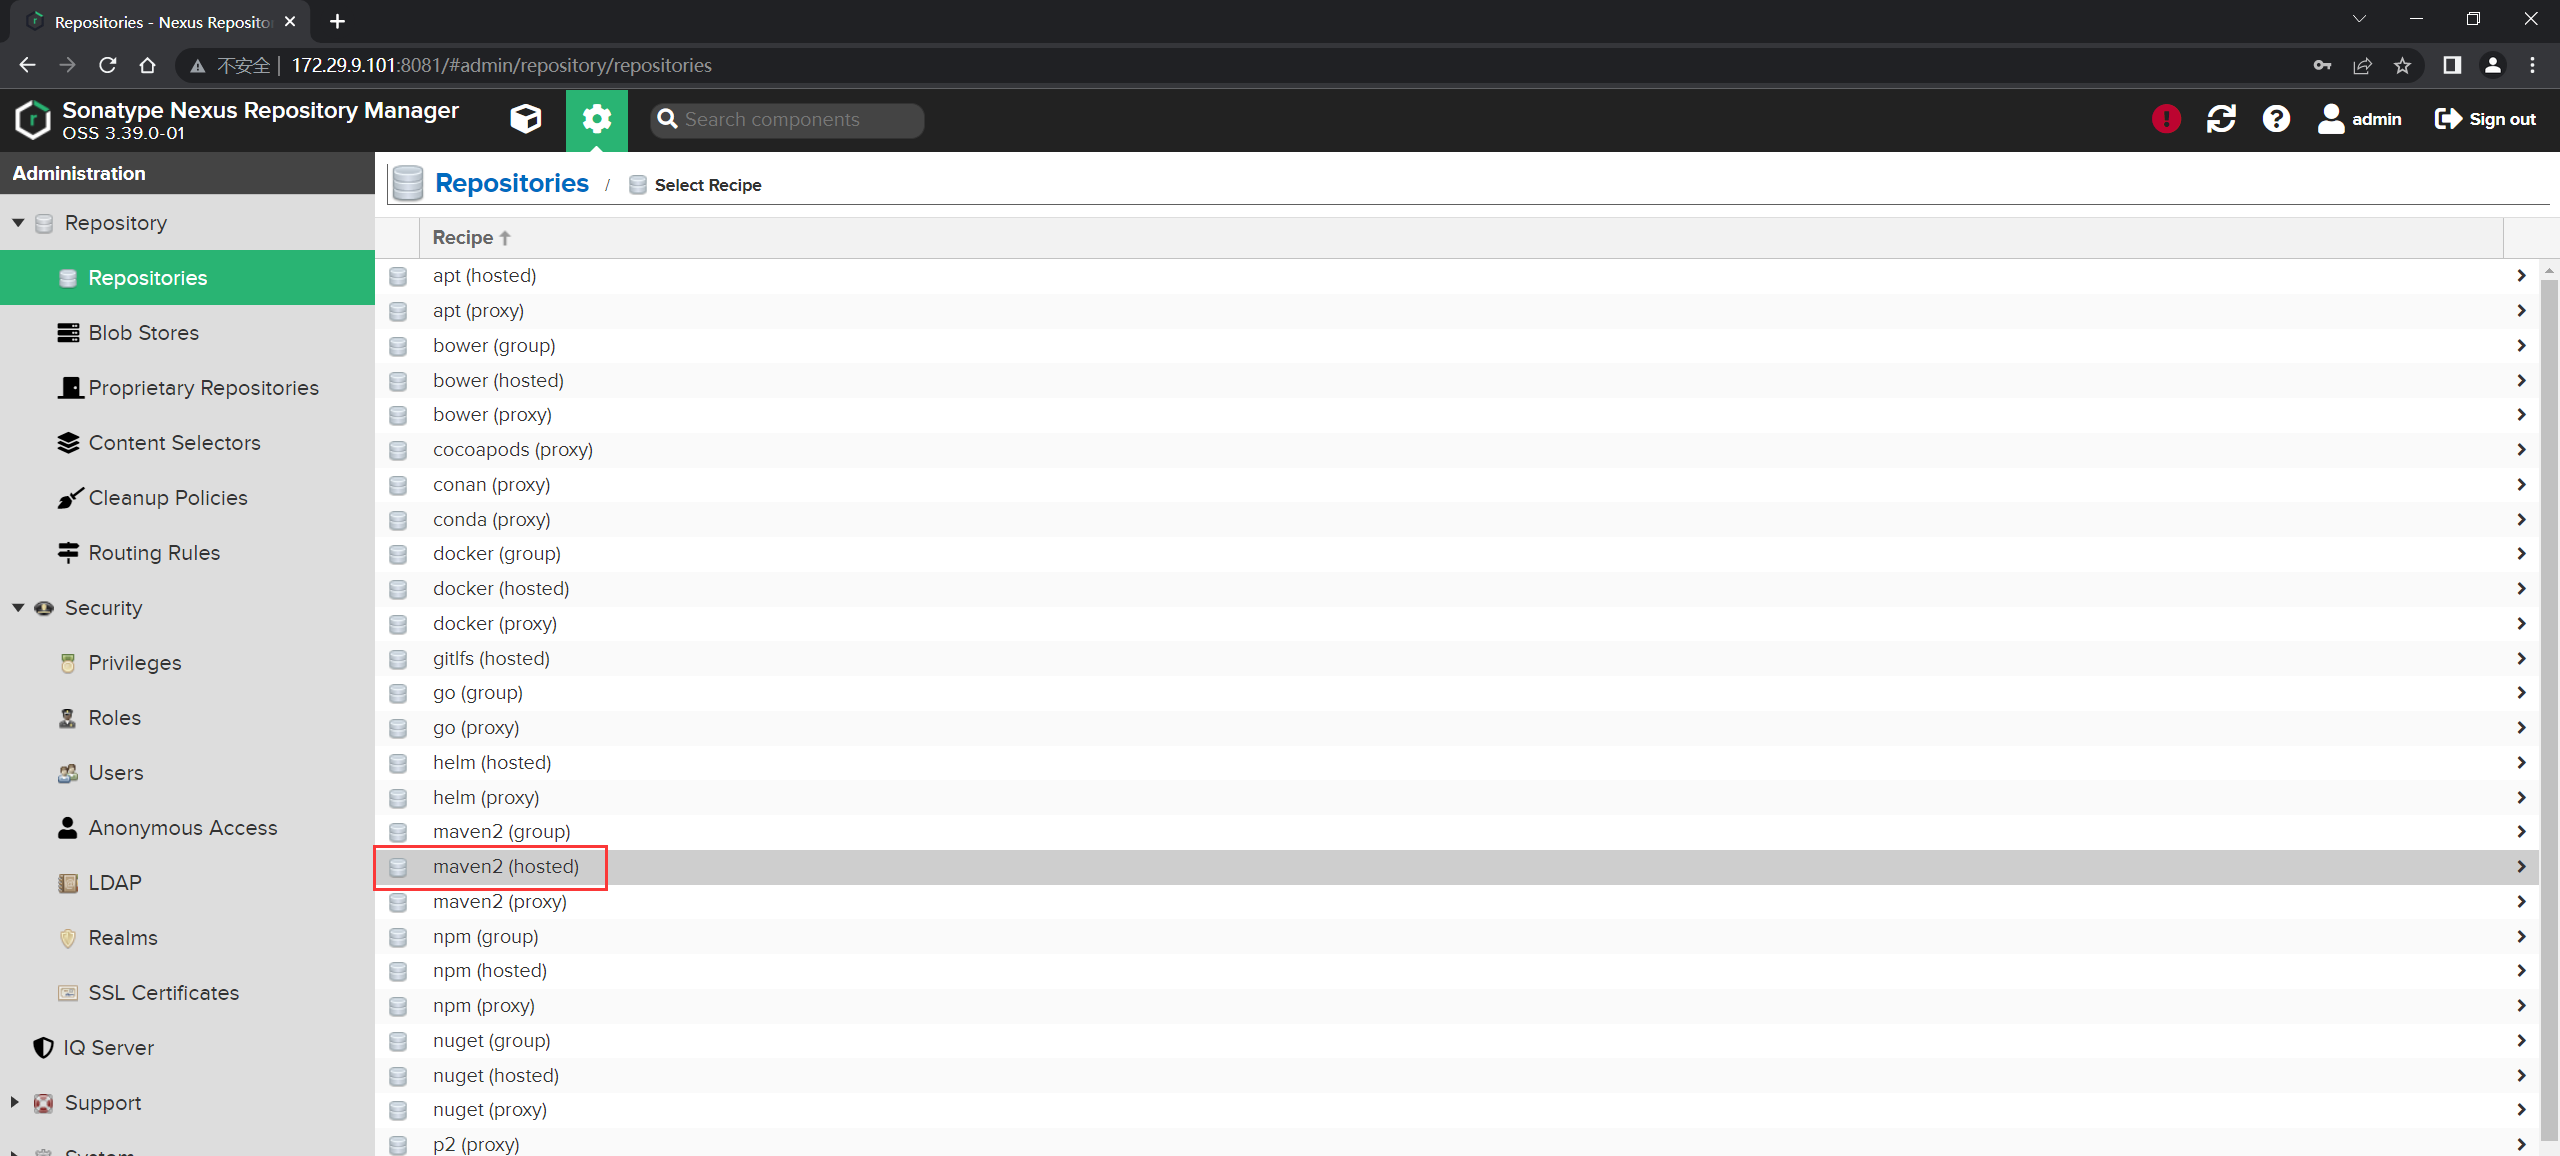
- 创建仓库:

选择hosted类型:
- 定义和配置仓库的信息: 名称、存储、是否允许重新上传:
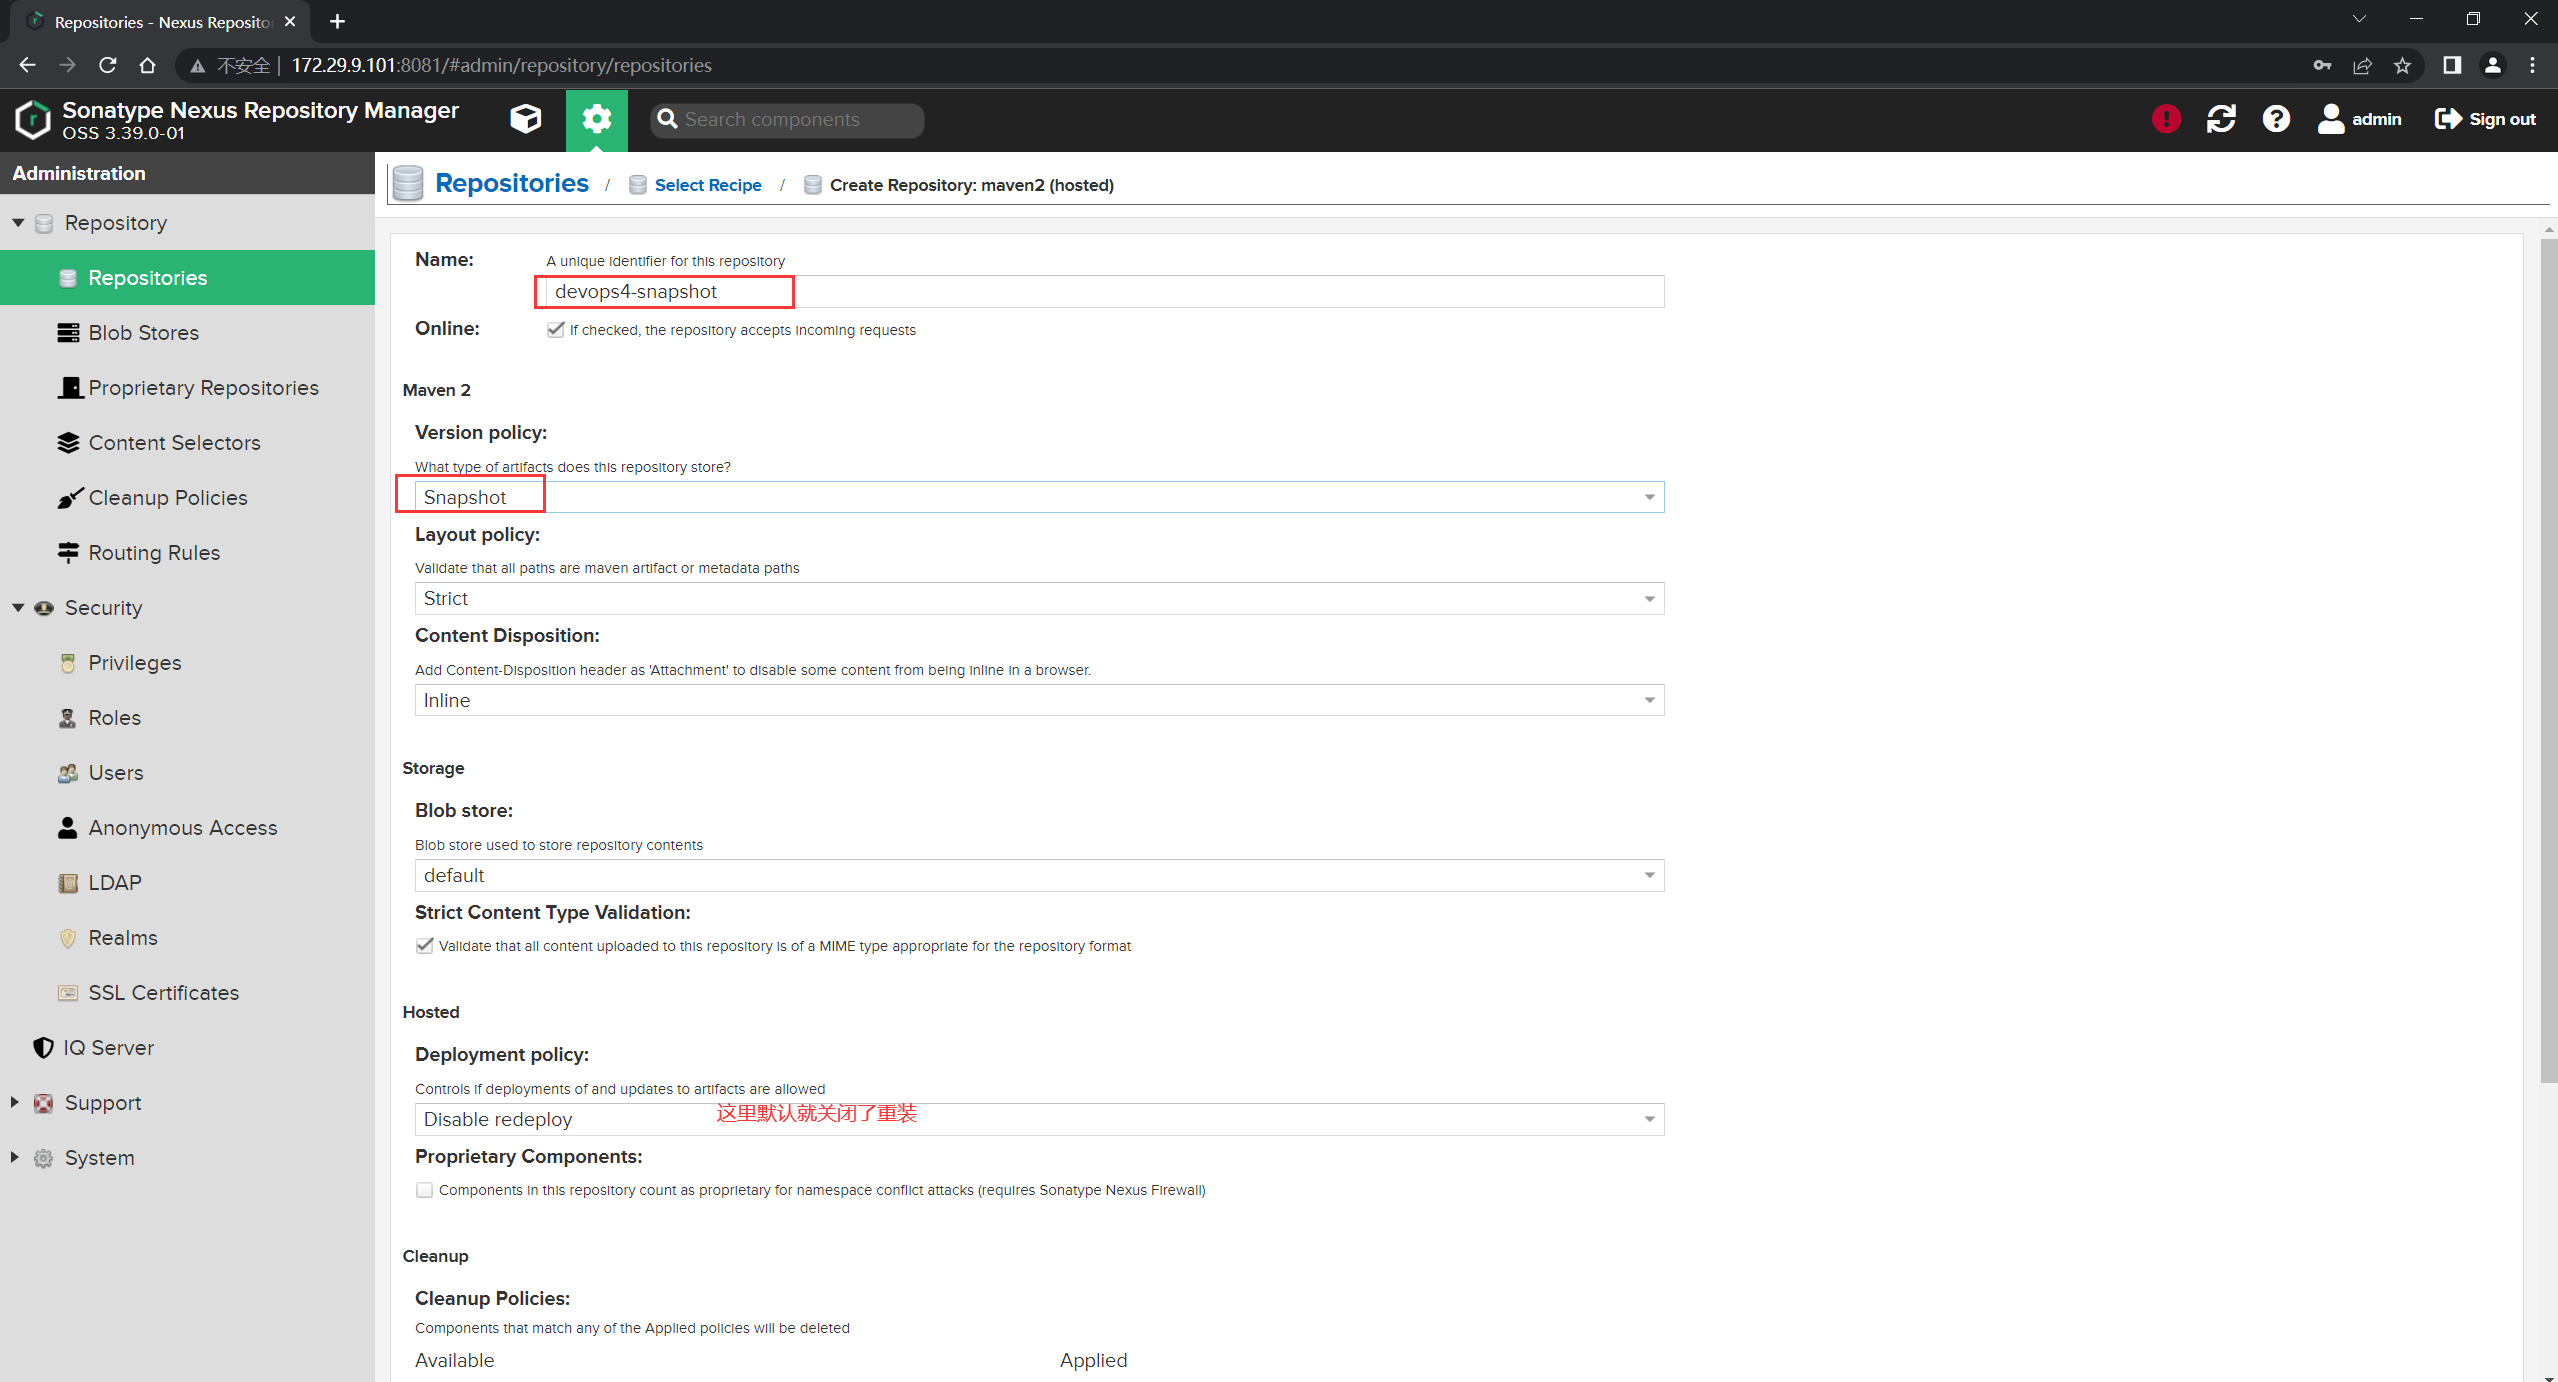
最后点击Create repositry:

- 观察效果:
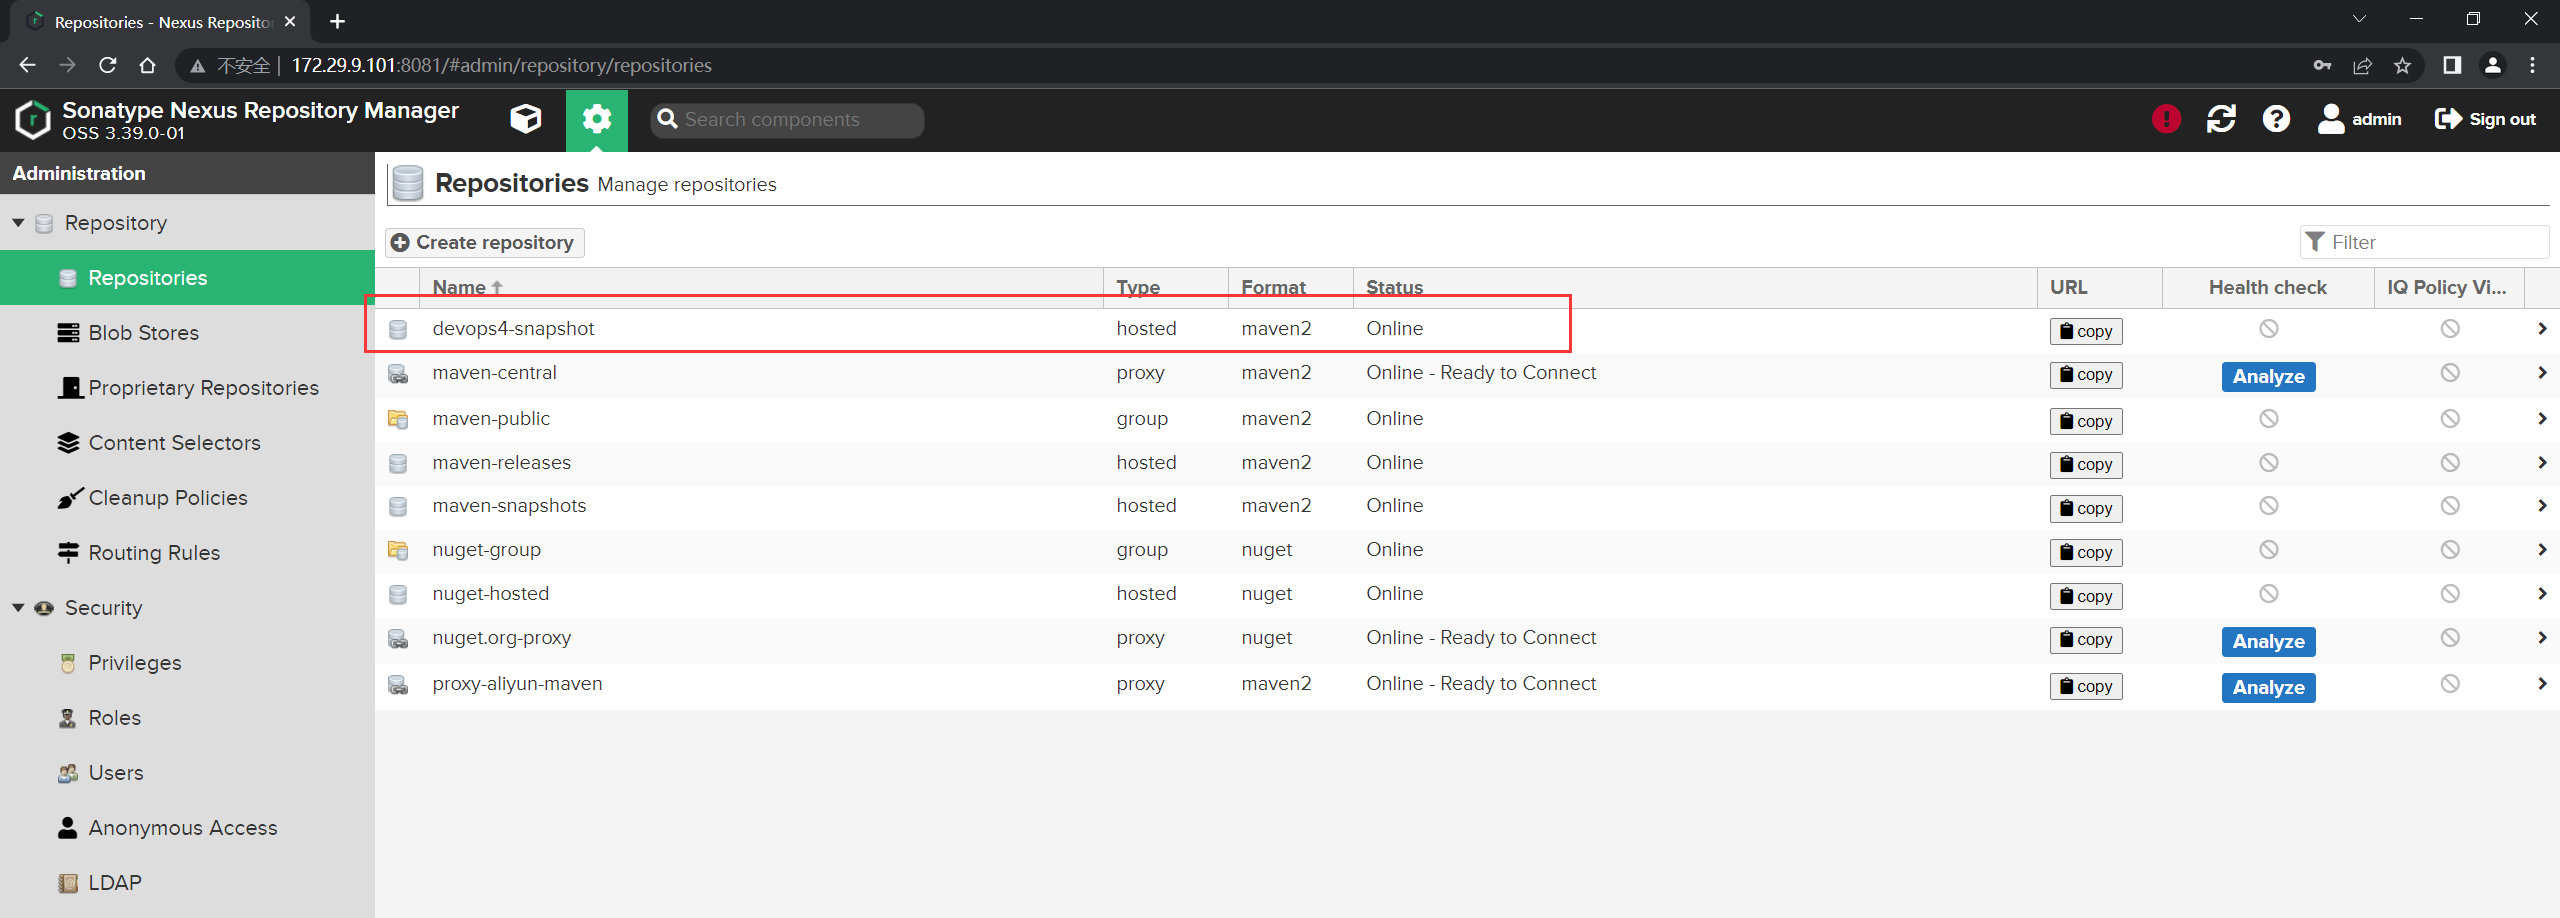
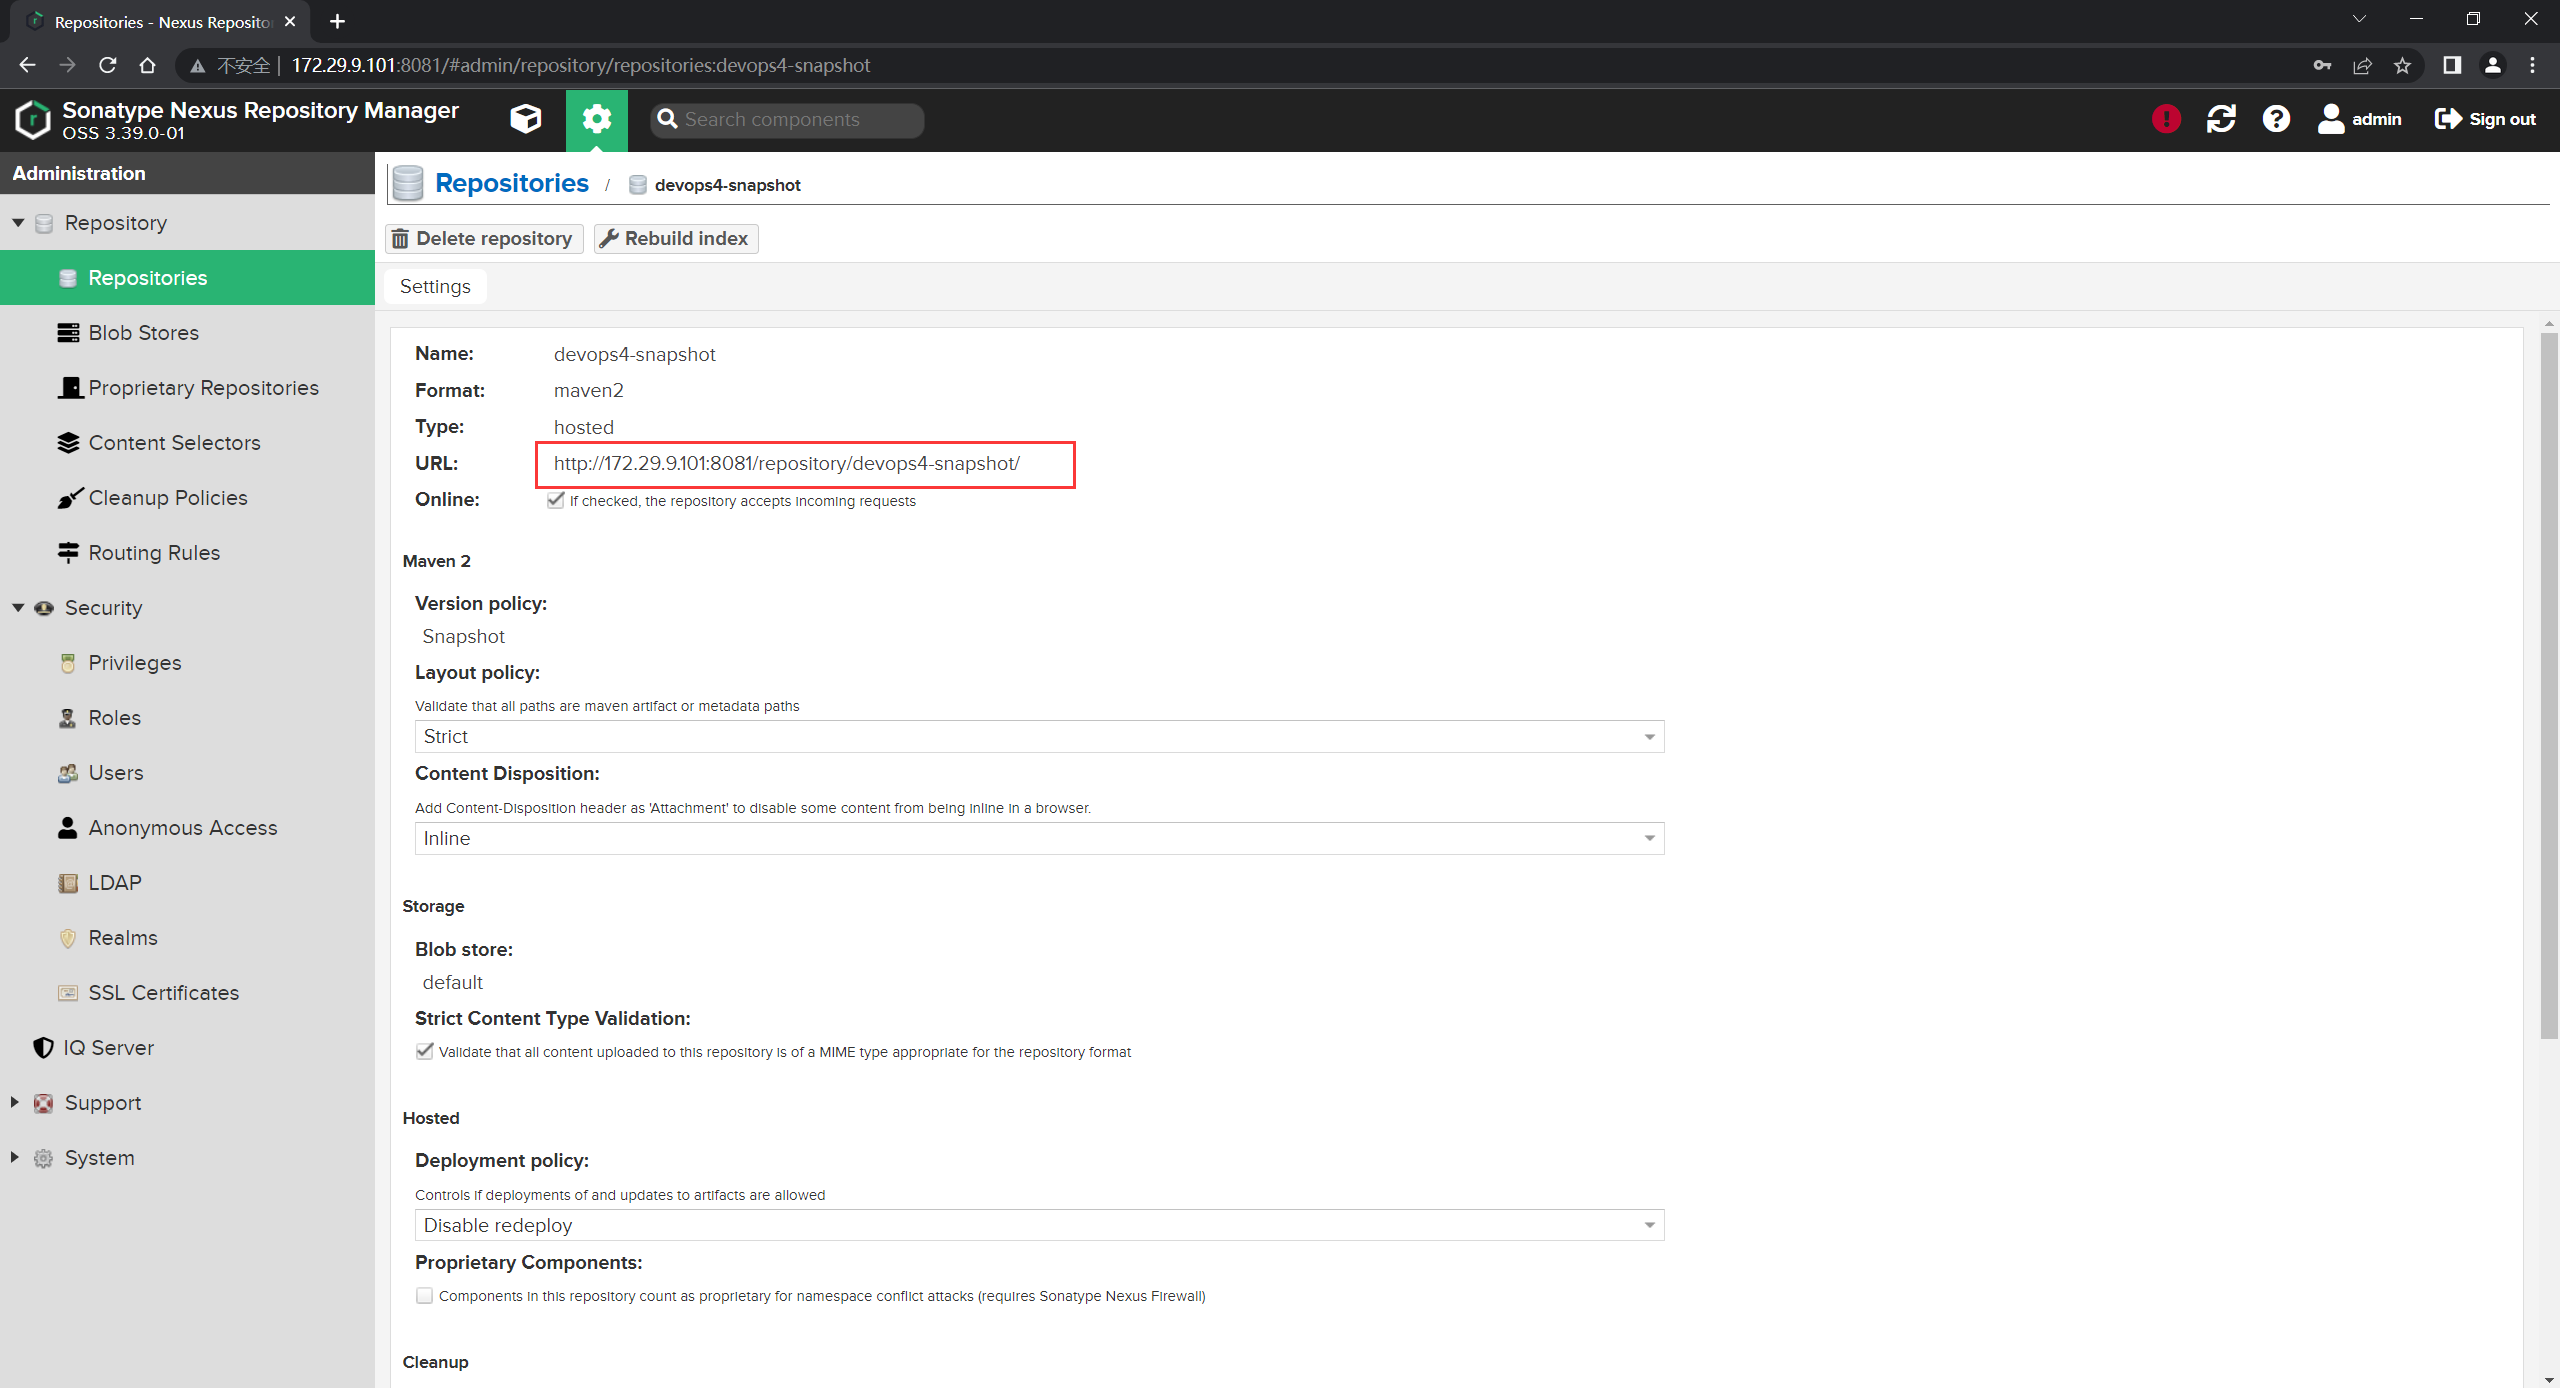
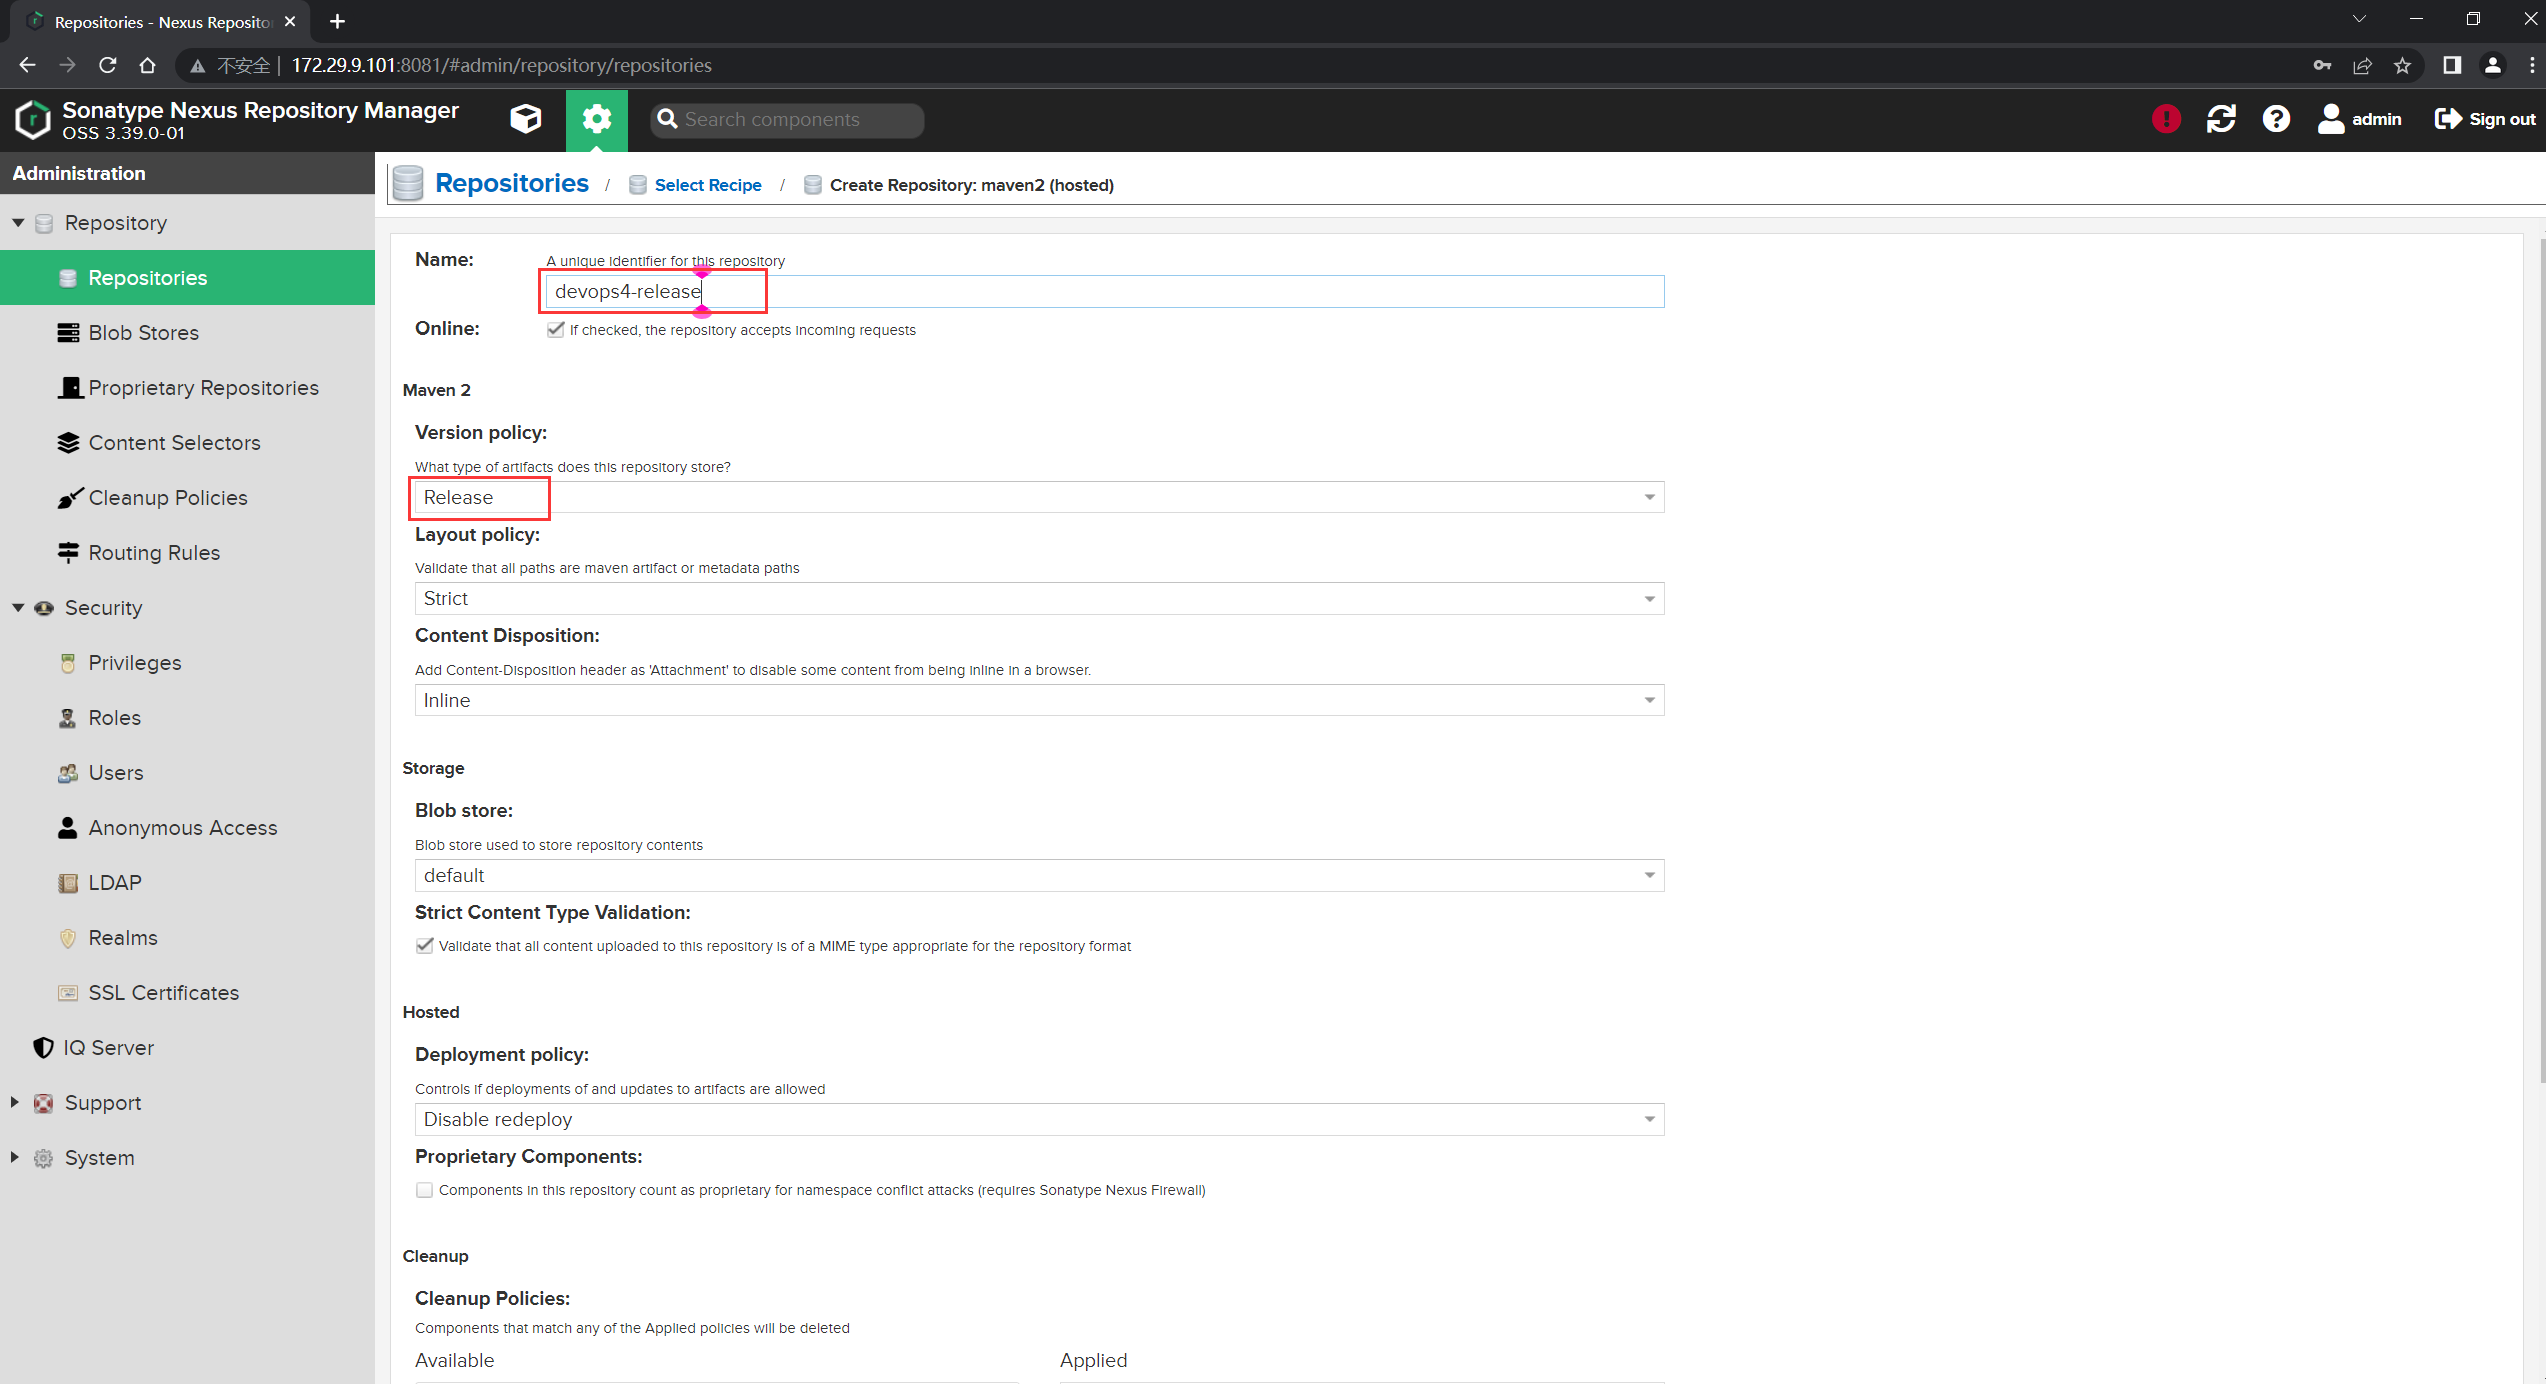
- 同理,我们再创建一个
devops4-release的本地仓库:
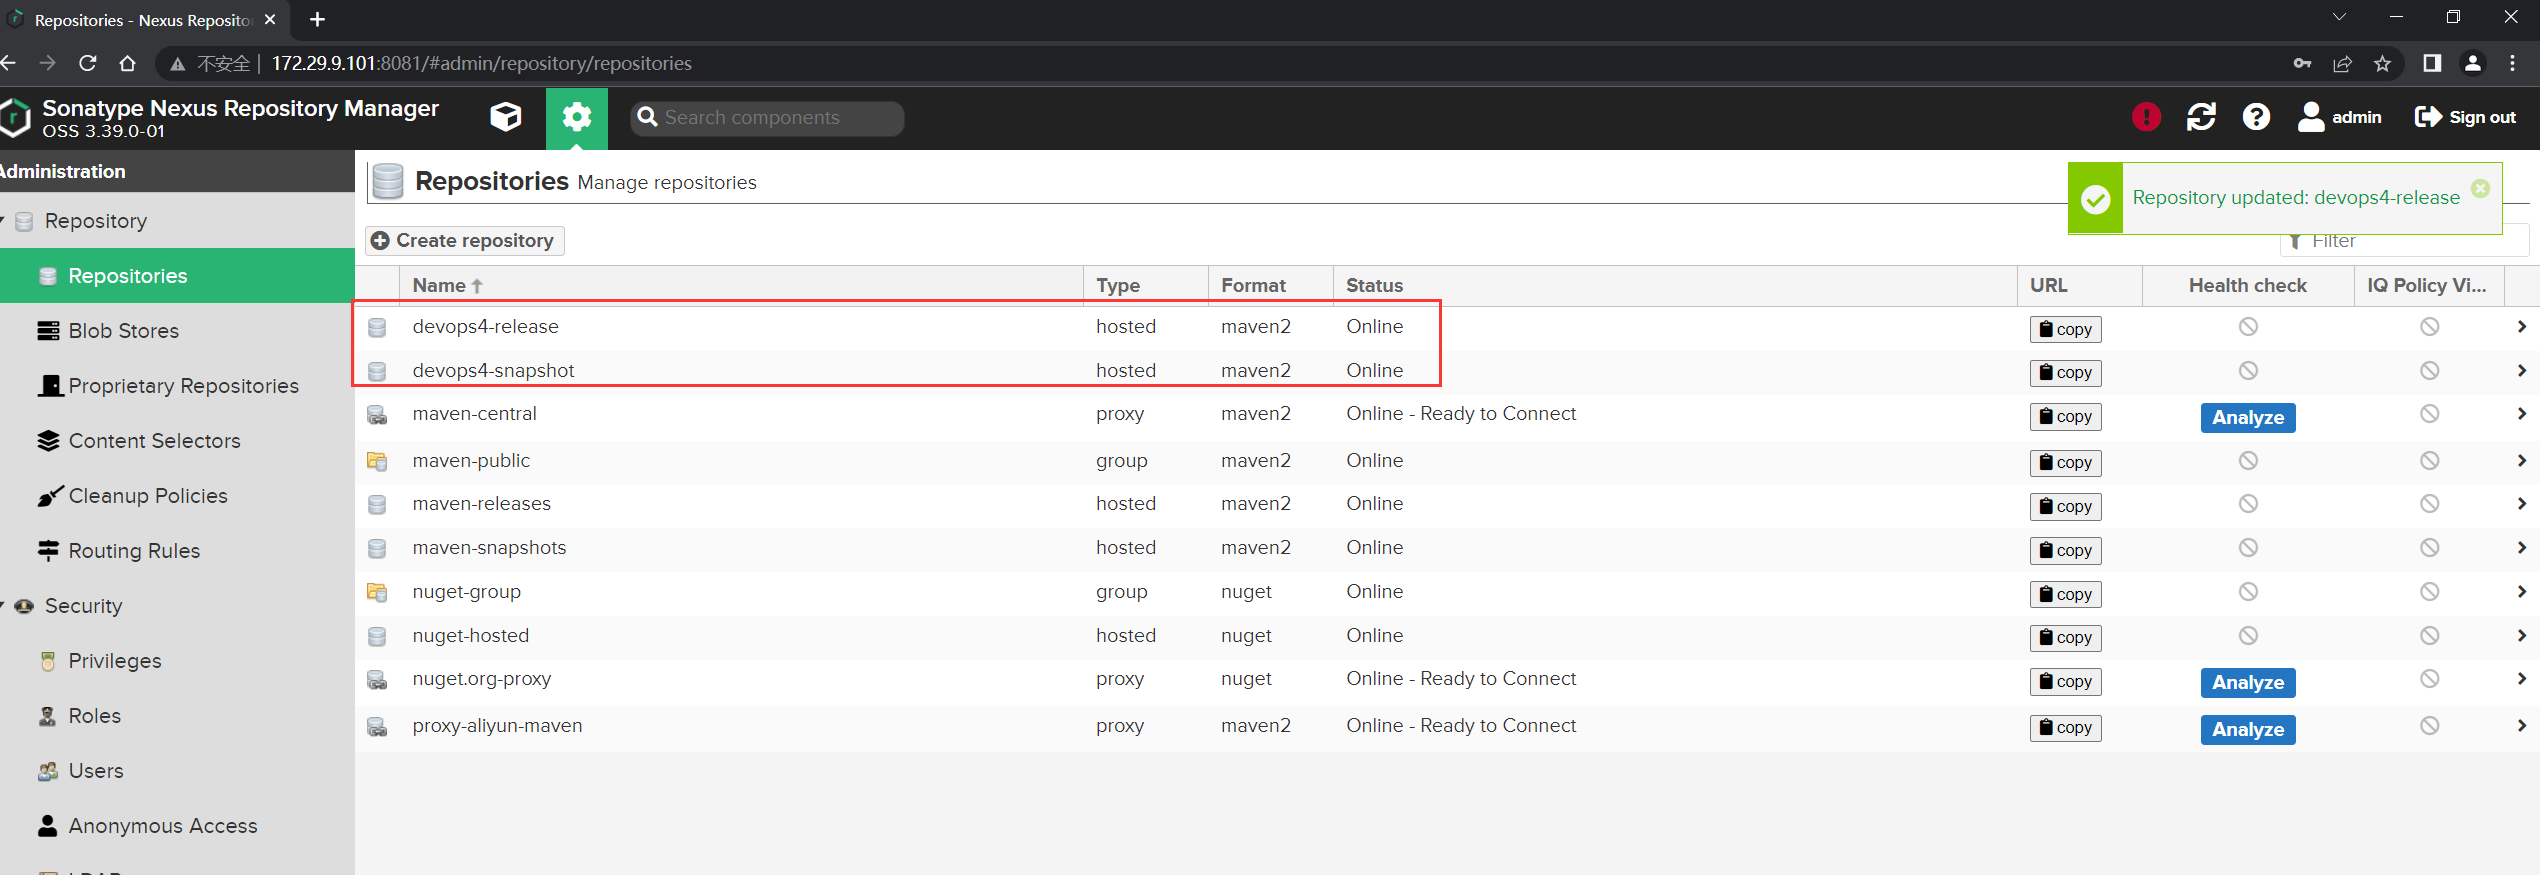
测试完成。😘
| 💘 实践:创建Raw本地仓库(制品)(测试成功)-2022.6.10 |
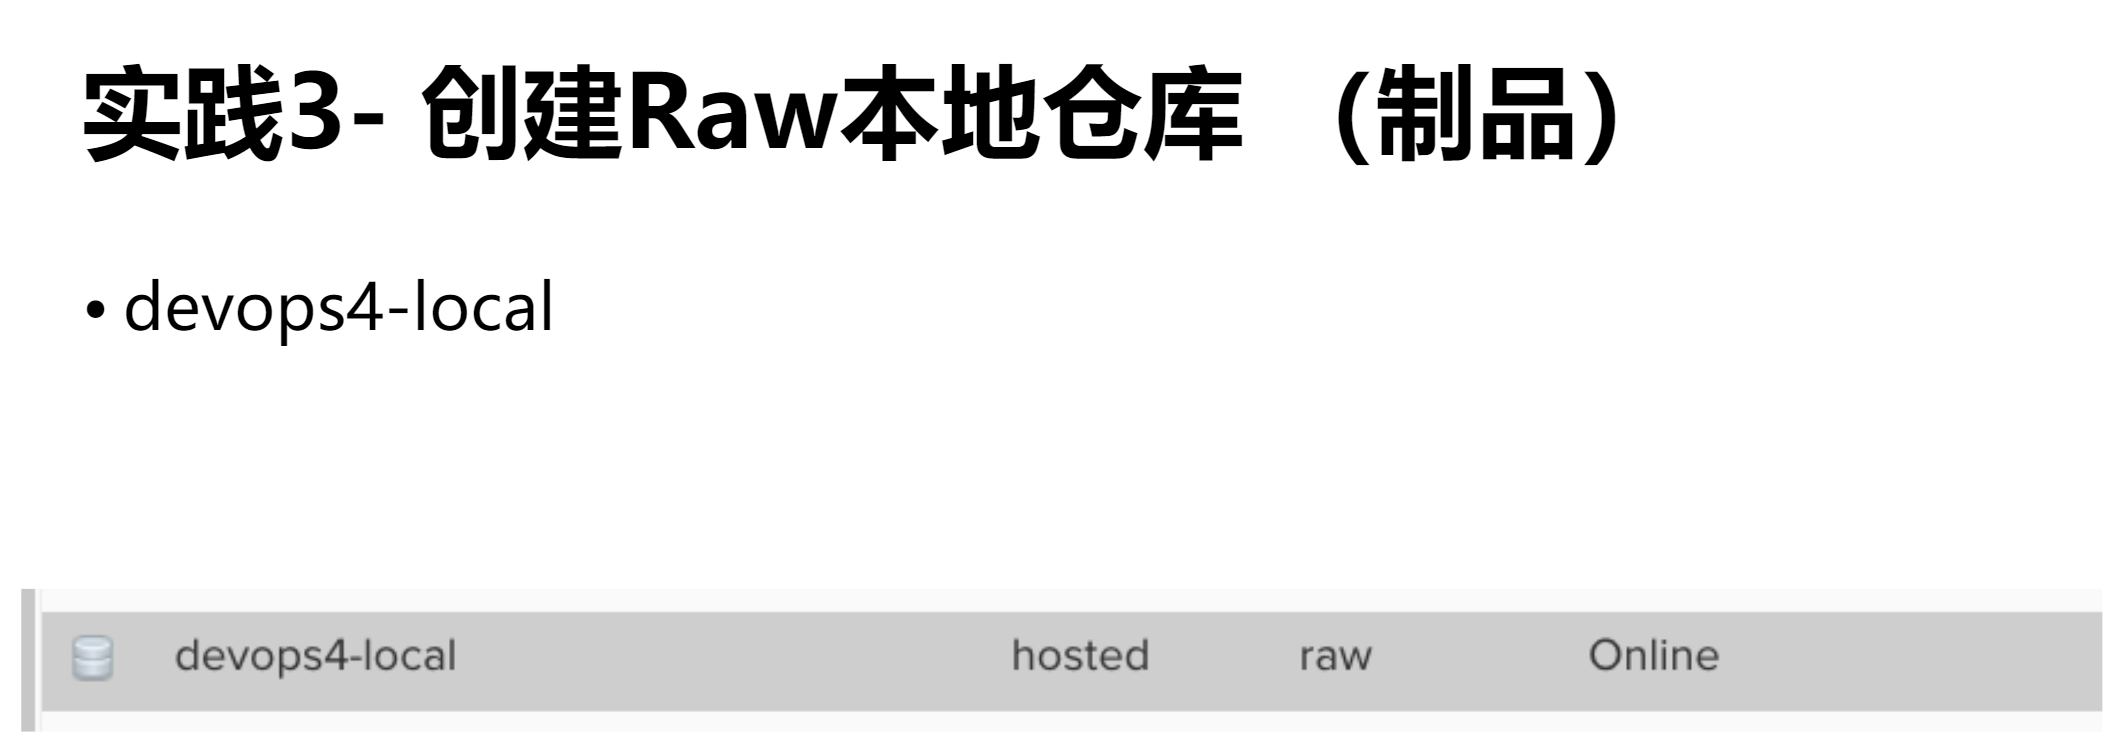
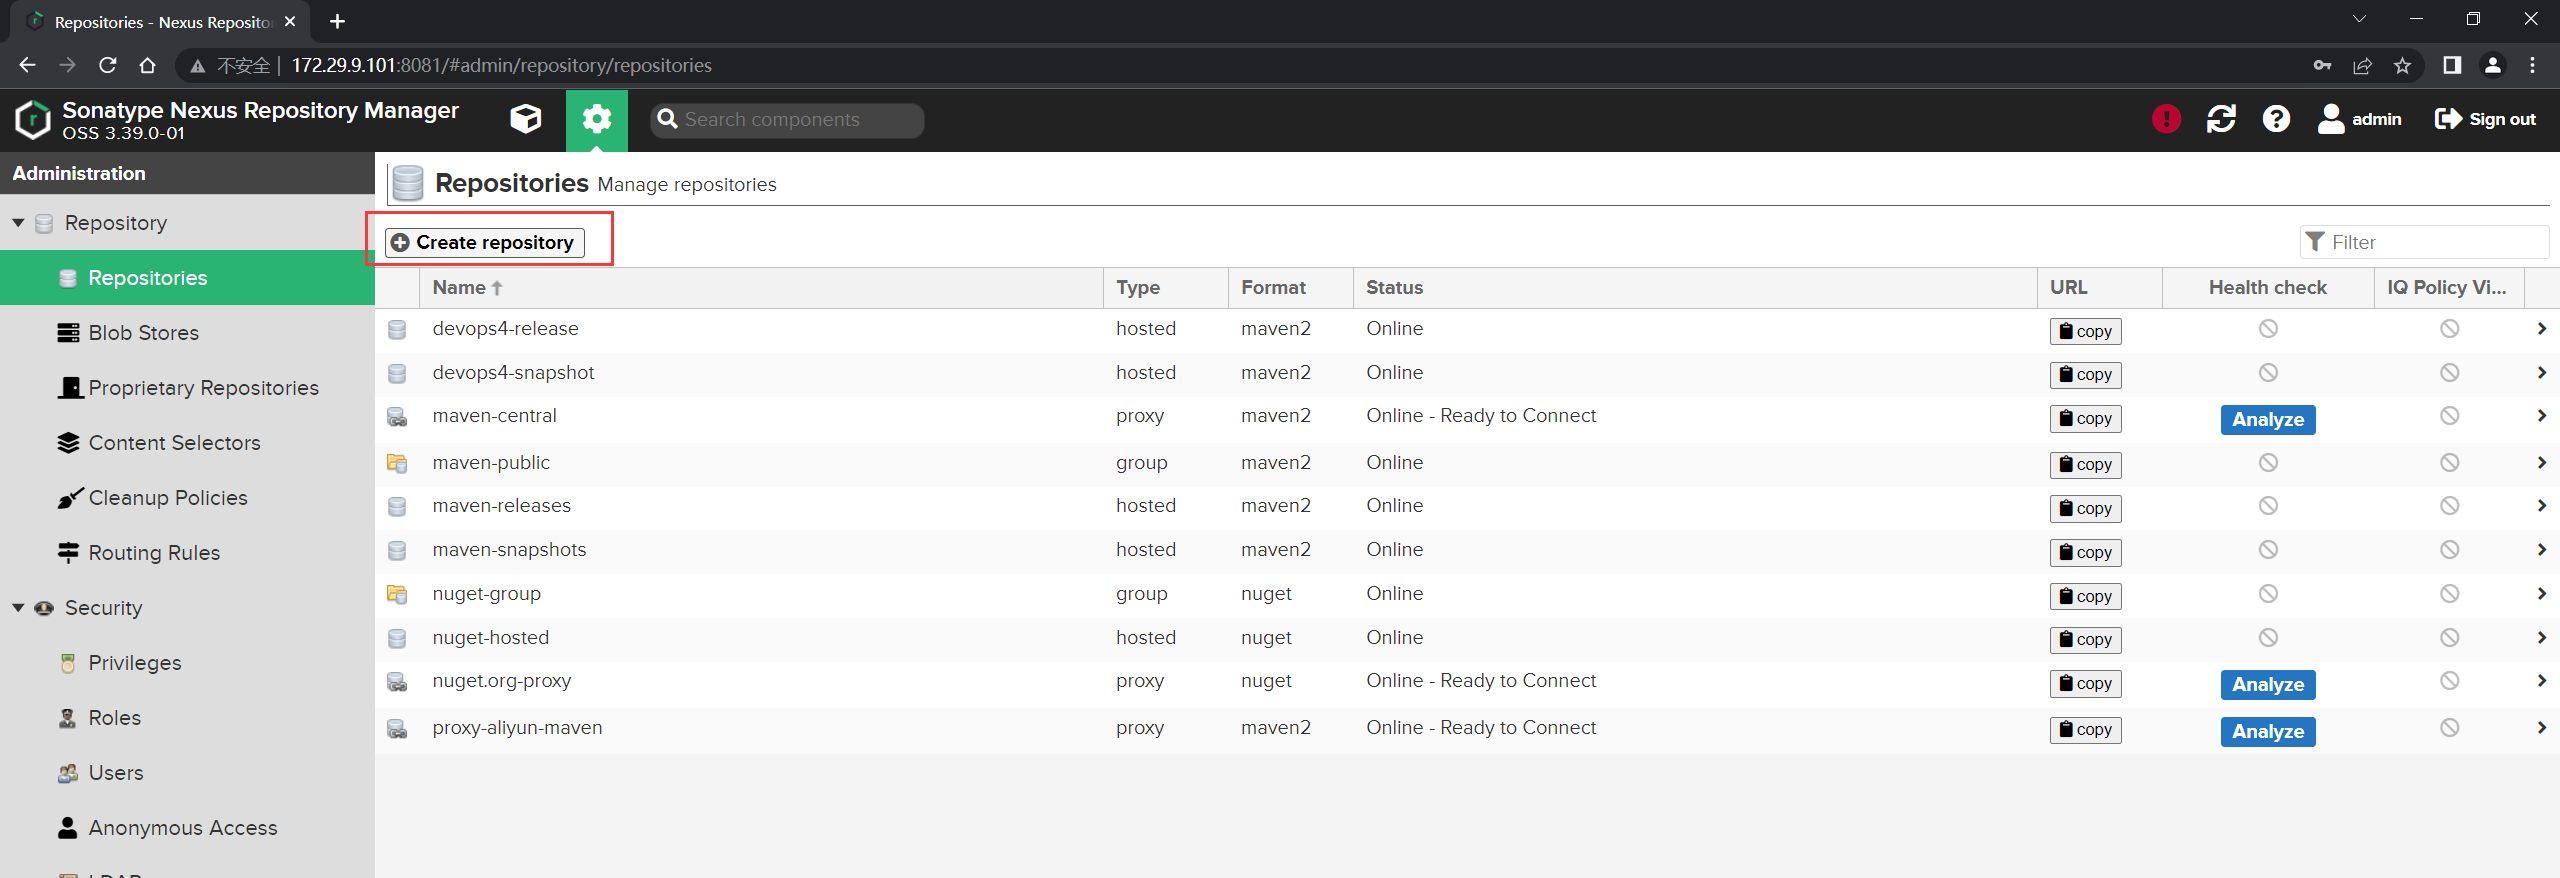
- 创建仓库:
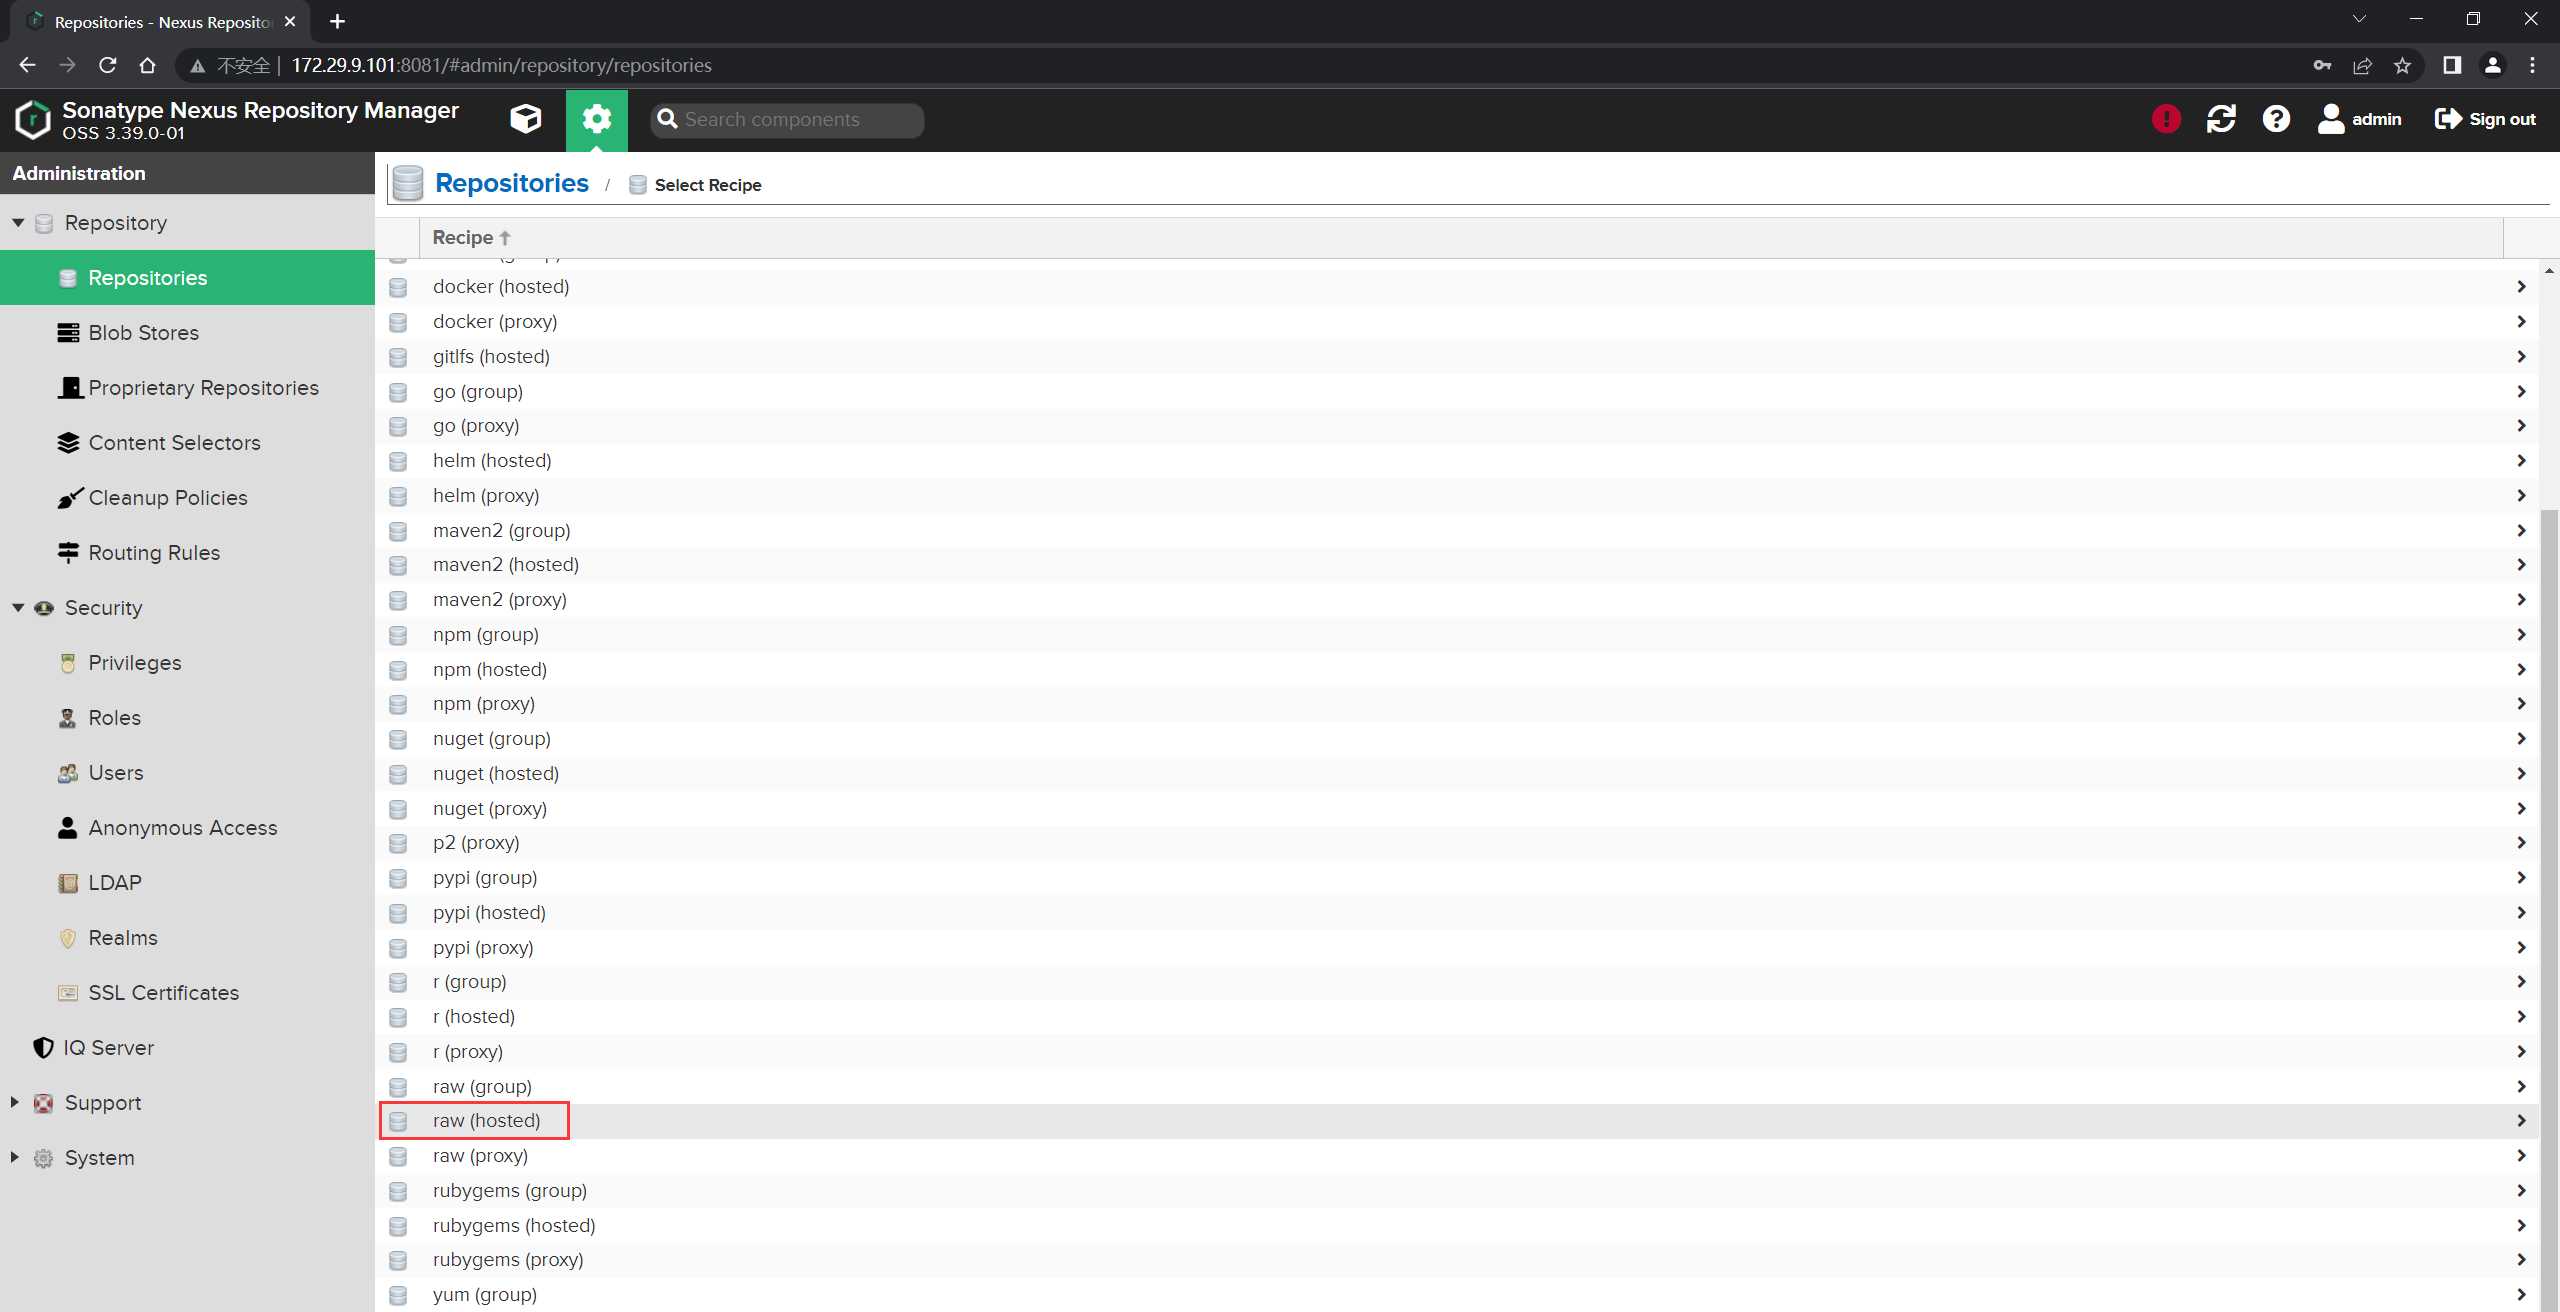
选择raw(hosted)类型:
填写仓库名,并创建:
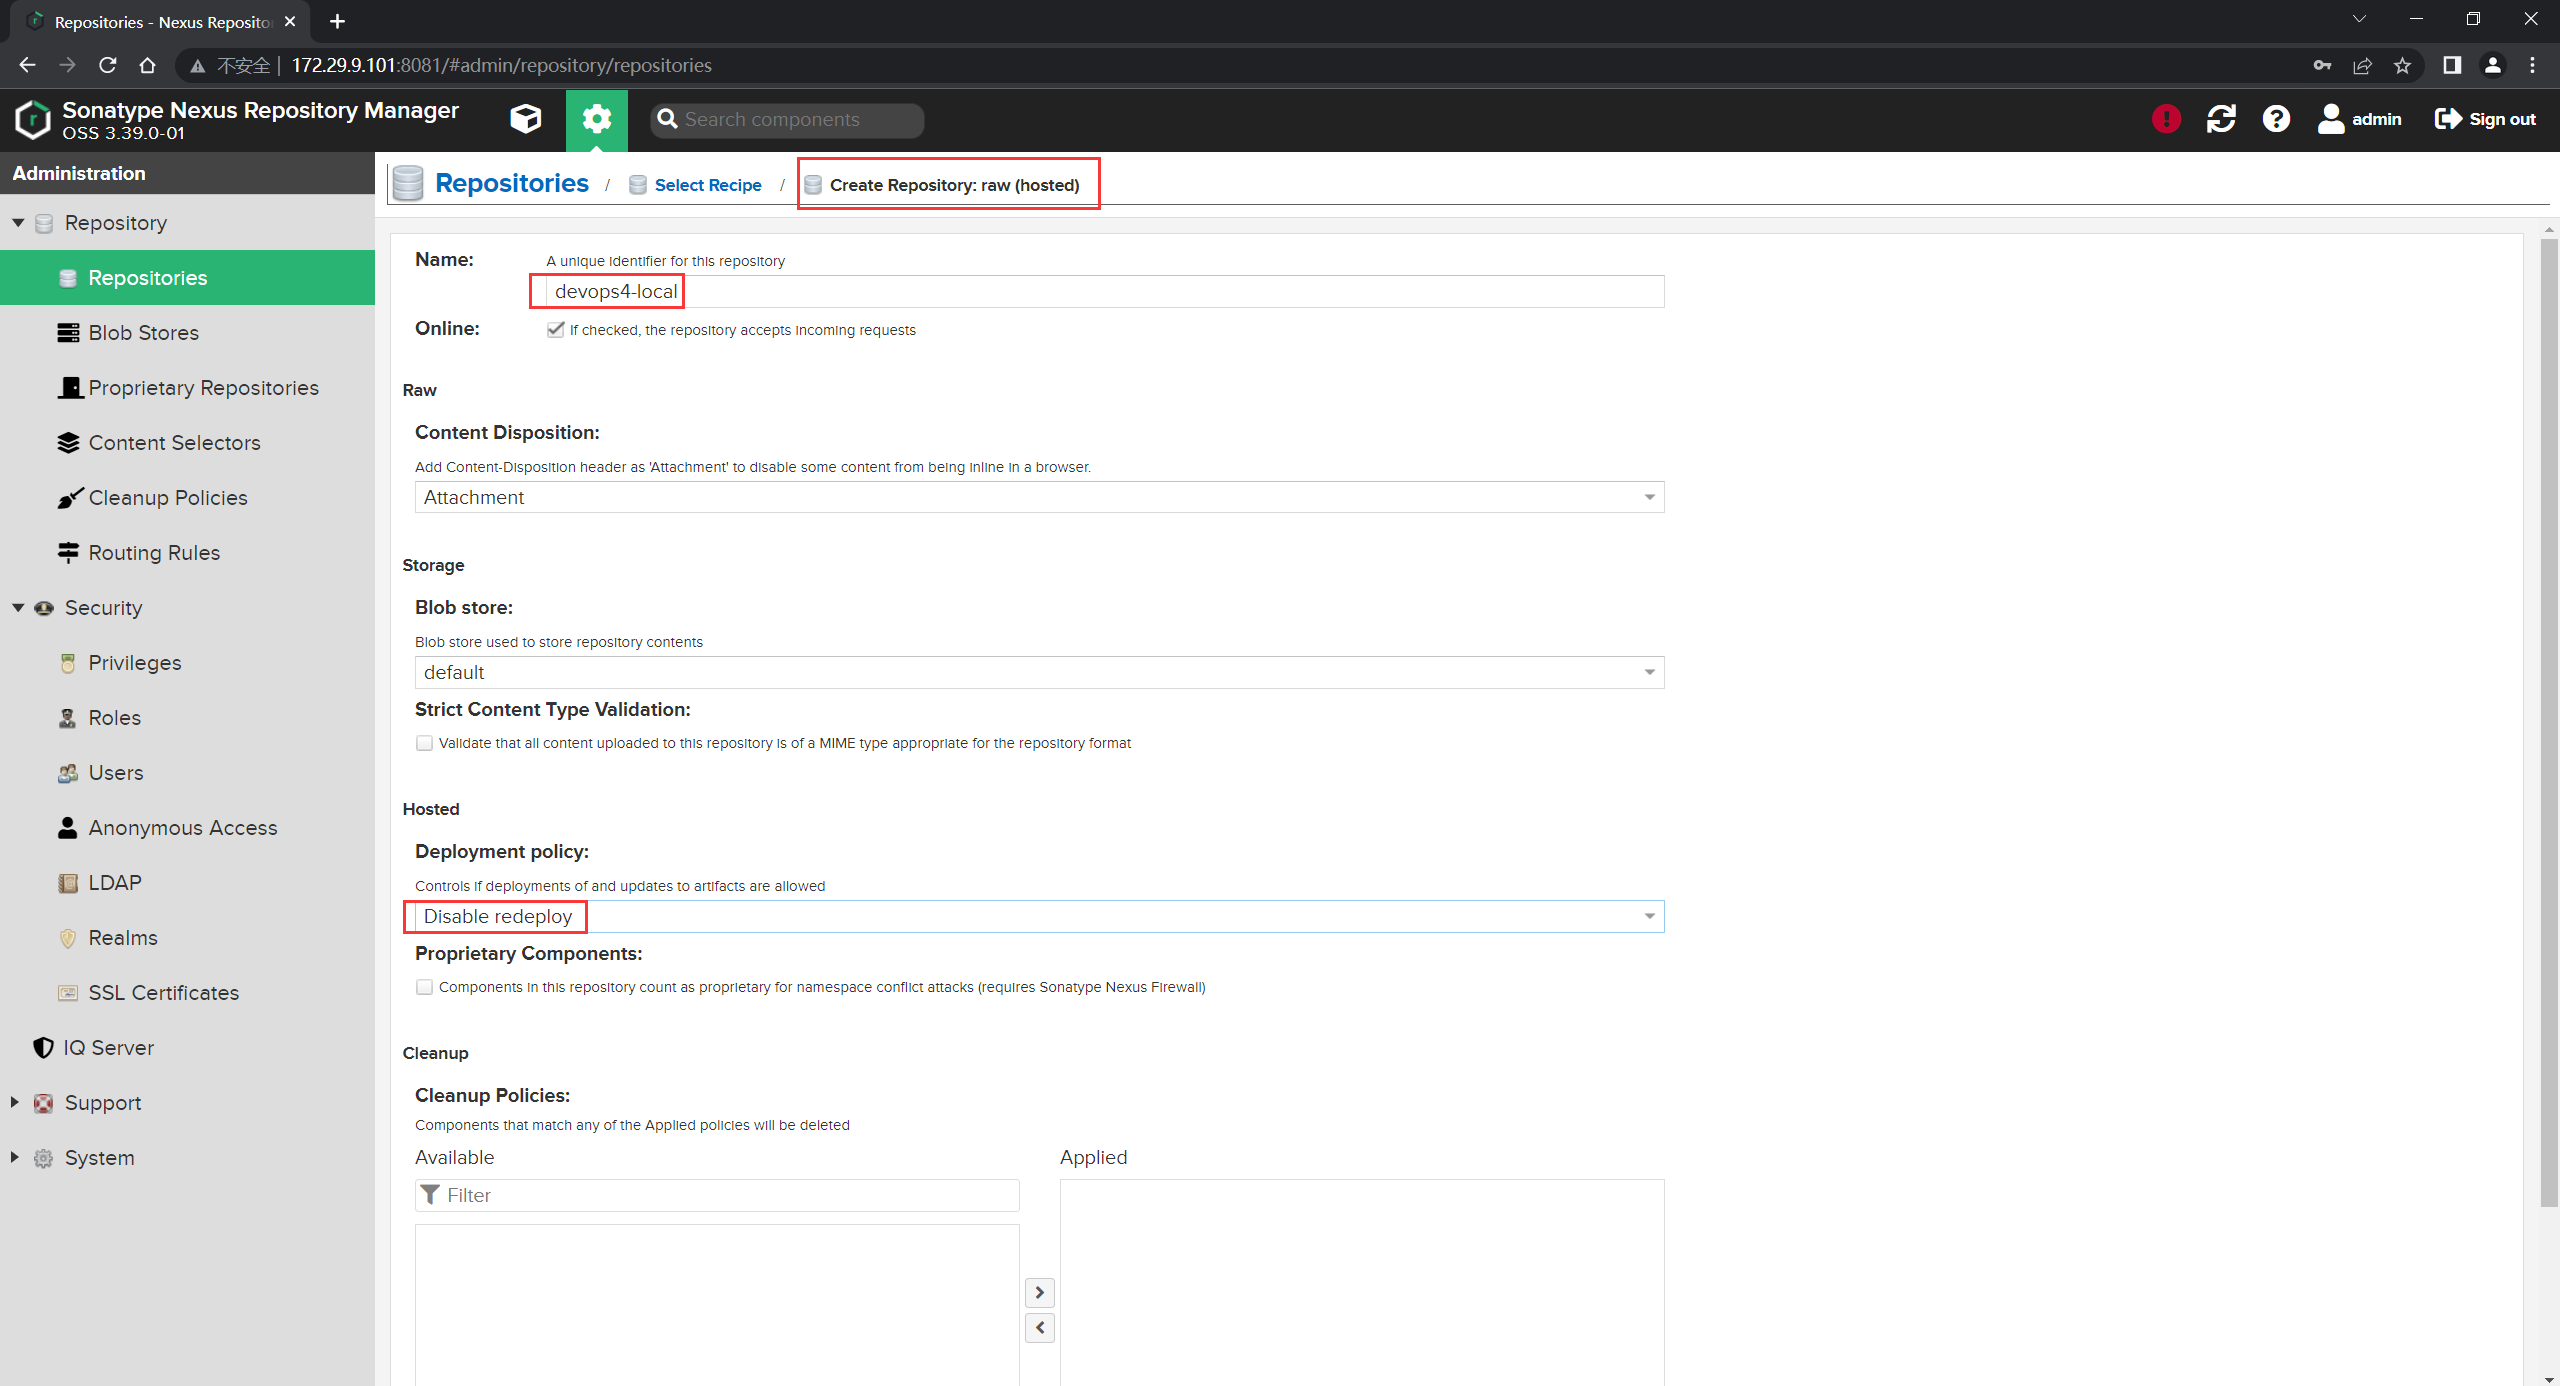
- 观察效果:
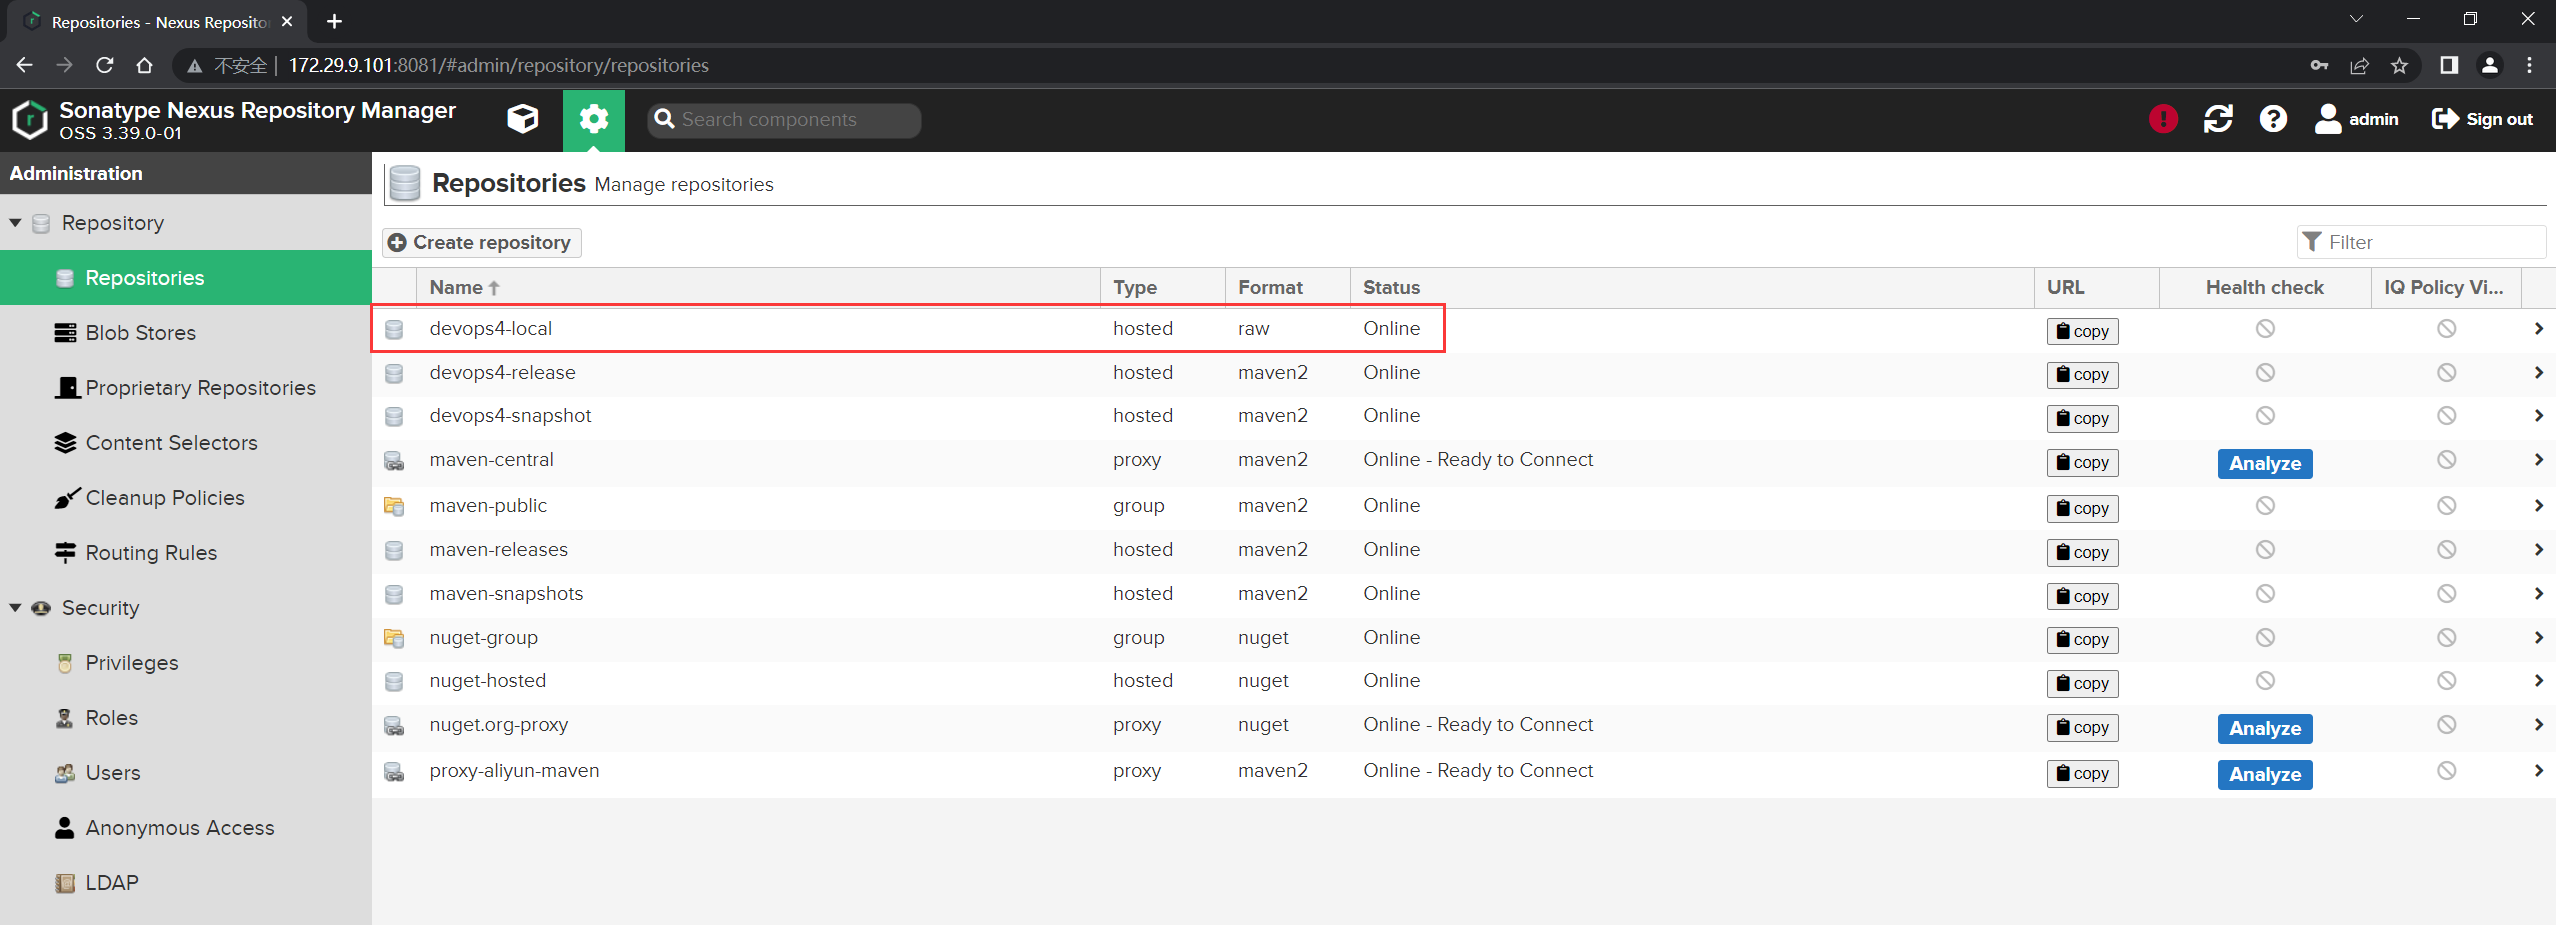
- 模拟上传一个图片:


测试结束。😘
📍 注意:maven的release和snapshot版本之间的区别
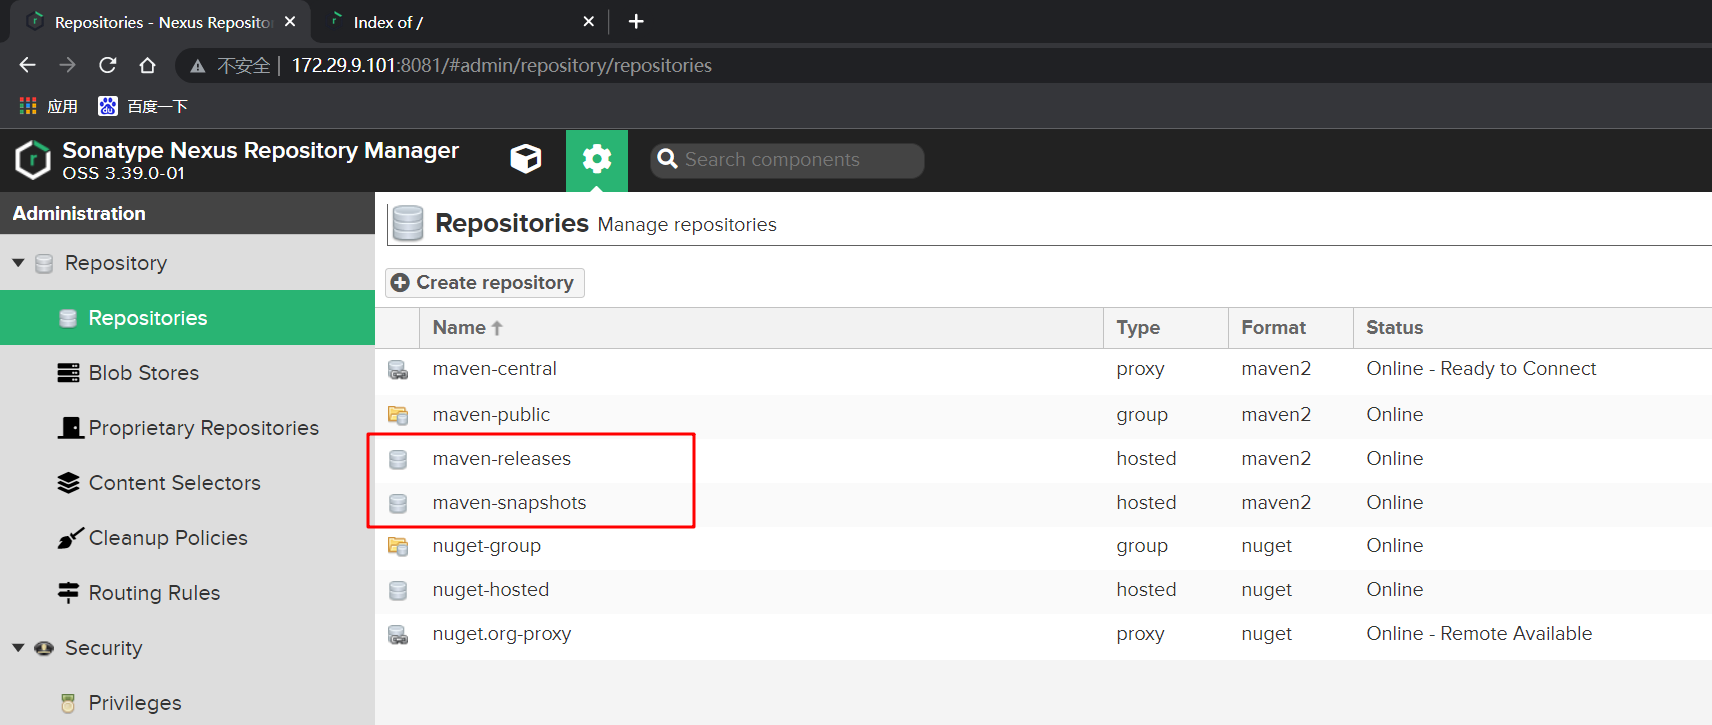
maven-release:正式版本; 这个里面的包一般是需要手动指定的;
maven-snapshots:开发版本; 这个里面的包一般是自动生成版本号的;
⚠️ 要区分依赖和制品!
📍 阿里云云效Maven
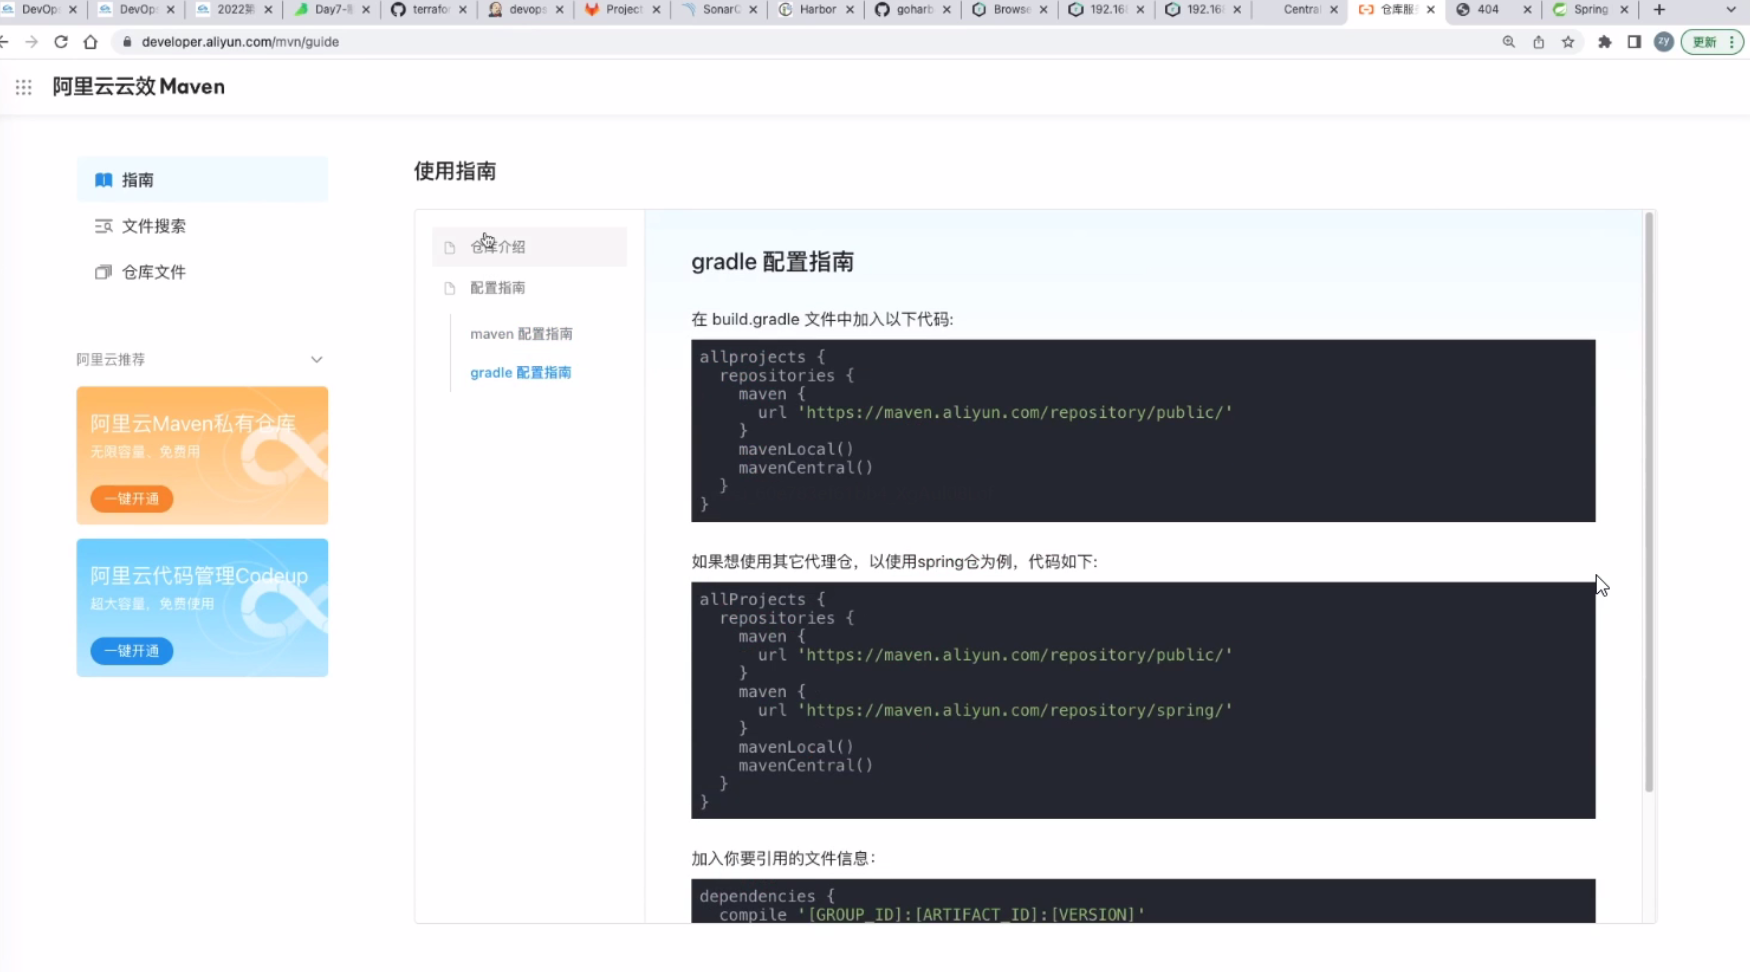
4.CI流水线中集成制品库
在开始引入制品的时候,就应该制定制品库的管理和使用规范。 有了标准化的规范之后, 就很容易实现自动化。(为什么有些工作无法做成自动化? -无标准)
1.约定制品规范
版本号
- 主版本号:表示项目的重大架构变更。
- 次版本号:表示较大范围的功能增加和变化。
- 修订版本号:表示重大Bug的修复。
- 里程碑版本:表示某一个版本的里程碑。
仓库命名
| 类型 | 格式 | 示例 |
|---|---|---|
| 仓库组 | <技术>-group | maven-group |
| 仓库 | <业务简称>-<技术>-<类型> | devops-maven-RELEASE |
| 制品 | <应用名称>-<版本号> | demo-devops-service-1.1.0.jar |
目录结构: 按照 业务/服务/版本 层级。
2.使用管理页面上传制品
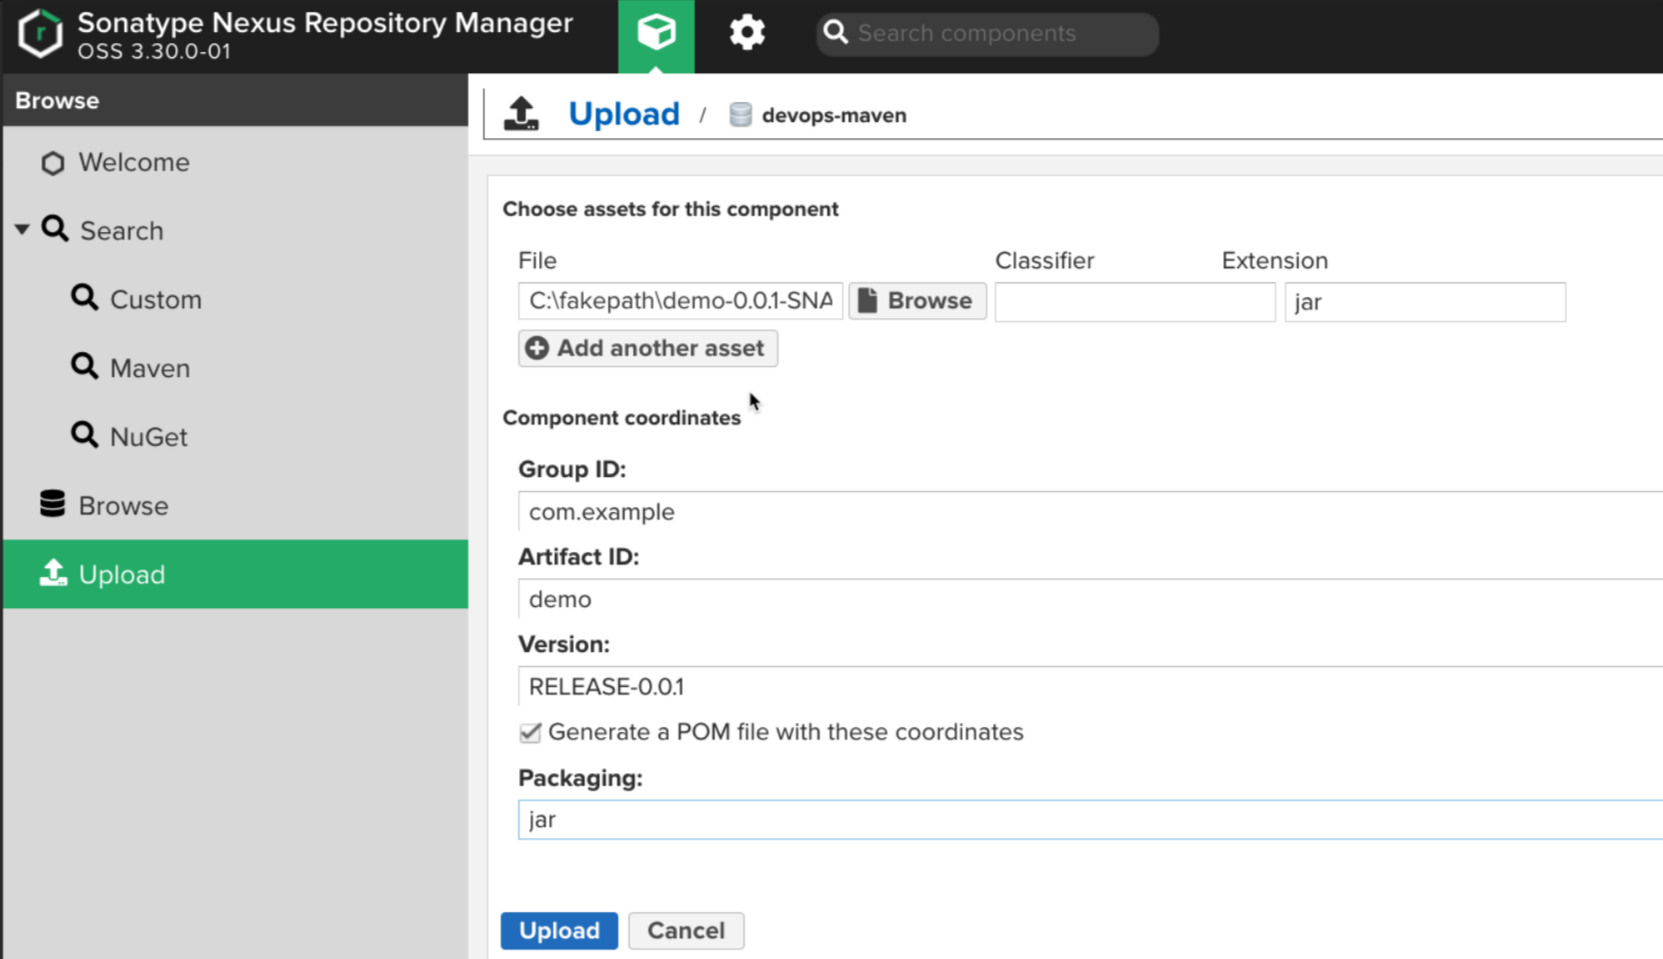
页面很方便上传,但是有时候不太好用…例如出现上传失败等问题(暂时无法解决,不同版本的nexus有些api不对应的坑)。
⚠️ 注意:这里的snapshot类型的制品是不能上传的,release是可以的;
选择制品, 填写制品的坐标信息:
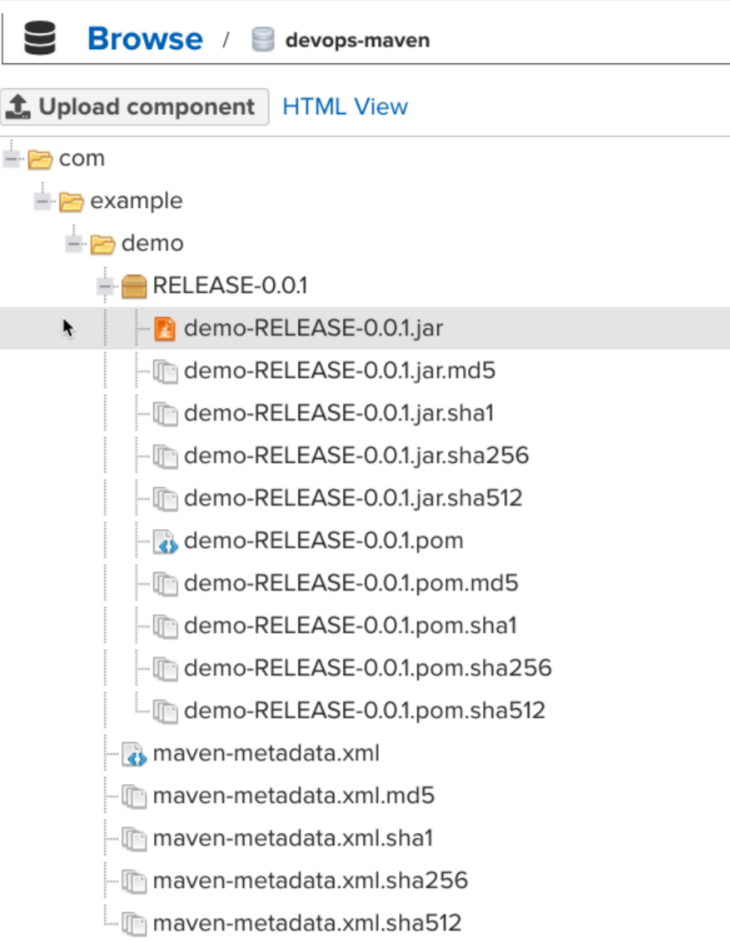
查看上传后的制品:
3.使用maven指令上传制品
参考:https://support.sonatype.com/hc/en-us/articles/213465818-How-can-I-programmatically-upload-an-artifact-into-Nexus-2-
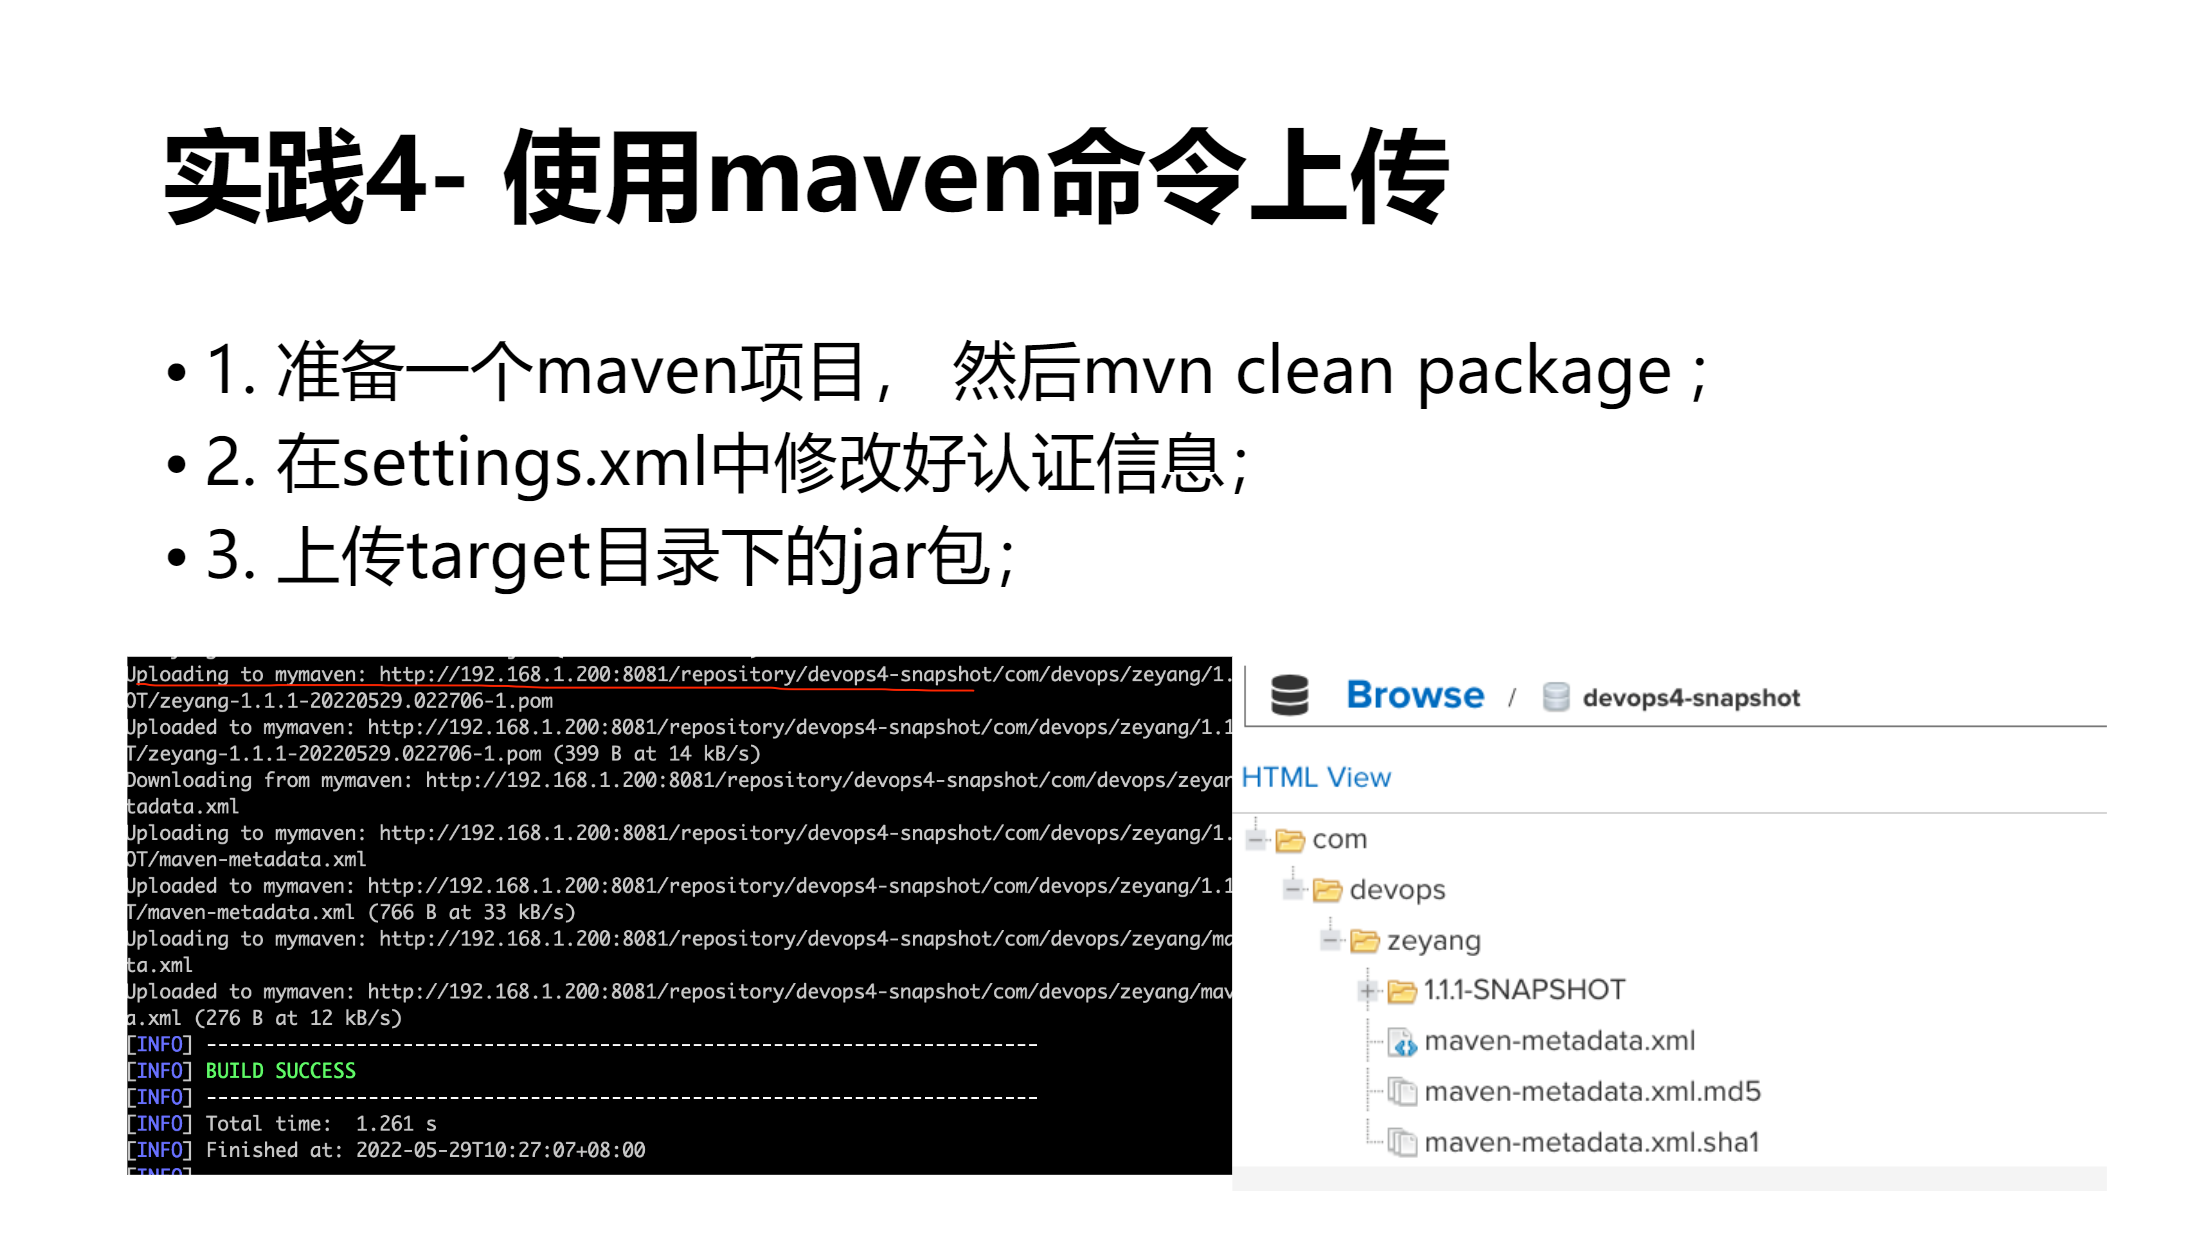
| 💘 实践:使用maven目录上传(测试成功)-2022.6.11 |
🍀 方法1:使用mvn命令上传制品(自定义pom信息(灵活))
- 上传制品之前, 肯定得确定目标仓库是存在的。 如果不存在我们可以新建一个 hosted类型的maven仓库。
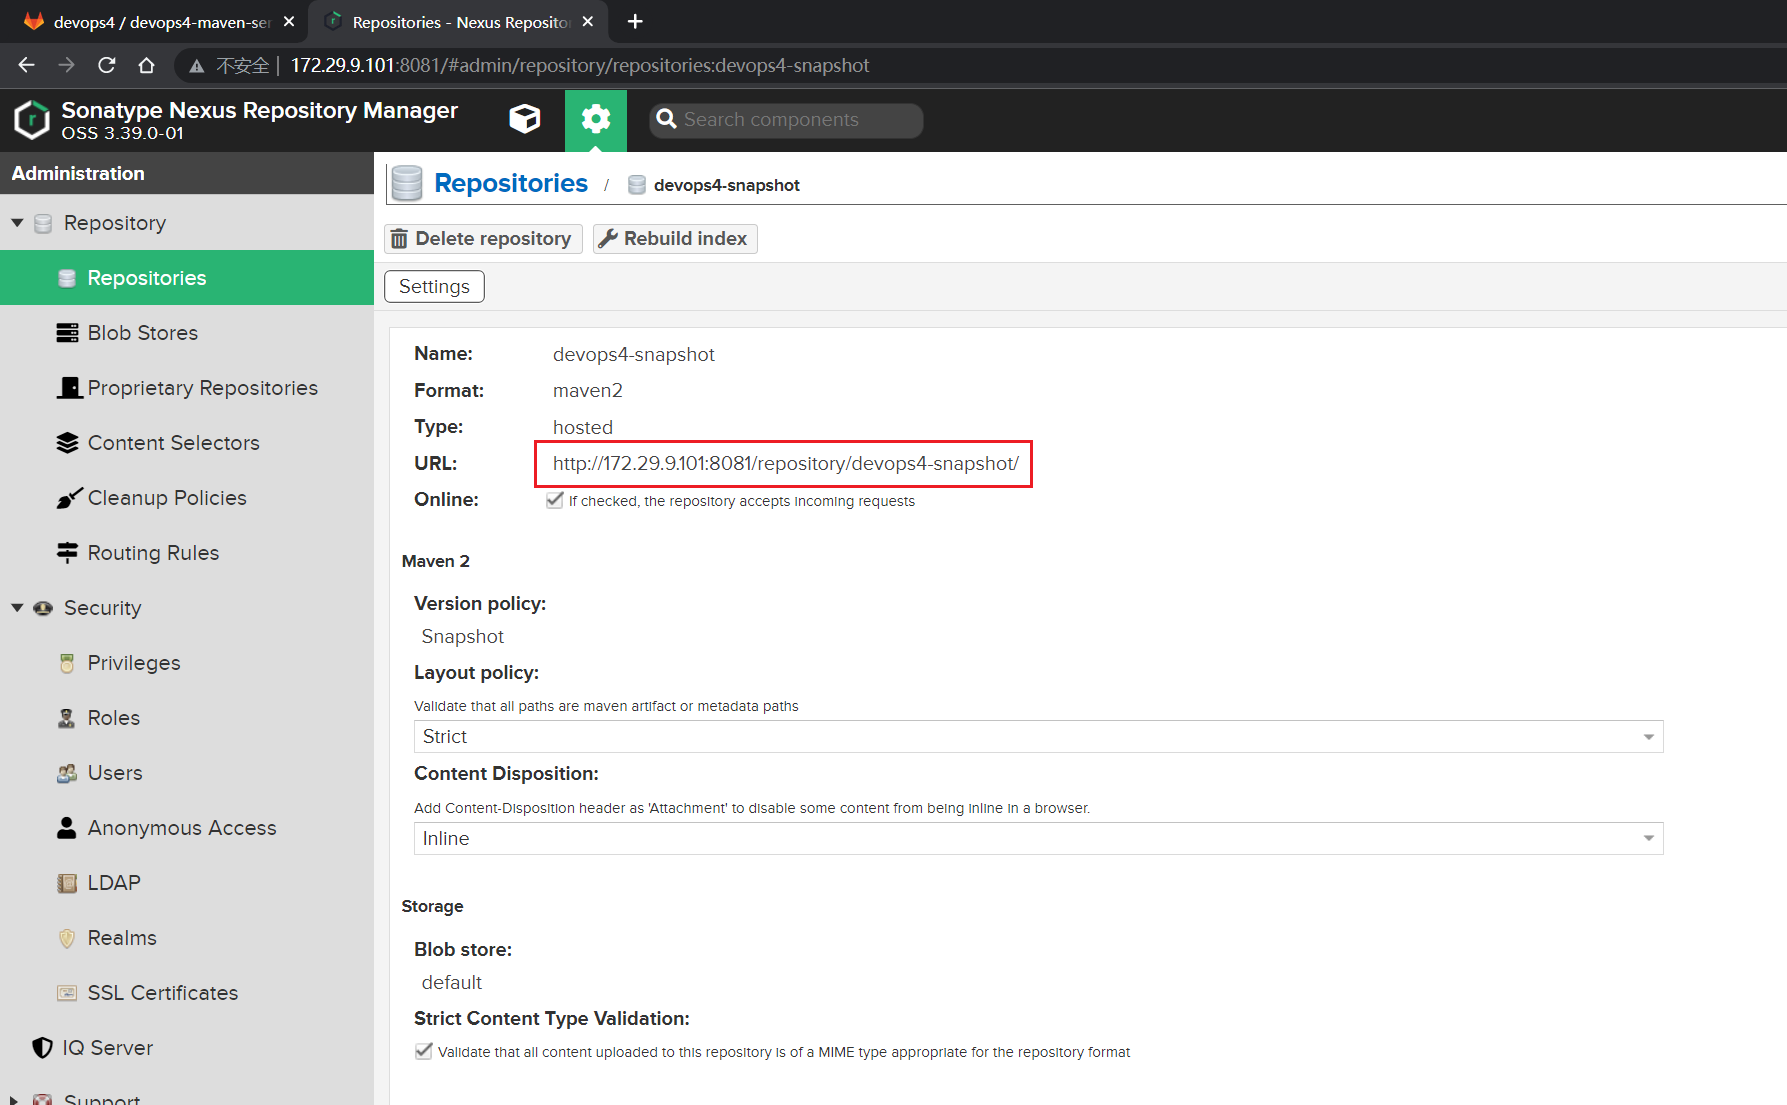
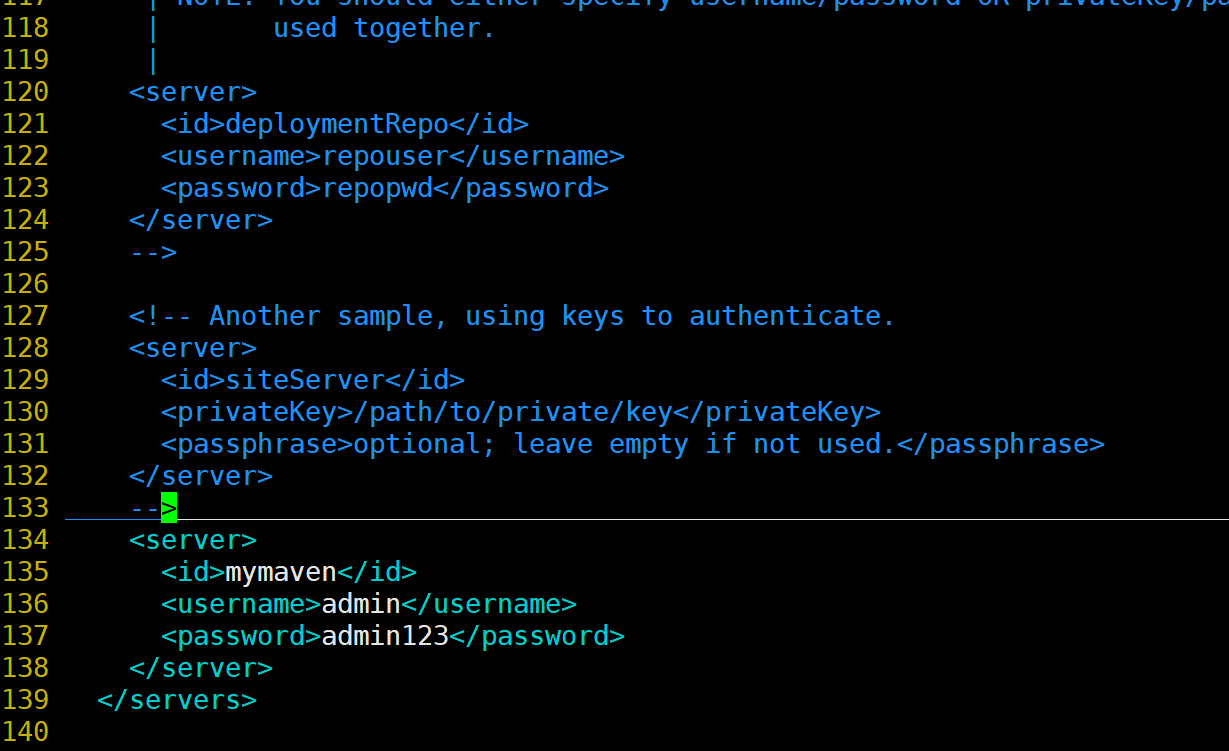
- 仓库已经有了, 需要更新maven的配置文件,在settings.xml中添加仓库的认证信息。如下:
    <server>
      <id>mymaven</id>
      <username>admin</username>
      <password>admin123</password>
    </server>
本次自己环境:
[root@devops ~]#vim /usr/local/apache-maven-3.8.5/conf/settings.xml
    <server>
      <id>mymaven</id>
      <username>admin</username>
      <password>admin123</password>
    </server>
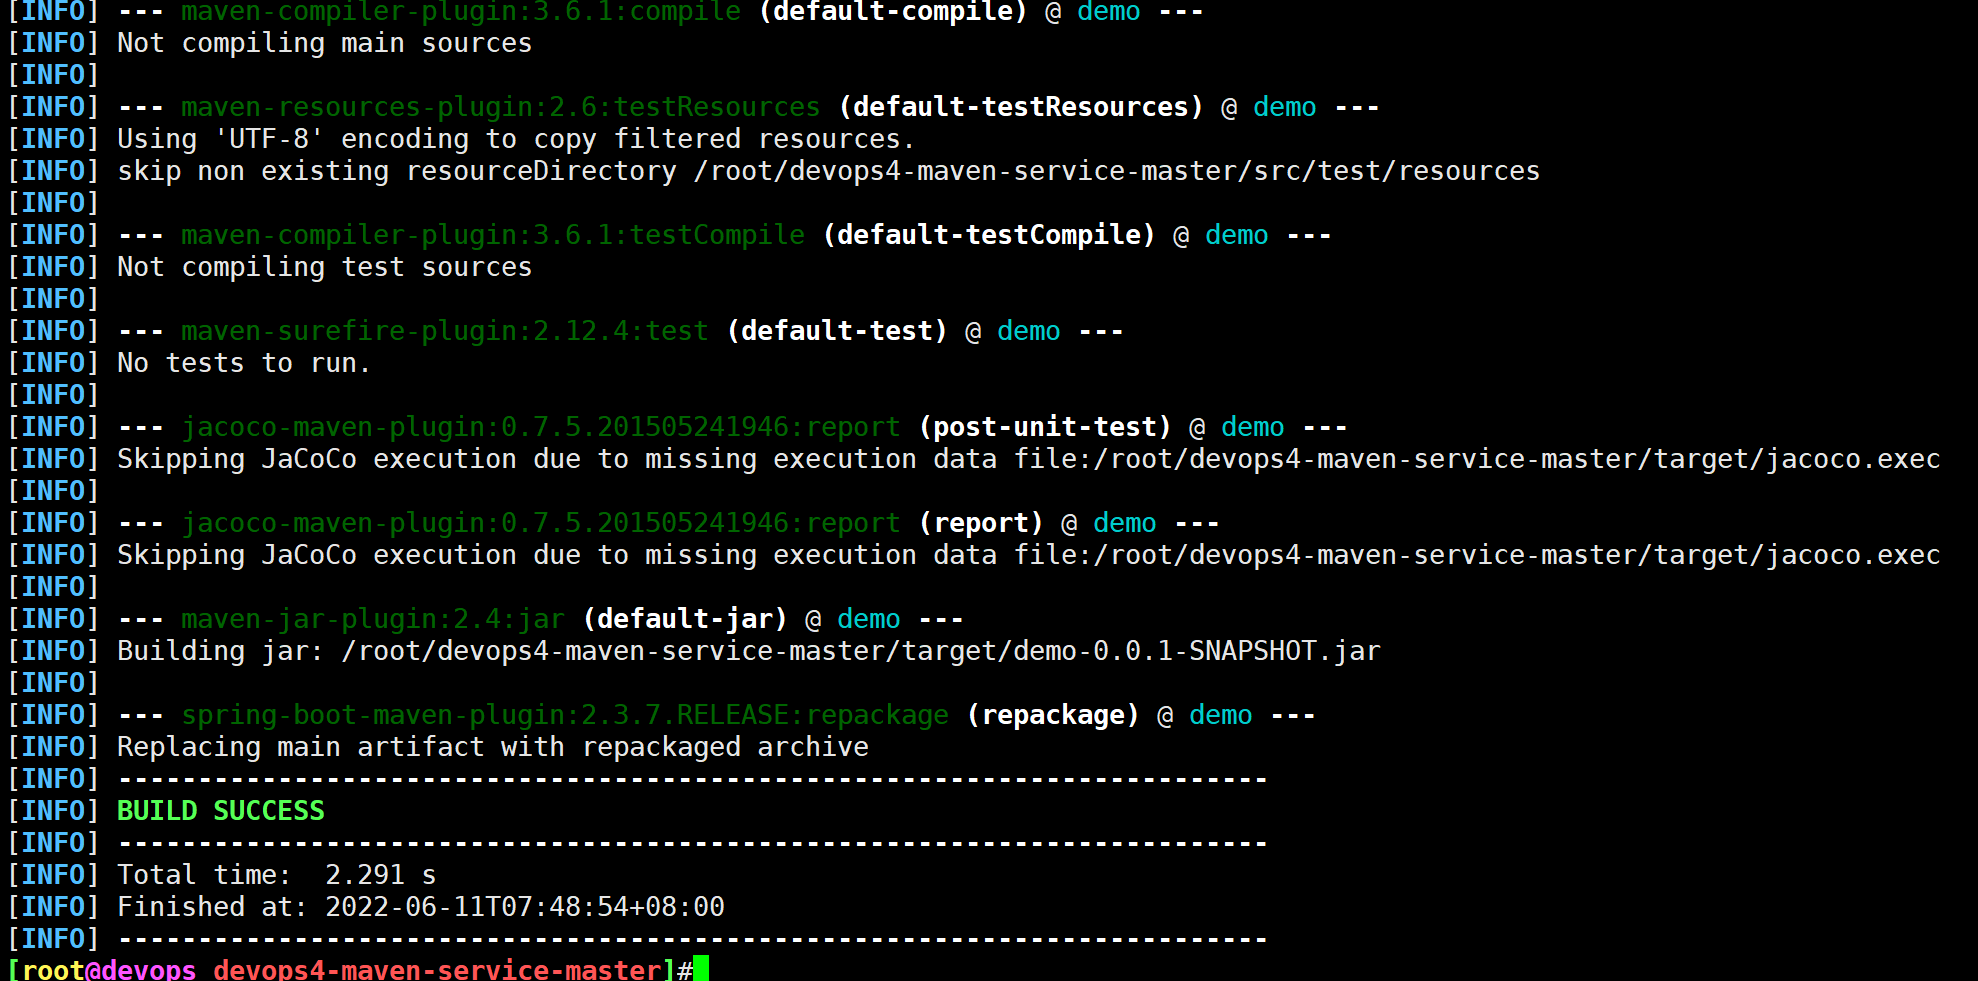
- 上传制品前记得先要编译构建下的:
[root@devops ~]#cd
[root@devops ~]#cd devops4-maven-service-master
[root@devops devops4-maven-service-master]#ls
build.sh  mvnw  mvnw.cmd  pom.xml  README.md  sonar-project.properties  src  target
[root@devops devops4-maven-service-master]#mvn clean package
[root@devops devops4-maven-service-master]#pwd
/root/devops4-maven-service-master
[root@devops devops4-maven-service-master]#ls
build.sh  mvnw  mvnw.cmd  pom.xml  README.md  sonar-project.properties  src  target
[root@devops devops4-maven-service-master]#ls target/
classes  demo-0.0.1-SNAPSHOT.jar  demo-0.0.1-SNAPSHOT.jar.original  maven-archiver
- 开始上传:
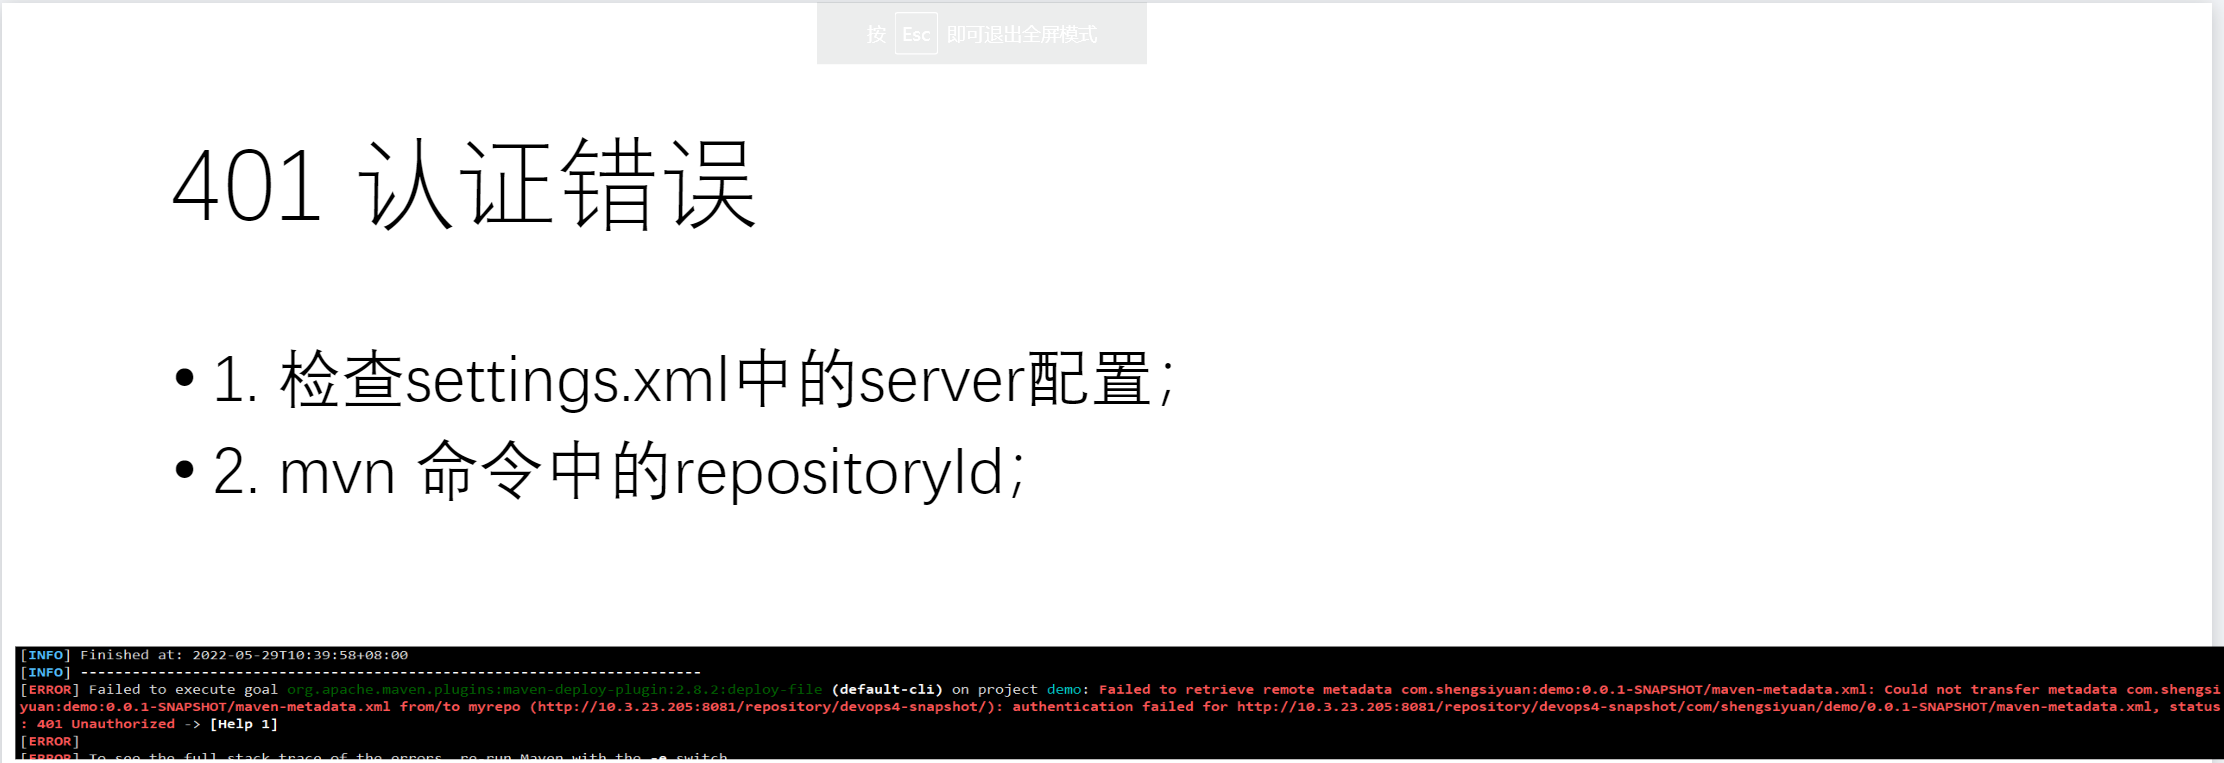
注意使用mvn deploy 发布时,-DrepositoryId参数的值要与上面配置文件中的<server>标签中的<id>一致。不然会出现401,用户认证失败的问题。
mvn deploy:deploy-file
-DgroupId=xxxxxx pom中的groupId
-DartifactId=xxxxxx pom中的artifactId
-Dversion=xxxxxx pom中的版本号version
-Dpackaging=xxxxxx pom中打包方式
-Dfile=xxxxxx 本地文件
-Durl=xxxxxx 仓库url
-DrepositoryId=xxxxxx 对应的是setting.xml(认证)
Maven上传报错, 401 可以确定是认证的错误。 需要检查认证信息。
[ERROR] Failed to execute goal org.apache.maven.plugins:maven-deploy-plugin:2.8.2:deploy-file (default-cli) on project demo: Failed to deploy artifacts: Could not transfer artifact com.devops:zeyang:jar:1.1.1 from/to remote-repository (http://192.168.1.200:8081/repository/devops-maven/): authentication failed for http://192.168.1.200:8081/repository/devops-maven/com/devops/zeyang/1.1.1/zeyang-1.1.1.jar, status: 401 Unauthorized -> [Help 1]
替换参数, 执行命令开始上传制品。
mvn deploy:deploy-file \
-DgroupId=com.devops \
-DartifactId=xyy \
-Dversion=1.1.1-snapshot \
-Dpackaging=jar  \
-Dfile=target/demo-0.0.1-SNAPSHOT.jar \
-Durl=http://172.29.9.101:8081/repository/devops4-snapshot/  \
-DrepositoryId=mymaven
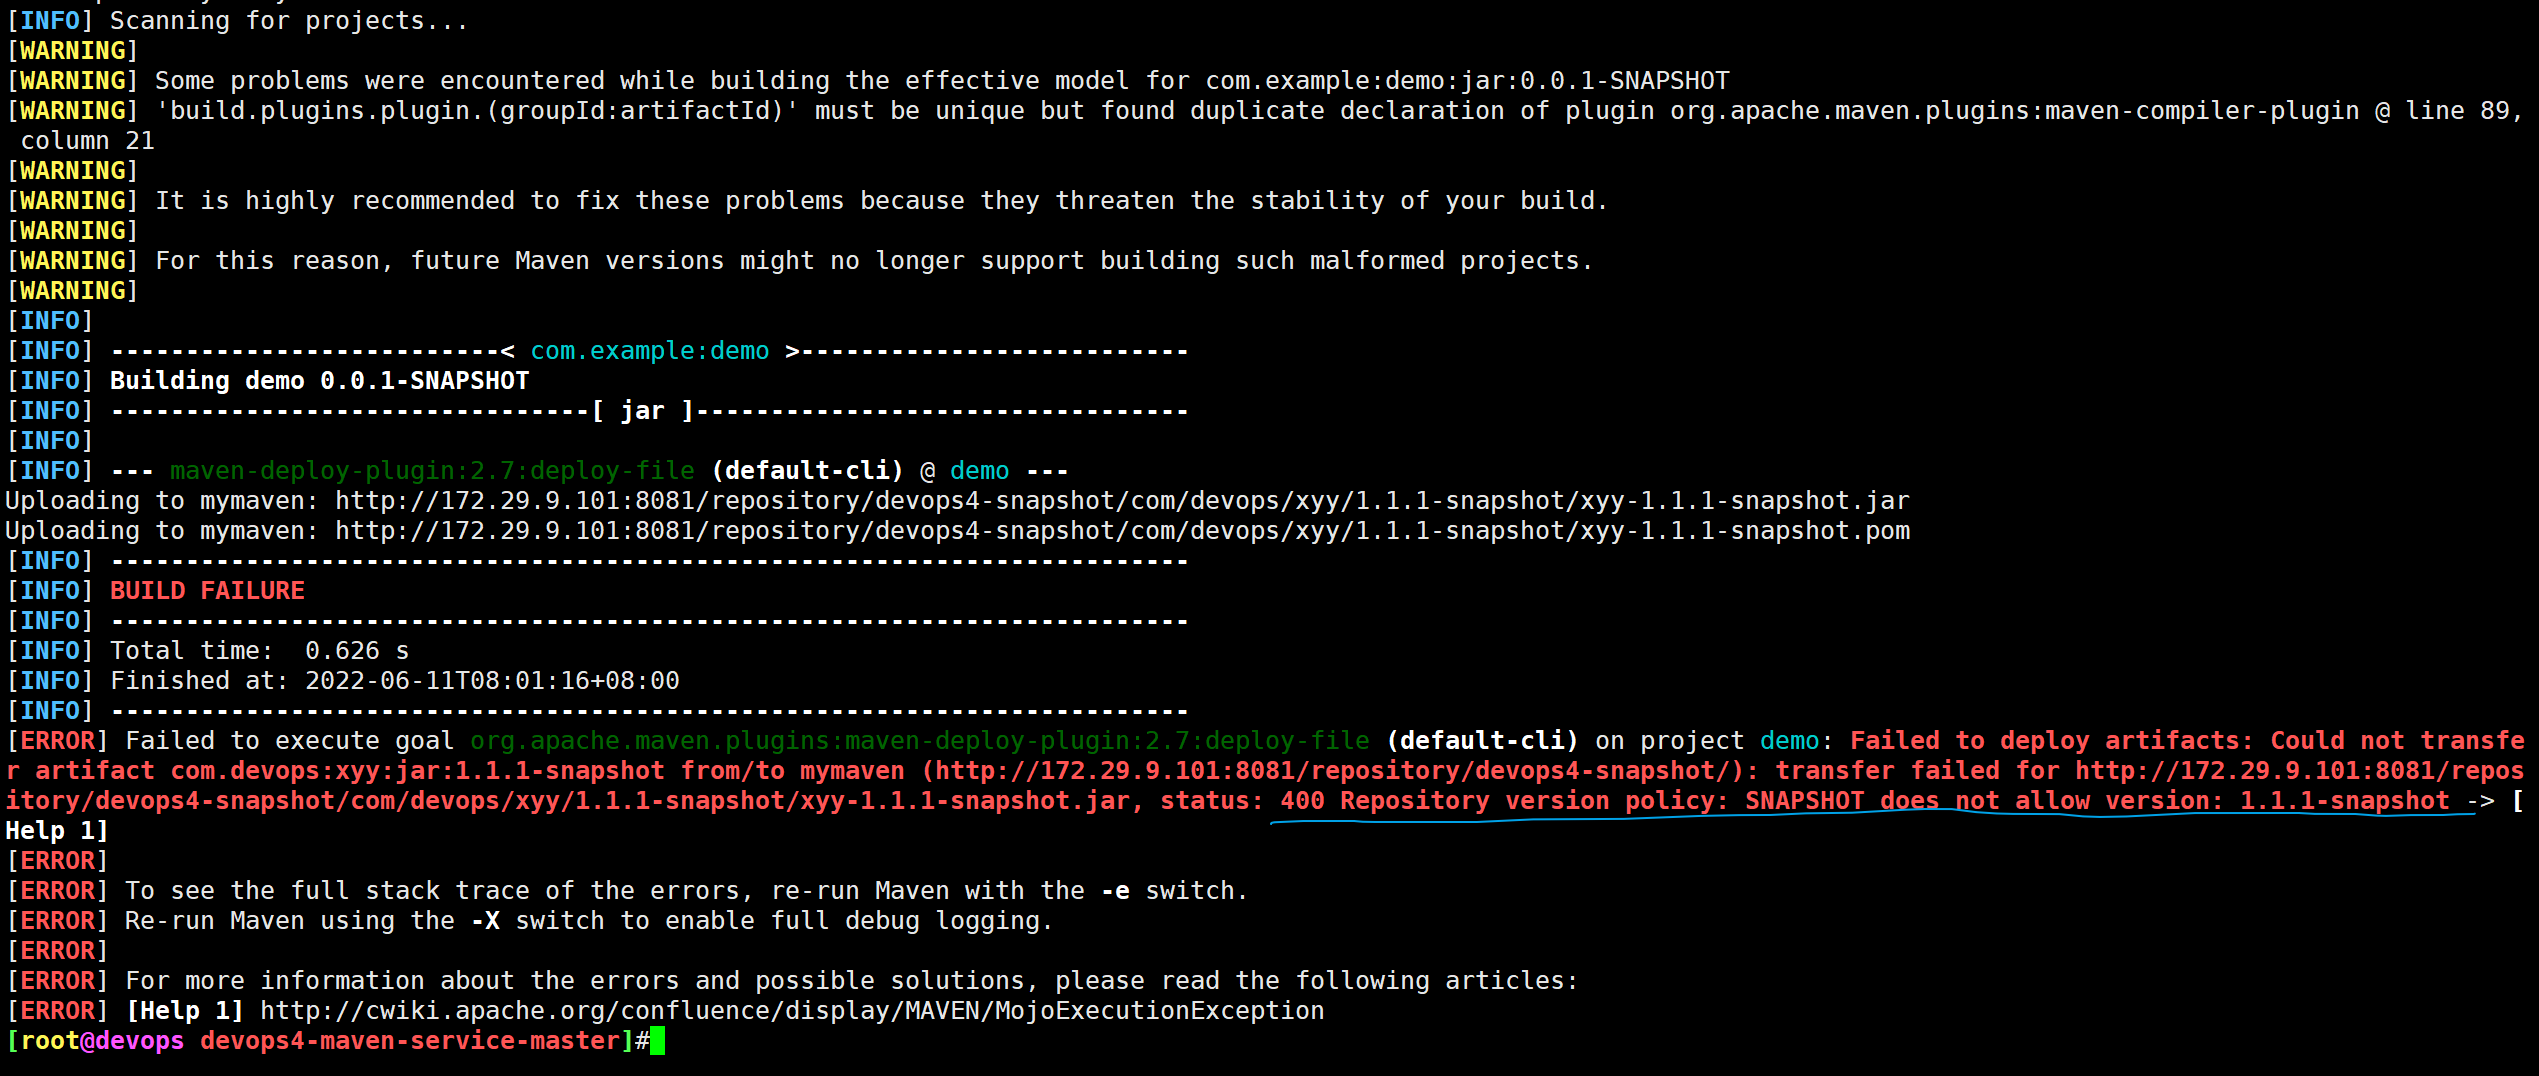
- 我们再次修改下参数观察下效果:
mvn deploy:deploy-file \
-DgroupId=com.devops \
-DartifactId=xyy \
-Dversion=1.1.1-SNAPSHOT \
-Dpackaging=jar  \
-Dfile=target/demo-0.0.1-SNAPSHOT.jar \
-Durl=http://172.29.9.101:8081/repository/devops4-snapshot/  \
-DrepositoryId=mymaven
这里的
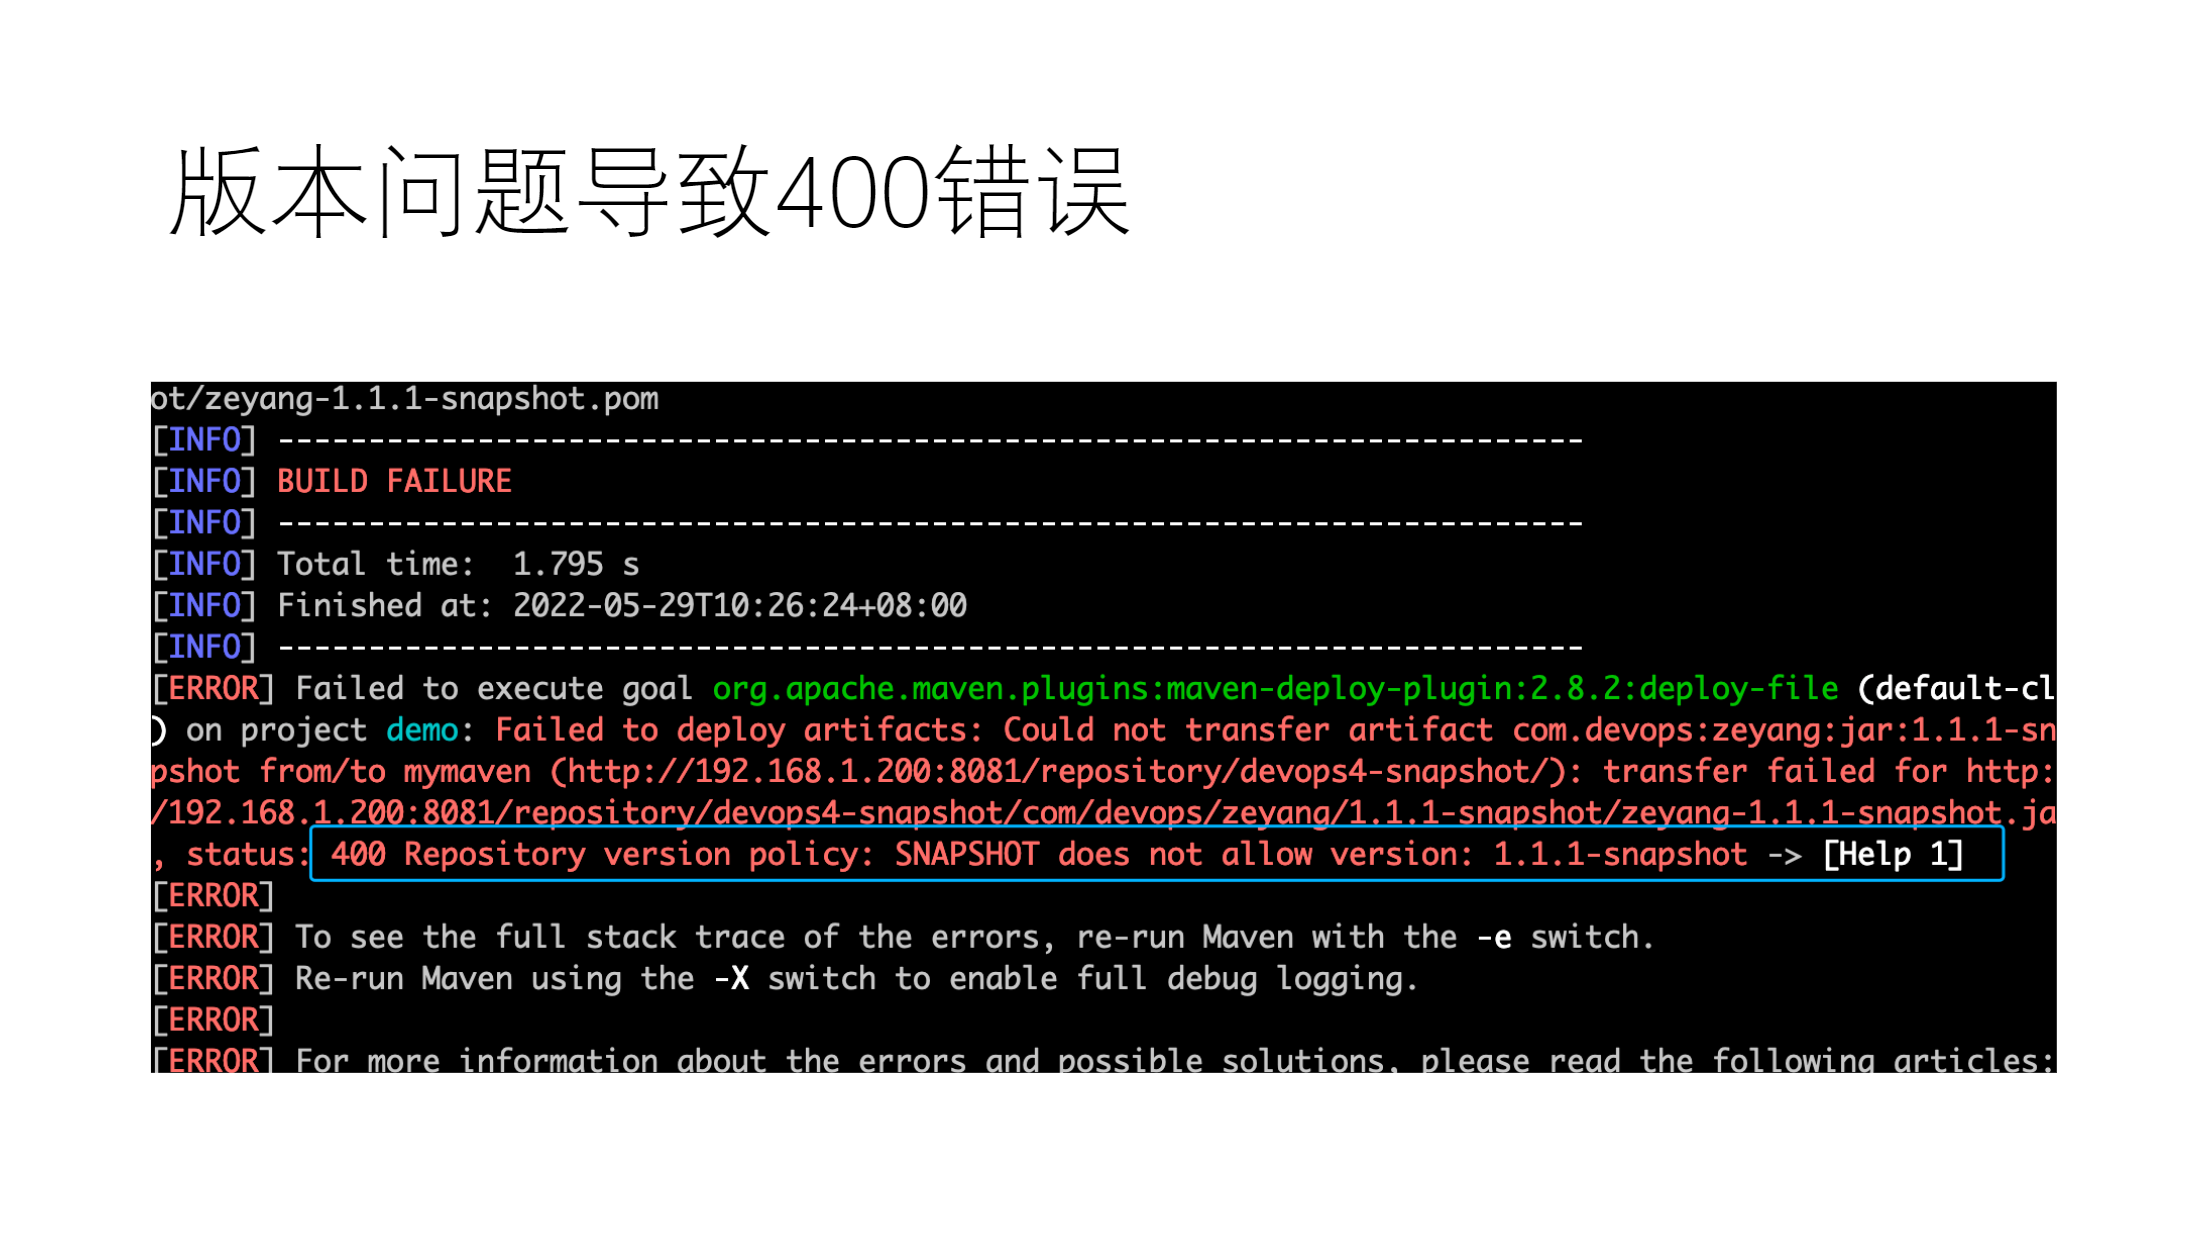
-Dversion=1.1.1-SNAPSHOTSNAPSHOT一定要大写才行的!否则会被认为是release类型的制品,当然也就不能上传到snapshot仓库了。
可以看到,本次上传成功了:
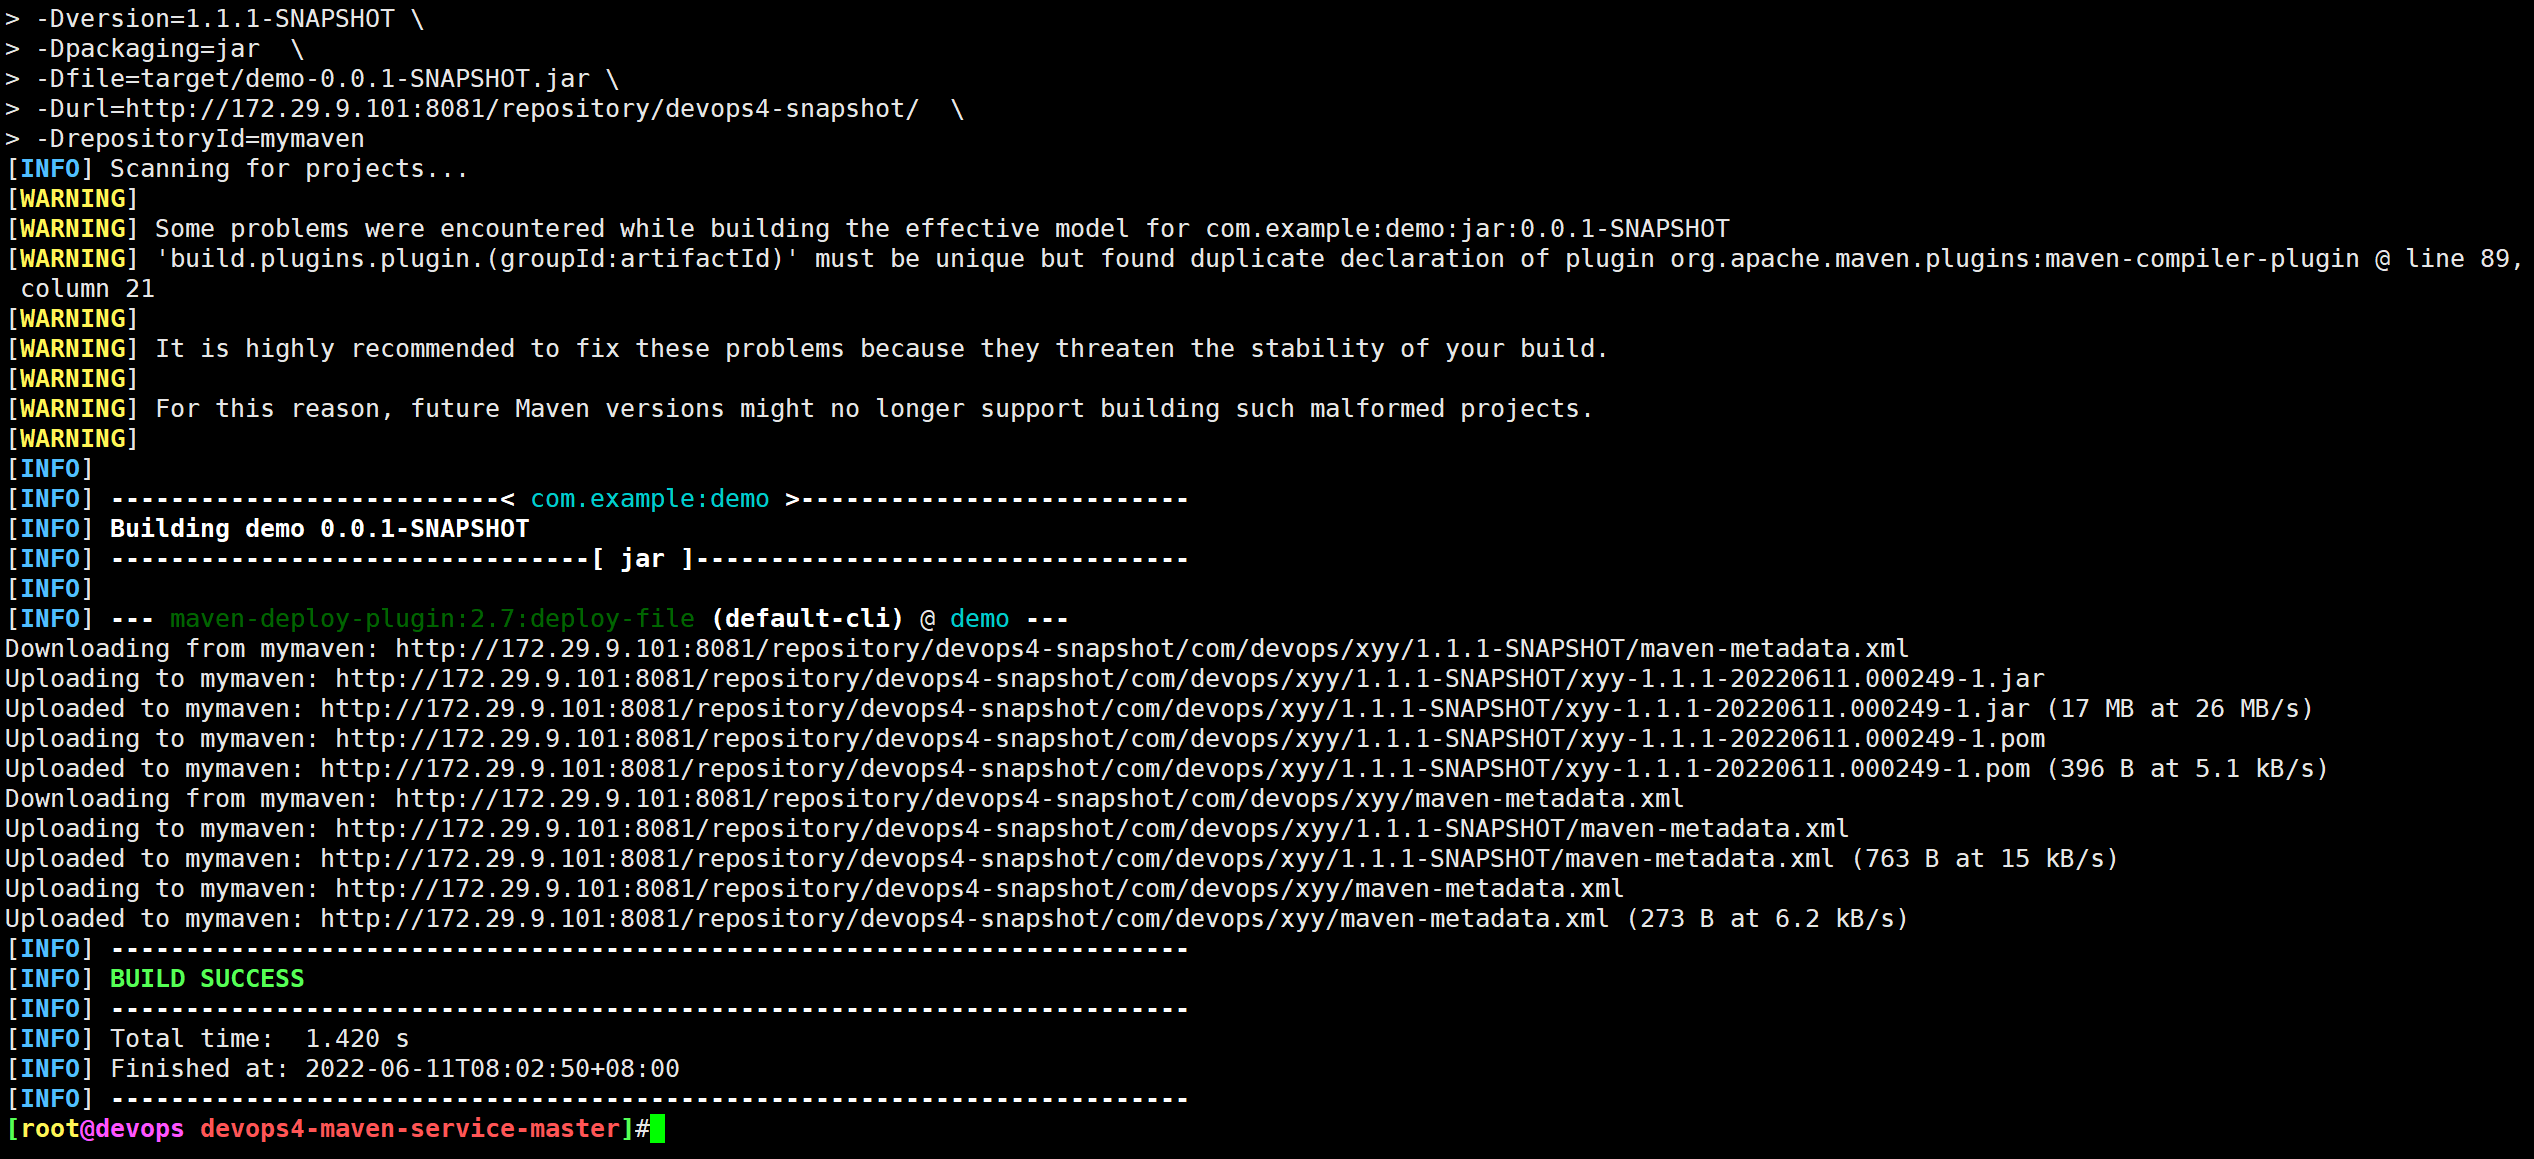
- 验证:制品已经上传成功了。
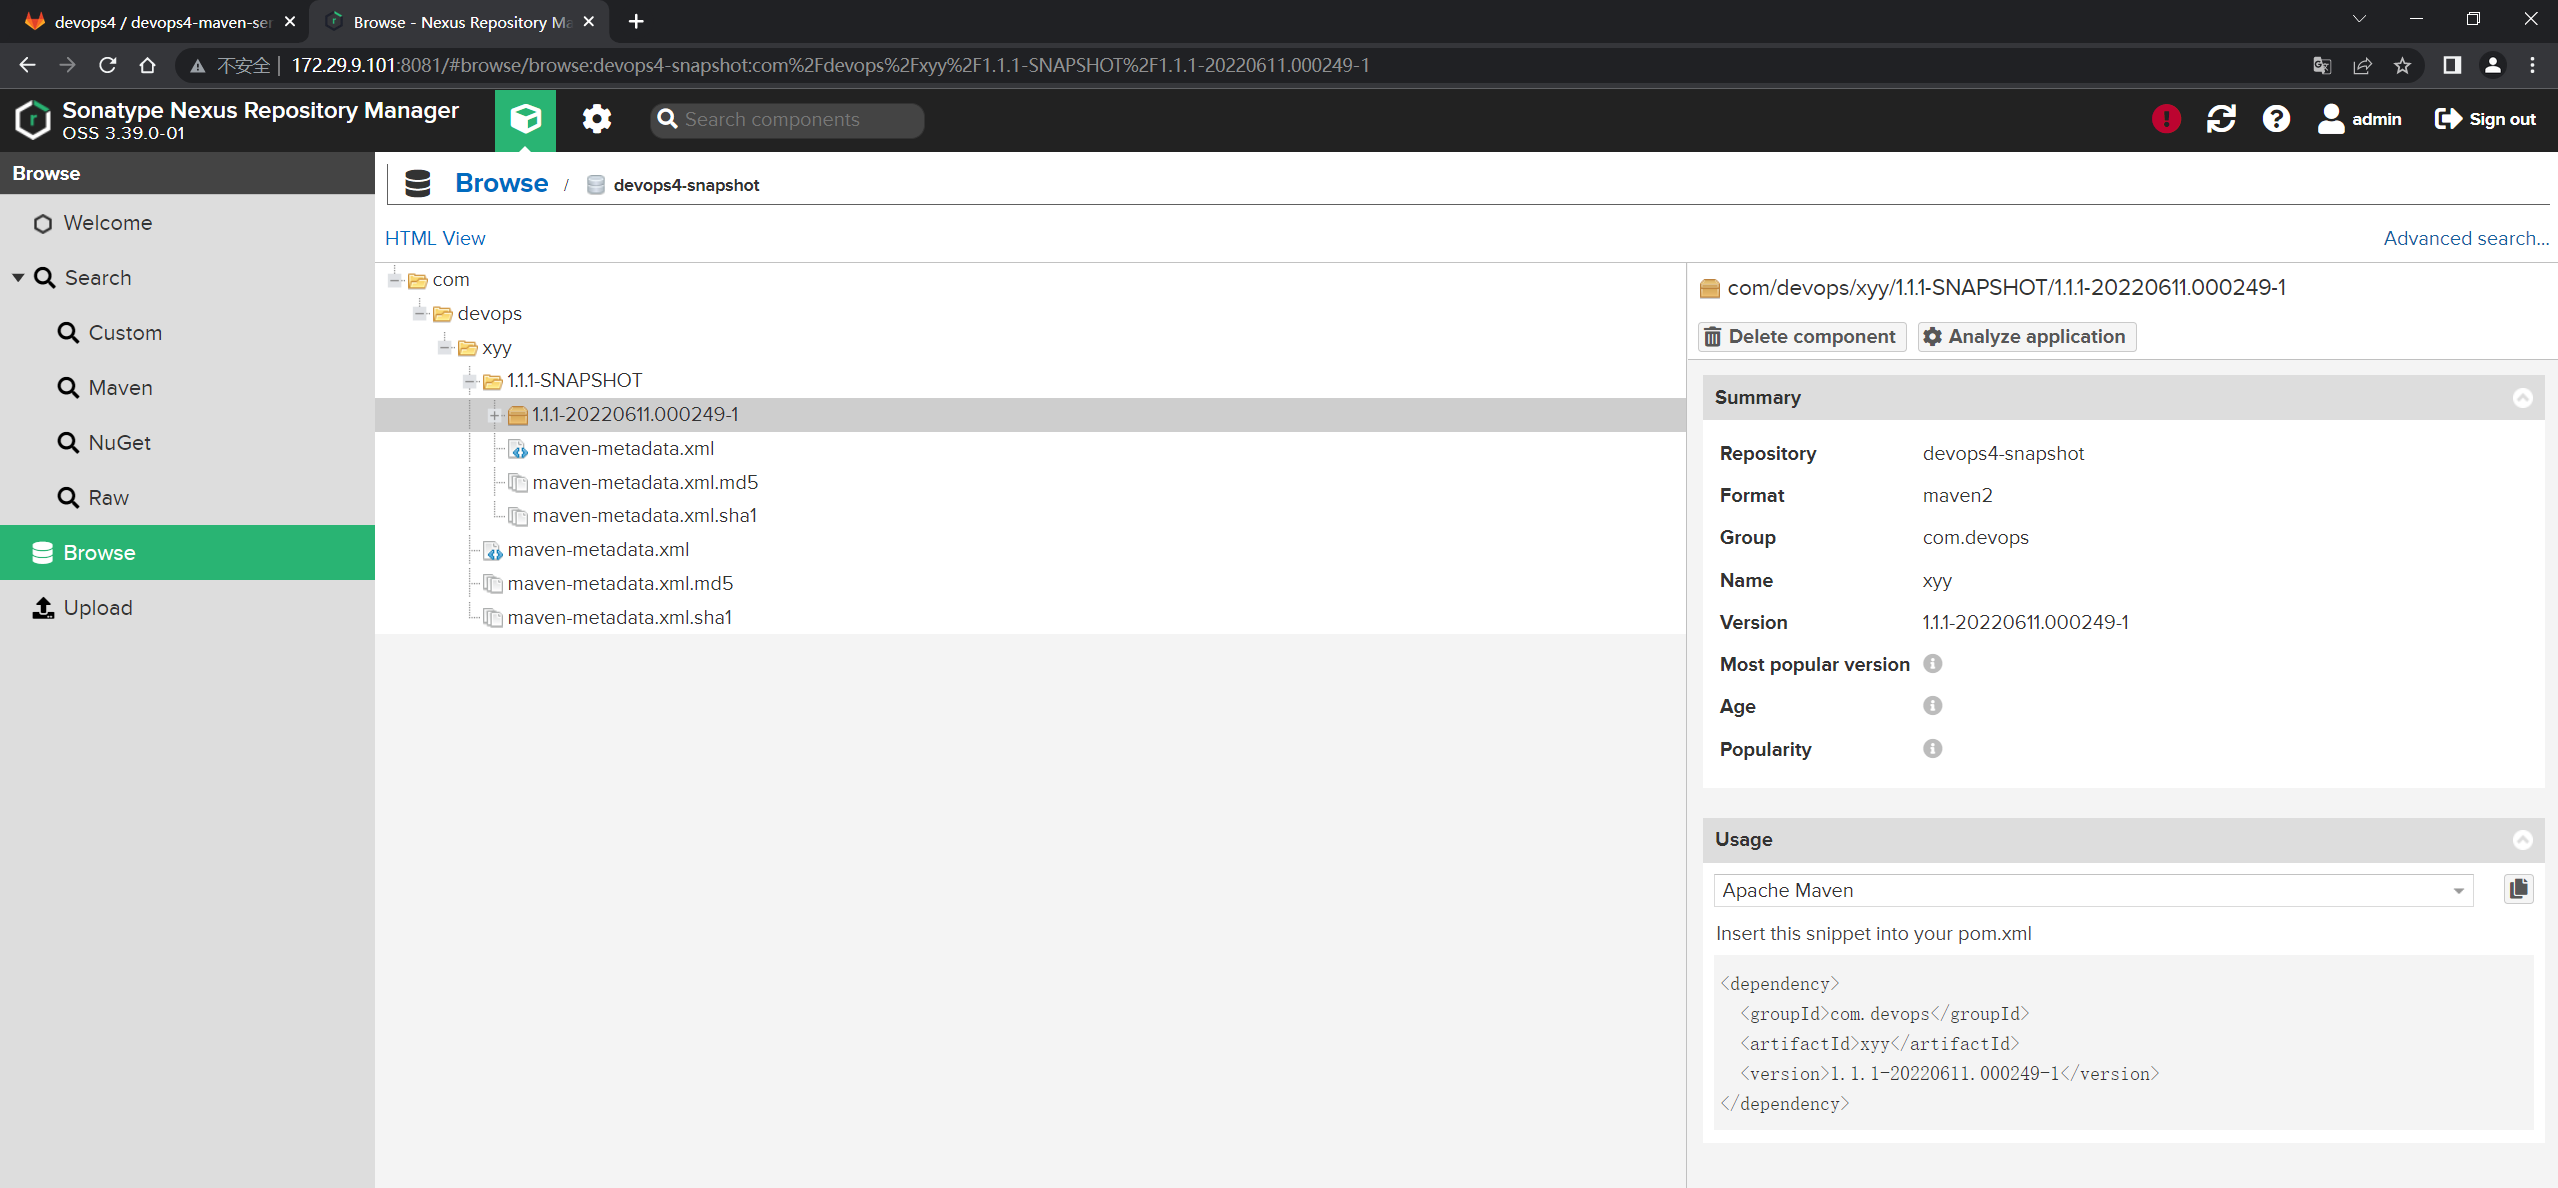
测试成功。😘
🍀 方法2:直接读取pom文件(方便)
- 默认项目下是已经有
pom.xml文件了:
[root@devops devops4-maven-service-master]#ls
build.sh  mvnw  mvnw.cmd  pom.xml  README.md  sonar-project.properties  src  target
[root@devops devops4-maven-service-master]#cat pom.xml
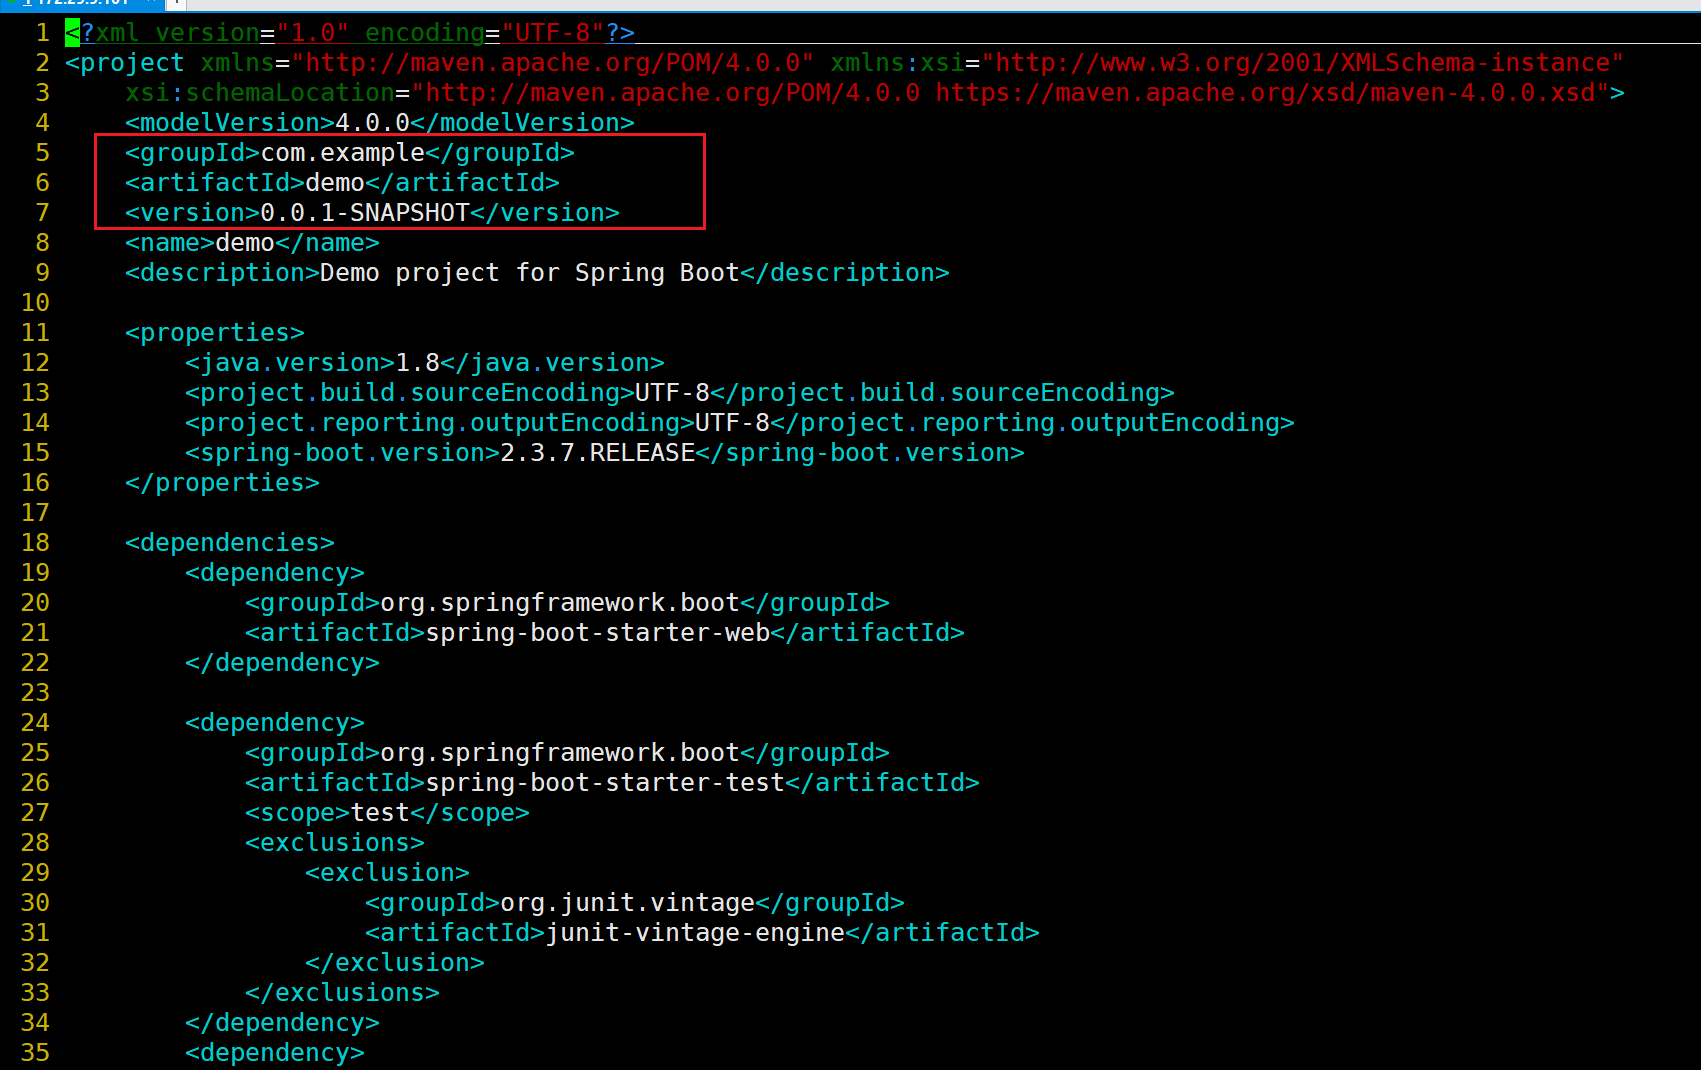
- 这里直接使用命令上传:
mvn deploy:deploy-file \
-DgeneratePom=true \
-DrepositoryId=mymaven \
-Durl=http://172.29.9.101:8081/repository/devops4-snapshot/ \
-DpomFile=pom.xml \
-Dfile=target/demo-0.0.1-SNAPSHOT.jar


- 验证:
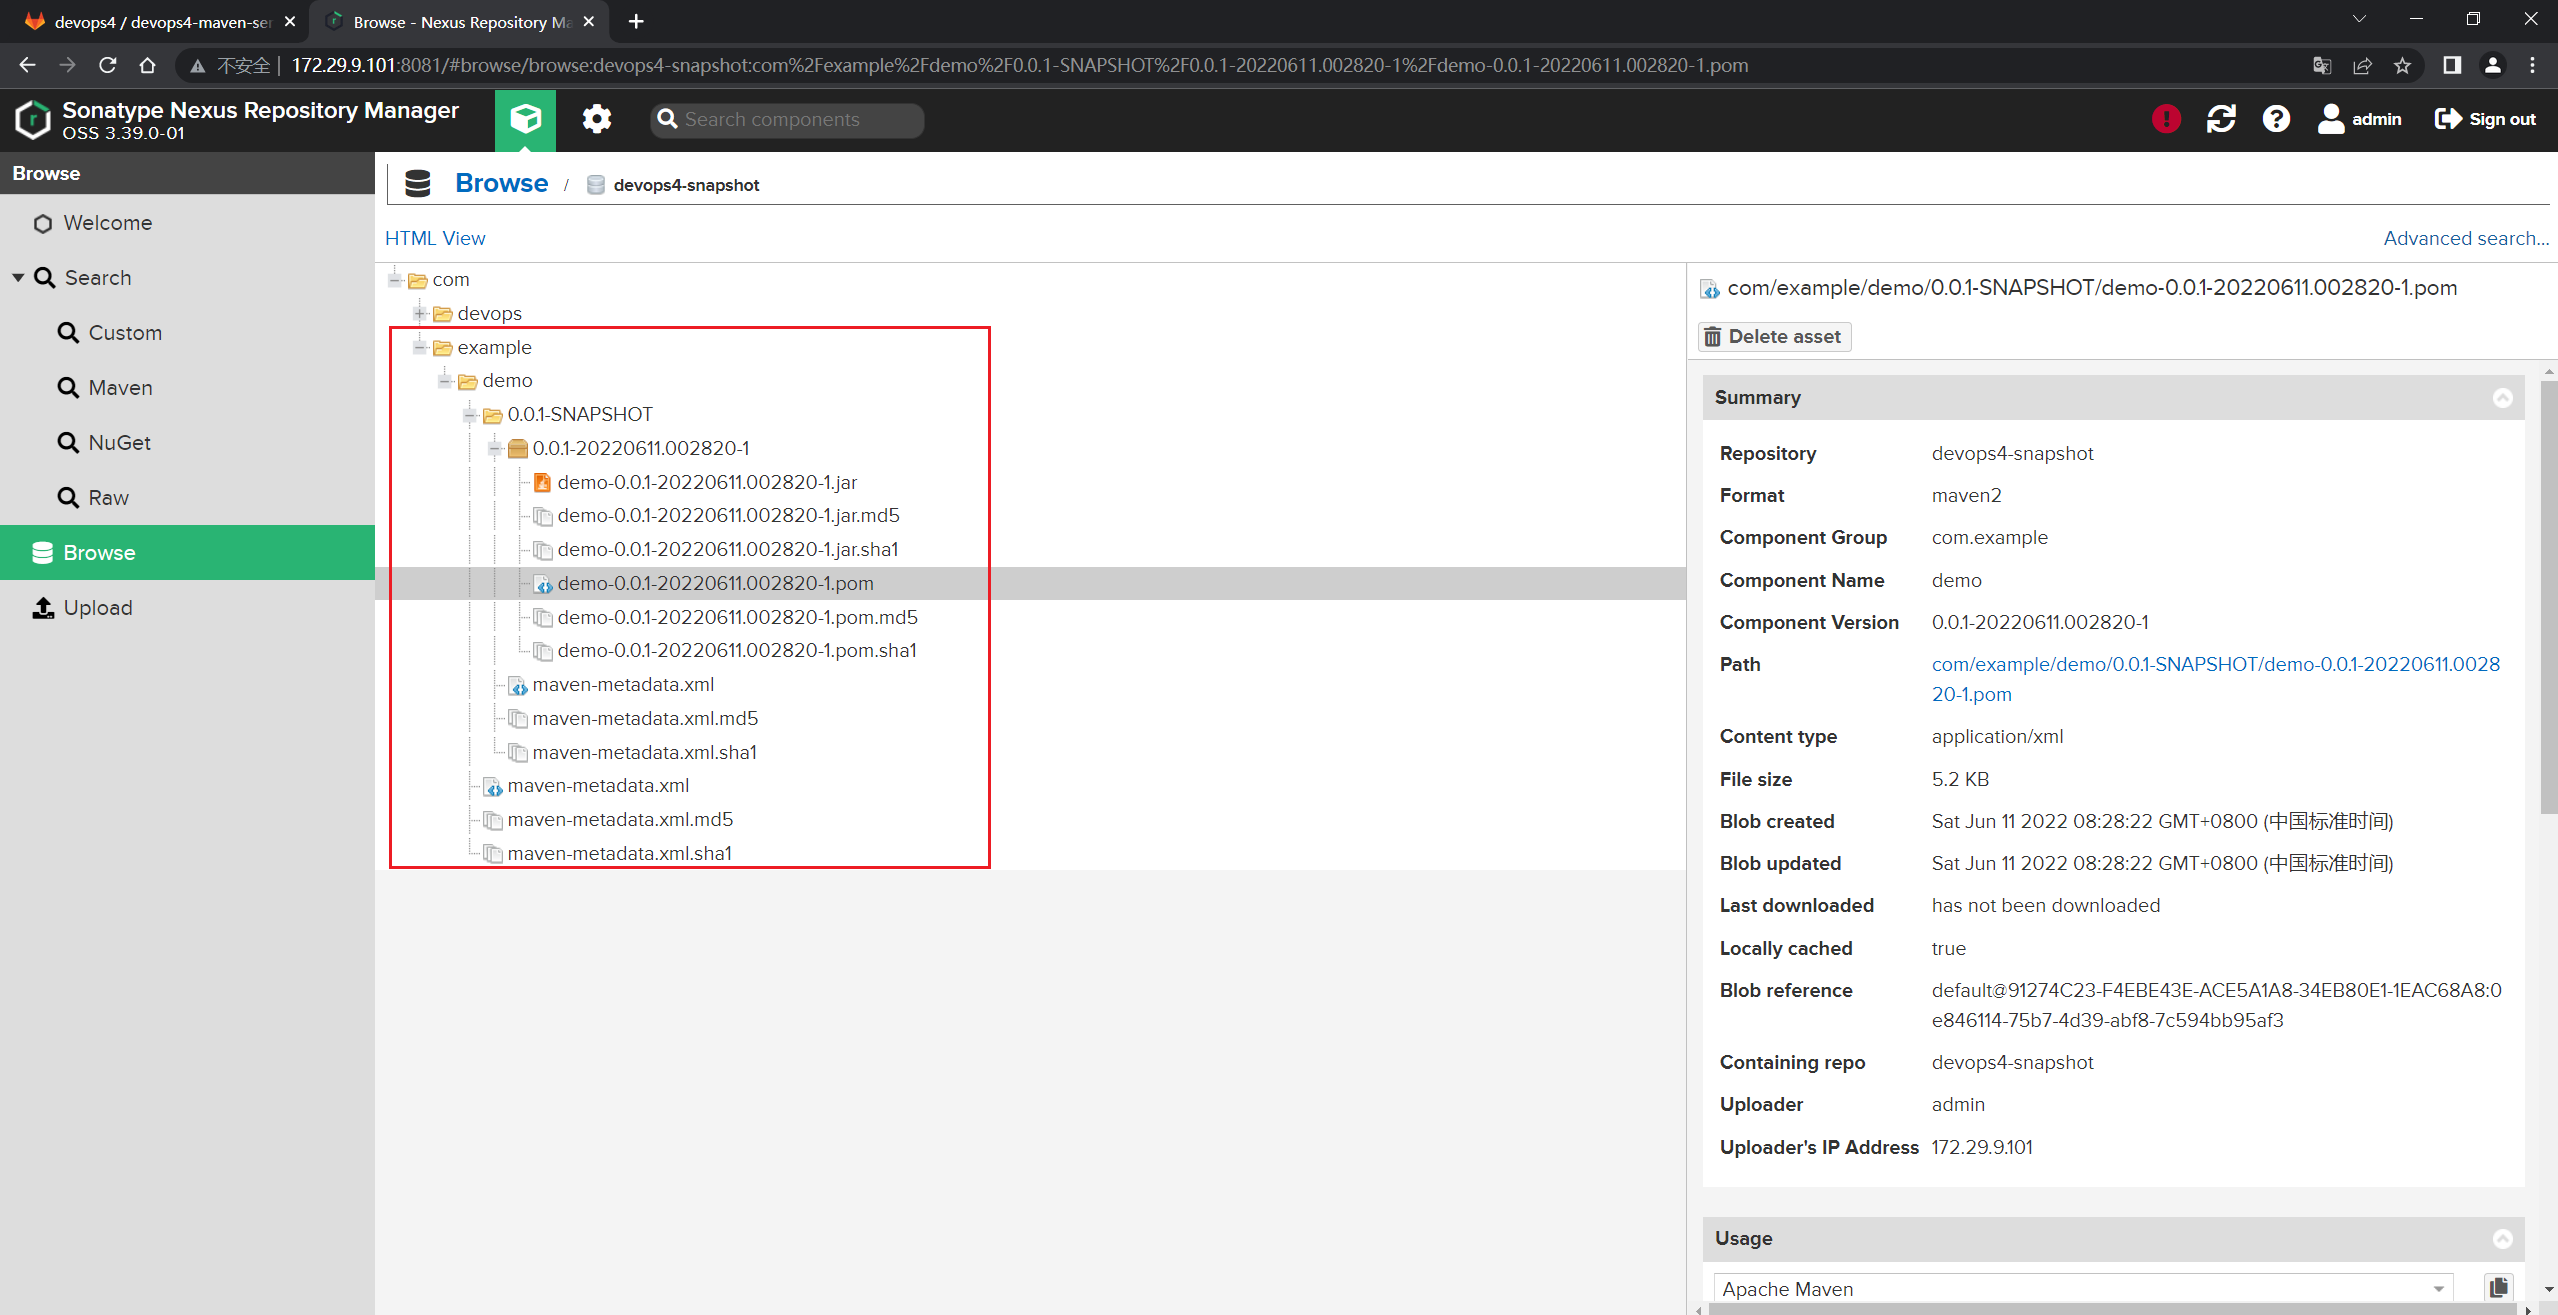
测试成功。😘
⚠️ FAQ:
release类型的仓库只能上传release版本的包。如果你尝试用snapshot包上传到release类型的仓库时会遇到这些错误的。
[ERROR] Failed to execute goal org.apache.maven.plugins:maven-deploy-plugin:2.8.2:deploy-file (default-cli) on project demo: Failed to deploy artifacts: Could not transfer artifact com.example:demo:jar:0.0.1 from/to maven-hosted (http://192.168.1.200:8081/repository/maven-zeyang-test/): transfer failed for http://192.168.1.200:8081/repository/maven-zeyang-test/com/example/demo/0.0.1/demo-0.0.1.jar, status: 400 Repository version policy: SNAPSHOT does not allow version: 0.0.1 -> [Help 1]

解决方法: 1. 更新pom中的版本号 2. 对号入座,上传到对应类型的仓库。
<groupId>com.example</groupId>
<artifactId>myapp</artifactId>
<version>0.0.2-SNAPSHOT</version>    //改成0.0.2-RELEASE
将包上传到snapshot类型的仓库:
mvn deploy:deploy-file \
-DgeneratePom=false \
-DrepositoryId=maven-hosted \
-Durl=http://192.168.1.200:8081/repository/devops-maven-snapshot/ \
-DpomFile=pom.xml \
-Dfile=target/demo-0.0.1-SNAPSHOT.jar
📍 通过maven命令上传
- 编写代码:
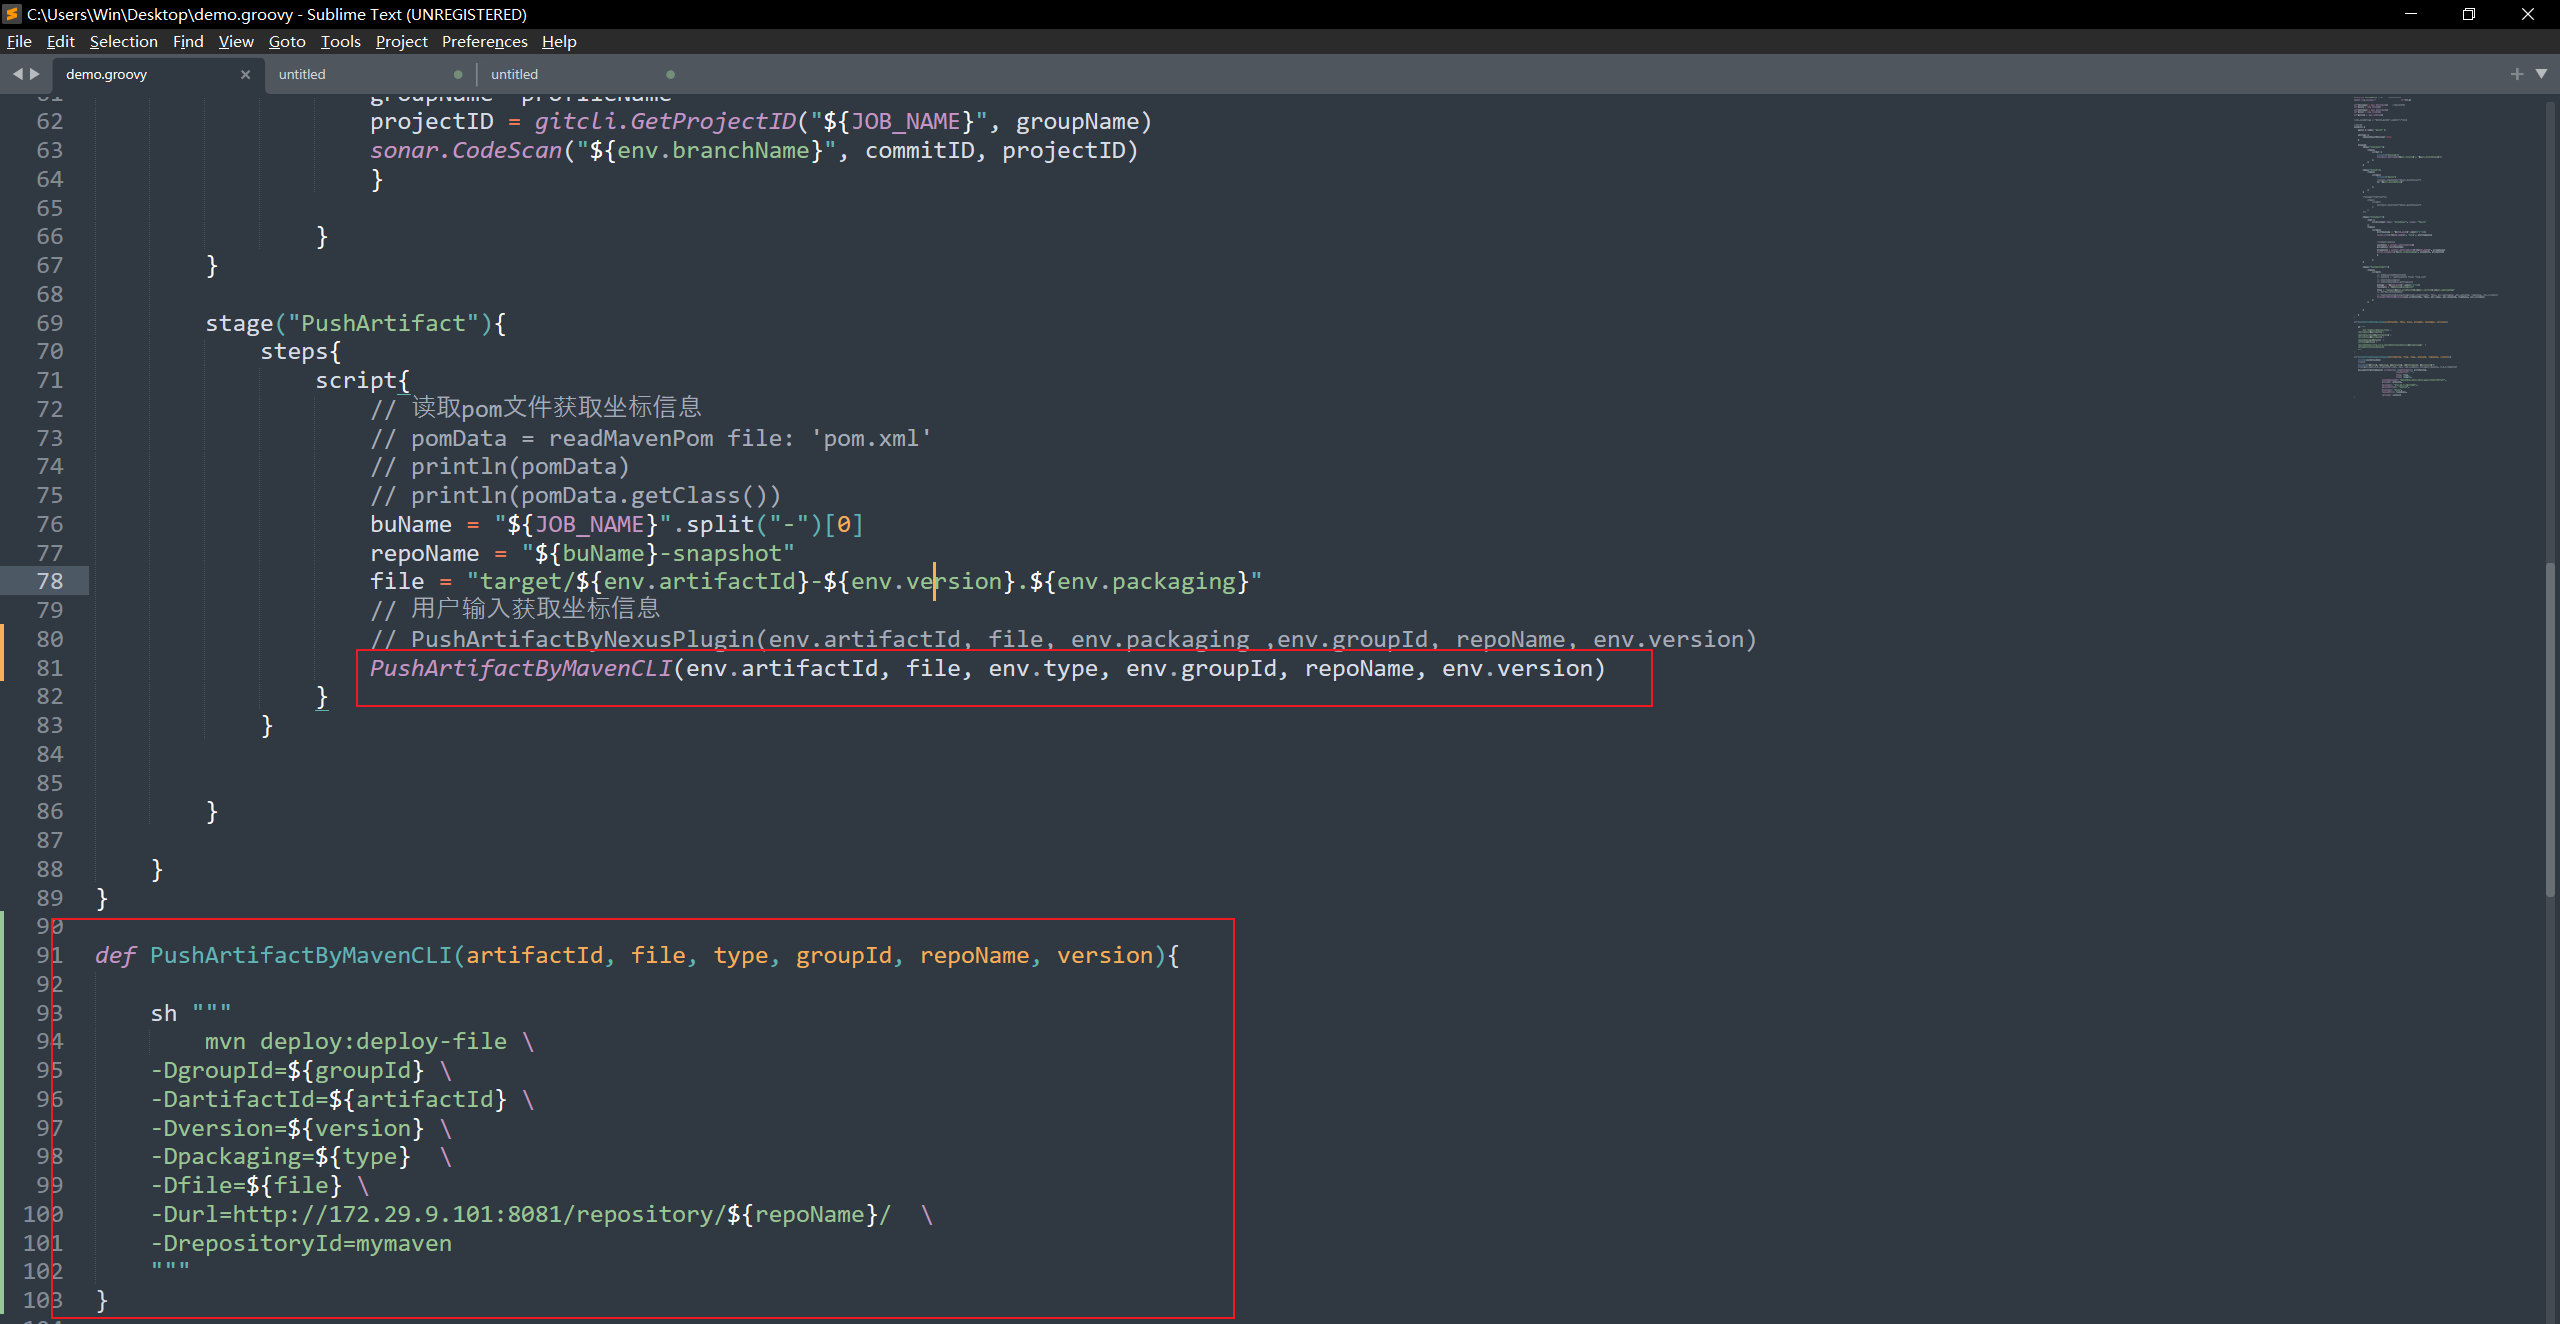
@Library("mylib@main") _     //加载共享库
import org.devops.*						// 导入库

def checkout = new Checkout()    //New实例化
def build = new Build()
def unittest = new UnitTest()
def sonar = new Sonar()
def gitcli = new GitLab()

//env.buildType = "${JOB_NAME}".split("-")[1]

//流水线
pipeline {
    agent { label "build" }

    options {
        skipDefaultCheckout true
    }

    stages{
        stage("Checkout"){
            steps{
                script {
                    println("GetCode")
                    checkout.GetCode("${env.srcUrl}", "${env.branchName}")
                }
            }
        }

        stage("Build"){
            steps{
                script{
                    println("Build")
                    //build.CodeBuild("${env.buildType}")
                    sh "${env.buildShell}"

                }
            }
        }

        /*stage("UnitTest"){
            steps{
                script{
                    unittest.CodeTest("${env.buildType}")
                }
            }
        }*/

        stage("CodeScan"){
            when {
                environment name: 'skipSonar', value: 'false'
            }
            steps{
                script{
                    profileName = "${JOB_NAME}".split("-")[0]
                    sonar.Init("${JOB_NAME}", "java", profileName)


                    //commit-status
                    commitID = gitcli.GetCommitID()
                    groupName =profileName
                    projectID = gitcli.GetProjectID("${JOB_NAME}", groupName)
                    sonar.CodeScan("${env.branchName}", commitID, projectID)
                    }

                }
        }

        stage("PushArtifact"){
        	steps{
        		script{
                    // 读取pom文件获取坐标信息
                    // pomData = readMavenPom file: 'pom.xml'
                    // println(pomData)
                    // println(pomData.getClass())
                    buName = "${JOB_NAME}".split("-")[0]
                    repoName = "${buName}-snapshot"
                    file = "target/${env.artifactId}-${env.version}.${env.packaging}"
                    // 用户输入获取坐标信息
        			// PushArtifactByNexusPlugin(env.artifactId, file, env.packaging ,env.groupId, repoName, env.version)
                    PushArtifactByMavenCLI(env.artifactId, file, env.type, env.groupId, repoName, env.version)
        		}
        	}


        }

    }
}

def PushArtifactByMavenCLI(artifactId, file, type, groupId, repoName, version){

    sh """
        mvn deploy:deploy-file \
    -DgroupId=${groupId} \
    -DartifactId=${artifactId} \
    -Dversion=${version} \
    -Dpackaging=${type}  \
    -Dfile=${file} \
    -Durl=http://172.29.9.101:8081/repository/${repoName}/  \
    -DrepositoryId=mymaven
    """
}

def PushArtifactByNexusPlugin(artifactId, file, type, groupId, repoName, version){
    println(artifactId)
    //demo
    println("${file}, ${type}, ${groupId}, ${repoName}, ${version}")
    //target/demo-0.0.1-SNAPSHOT.jar, jar, com.example, devops4-release, 0.0.1-SNAPSHOT
    nexusArtifactUploader artifacts: [[artifactId: artifactId,
                                    classifier: '',
                                    file: file,
                                    type: type]],
                        credentialsId: '2b44f51a-2374-4275-aeed-b720f4fbf937',
                        groupId: groupId,
                        nexusUrl: '172.29.9.101:8081',
                        nexusVersion: 'nexus3',
                        protocol: 'http',
                        repository: repoName,
                        version: version
}
- 删除nexus
devops4-snapshot仓库:
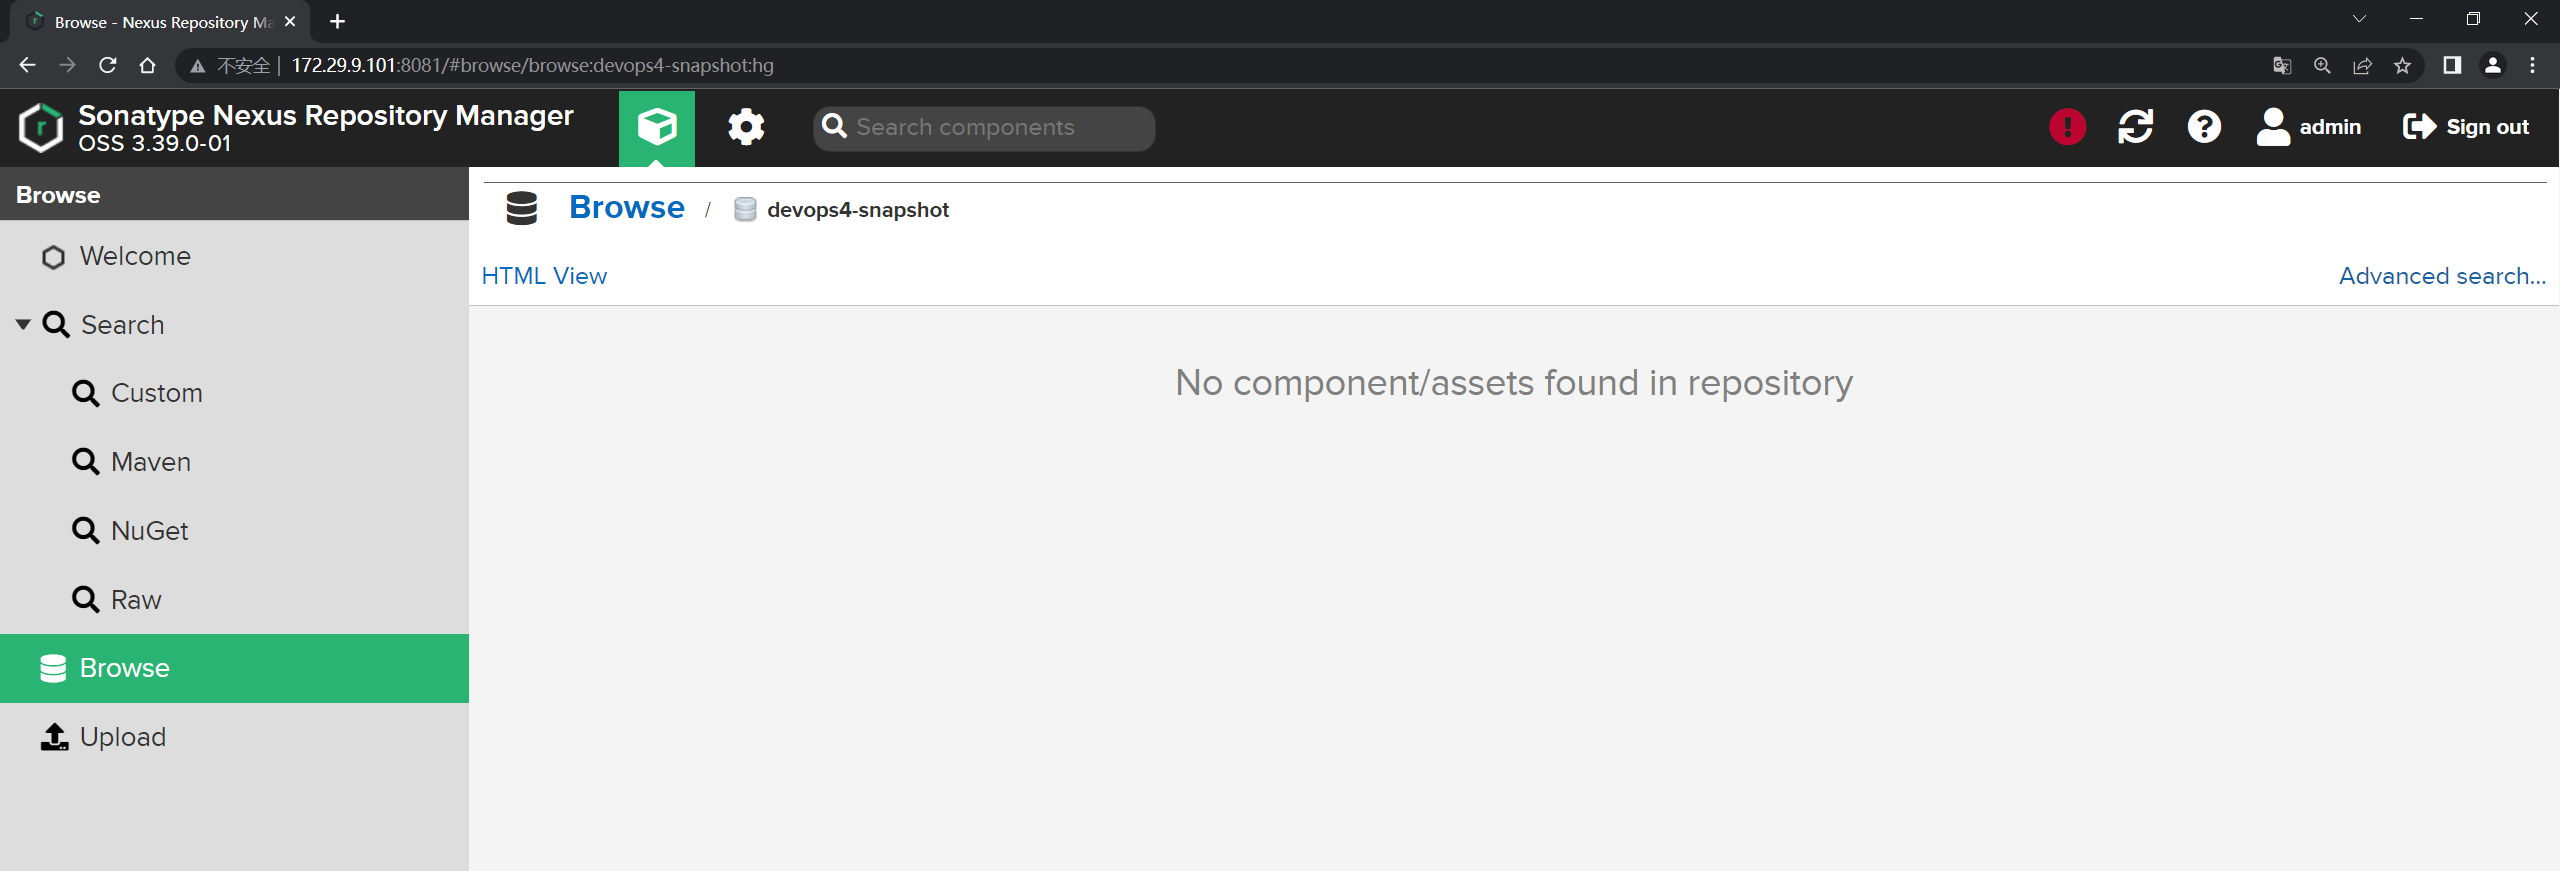
- 构建运行:
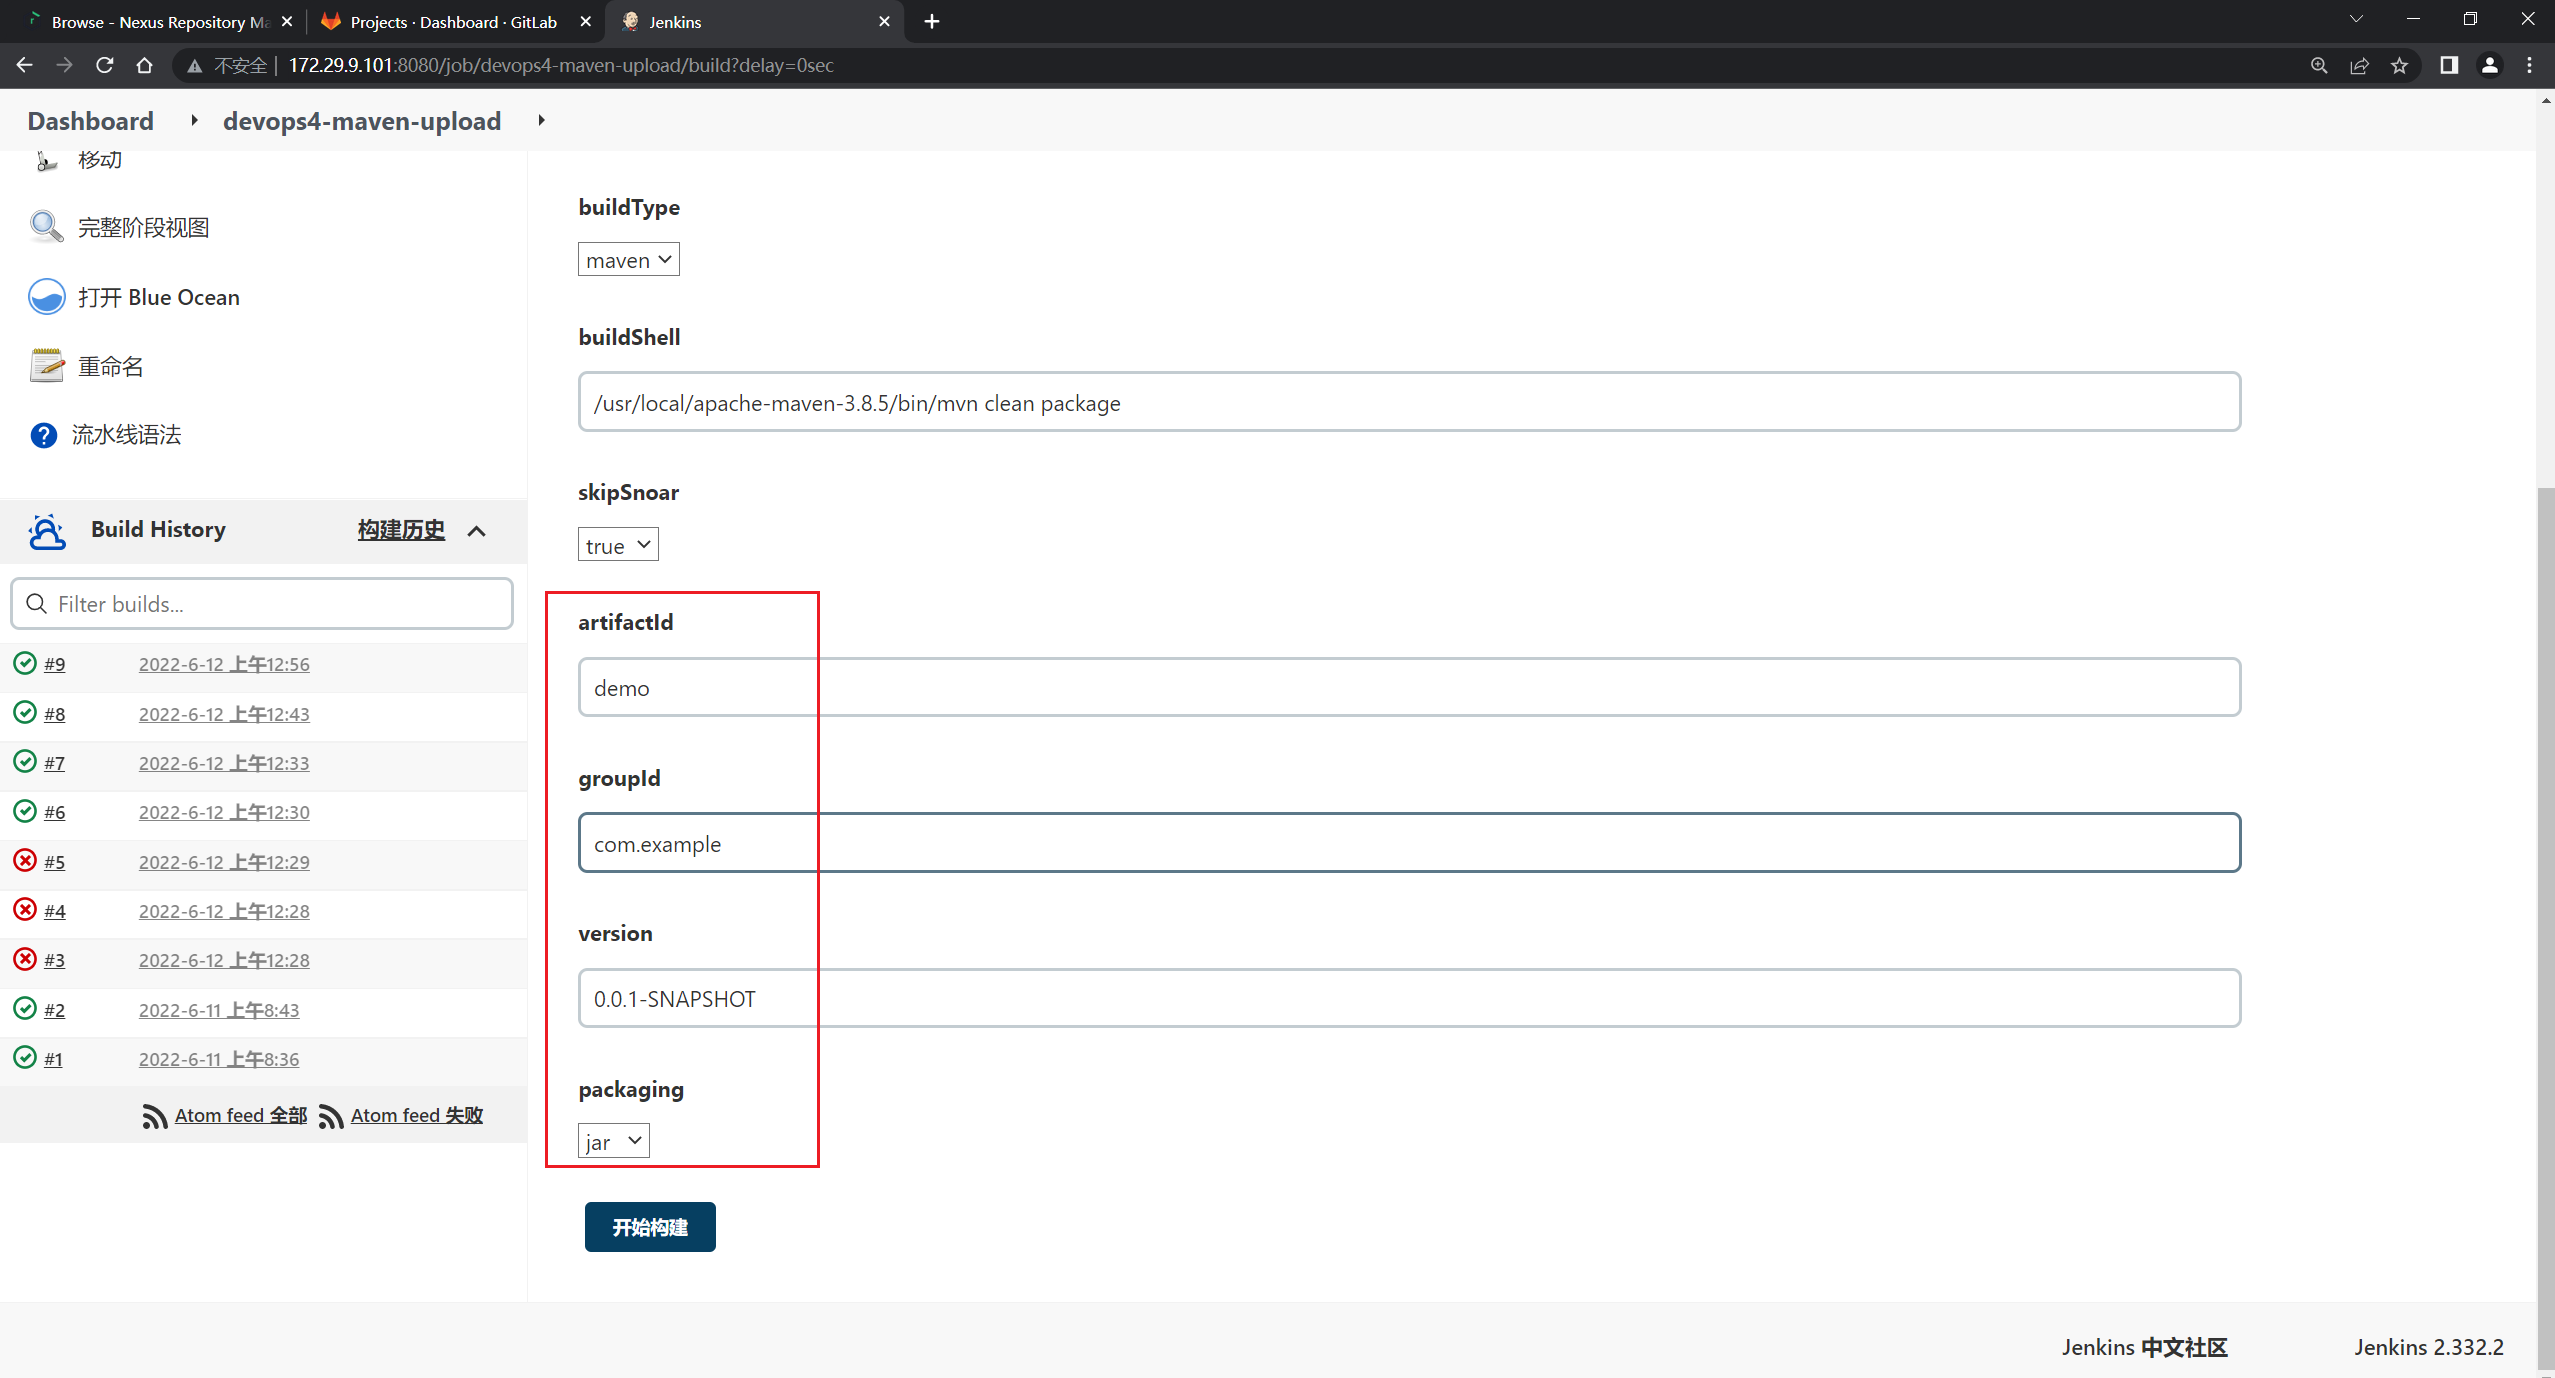

感觉从pom里面杜更方便一点,手输入的话,会比较麻烦些的:
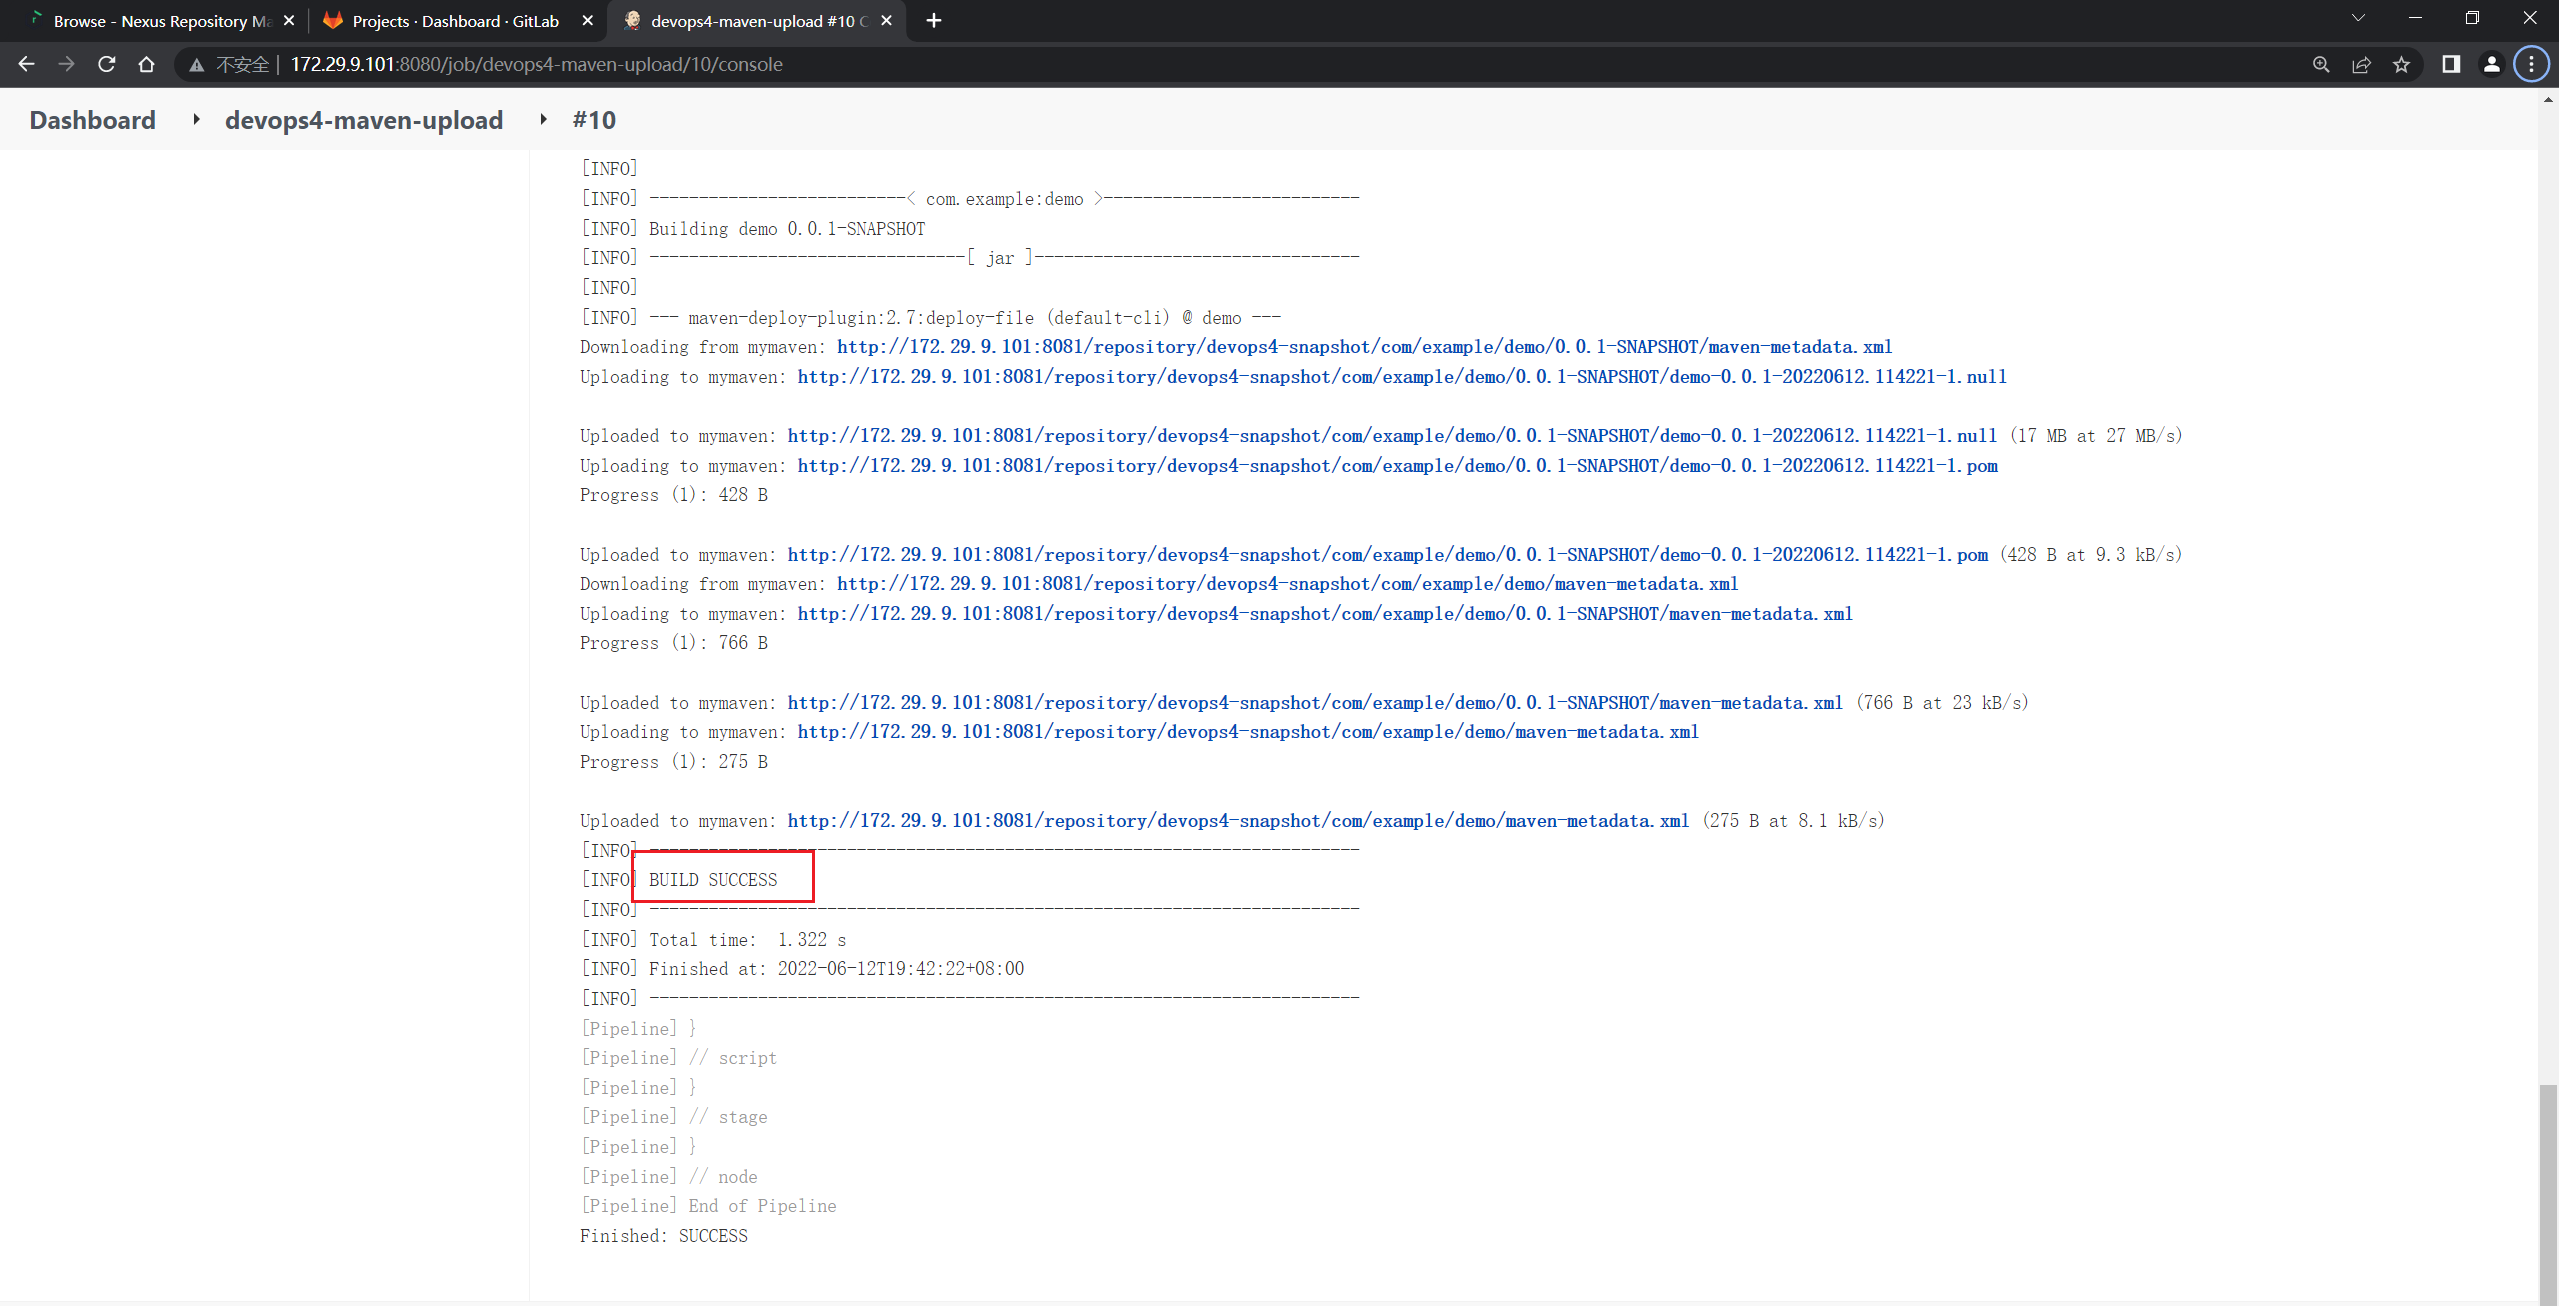

符合预期测试成功。😘
📍 从pom文件读取:
如果是maven类型的具有源码的项目, 可以直接使用mvn命令上传,更加方便。
- 这边有2种方法:
1种是使用上面这种方式从Pom读取,一种是使用ls命令来过滤文件:
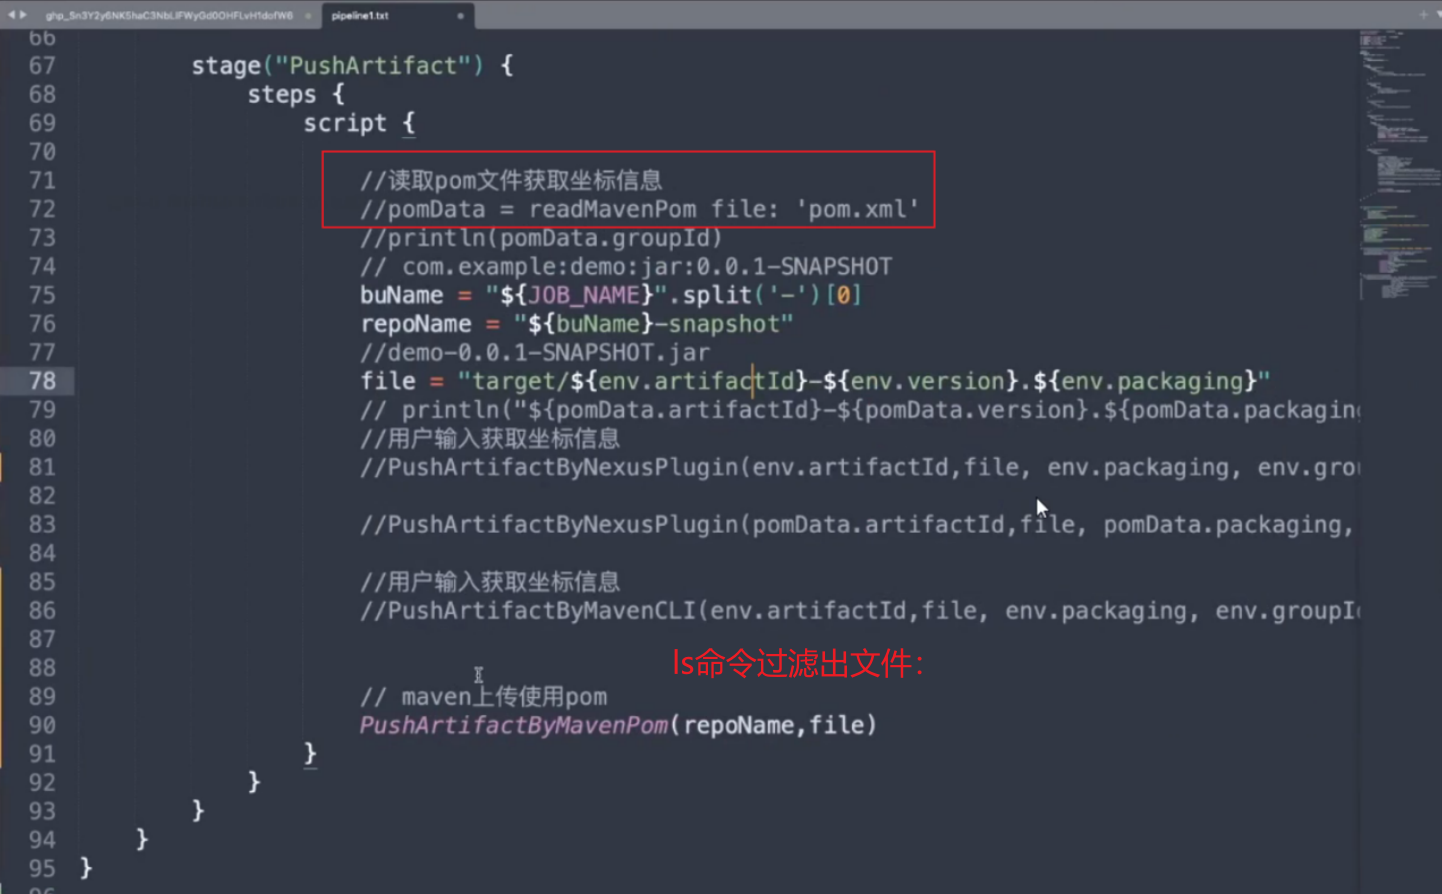
- 本次我们来使用ls命令过滤下:
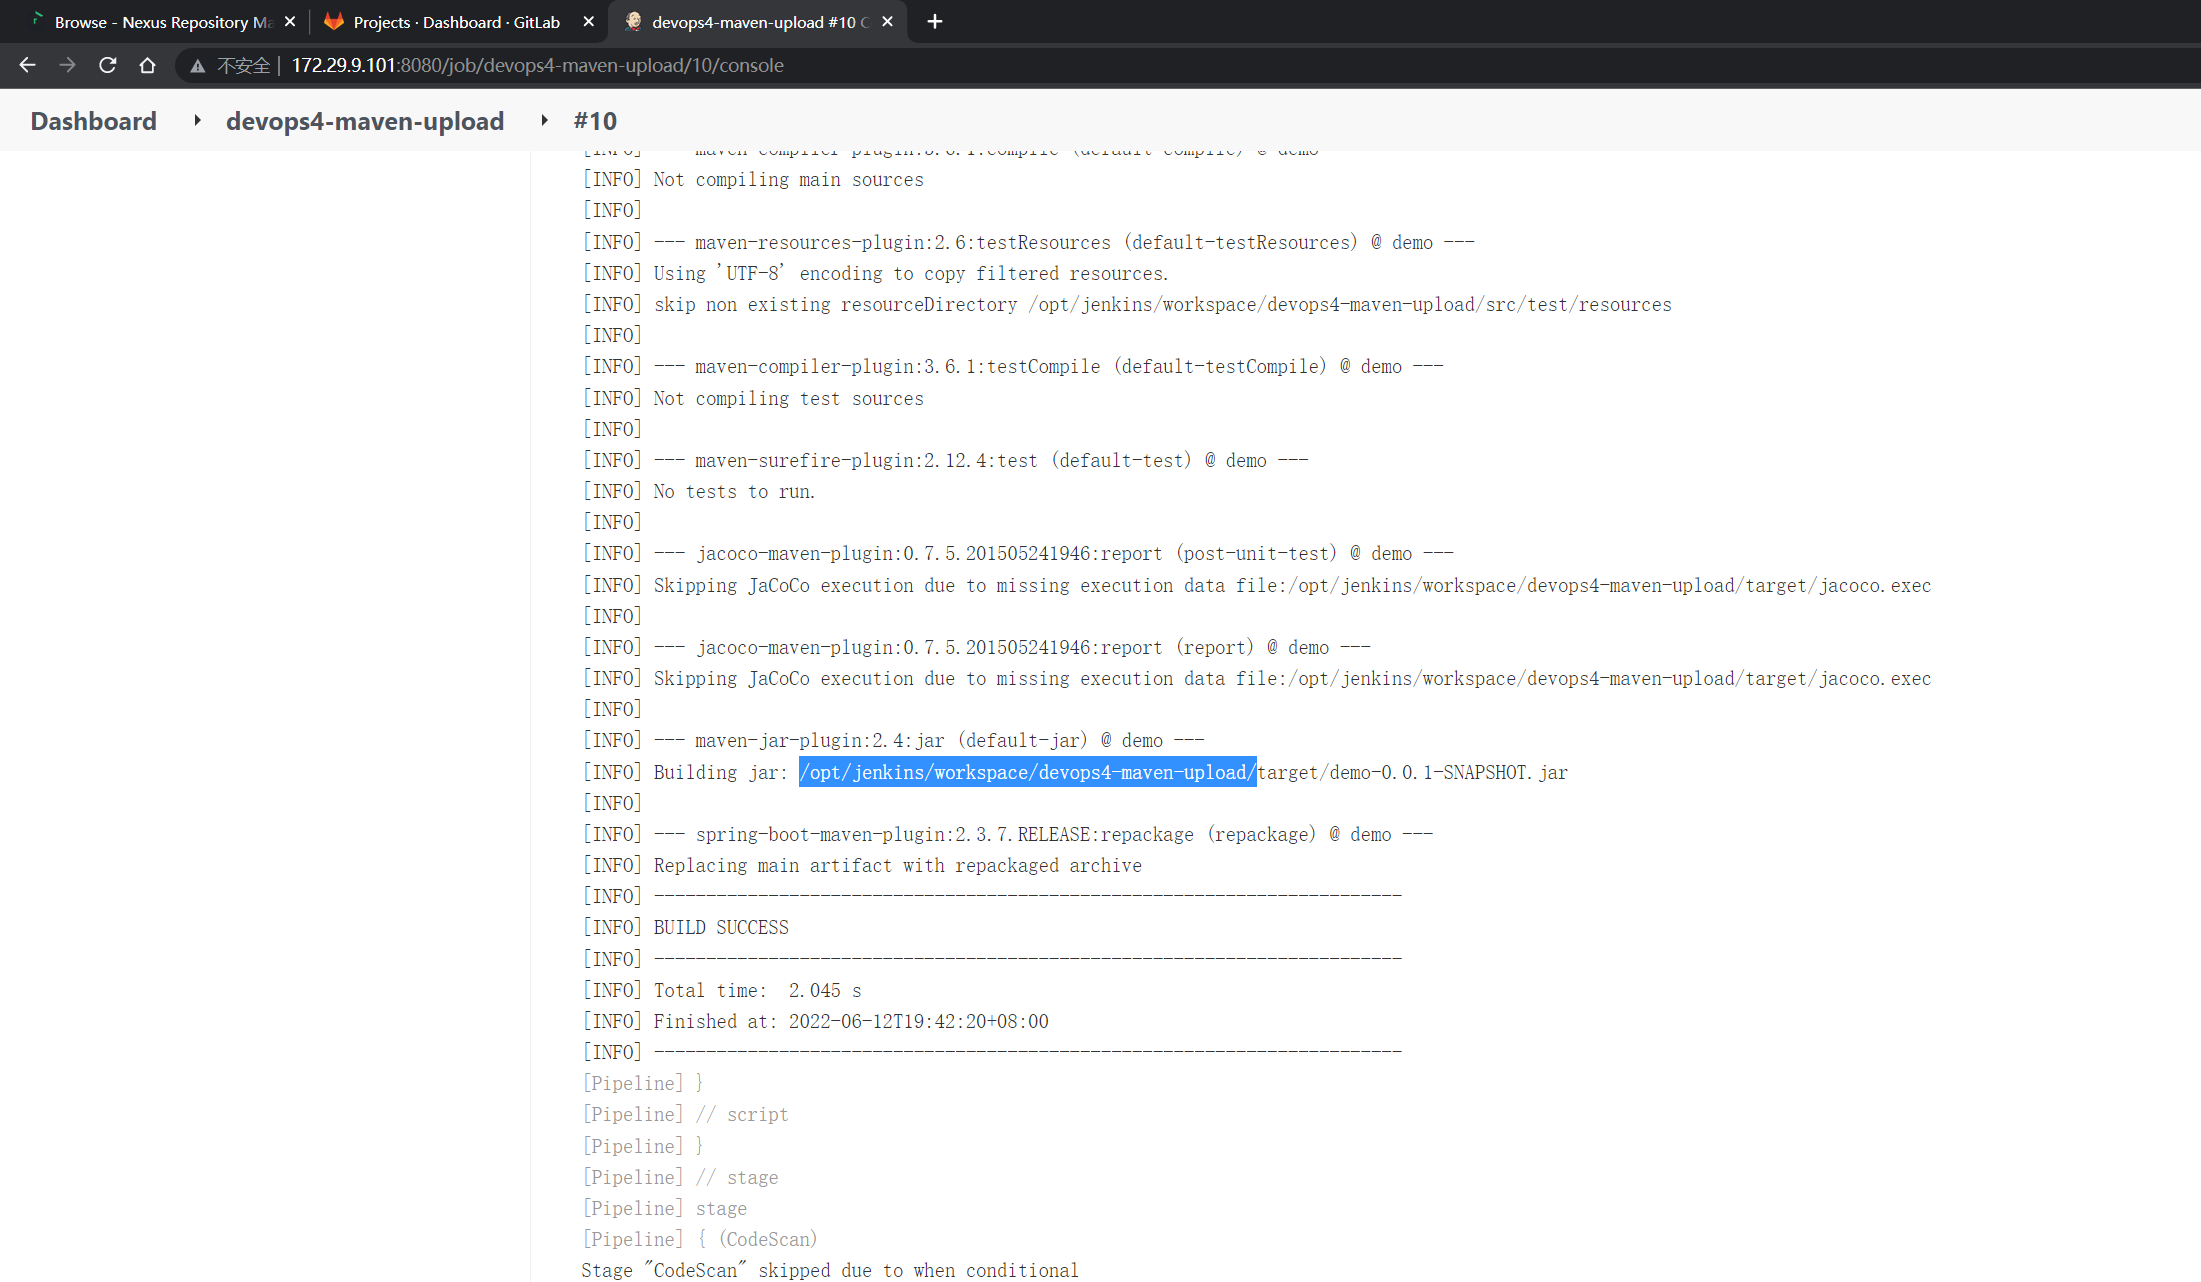

ls |grep -E "jar$"
- 在流水线语法里生成下代码:
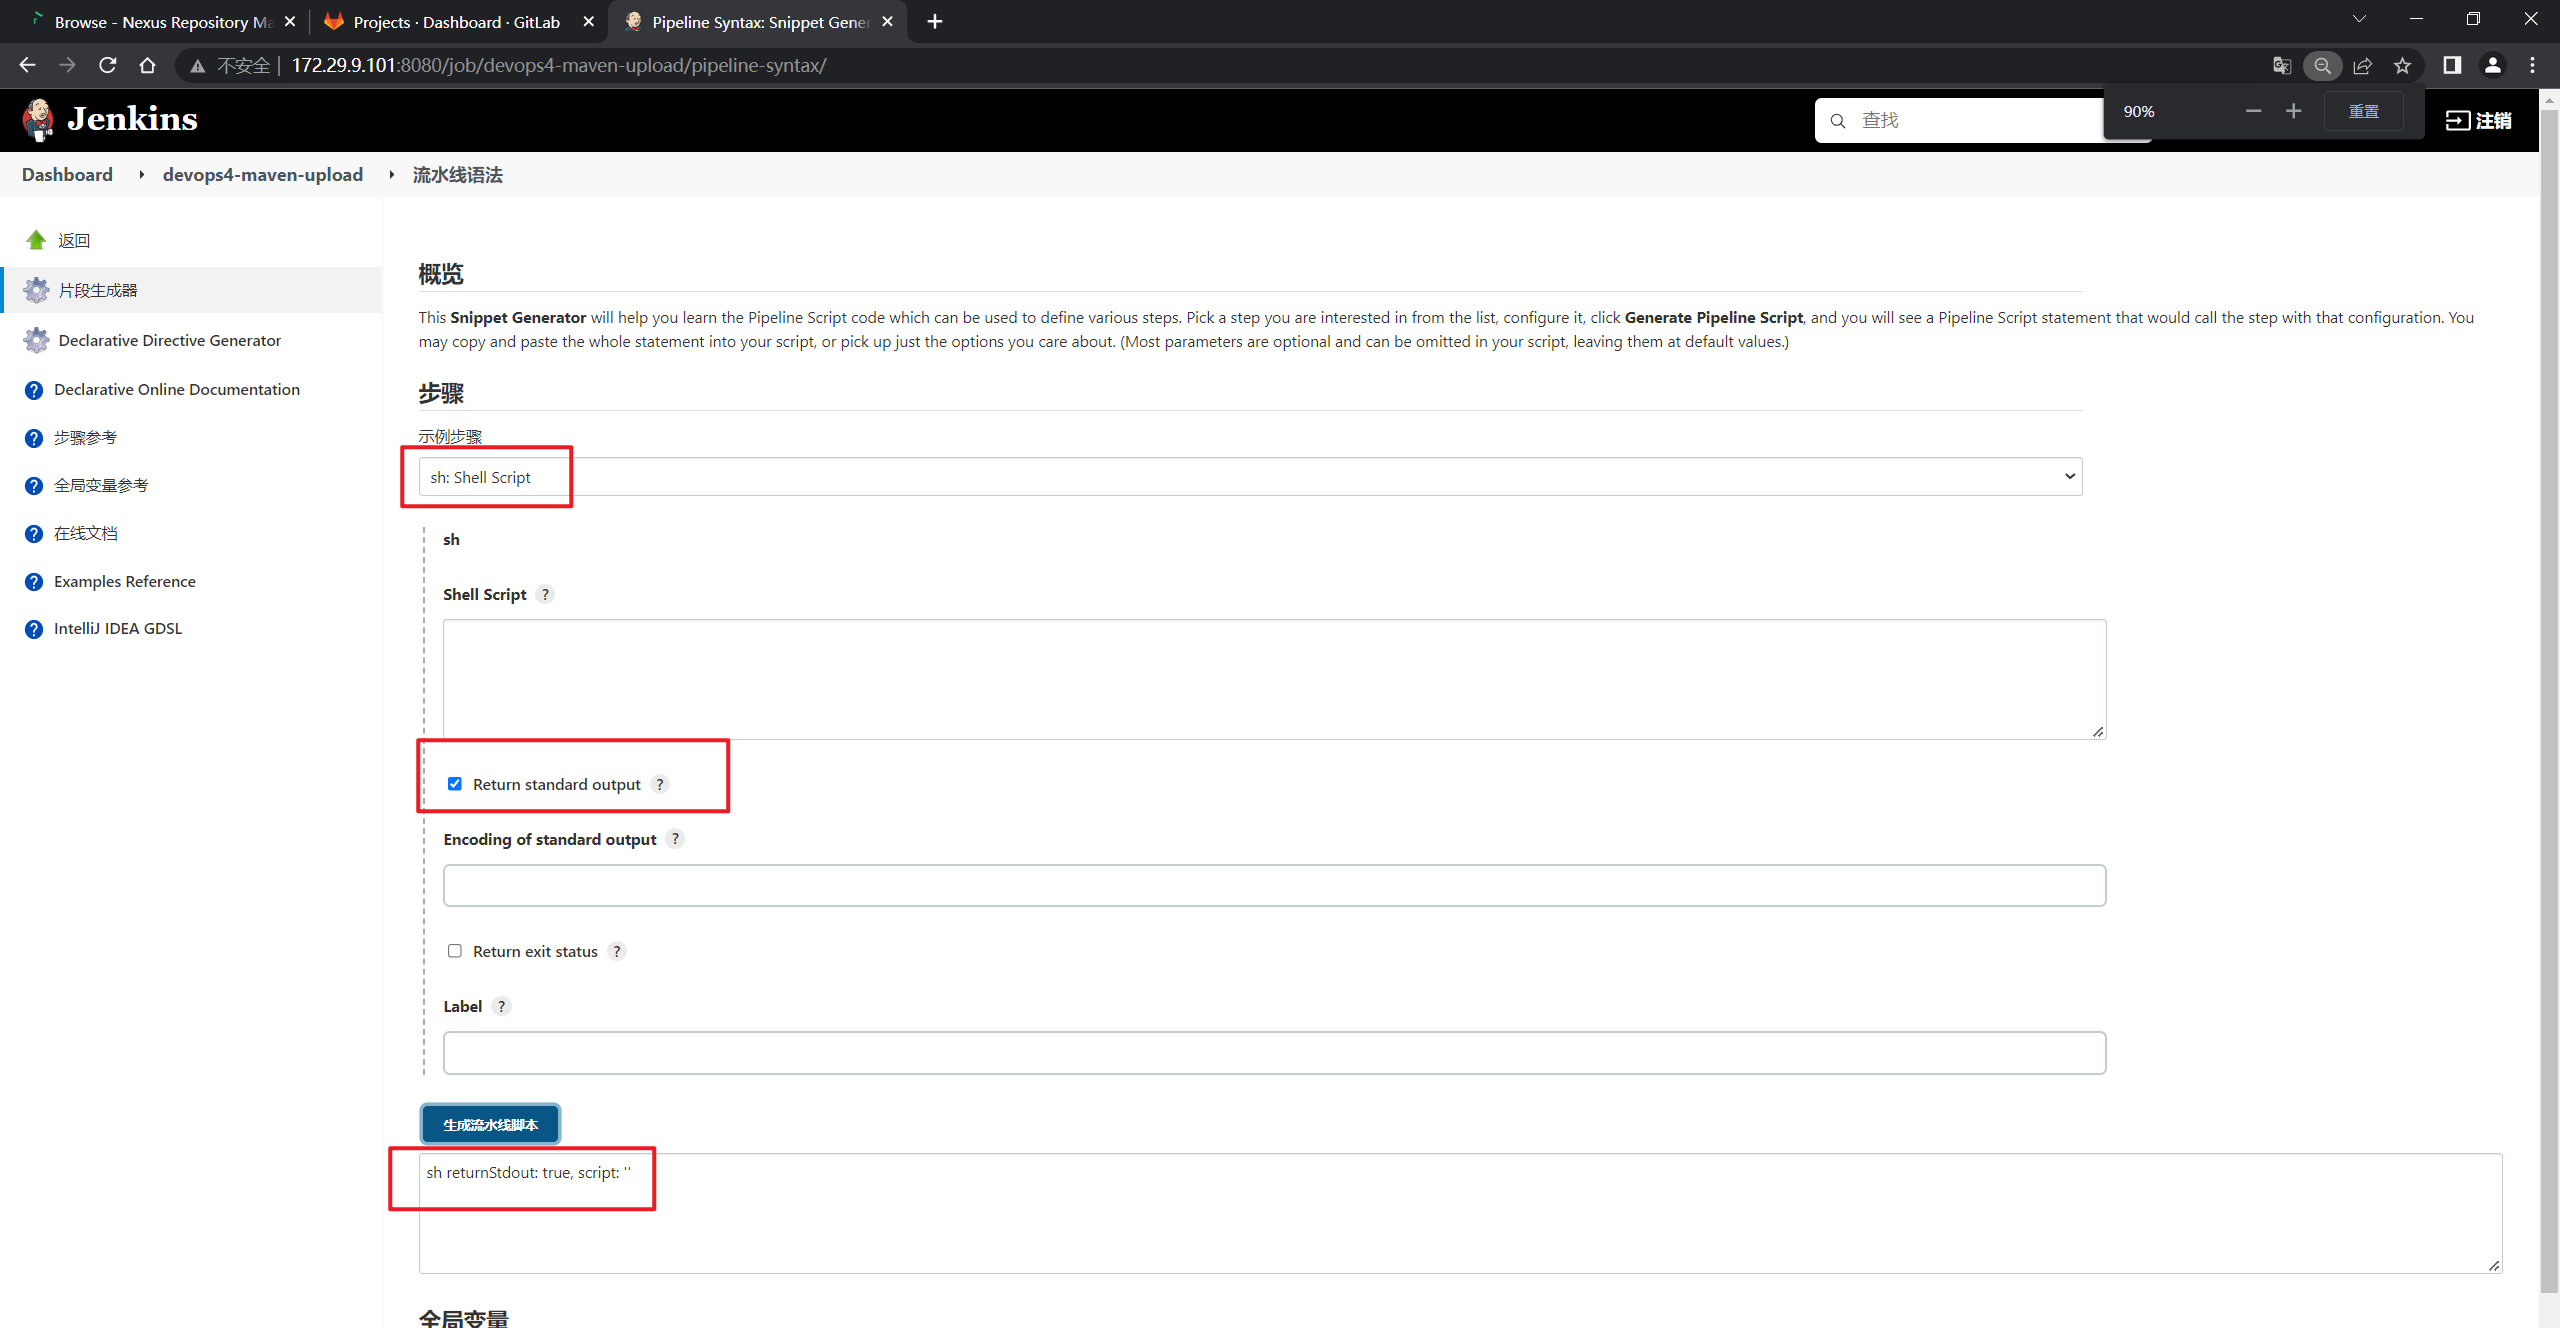
sh returnStdout: true, script: ''
- 修改代码:
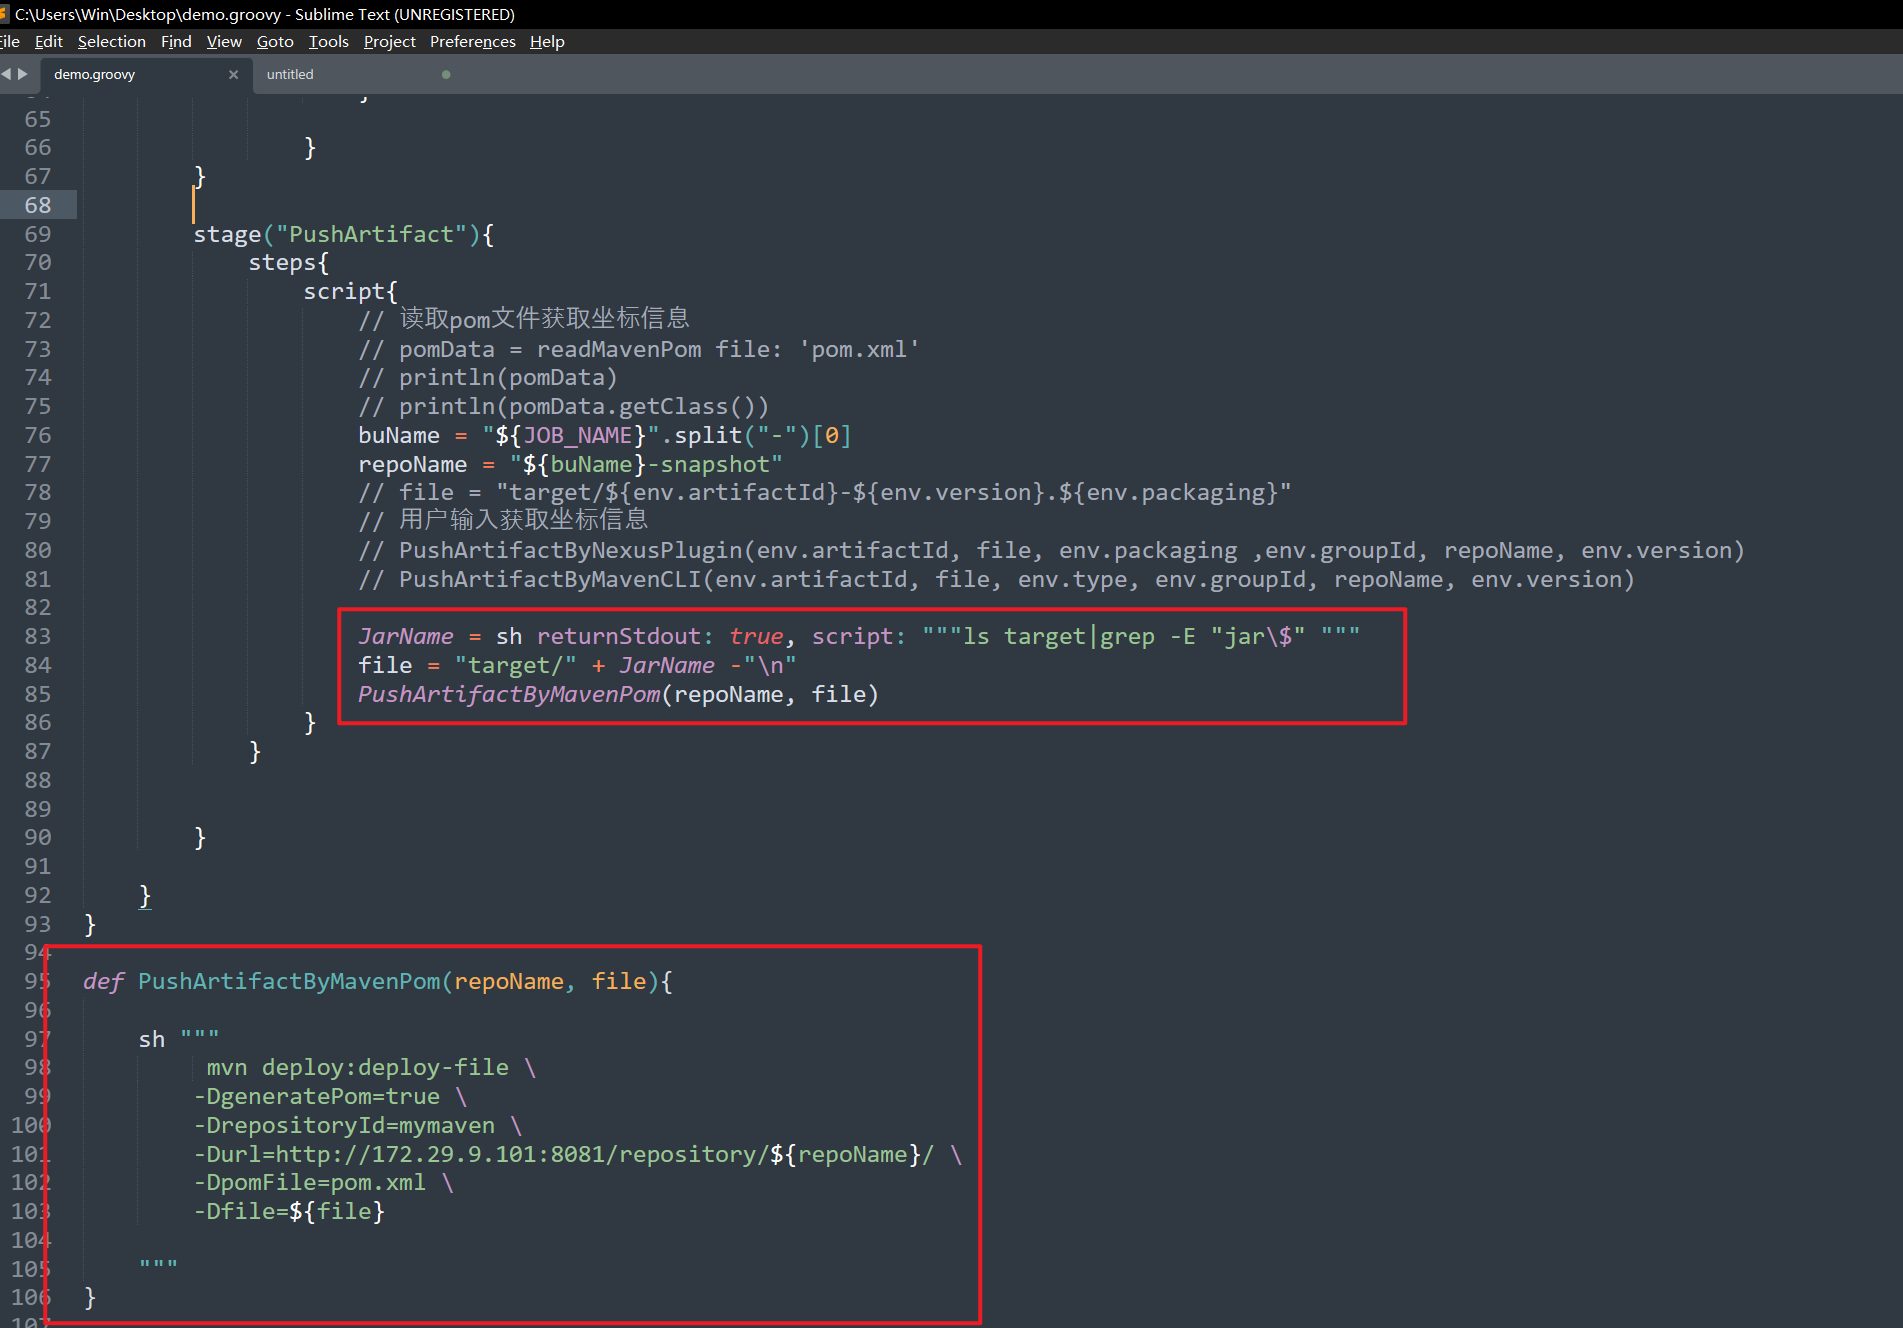
@Library("mylib@main") _     //加载共享库
import org.devops.*						// 导入库

def checkout = new Checkout()    //New实例化
def build = new Build()
def unittest = new UnitTest()
def sonar = new Sonar()
def gitcli = new GitLab()

//env.buildType = "${JOB_NAME}".split("-")[1]

//流水线
pipeline {
    agent { label "build" }

    options {
        skipDefaultCheckout true
    }

    stages{
        stage("Checkout"){
            steps{
                script {
                    println("GetCode")
                    checkout.GetCode("${env.srcUrl}", "${env.branchName}")
                }
            }
        }

        stage("Build"){
            steps{
                script{
                    println("Build")
                    //build.CodeBuild("${env.buildType}")
                    sh "${env.buildShell}"

                }
            }
        }

        /*stage("UnitTest"){
            steps{
                script{
                    unittest.CodeTest("${env.buildType}")
                }
            }
        }*/

        stage("CodeScan"){
            when {
                environment name: 'skipSonar', value: 'false'
            }
            steps{
                script{
                    profileName = "${JOB_NAME}".split("-")[0]
                    sonar.Init("${JOB_NAME}", "java", profileName)


                    //commit-status
                    commitID = gitcli.GetCommitID()
                    groupName =profileName
                    projectID = gitcli.GetProjectID("${JOB_NAME}", groupName)
                    sonar.CodeScan("${env.branchName}", commitID, projectID)
                    }

                }
        }

        stage("PushArtifact"){
        	steps{
        		script{
                    // 读取pom文件获取坐标信息
                    // pomData = readMavenPom file: 'pom.xml'
                    // println(pomData)
                    // println(pomData.getClass())
                    buName = "${JOB_NAME}".split("-")[0]
                    repoName = "${buName}-snapshot"
                    // file = "target/${env.artifactId}-${env.version}.${env.packaging}"
                    // 用户输入获取坐标信息
        			// PushArtifactByNexusPlugin(env.artifactId, file, env.packaging ,env.groupId, repoName, env.version)
                    // PushArtifactByMavenCLI(env.artifactId, file, env.type, env.groupId, repoName, env.version)

                    JarName = sh returnStdout: true, script: """ls target|grep -E "jar\$" """
                    file = "target/" + JarName -"\n"
                    PushArtifactByMavenPom(repoName, file)
        		}
        	}


        }

    }
}

def PushArtifactByMavenPom(repoName, file){

    sh """
         mvn deploy:deploy-file \
        -DgeneratePom=true \
        -DrepositoryId=mymaven \
        -Durl=http://172.29.9.101:8081/repository/${repoName}/ \
        -DpomFile=pom.xml \
        -Dfile=${file}

    """
}

def PushArtifactByMavenCLI(artifactId, file, type, groupId, repoName, version){

    sh """
        mvn deploy:deploy-file \
    -DgroupId=${groupId} \
    -DartifactId=${artifactId} \
    -Dversion=${version} \
    -Dpackaging=${type}  \
    -Dfile=${file} \
    -Durl=http://172.29.9.101:8081/repository/${repoName}/  \
    -DrepositoryId=mymaven
    """
}

def PushArtifactByNexusPlugin(artifactId, file, type, groupId, repoName, version){
    println(artifactId)
    //demo
    println("${file}, ${type}, ${groupId}, ${repoName}, ${version}")
    //target/demo-0.0.1-SNAPSHOT.jar, jar, com.example, devops4-release, 0.0.1-SNAPSHOT
    nexusArtifactUploader artifacts: [[artifactId: artifactId,
                                    classifier: '',
                                    file: file,
                                    type: type]],
                        credentialsId: '2b44f51a-2374-4275-aeed-b720f4fbf937',
                        groupId: groupId,
                        nexusUrl: '172.29.9.101:8081',
                        nexusVersion: 'nexus3',
                        protocol: 'http',
                        repository: repoName,
                        version: version
}
- 构建流水线:
记得删除下之前nxeus仓库里的内容:
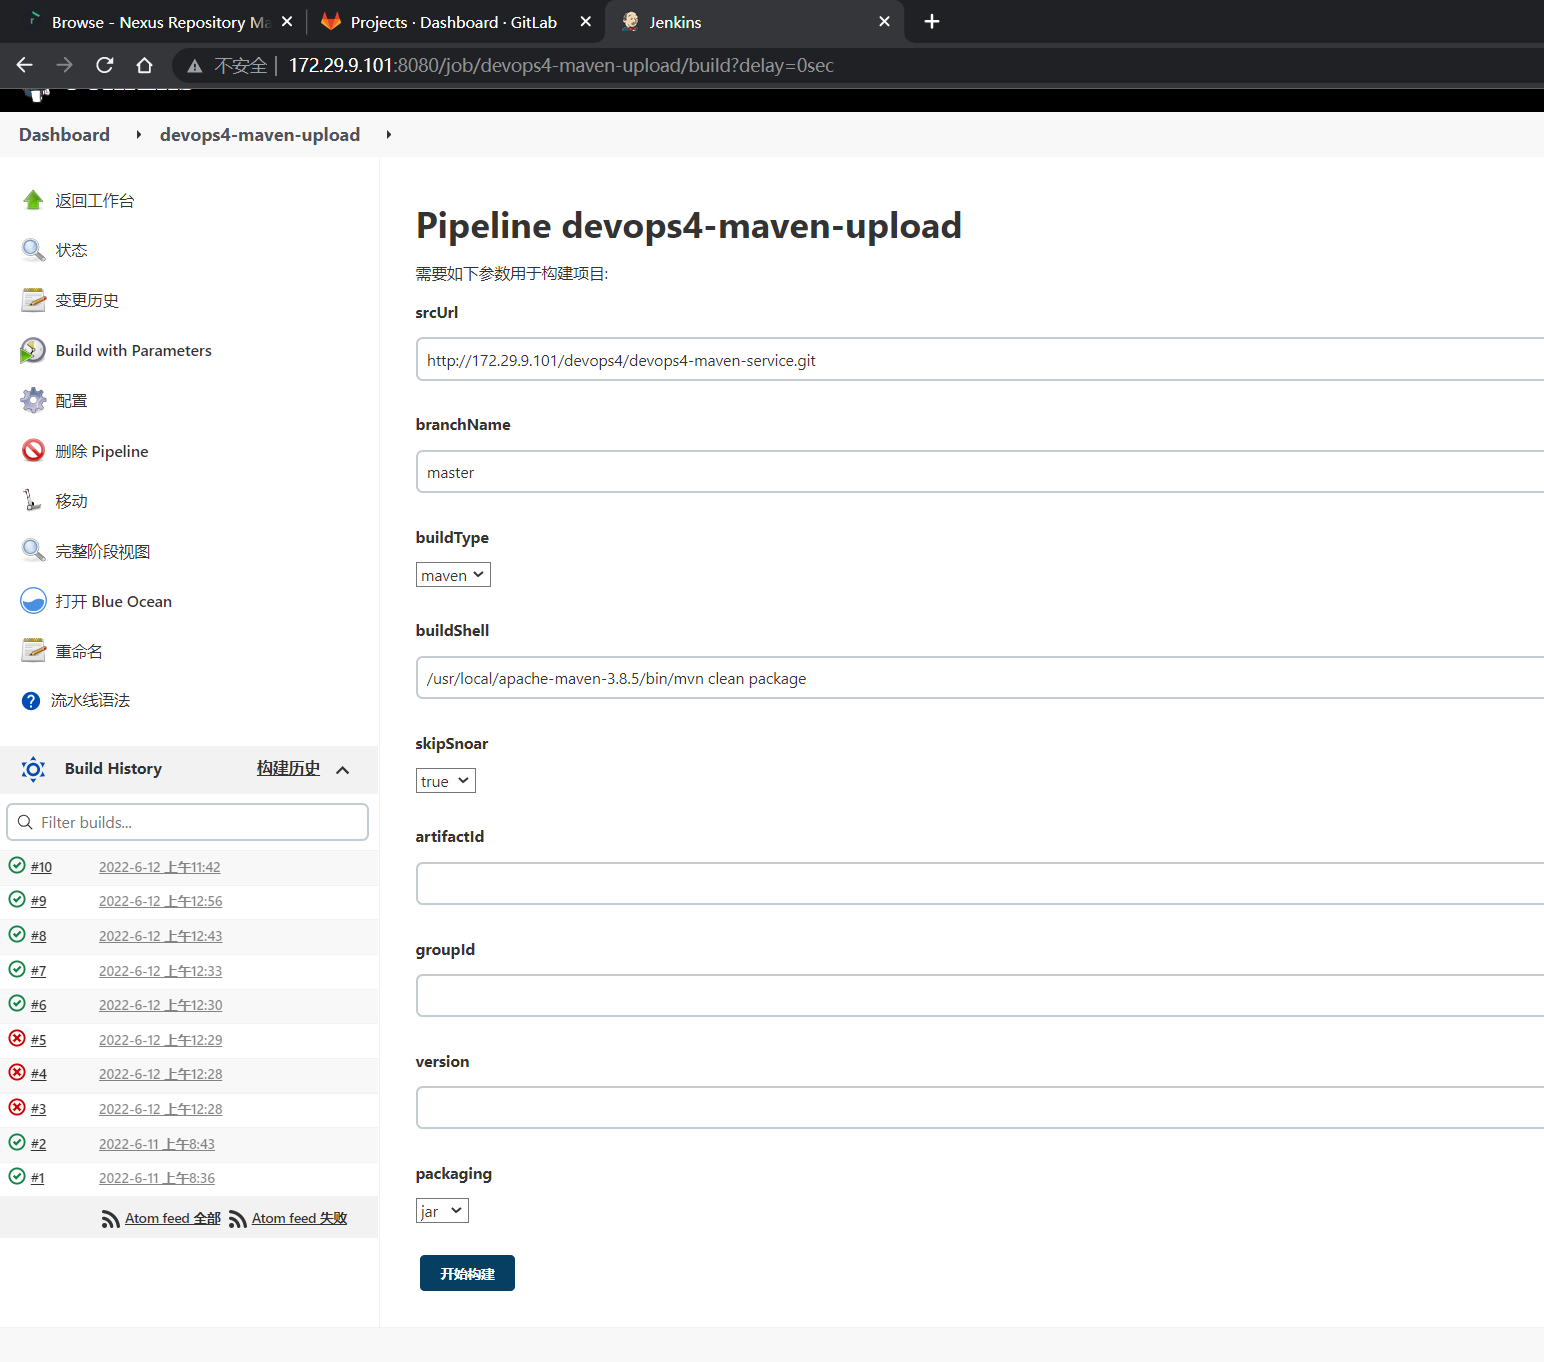
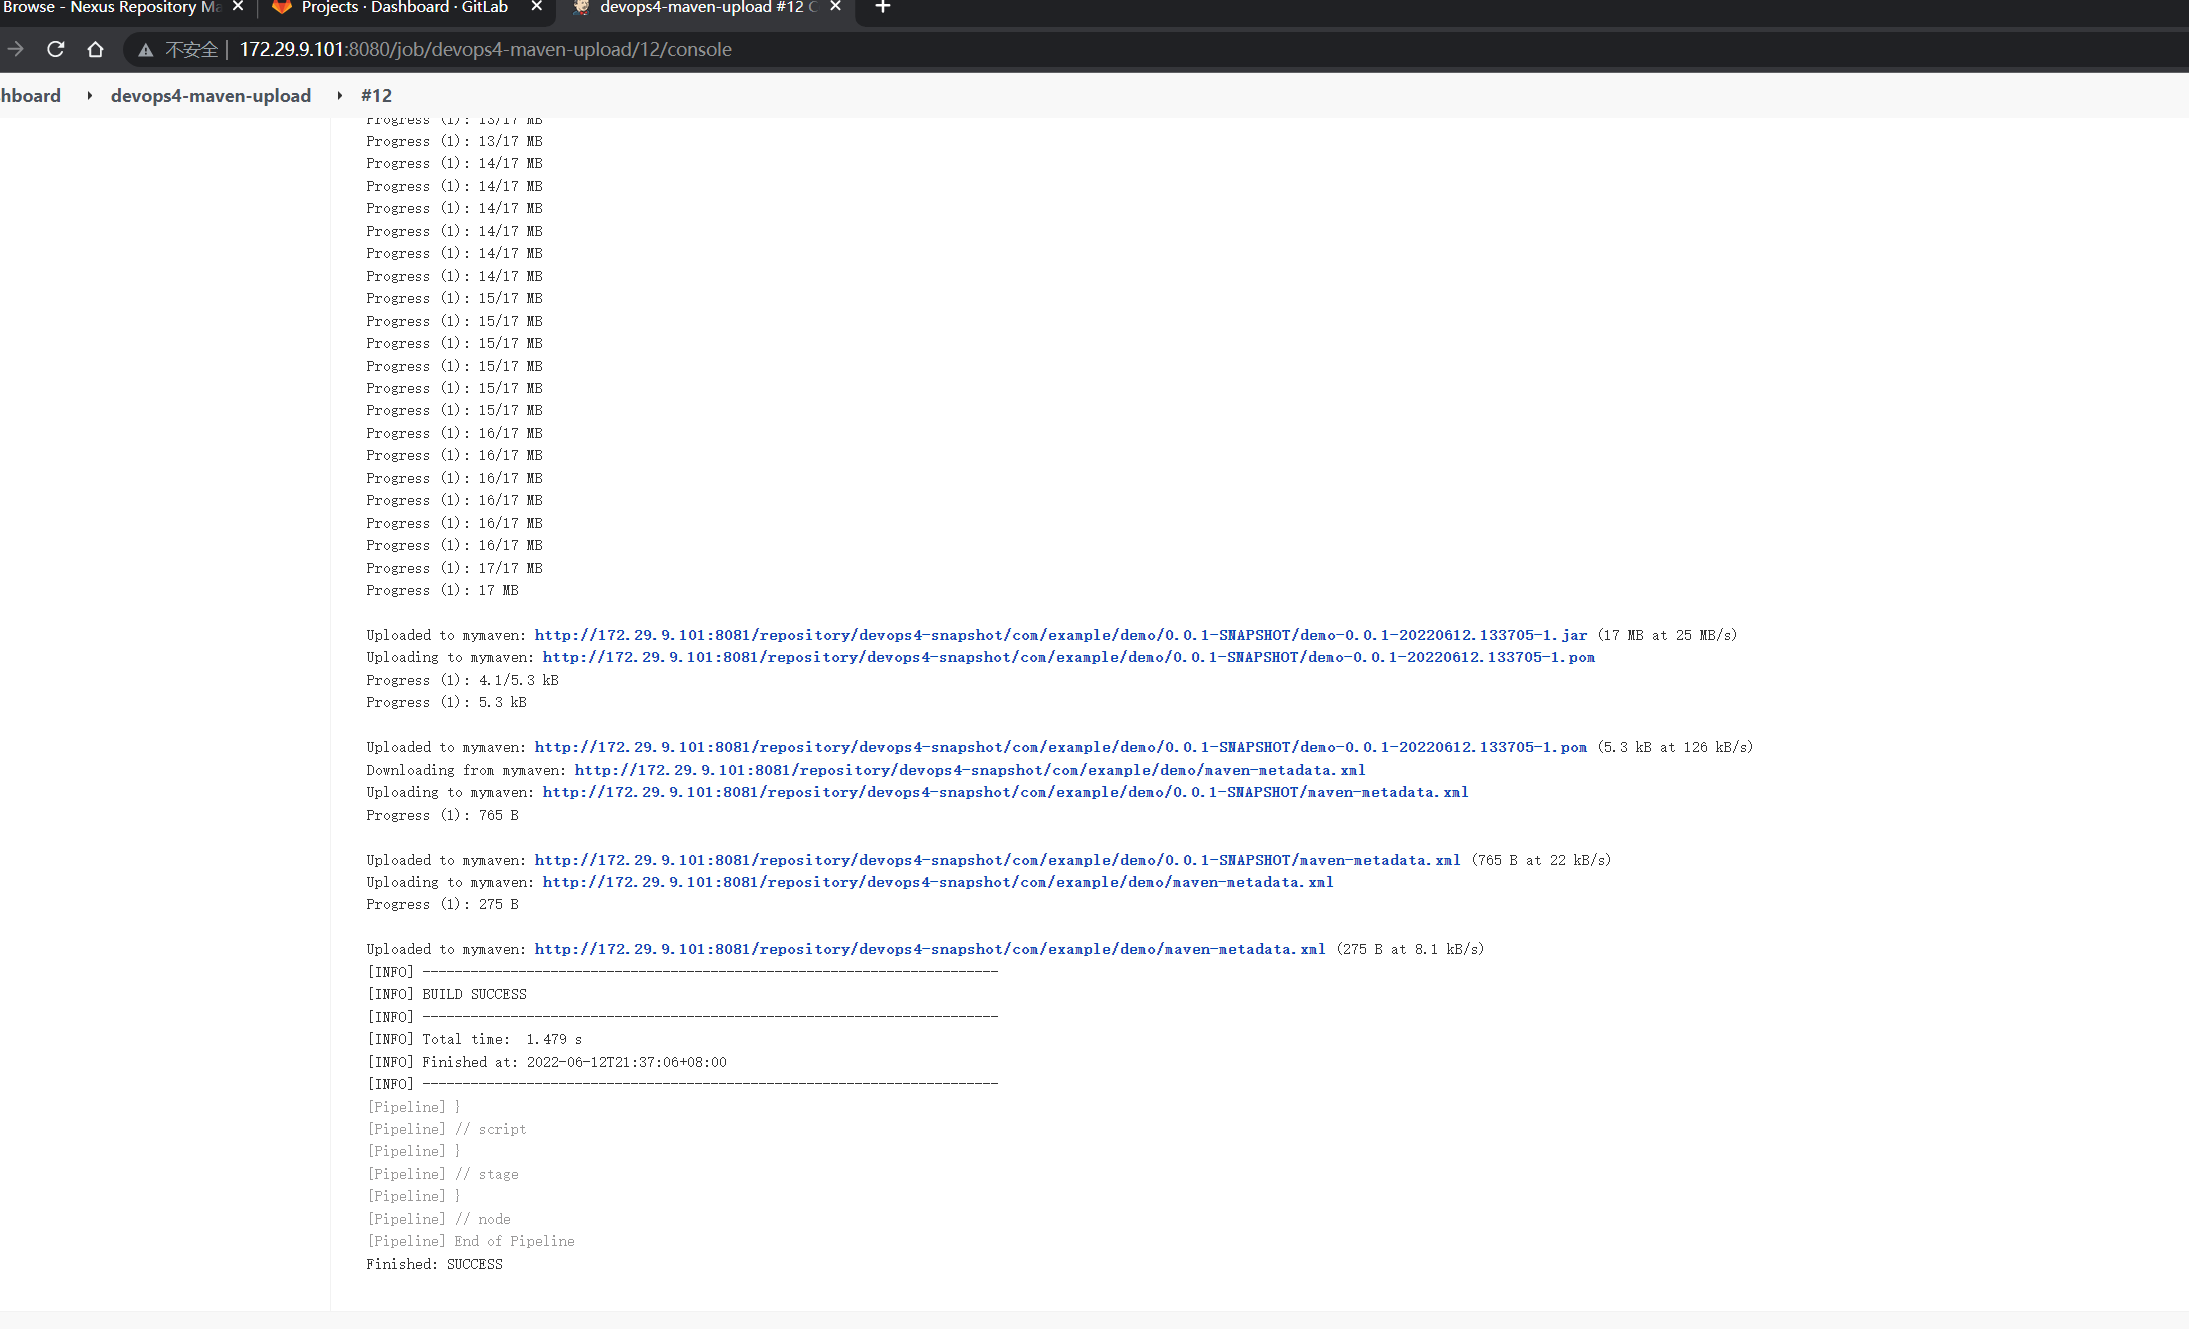
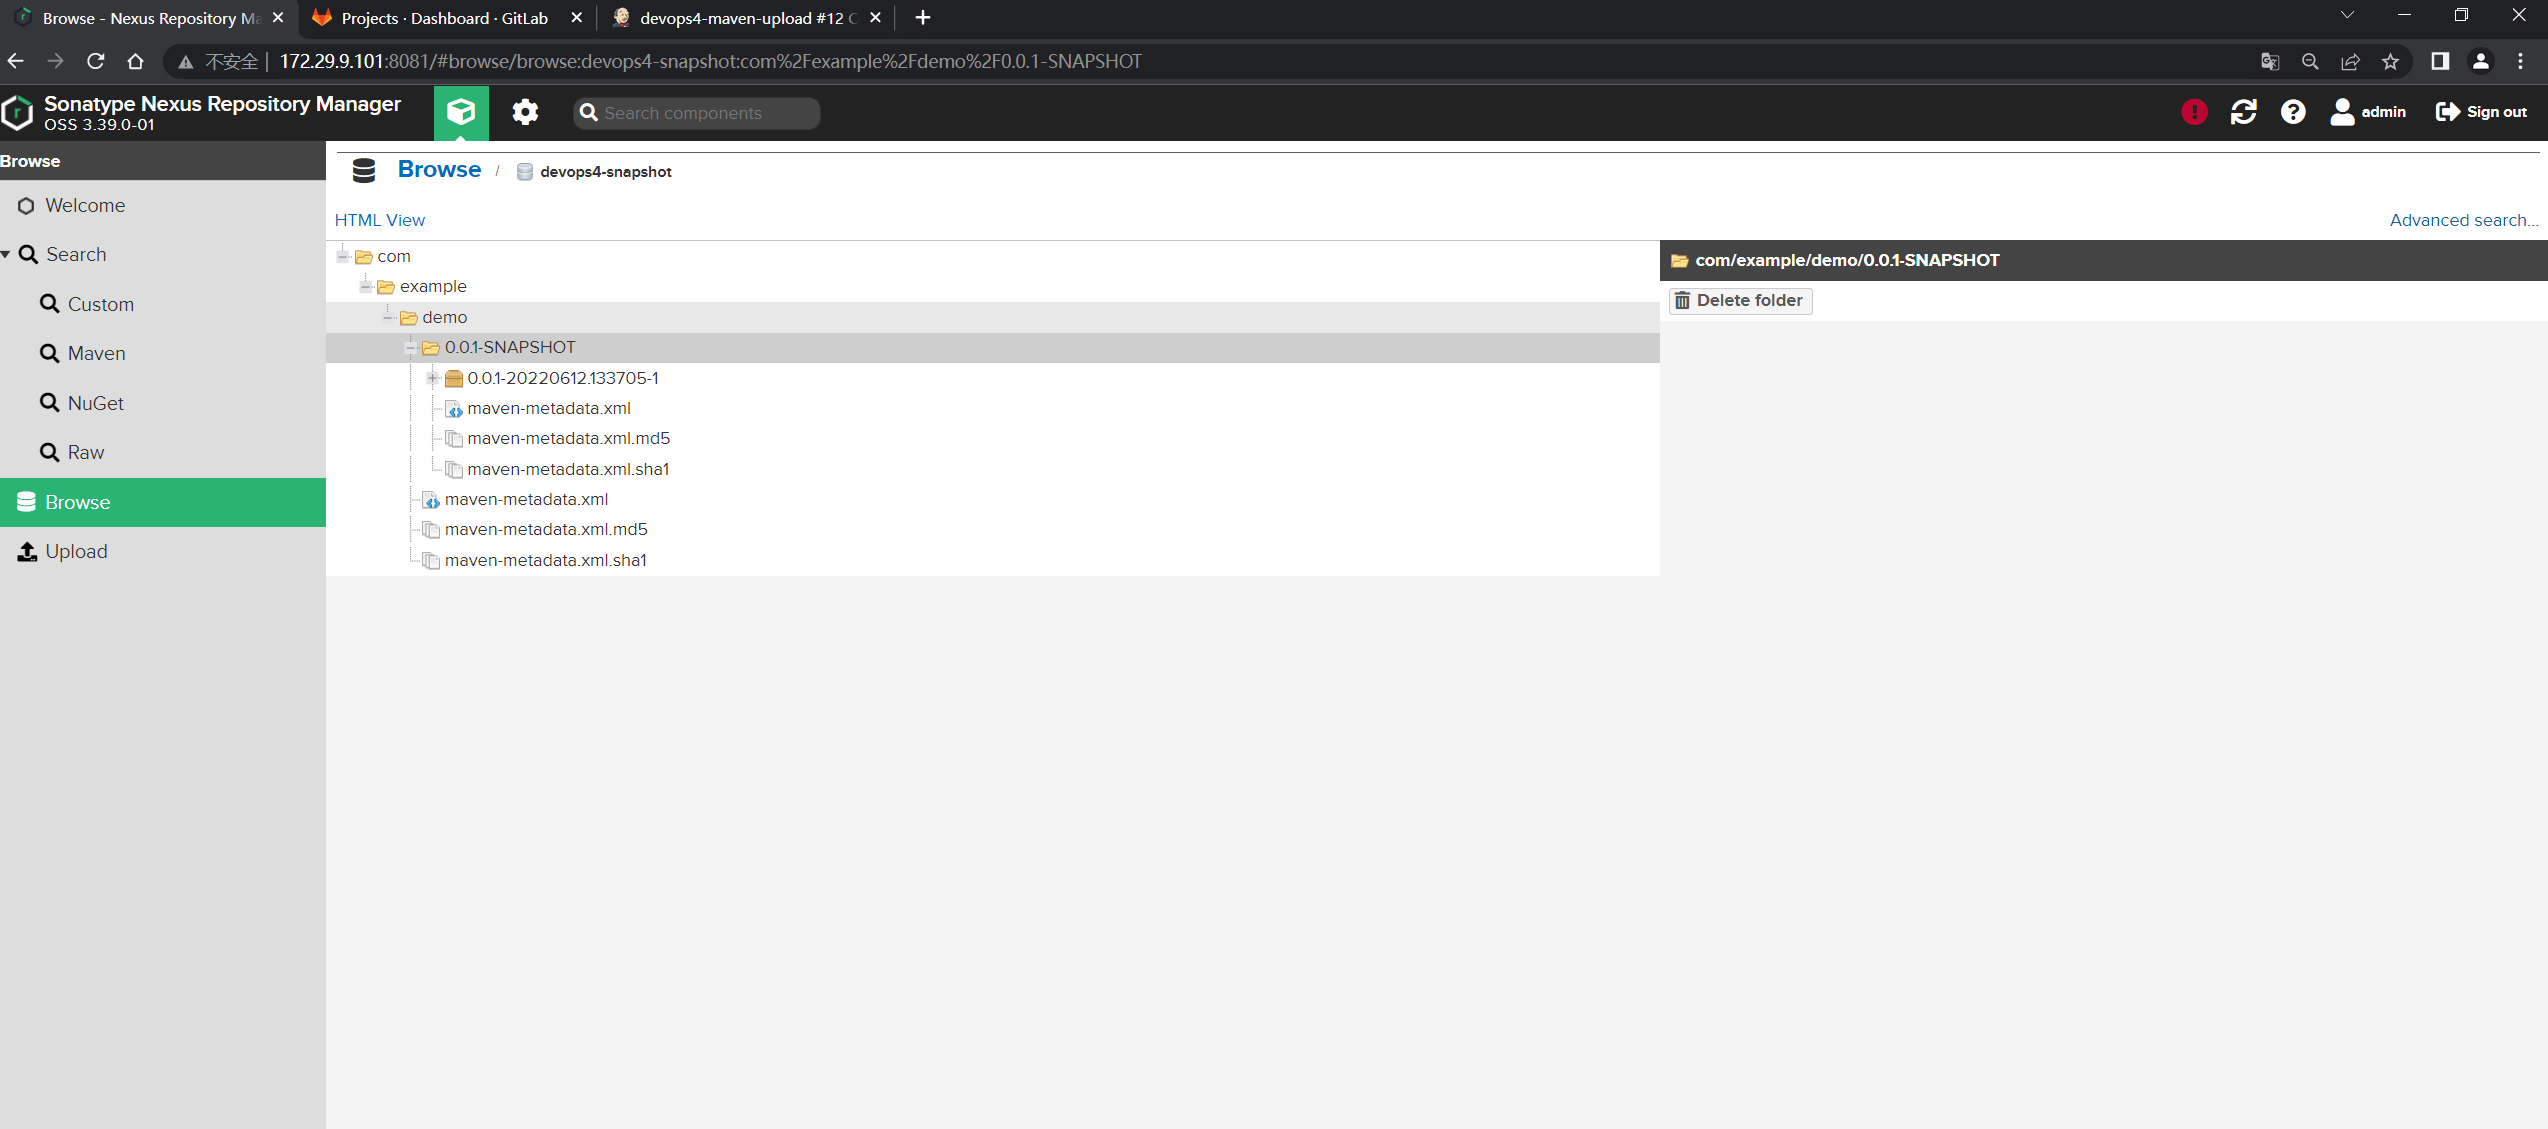
测试成功,符合预期。😘
4.使用Jenkins插件上传制品
| 💘 实践5:使用插件命令上传(测试成功)-2022.6.11 |
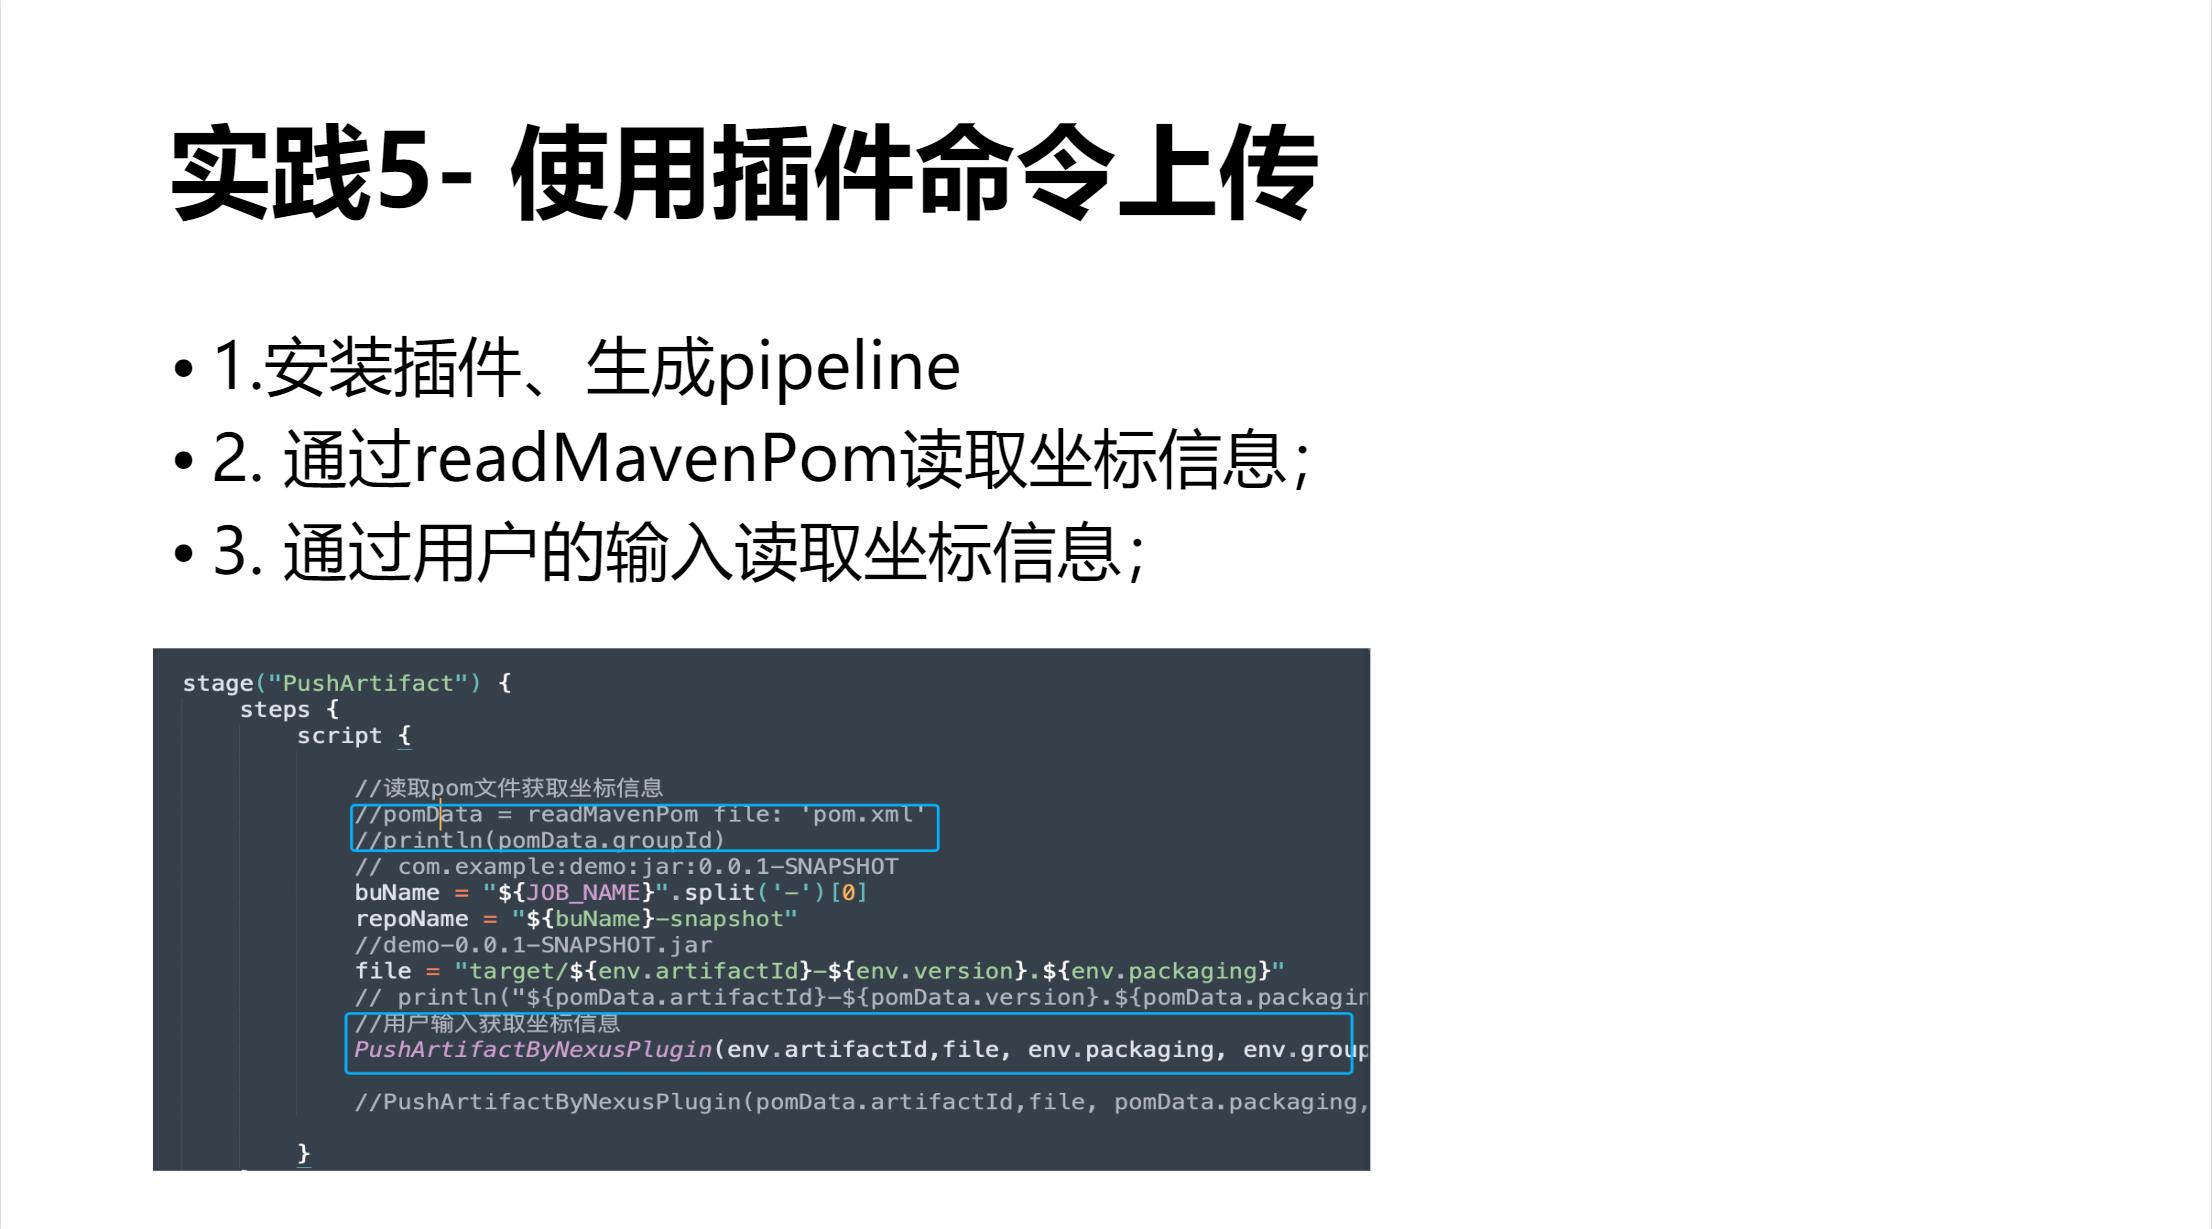
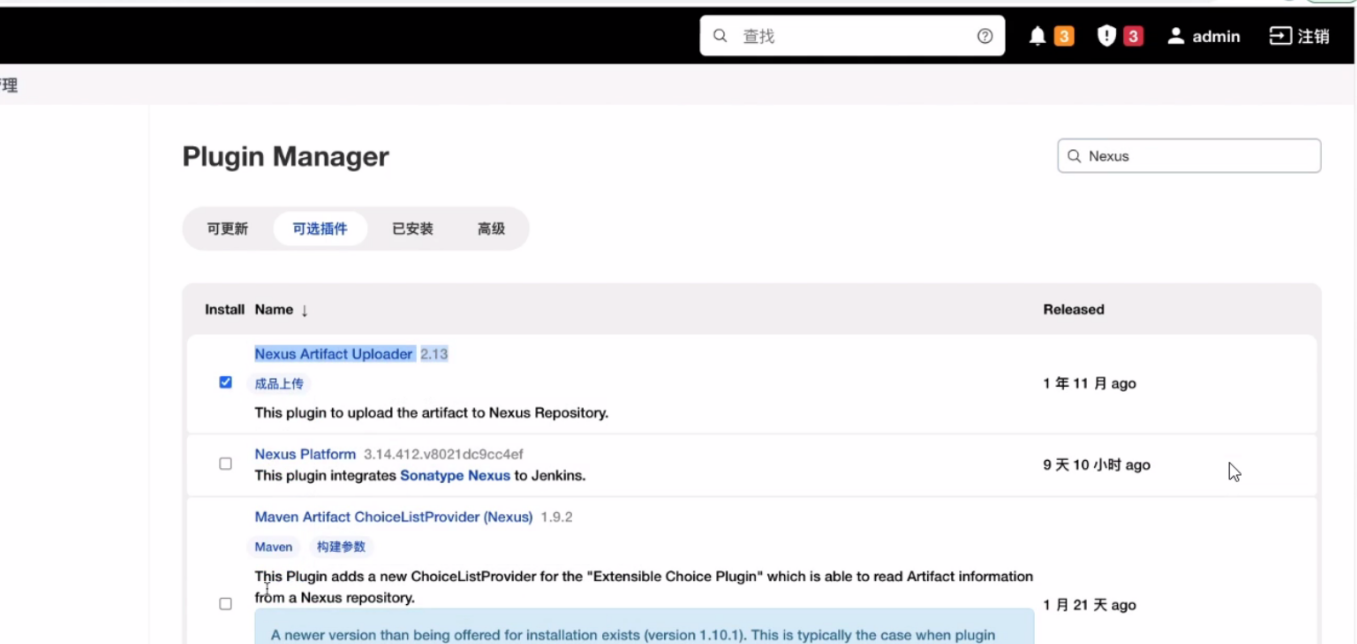
- 安装插件:
Nexus Aritifact Uploader
- 使用片段生成器生成DSL:
找一个pipeline项目,生成流水线脚本:
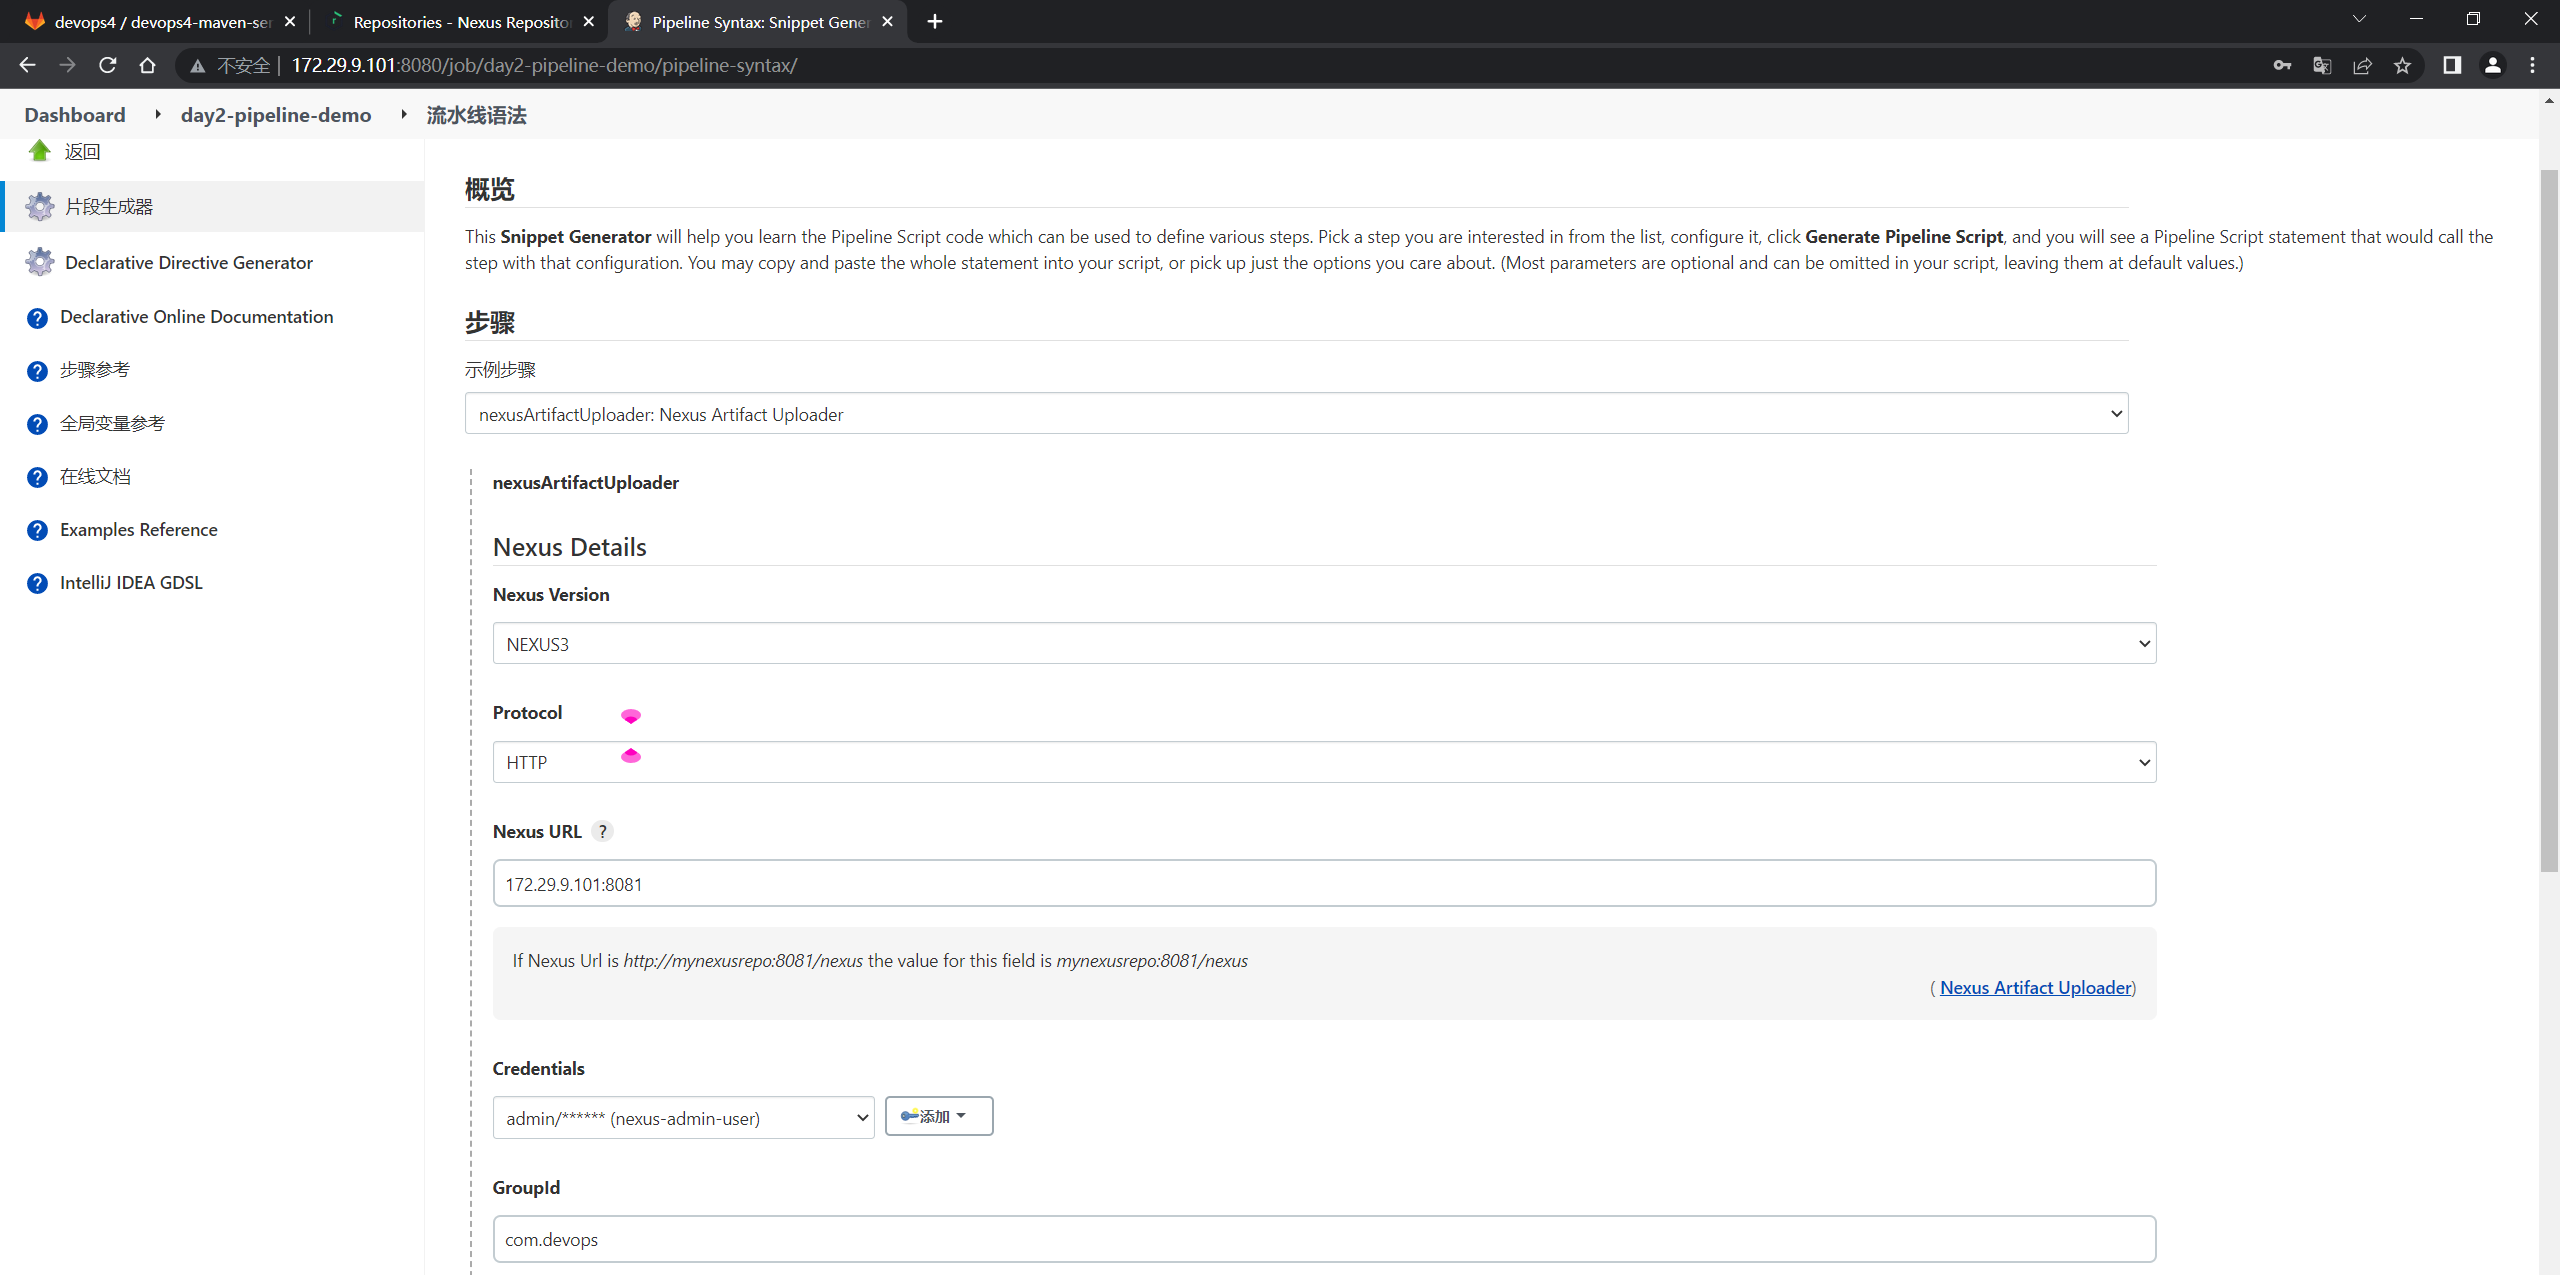
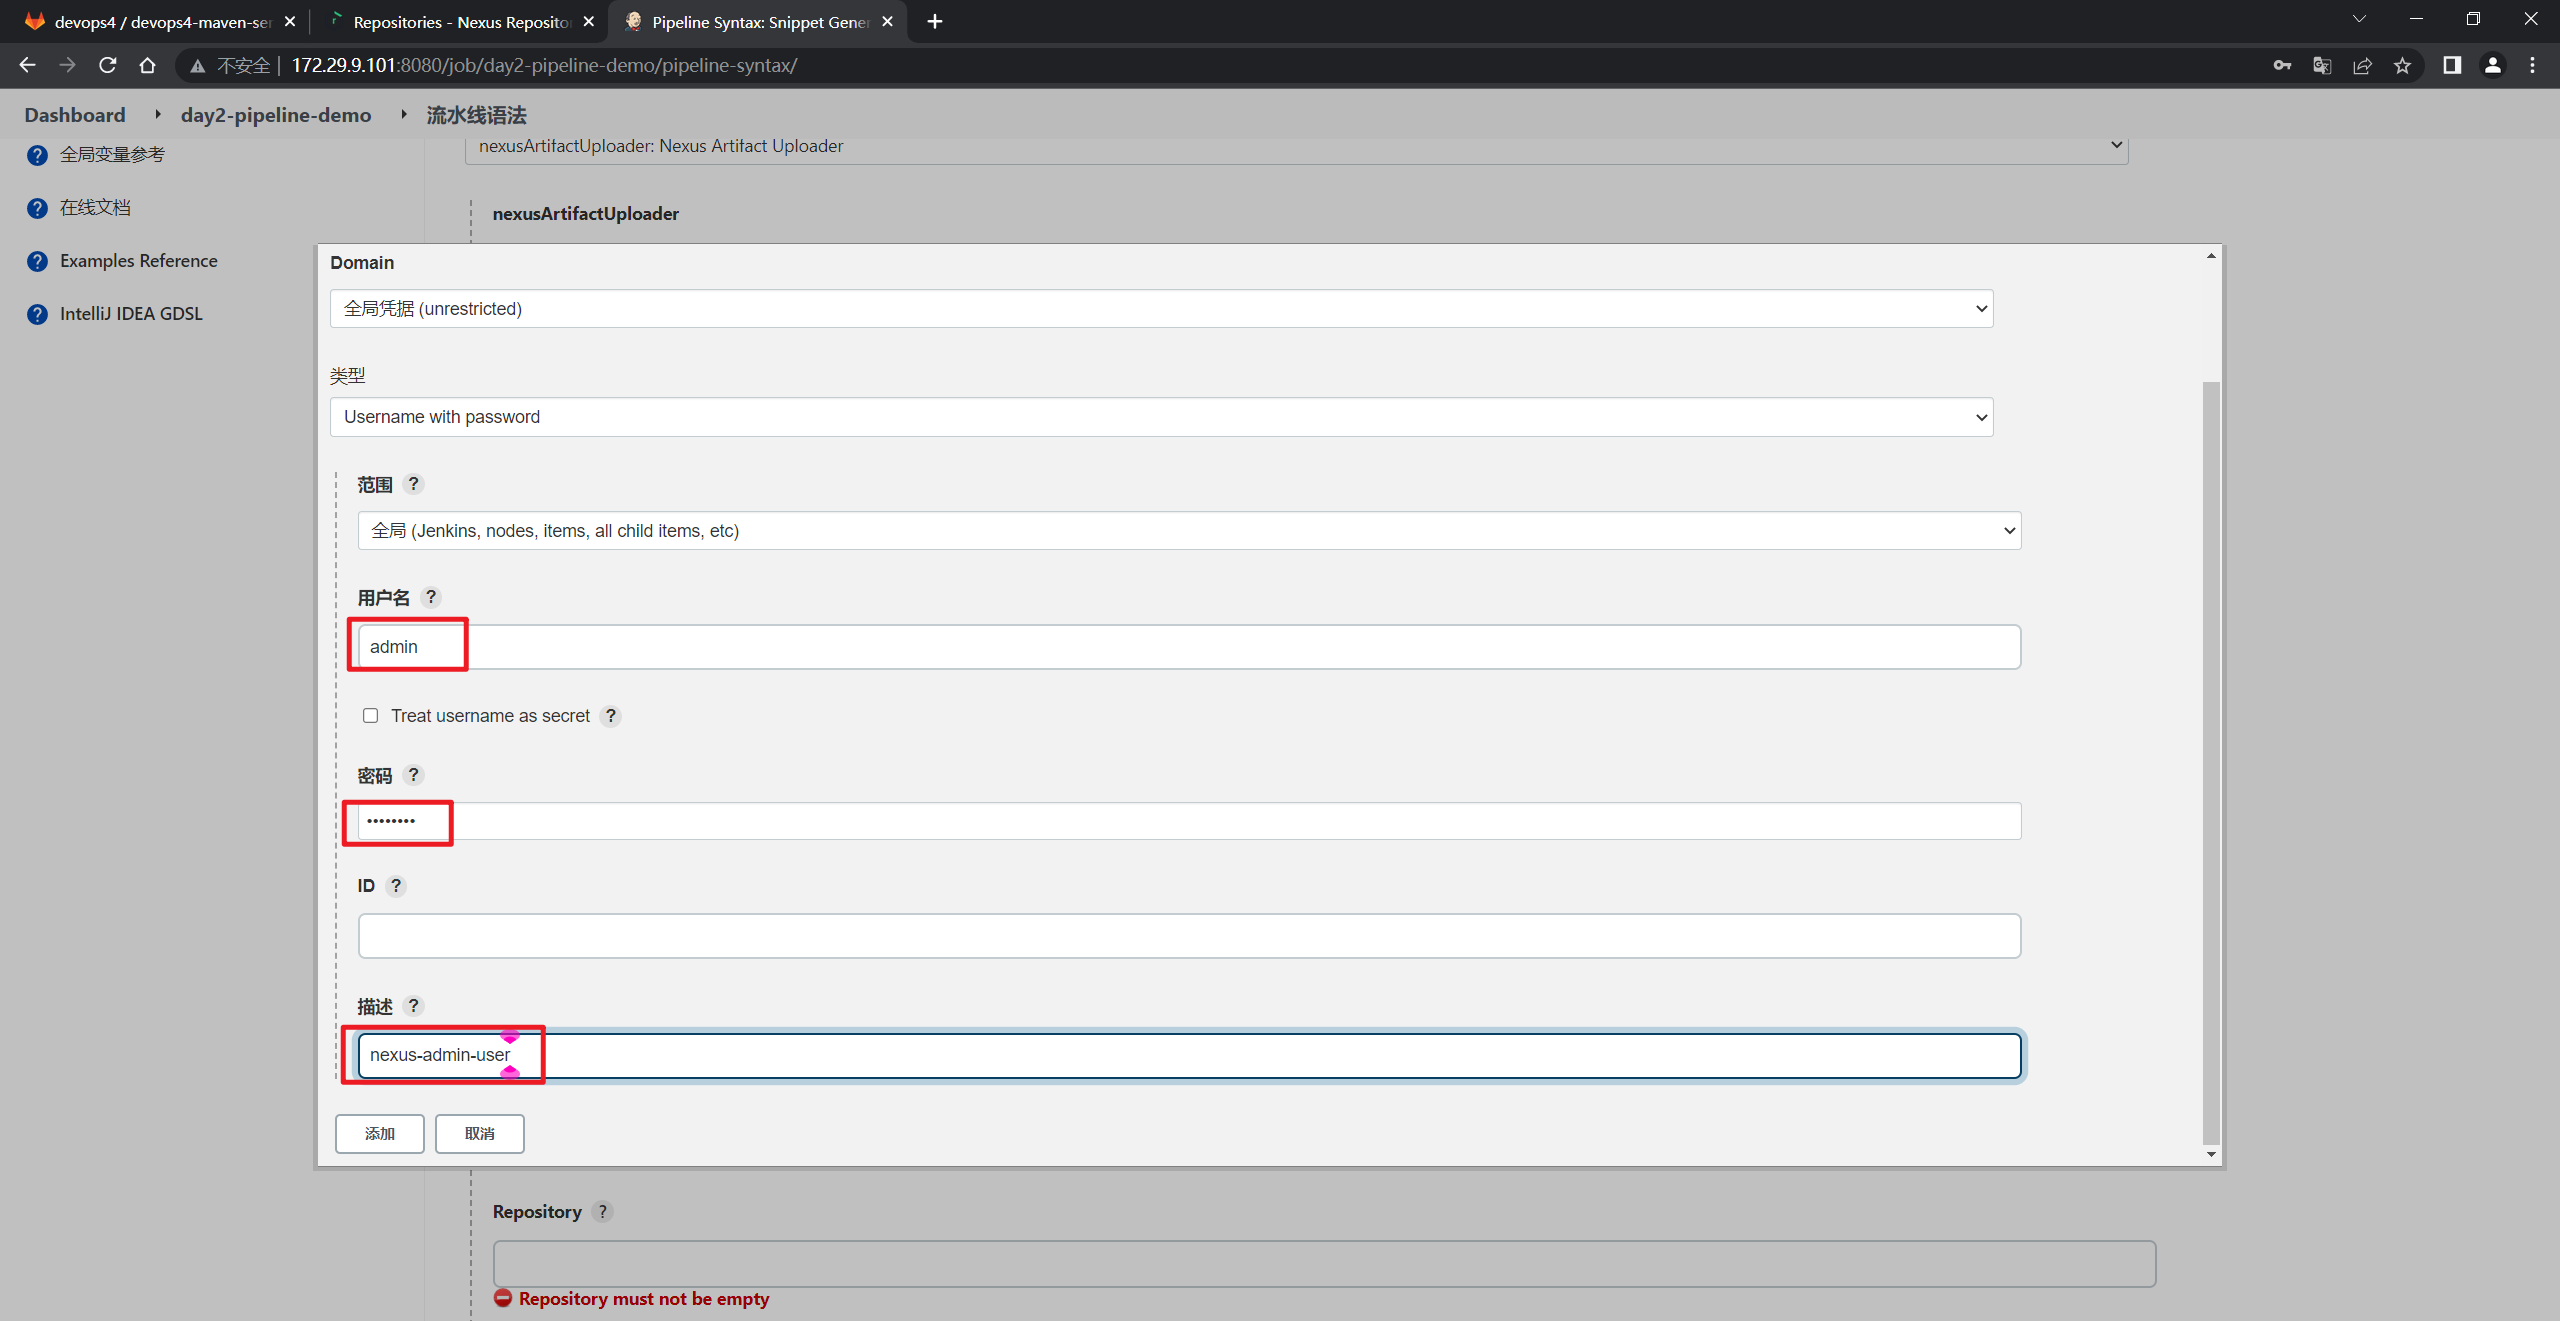
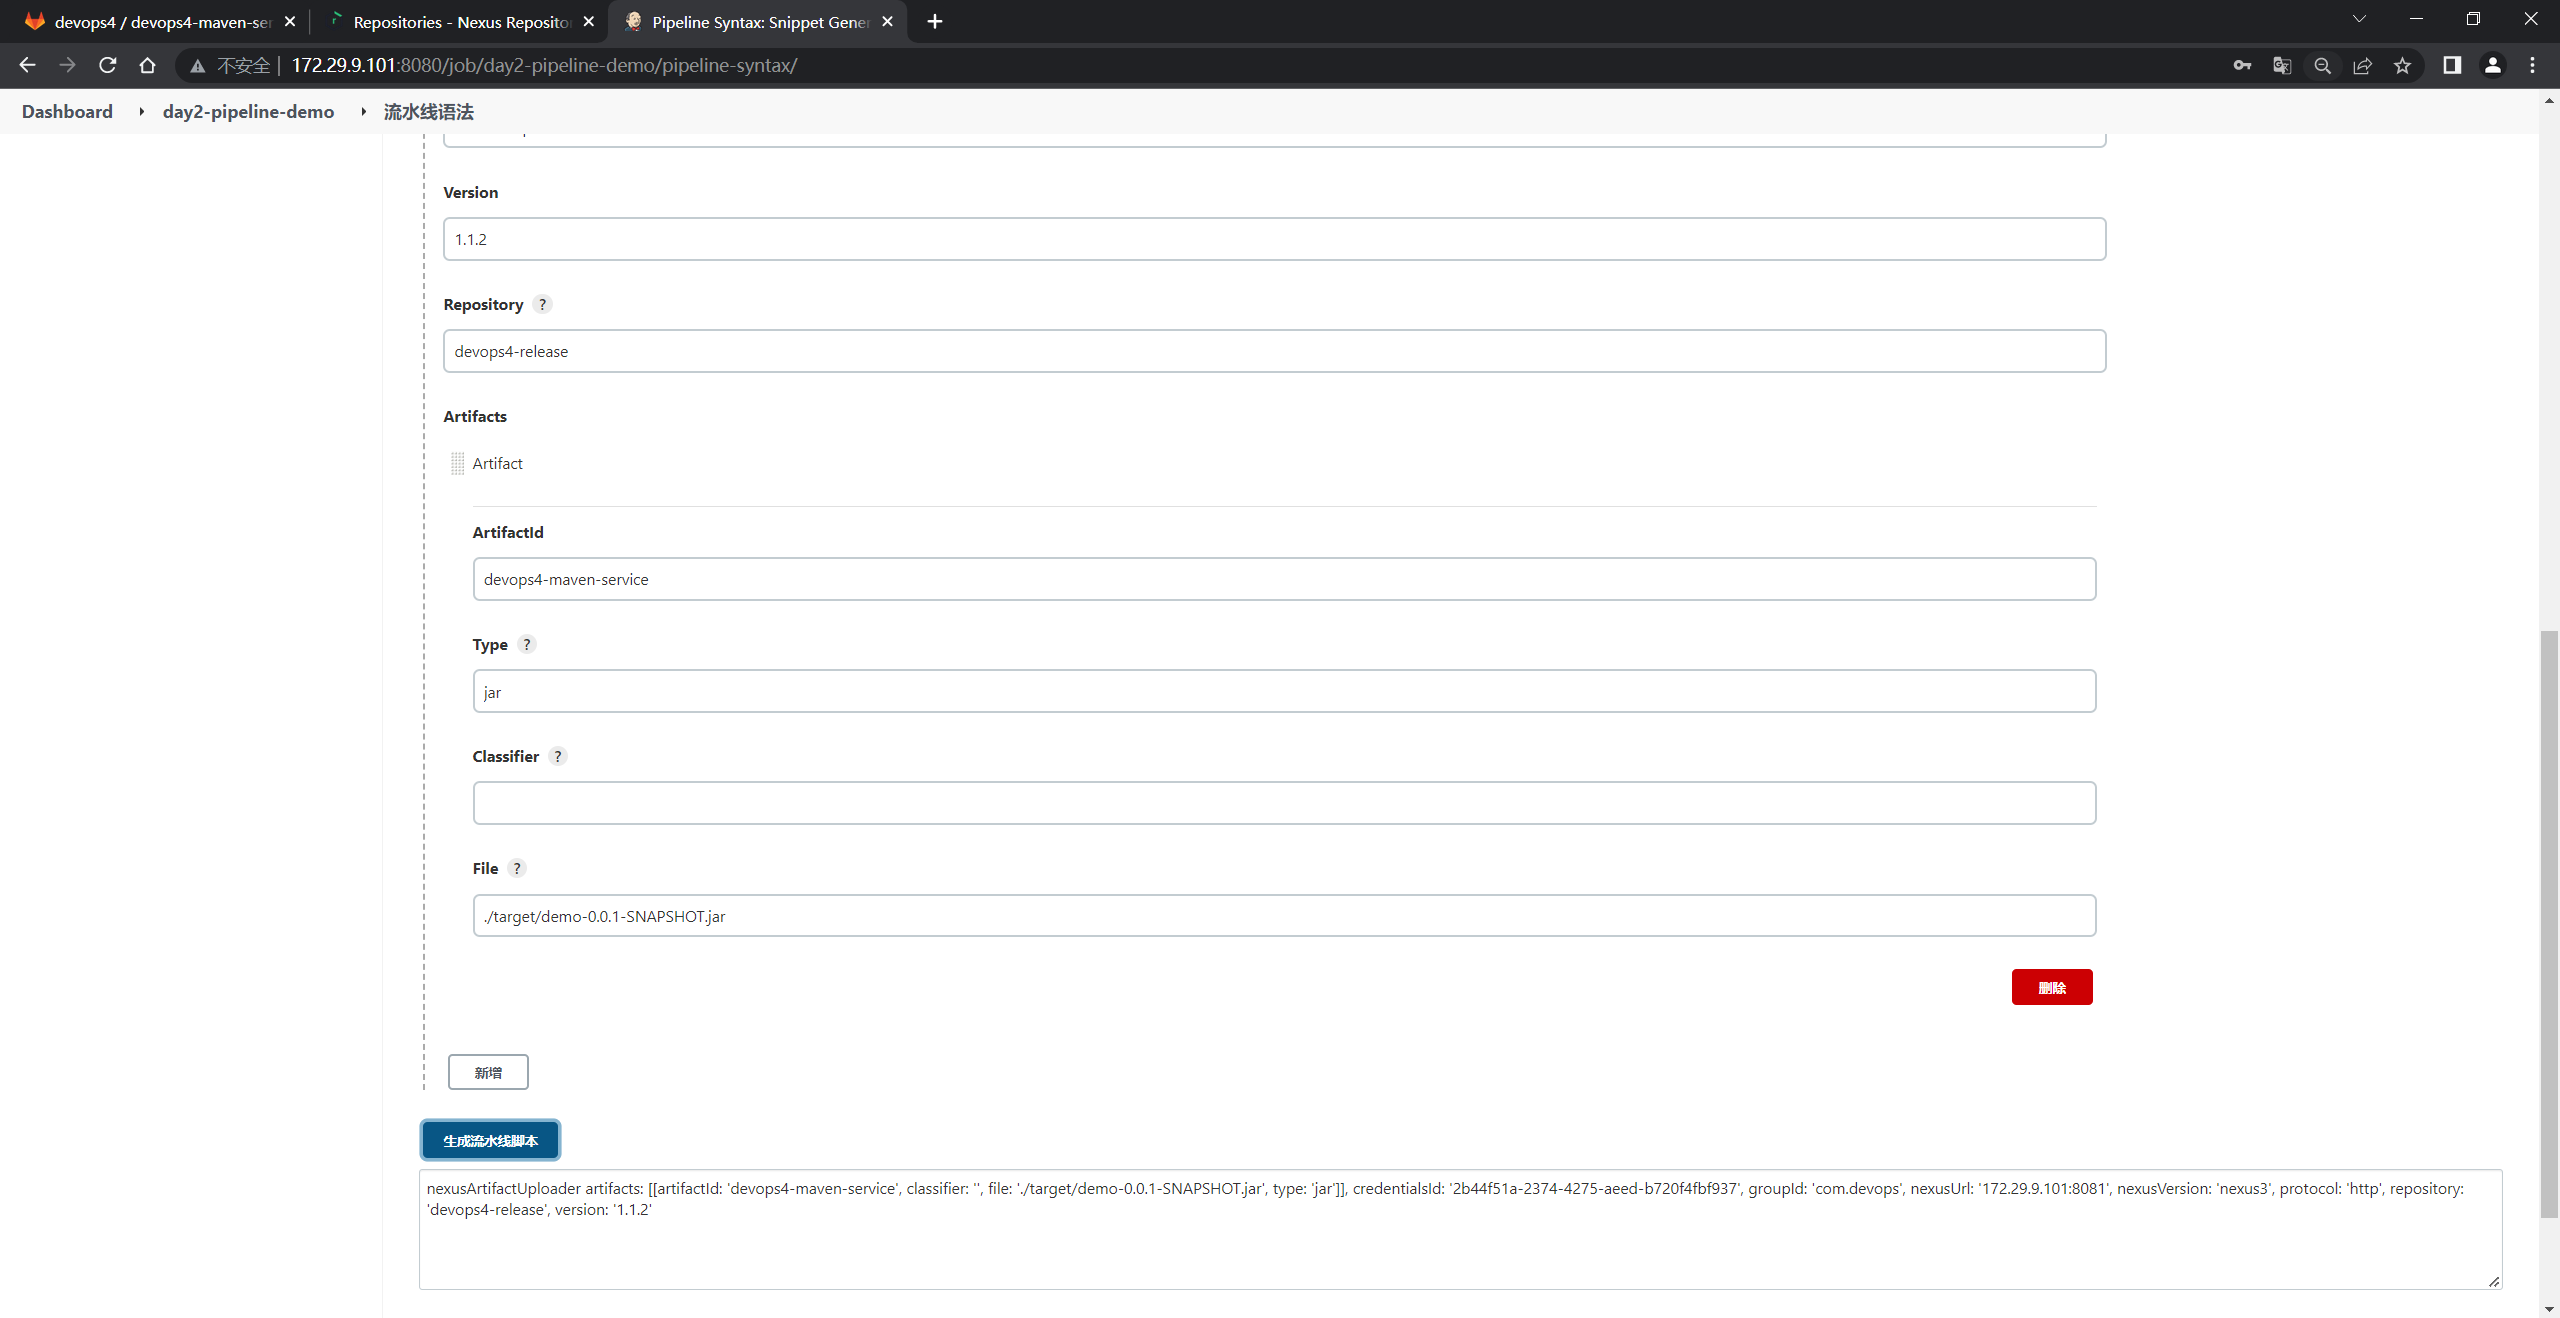
调整下格式:
nexusArtifactUploader artifacts: [[artifactId: 'devops4-maven-service',
								classifier: '',
								file: './target/demo-0.0.1-SNAPSHOT.jar',
								type: 'jar']],
					credentialsId: '2b44f51a-2374-4275-aeed-b720f4fbf937',
					groupId: 'com.devops',
					nexusUrl: '172.29.9.101:8081',
					nexusVersion: 'nexus3',
					protocol: 'http',
					repository: 'devops4-release',
					version: '1.1.2'
- 这边来到jenkins的
devops4-maven-service项目里,先跑一次流水线看下有问题没:
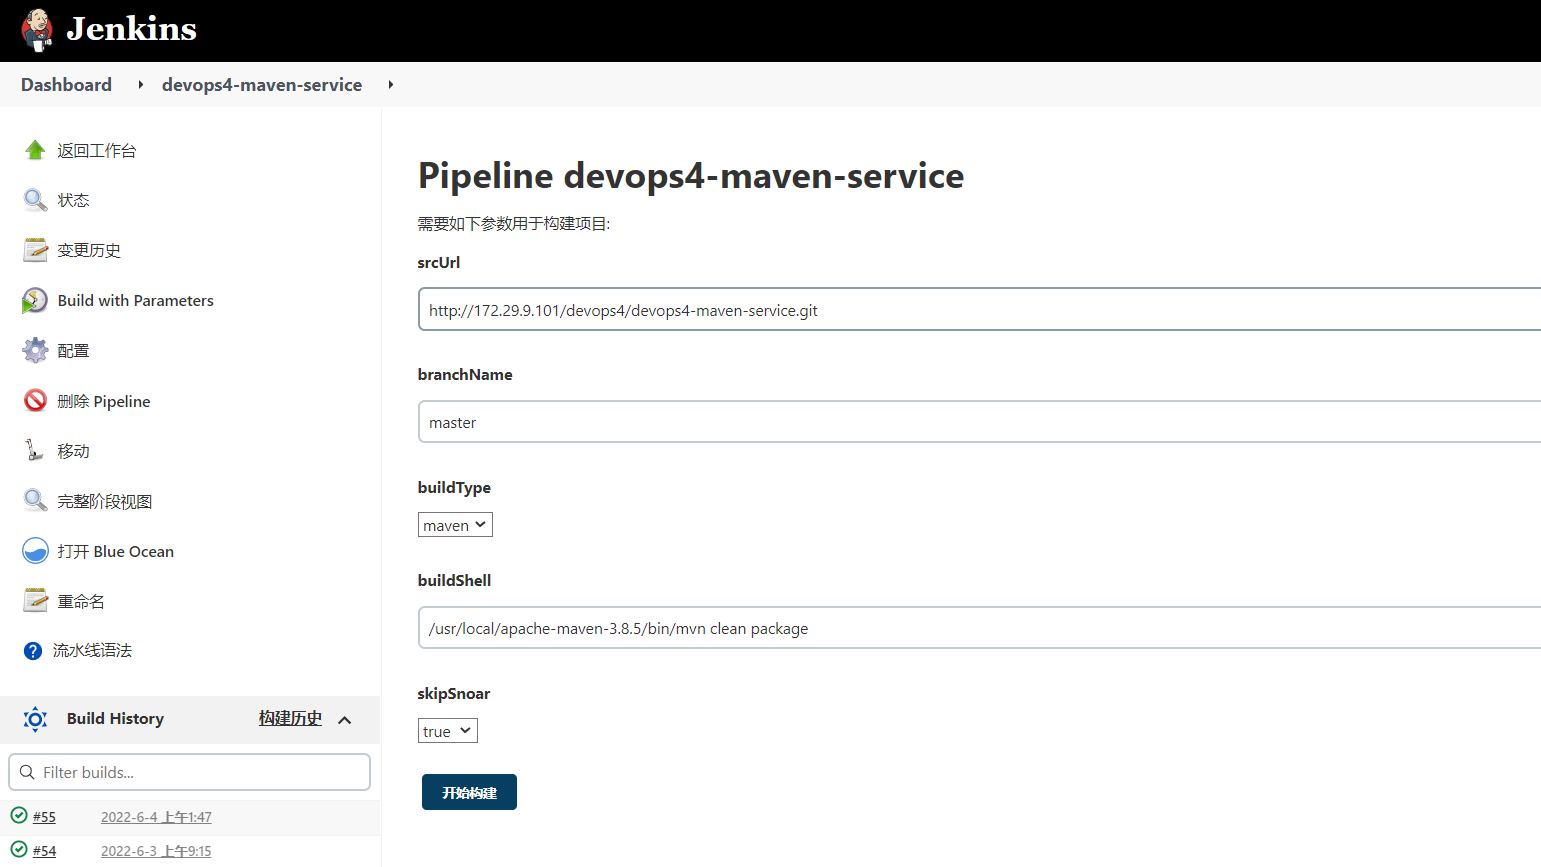
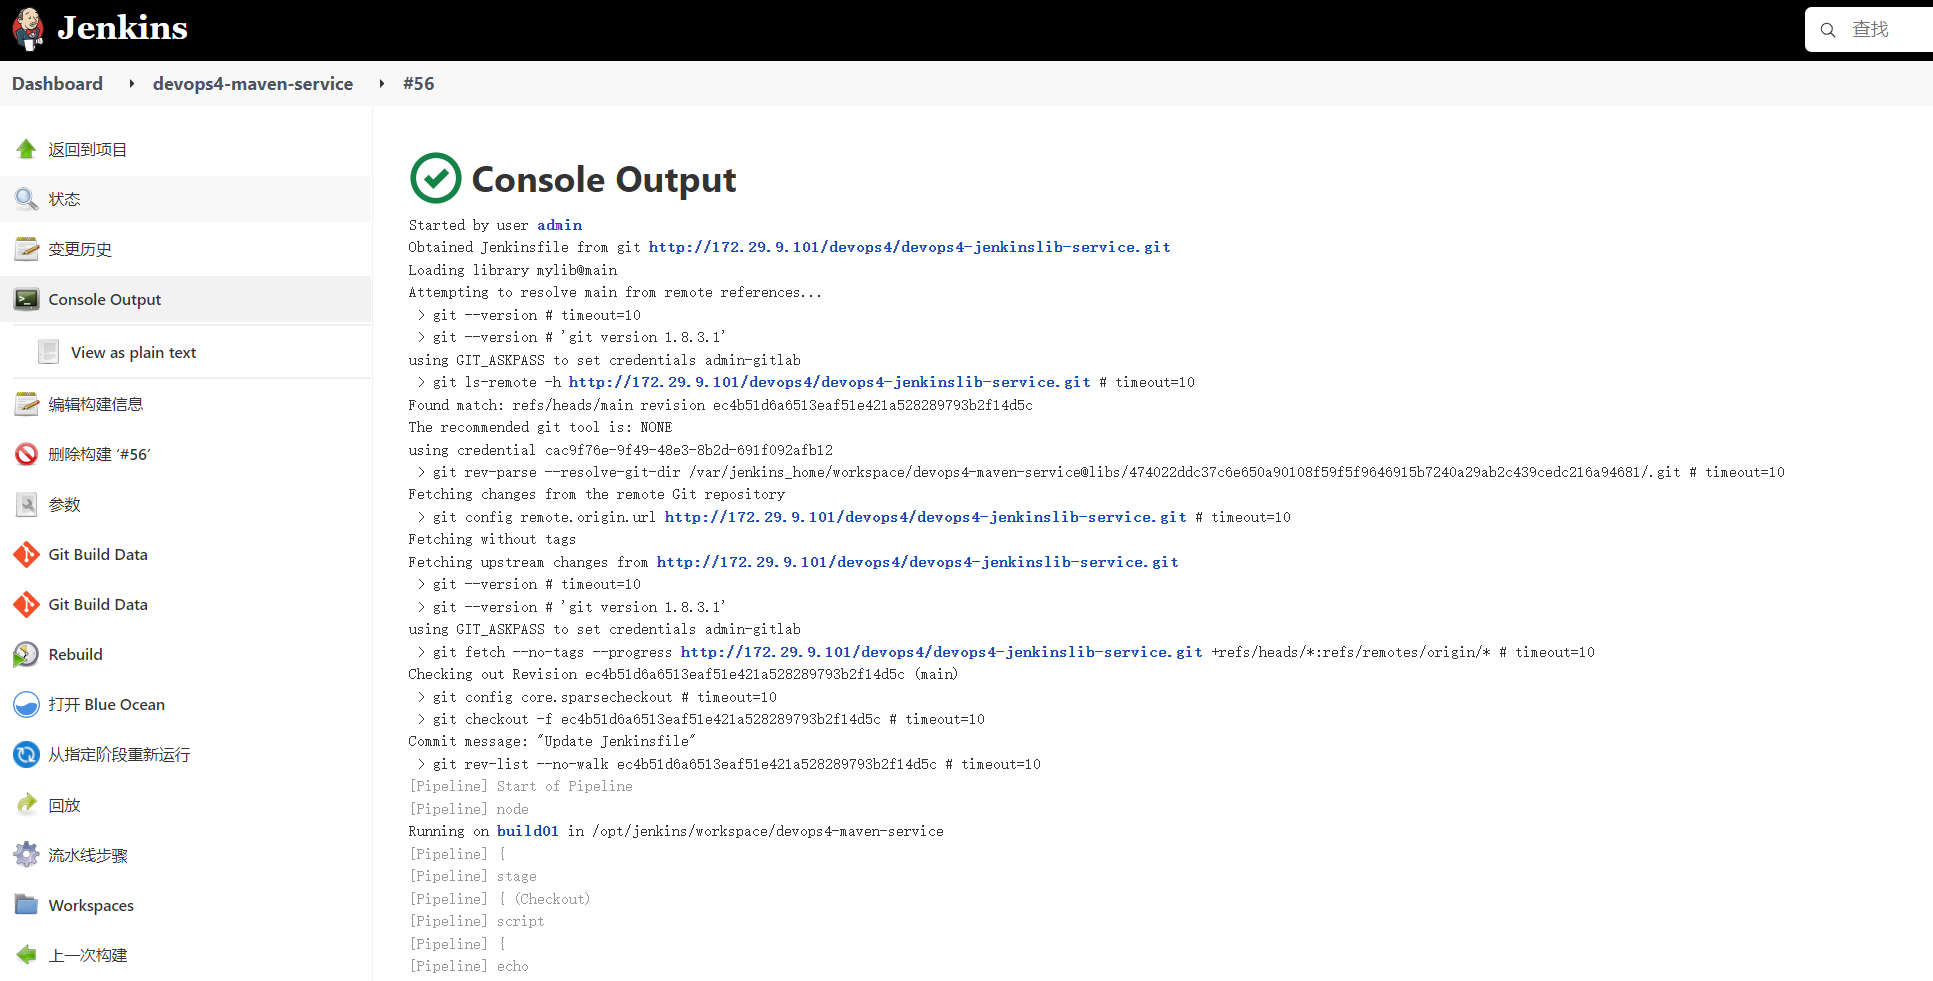
可以看到流水线是ok的。
- 我们再来写一下流水线代码:
stage("PushArtifact"){
	steps{
		script{
			PushArtifactByNexusPlugin()
		}
	}


}

def PushArtifactByNexusPlugin(){
	nexusArtifactUploader artifacts: [[artifactId: 'devops4-maven-service',
									classifier: '',
									file: './target/demo-0.0.1-SNAPSHOT.jar',
									type: 'jar']],
						credentialsId: '2b44f51a-2374-4275-aeed-b720f4fbf937',
						groupId: 'com.devops',
						nexusUrl: '172.29.9.101:8081',
						nexusVersion: 'nexus3',
						protocol: 'http',
						repository: 'devops4-release',
						version: '1.1.2'
}

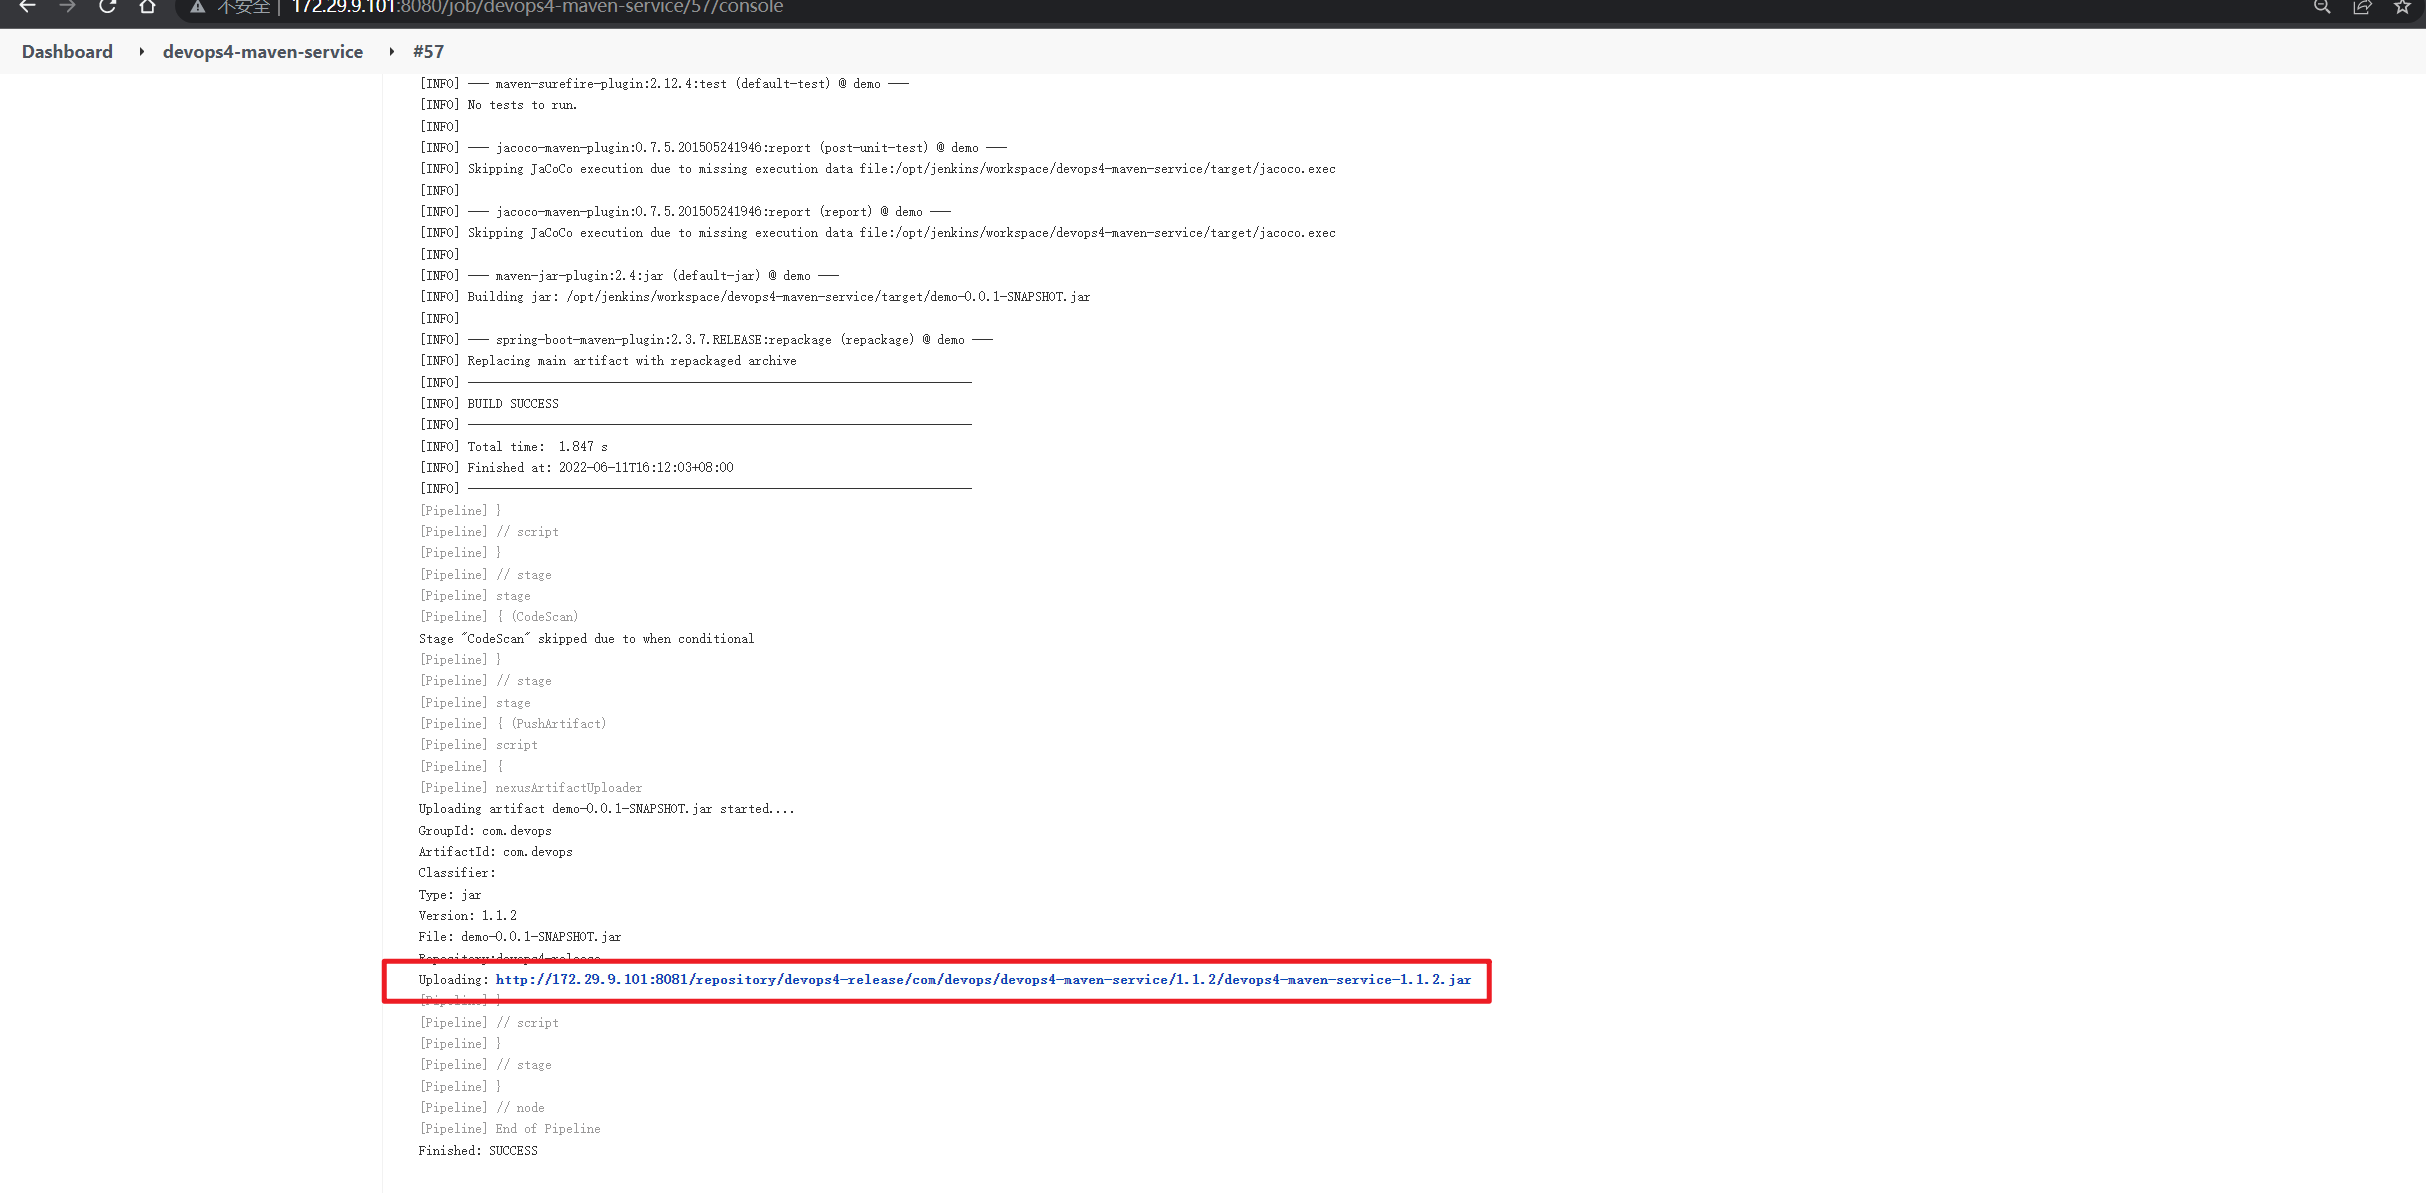
然后把这个代码放到上面项目的回放里,跑一次:
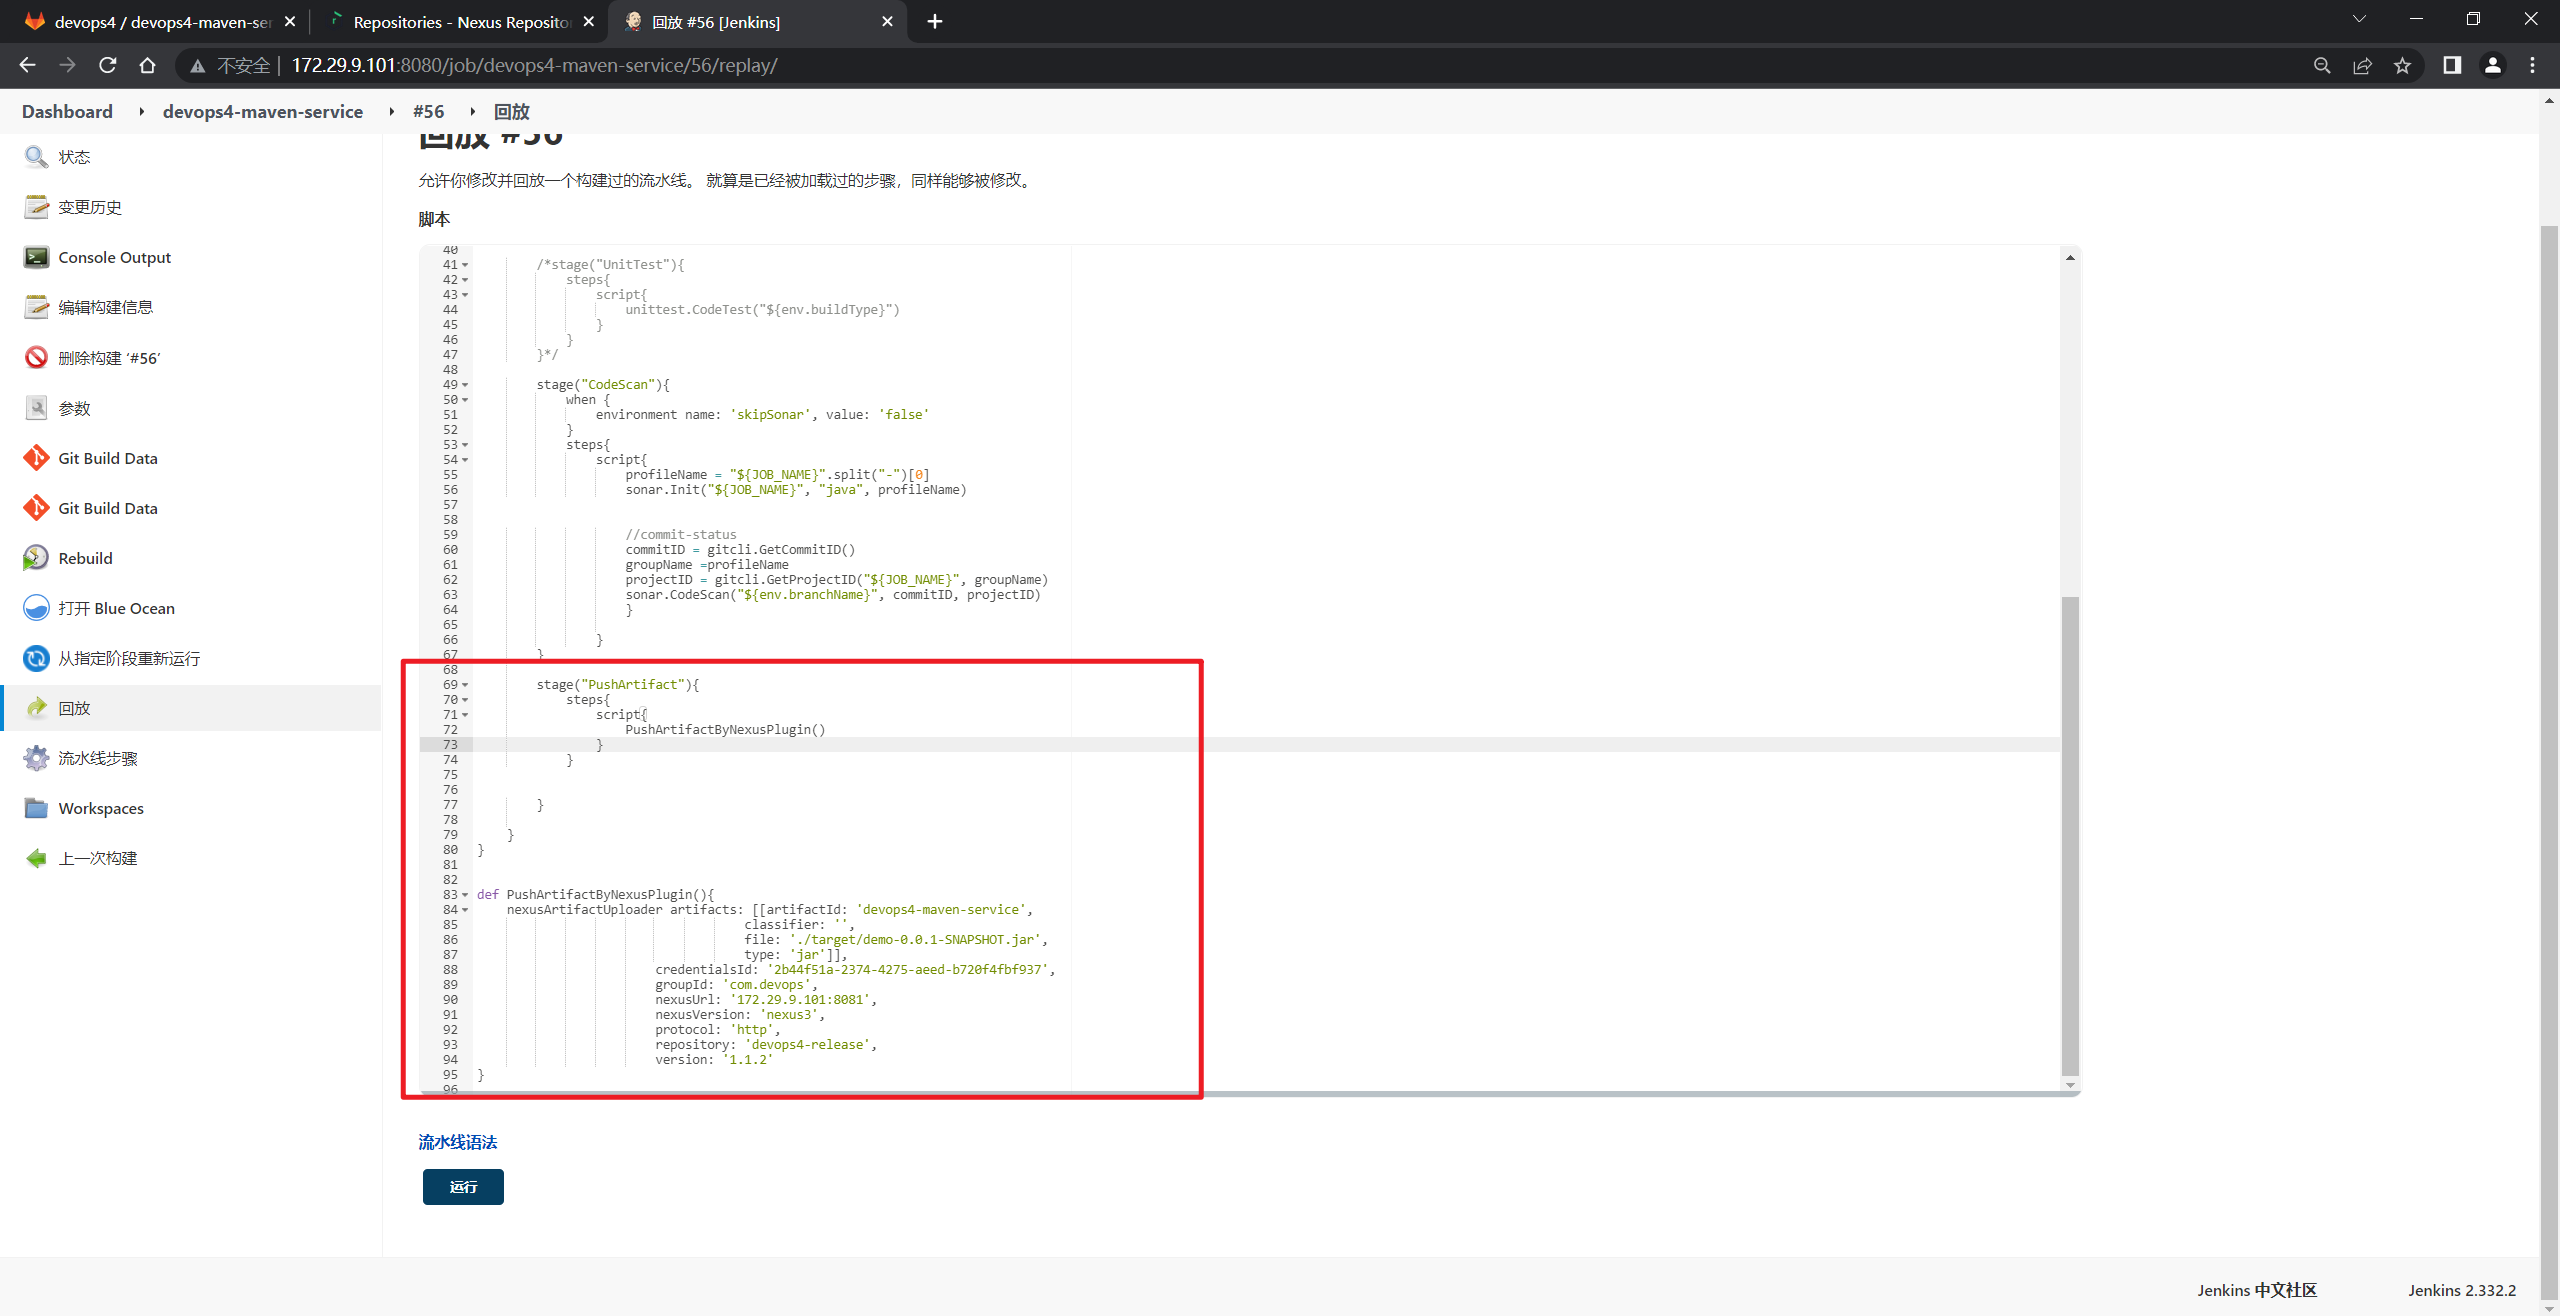
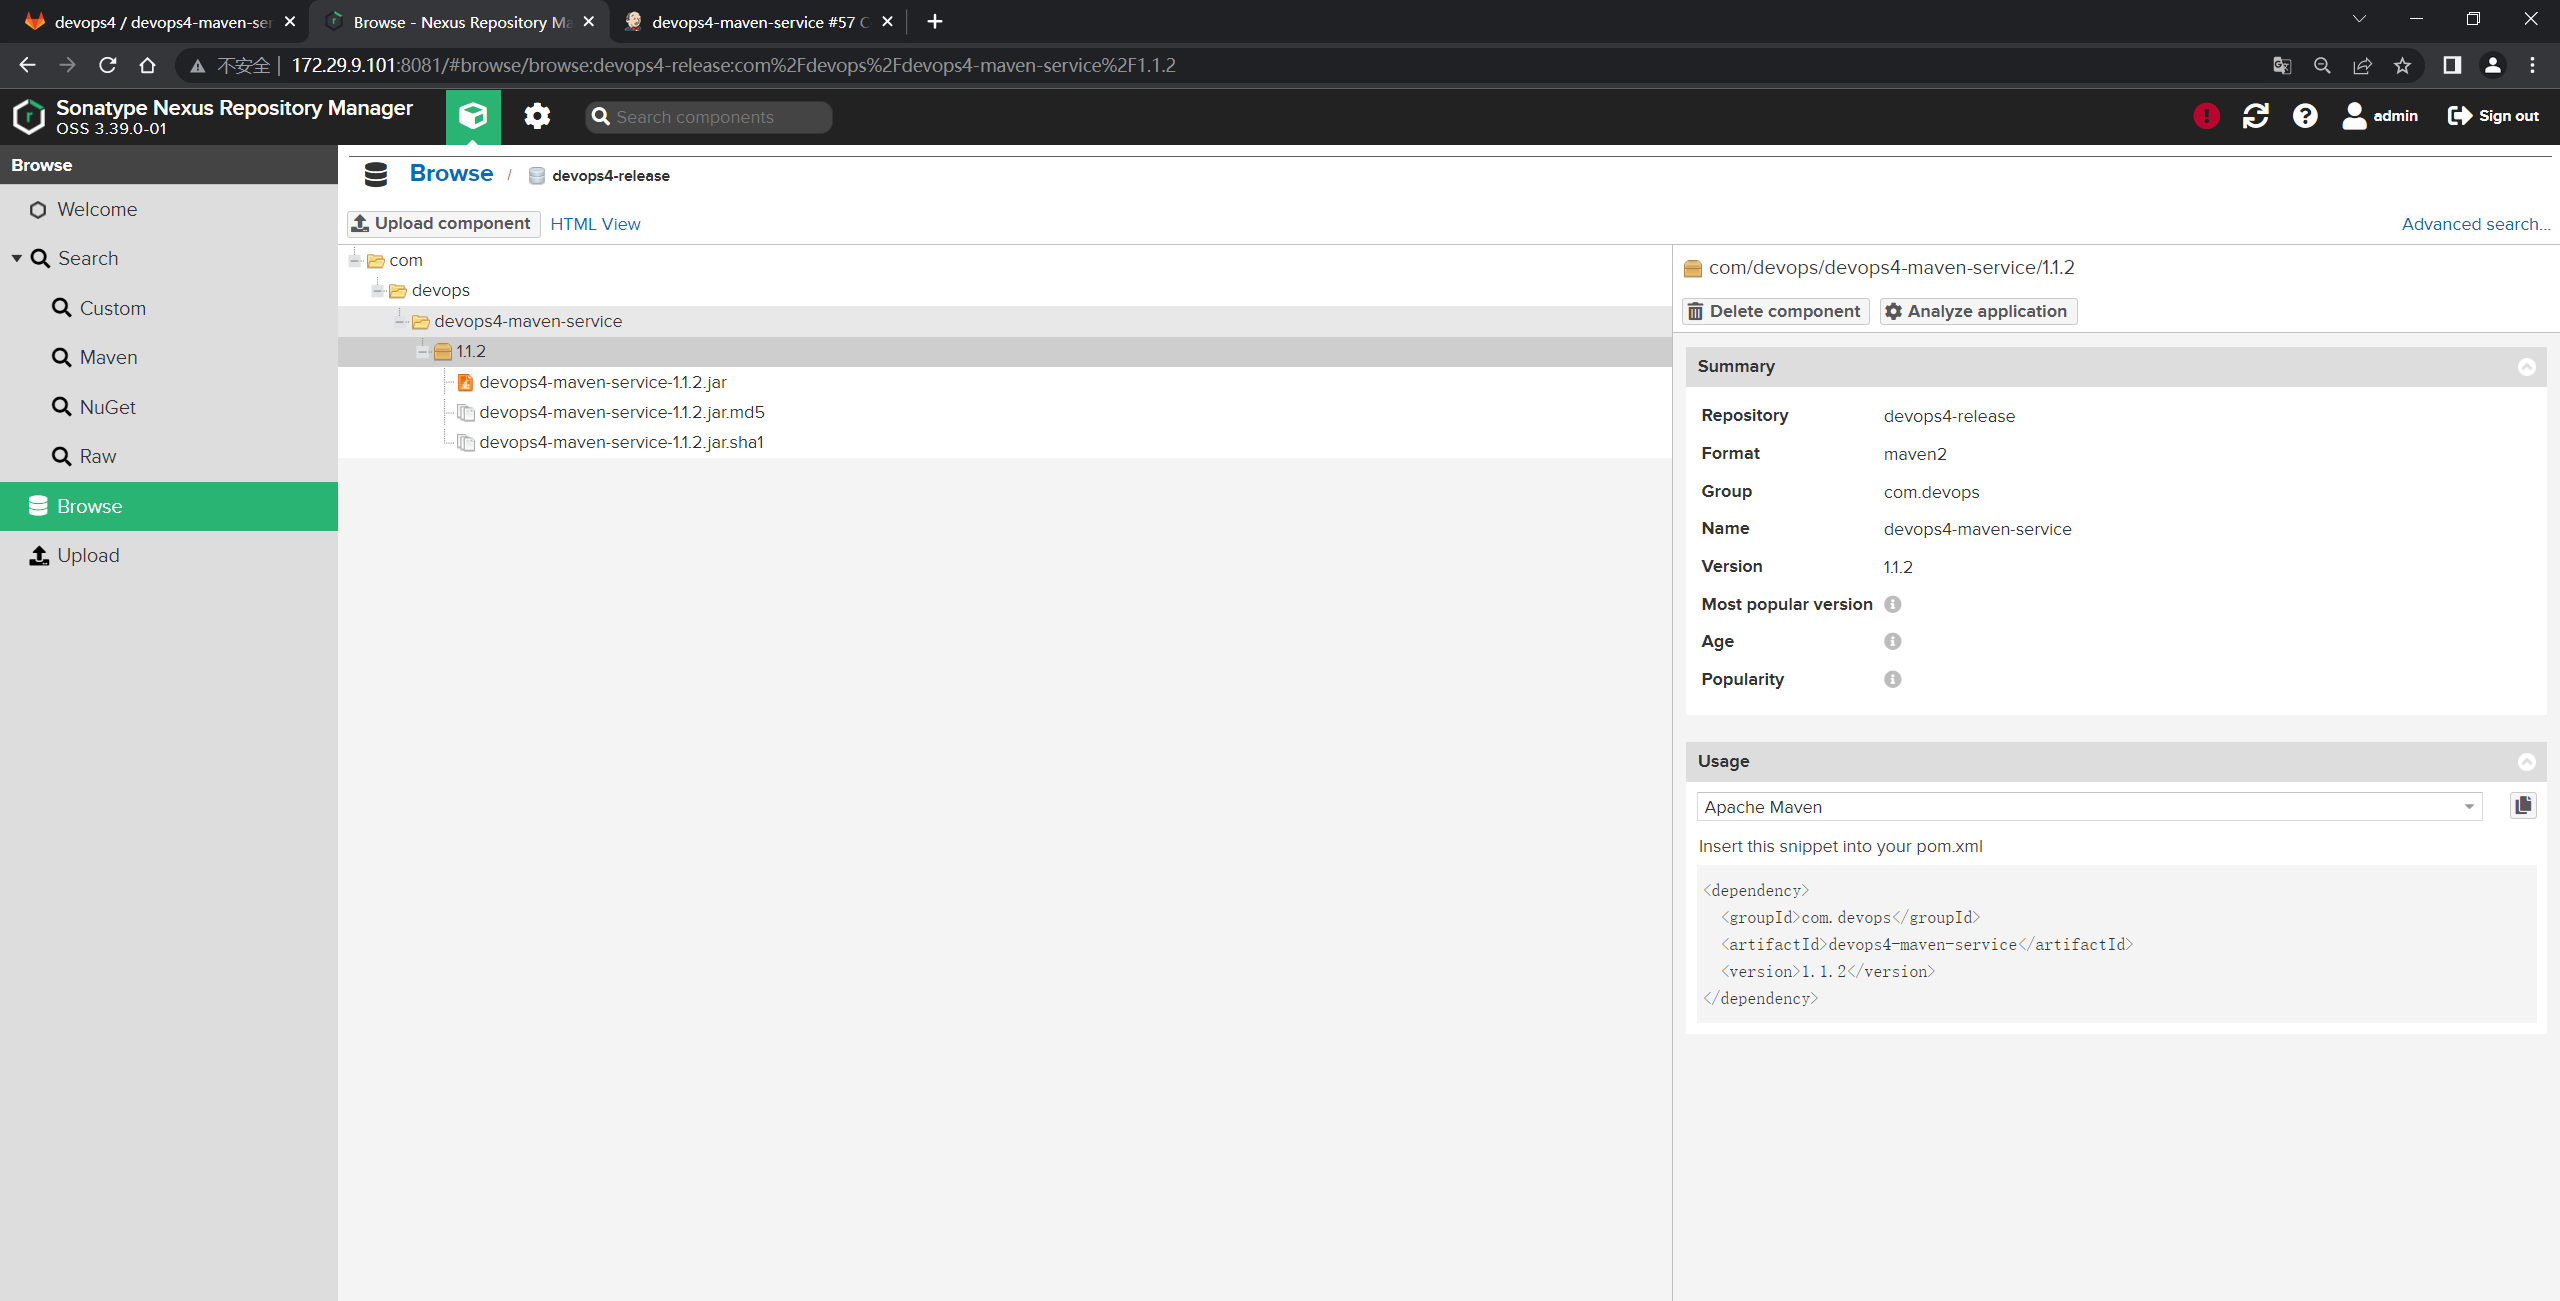
可以看到,上传制品成功了:
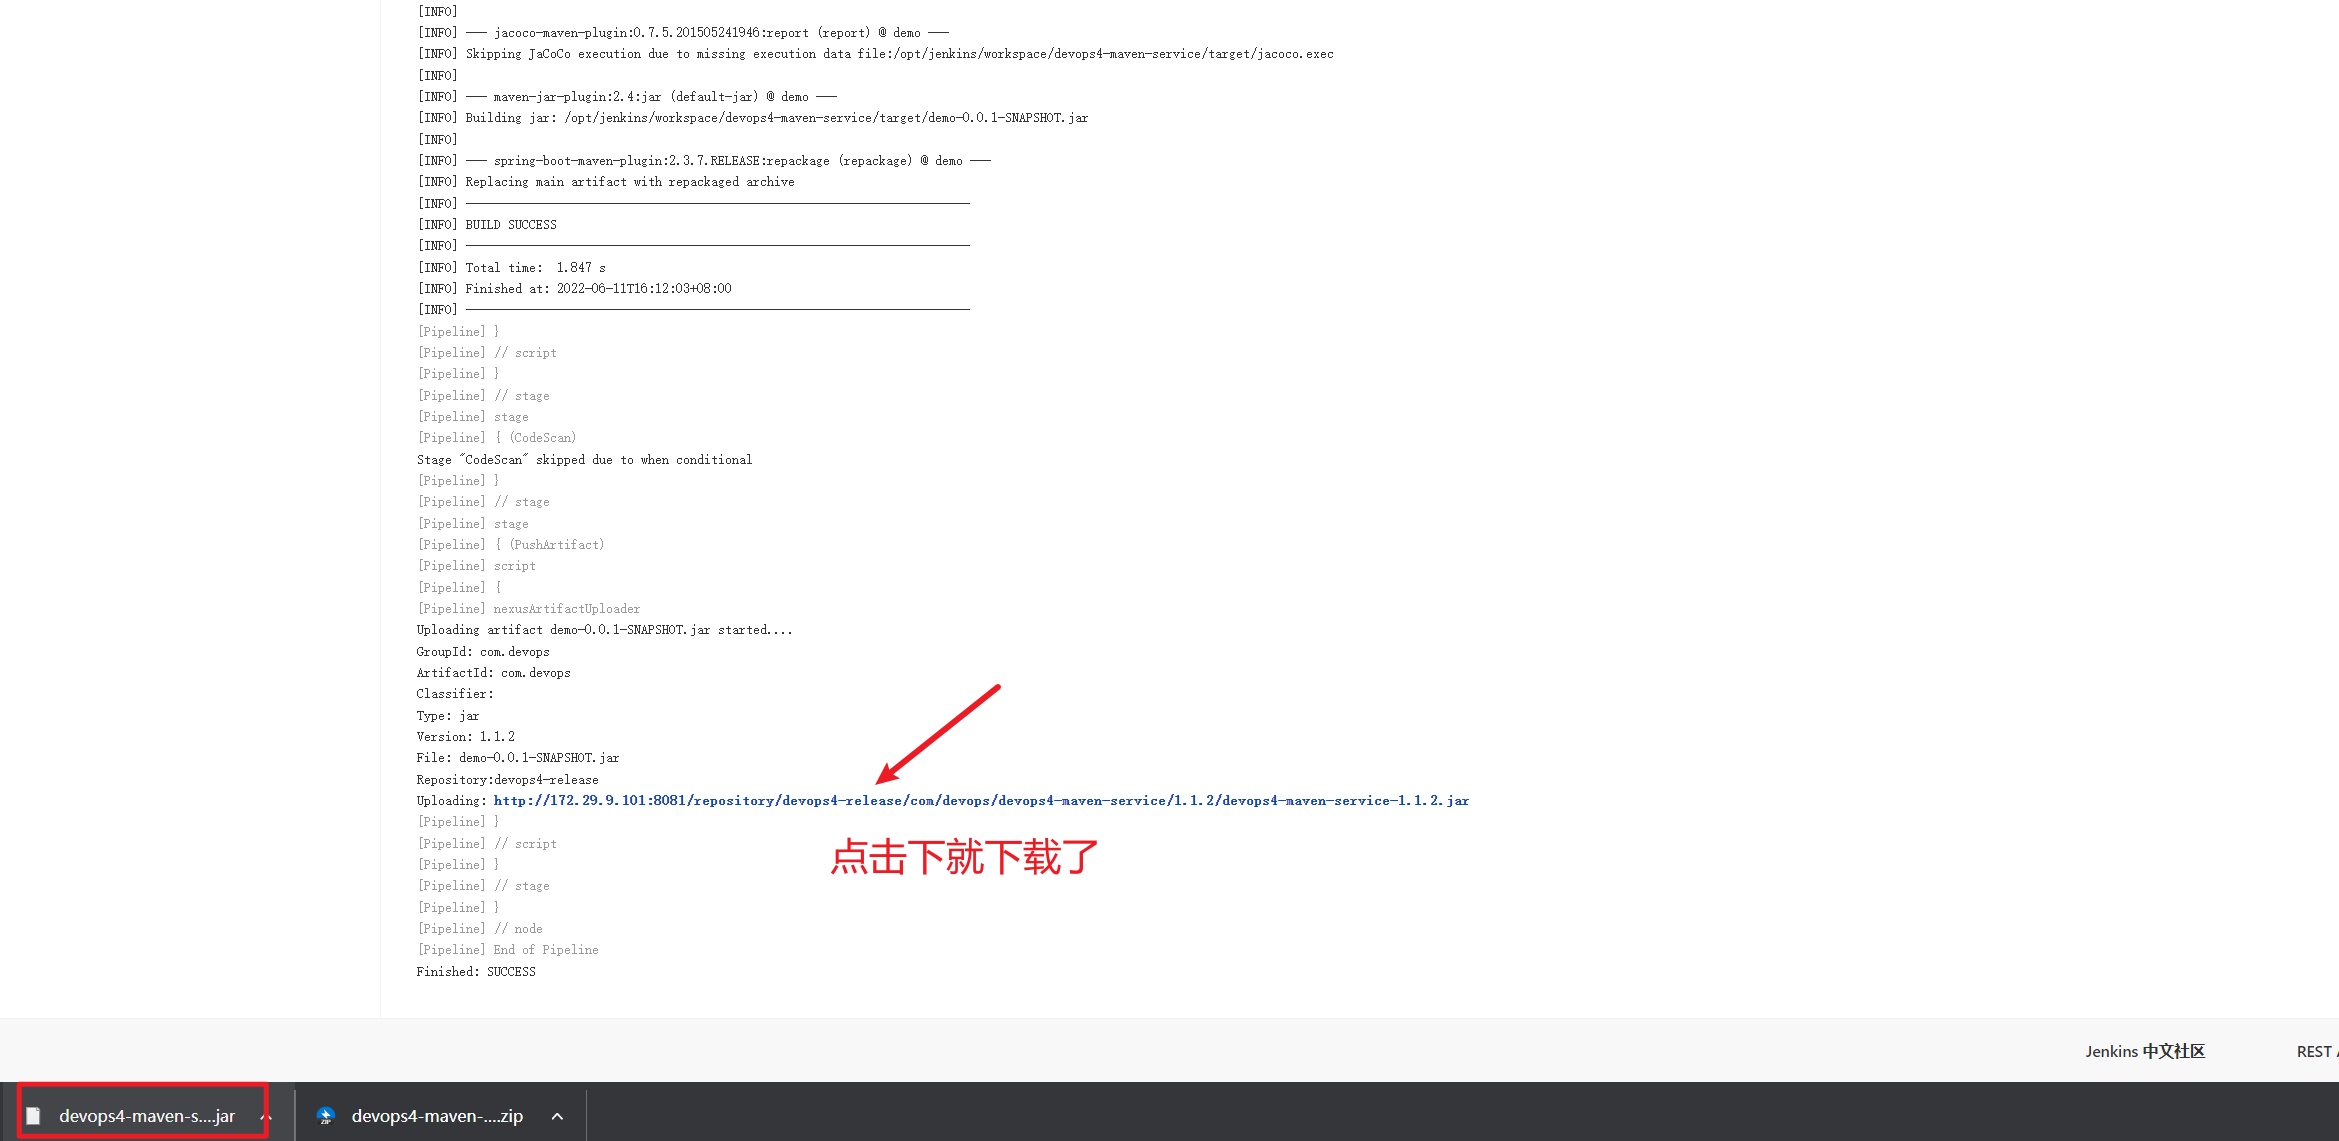
- 下载制品:
- 现在开始对上面的进行替换:
进行优化, 将参数以变量的方式传递给函数。
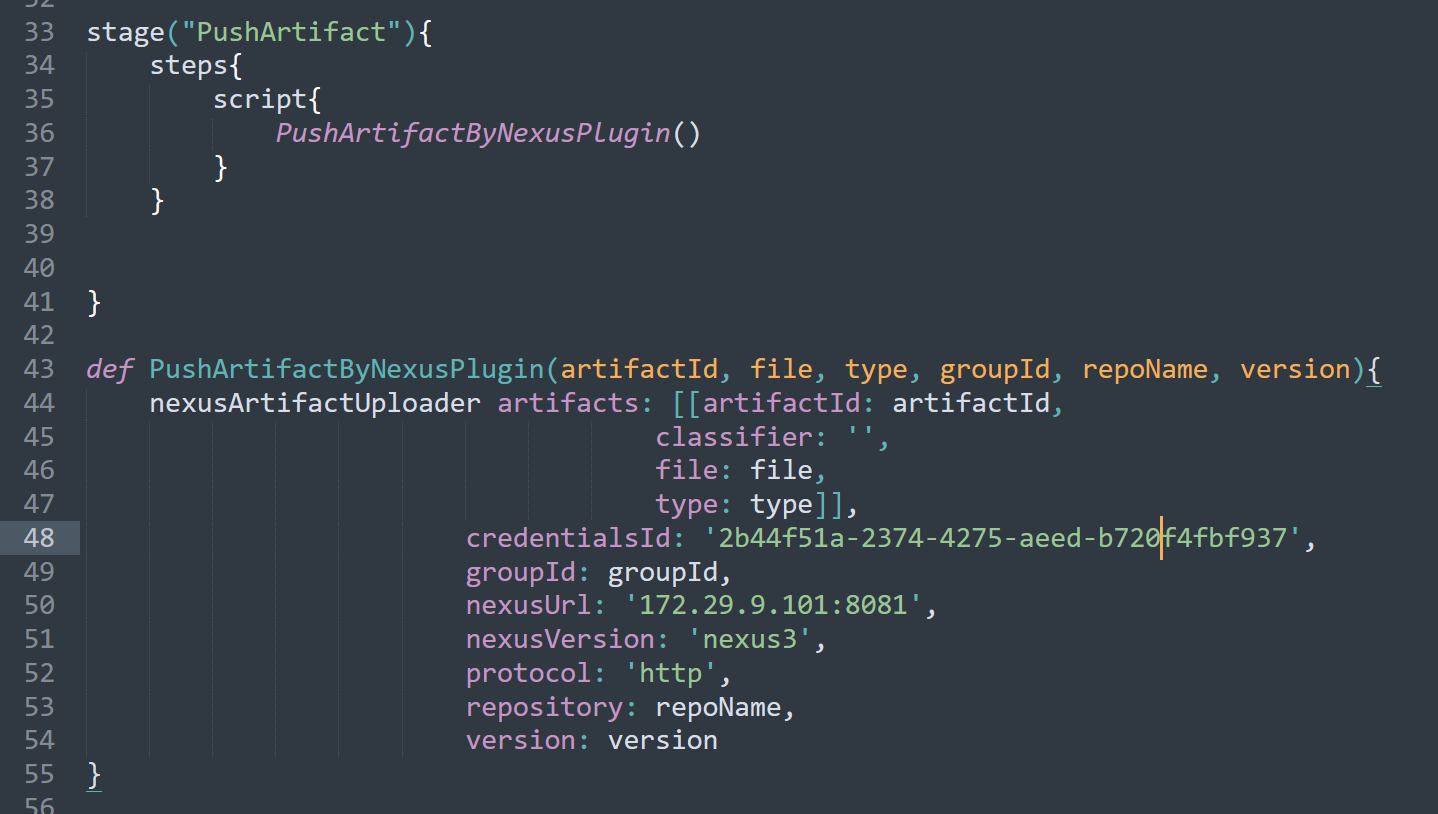
stage("PushArtifact"){
	steps{
		script{
			PushArtifactByNexusPlugin()
		}
	}


}

def PushArtifactByNexusPlugin(artifactId, file, type, groupId, repoName, version){
	nexusArtifactUploader artifacts: [[artifactId: artifactId,
									classifier: '',
									file: file,
									type: type]],
						credentialsId: '2b44f51a-2374-4275-aeed-b720f4fbf937',
						groupId: groupId,
						nexusUrl: '172.29.9.101:8081',
						nexusVersion: 'nexus3',
						protocol: 'http',
						repository: repoName,
						version: version
}
- 读pom文件:
找一个流水线项目,来生成下代码:
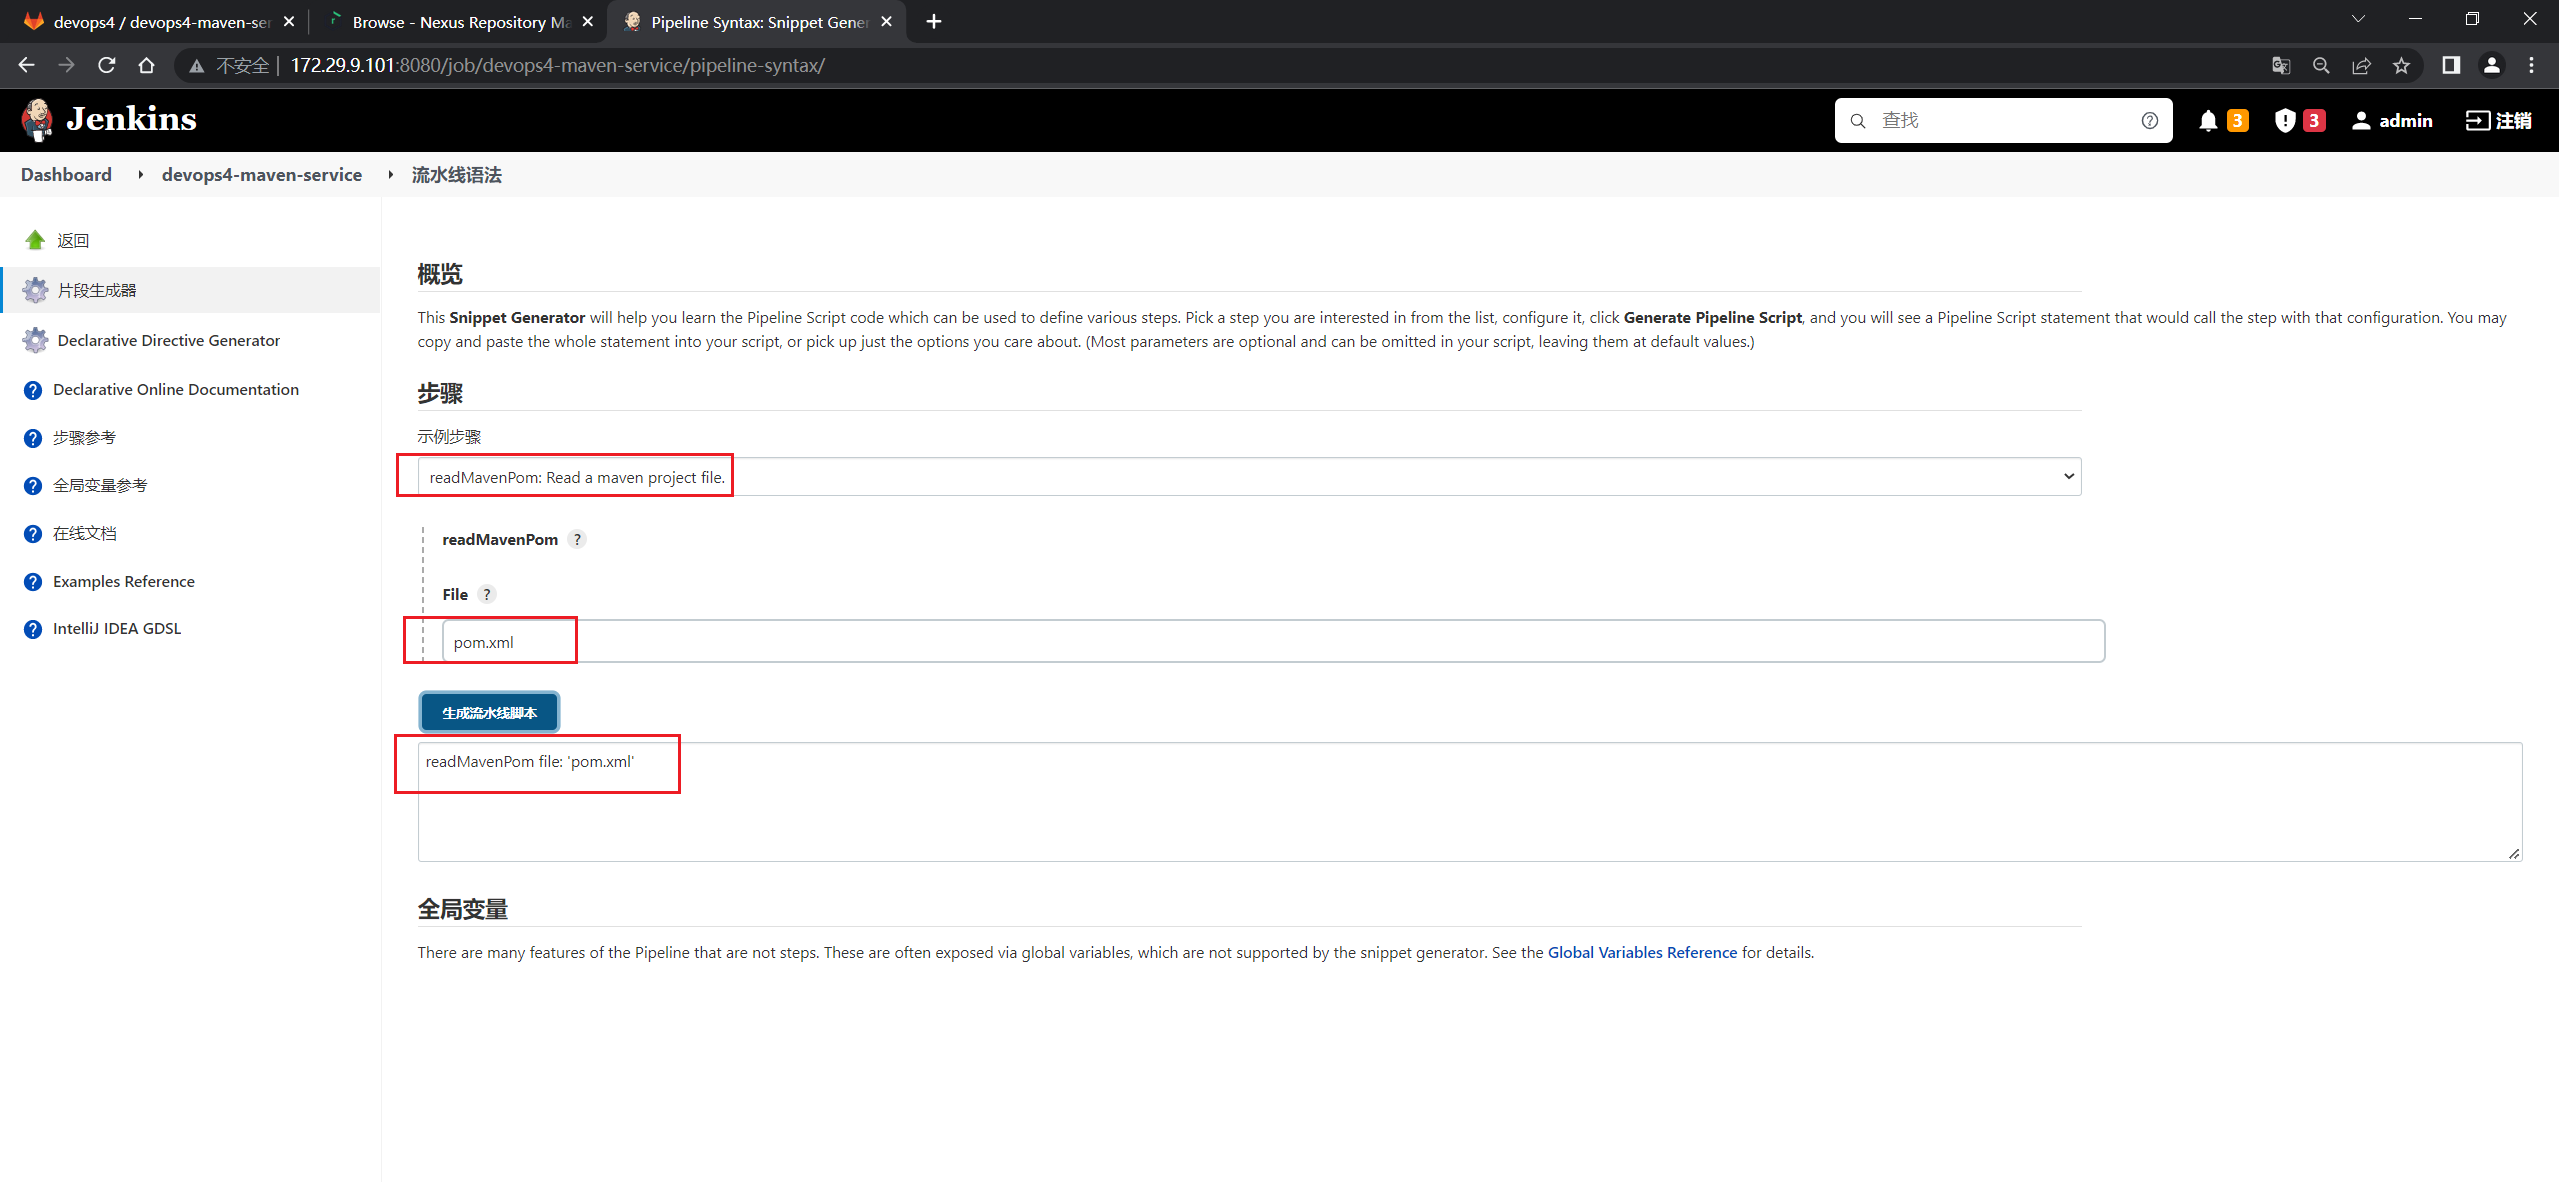
readMavenPom file: 'pom.xml'
- 此时,以
devops4-maven-service作业为基础创建一个新的作业devops4-maven-upload:
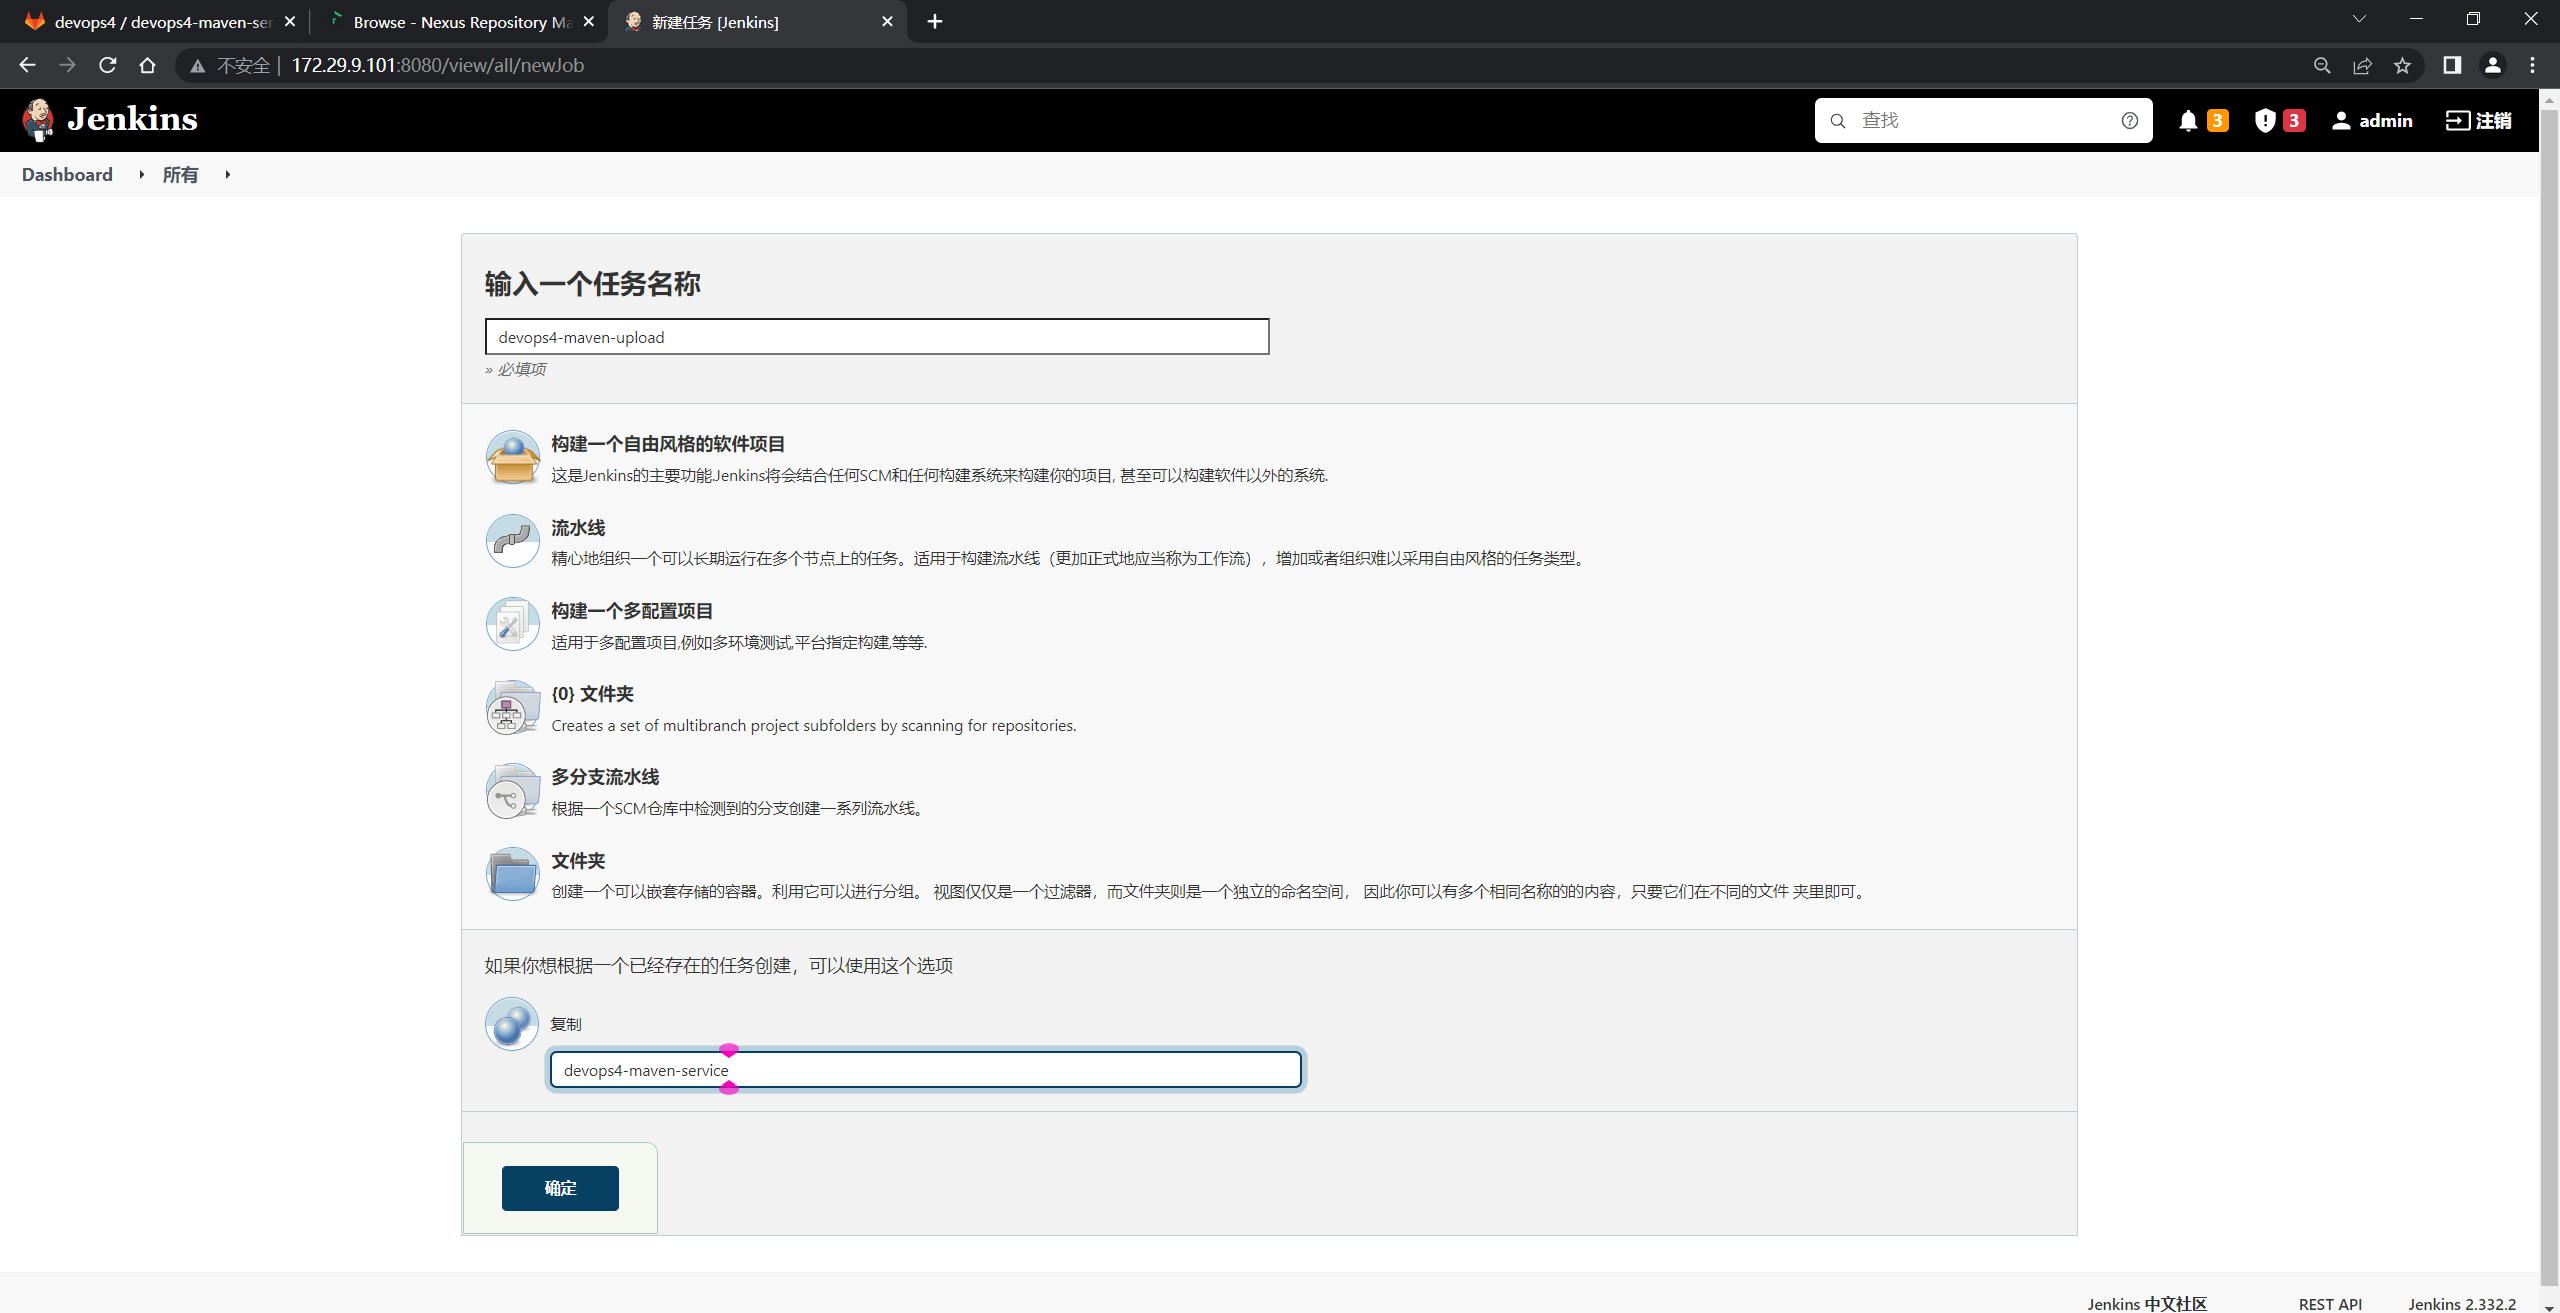
从刚才那个devops4-maven-service的回放里拿一下代码:
修改下,然后放到pipeline里跑一下:
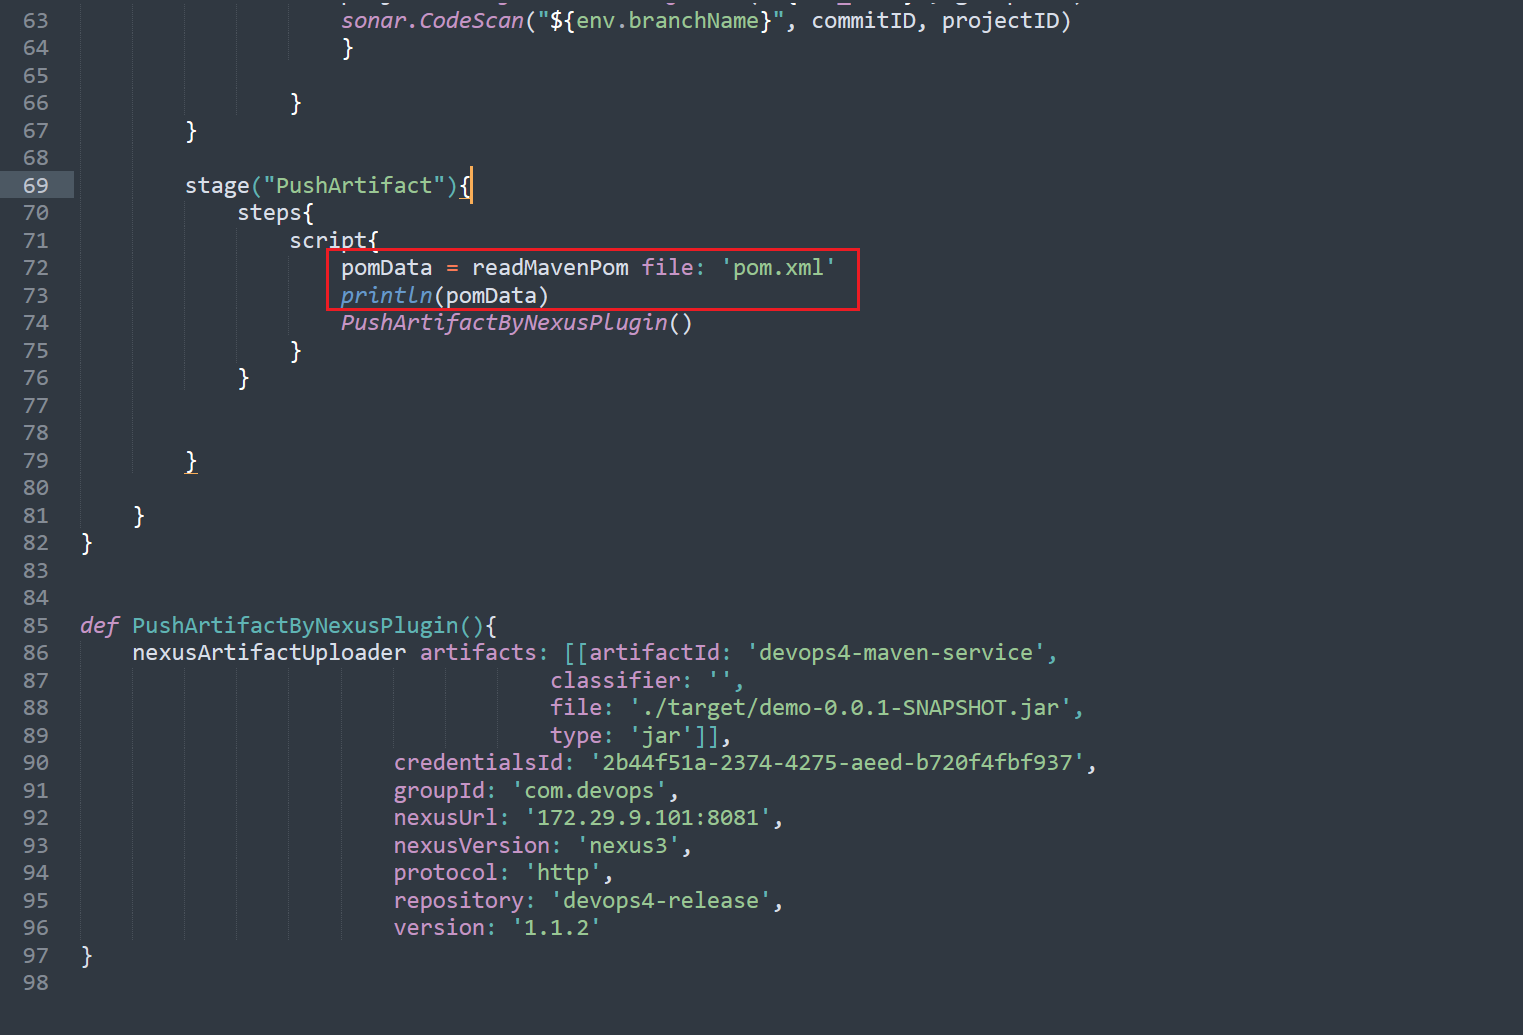
@Library("mylib@main") _     //加载共享库
import org.devops.*						// 导入库

def checkout = new Checkout()    //New实例化
def build = new Build()
def unittest = new UnitTest()
def sonar = new Sonar()
def gitcli = new GitLab()

//env.buildType = "${JOB_NAME}".split("-")[1]

//流水线
pipeline {
    agent { label "build" }

    options {
        skipDefaultCheckout true
    }

    stages{
        stage("Checkout"){
            steps{
                script {
                    println("GetCode")
                    checkout.GetCode("${env.srcUrl}", "${env.branchName}")
                }
            }
        }

        stage("Build"){
            steps{
                script{
                    println("Build")
                    //build.CodeBuild("${env.buildType}")
                    sh "${env.buildShell}"

                }
            }
        }

        /*stage("UnitTest"){
            steps{
                script{
                    unittest.CodeTest("${env.buildType}")
                }
            }
        }*/

        stage("CodeScan"){
            when {
                environment name: 'skipSonar', value: 'false'
            }
            steps{
                script{
                    profileName = "${JOB_NAME}".split("-")[0]
                    sonar.Init("${JOB_NAME}", "java", profileName)


                    //commit-status
                    commitID = gitcli.GetCommitID()
                    groupName =profileName
                    projectID = gitcli.GetProjectID("${JOB_NAME}", groupName)
                    sonar.CodeScan("${env.branchName}", commitID, projectID)
                    }

                }
        }

        stage("PushArtifact"){
        	steps{
        		script{
                    pomData = readMavenPom file: 'pom.xml'
                    println(pomData)
        			PushArtifactByNexusPlugin()
        		}
        	}


        }

    }
}


def PushArtifactByNexusPlugin(){
	nexusArtifactUploader artifacts: [[artifactId: 'devops4-maven-service',
									classifier: '',
									file: './target/demo-0.0.1-SNAPSHOT.jar',
									type: 'jar']],
						credentialsId: '2b44f51a-2374-4275-aeed-b720f4fbf937',
						groupId: 'com.devops',
						nexusUrl: '172.29.9.101:8081',
						nexusVersion: 'nexus3',
						protocol: 'http',
						repository: 'devops4-release',
						version: '1.1.2'
}
流水线结果:
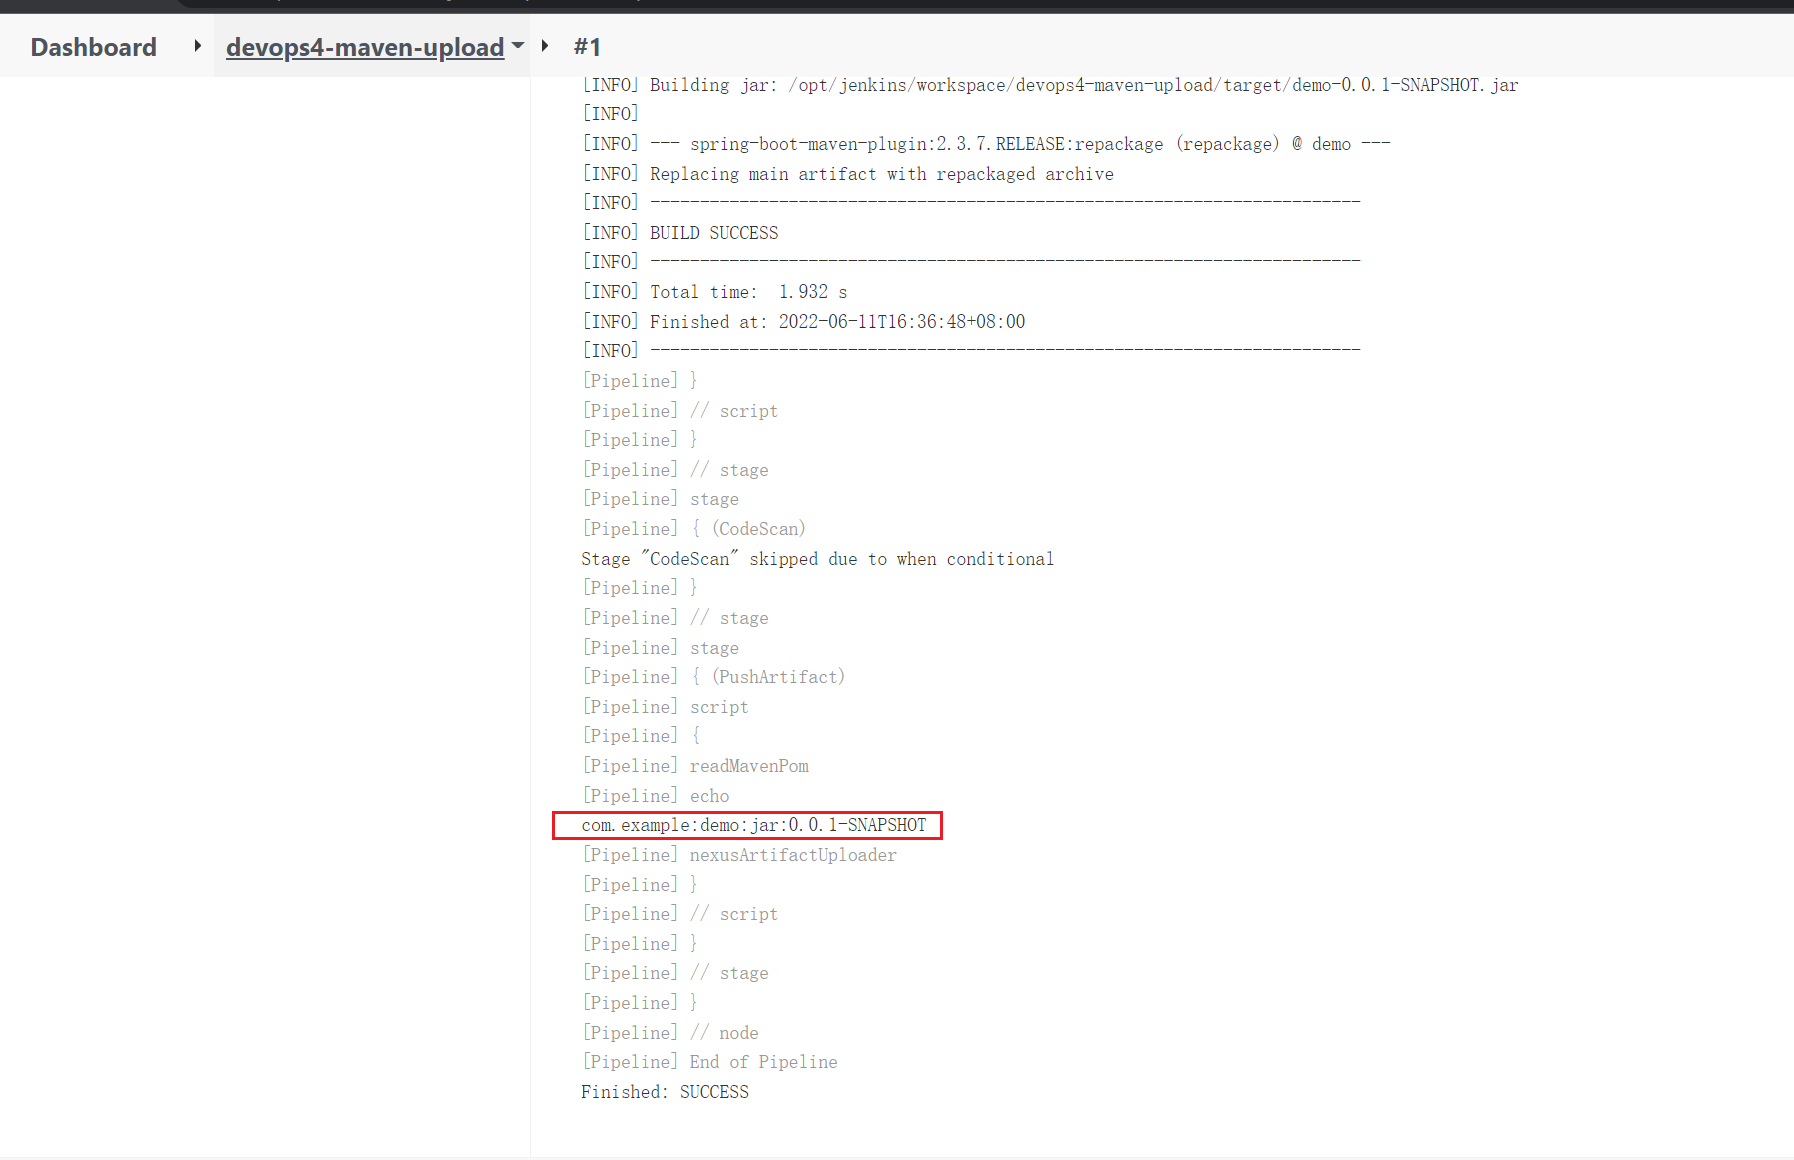
我们看下pom.xml里的内容:
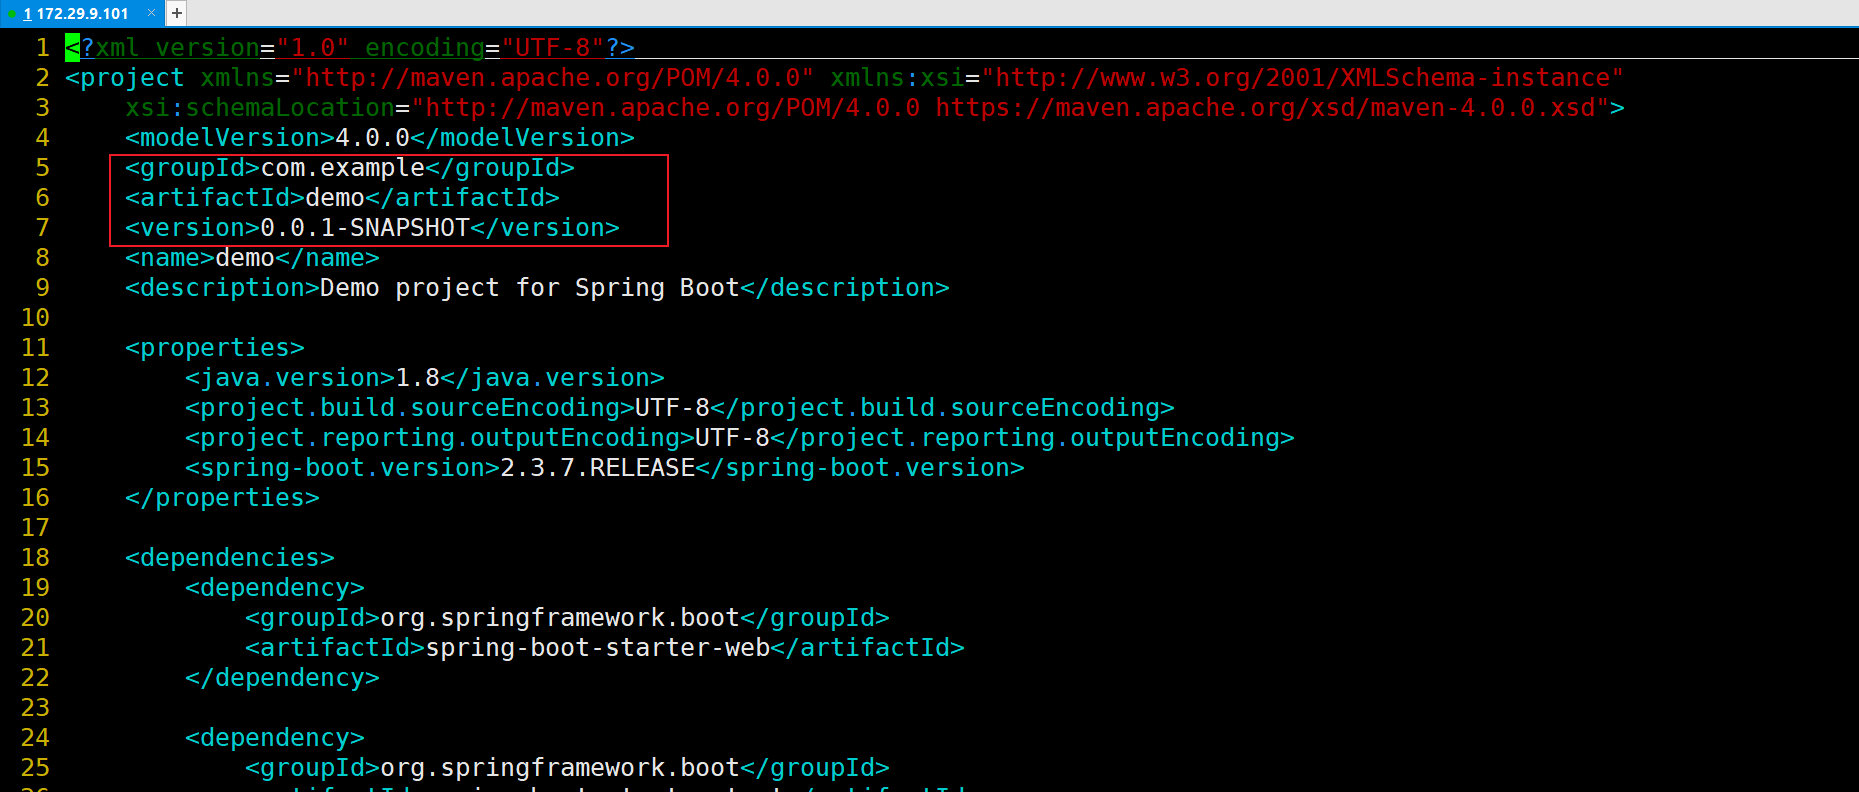
- 我们再来看一下这个pomData的类型是什么?
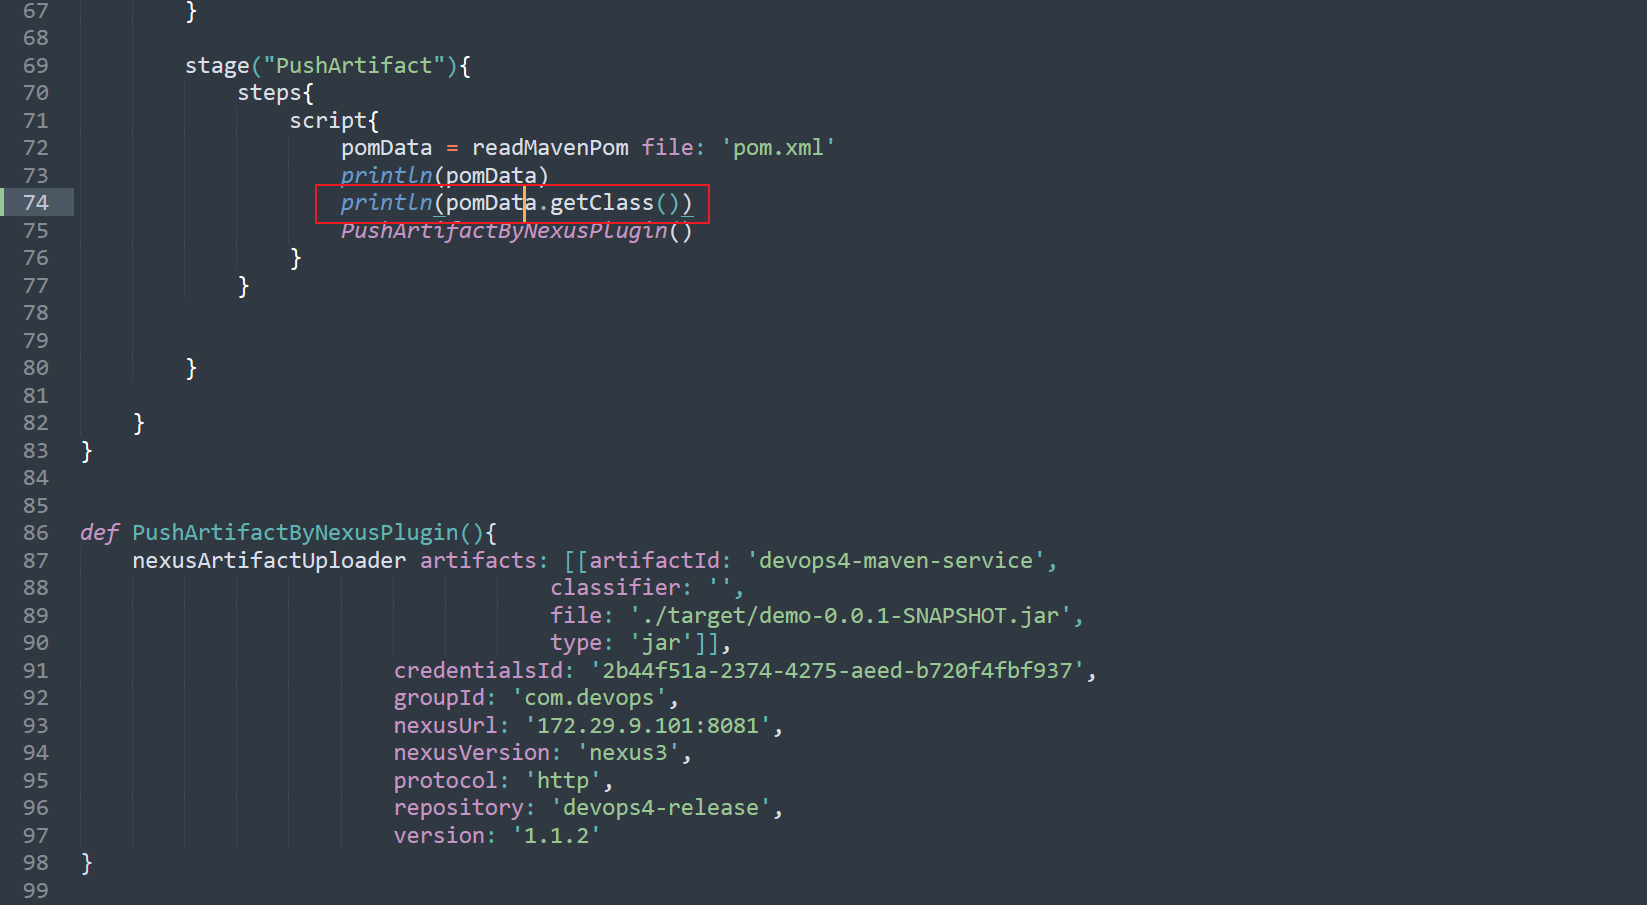
在刚才的回放里跑一下流水线:
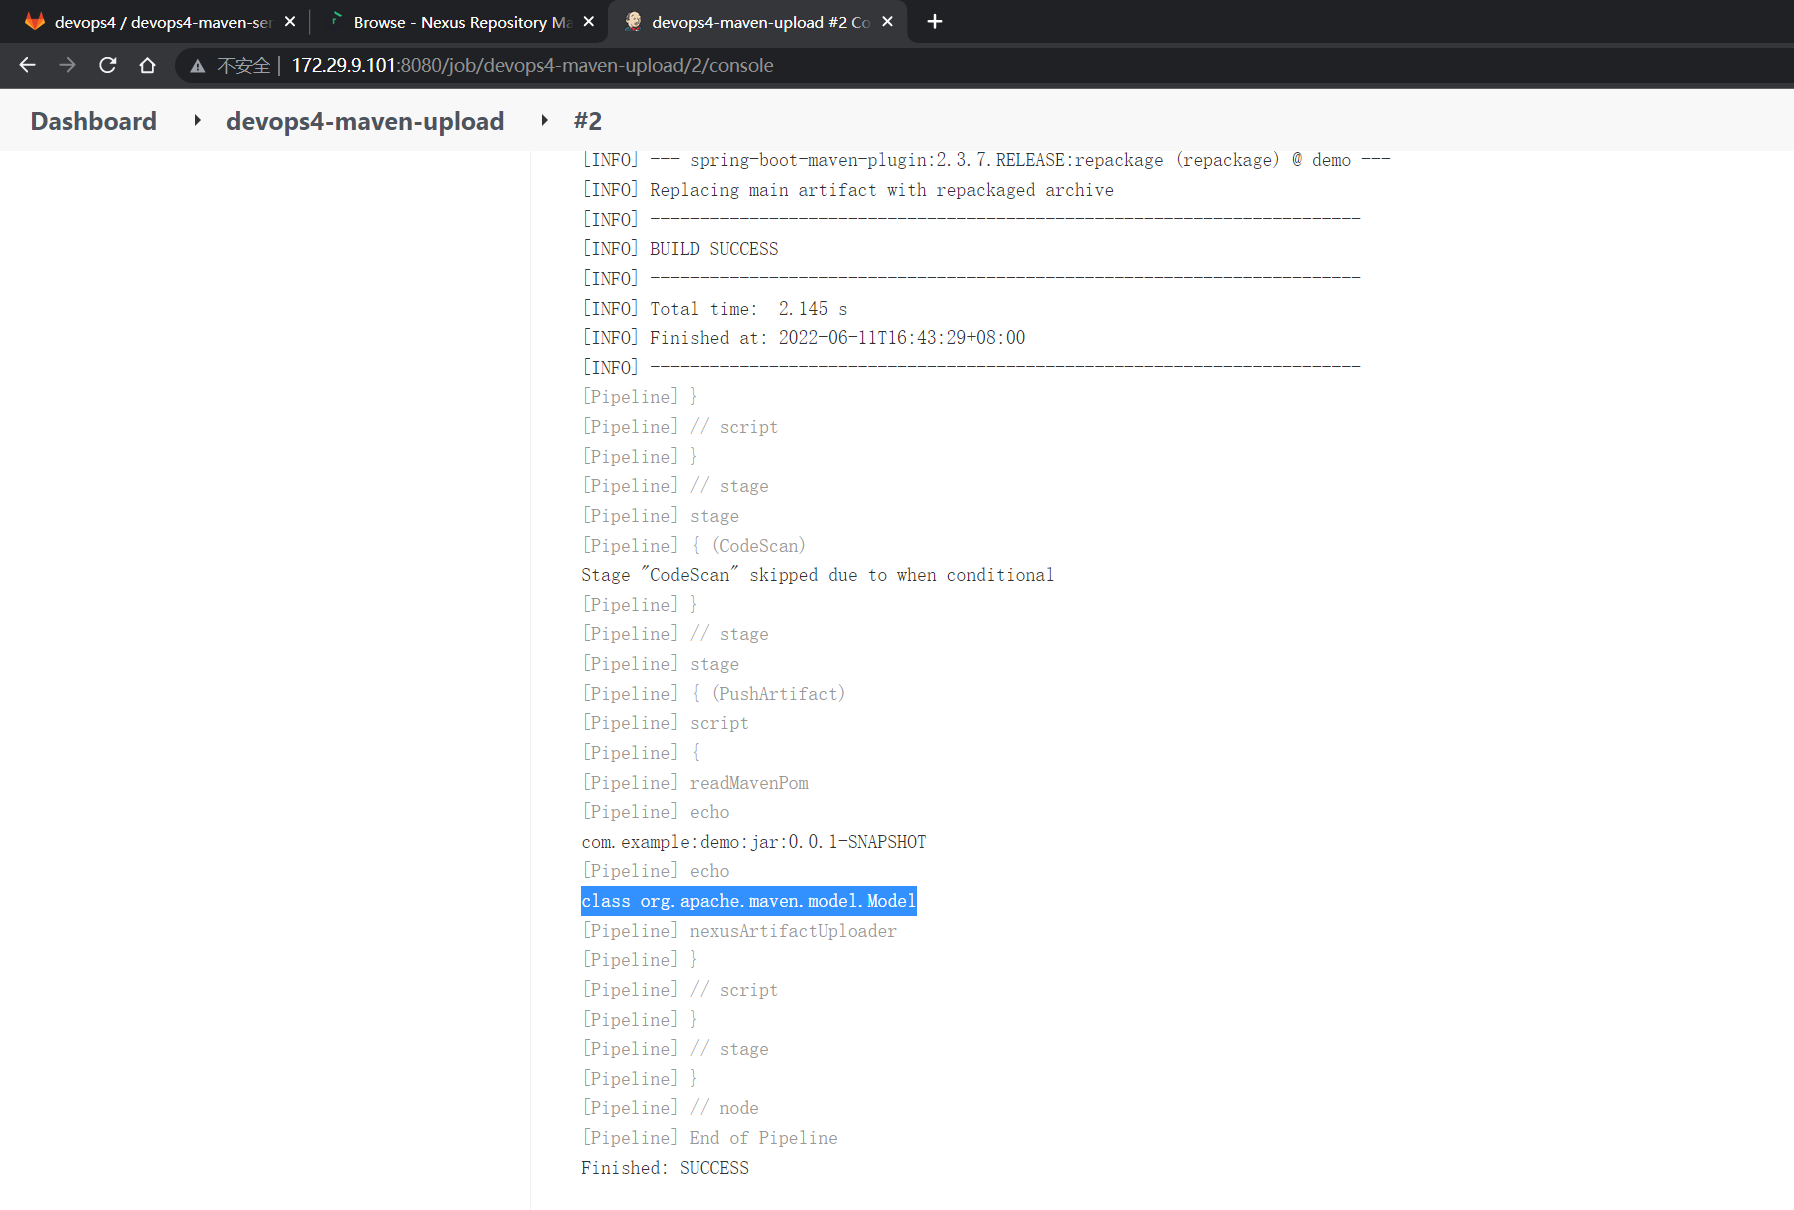
可以看到是一个model类型的数据。
- 那可能是要使用如下方法来改下代码了:
我们可以查看下帮助信息:
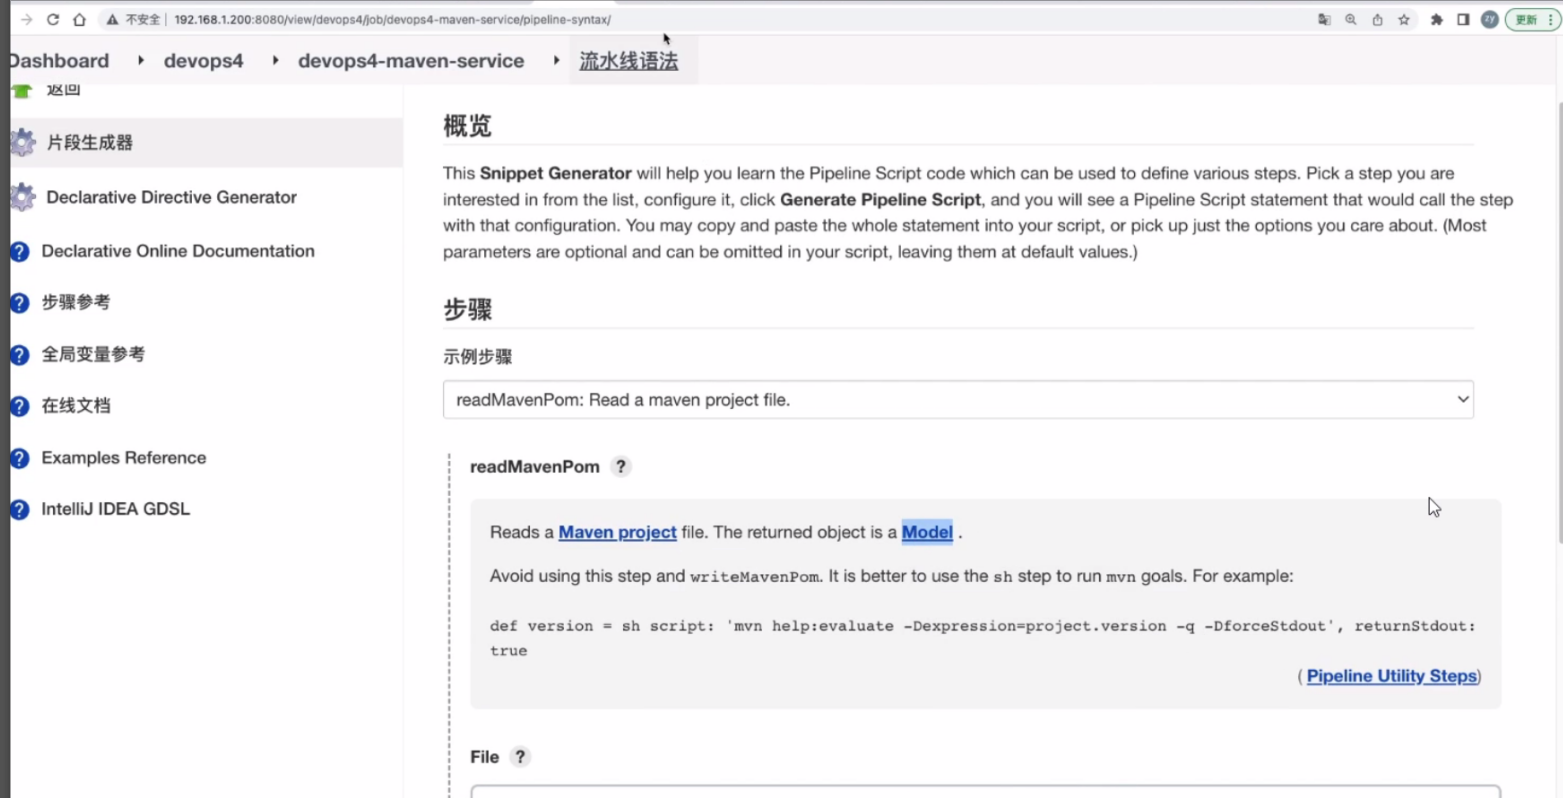
注意下这个type类型:
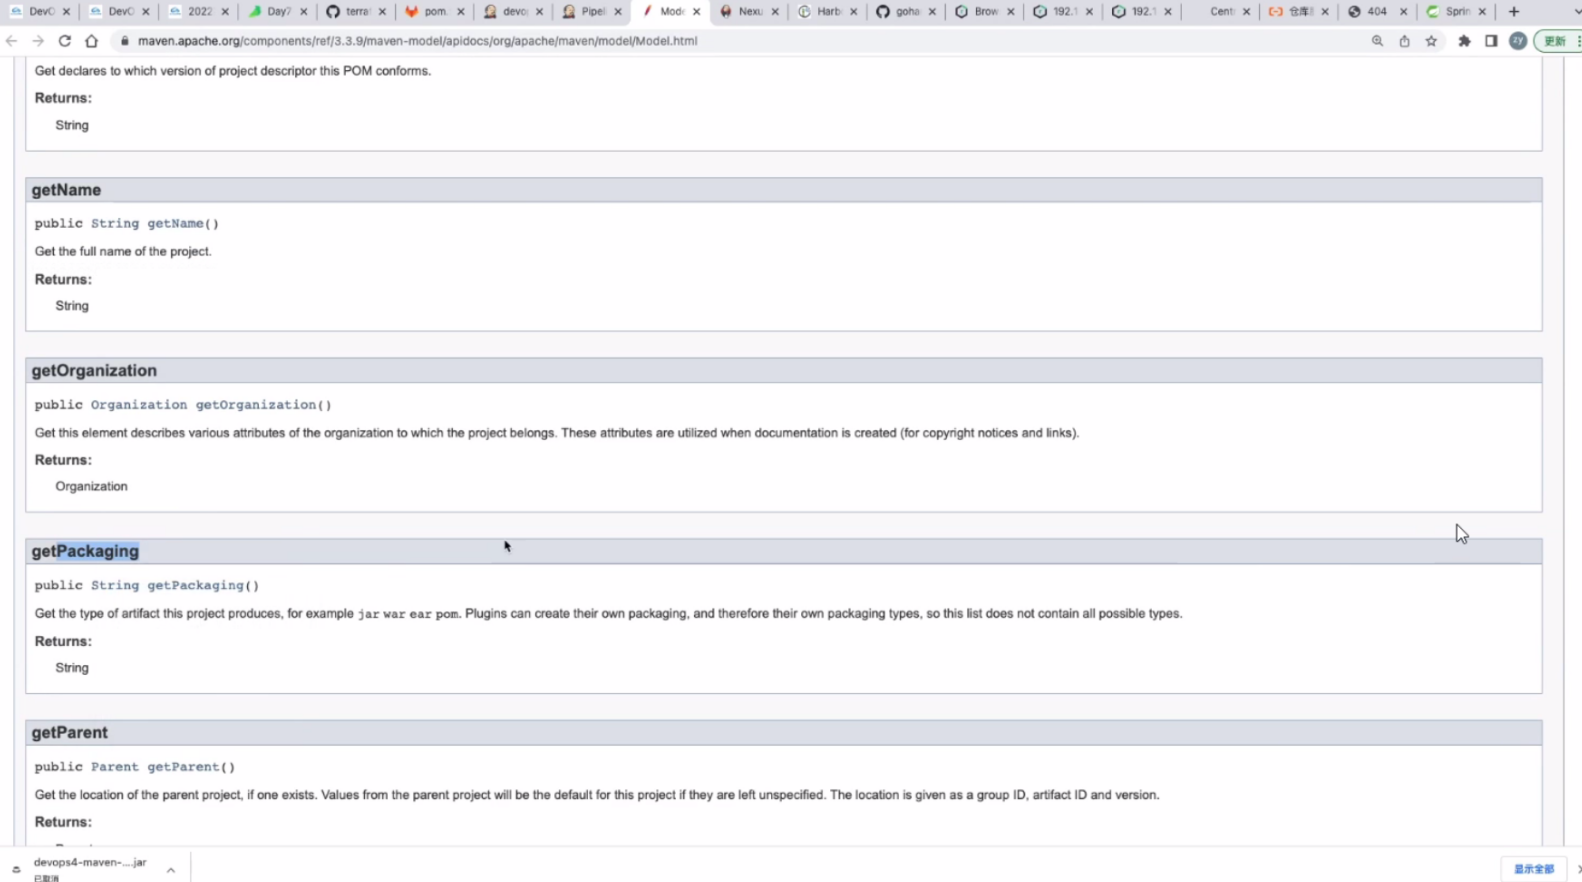
这里改下代码:

@Library("mylib@main") _     //加载共享库
import org.devops.*						// 导入库

def checkout = new Checkout()    //New实例化
def build = new Build()
def unittest = new UnitTest()
def sonar = new Sonar()
def gitcli = new GitLab()

//env.buildType = "${JOB_NAME}".split("-")[1]

//流水线
pipeline {
    agent { label "build" }

    options {
        skipDefaultCheckout true
    }

    stages{
        stage("Checkout"){
            steps{
                script {
                    println("GetCode")
                    checkout.GetCode("${env.srcUrl}", "${env.branchName}")
                }
            }
        }

        stage("Build"){
            steps{
                script{
                    println("Build")
                    //build.CodeBuild("${env.buildType}")
                    sh "${env.buildShell}"

                }
            }
        }

        /*stage("UnitTest"){
            steps{
                script{
                    unittest.CodeTest("${env.buildType}")
                }
            }
        }*/

        stage("CodeScan"){
            when {
                environment name: 'skipSonar', value: 'false'
            }
            steps{
                script{
                    profileName = "${JOB_NAME}".split("-")[0]
                    sonar.Init("${JOB_NAME}", "java", profileName)


                    //commit-status
                    commitID = gitcli.GetCommitID()
                    groupName =profileName
                    projectID = gitcli.GetProjectID("${JOB_NAME}", groupName)
                    sonar.CodeScan("${env.branchName}", commitID, projectID)
                    }

                }
        }

        stage("PushArtifact"){
        	steps{
        		script{
                    pomData = readMavenPom file: 'pom.xml'
                    // println(pomData)
                    // println(pomData.getClass())
                    buName = "${JOB_NAME}".split("-")[0]
                    repoName = "${buName}-release"
                    file = "target/${pomData.artifactId}-${pomData.version}.${pomData.packaging}"
        			PushArtifactByNexusPlugin(pomData.artifactId, file, pomData.packaging ,pomData.groupId, repoName, pomData.version)
        		}
        	}


        }

    }
}


def PushArtifactByNexusPlugin(artifactId, file, type, groupId, repoName, version){
    println(artifactId)
    println("${file}, ${type}, ${groupId}, ${repoName}, ${version}")
    nexusArtifactUploader artifacts: [[artifactId: artifactId,
                                    classifier: '',
                                    file: file,
                                    type: type]],
                        credentialsId: '2b44f51a-2374-4275-aeed-b720f4fbf937',
                        groupId: groupId,
                        nexusUrl: '172.29.9.101:8081',
                        nexusVersion: 'nexus3',
                        protocol: 'http',
                        repository: repoName,
                        version: version
}
再次跑下流水线,观察效果:
可以看到流实线是跑成功了,但是仓库里是没东西的:……
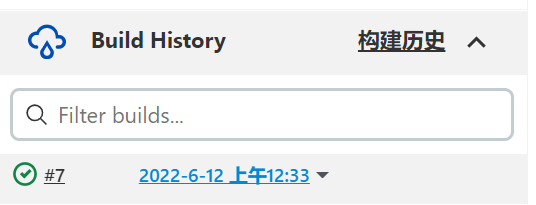
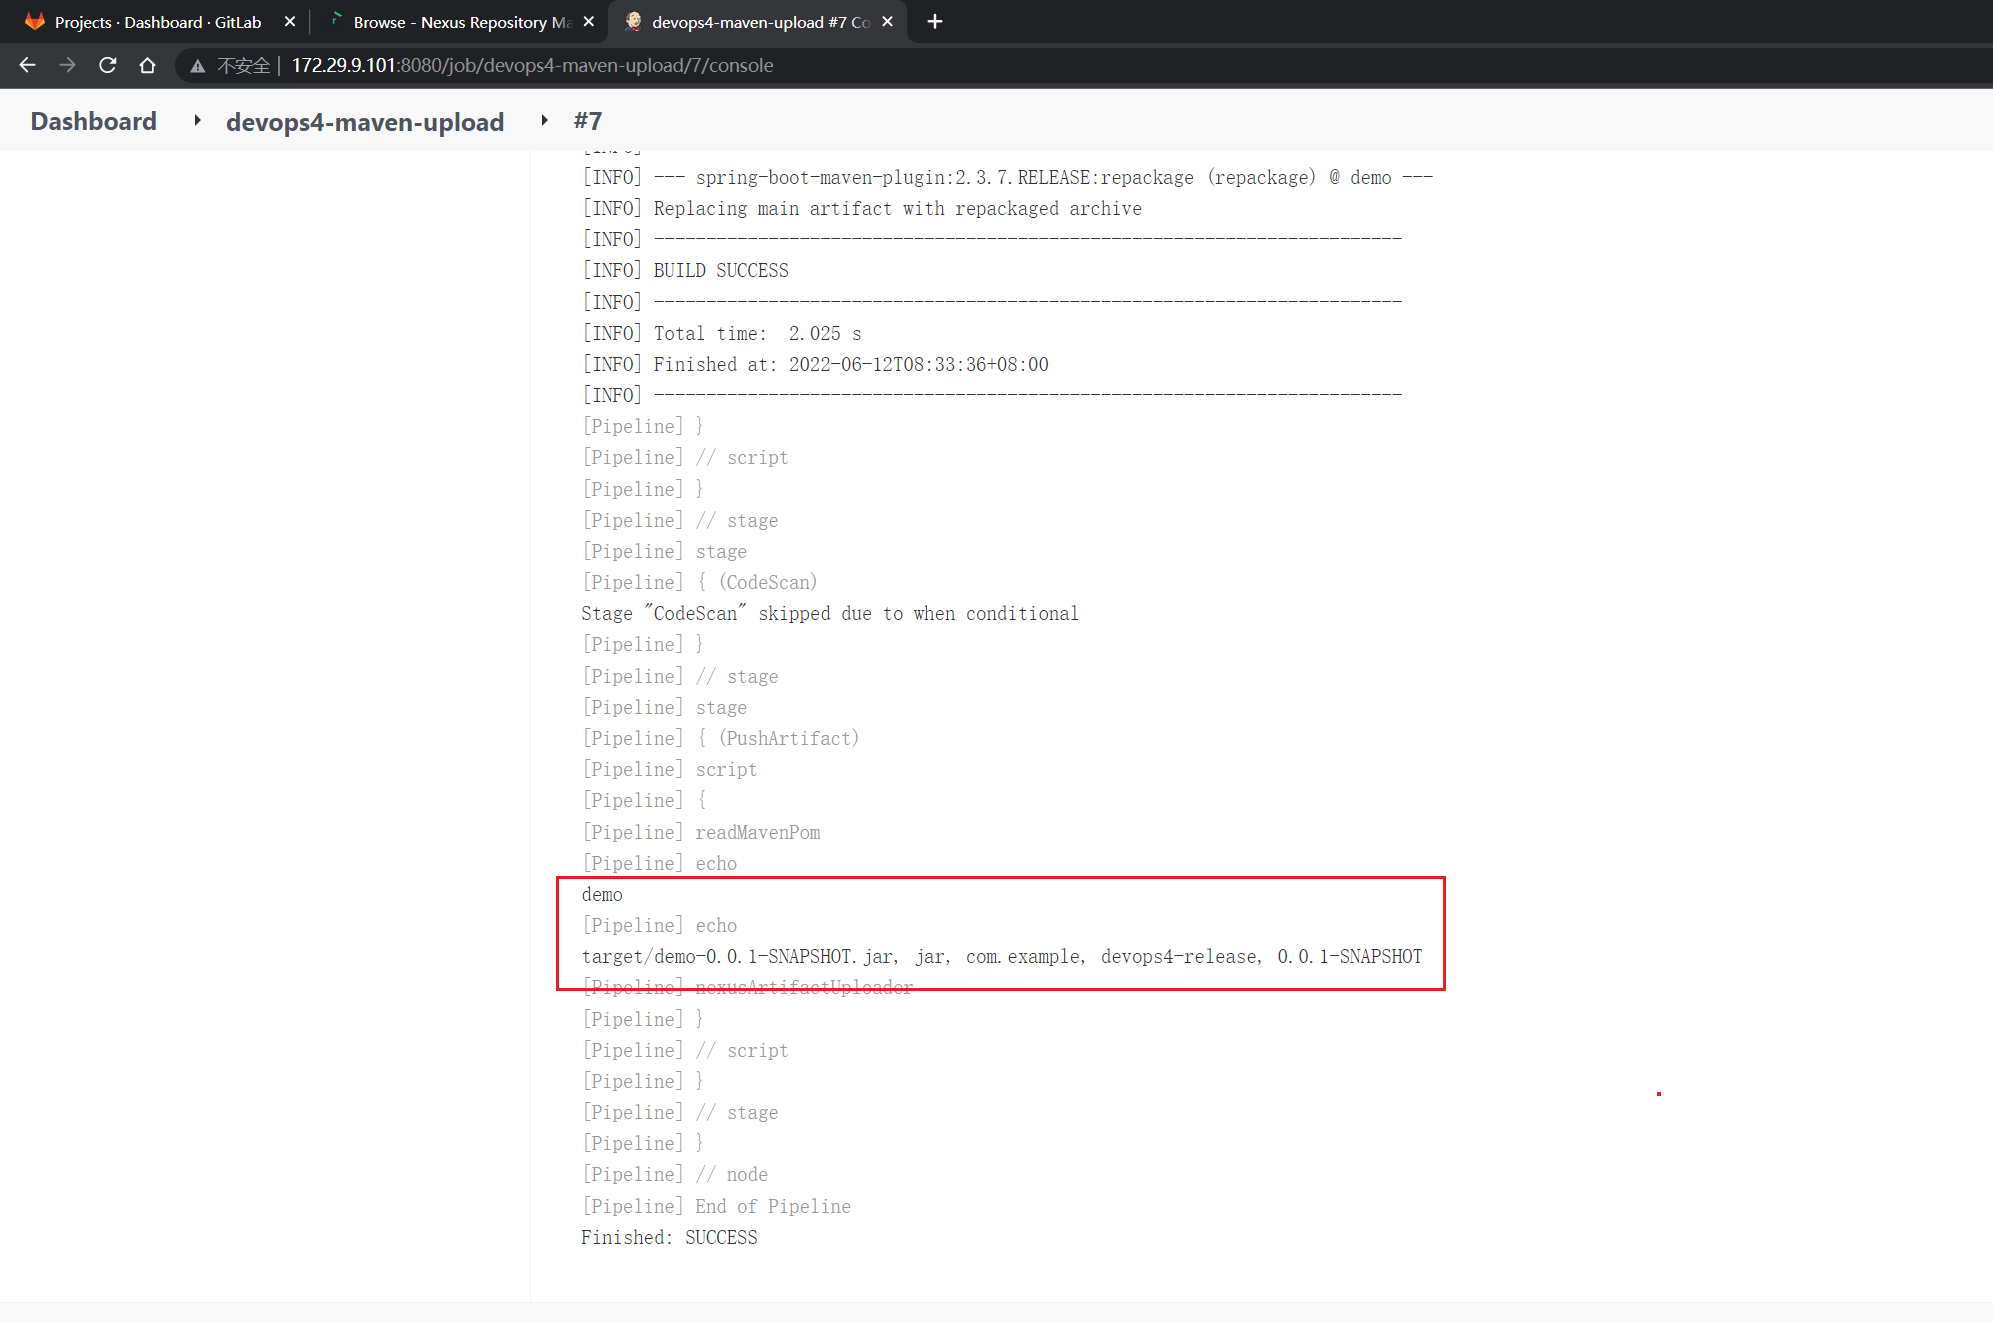
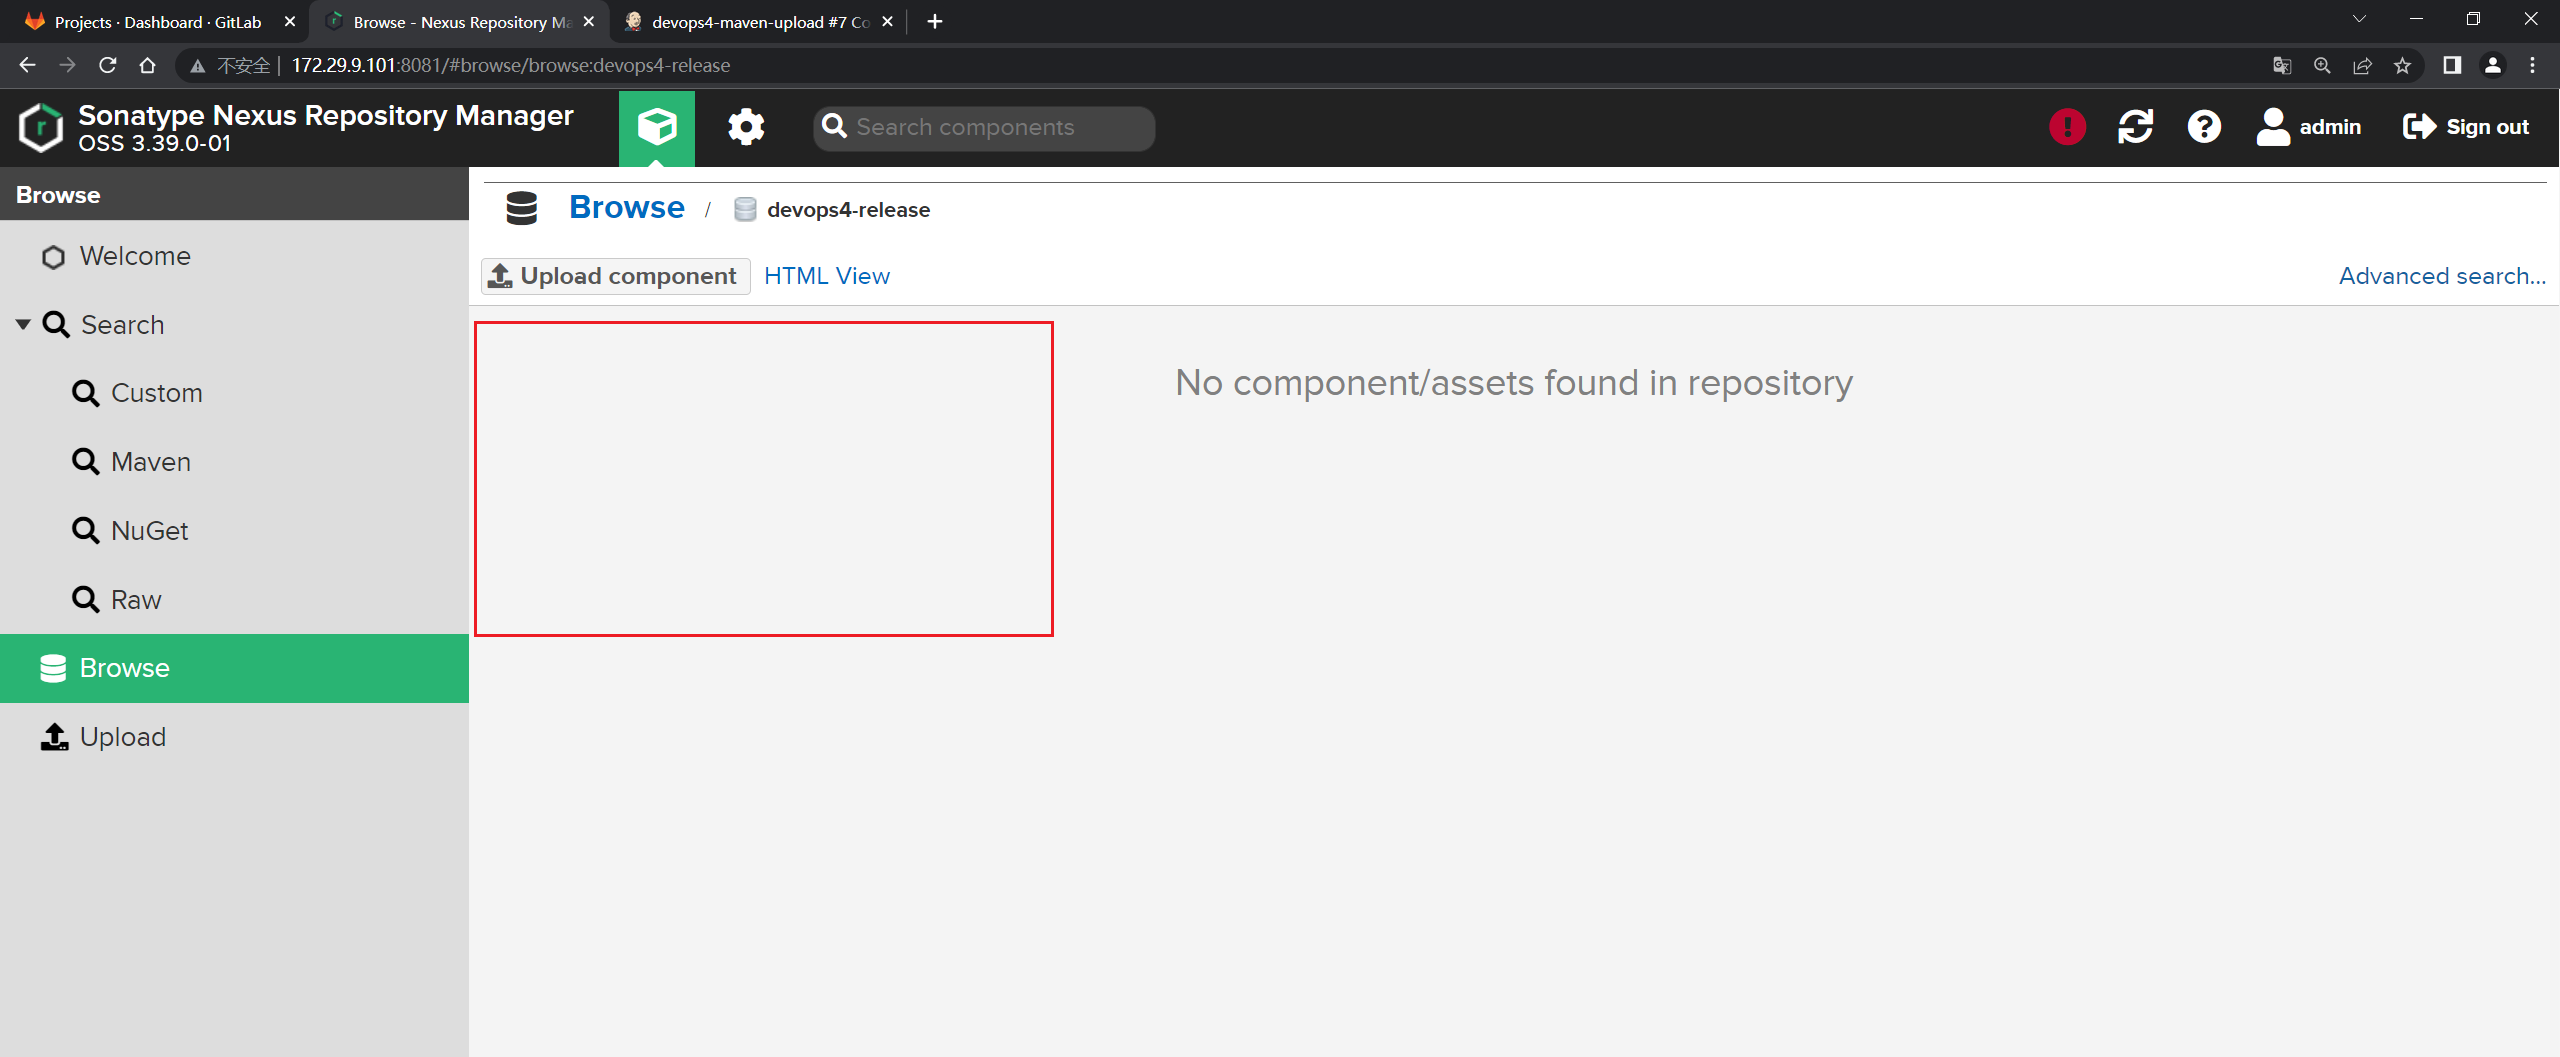
- 分析下失败原因:
应该是这里的版本存在问题:
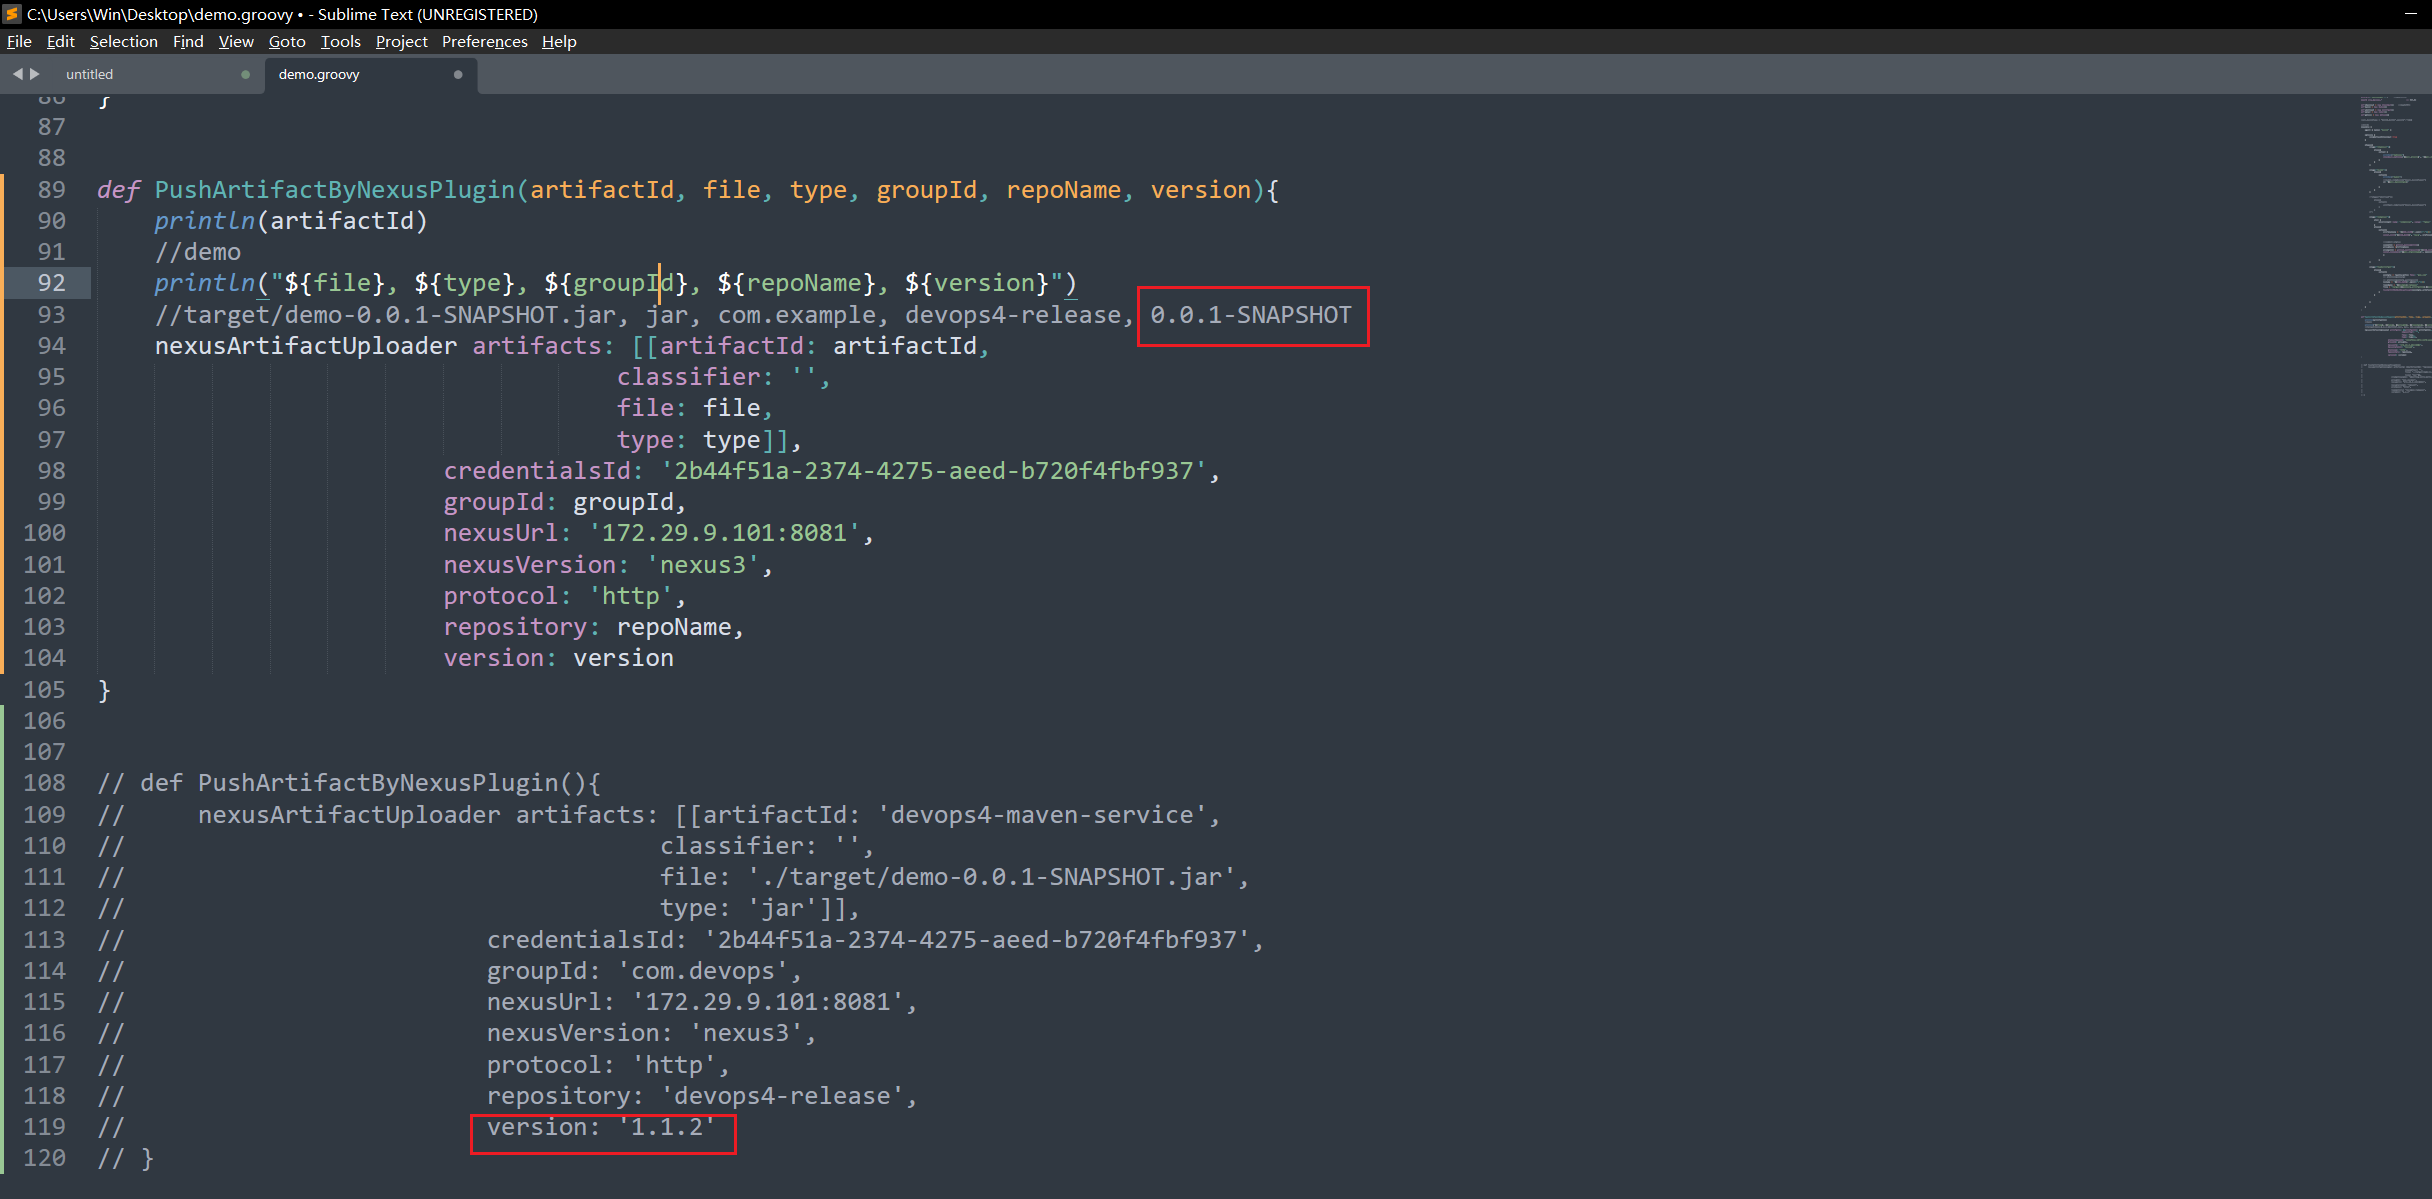
此时,先删除nexus上的devops4-nexus和devops4-release2个仓库里的所有文件:


- 我们将这里的repoName改为
snapshot类型的:

@Library("mylib@main") _     //加载共享库
import org.devops.*						// 导入库

def checkout = new Checkout()    //New实例化
def build = new Build()
def unittest = new UnitTest()
def sonar = new Sonar()
def gitcli = new GitLab()

//env.buildType = "${JOB_NAME}".split("-")[1]

//流水线
pipeline {
    agent { label "build" }

    options {
        skipDefaultCheckout true
    }

    stages{
        stage("Checkout"){
            steps{
                script {
                    println("GetCode")
                    checkout.GetCode("${env.srcUrl}", "${env.branchName}")
                }
            }
        }

        stage("Build"){
            steps{
                script{
                    println("Build")
                    //build.CodeBuild("${env.buildType}")
                    sh "${env.buildShell}"

                }
            }
        }

        /*stage("UnitTest"){
            steps{
                script{
                    unittest.CodeTest("${env.buildType}")
                }
            }
        }*/

        stage("CodeScan"){
            when {
                environment name: 'skipSonar', value: 'false'
            }
            steps{
                script{
                    profileName = "${JOB_NAME}".split("-")[0]
                    sonar.Init("${JOB_NAME}", "java", profileName)


                    //commit-status
                    commitID = gitcli.GetCommitID()
                    groupName =profileName
                    projectID = gitcli.GetProjectID("${JOB_NAME}", groupName)
                    sonar.CodeScan("${env.branchName}", commitID, projectID)
                    }

                }
        }

        stage("PushArtifact"){
        	steps{
        		script{
                    pomData = readMavenPom file: 'pom.xml'
                    // println(pomData)
                    // println(pomData.getClass())
                    buName = "${JOB_NAME}".split("-")[0]
                    repoName = "${buName}-snapshot"
                    file = "target/${pomData.artifactId}-${pomData.version}.${pomData.packaging}"
        			PushArtifactByNexusPlugin(pomData.artifactId, file, pomData.packaging ,pomData.groupId, repoName, pomData.version)
        		}
        	}


        }

    }
}


def PushArtifactByNexusPlugin(artifactId, file, type, groupId, repoName, version){
    println(artifactId)
    //demo
    println("${file}, ${type}, ${groupId}, ${repoName}, ${version}")
    //target/demo-0.0.1-SNAPSHOT.jar, jar, com.example, devops4-release, 0.0.1-SNAPSHOT
    nexusArtifactUploader artifacts: [[artifactId: artifactId,
                                    classifier: '',
                                    file: file,
                                    type: type]],
                        credentialsId: '2b44f51a-2374-4275-aeed-b720f4fbf937',
                        groupId: groupId,
                        nexusUrl: '172.29.9.101:8081',
                        nexusVersion: 'nexus3',
                        protocol: 'http',
                        repository: repoName,
                        version: version
}


// def PushArtifactByNexusPlugin(){
//     nexusArtifactUploader artifacts: [[artifactId: 'devops4-maven-service',
//                                     classifier: '',
//                                     file: './target/demo-0.0.1-SNAPSHOT.jar',
//                                     type: 'jar']],
//                         credentialsId: '2b44f51a-2374-4275-aeed-b720f4fbf937',
//                         groupId: 'com.devops',
//                         nexusUrl: '172.29.9.101:8081',
//                         nexusVersion: 'nexus3',
//                         protocol: 'http',
//                         repository: 'devops4-release',
//                         version: '1.1.2'
// }
再次编译:
可以看到仓库里已经有东西了:
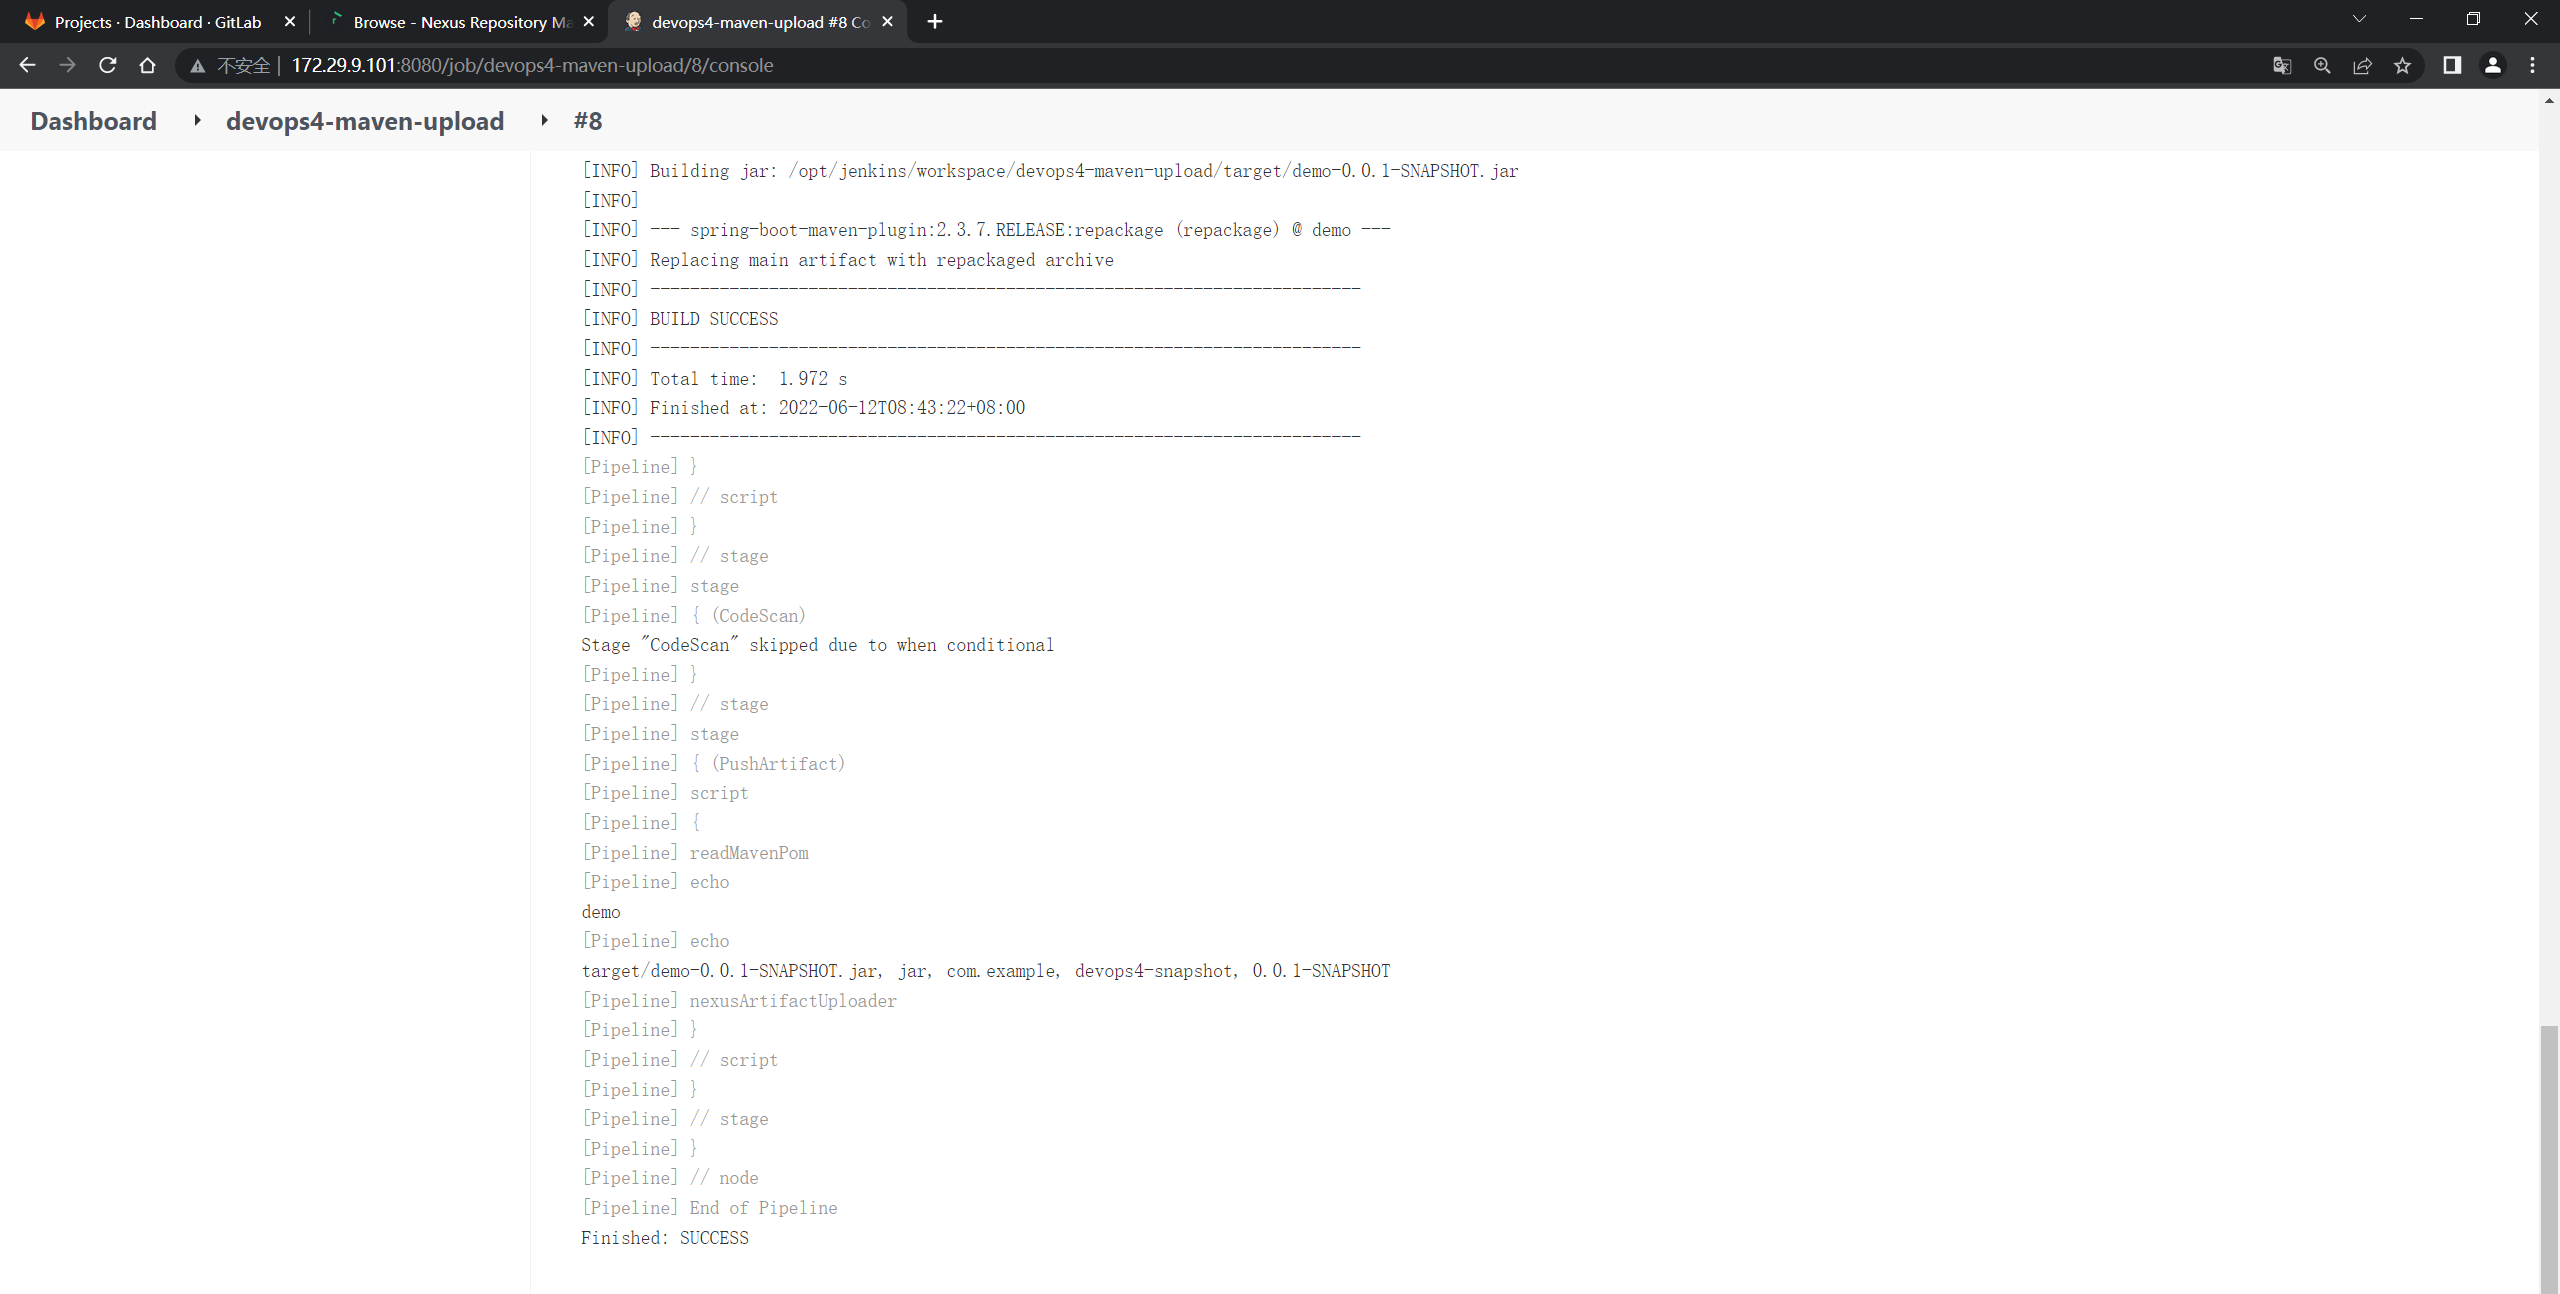
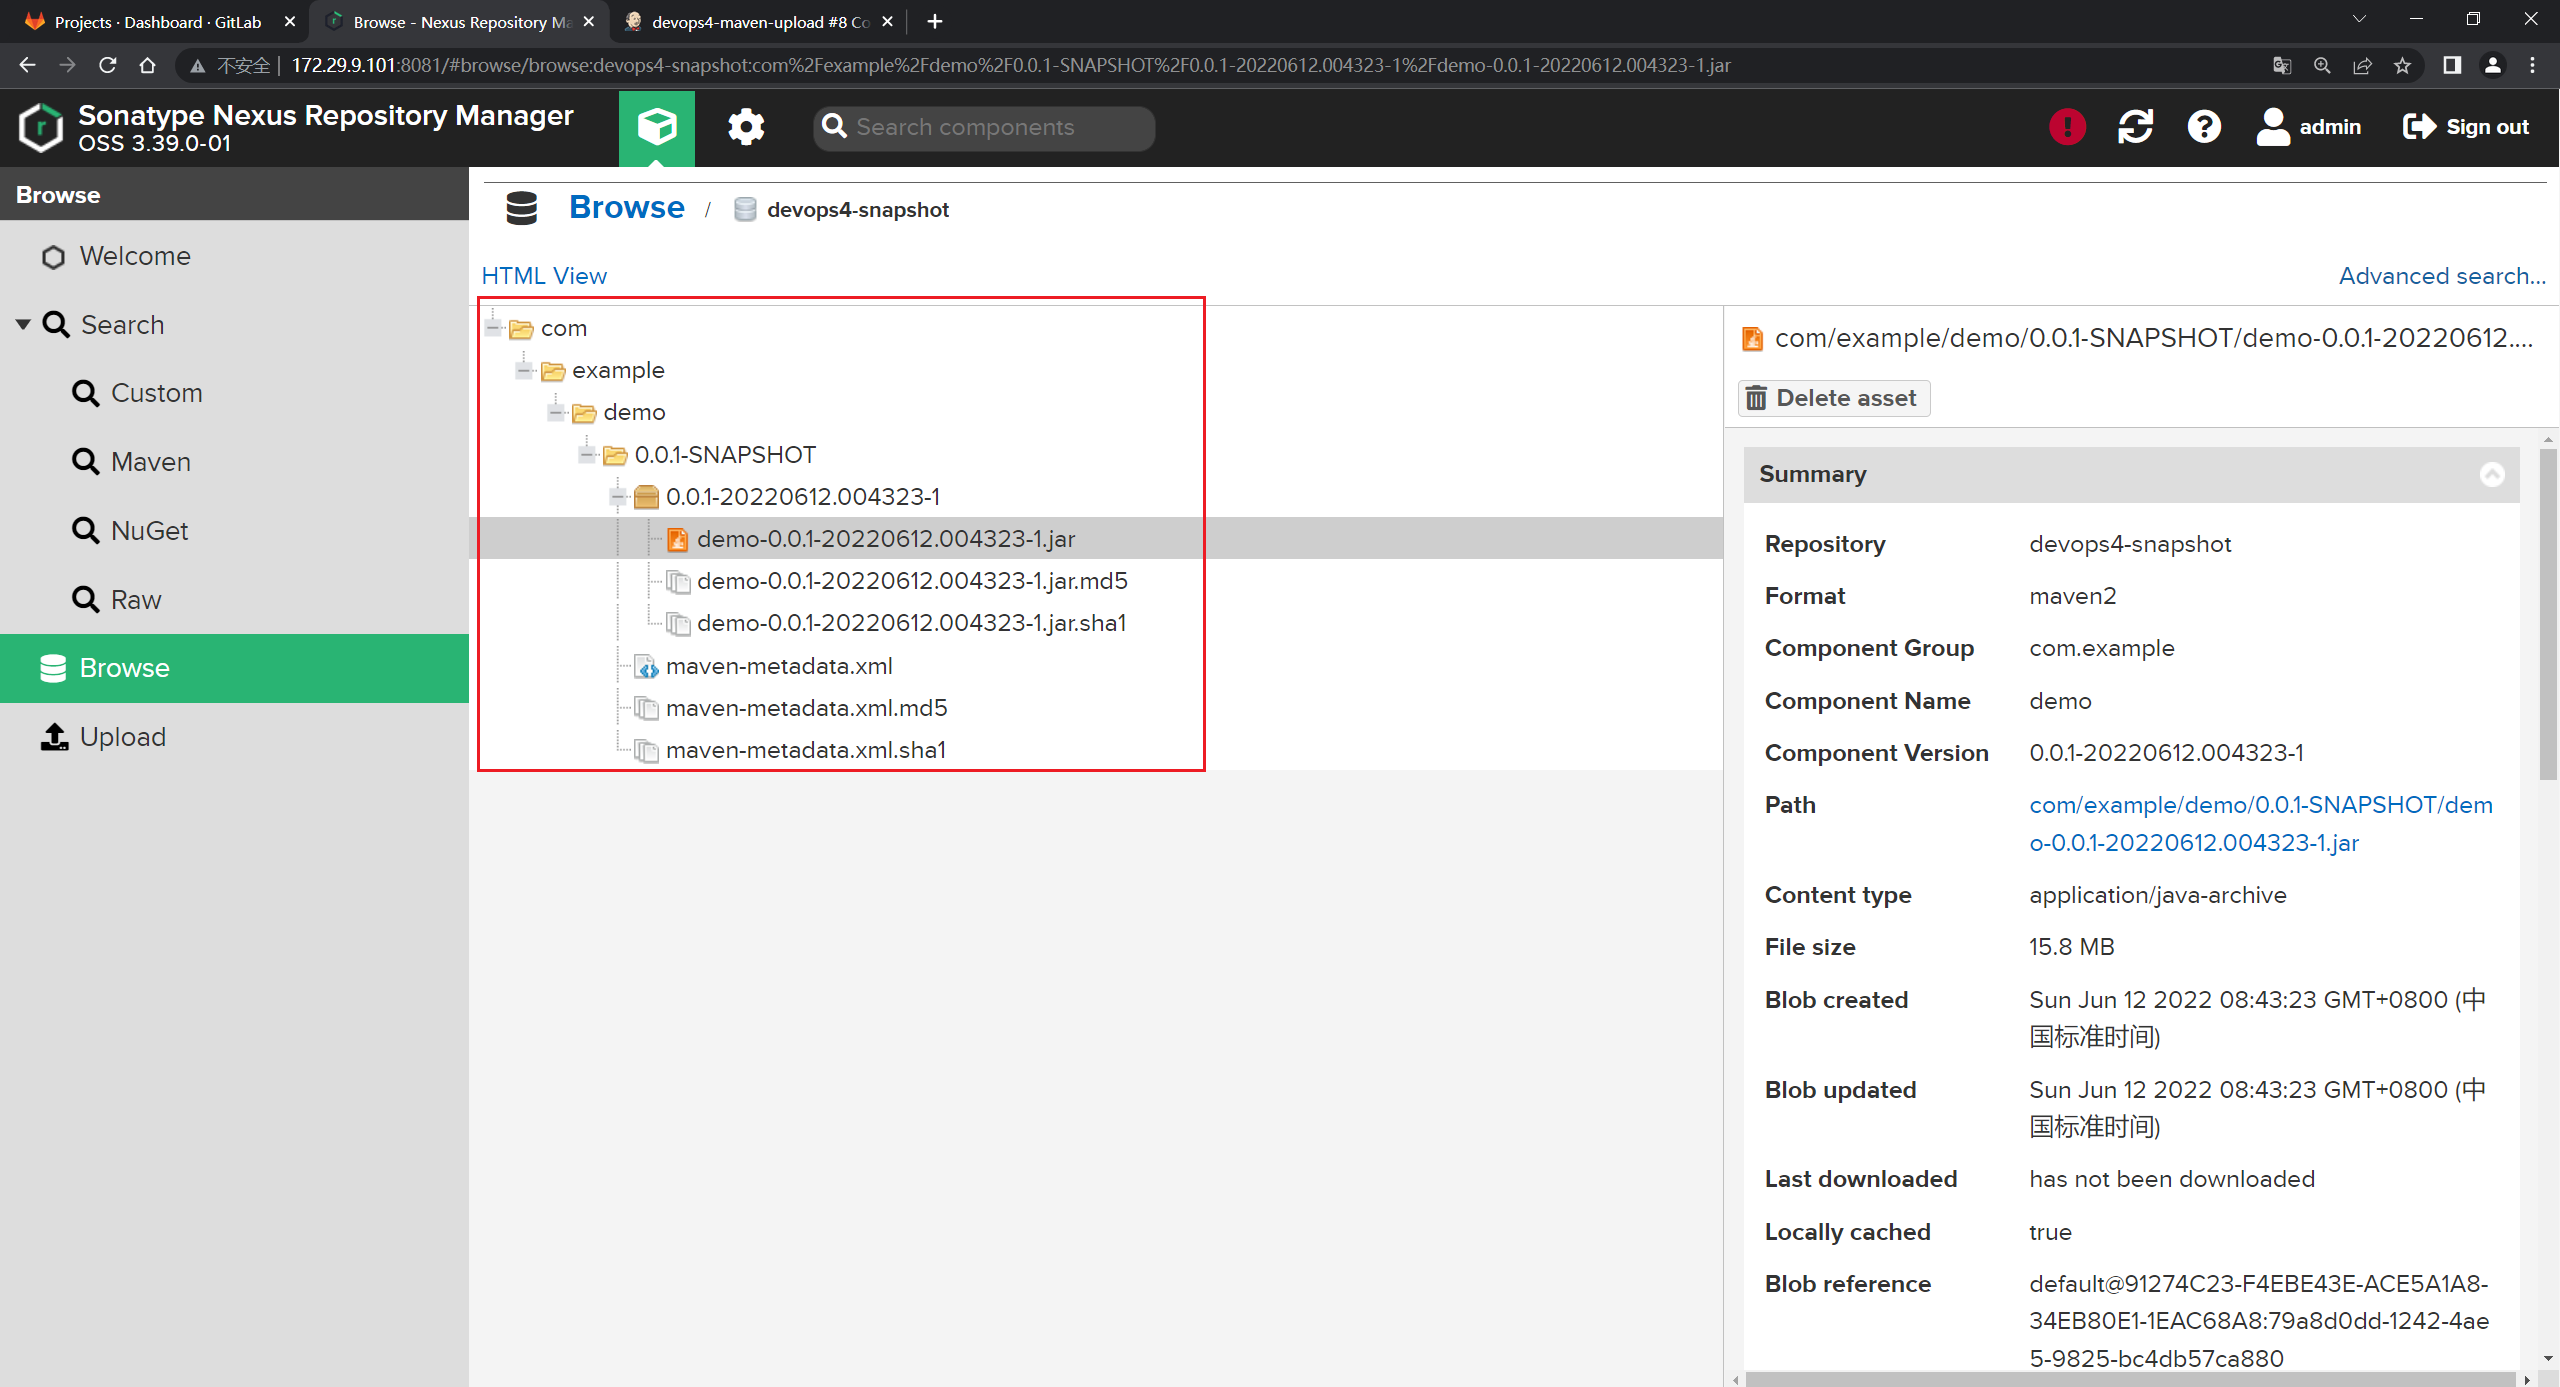
⚠️ 注意:上面问题的原因是:前面这个问题应该是snapshot和release冲突了;
这个是报错了也不会显示,成功了也不会显示……
因此,最后完整代码如下:
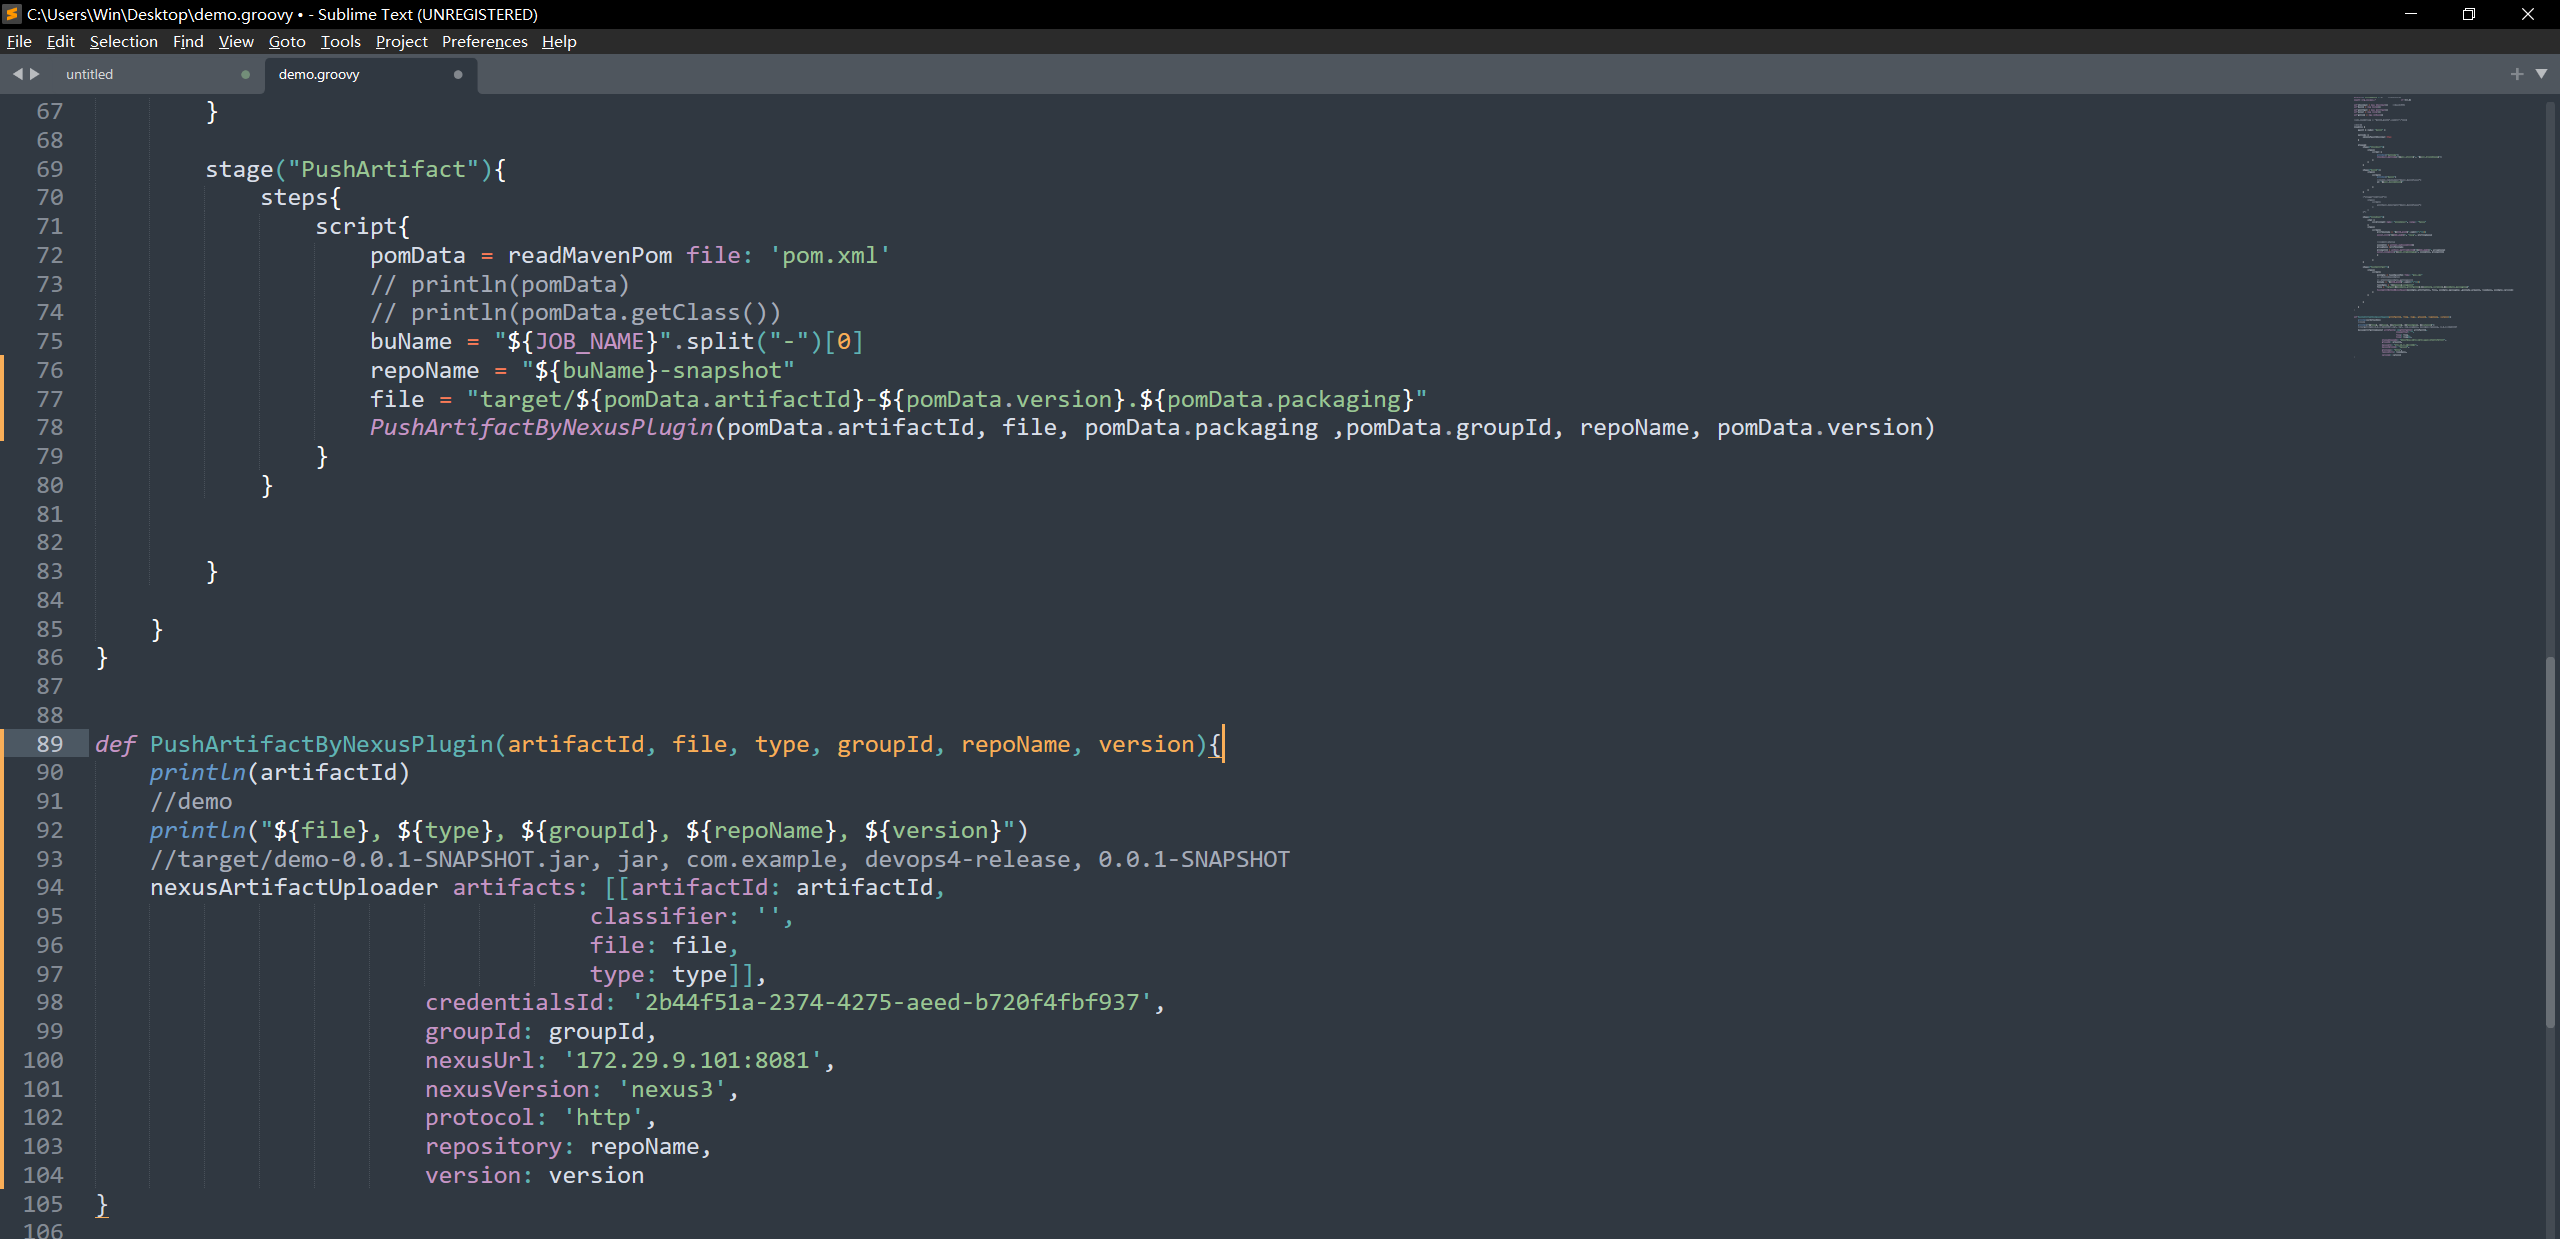
@Library("mylib@main") _     //加载共享库
import org.devops.*						// 导入库

def checkout = new Checkout()    //New实例化
def build = new Build()
def unittest = new UnitTest()
def sonar = new Sonar()
def gitcli = new GitLab()

//env.buildType = "${JOB_NAME}".split("-")[1]

//流水线
pipeline {
    agent { label "build" }

    options {
        skipDefaultCheckout true
    }

    stages{
        stage("Checkout"){
            steps{
                script {
                    println("GetCode")
                    checkout.GetCode("${env.srcUrl}", "${env.branchName}")
                }
            }
        }

        stage("Build"){
            steps{
                script{
                    println("Build")
                    //build.CodeBuild("${env.buildType}")
                    sh "${env.buildShell}"

                }
            }
        }

        /*stage("UnitTest"){
            steps{
                script{
                    unittest.CodeTest("${env.buildType}")
                }
            }
        }*/

        stage("CodeScan"){
            when {
                environment name: 'skipSonar', value: 'false'
            }
            steps{
                script{
                    profileName = "${JOB_NAME}".split("-")[0]
                    sonar.Init("${JOB_NAME}", "java", profileName)


                    //commit-status
                    commitID = gitcli.GetCommitID()
                    groupName =profileName
                    projectID = gitcli.GetProjectID("${JOB_NAME}", groupName)
                    sonar.CodeScan("${env.branchName}", commitID, projectID)
                    }

                }
        }

        stage("PushArtifact"){
        	steps{
        		script{
                    pomData = readMavenPom file: 'pom.xml'
                    // println(pomData)
                    // println(pomData.getClass())
                    buName = "${JOB_NAME}".split("-")[0]
                    repoName = "${buName}-snapshot"
                    file = "target/${pomData.artifactId}-${pomData.version}.${pomData.packaging}"
        			PushArtifactByNexusPlugin(pomData.artifactId, file, pomData.packaging ,pomData.groupId, repoName, pomData.version)
        		}
        	}


        }

    }
}


def PushArtifactByNexusPlugin(artifactId, file, type, groupId, repoName, version){
    println(artifactId)
    //demo
    println("${file}, ${type}, ${groupId}, ${repoName}, ${version}")
    //target/demo-0.0.1-SNAPSHOT.jar, jar, com.example, devops4-release, 0.0.1-SNAPSHOT
    nexusArtifactUploader artifacts: [[artifactId: artifactId,
                                    classifier: '',
                                    file: file,
                                    type: type]],
                        credentialsId: '2b44f51a-2374-4275-aeed-b720f4fbf937',
                        groupId: groupId,
                        nexusUrl: '172.29.9.101:8081',
                        nexusVersion: 'nexus3',
                        protocol: 'http',
                        repository: repoName,
                        version: version
}
测试结束。😘
📍 扩展: 可以在Jenkins页面添加参数, 让用户输入后进行发布。
测试过程如下:
- 改写代码:
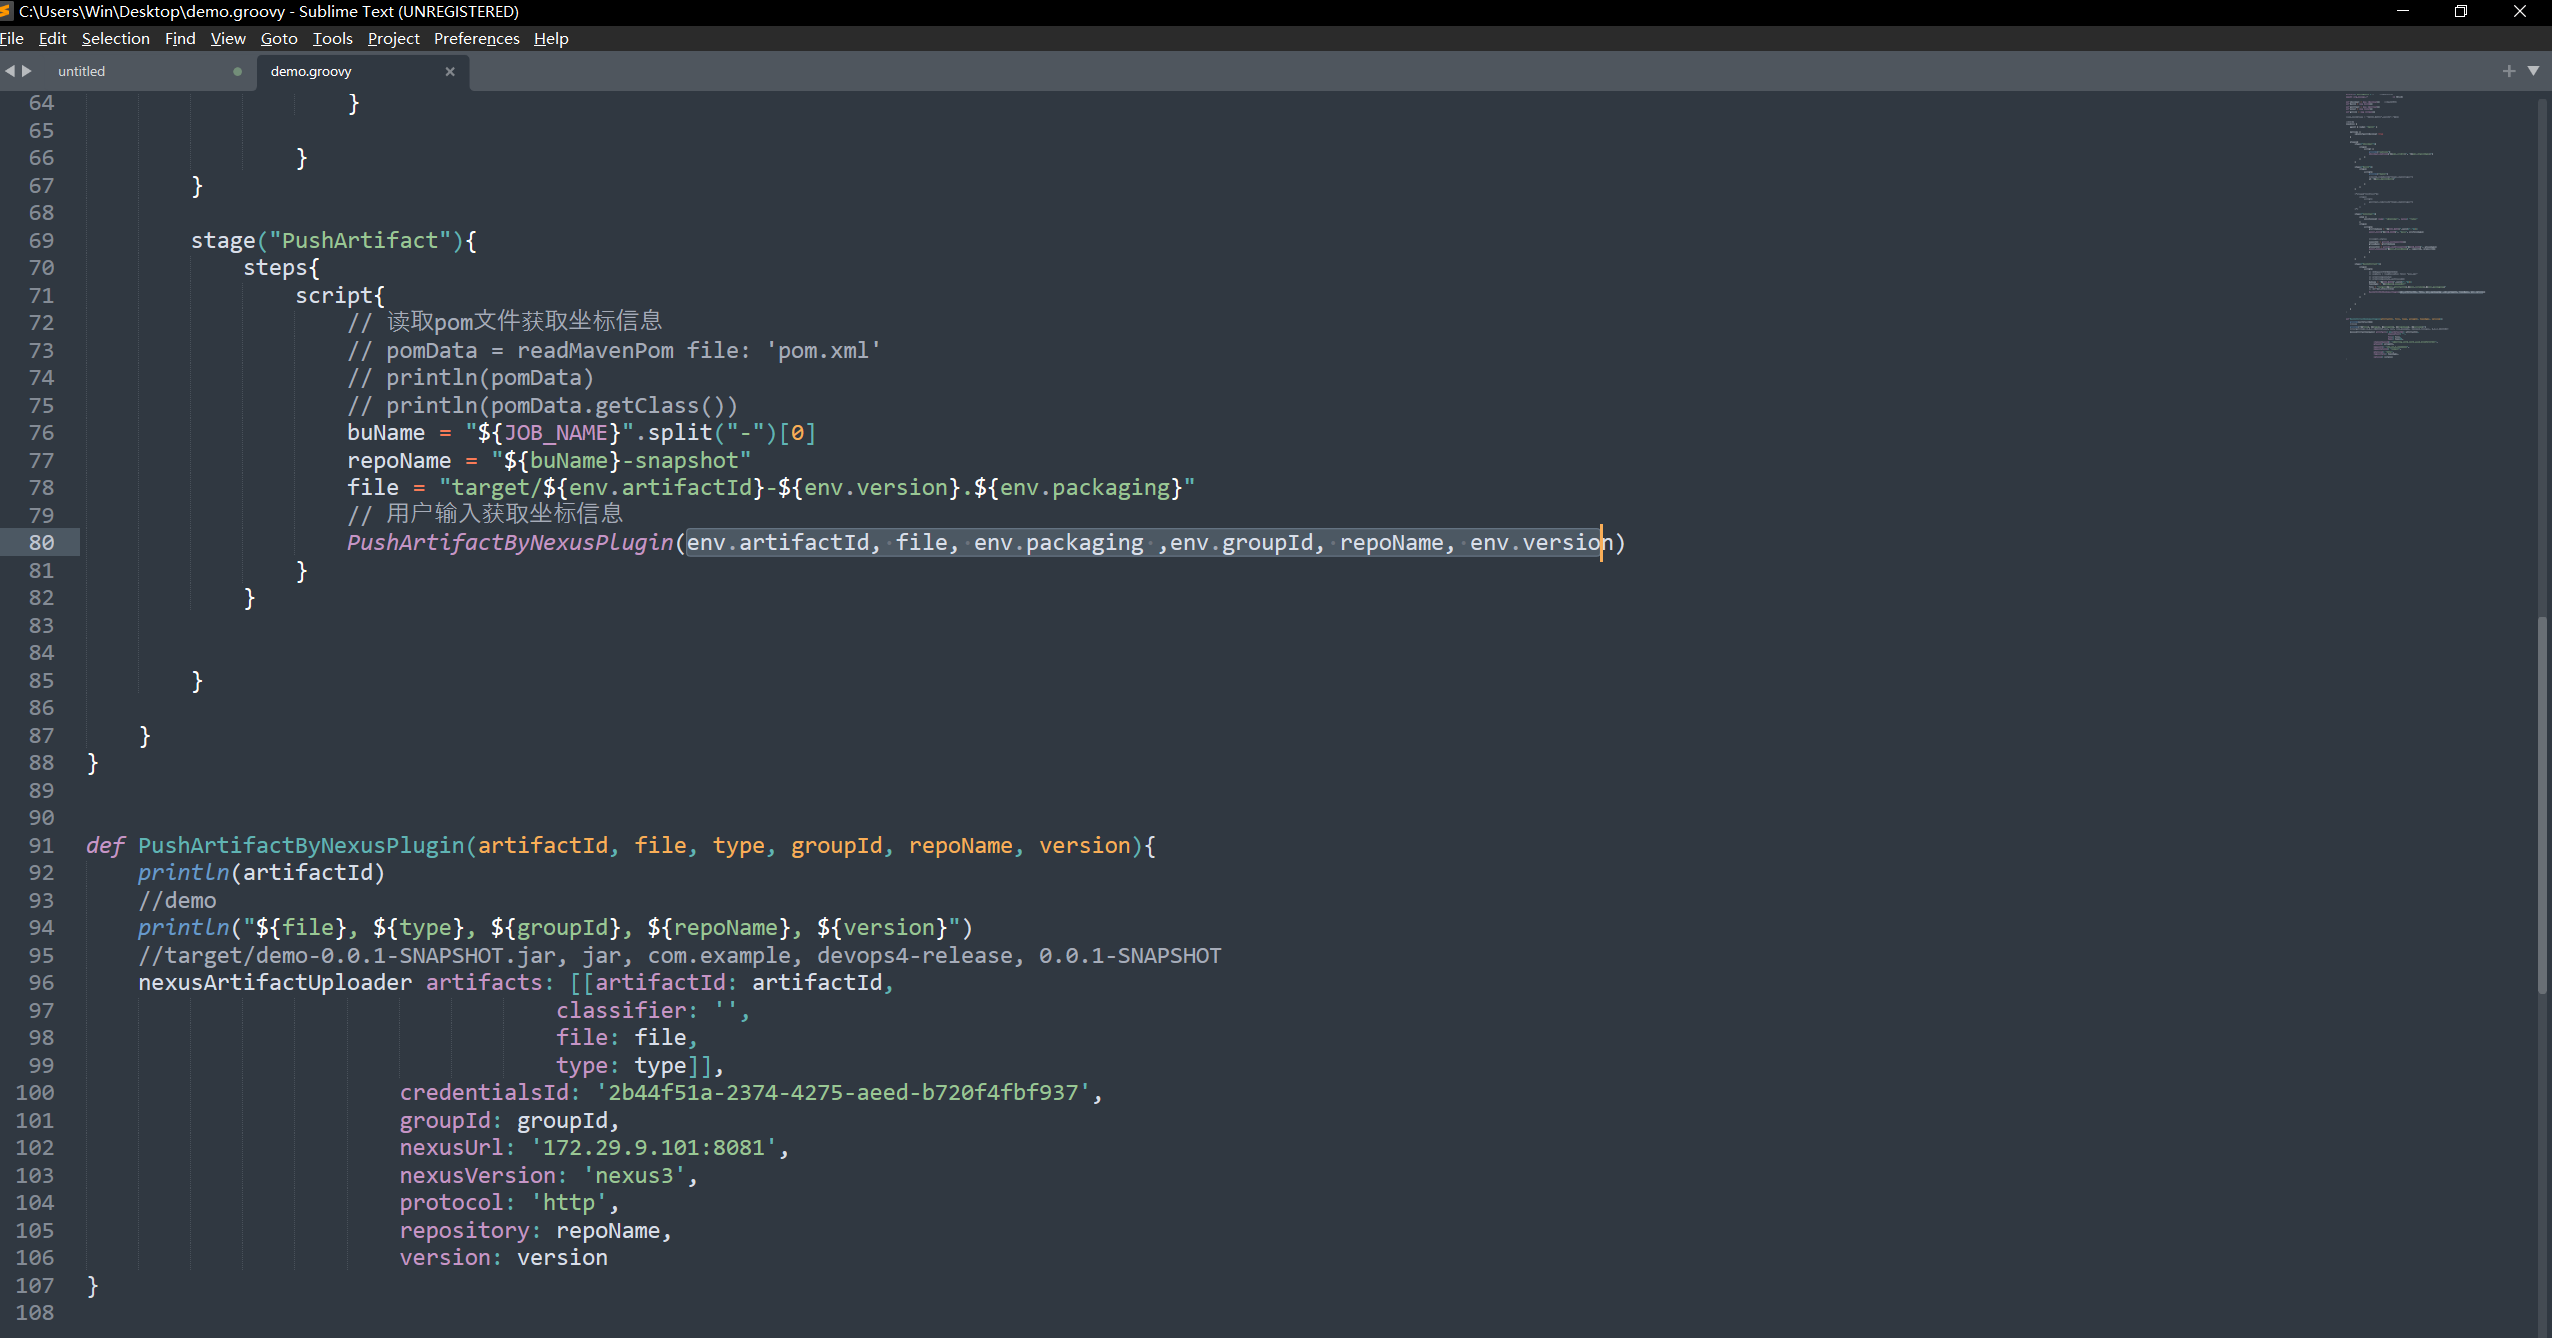
@Library("mylib@main") _     //加载共享库
import org.devops.*						// 导入库

def checkout = new Checkout()    //New实例化
def build = new Build()
def unittest = new UnitTest()
def sonar = new Sonar()
def gitcli = new GitLab()

//env.buildType = "${JOB_NAME}".split("-")[1]

//流水线
pipeline {
    agent { label "build" }

    options {
        skipDefaultCheckout true
    }

    stages{
        stage("Checkout"){
            steps{
                script {
                    println("GetCode")
                    checkout.GetCode("${env.srcUrl}", "${env.branchName}")
                }
            }
        }

        stage("Build"){
            steps{
                script{
                    println("Build")
                    //build.CodeBuild("${env.buildType}")
                    sh "${env.buildShell}"

                }
            }
        }

        /*stage("UnitTest"){
            steps{
                script{
                    unittest.CodeTest("${env.buildType}")
                }
            }
        }*/

        stage("CodeScan"){
            when {
                environment name: 'skipSonar', value: 'false'
            }
            steps{
                script{
                    profileName = "${JOB_NAME}".split("-")[0]
                    sonar.Init("${JOB_NAME}", "java", profileName)


                    //commit-status
                    commitID = gitcli.GetCommitID()
                    groupName =profileName
                    projectID = gitcli.GetProjectID("${JOB_NAME}", groupName)
                    sonar.CodeScan("${env.branchName}", commitID, projectID)
                    }

                }
        }

        stage("PushArtifact"){
        	steps{
        		script{
                    // 读取pom文件获取坐标信息
                    // pomData = readMavenPom file: 'pom.xml'
                    // println(pomData)
                    // println(pomData.getClass())
                    buName = "${JOB_NAME}".split("-")[0]
                    repoName = "${buName}-snapshot"
                    file = "target/${env.artifactId}-${env.version}.${env.packaging}"
                    // 用户输入获取坐标信息
        			PushArtifactByNexusPlugin(env.artifactId, file, env.packaging ,env.groupId, repoName, env.version)
        		}
        	}


        }

    }
}


def PushArtifactByNexusPlugin(artifactId, file, type, groupId, repoName, version){
    println(artifactId)
    //demo
    println("${file}, ${type}, ${groupId}, ${repoName}, ${version}")
    //target/demo-0.0.1-SNAPSHOT.jar, jar, com.example, devops4-release, 0.0.1-SNAPSHOT
    nexusArtifactUploader artifacts: [[artifactId: artifactId,
                                    classifier: '',
                                    file: file,
                                    type: type]],
                        credentialsId: '2b44f51a-2374-4275-aeed-b720f4fbf937',
                        groupId: groupId,
                        nexusUrl: '172.29.9.101:8081',
                        nexusVersion: 'nexus3',
                        protocol: 'http',
                        repository: repoName,
                        version: version
}
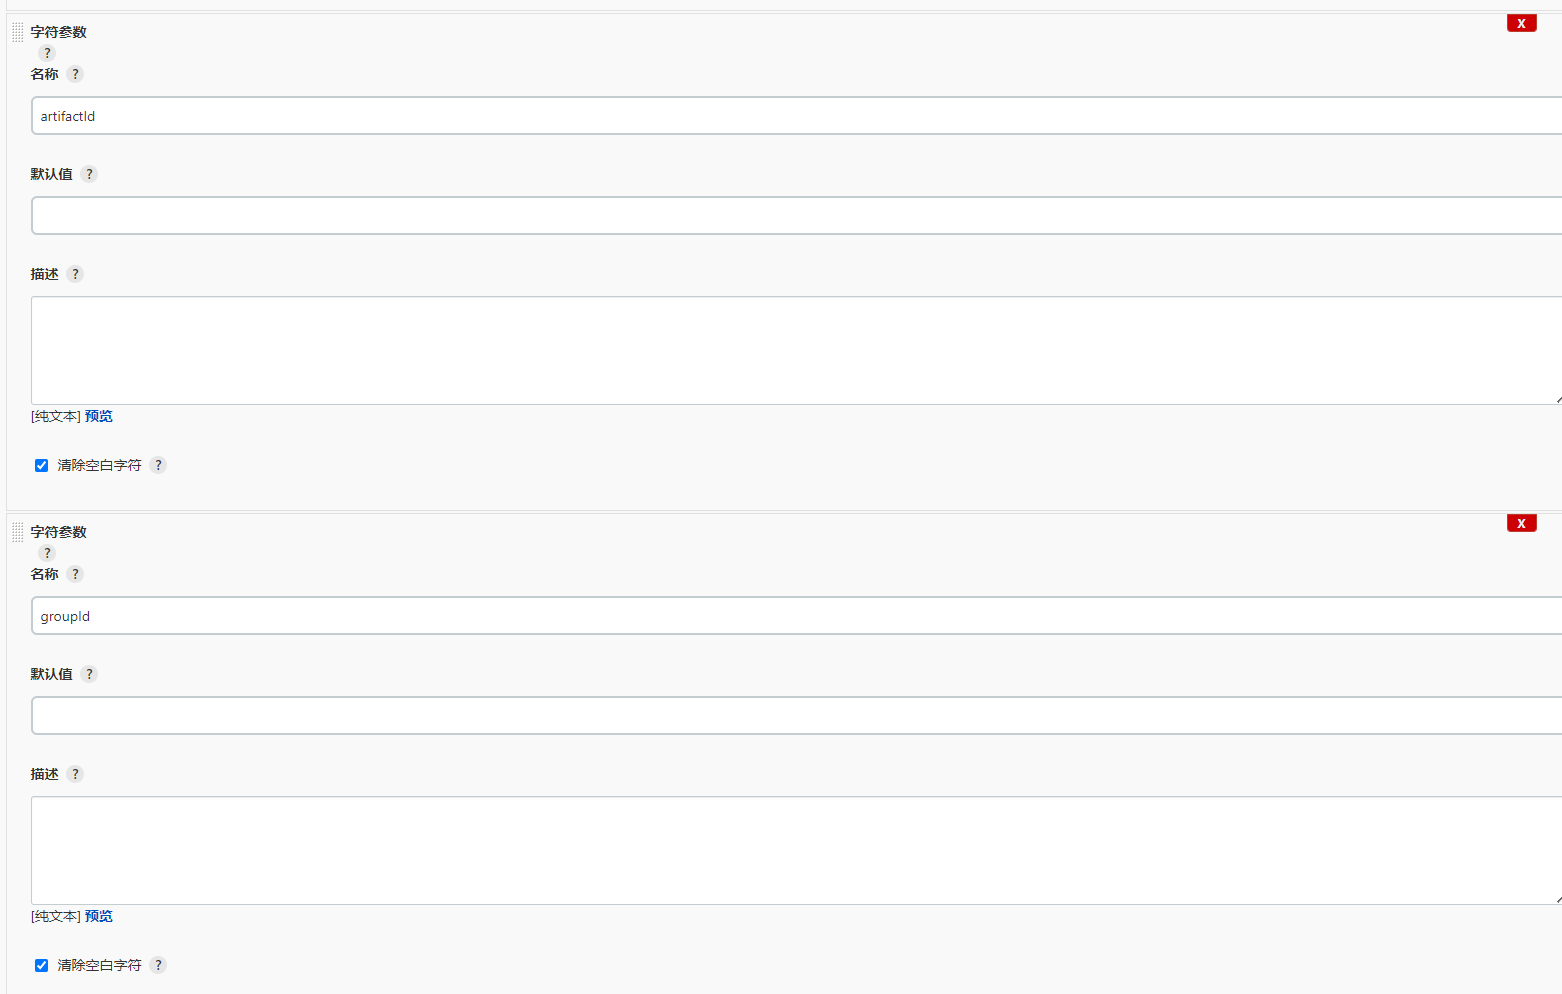
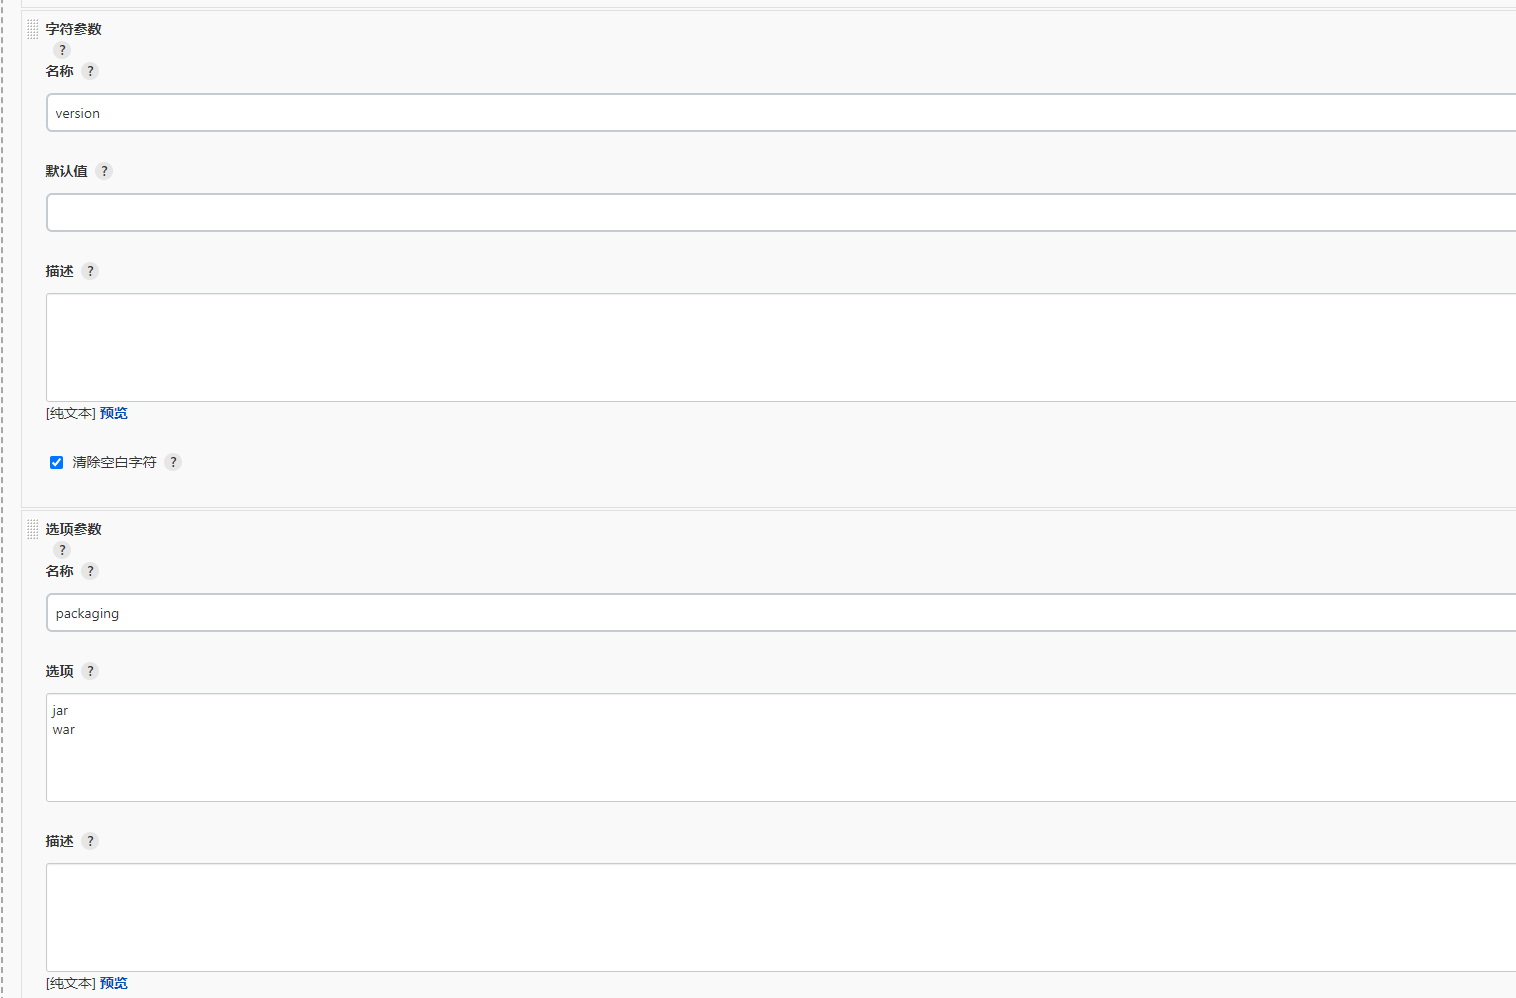
- 在流水线里添加字符参数和选项参数:
- 开始构建:
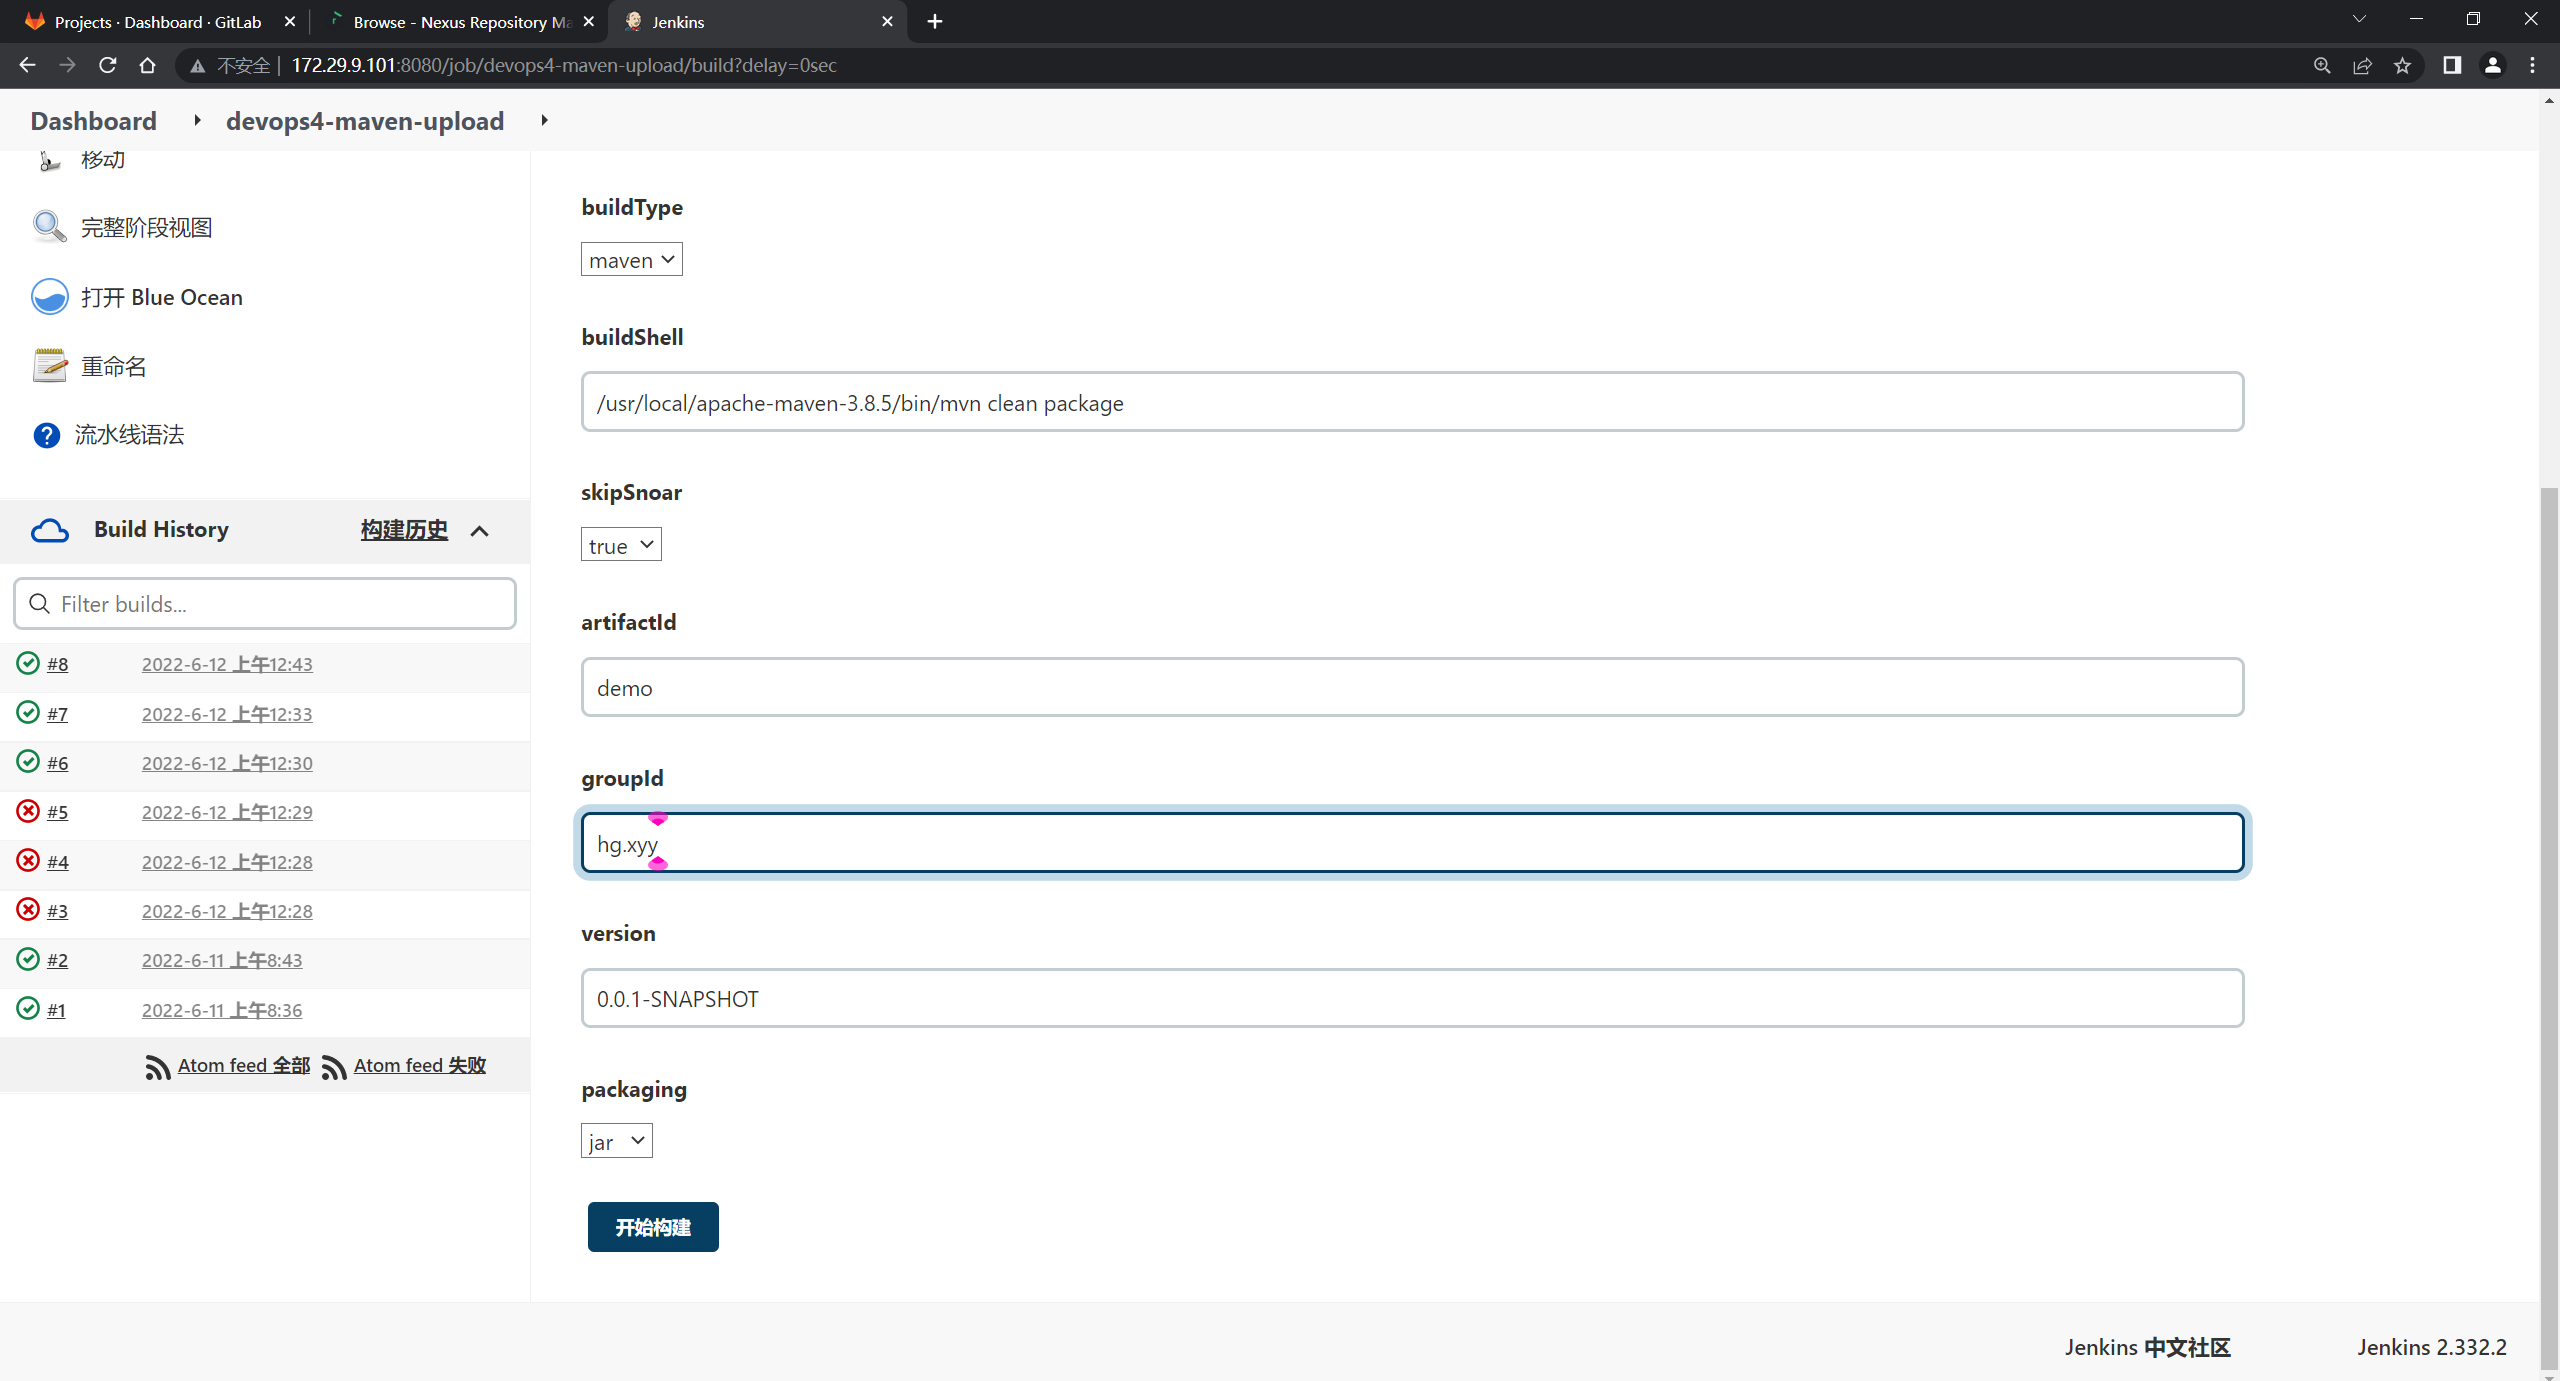
观察效果:
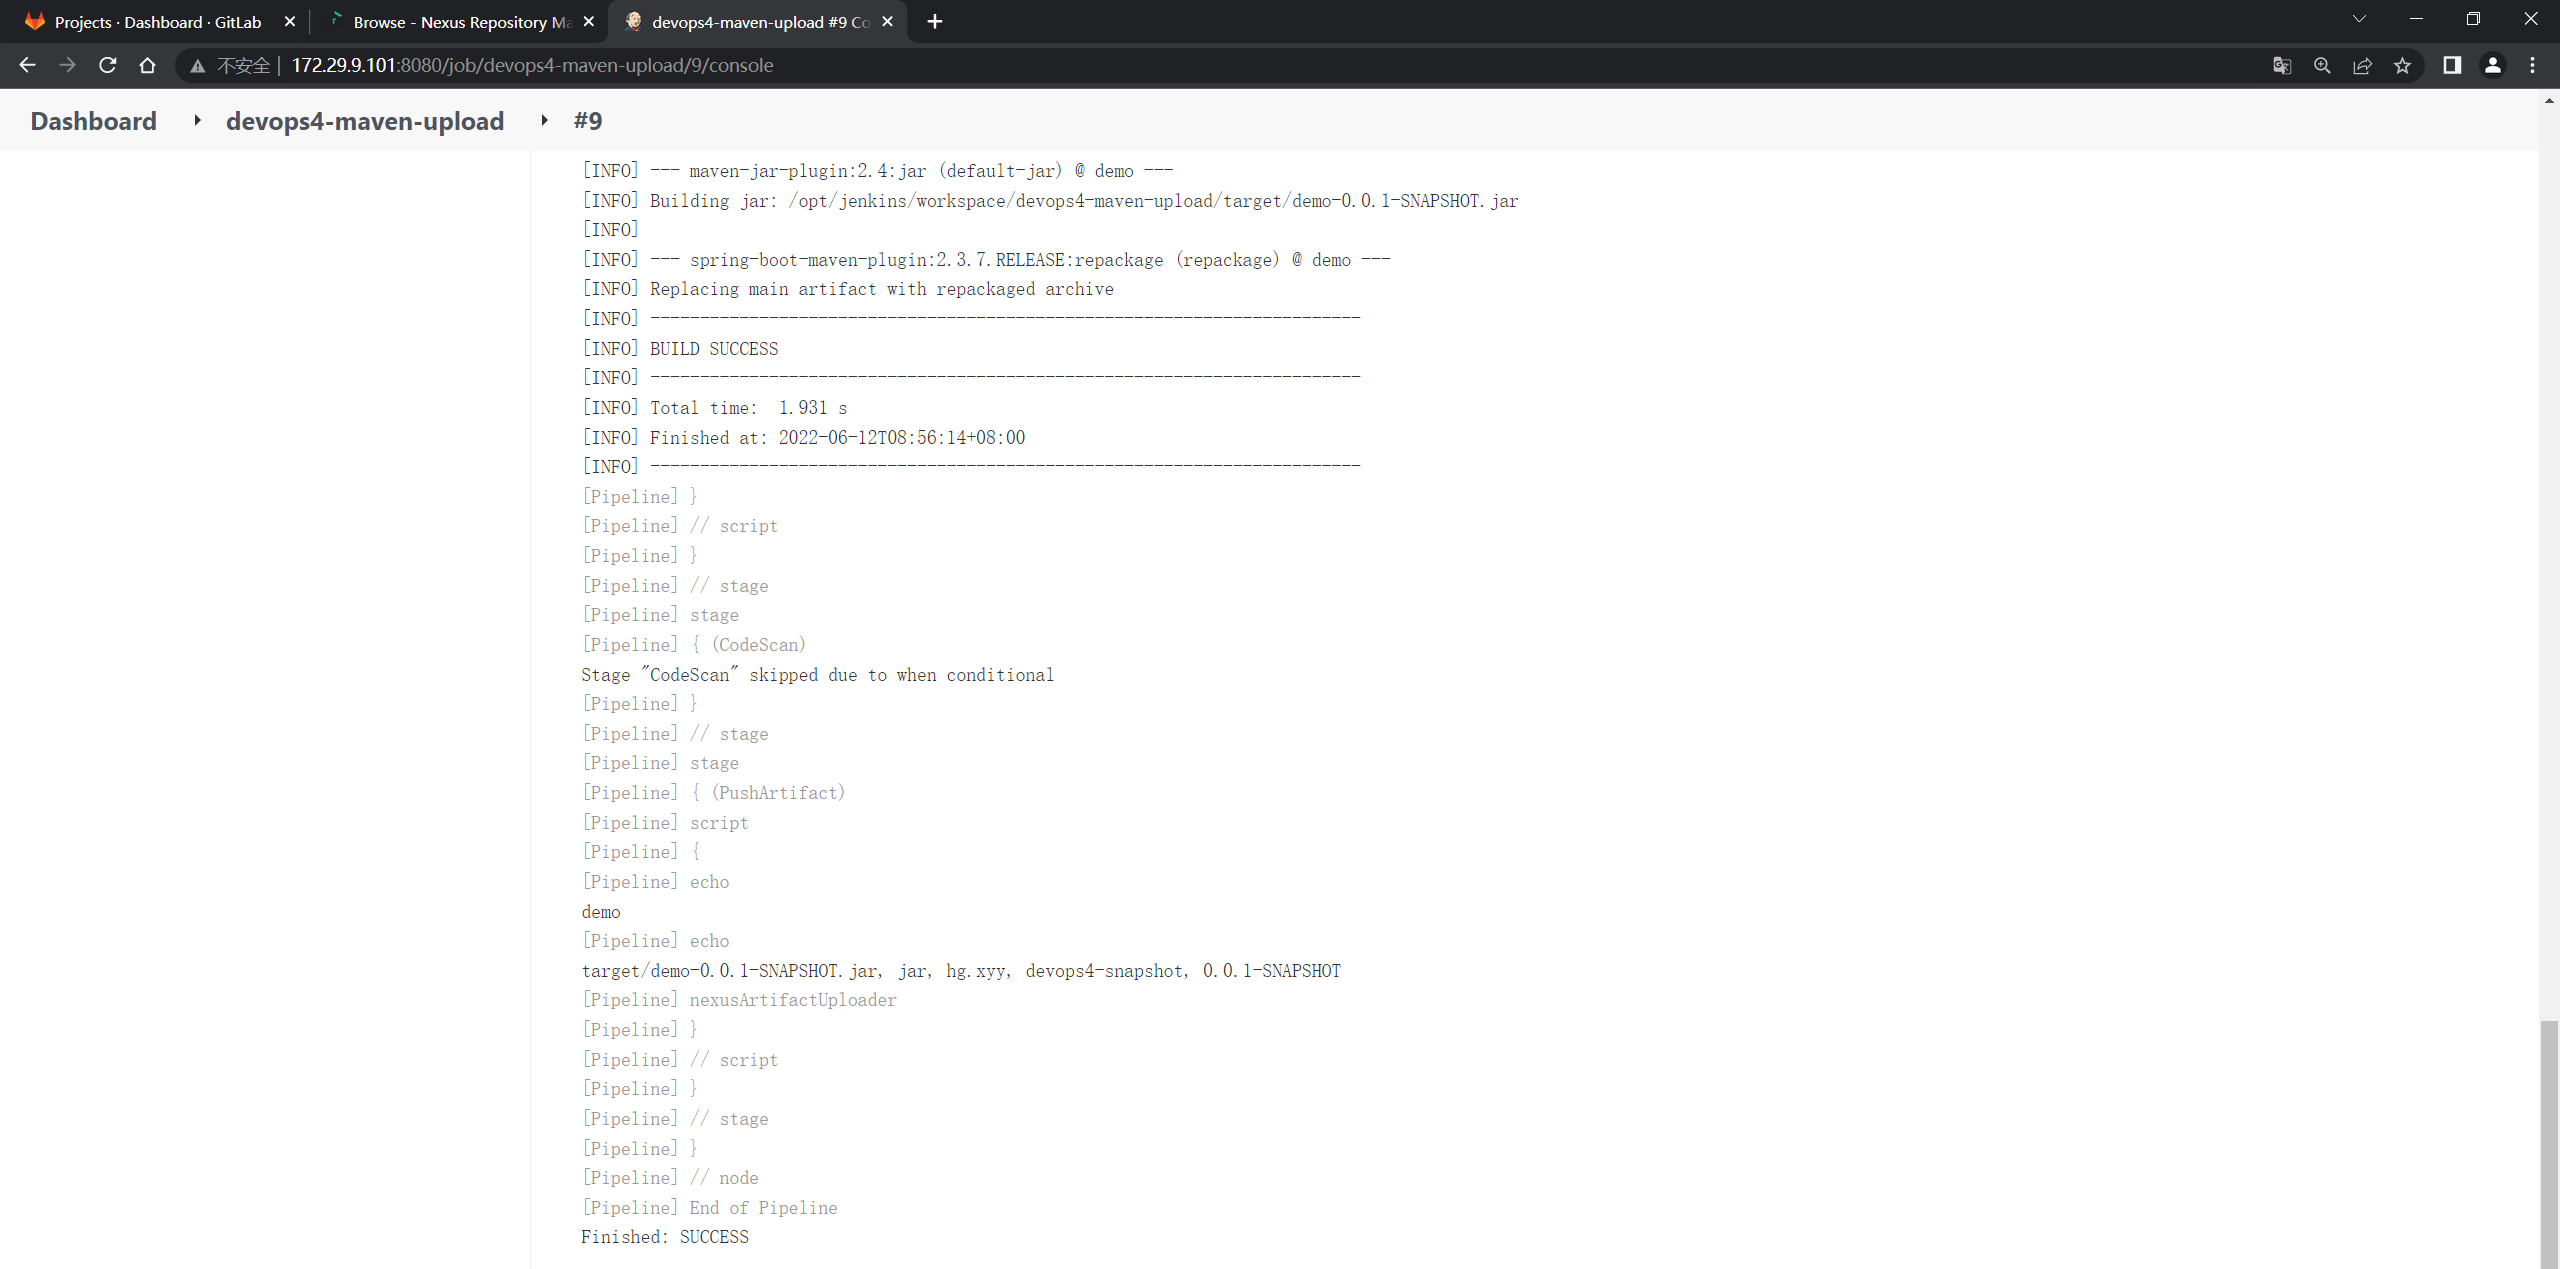
可以看到制品被成功上传到制品库了:
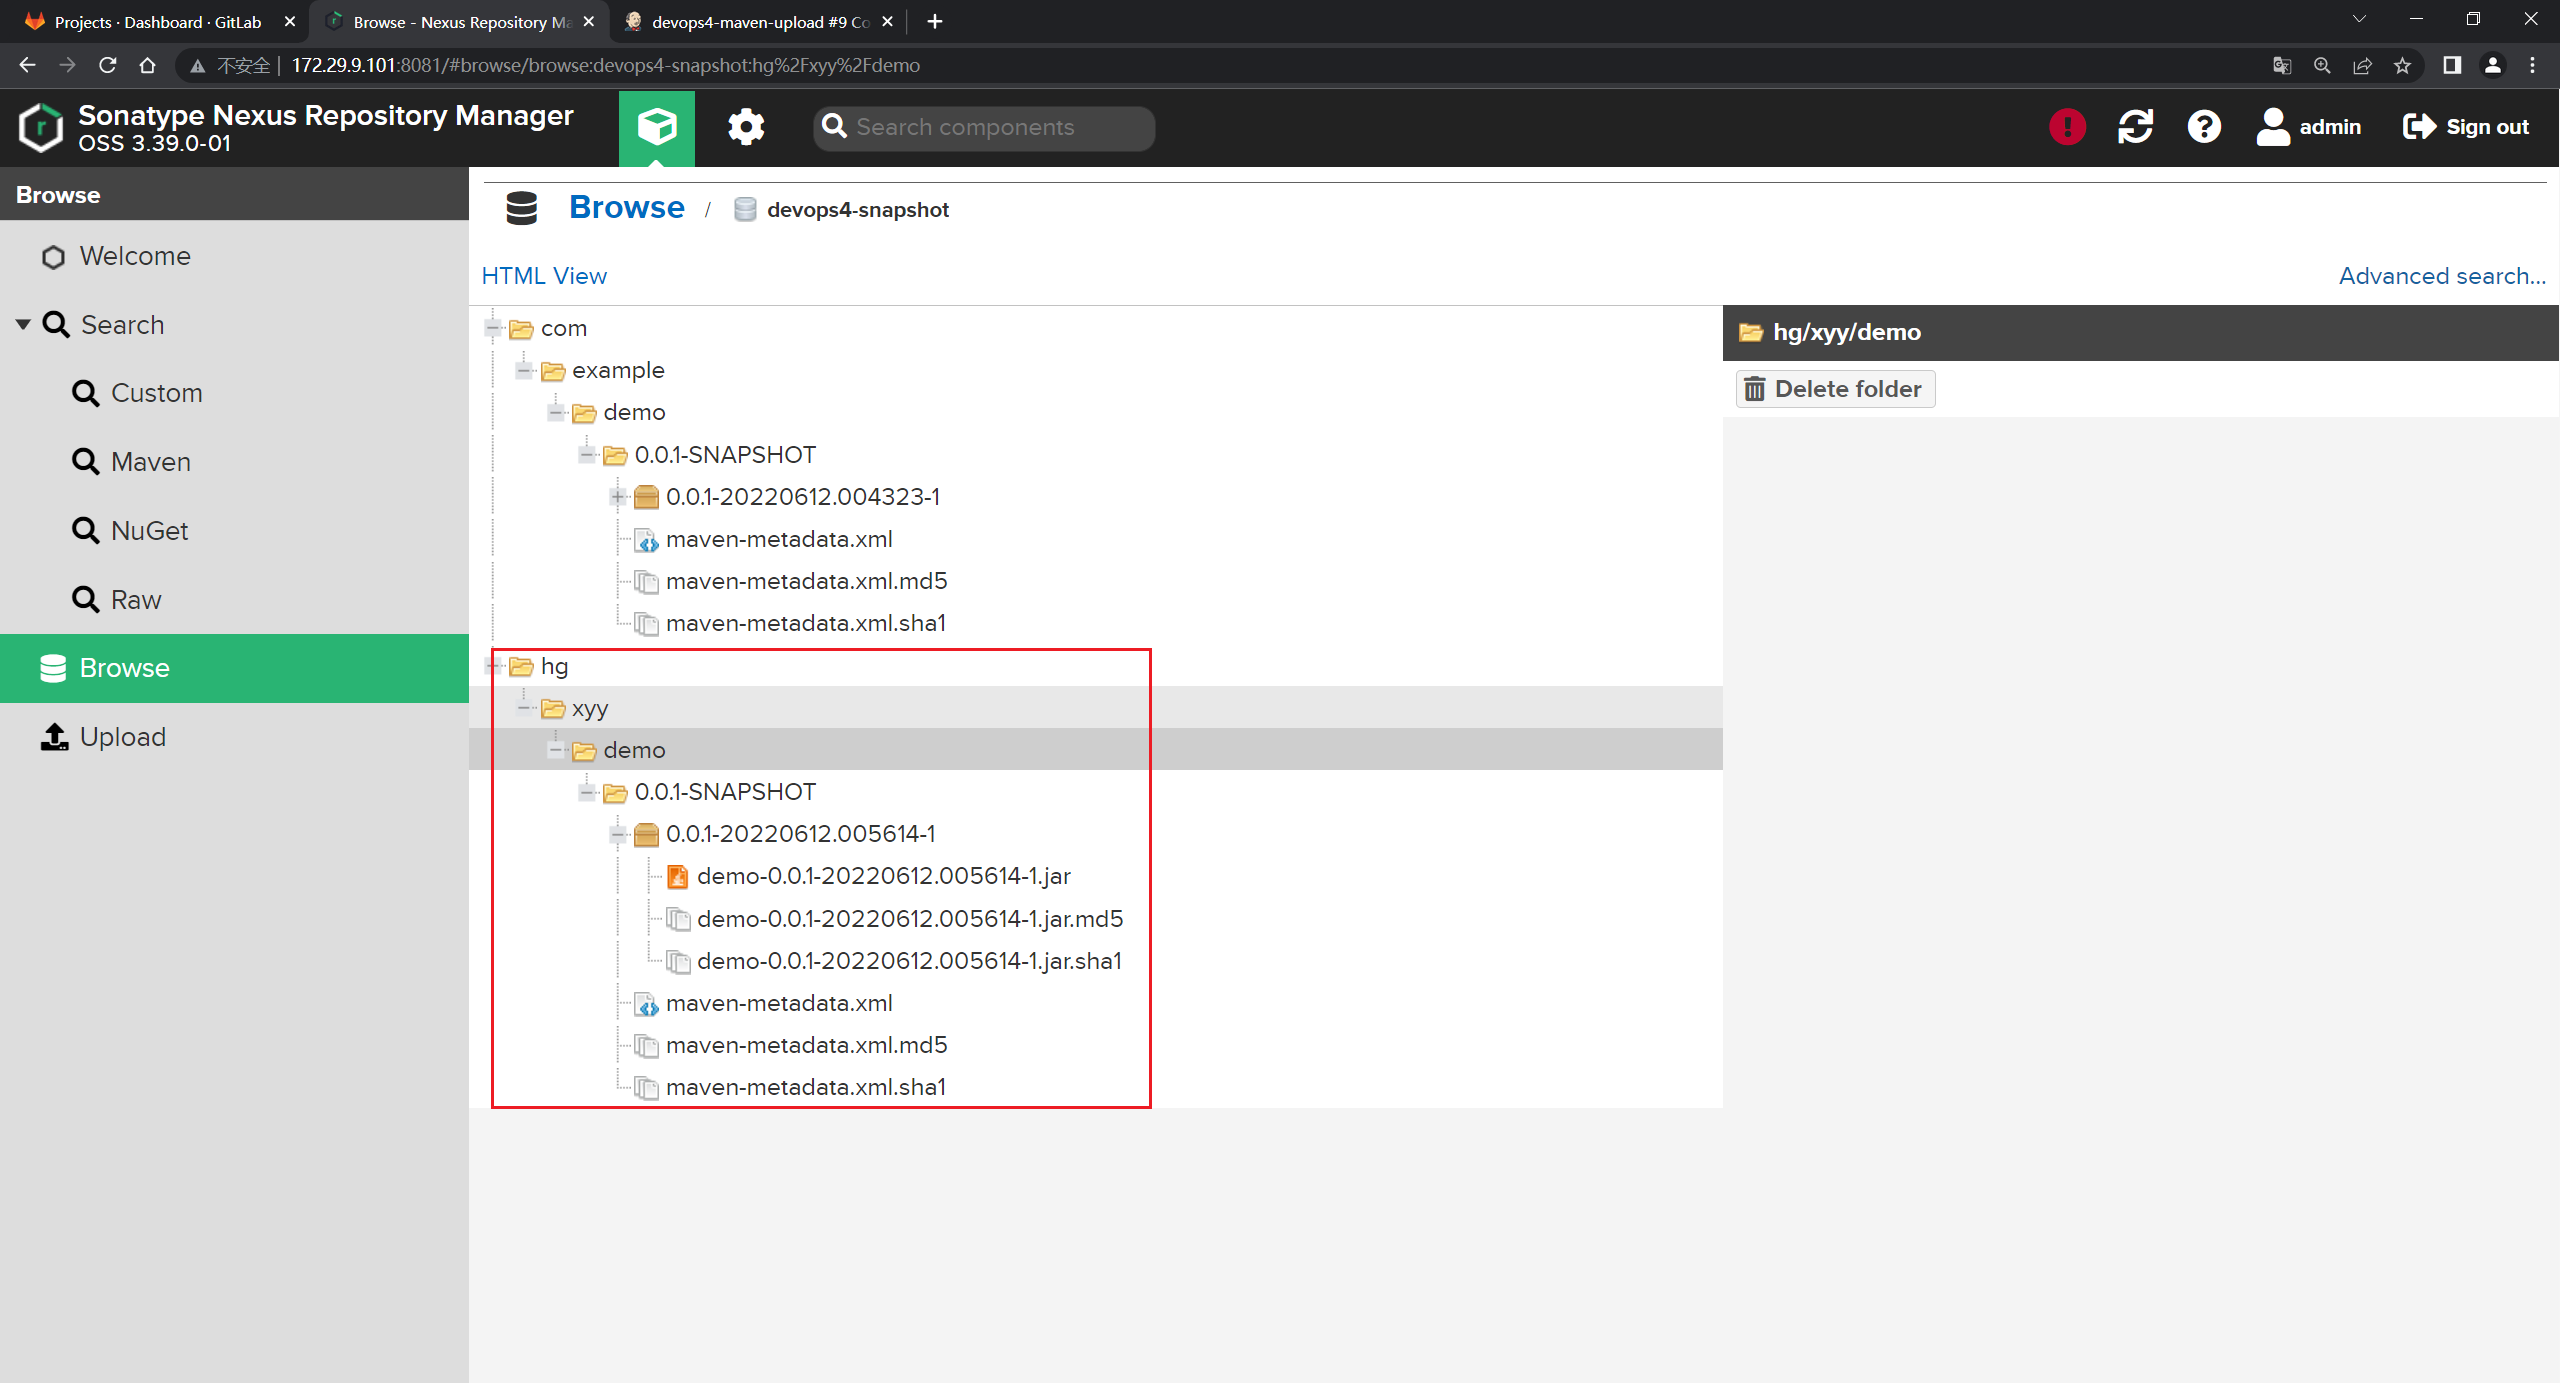
测试结束。😘
📍 此时,把代码写到共享库里:
来到devops4-jenkinslib-service项目里:
创建src/org/devops/Artifact.groovy文件:
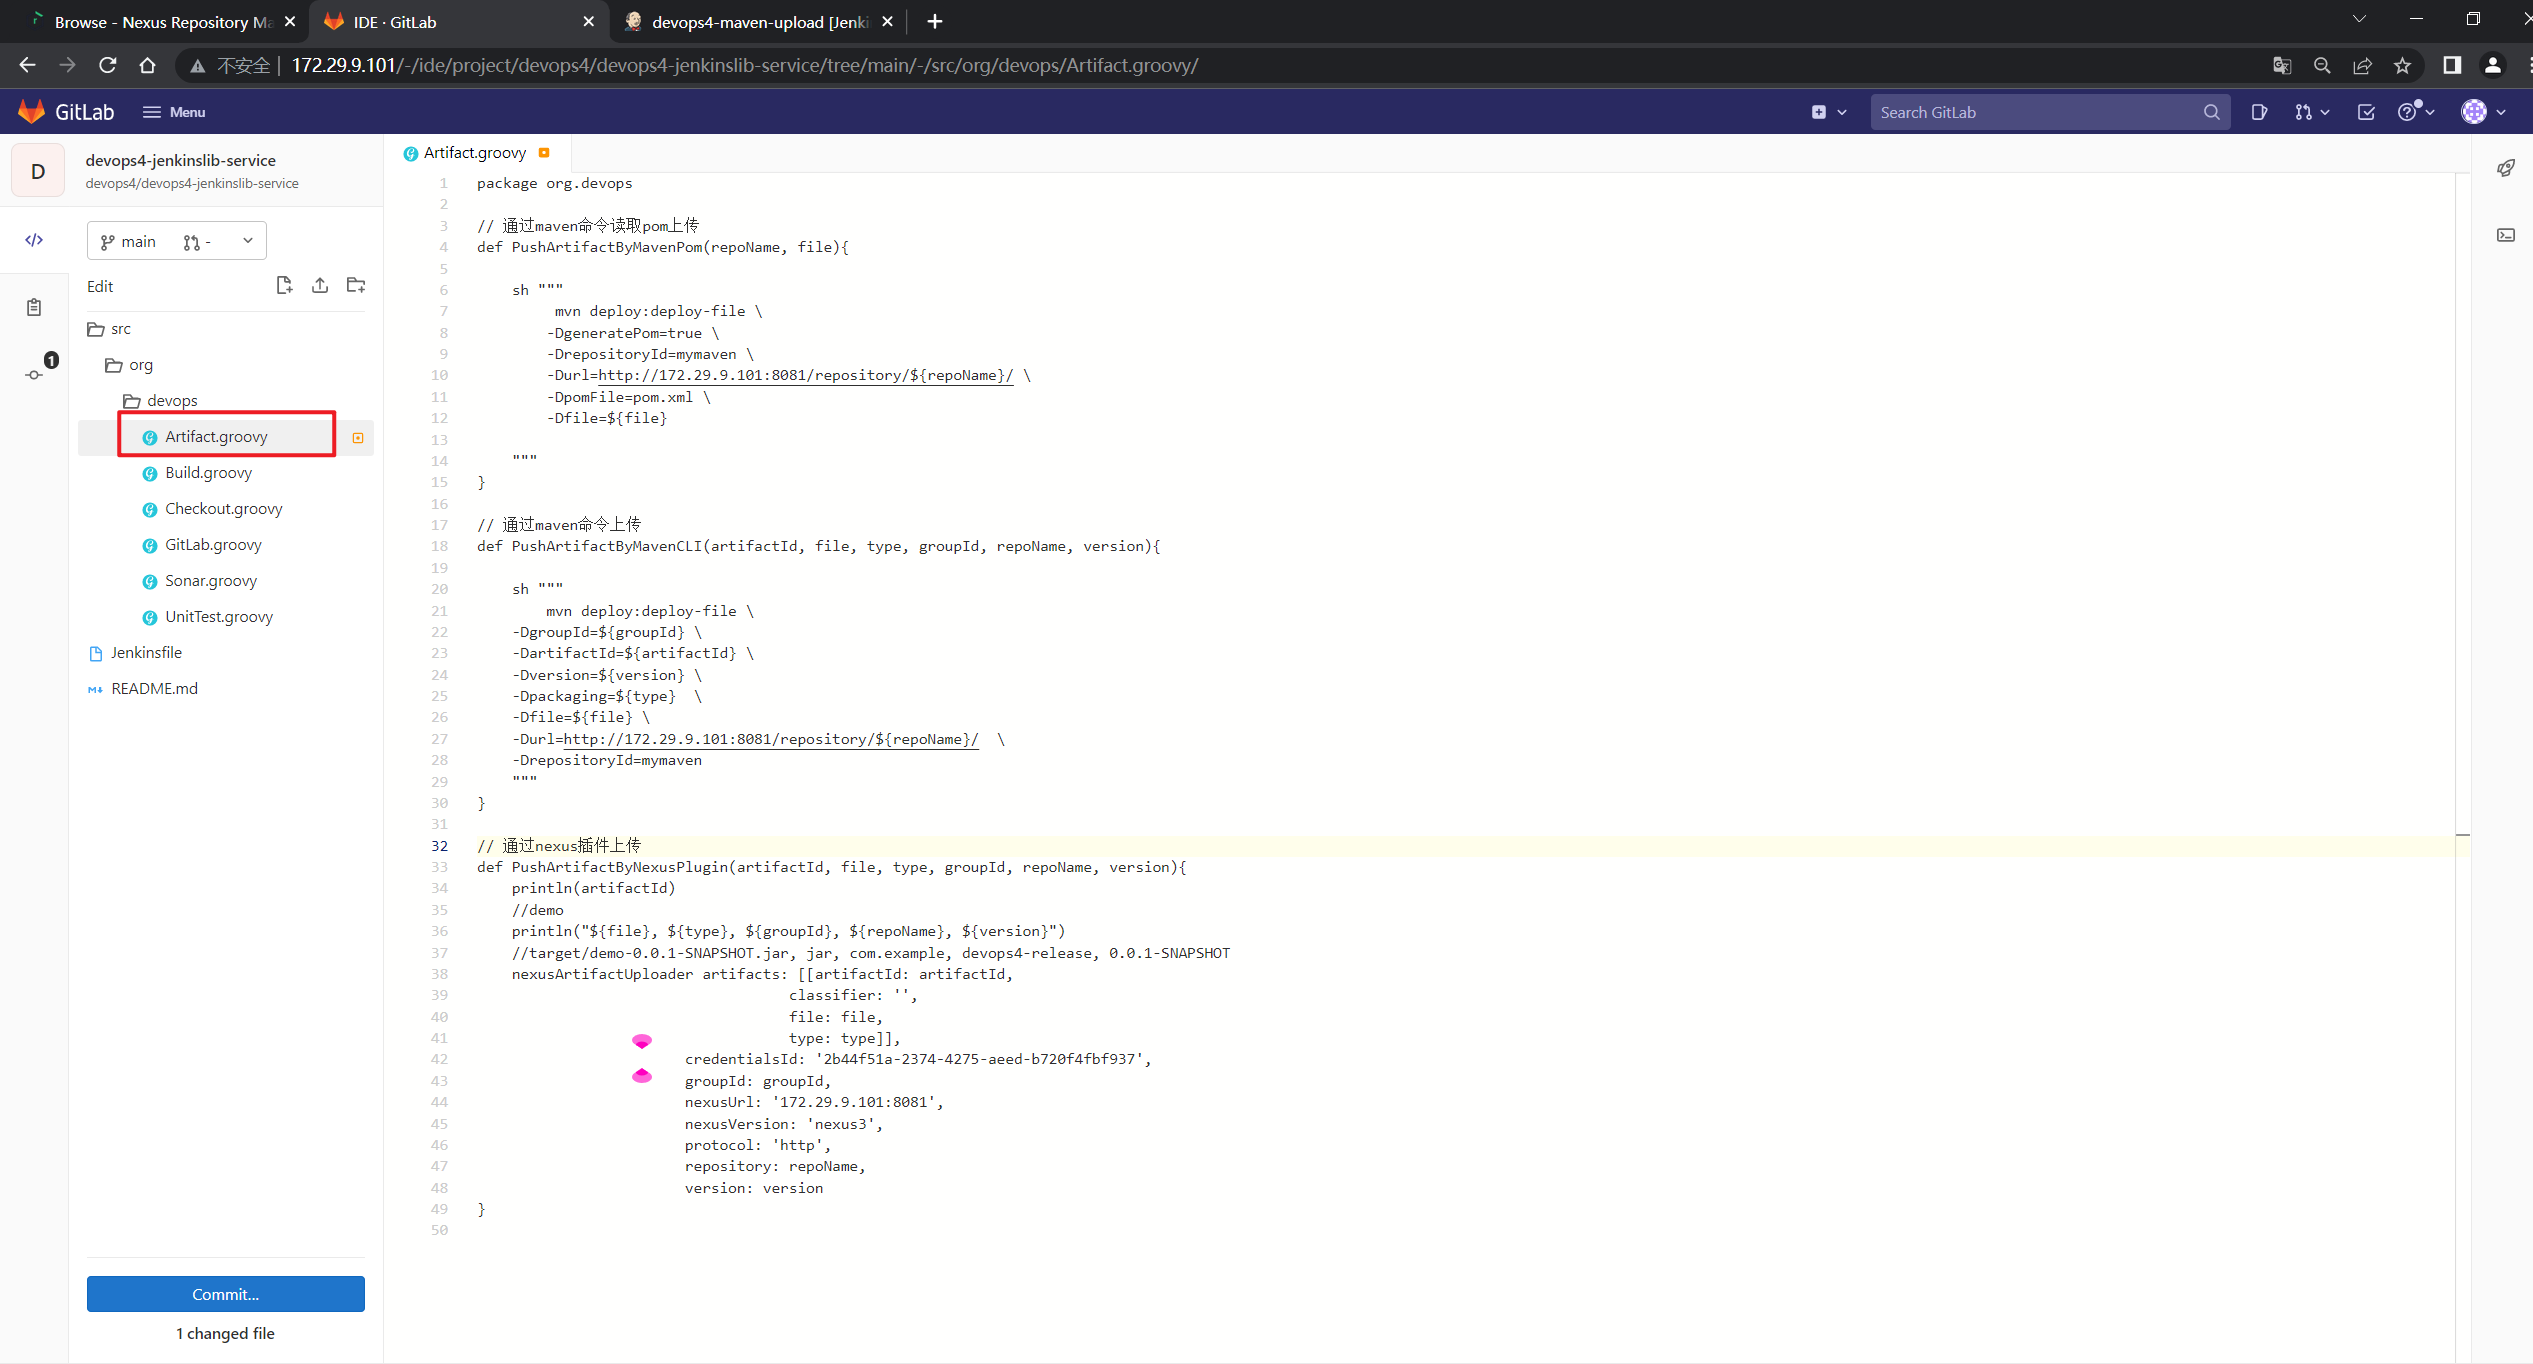
package org.devops

// 通过maven命令读取pom上传
def PushArtifactByMavenPom(repoName, file){

    sh """
         mvn deploy:deploy-file \
        -DgeneratePom=true \
        -DrepositoryId=mymaven \
        -Durl=http://172.29.9.101:8081/repository/${repoName}/ \
        -DpomFile=pom.xml \
        -Dfile=${file}

    """
}

// 通过maven命令上传
def PushArtifactByMavenCLI(artifactId, file, type, groupId, repoName, version){

    sh """
        mvn deploy:deploy-file \
    -DgroupId=${groupId} \
    -DartifactId=${artifactId} \
    -Dversion=${version} \
    -Dpackaging=${type}  \
    -Dfile=${file} \
    -Durl=http://172.29.9.101:8081/repository/${repoName}/  \
    -DrepositoryId=mymaven
    """
}

// 通过nexus插件上传
def PushArtifactByNexusPlugin(artifactId, file, type, groupId, repoName, version){
    println(artifactId)
    //demo
    println("${file}, ${type}, ${groupId}, ${repoName}, ${version}")
    //target/demo-0.0.1-SNAPSHOT.jar, jar, com.example, devops4-release, 0.0.1-SNAPSHOT
    nexusArtifactUploader artifacts: [[artifactId: artifactId,
                                    classifier: '',
                                    file: file,
                                    type: type]],
                        credentialsId: '2b44f51a-2374-4275-aeed-b720f4fbf937',
                        groupId: groupId,
                        nexusUrl: '172.29.9.101:8081',
                        nexusVersion: 'nexus3',
                        protocol: 'http',
                        repository: repoName,
                        version: version
}
⚠️ 注意:这个是依赖的上传,而不是制品的上传:
后面再通过api的方式去传制品;
注意:制品和依赖,大家要区分开哦,
注意:刚才所生成的jar包我们是当依赖包来对待的哦,接下来,我们看一下制品。
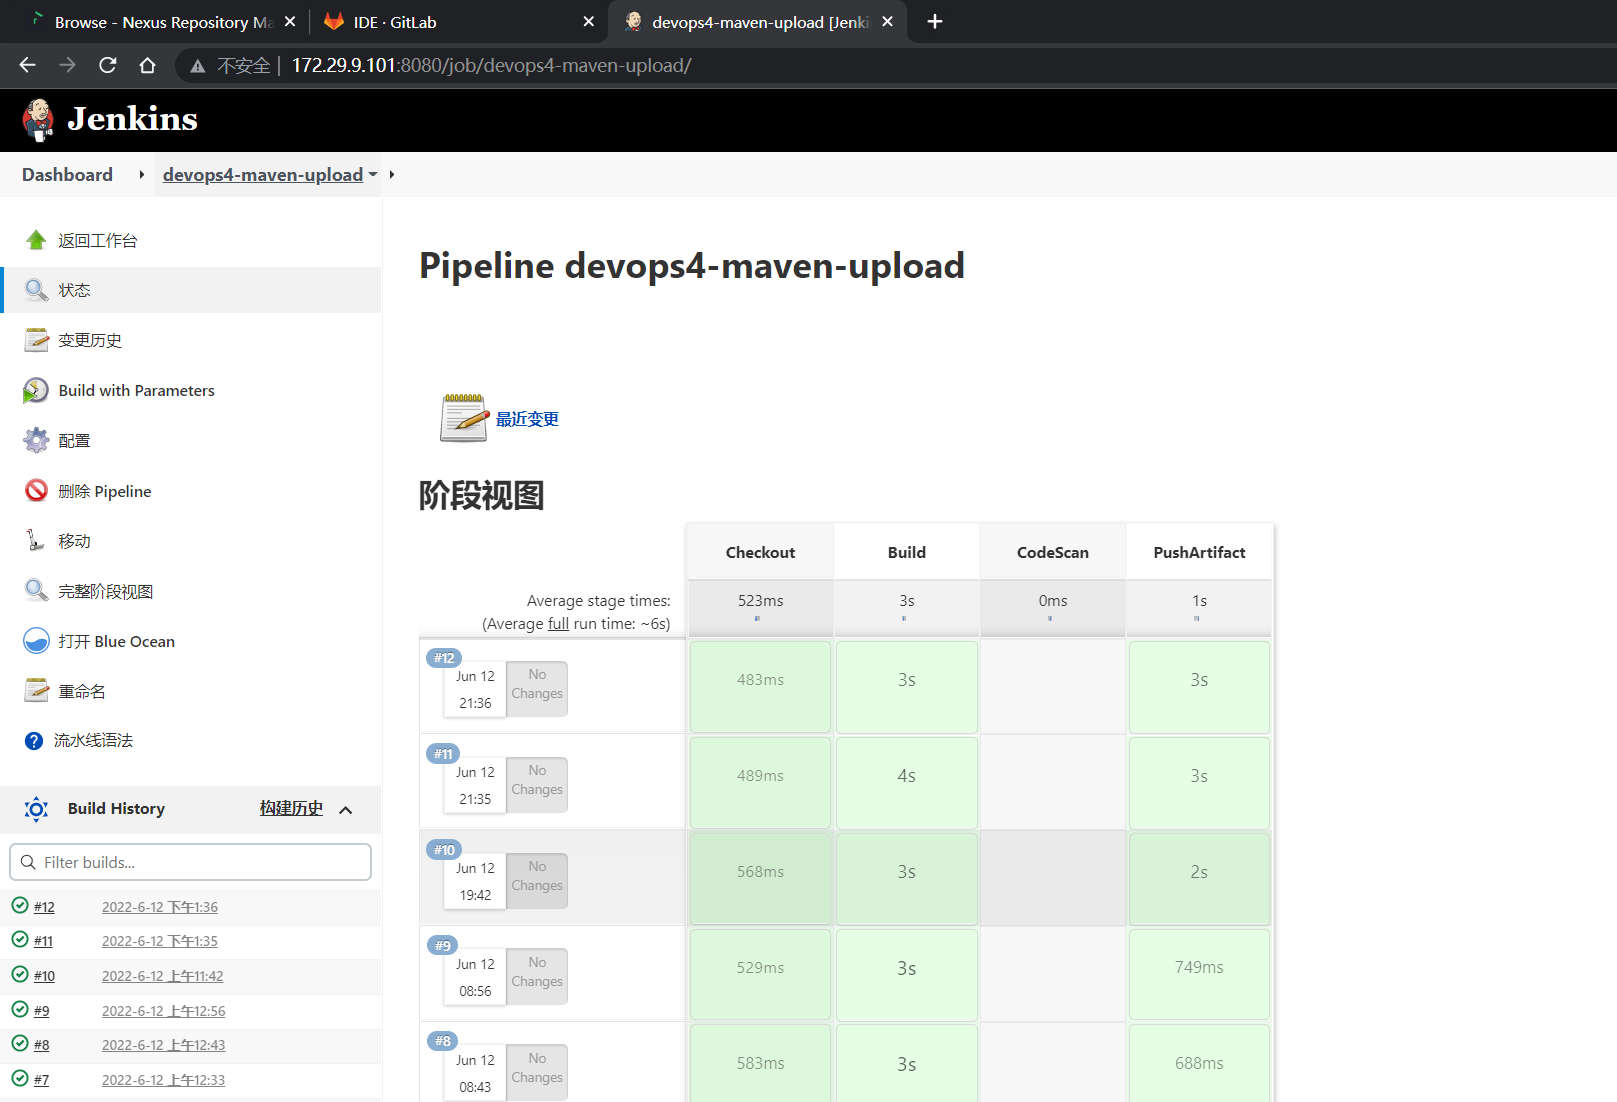
5.使用Jenkins插件发布制品
发布其实就是下载制品,然后将制品发送到目标主机,最后通过脚本或者指令启动程序。
这个其实没多大意义,本次老师跳过次部分。
下面是下载制品的示例:
curl http://192.168.1.200:8081/repository/devops-maven/com/example/demo/1.1.10/demo-1.1.10.jar -o app.jar -uadmin:admin123
安装Maven Artifact ChoiceListProvider (Nexus)插件, 可以使用该插件列出包列表。
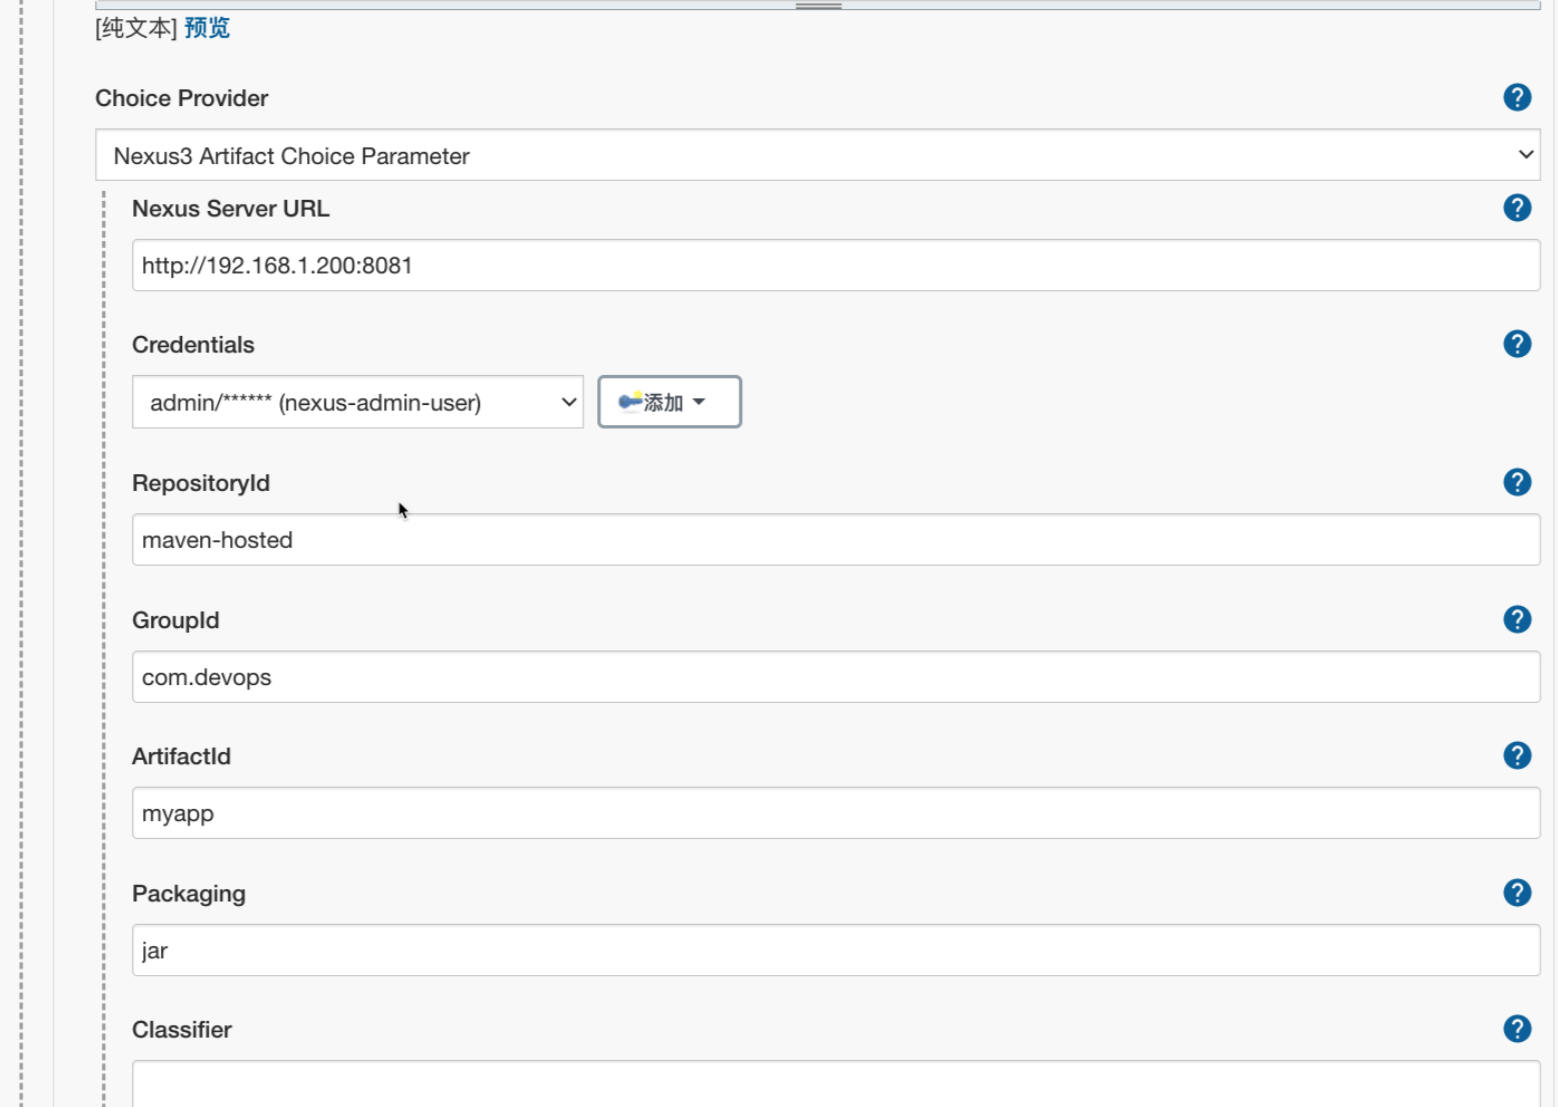
用户选择制品后, 点击构建。此时可以想象,Jenkins下载这个包, 然后通过salt、ansible进行发布部署。

5.Nexus REST API
http://172.29.9.101:8081/#admin/system/api
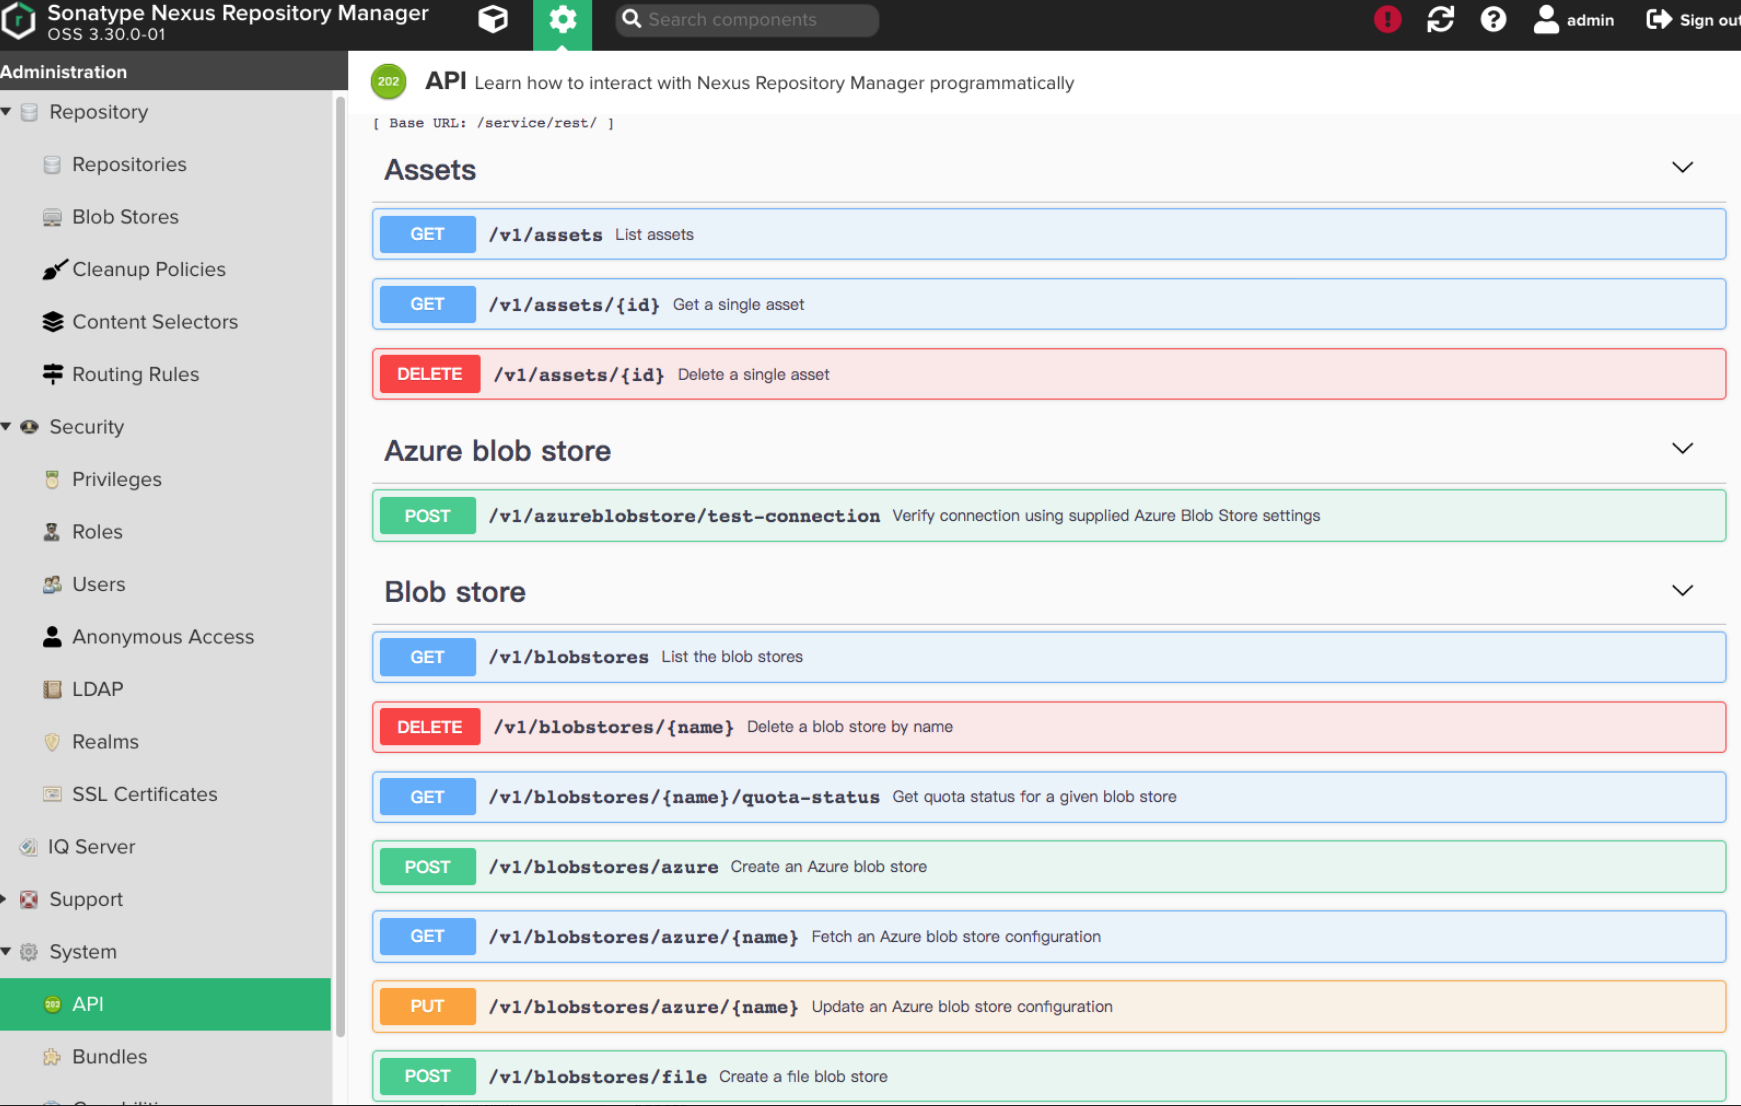
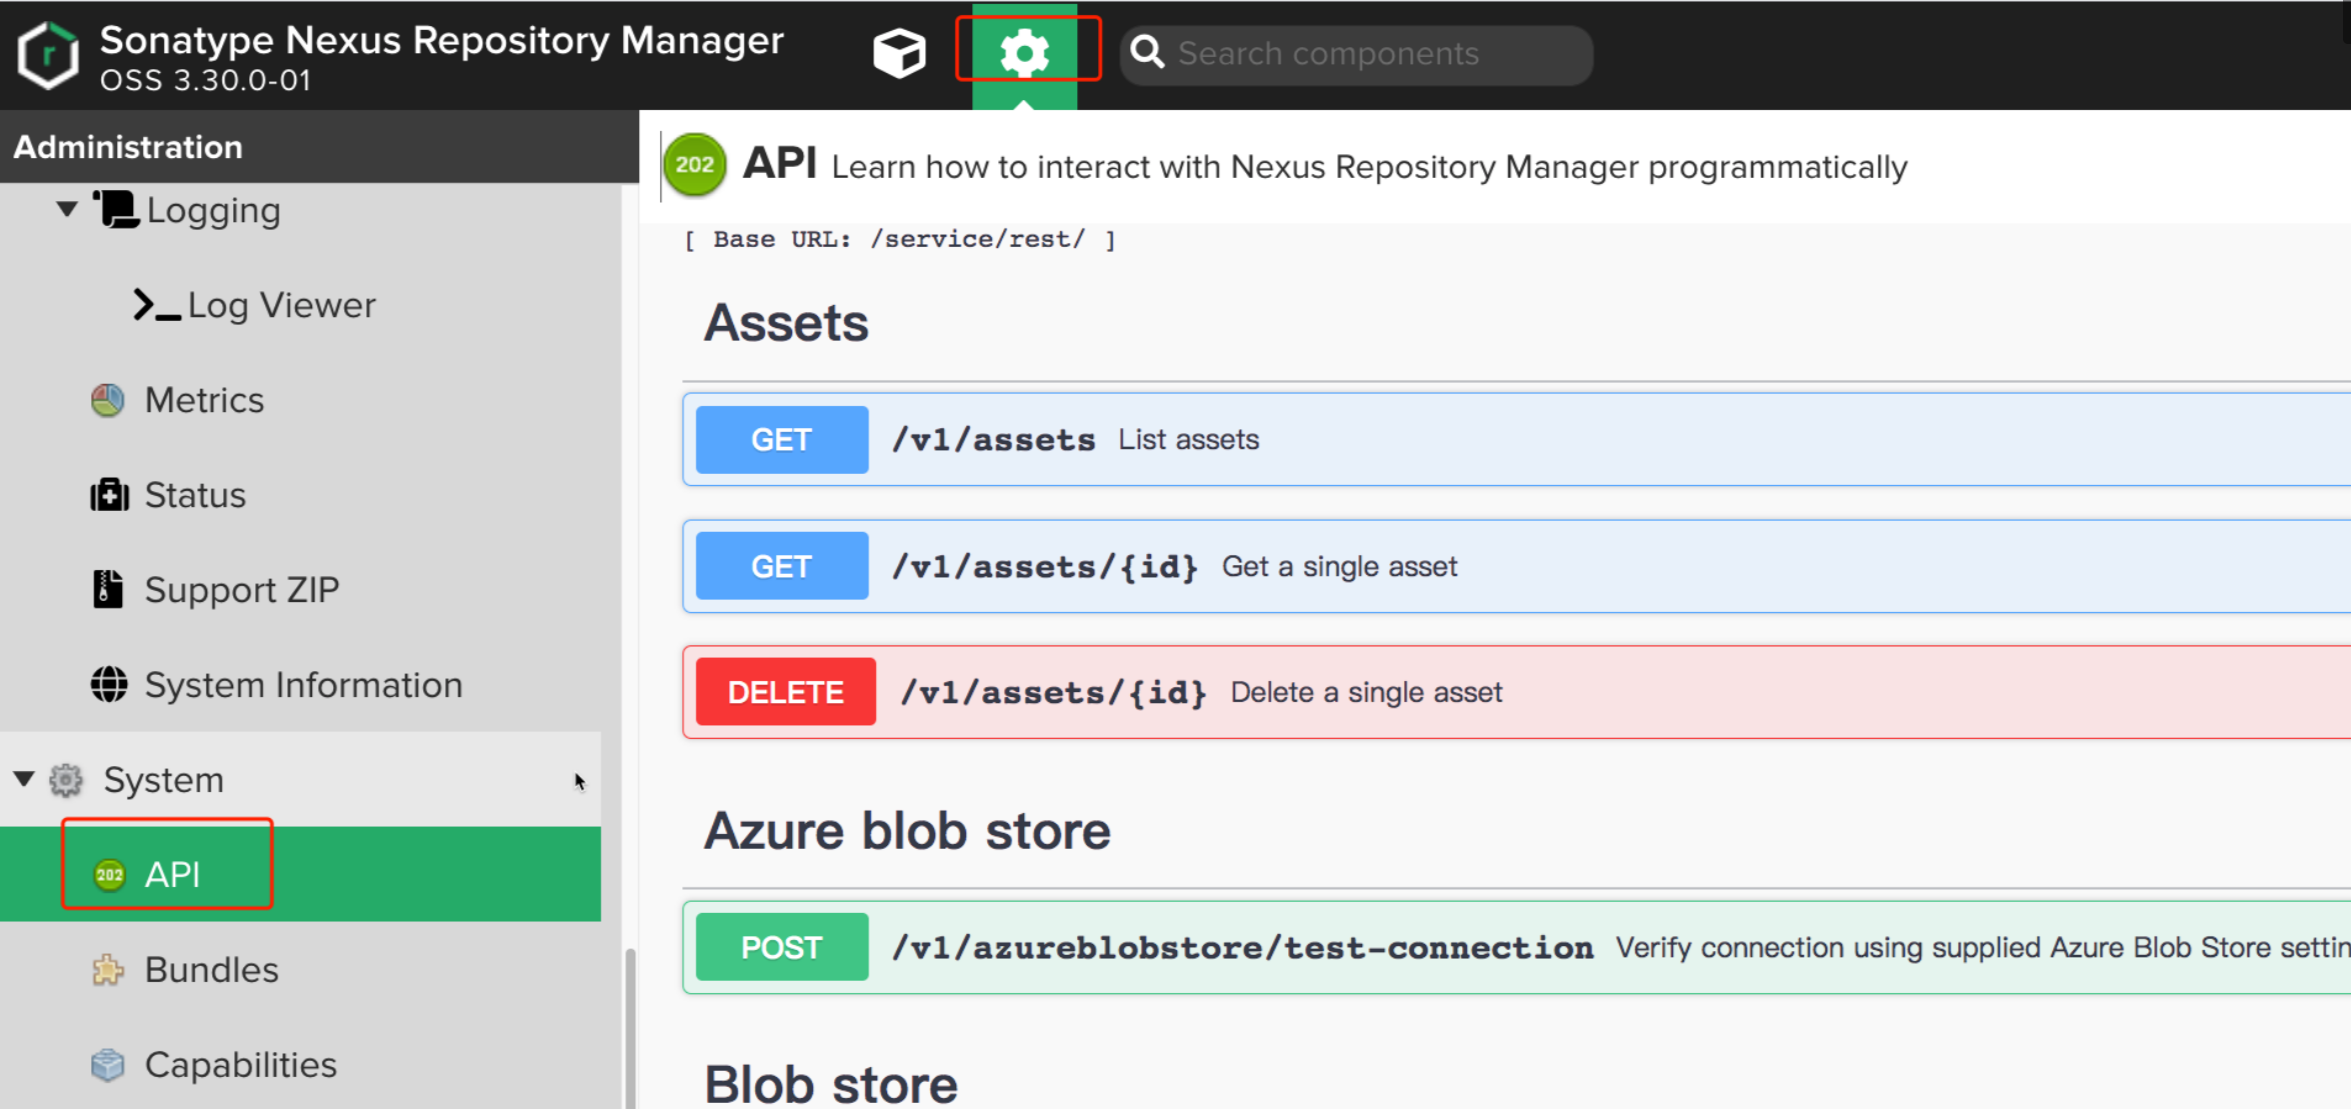
1、NexusAPI调试方法
进入设置页面, 找到System > API , 即可进入API调试页面。
调试API /v1/components, 点击Try it out才能填写信息。

填写参数信息

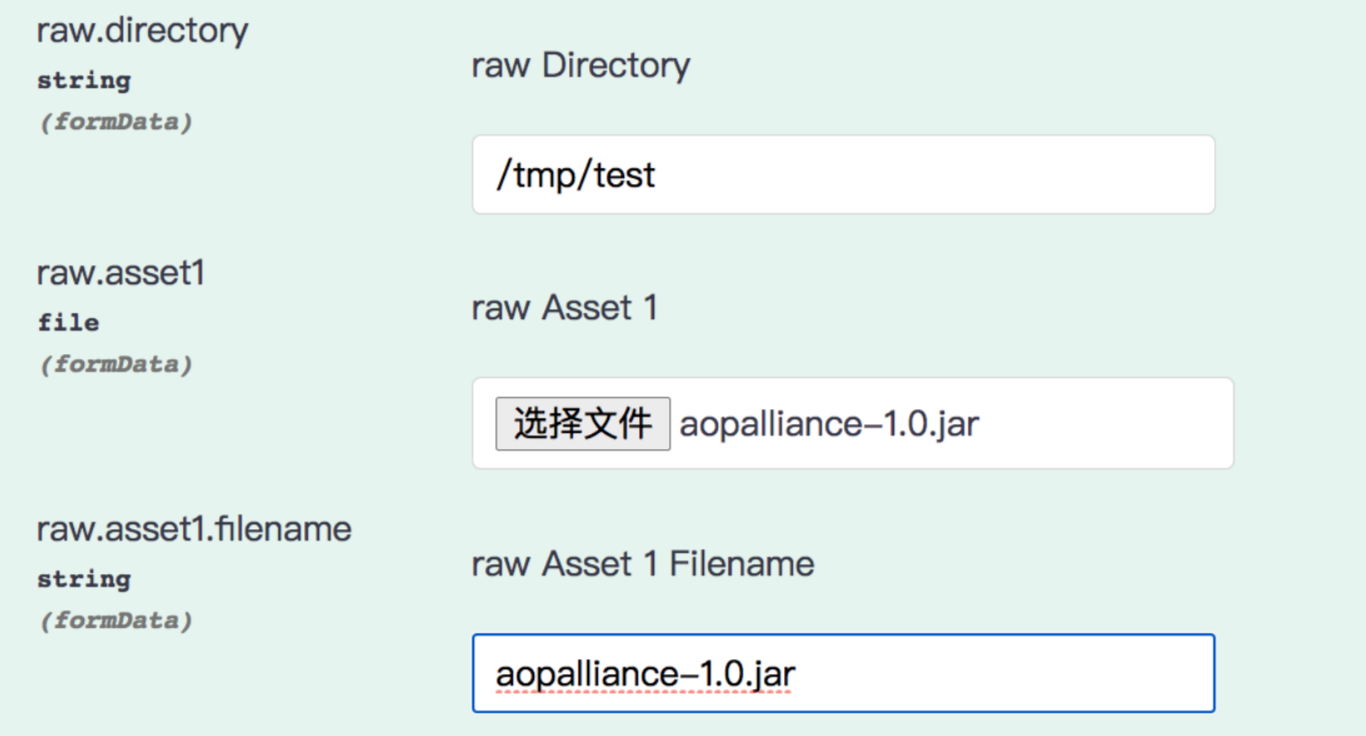
点击 执行操作, 204表示成功。 我们可以复用这里的CURL指令, 最后封装到Jenkins流水线当中。
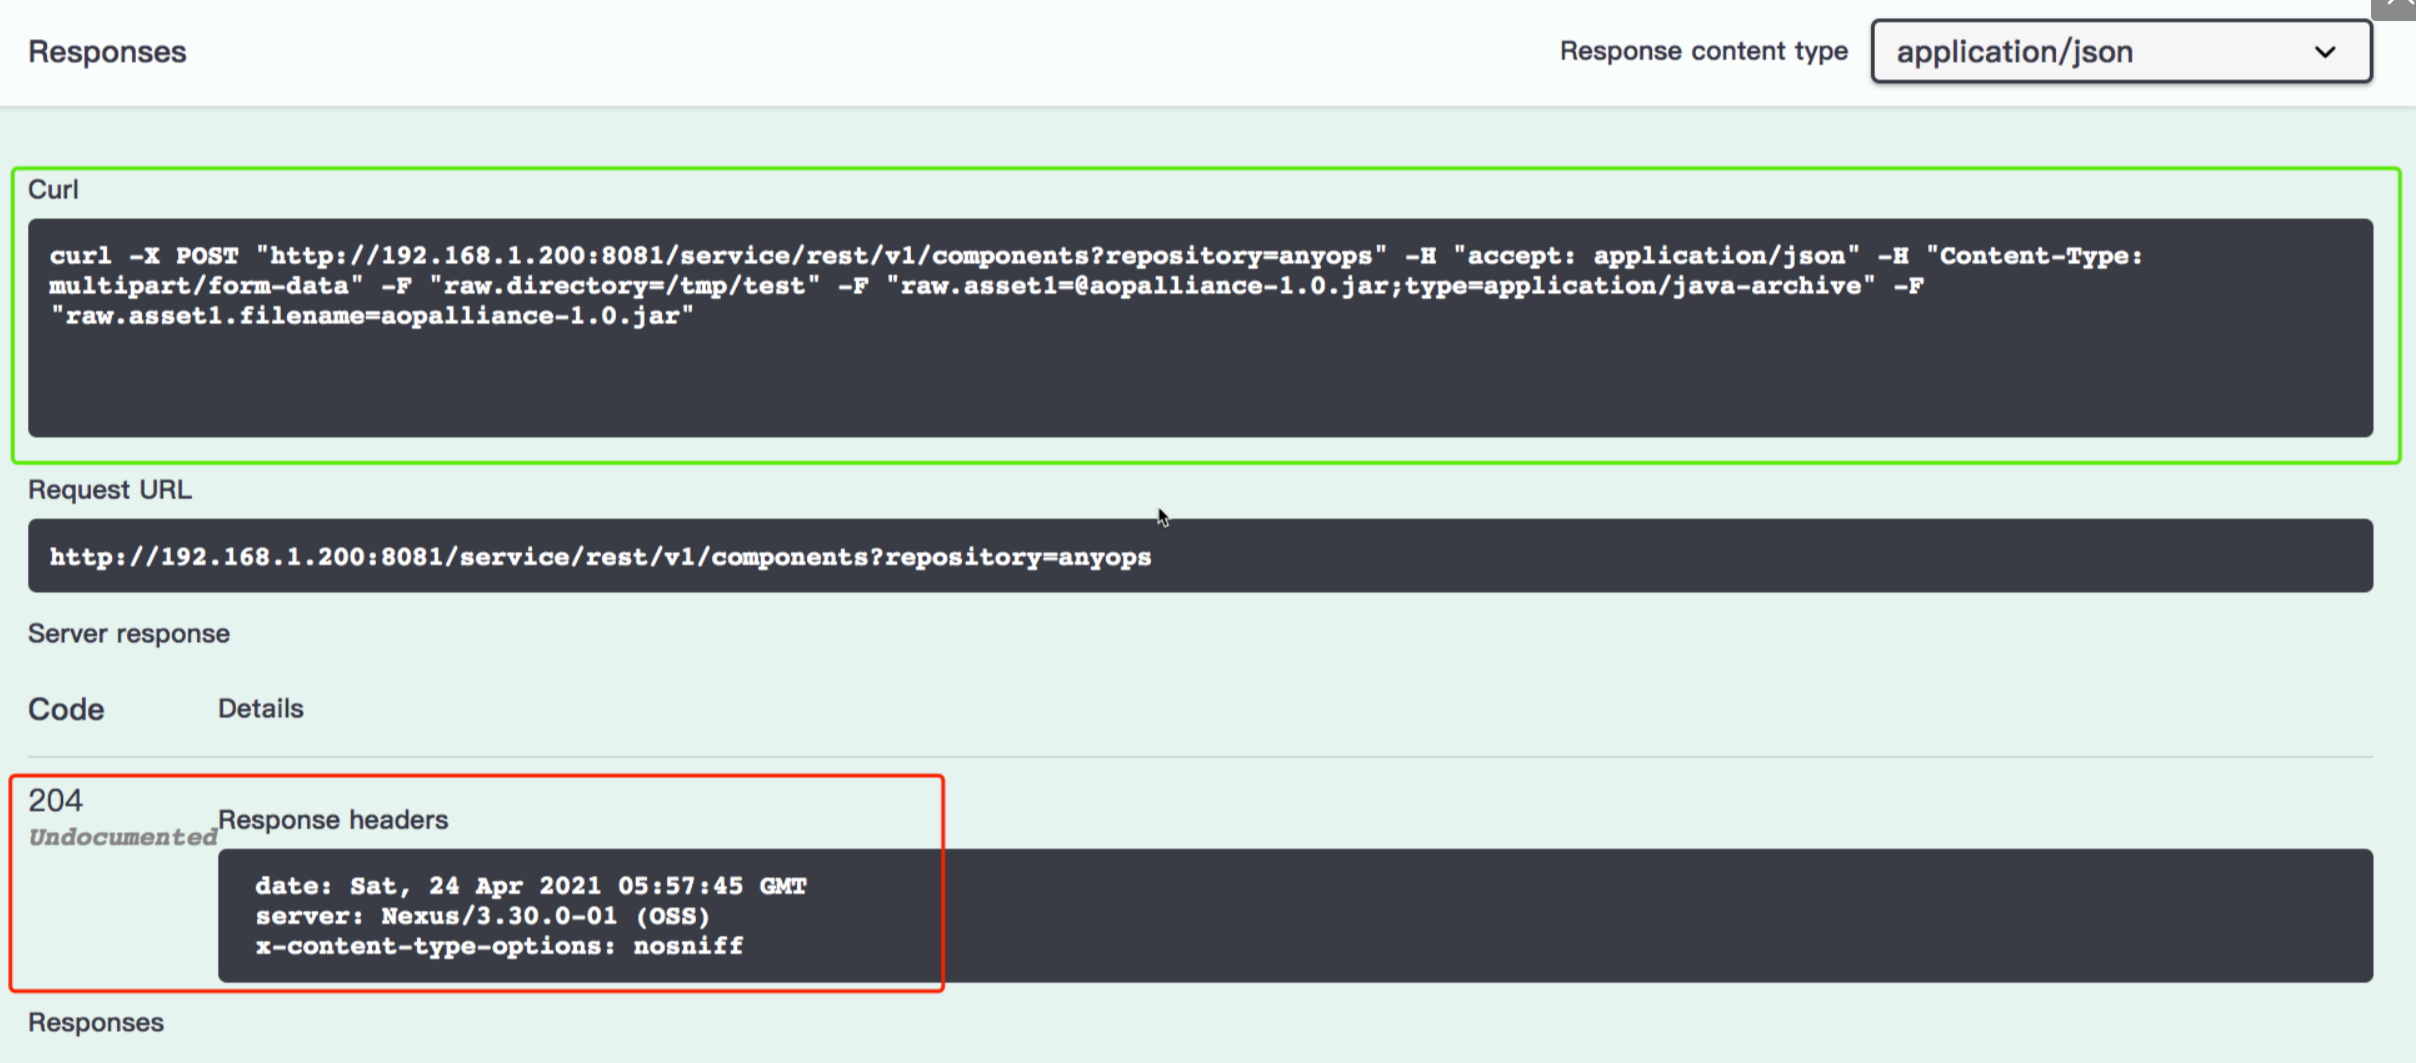
📍 自己测试过程如下:
- 填写参数:

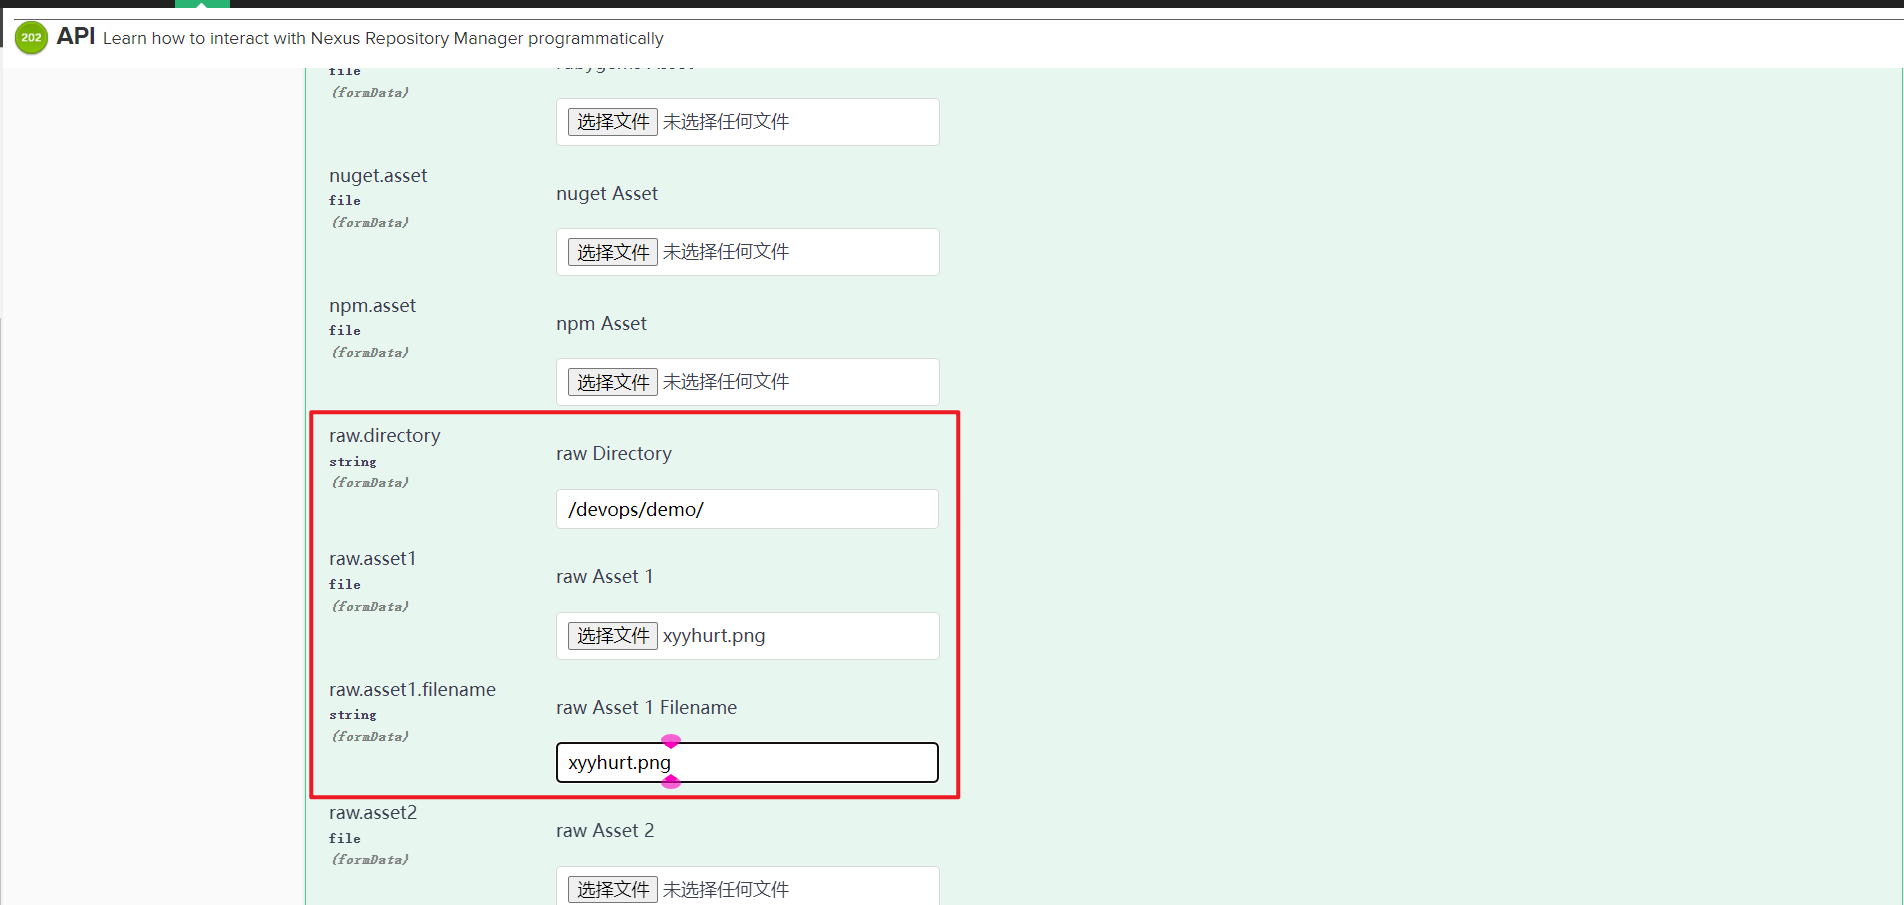
- 点击
Excute上传:
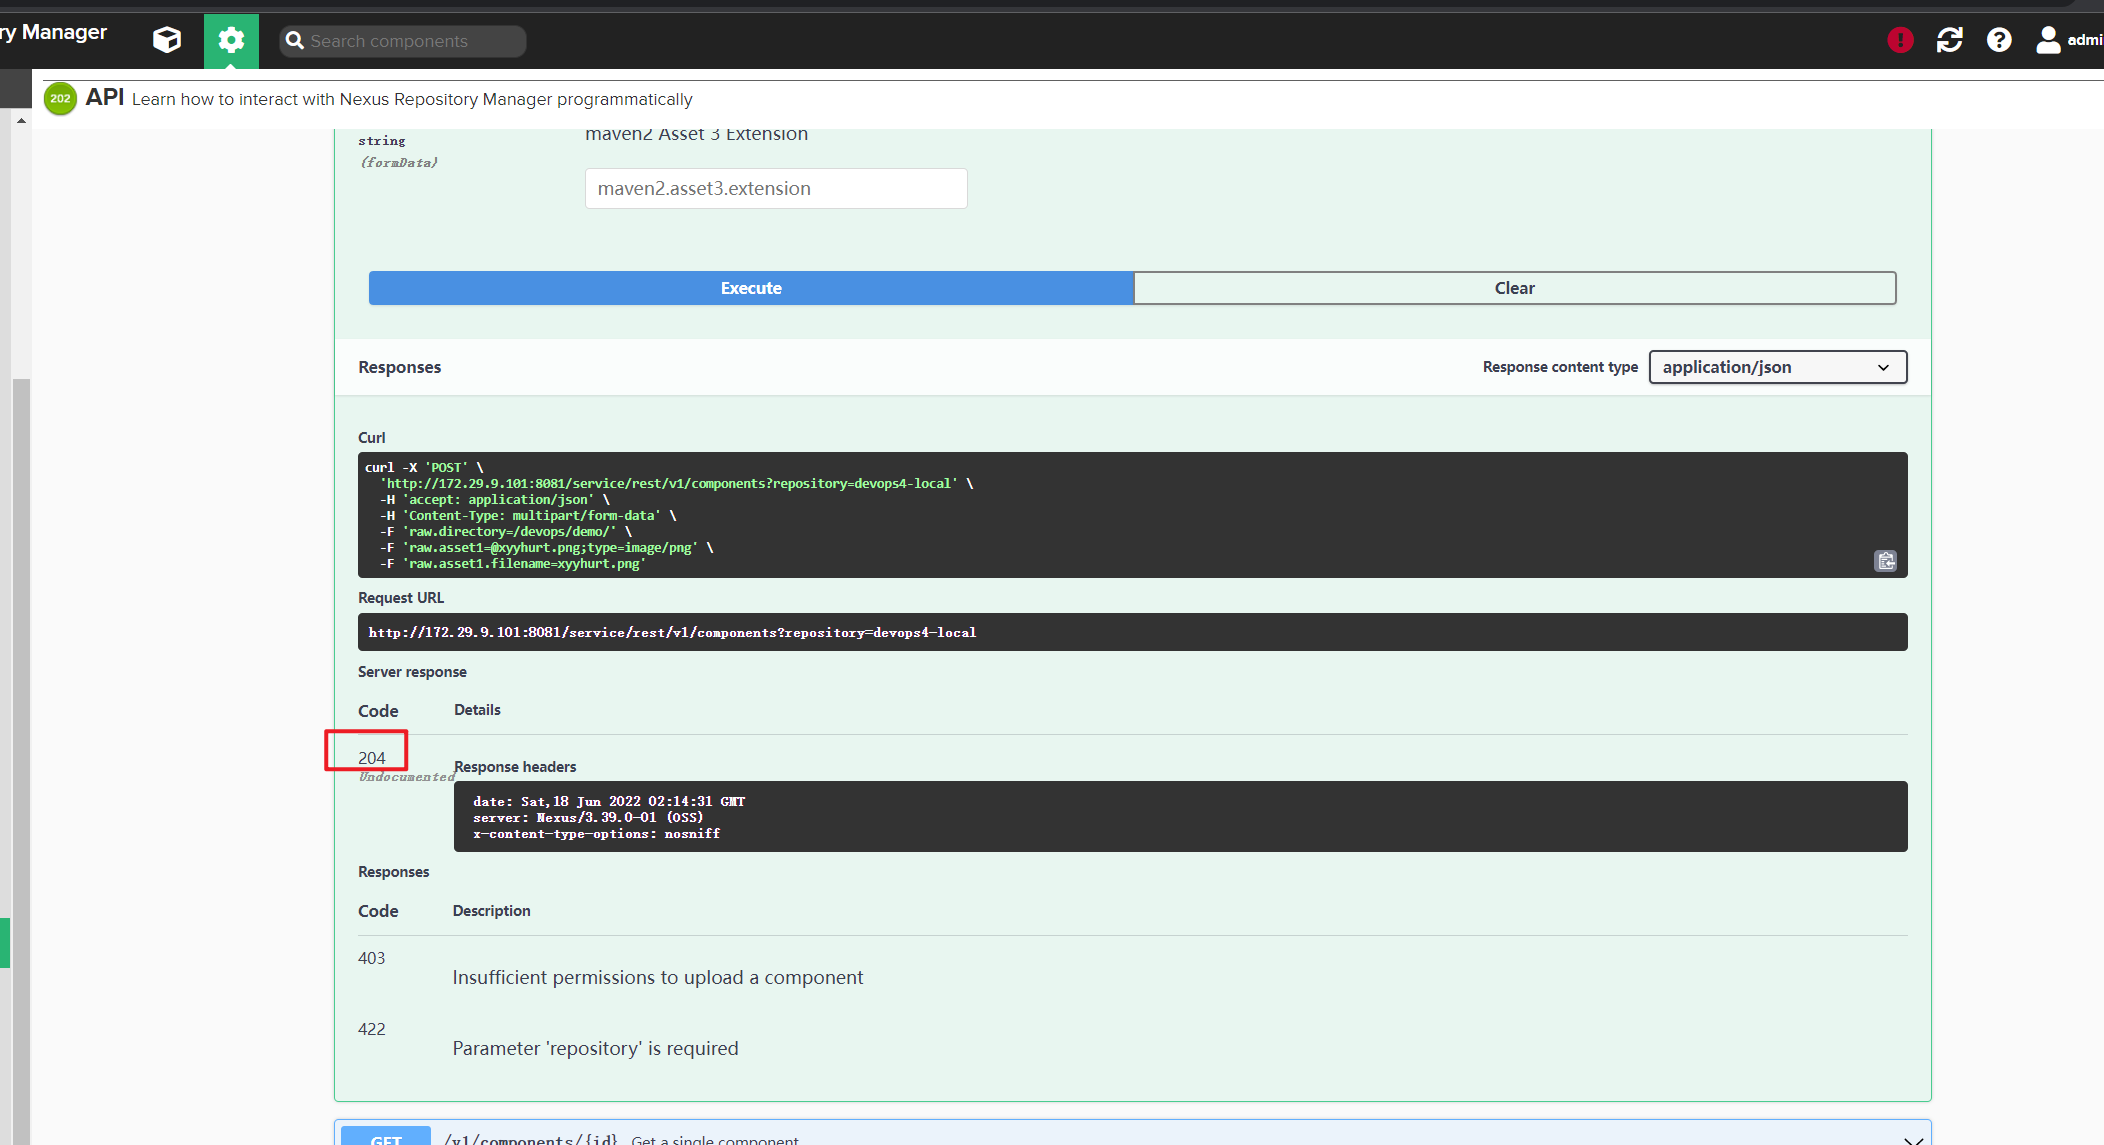
- 观察效果:
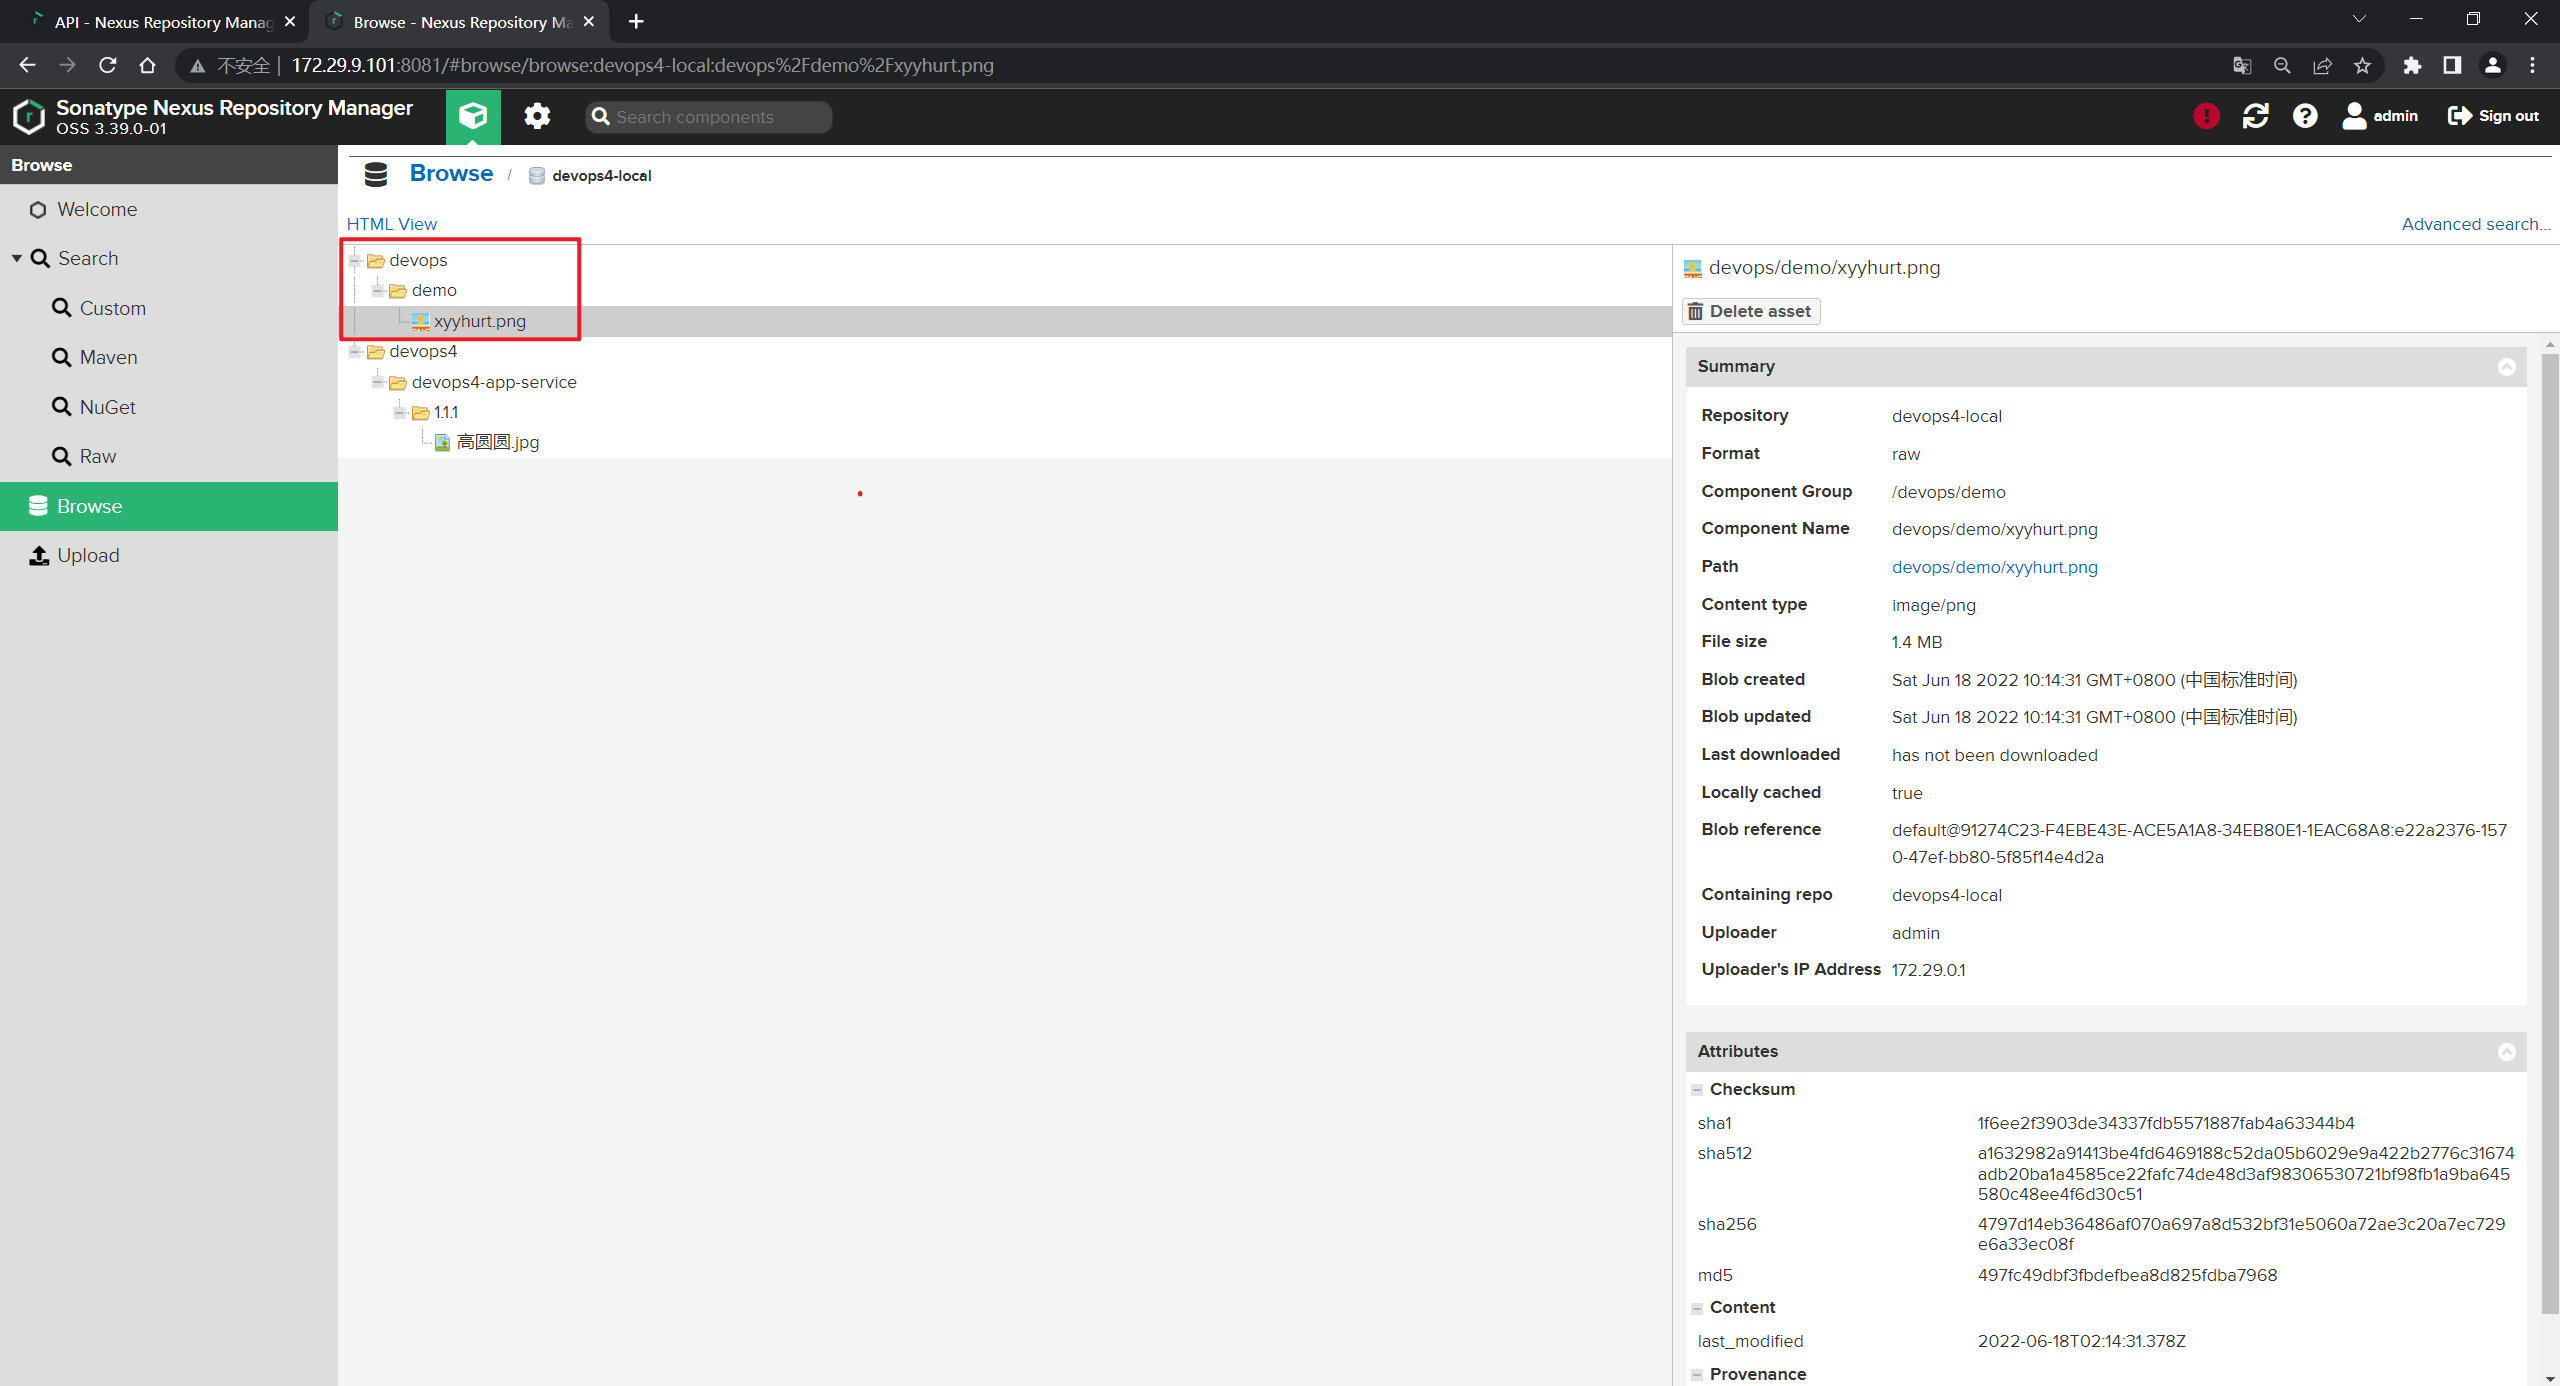
上传制品成功。
2、上传制品
curl -u admin:admin123 如果Nexus开启了认证需要配置认证信息才能正常访问。
##PNG
curl -X POST "http://192.168.1.200:8081/service/rest/v1/components?repository=myrepo" \
-H "accept: application/json" \
-H "Content-Type: multipart/form-data" \
-F "raw.directory=/tmp" \
-F "raw.asset1=@默认标题_自定义px_2020-10-01-0.png;type=image/png" \
-F "raw.asset1.filename=默认标题_自定义px_2020-10-01-0.png"


## tar.gz & ZIP
curl -X POST "http://192.168.1.200:8081/service/rest/v1/components?repository=myrepo" \
-H "accept: application/json" \
-H "Content-Type: multipart/form-data" \
-F "raw.directory=/tmp" \
-F "raw.asset1=@nexus-3.30.0-01-unix.tar.gz;type=application/x-gzip" \
-F "raw.asset1.filename=aaa.tar.gz"


curl -X POST "http://192.168.1.200:8081/service/rest/v1/components?repository=myrepo" -H "accept: application/json" -H "Content-Type: multipart/form-data" -F "raw.directory=/tmp" -F "raw.asset1=@waypoint_0.1.5_linux_amd64.zip;type=application/x-gzip" -F "raw.asset1.filename=waypoint_0.1.5_linux_amd64.zip"


## Jar file
curl -X POST "http://192.168.1.200:8081/service/rest/v1/components?repository=myrepo" \
-H "accept: application/json" \
-H "Content-Type: multipart/form-data" \
-F "raw.directory=/tmp" \
-F "raw.asset1=@aopalliance-1.0.jar;type=application/java-archive" \
-F "raw.asset1.filename=aopalliance-1.0.jar"
上传制品(maven类型的制品):
 curl -X POST "http://192.168.1.200:8081/service/rest/v1/components?repository=devops-maven" \
 -H "accept: application/json" \
 -H "Content-Type: multipart/form-data" \
 -F "maven2.groupId=com.newdevops" \
 -F "maven2.artifactId=devopsapp" \
 -F "maven2.version=1.1.5" \
 -F "maven2.packaging=jar" \
 -F "maven2.asset1=@demo-0.0.1-SNAPSHOT.jar;type=application/java-archive" \
 -F "maven2.asset1.extension=demo-0.0.1-SNAPSHOT.jar" \
 -u admin:admin123
📍 自己测试过程:
- 把
devops4-jenkinslib-service这里的Jenkinsfile数据拿下来,进行编写:
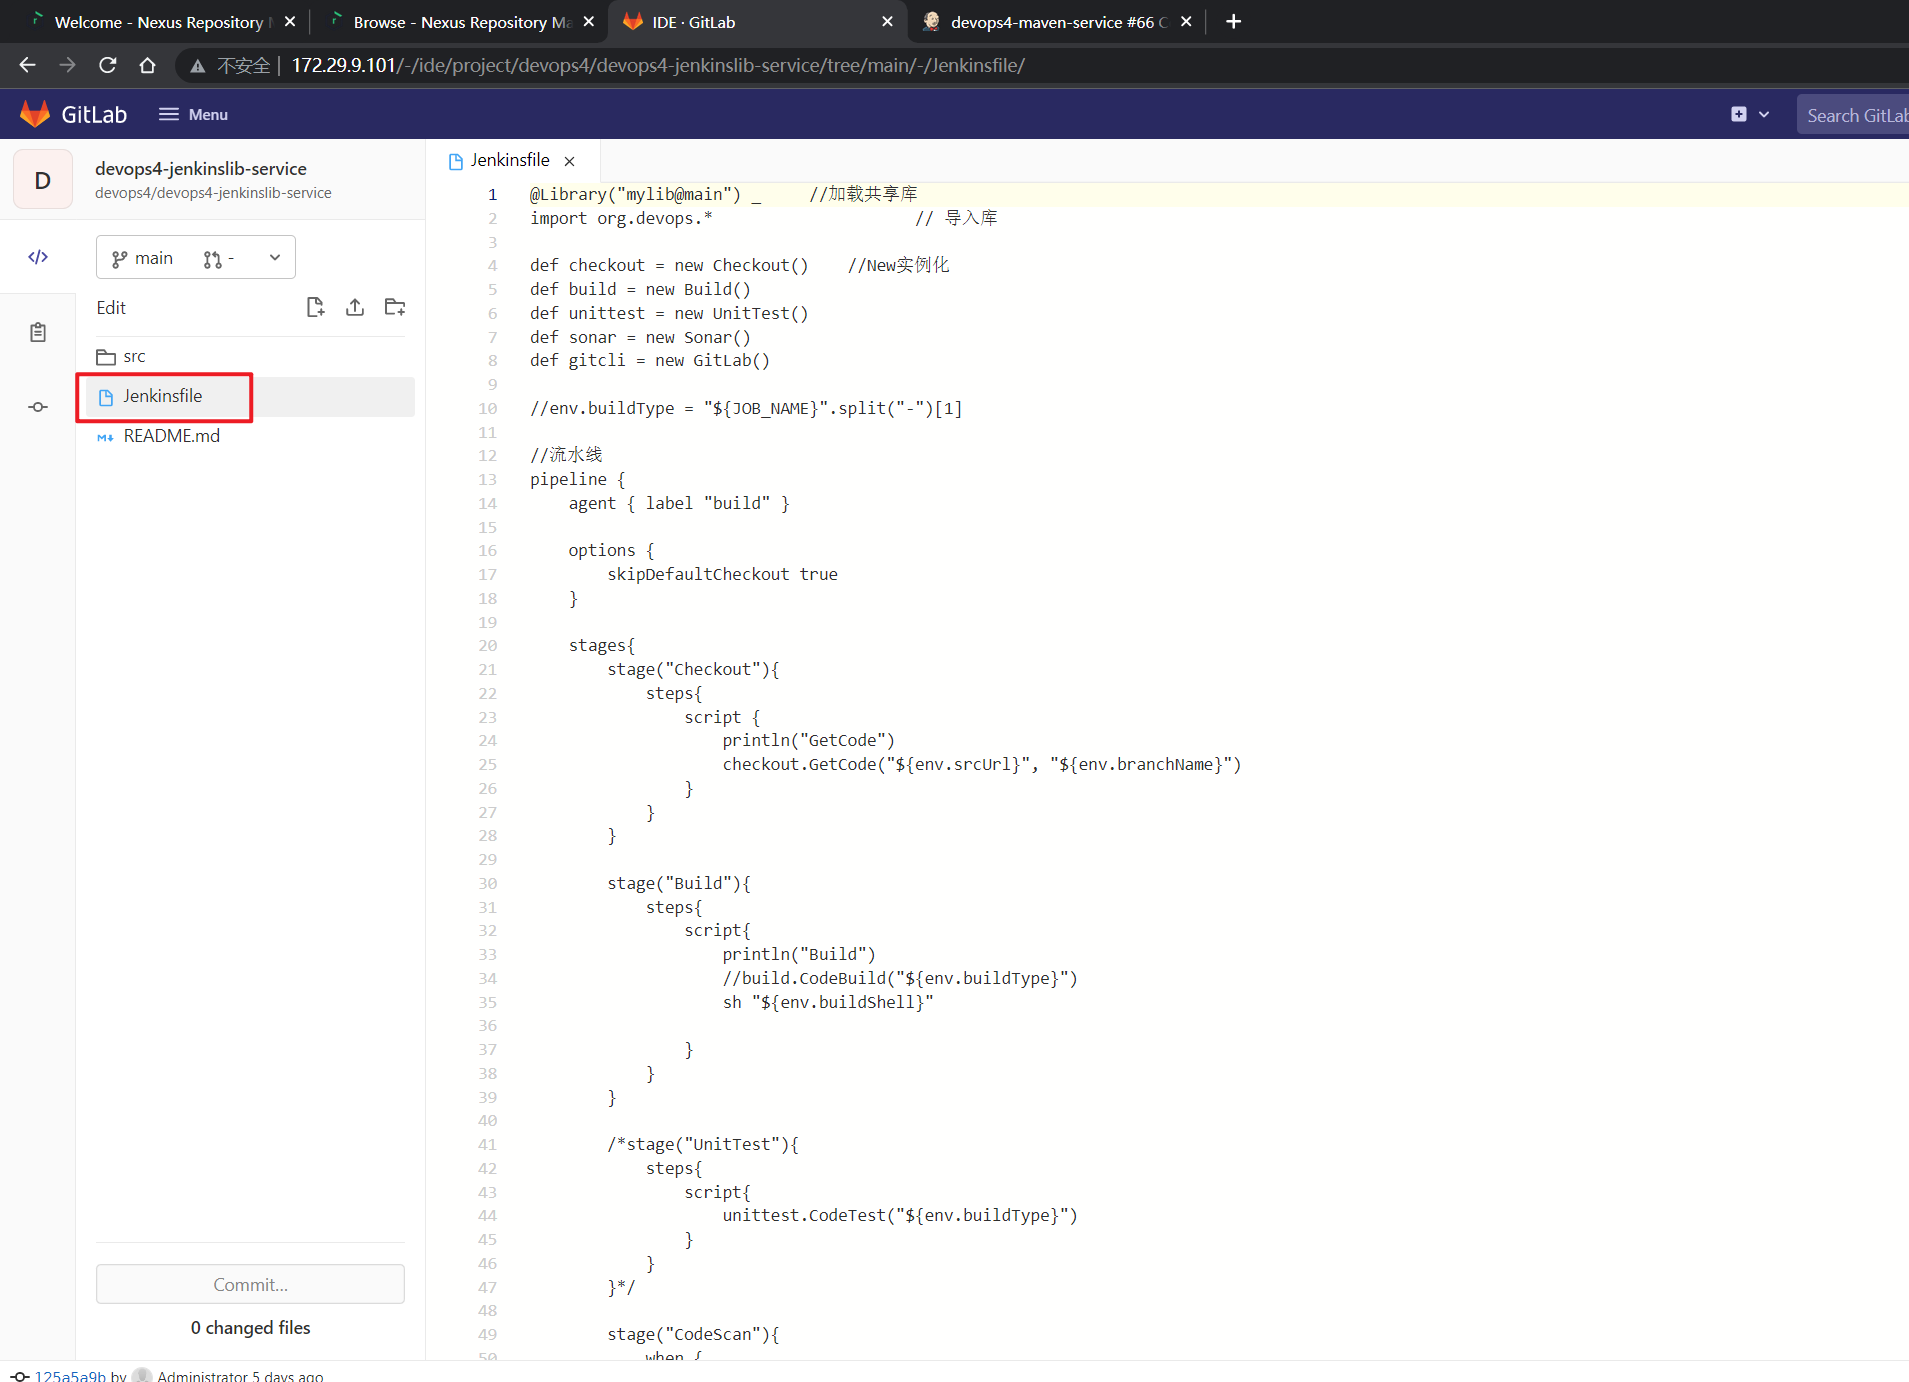
编写如下:
修改下env.commitID:

把这一块写好:
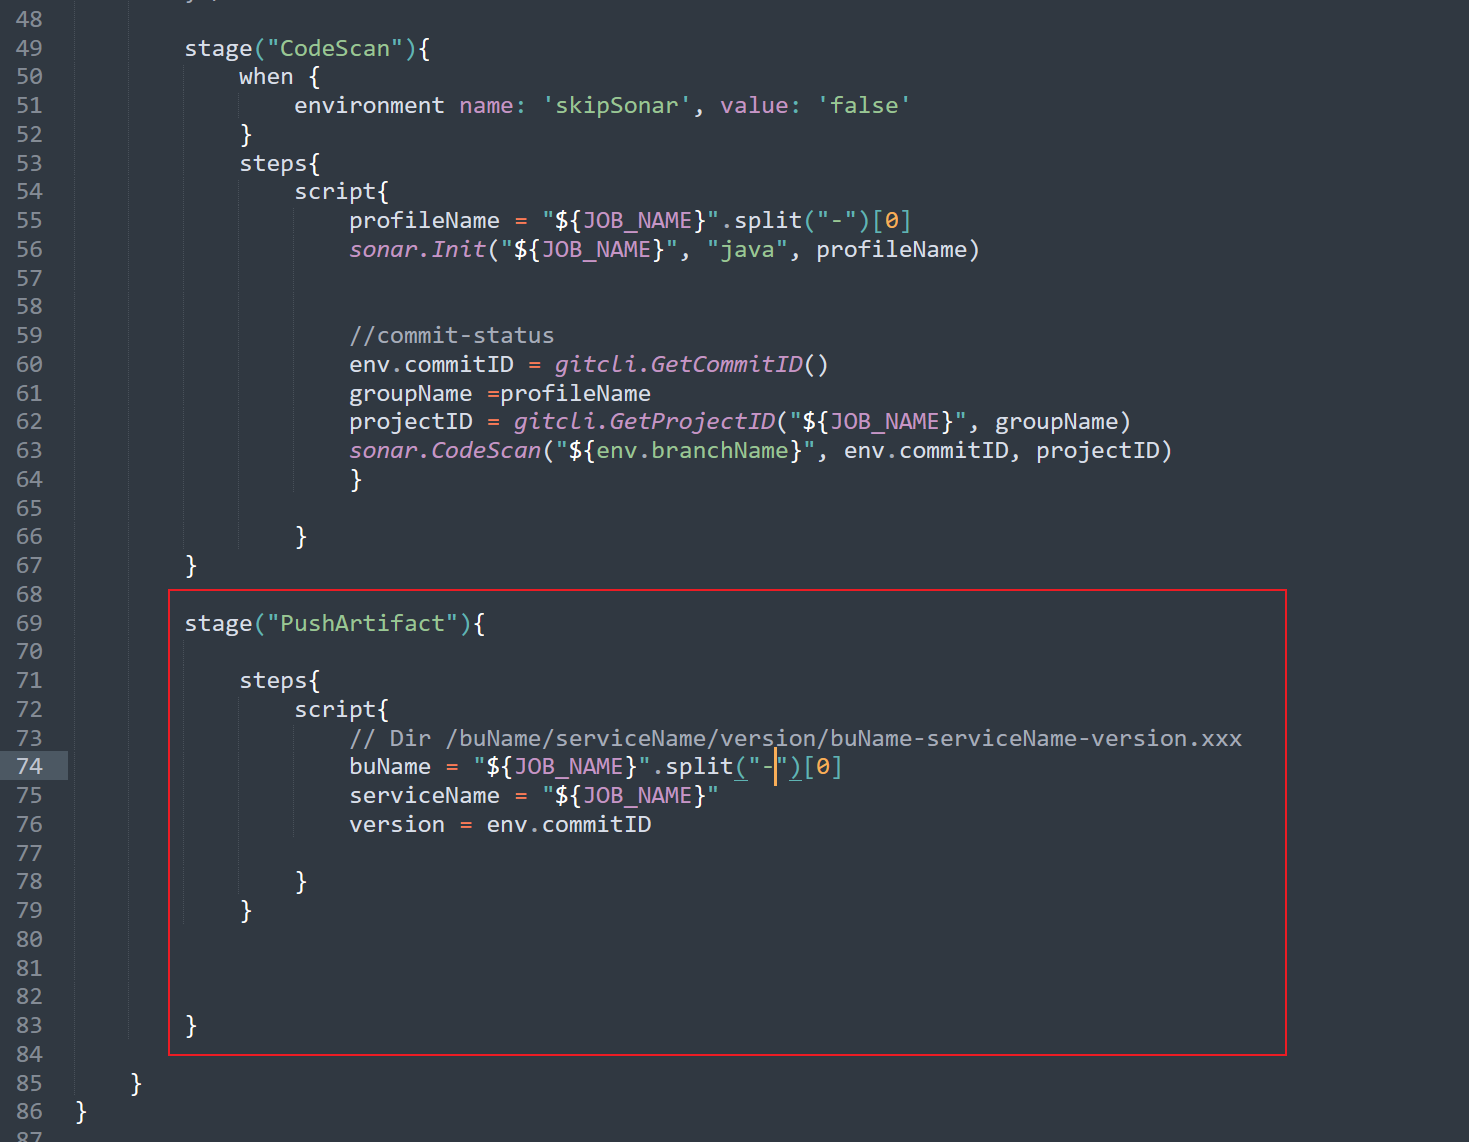
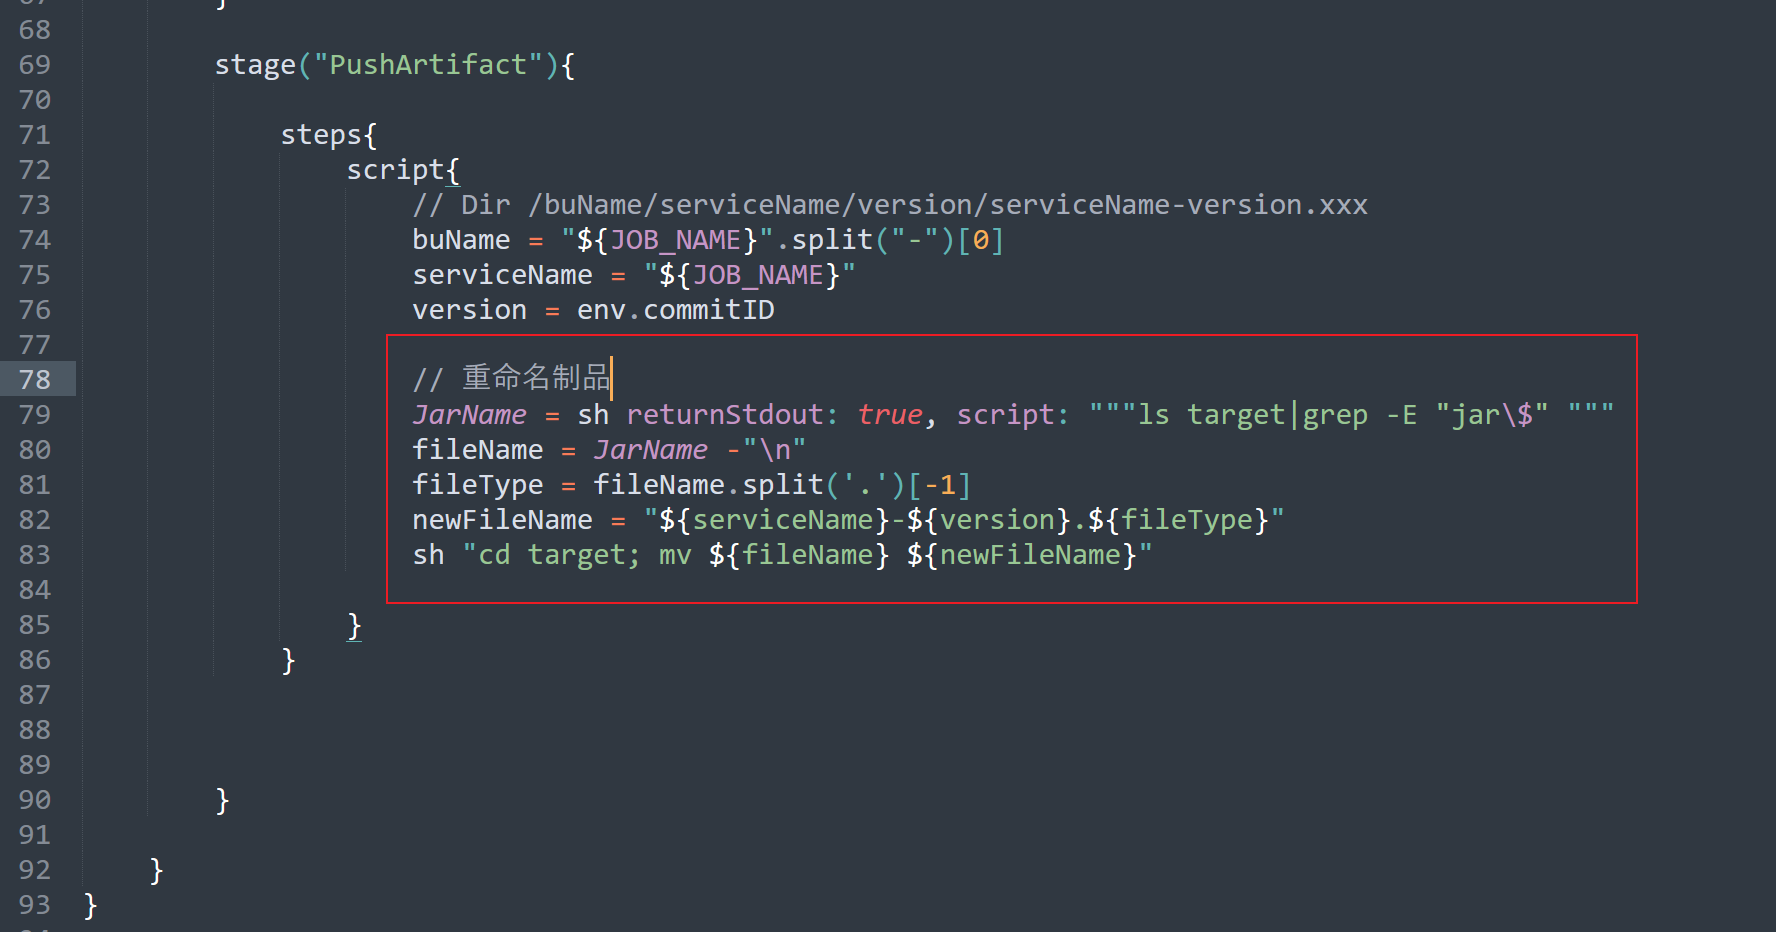
重命名制品:
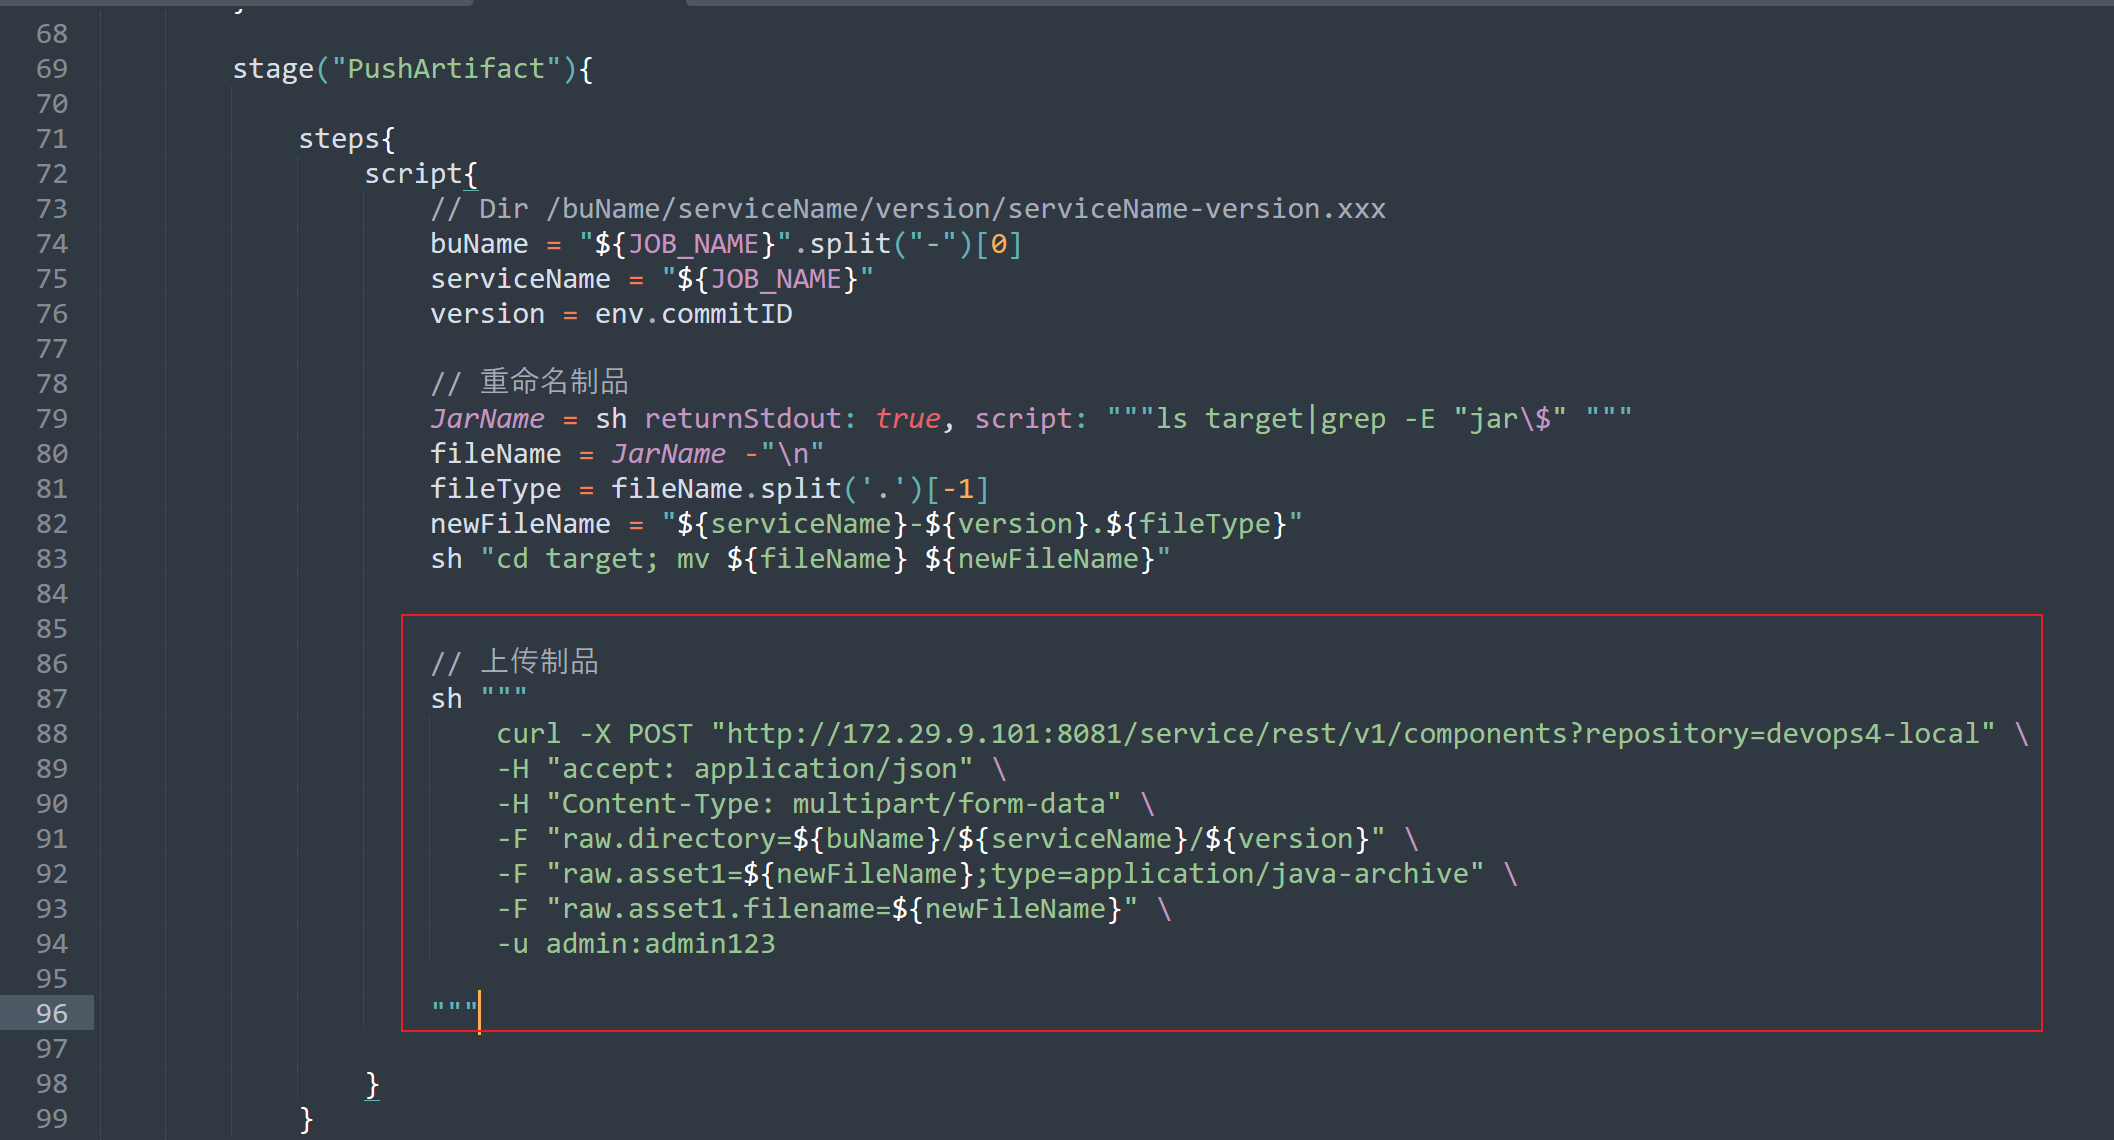
上传制品:
这里要加一个认证信息,因为我们要调用api:
- 此时复制代码,到
devops4-maven-service项目的回放里,跑一下,看下效果:
@Library("mylib@main") _     //加载共享库
import org.devops.*						// 导入库

def checkout = new Checkout()    //New实例化
def build = new Build()
def unittest = new UnitTest()
def sonar = new Sonar()
def gitcli = new GitLab()

//env.buildType = "${JOB_NAME}".split("-")[1]

//流水线
pipeline {
    agent { label "build" }

    options {
        skipDefaultCheckout true
    }

    stages{
        stage("Checkout"){
            steps{
                script {
                    println("GetCode")
                    checkout.GetCode("${env.srcUrl}", "${env.branchName}")
                }
            }
        }

        stage("Build"){
            steps{
                script{
                    println("Build")
                    //build.CodeBuild("${env.buildType}")
                    sh "${env.buildShell}"

                }
            }
        }

        /*stage("UnitTest"){
            steps{
                script{
                    unittest.CodeTest("${env.buildType}")
                }
            }
        }*/

        stage("CodeScan"){
            when {
                environment name: 'skipSonar', value: 'false'
            }
            steps{
                script{
                    profileName = "${JOB_NAME}".split("-")[0]
                    sonar.Init("${JOB_NAME}", "java", profileName)


                    //commit-status
                    env.commitID = gitcli.GetCommitID()
                    groupName =profileName
                    projectID = gitcli.GetProjectID("${JOB_NAME}", groupName)
                    sonar.CodeScan("${env.branchName}", env.commitID, projectID)
                    }

                }
        }

        stage("PushArtifact"){

            steps{
                script{
                    // Dir /buName/serviceName/version/serviceName-version.xxx
                    buName = "${JOB_NAME}".split("-")[0]
                    serviceName = "${JOB_NAME}"
                    version = env.commitID

                    // 重命名制品
                    JarName = sh returnStdout: true, script: """ls target|grep -E "jar\$" """
                    fileName = JarName -"\n"
                    fileType = fileName.split('.')[-1]
                    newFileName = "${serviceName}-${version}.${fileType}"
                    sh "cd target; mv ${fileName} ${newFileName}"


                    // 上传制品
                    sh """
                        curl -X POST "http://172.29.9.101:8081/service/rest/v1/components?repository=devops4-local" \
                        -H "accept: application/json" \
                        -H "Content-Type: multipart/form-data" \
                        -F "raw.directory=${buName}/${serviceName}/${version}" \
                        -F "raw.asset1=${newFileName};type=application/java-archive" \
                        -F "raw.asset1.filename=${newFileName}" \
                        -u admin:admin123

                    """

                }
            }


        }

    }
}
可以看到会报错:
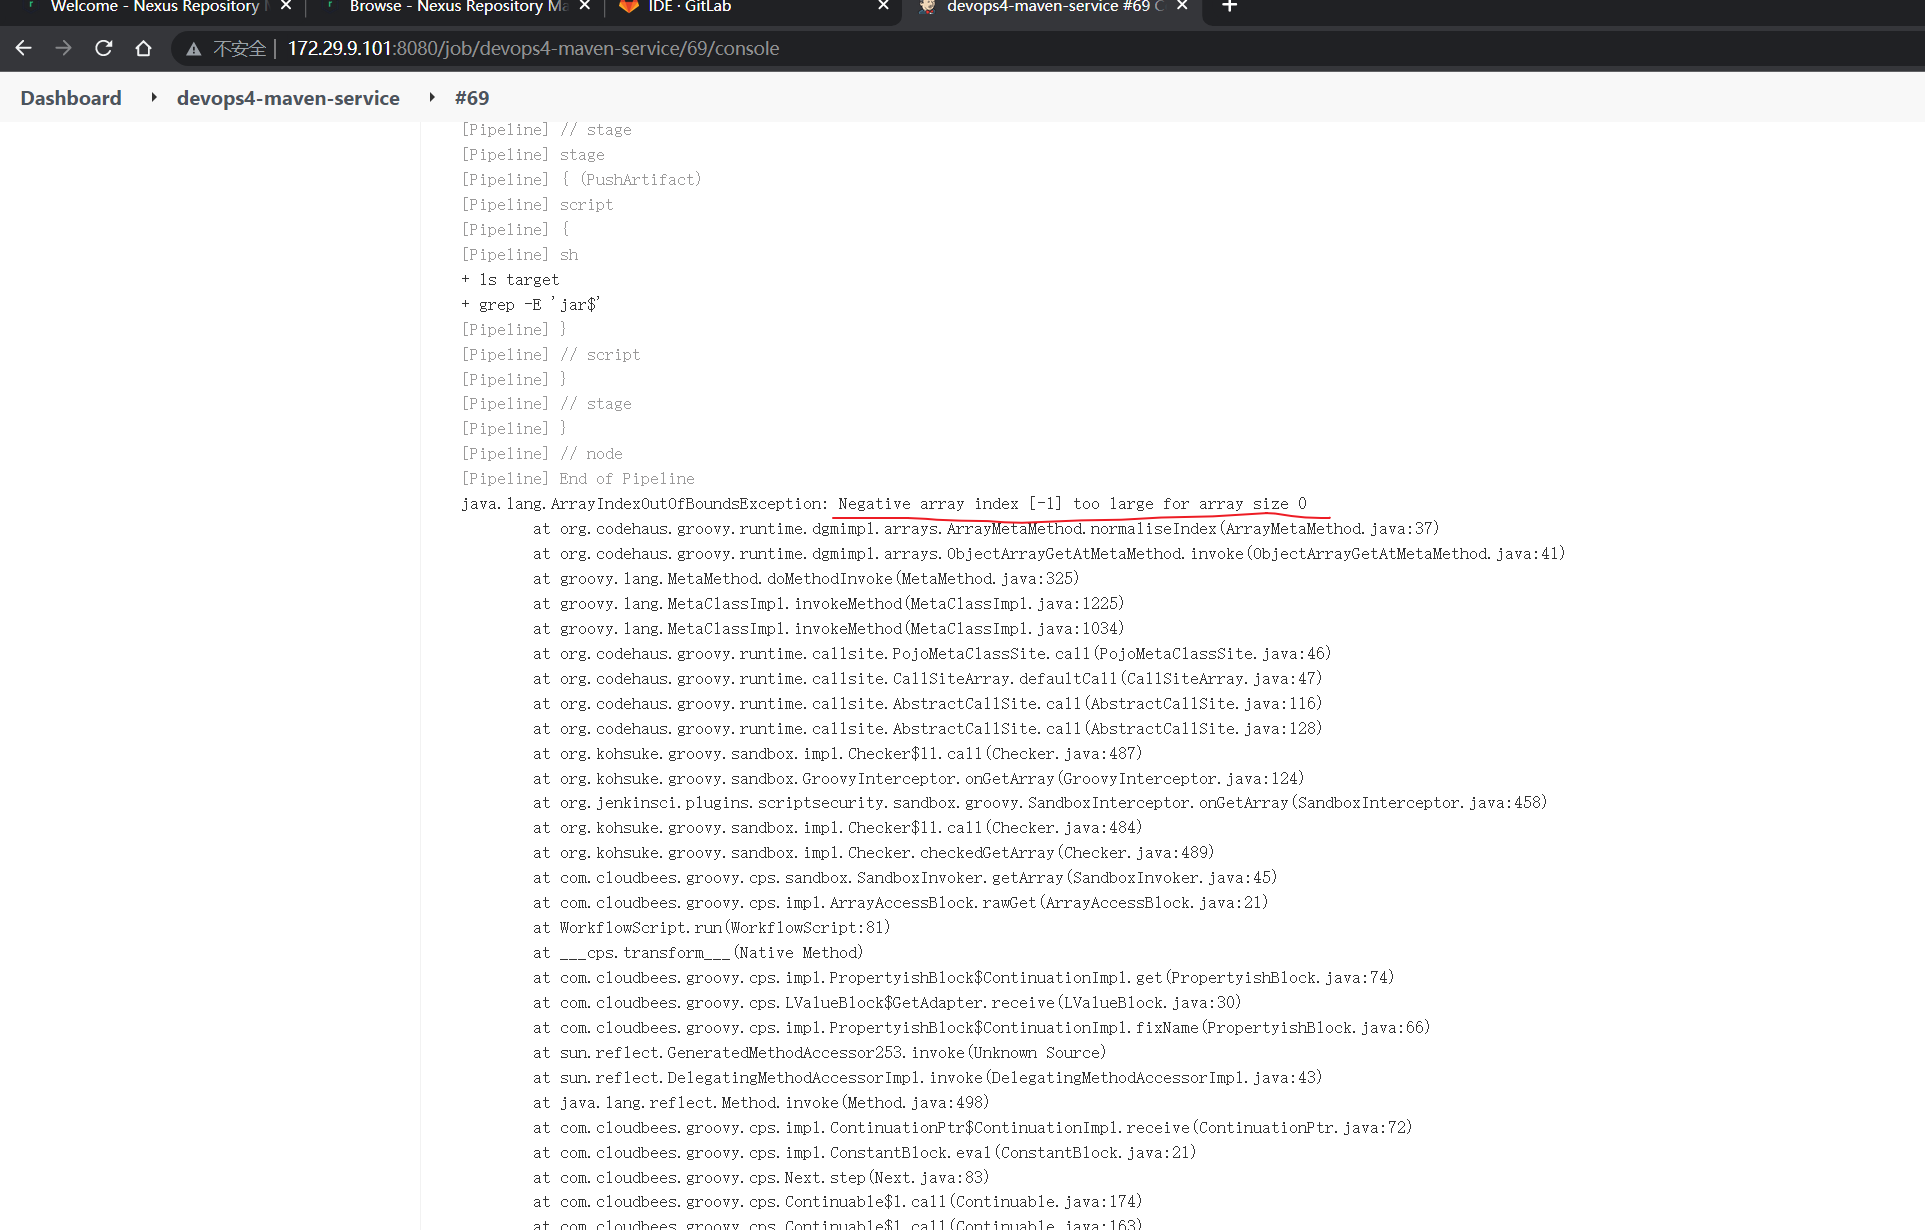
我们先来打印下fileName:
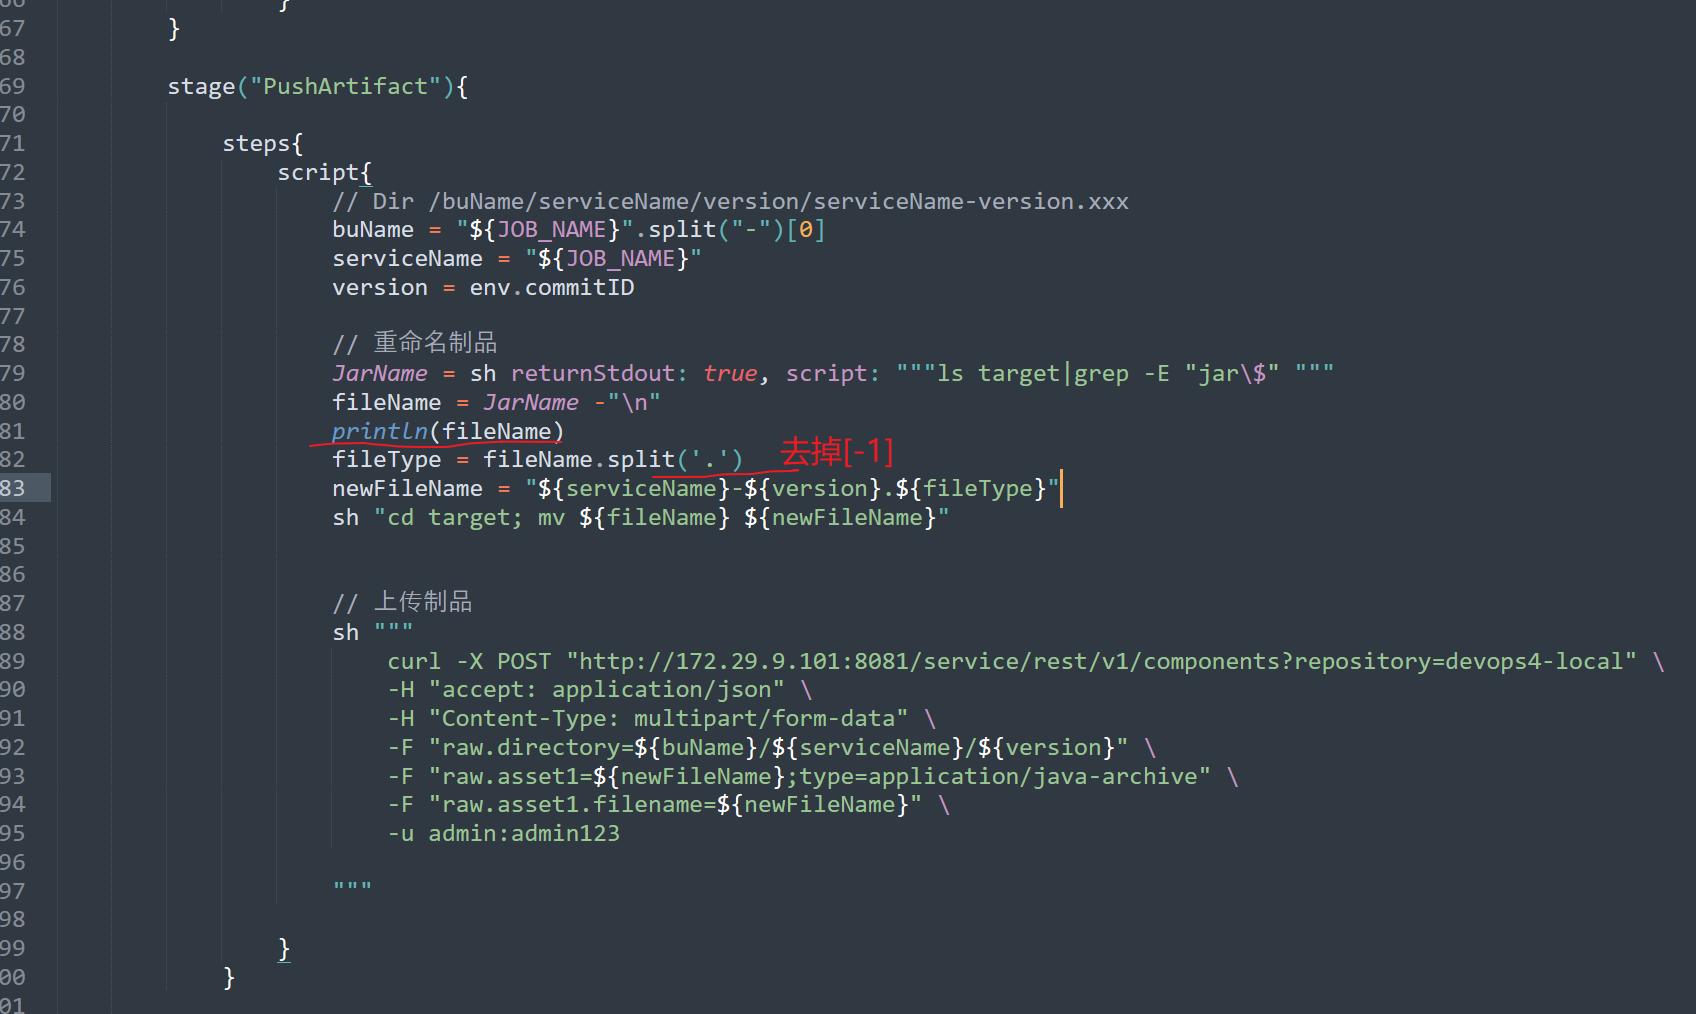
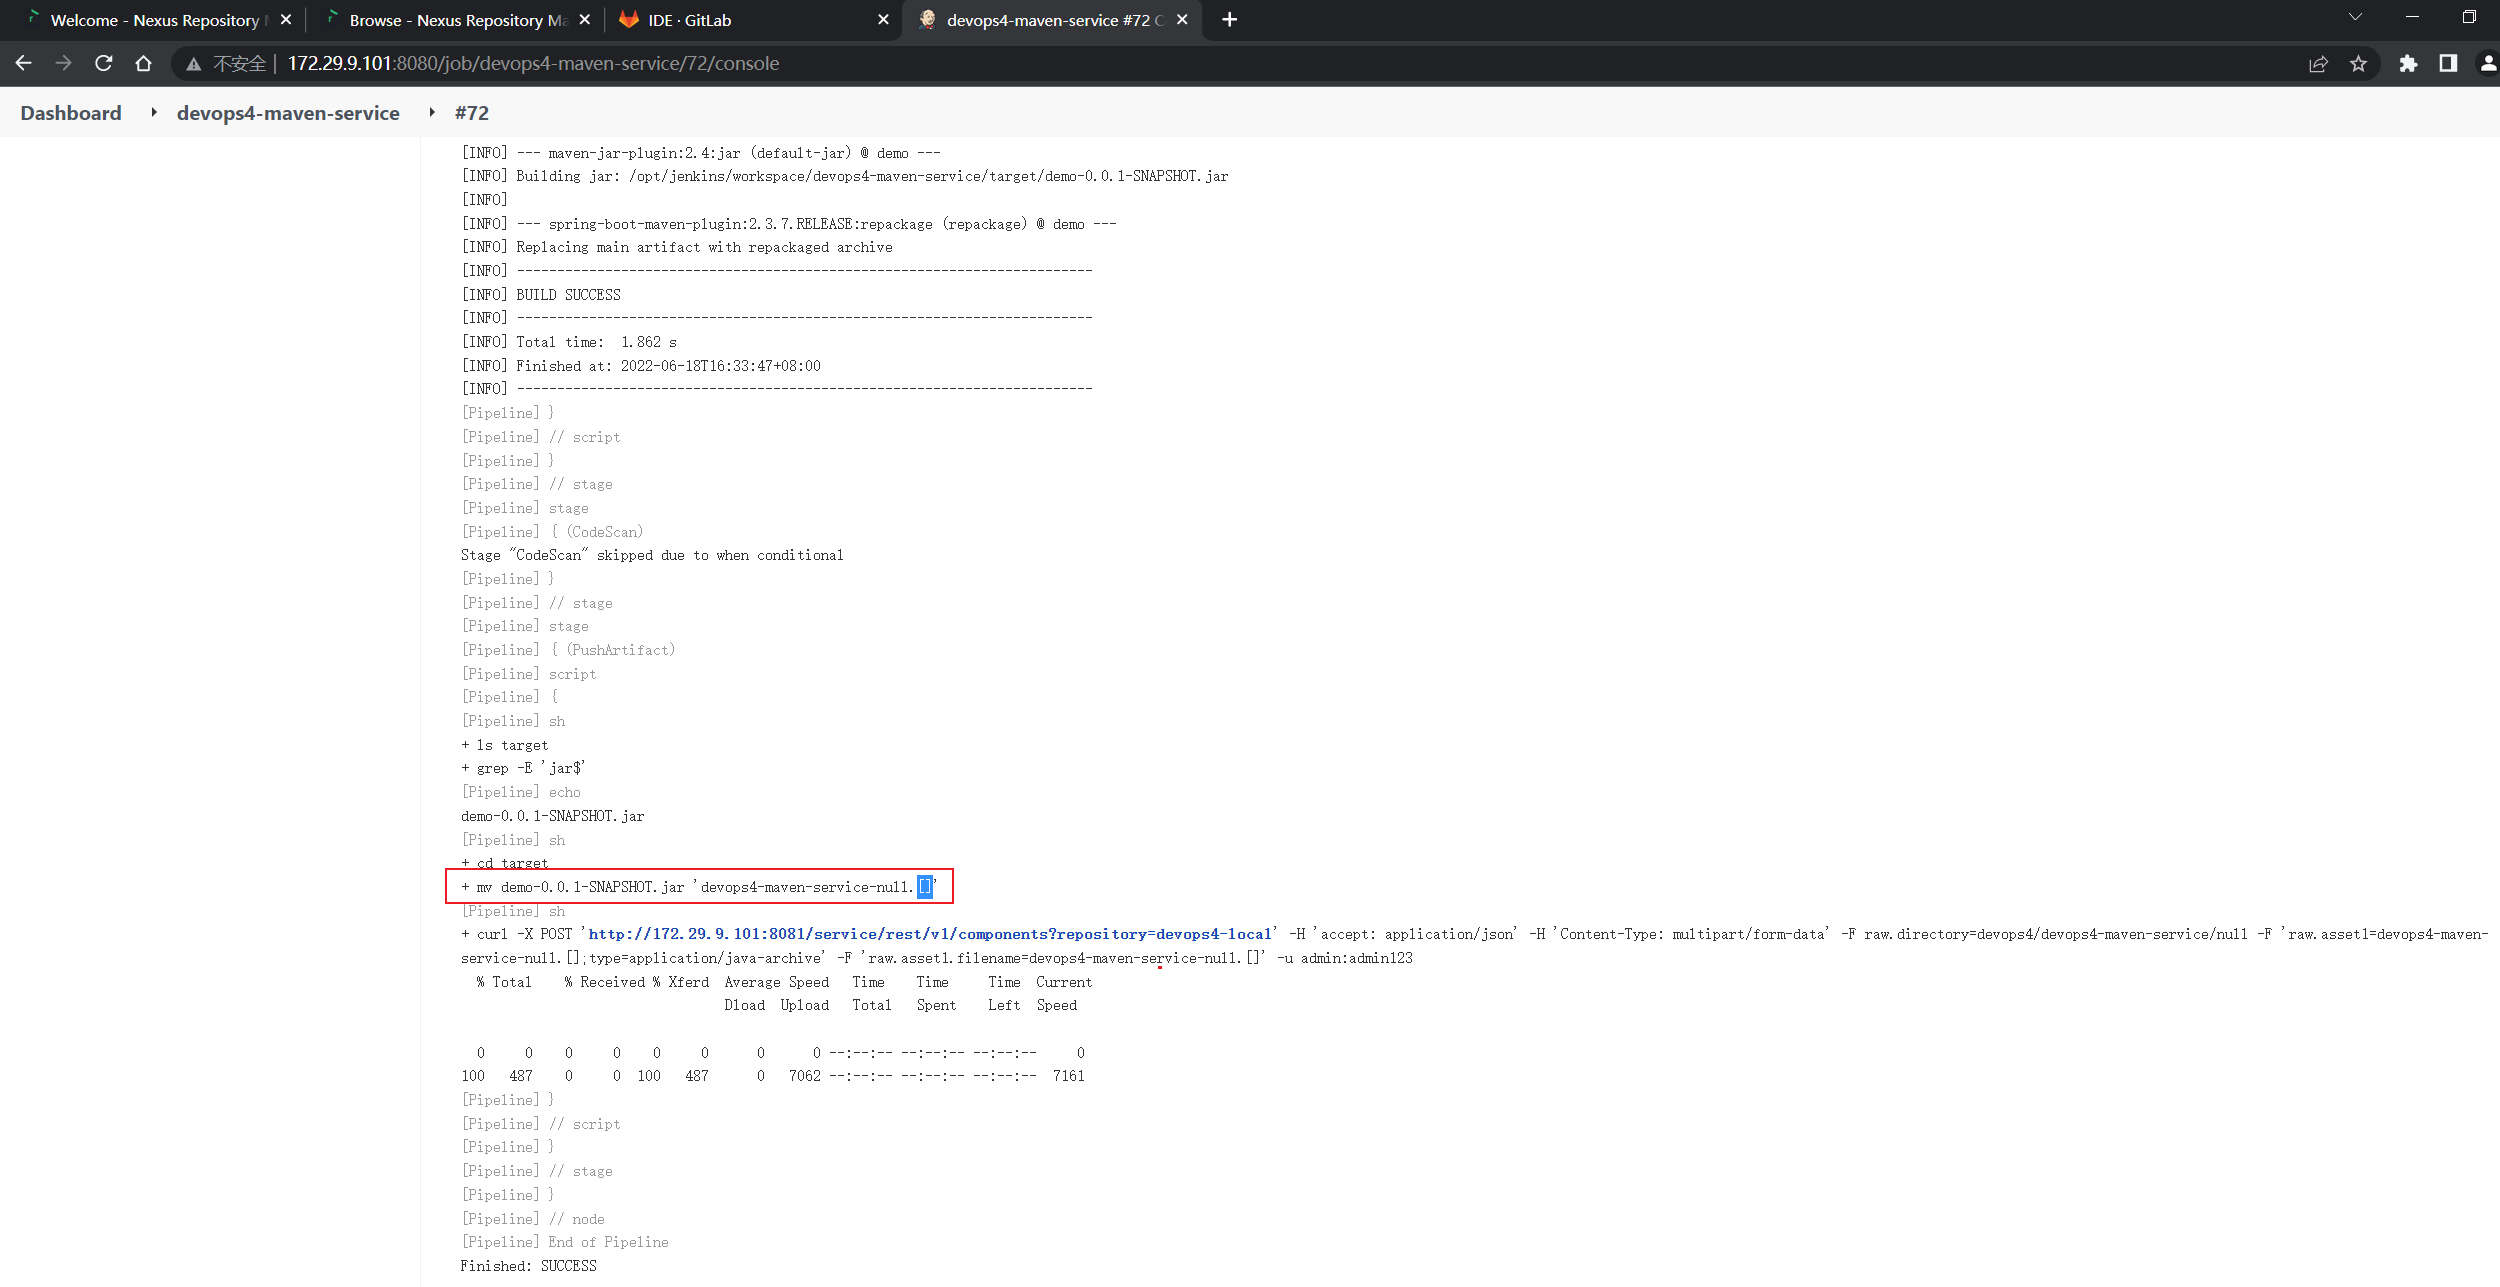
可能这里的.需要转义:2个\
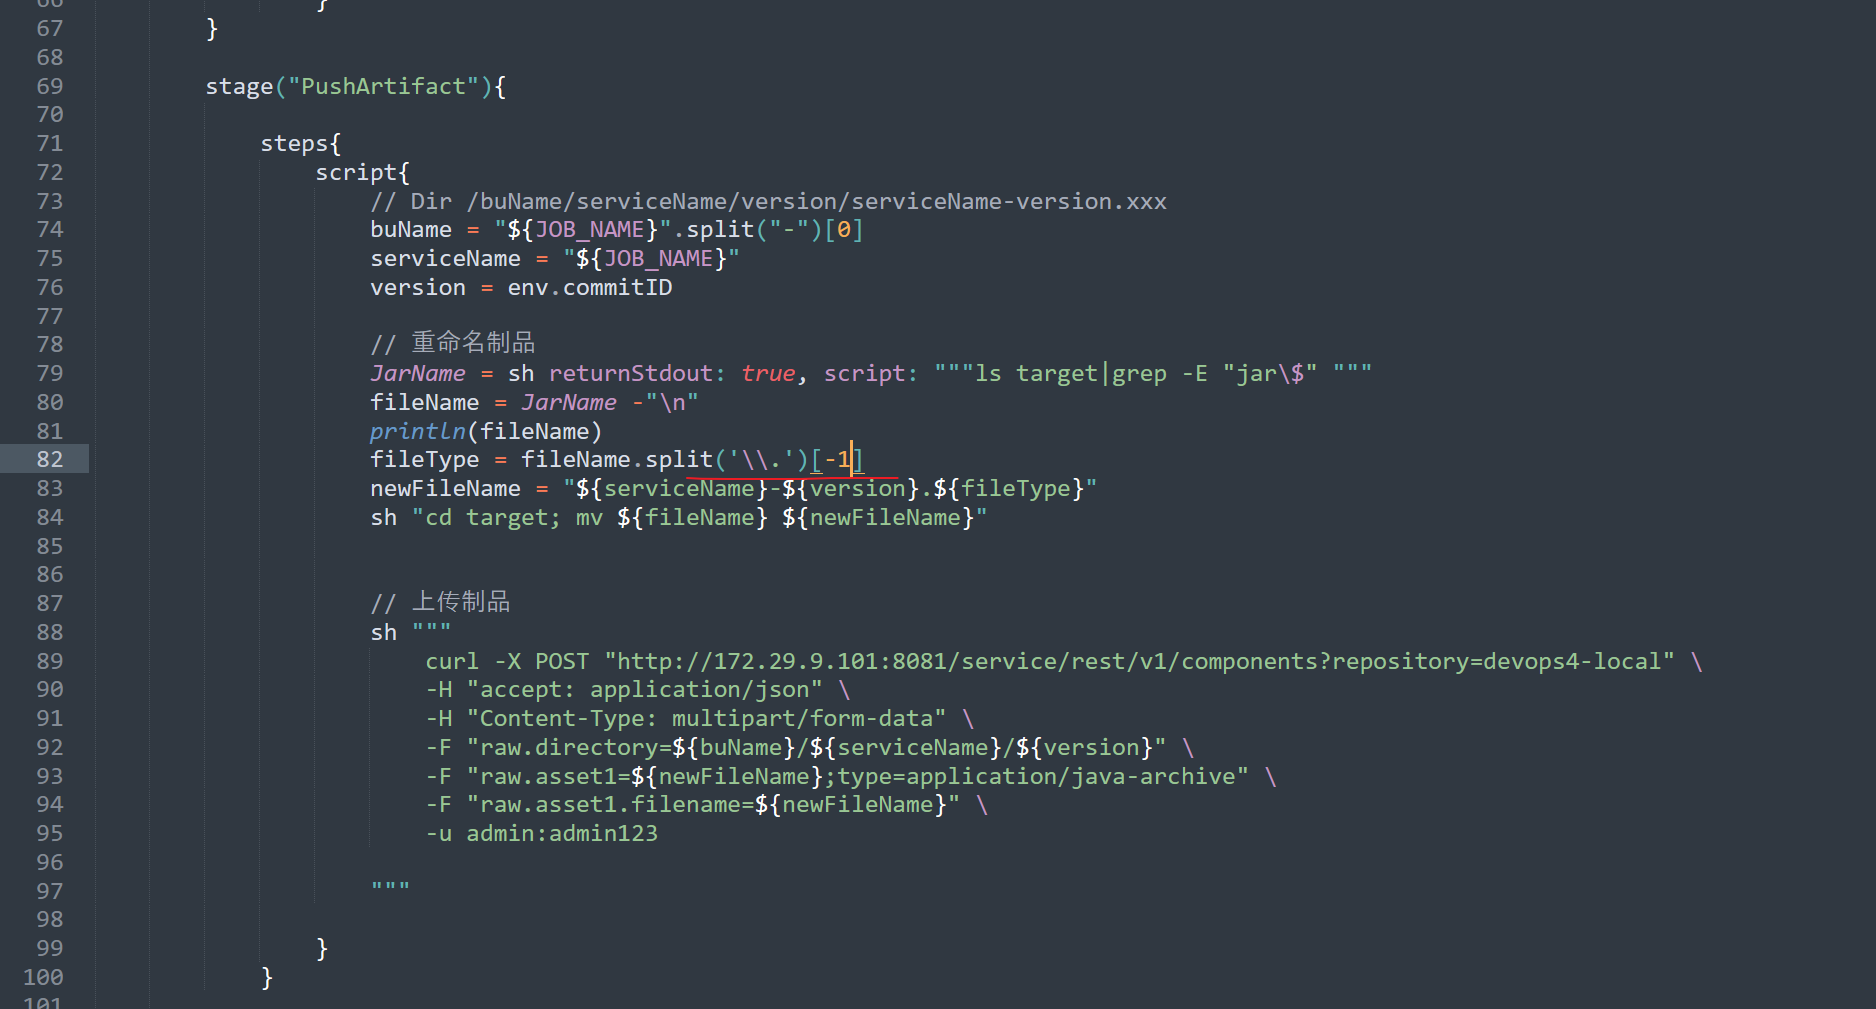
- 可以看到,这里的version有问题,是一个null
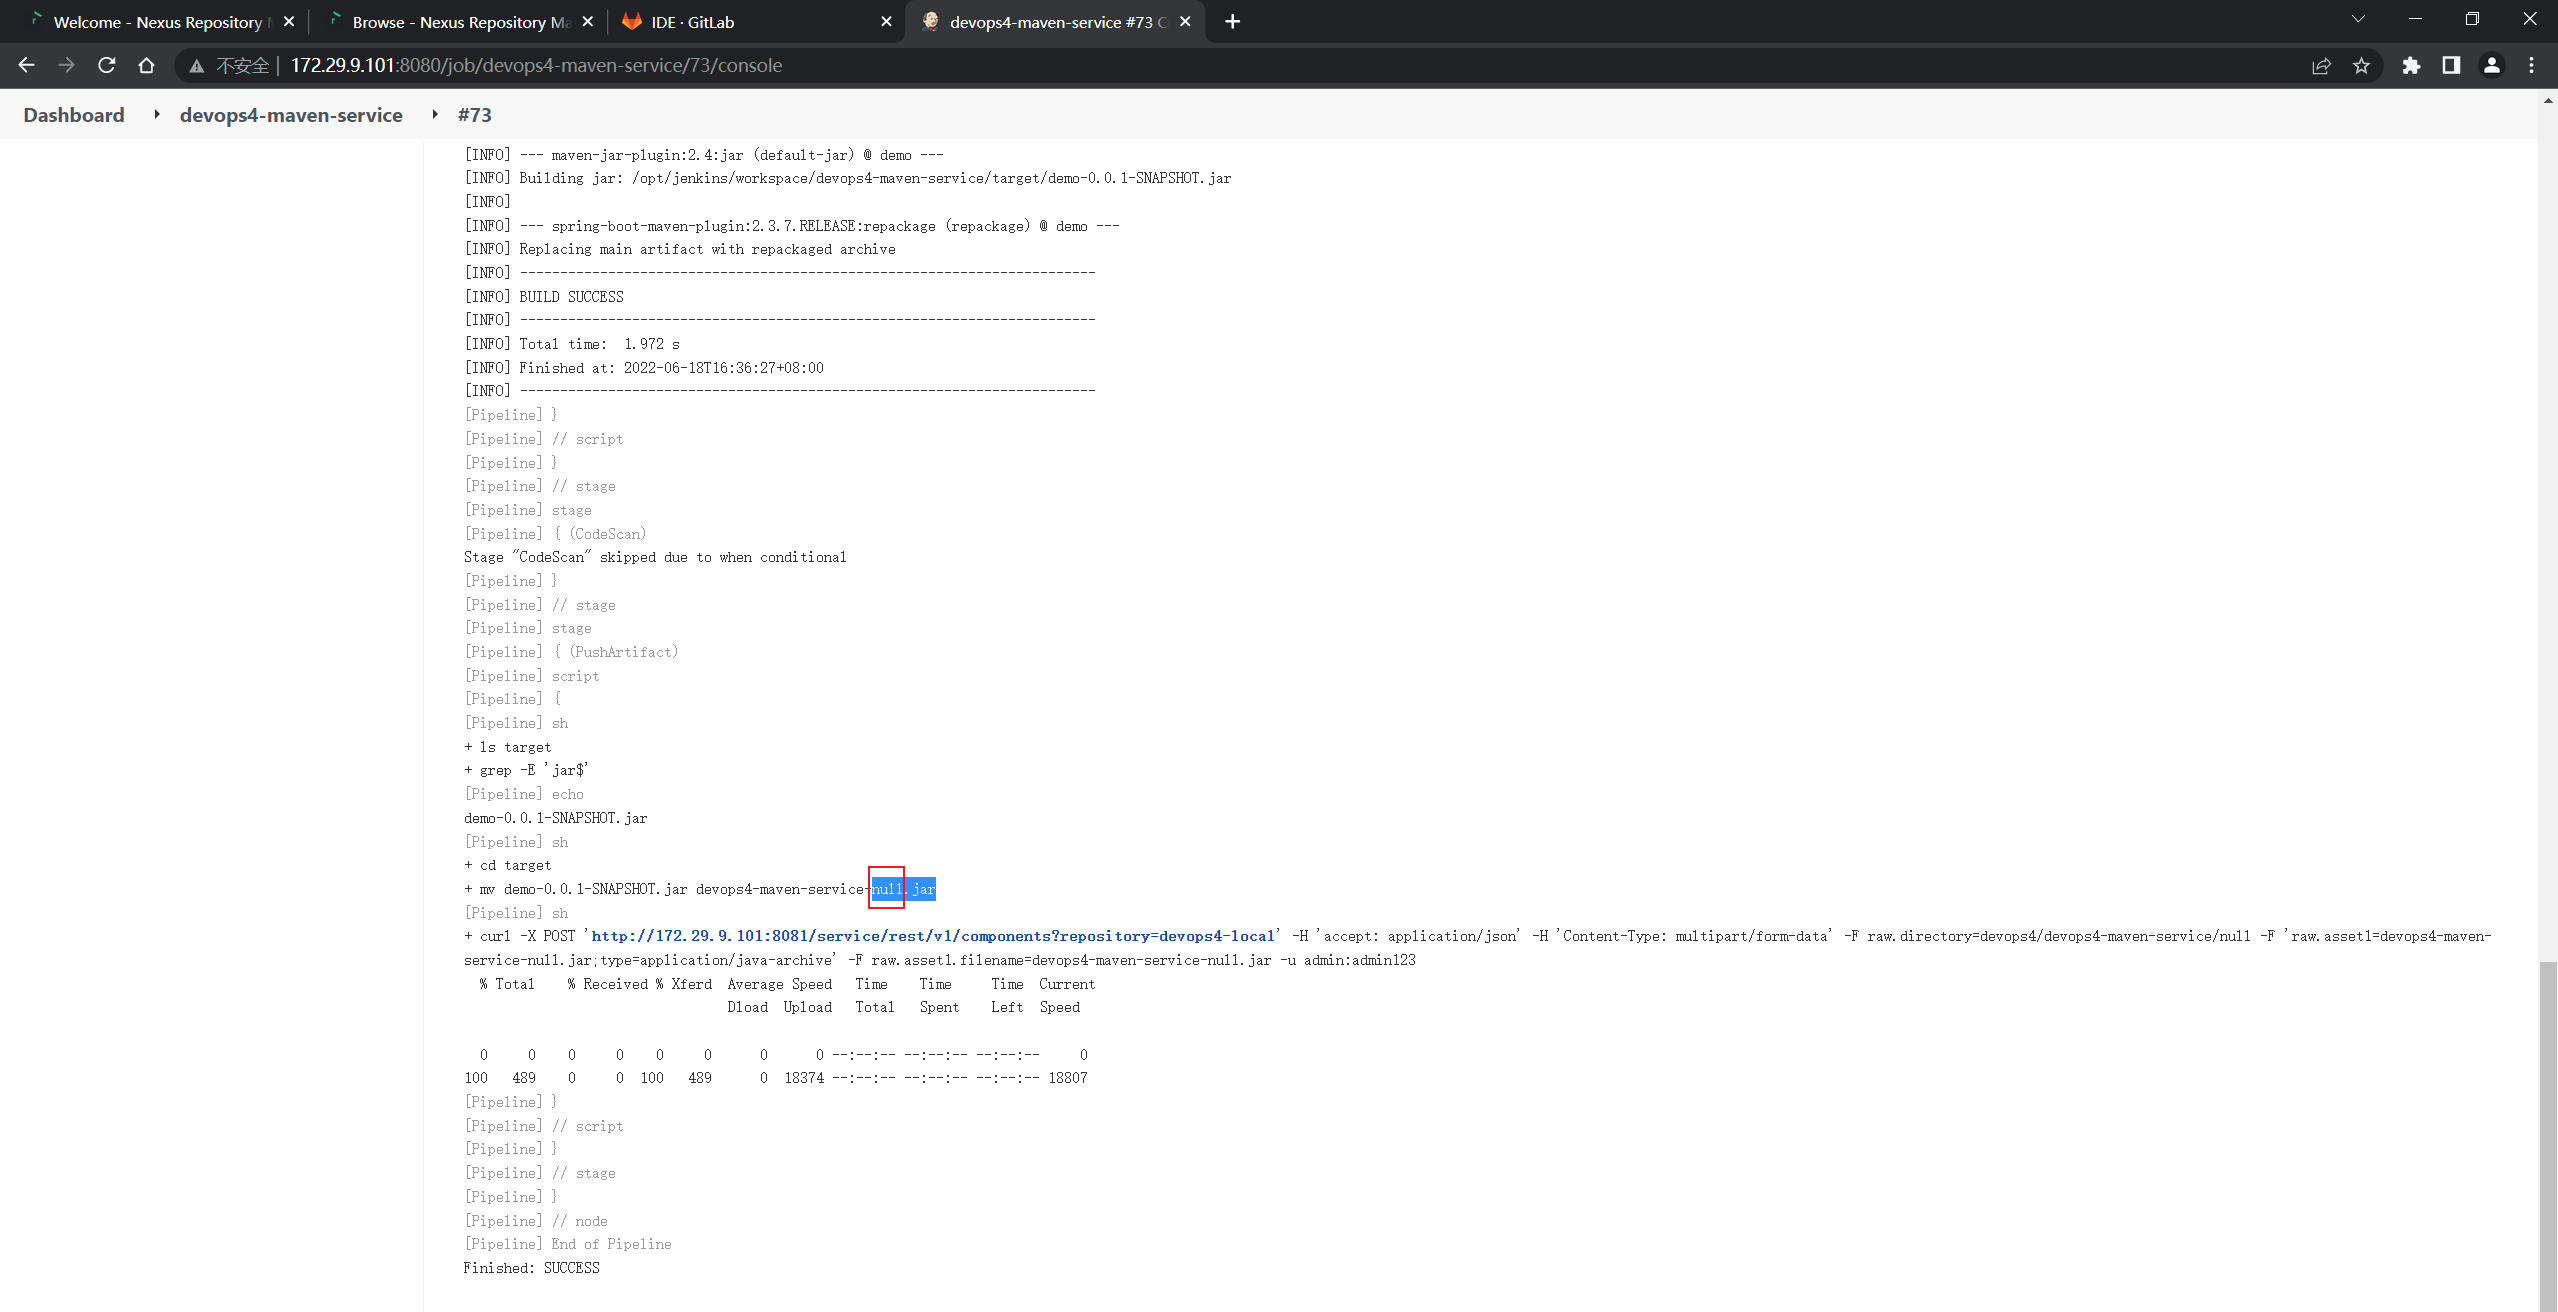
- 注意:这里有个target目录的:
没有这个target目录时会报错的:
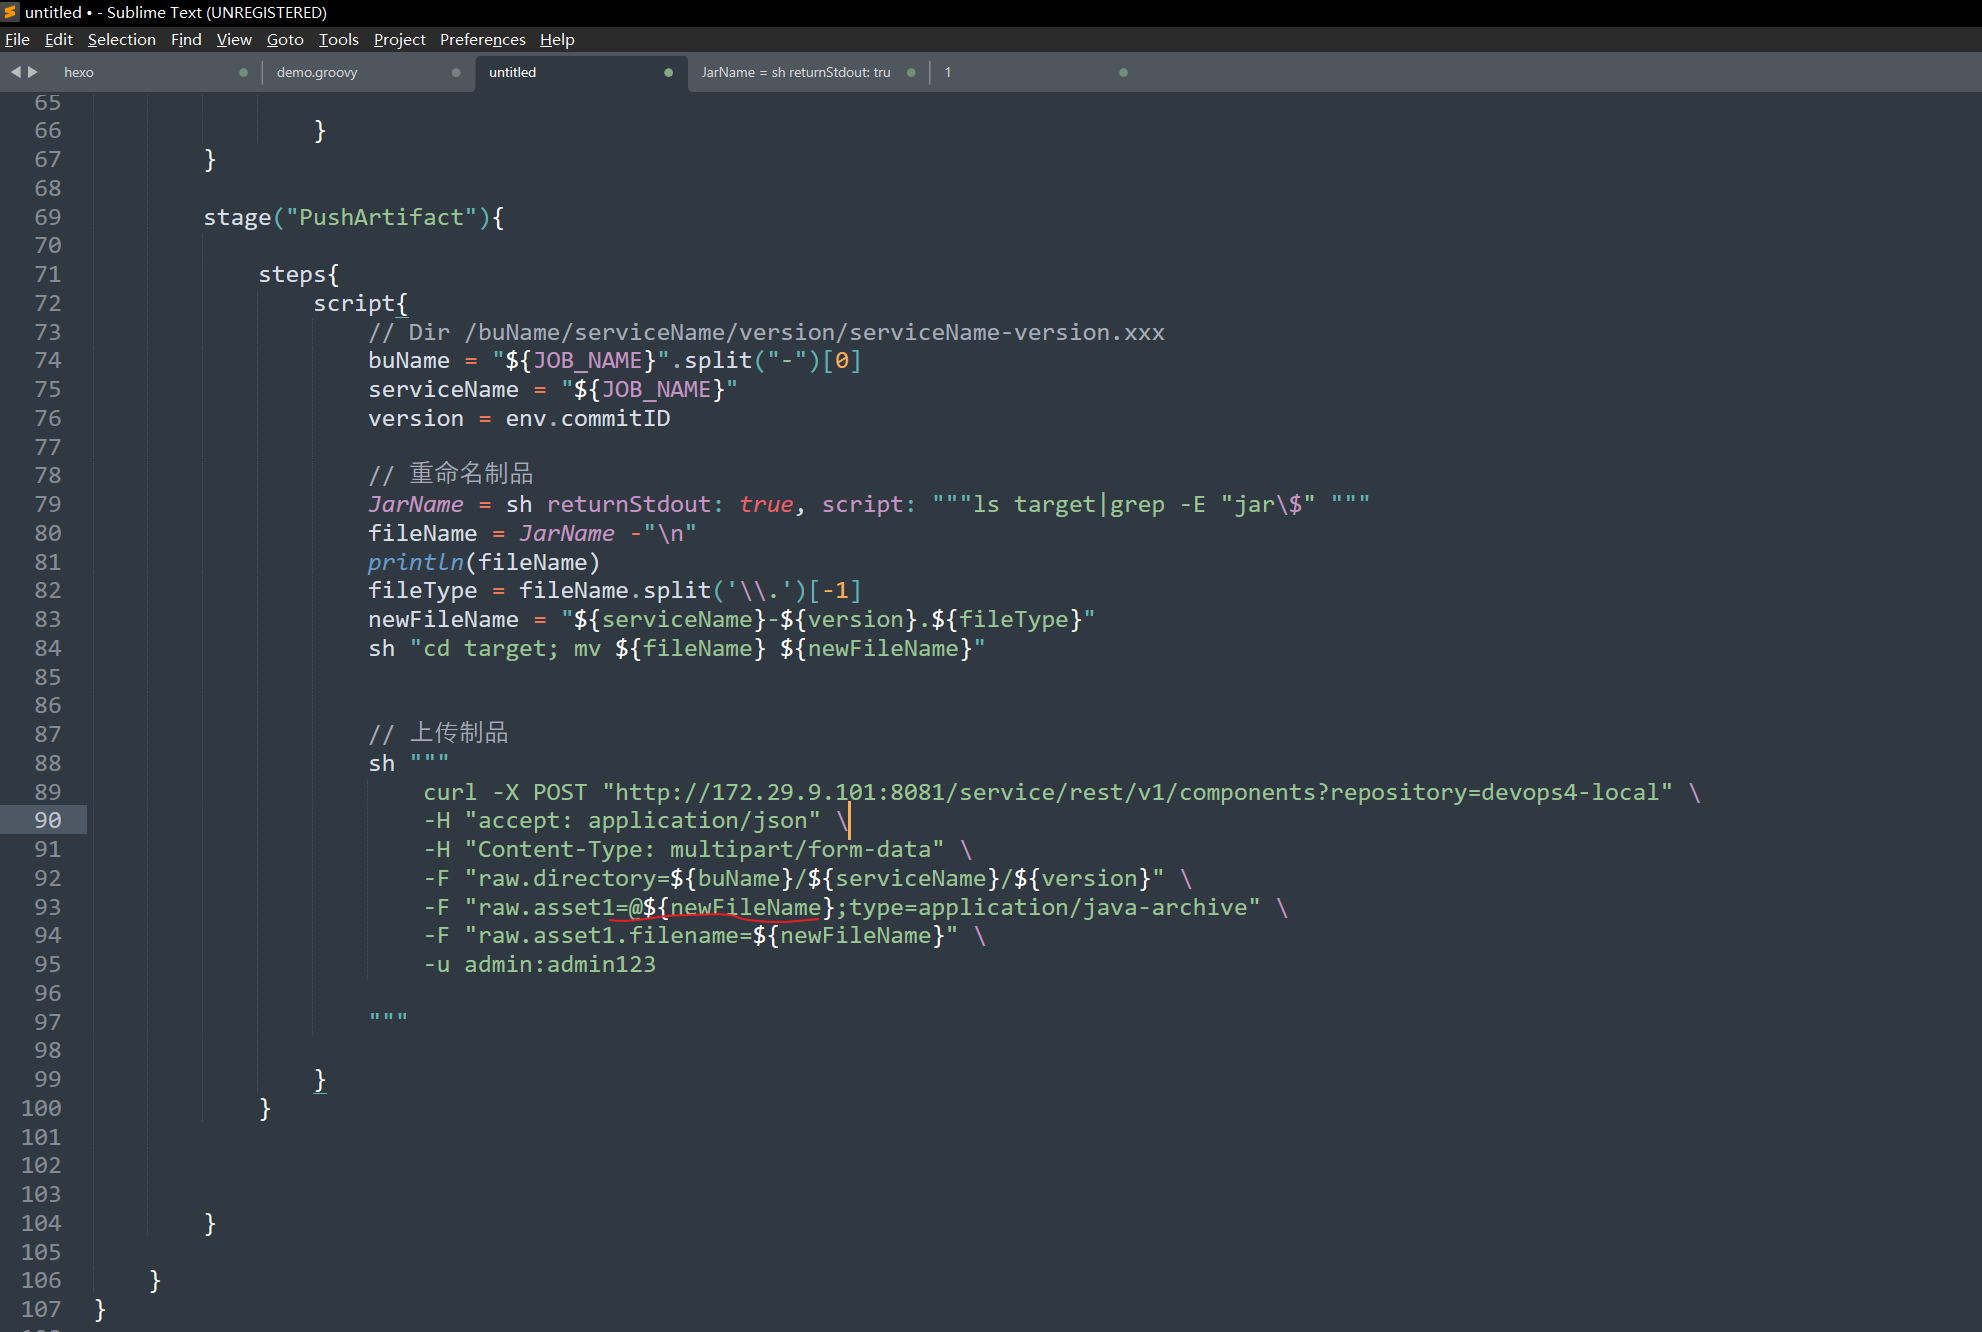
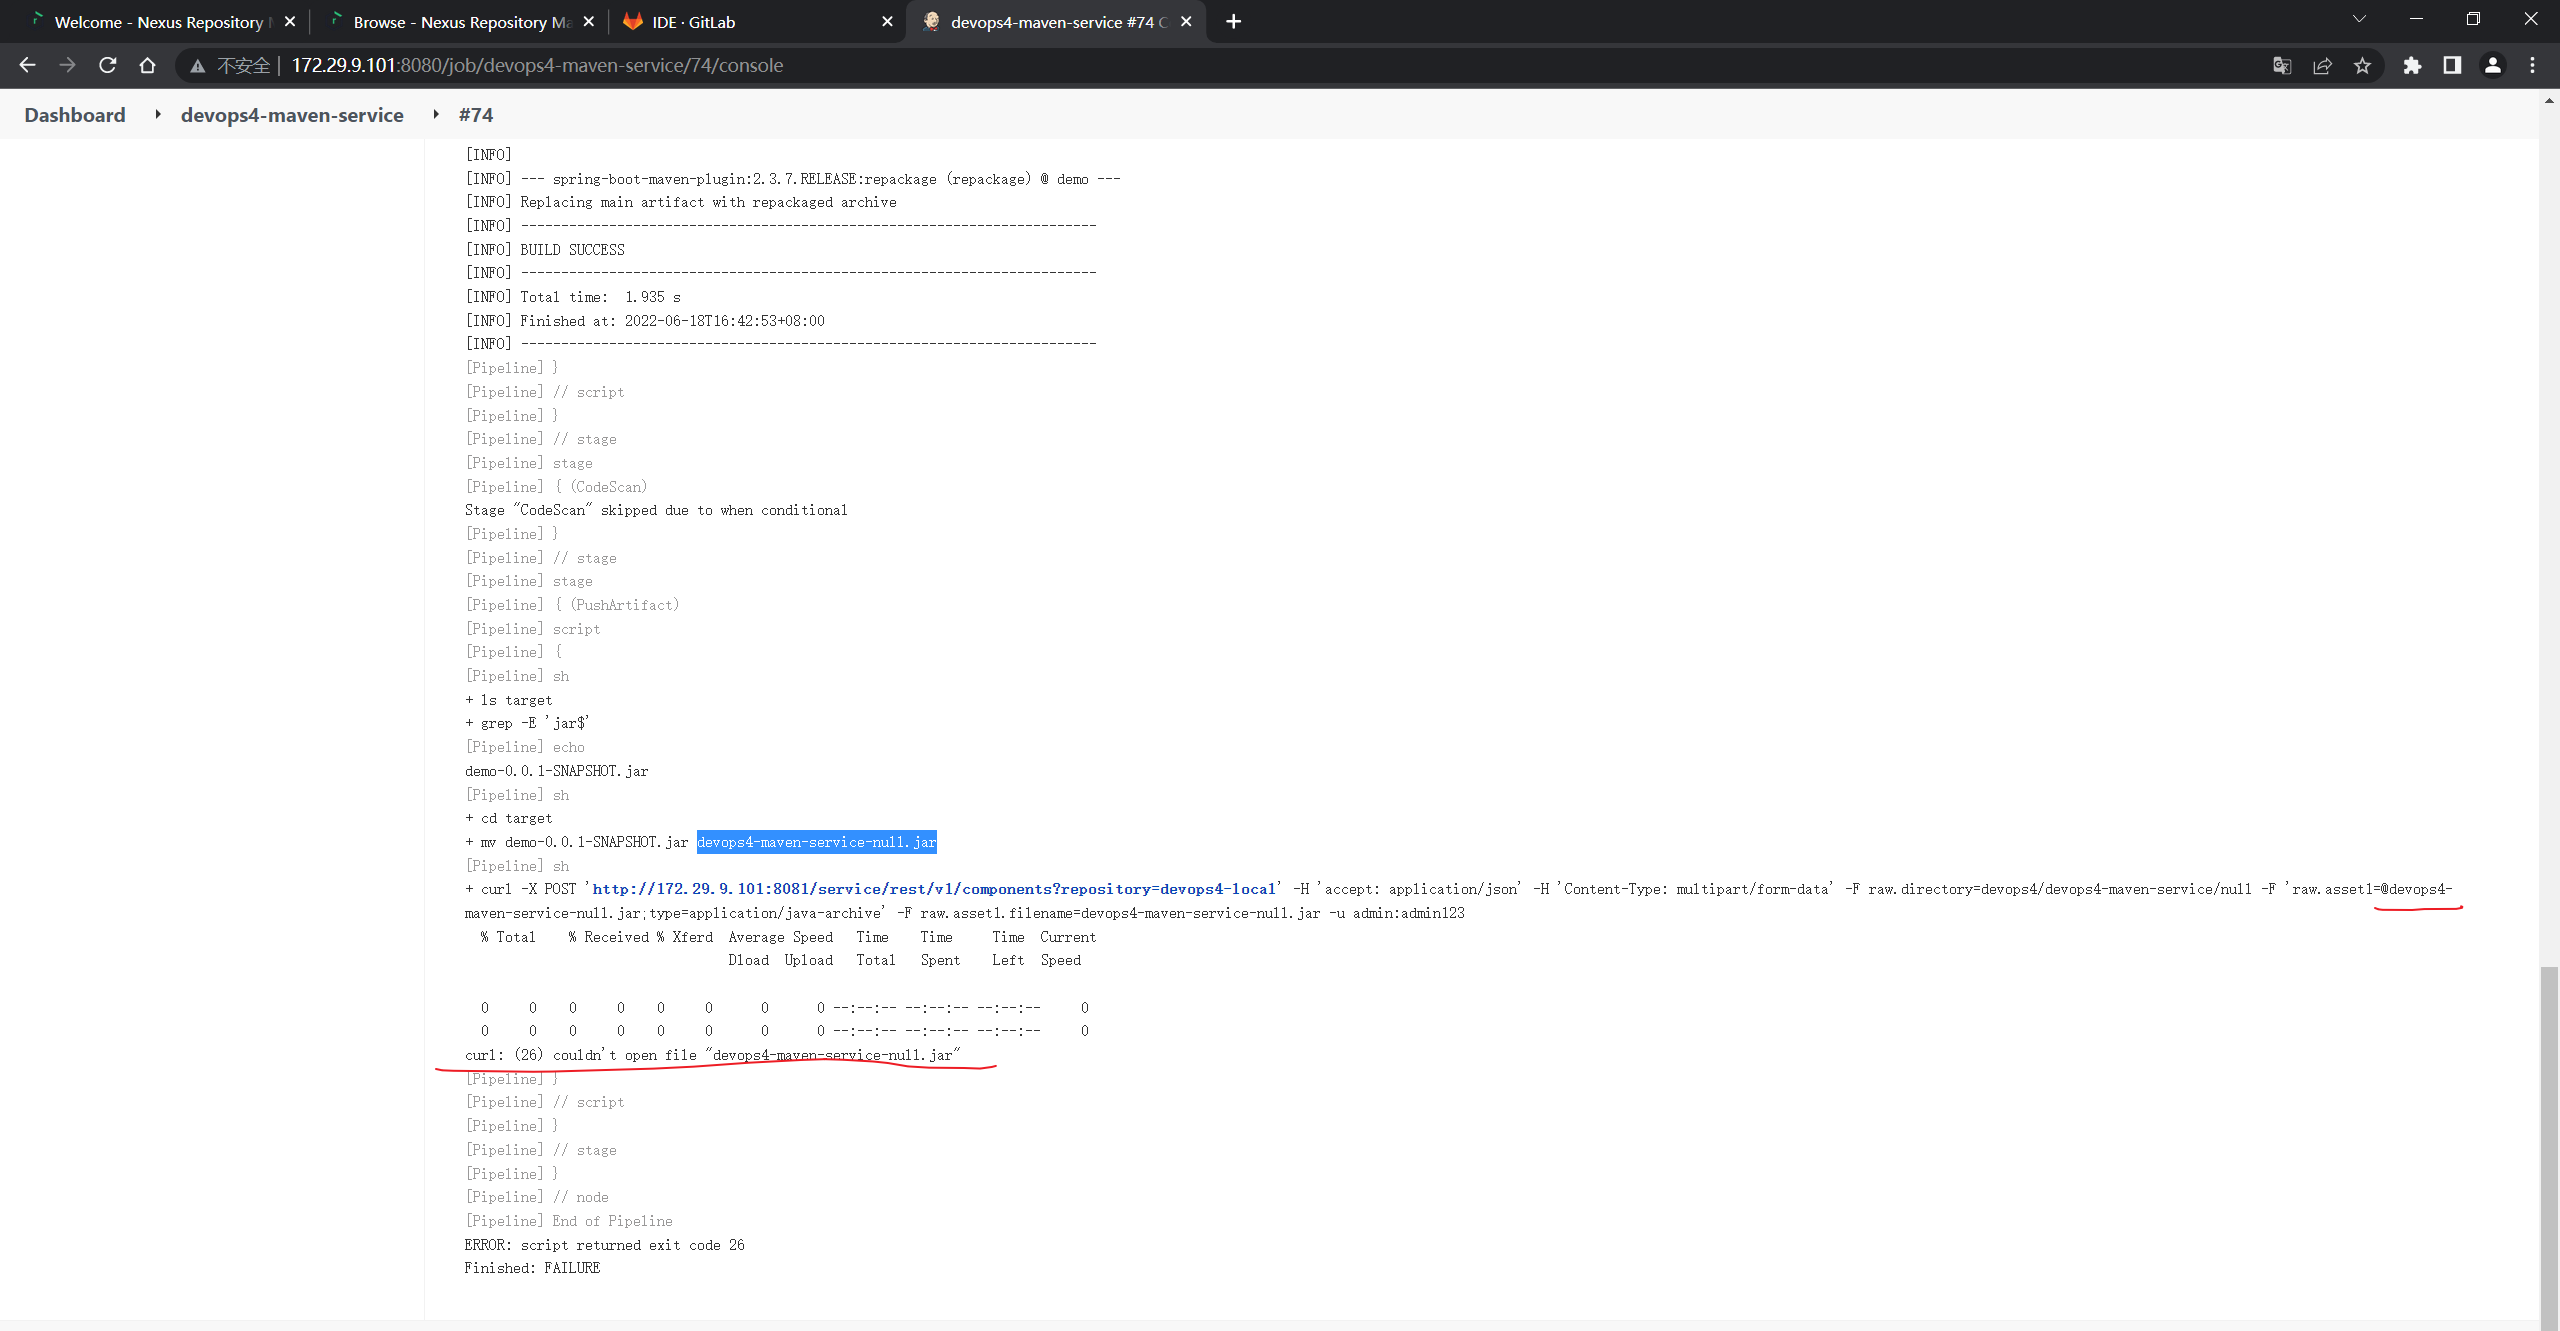


我们这里加一下:
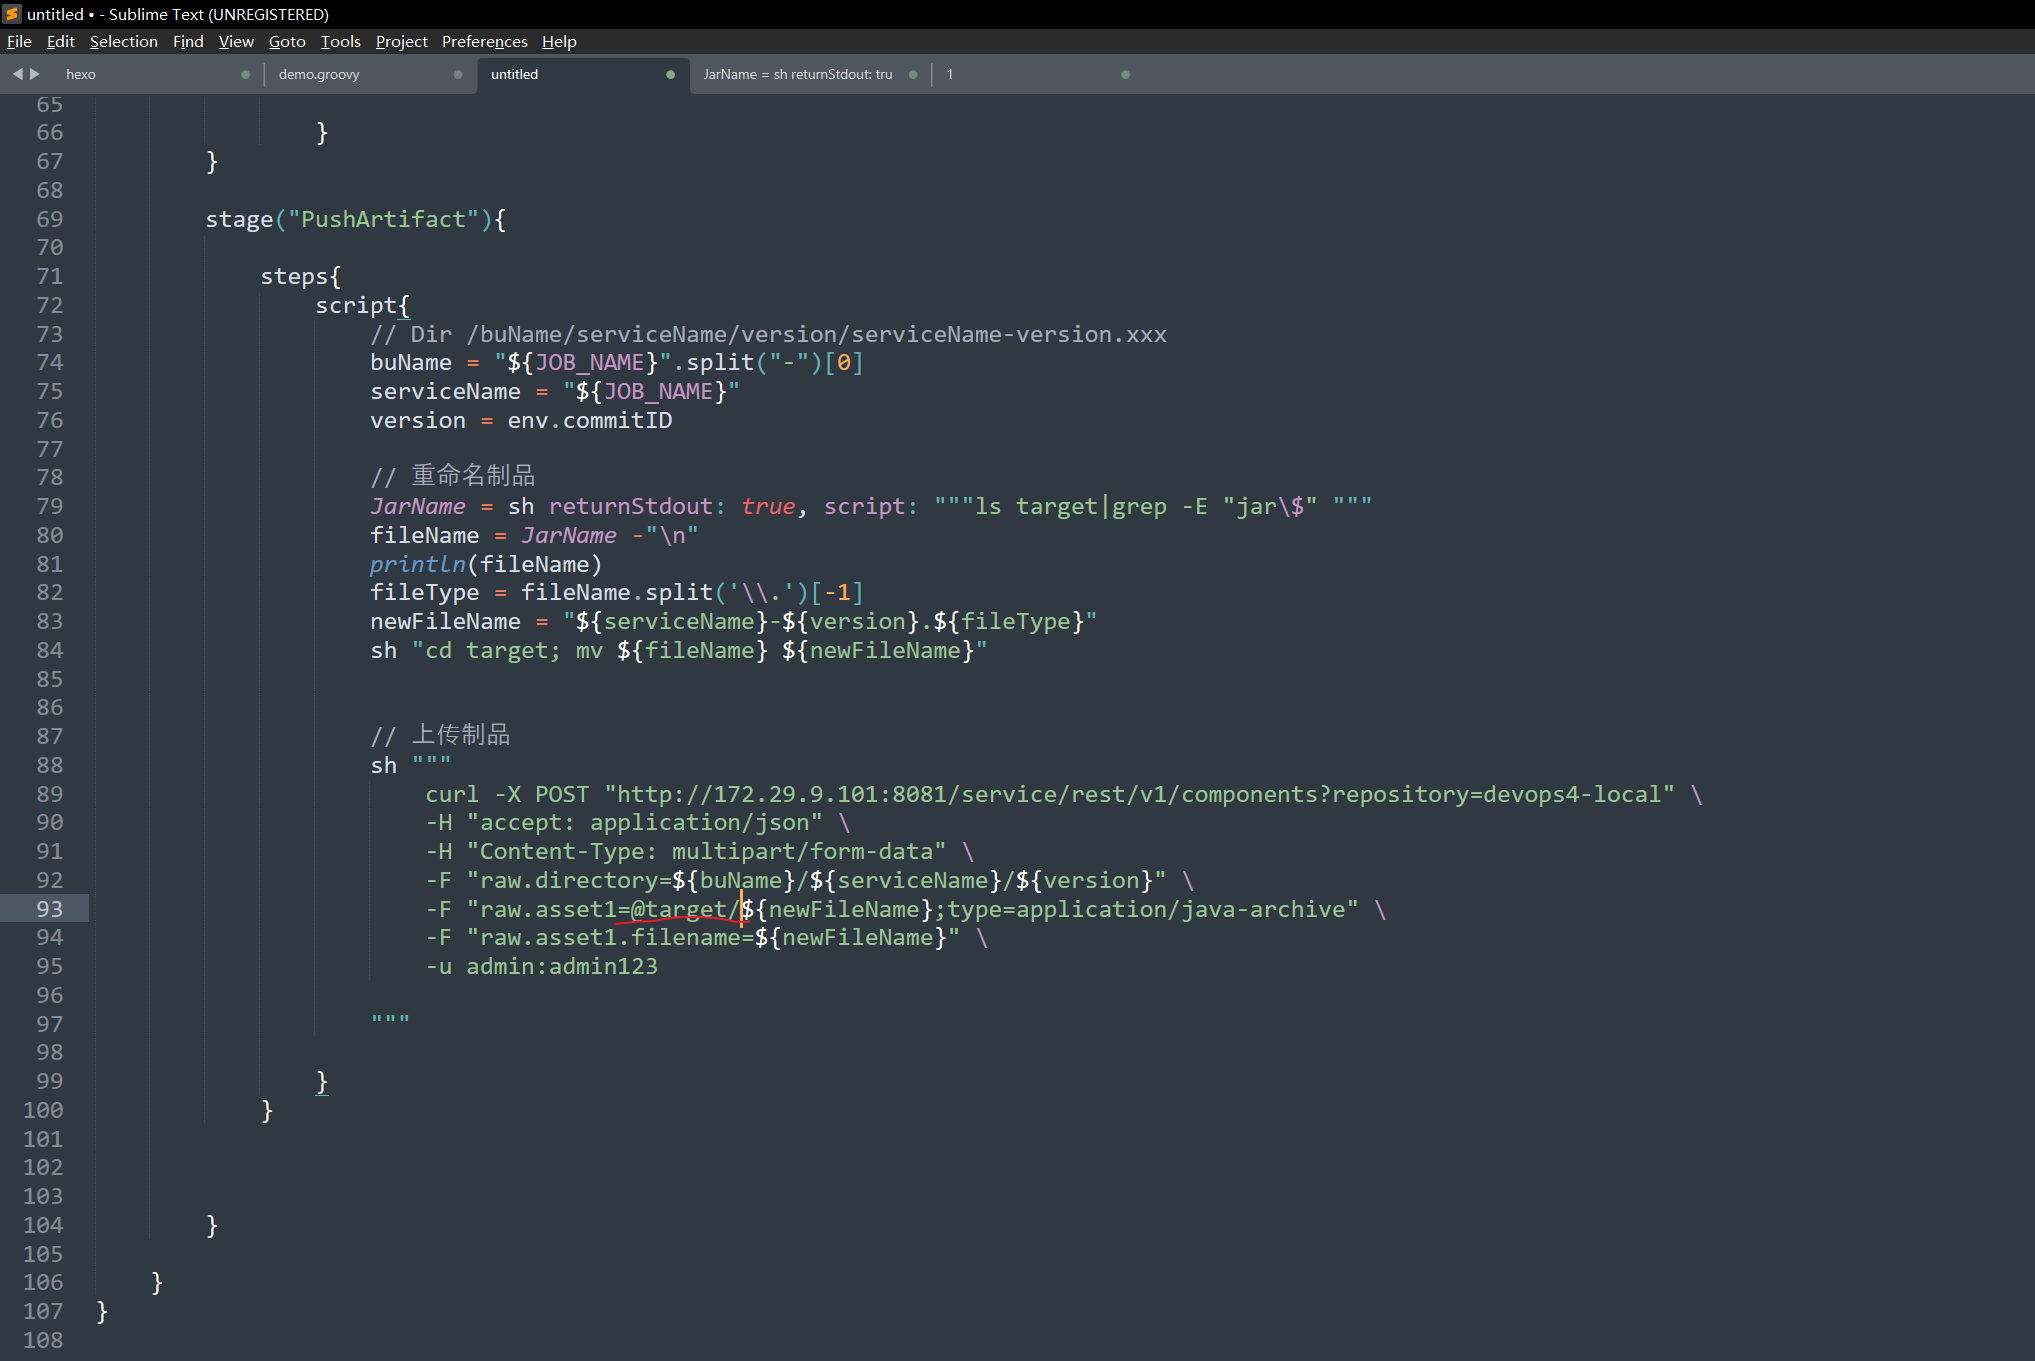
虽然这个version是null,但是他不影响这个流水线的执行,我们先把流水线给调通,后面再排查下version显示为null的问题;
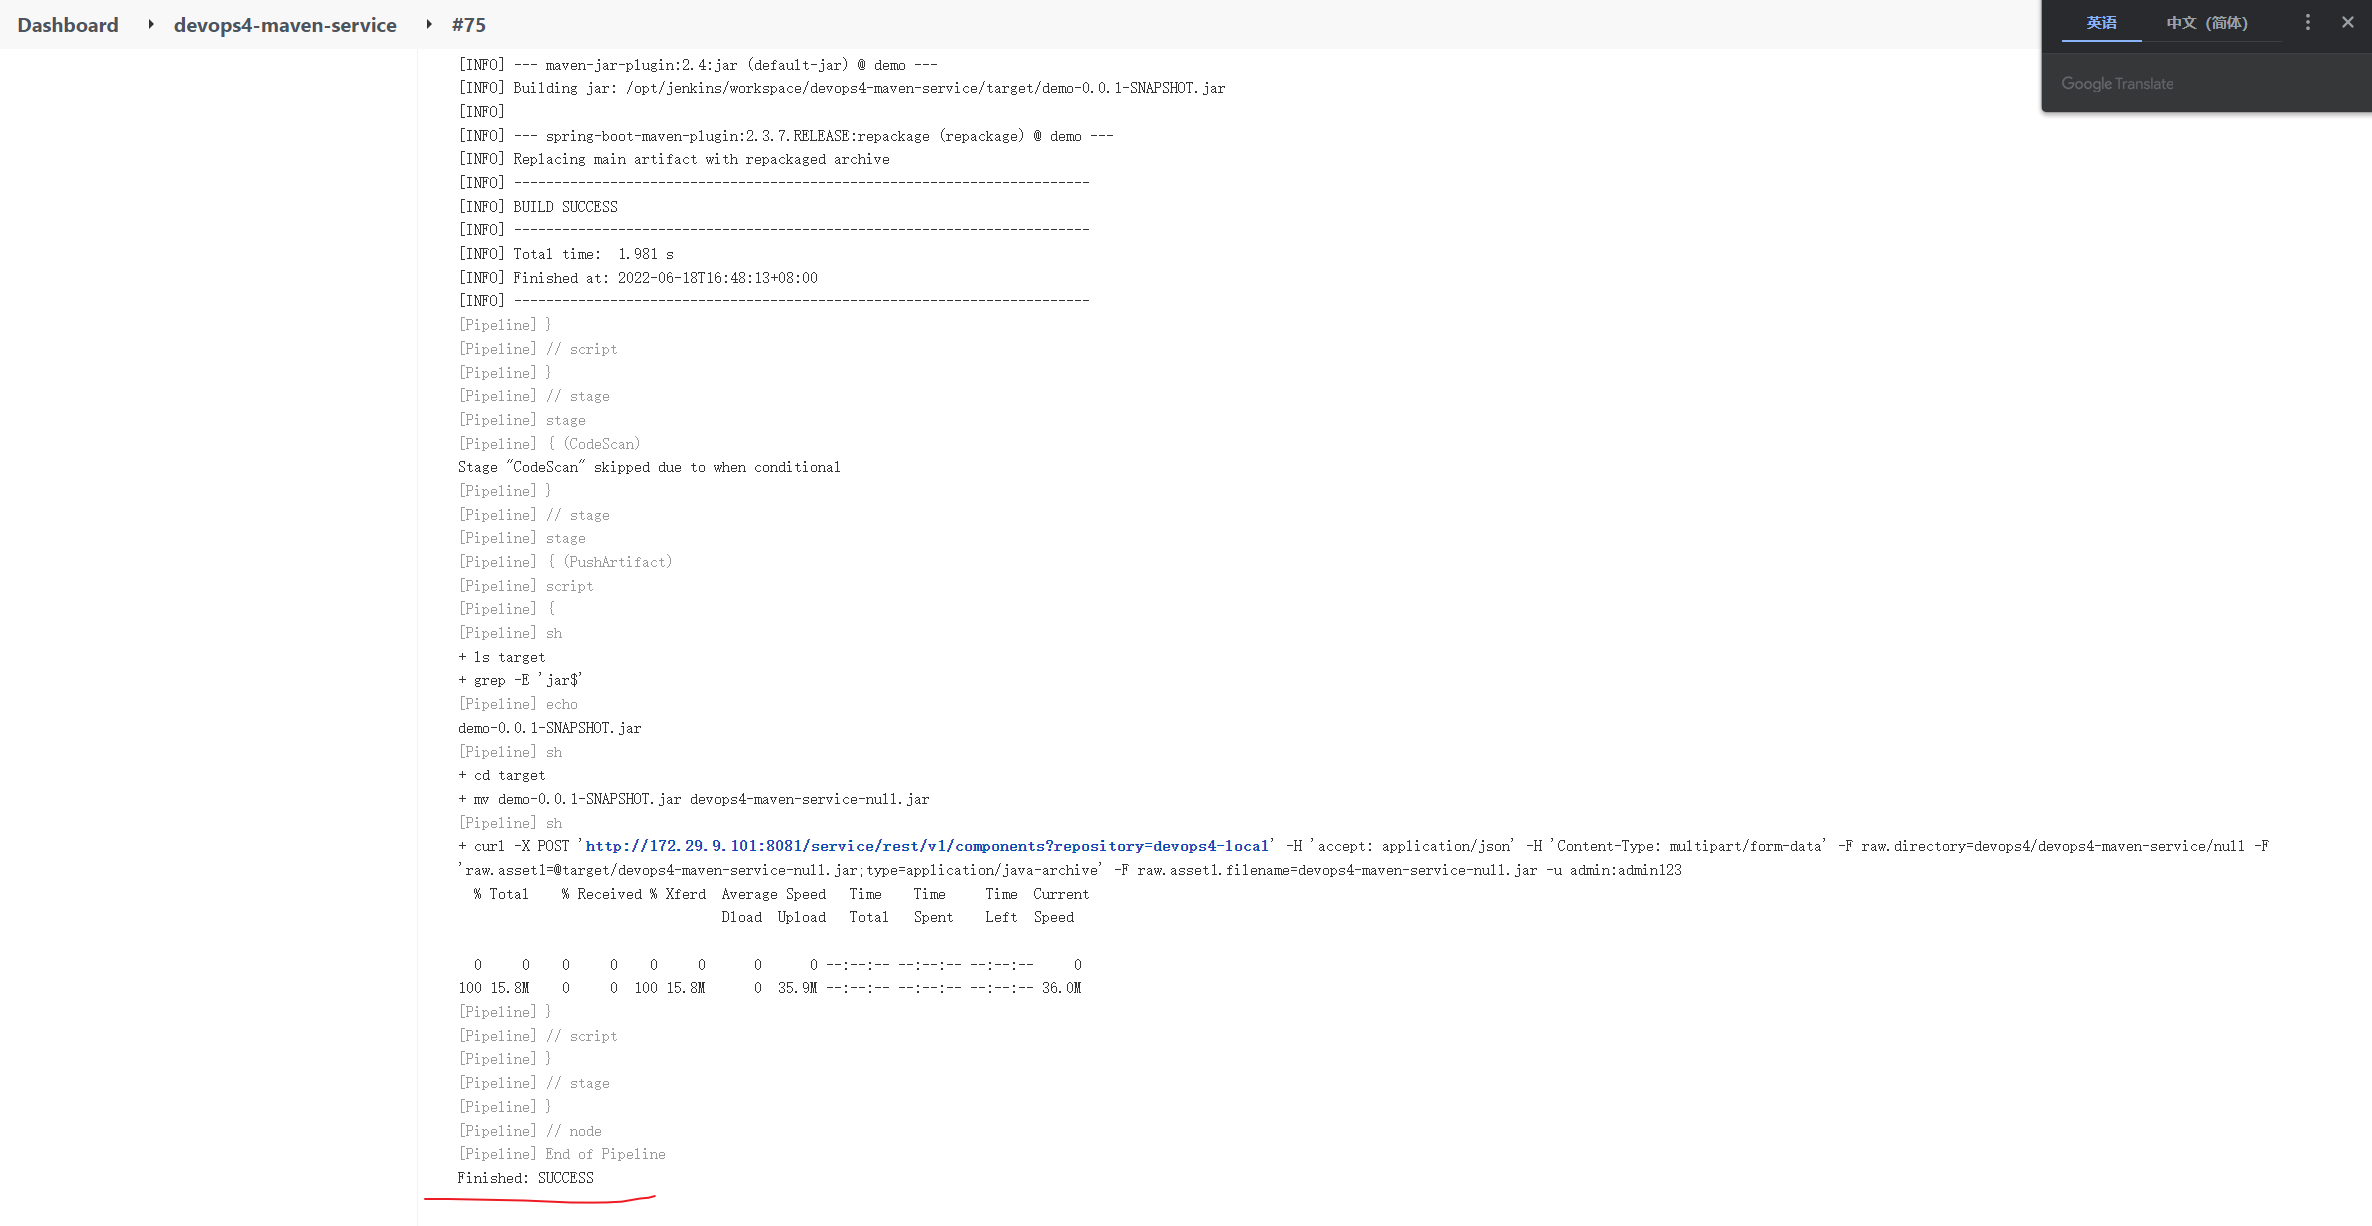
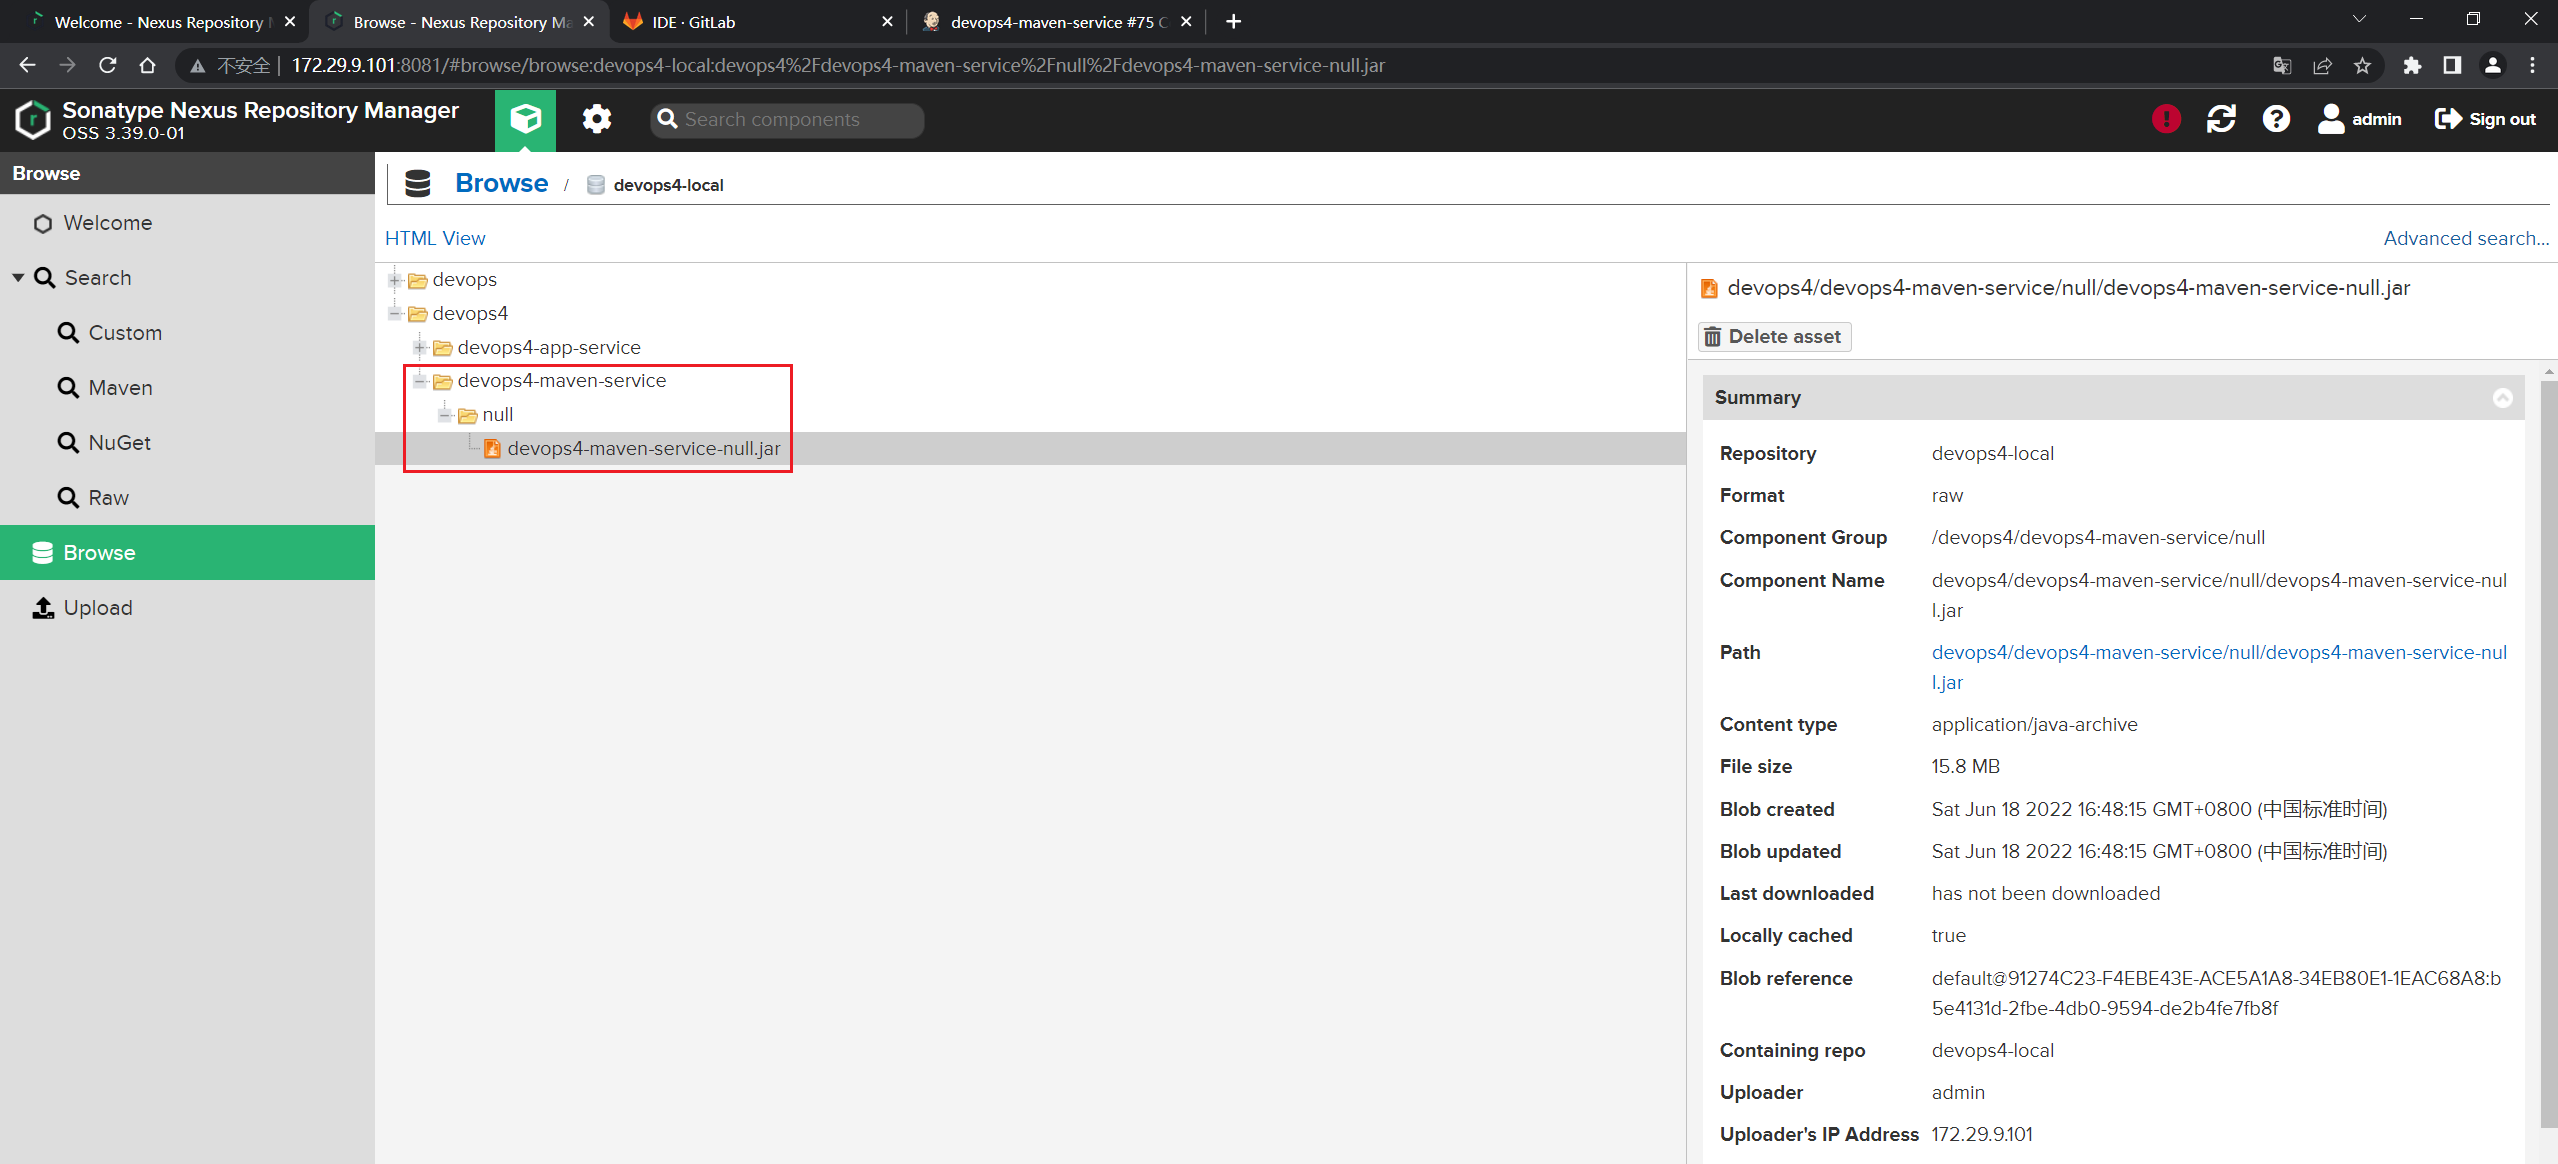
可以看到,可以正常上传制品了;
- 再看下,我们的版本为什么没拿到呢?
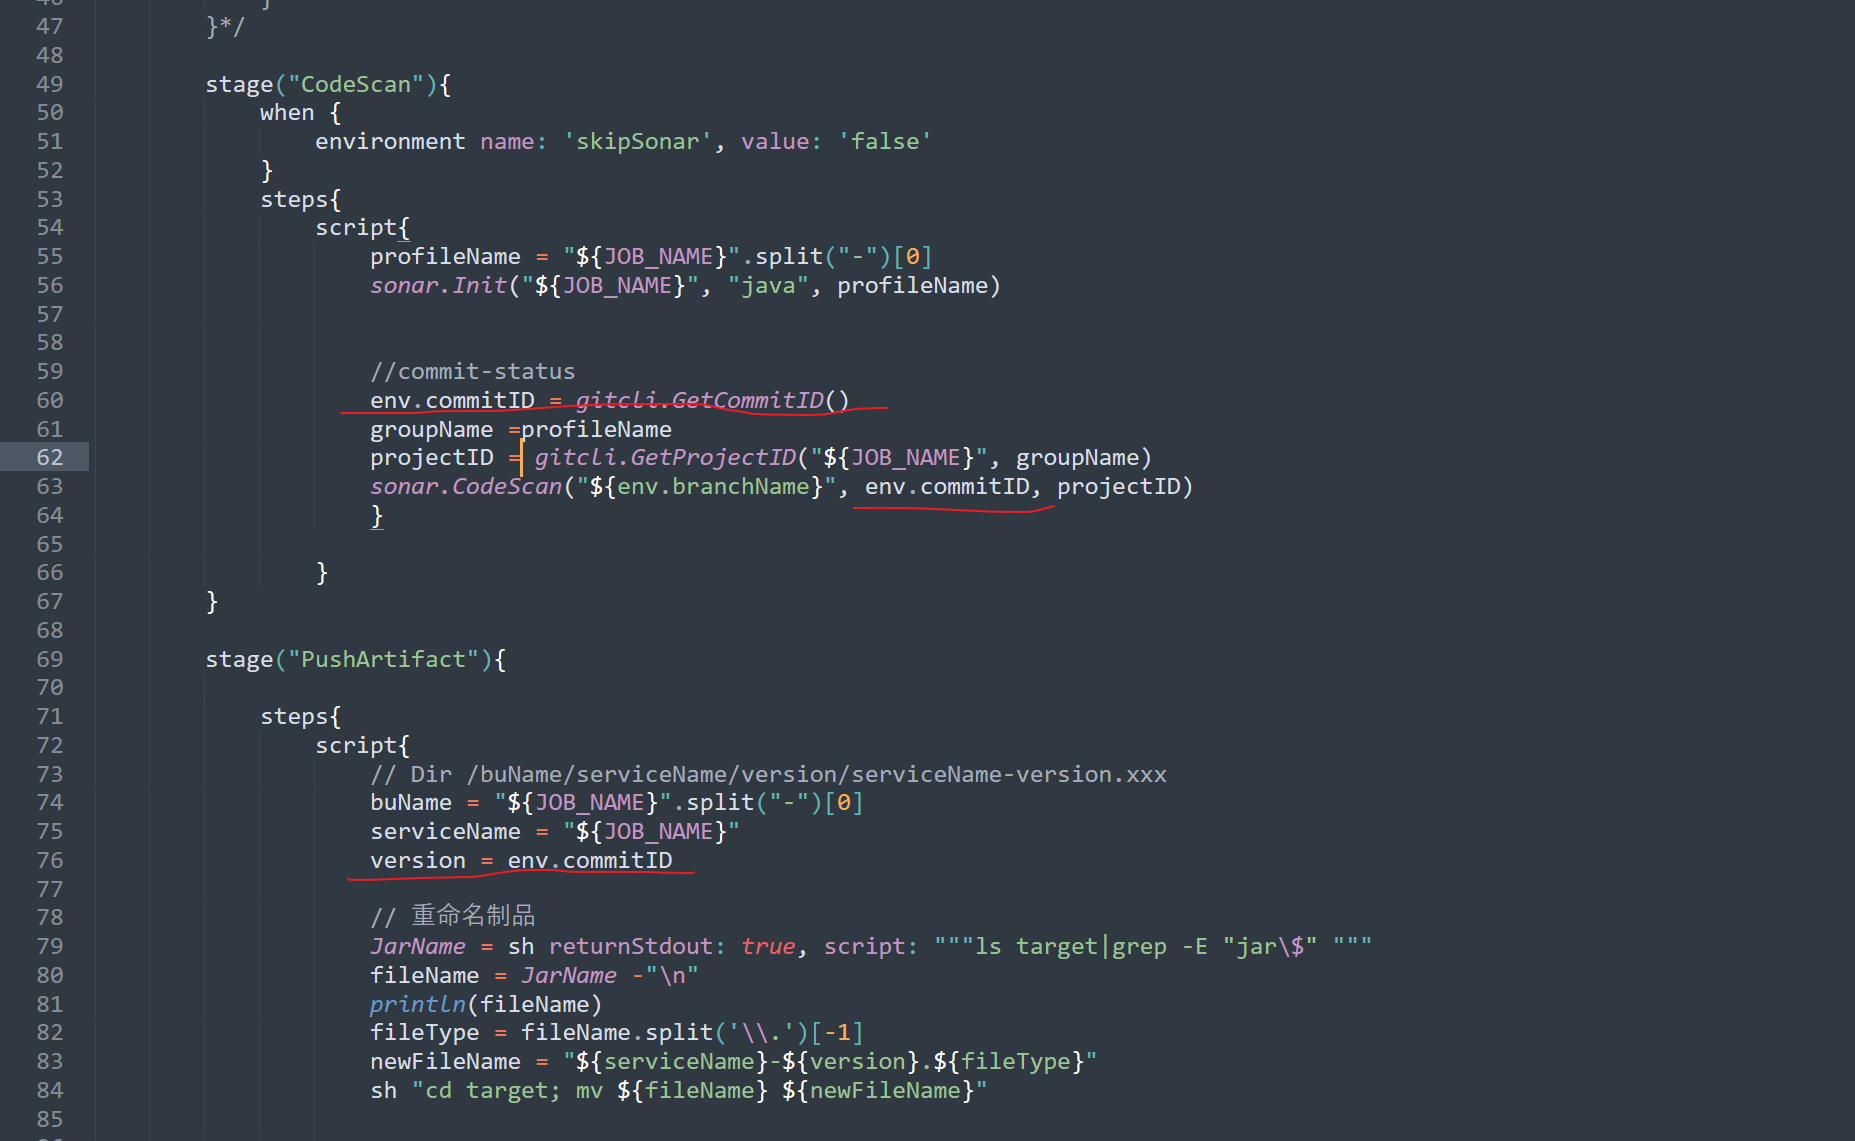
修改代码再打印下:

哦:这个代码扫描被跳过了,所以这个commitID就当然没数据了:
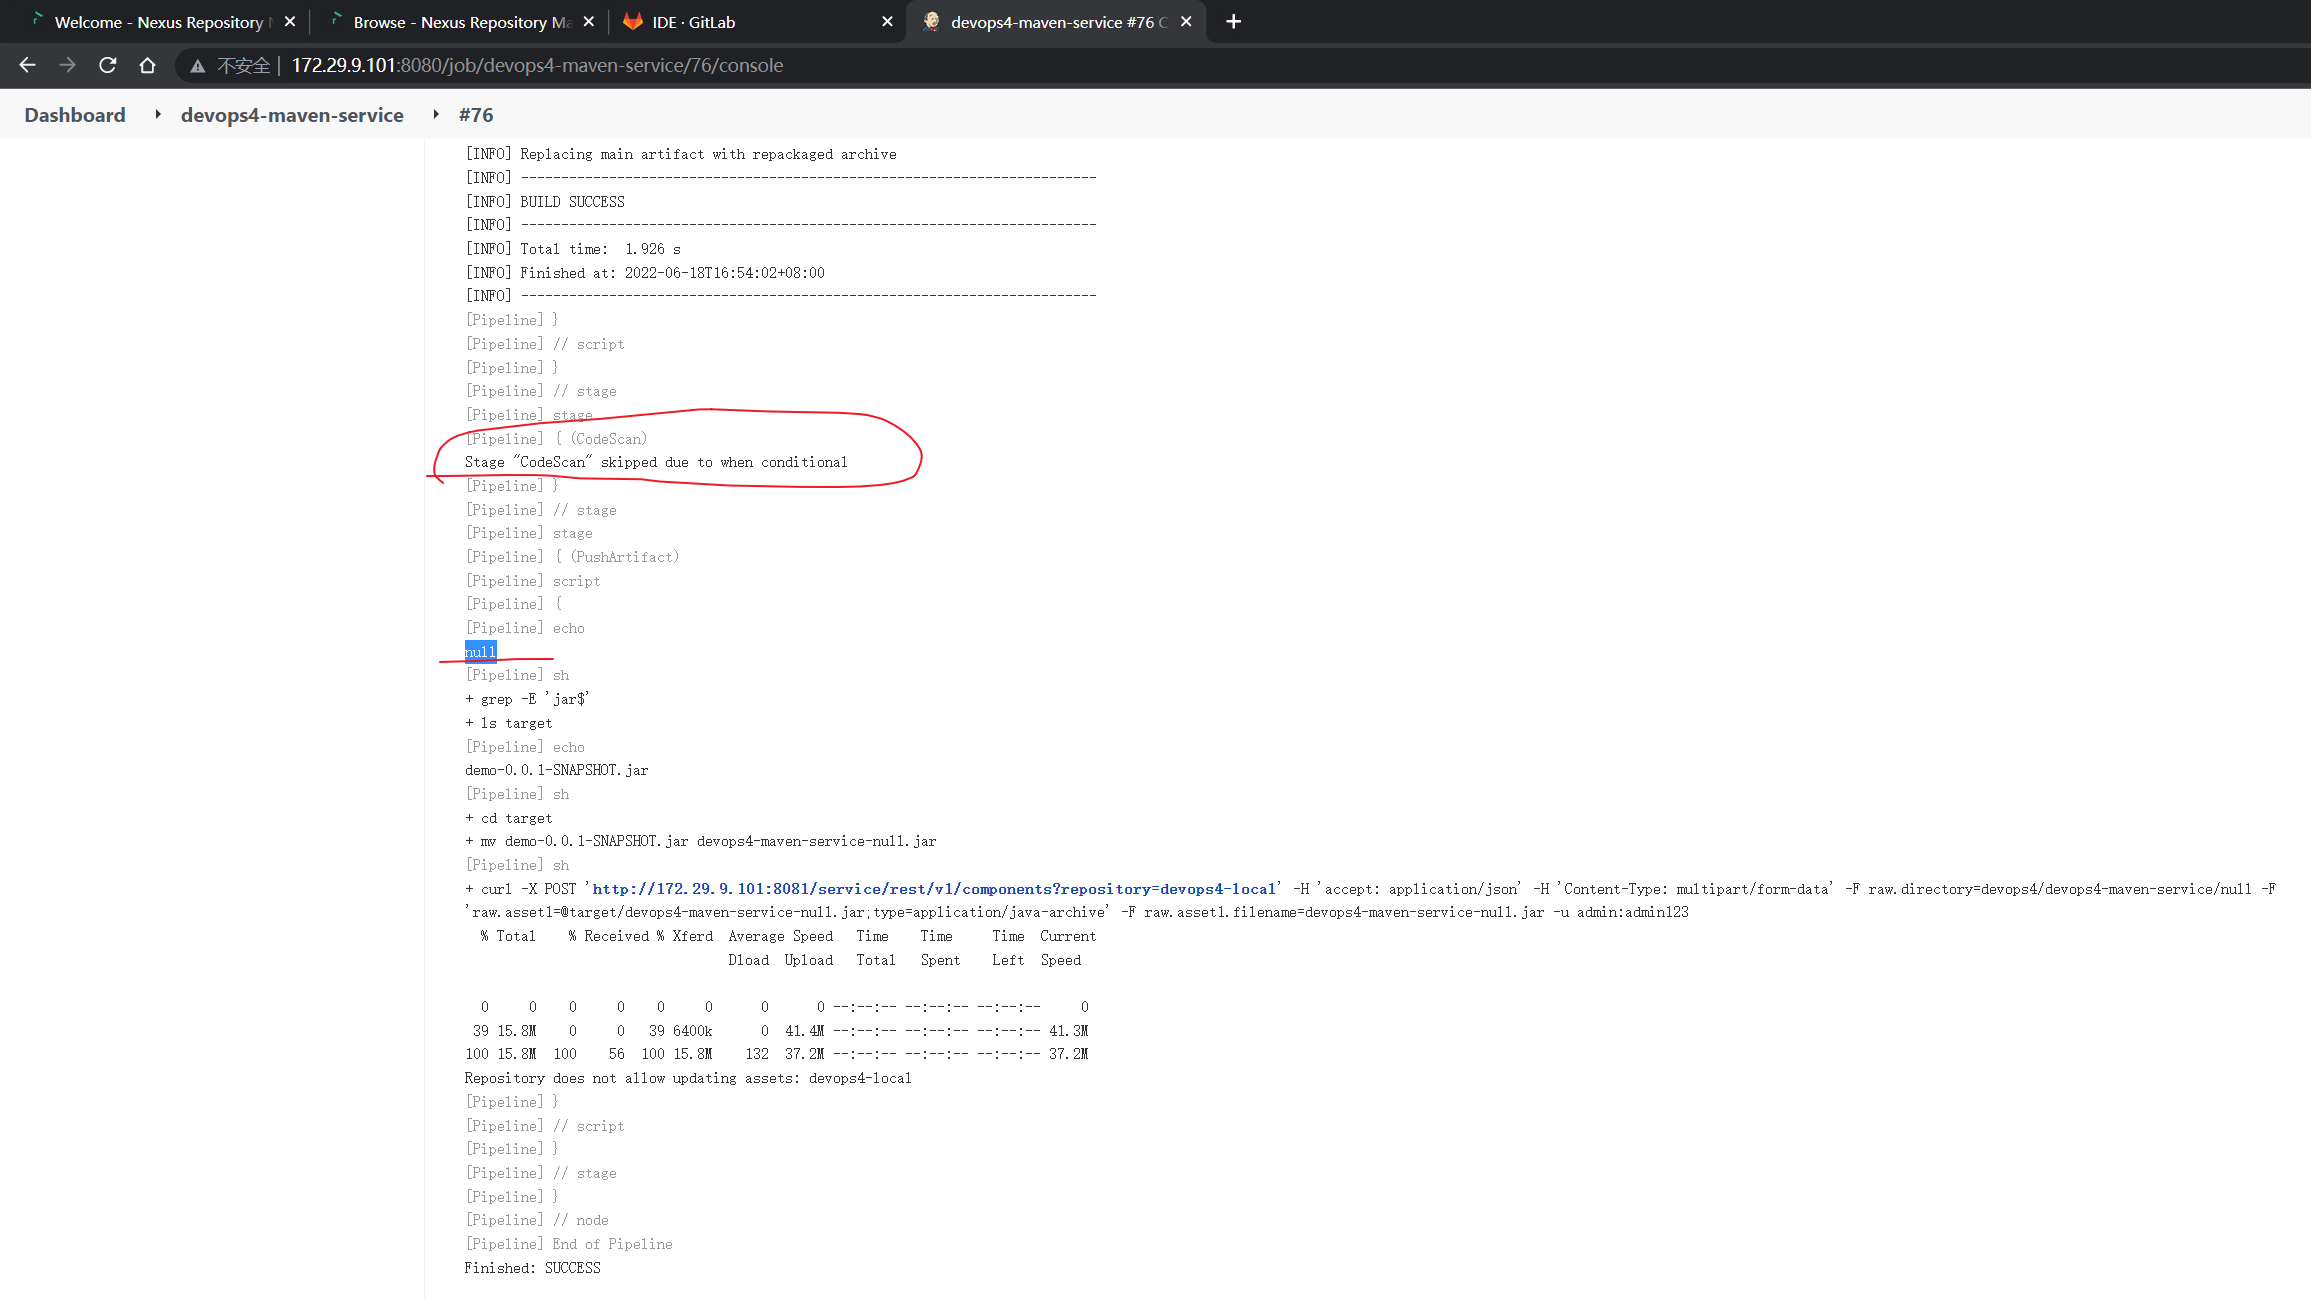
- 我现在做一些整改:
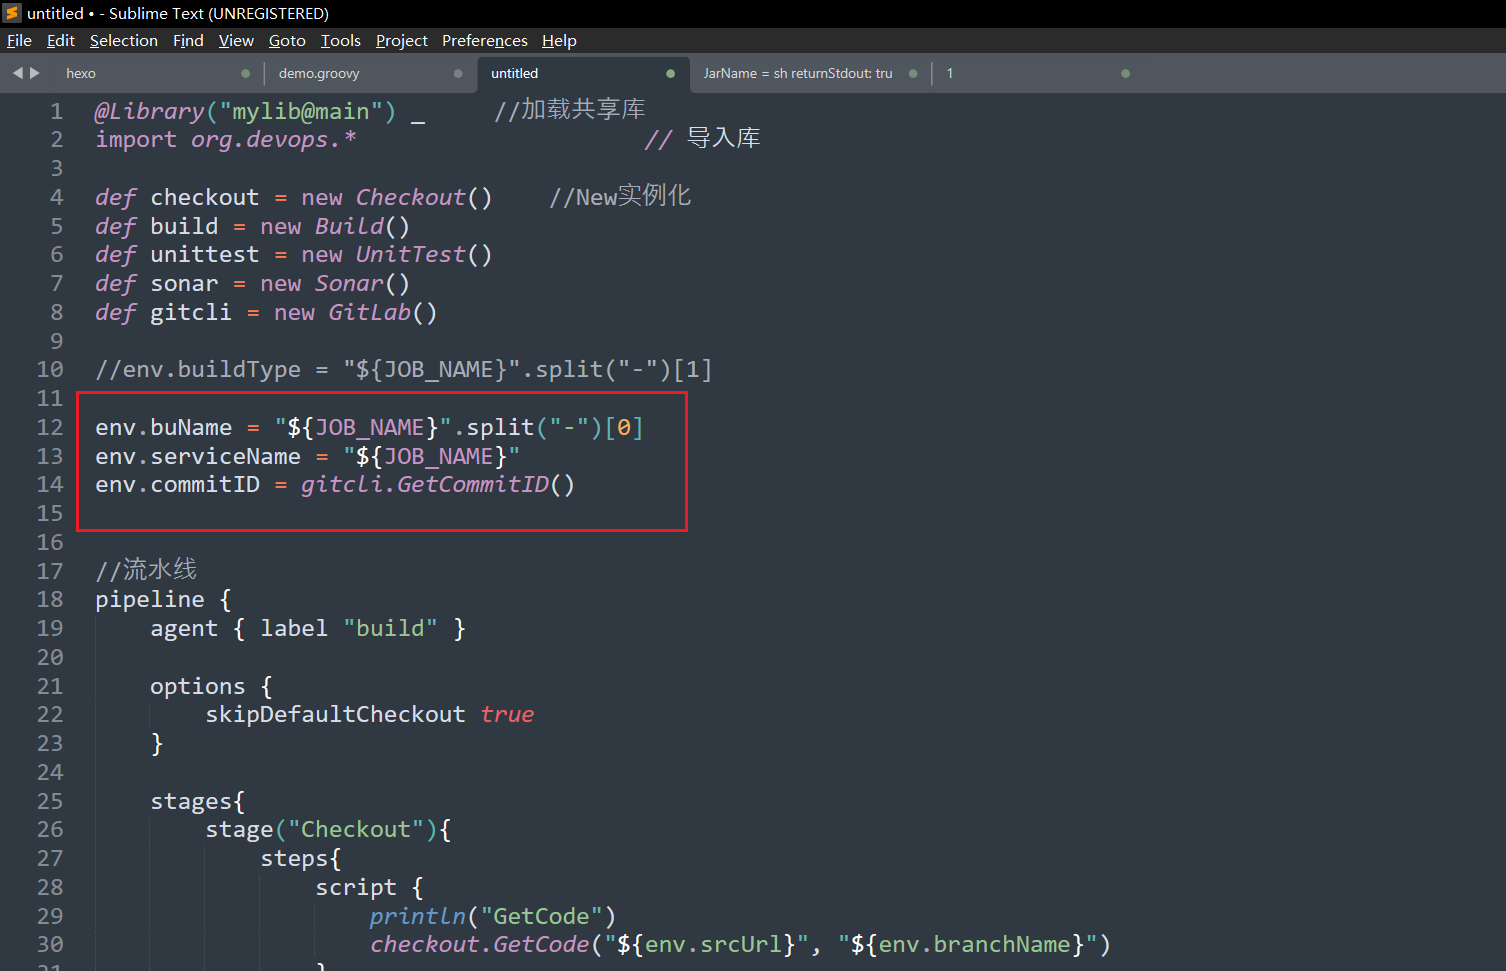
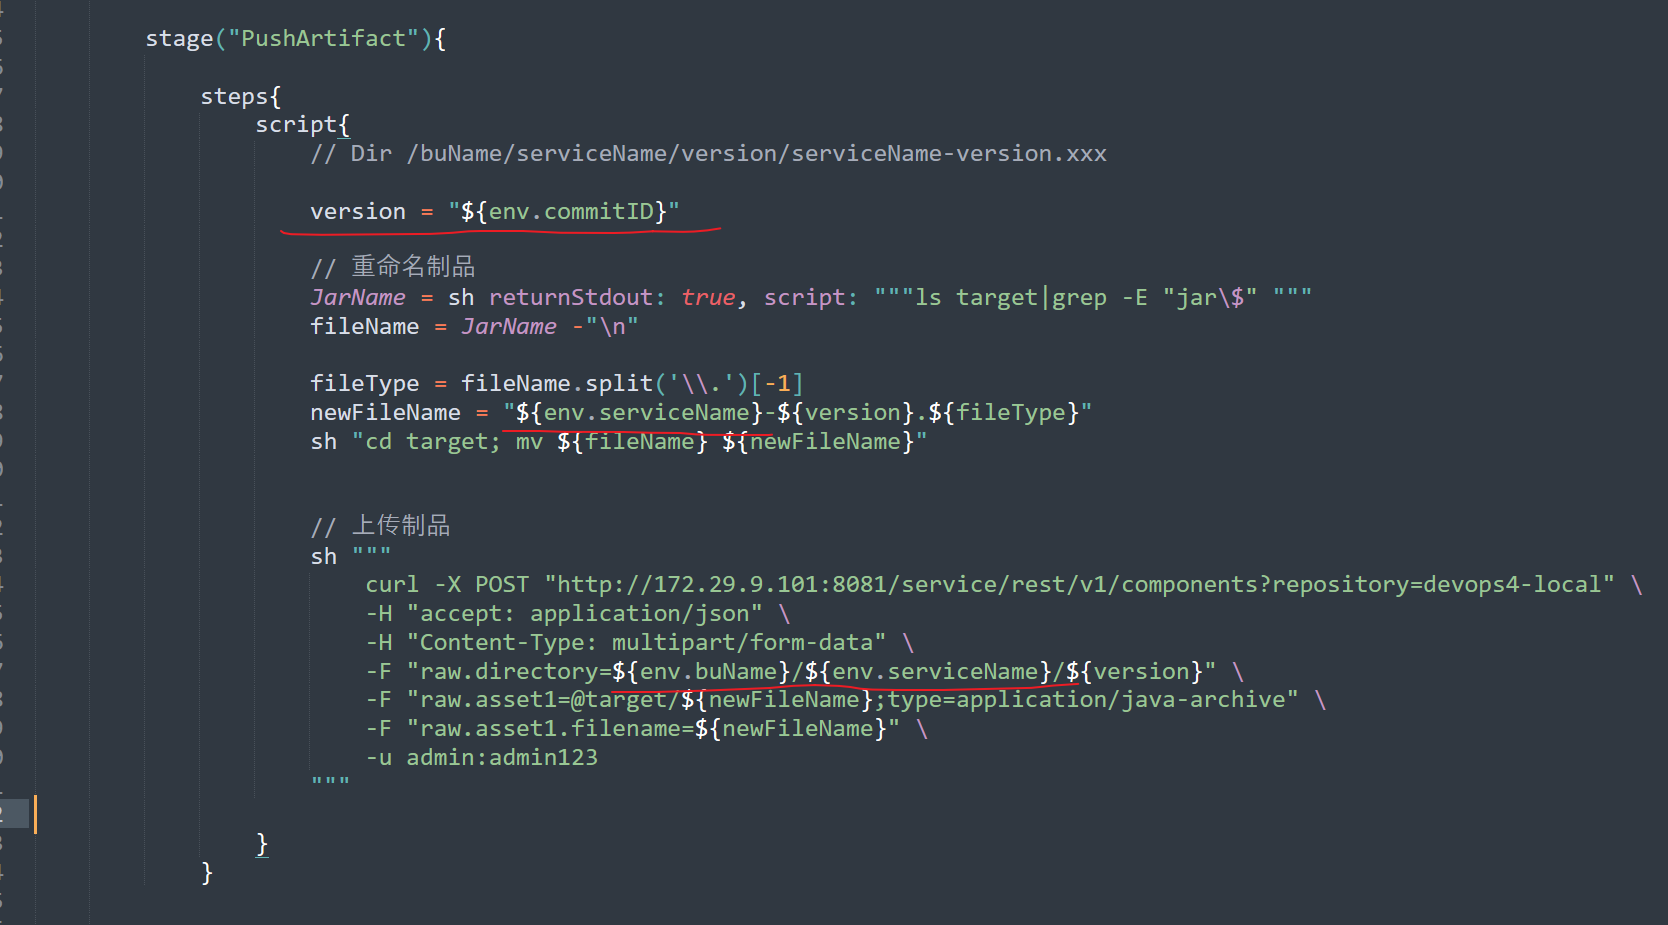
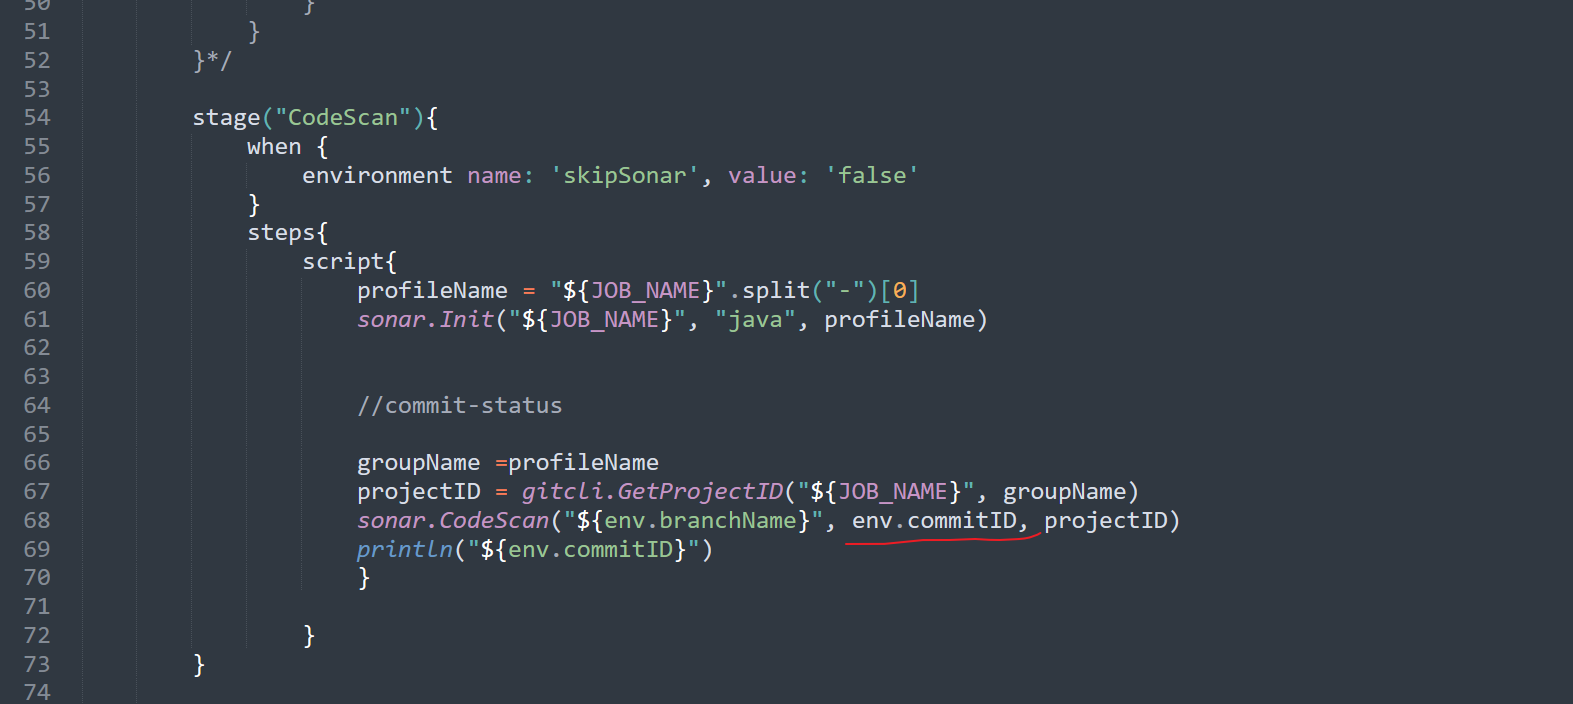
再次运行,查看效果:
会发现报错了:
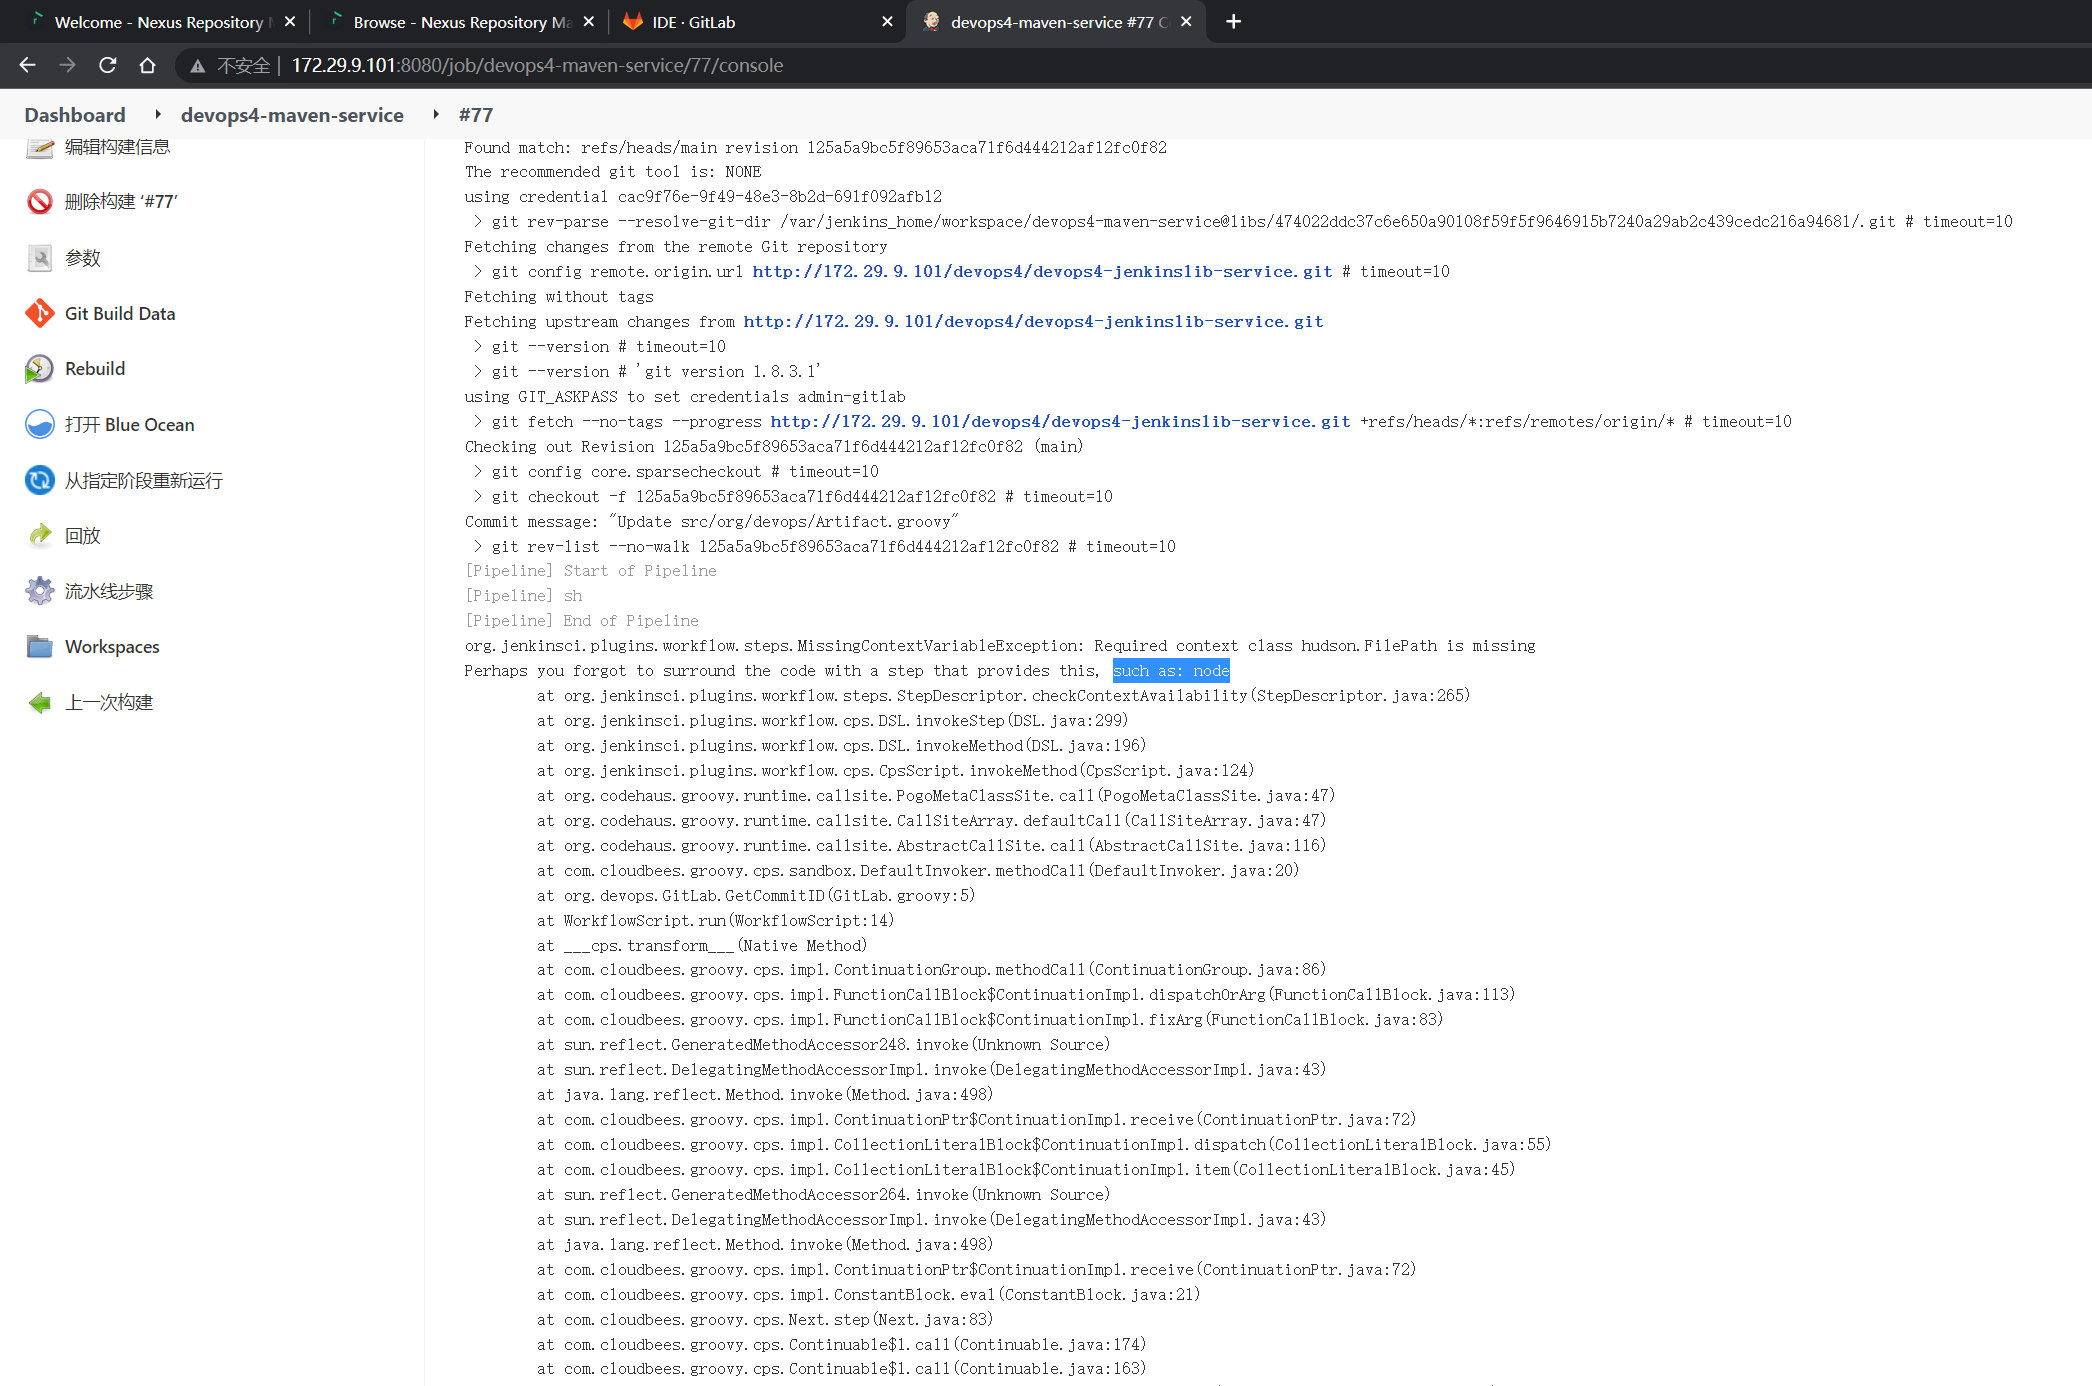
好像这里定义的地方不对:
我们再次修改下代码:
我们把这些变量放在了第一个阶段:
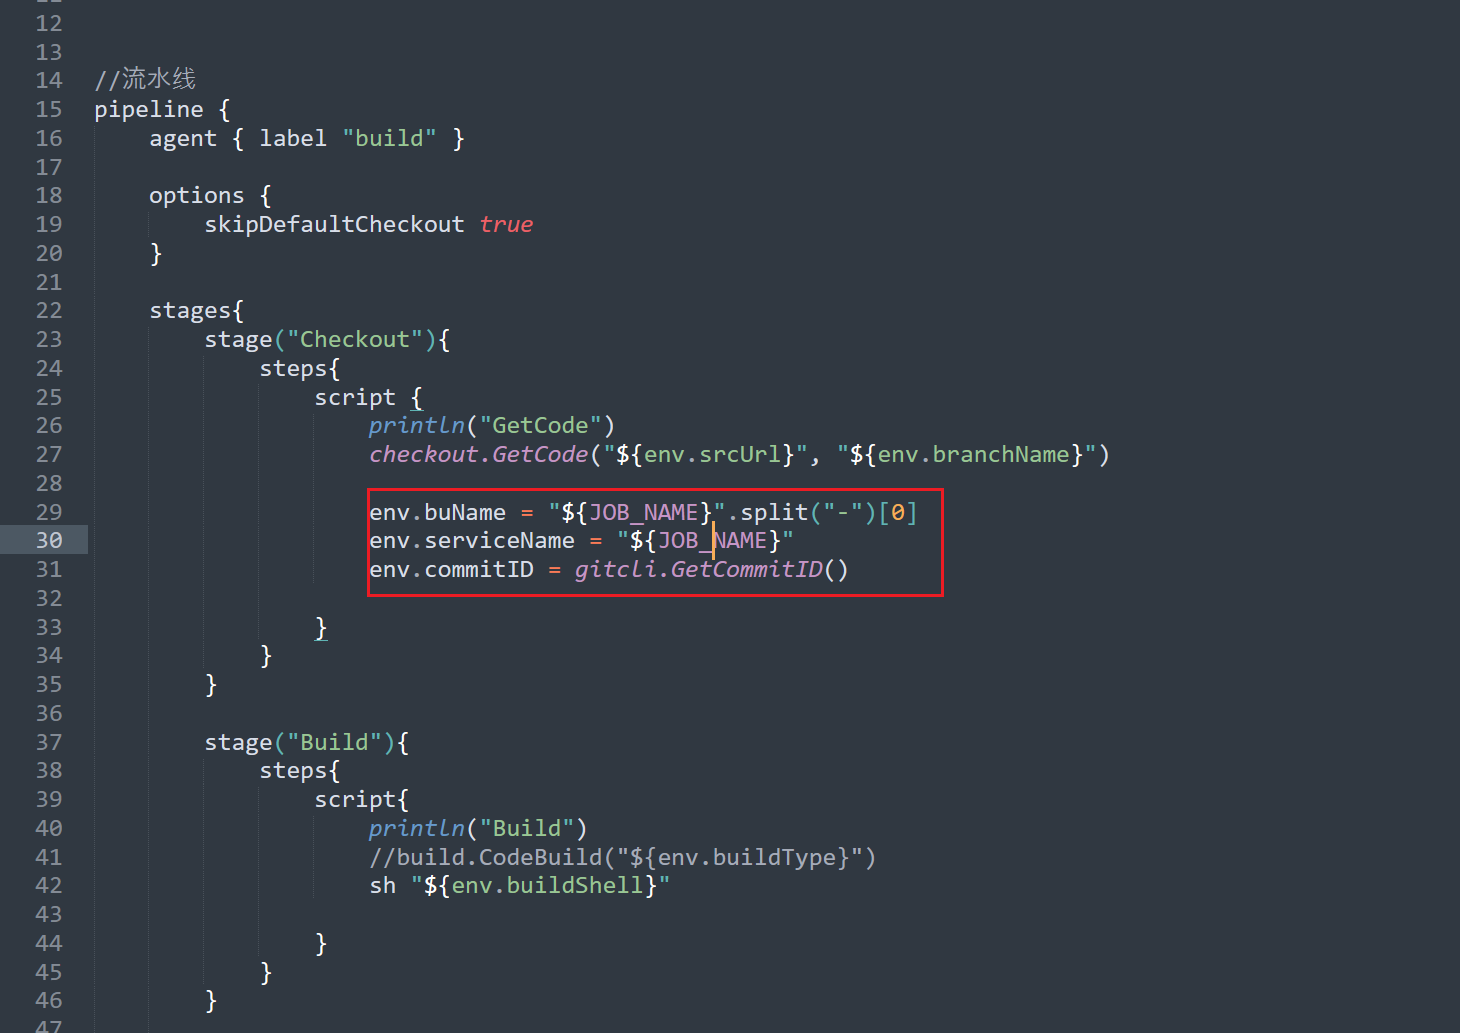
再次构建运行,查看效果:

- 这次发现构建成功了,但是这个comitID太长了吧:……
记得之前有剪切过短的commitID吧:
目前这个包是传上去了哈:
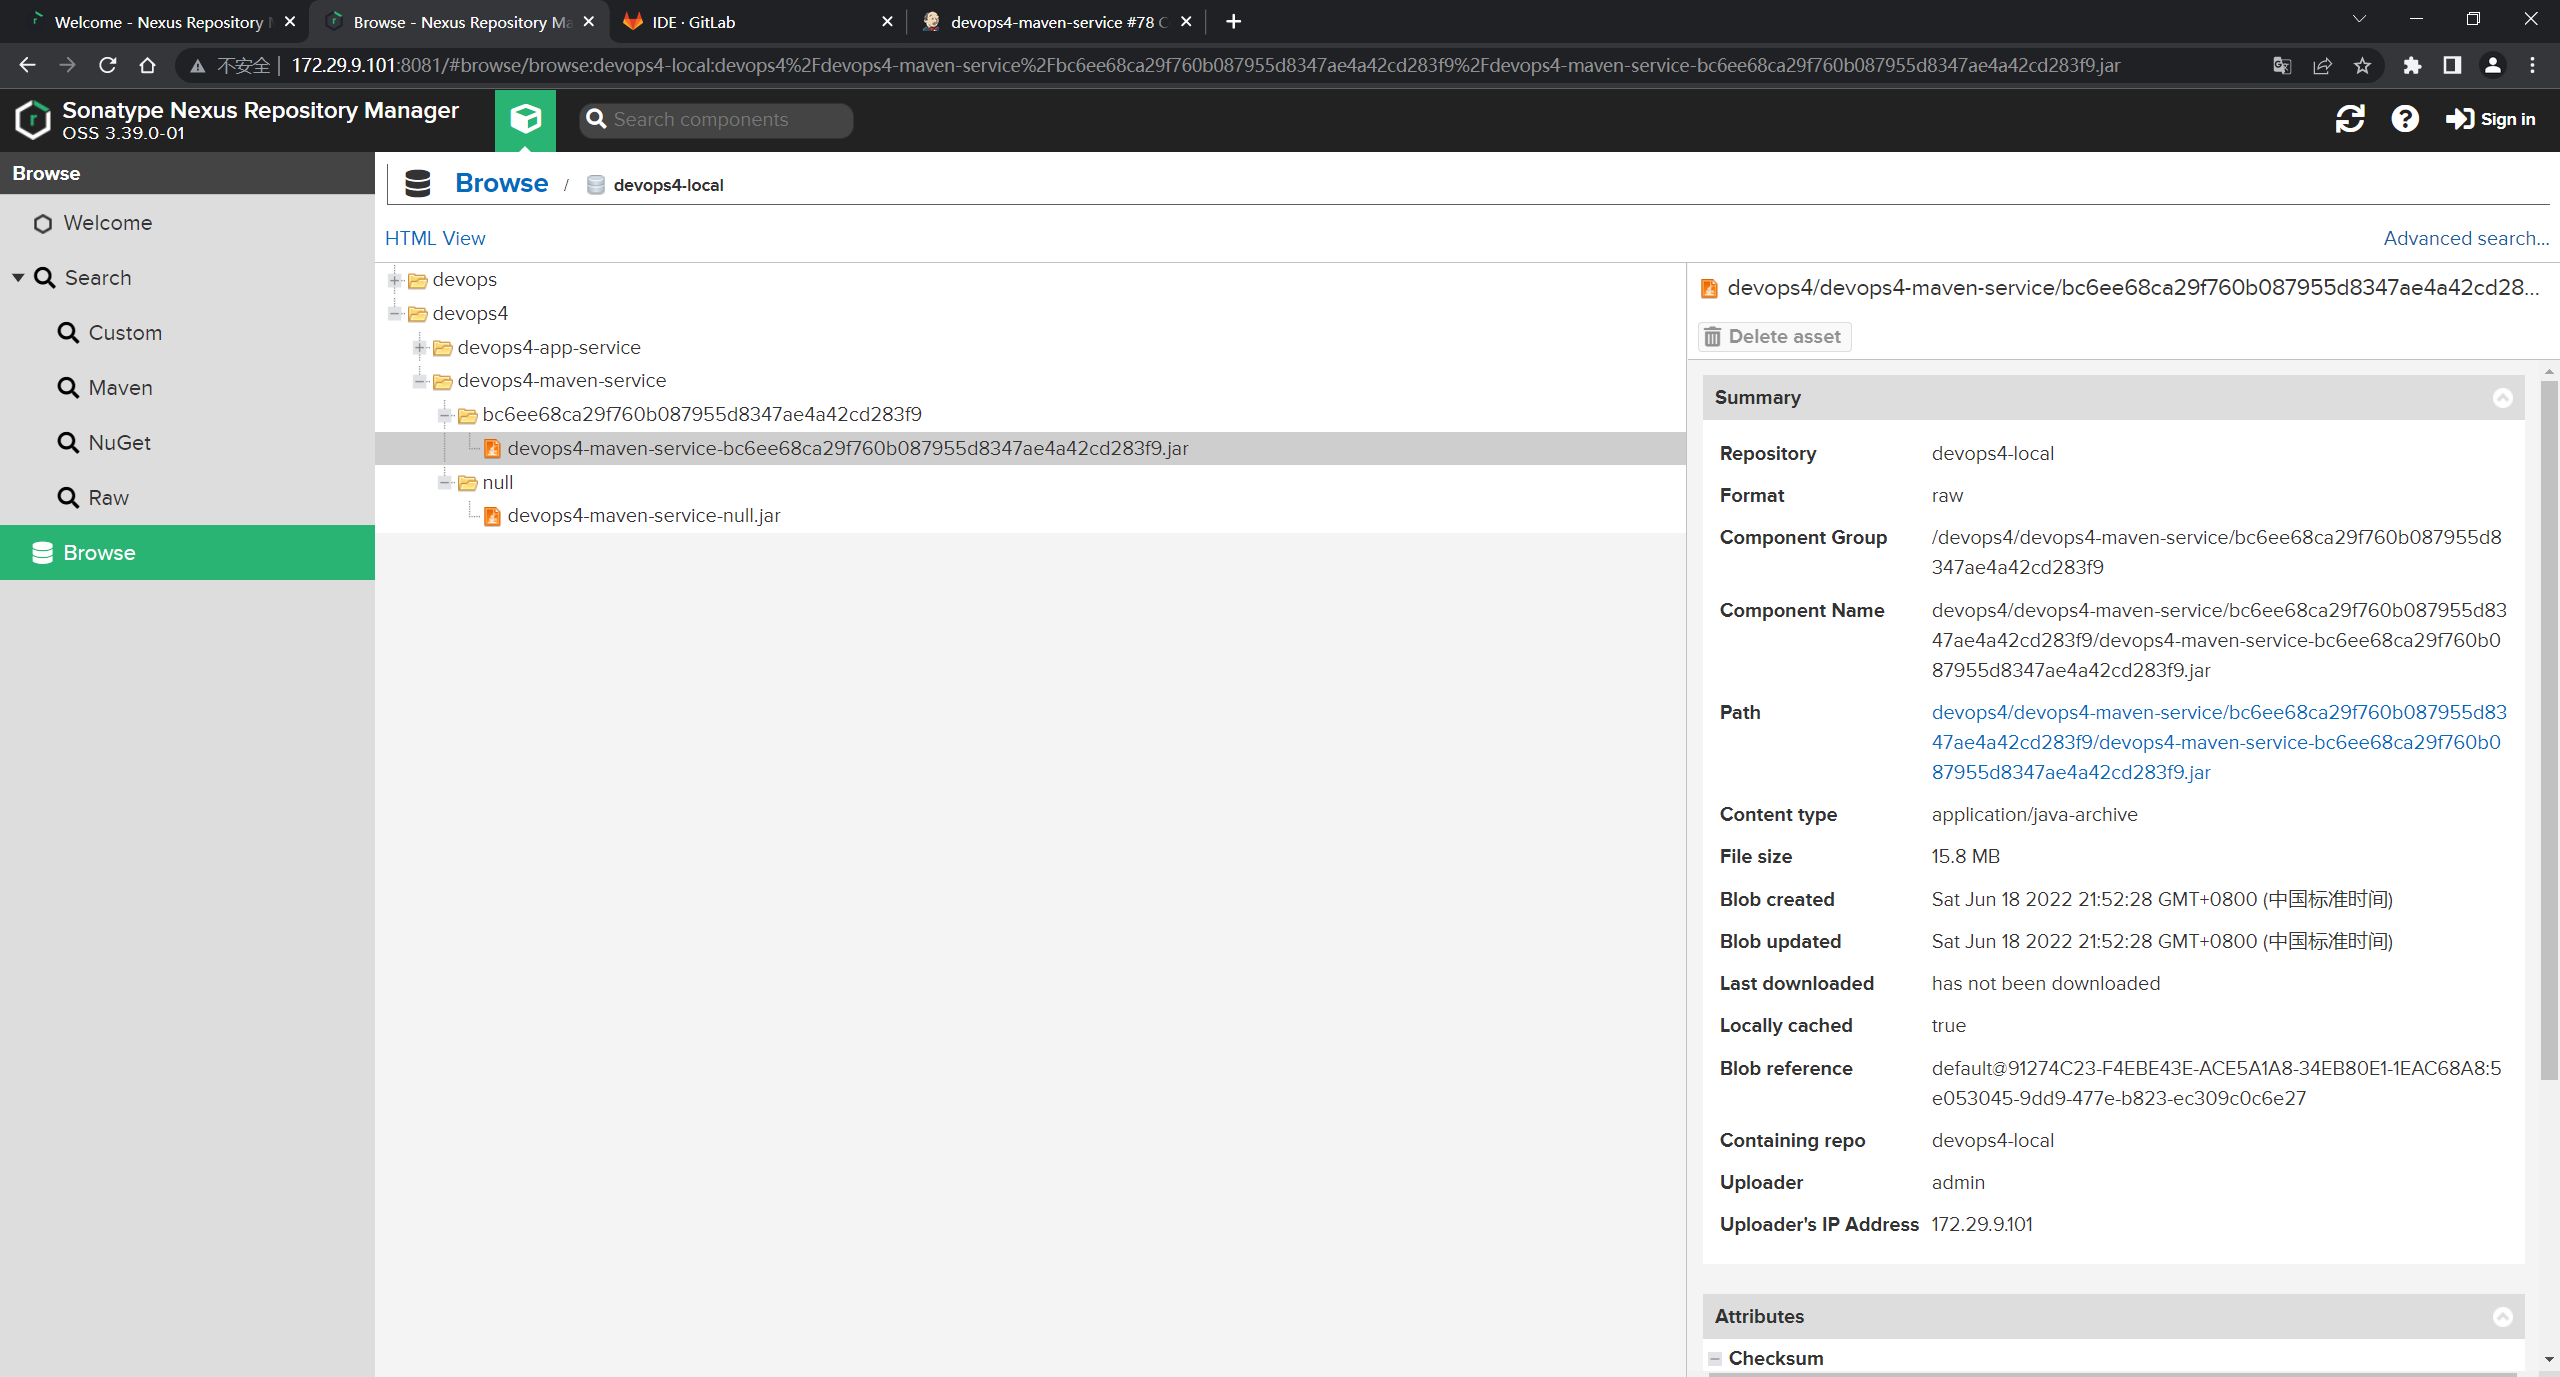
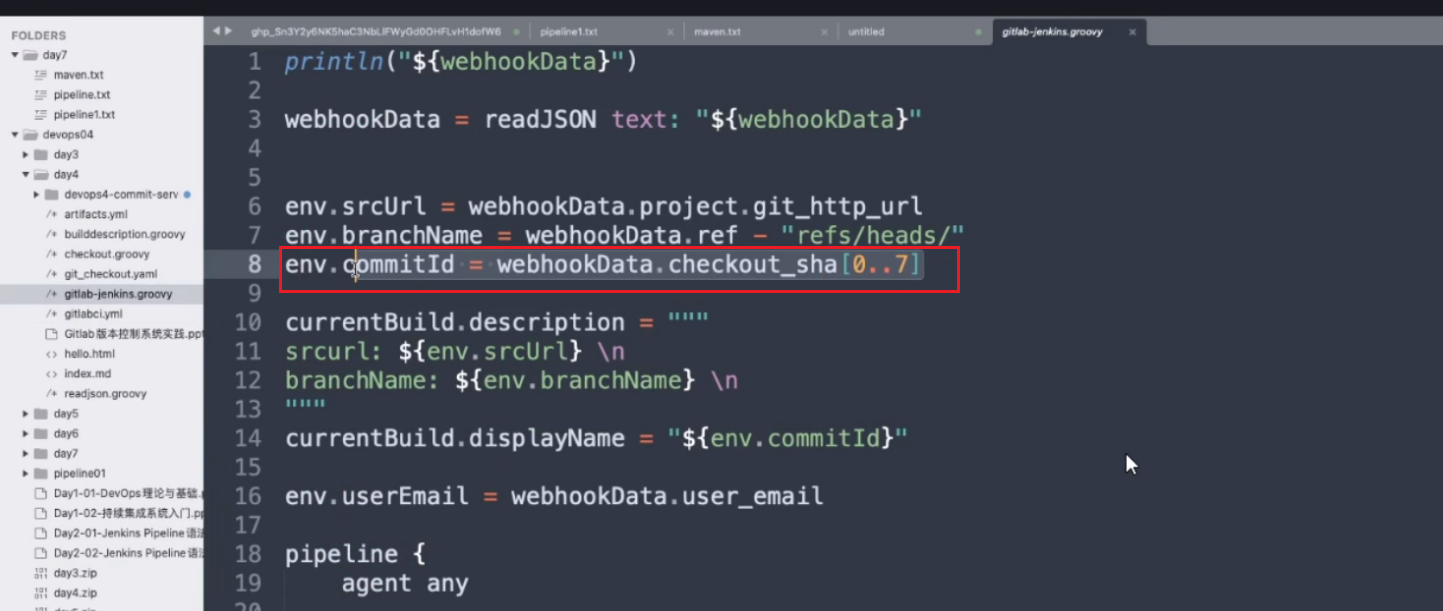
现在来看下这个commitID如何要切成短一点的8位:
之前是从webhook那里拿的:
这次直接从devops4-jenkinslib-service项目的/src/org/devops/GitLab.groovy文件里修改:
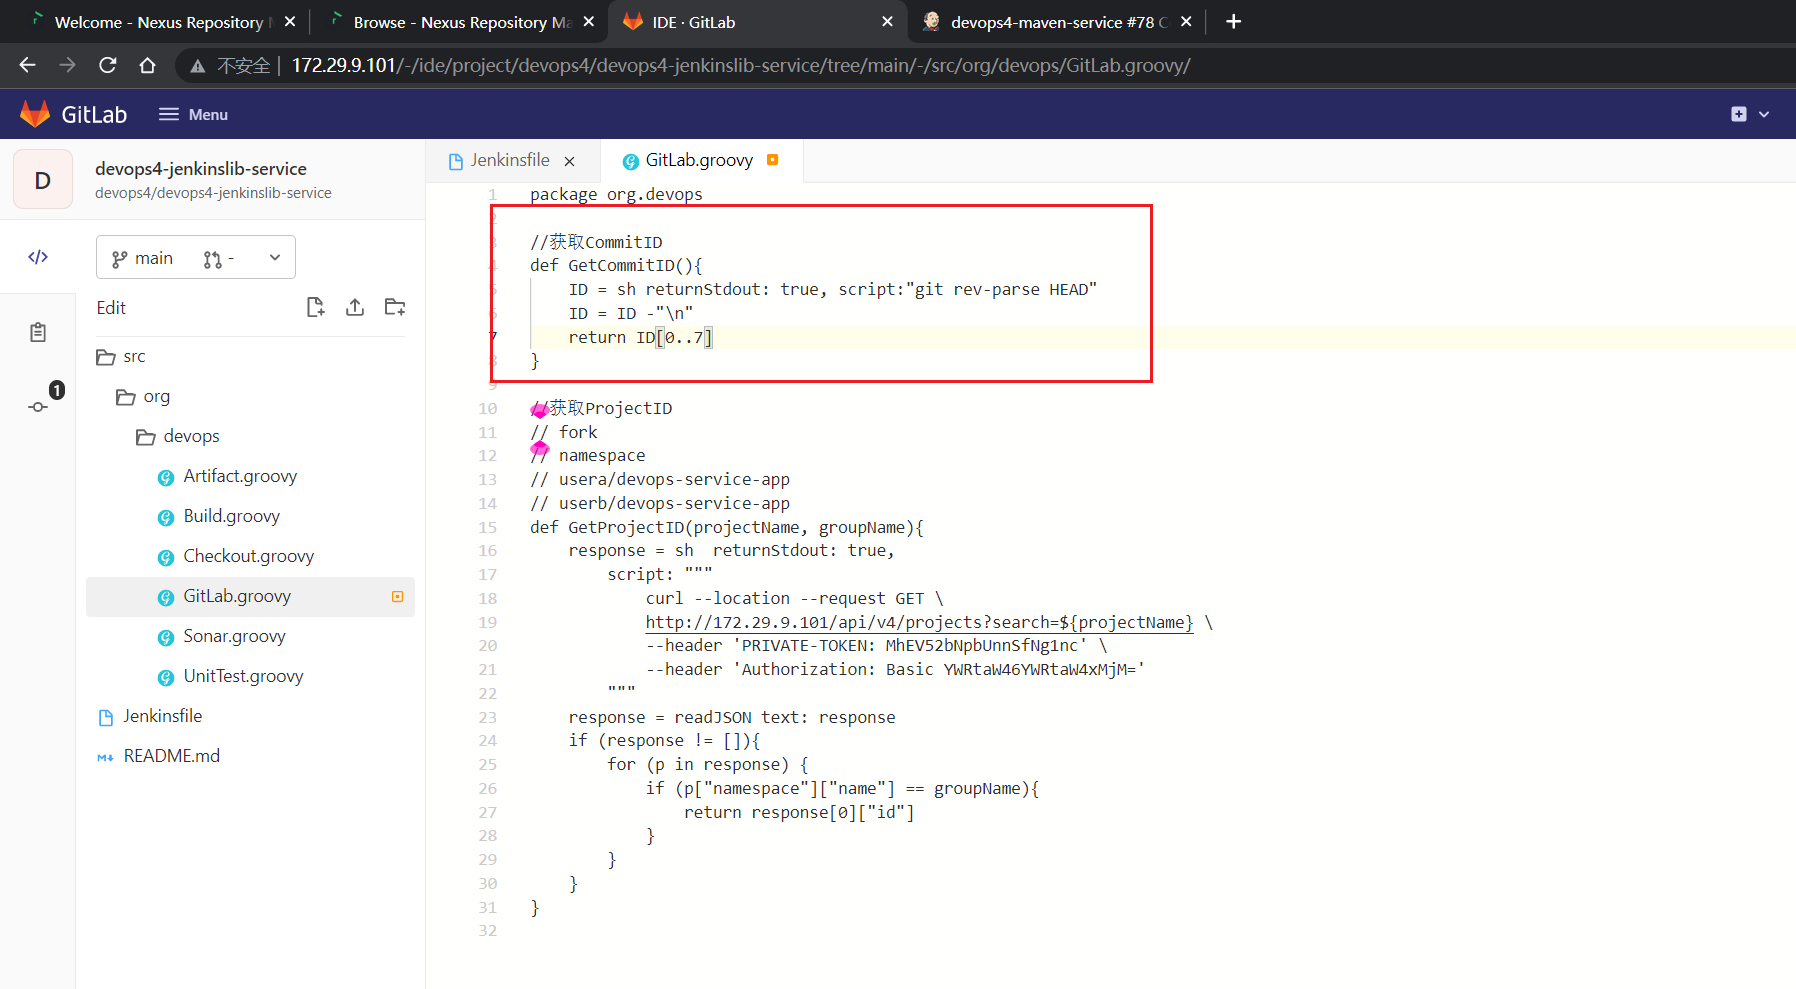
修改后,提交:
此时,在运行一次刚才的回放:
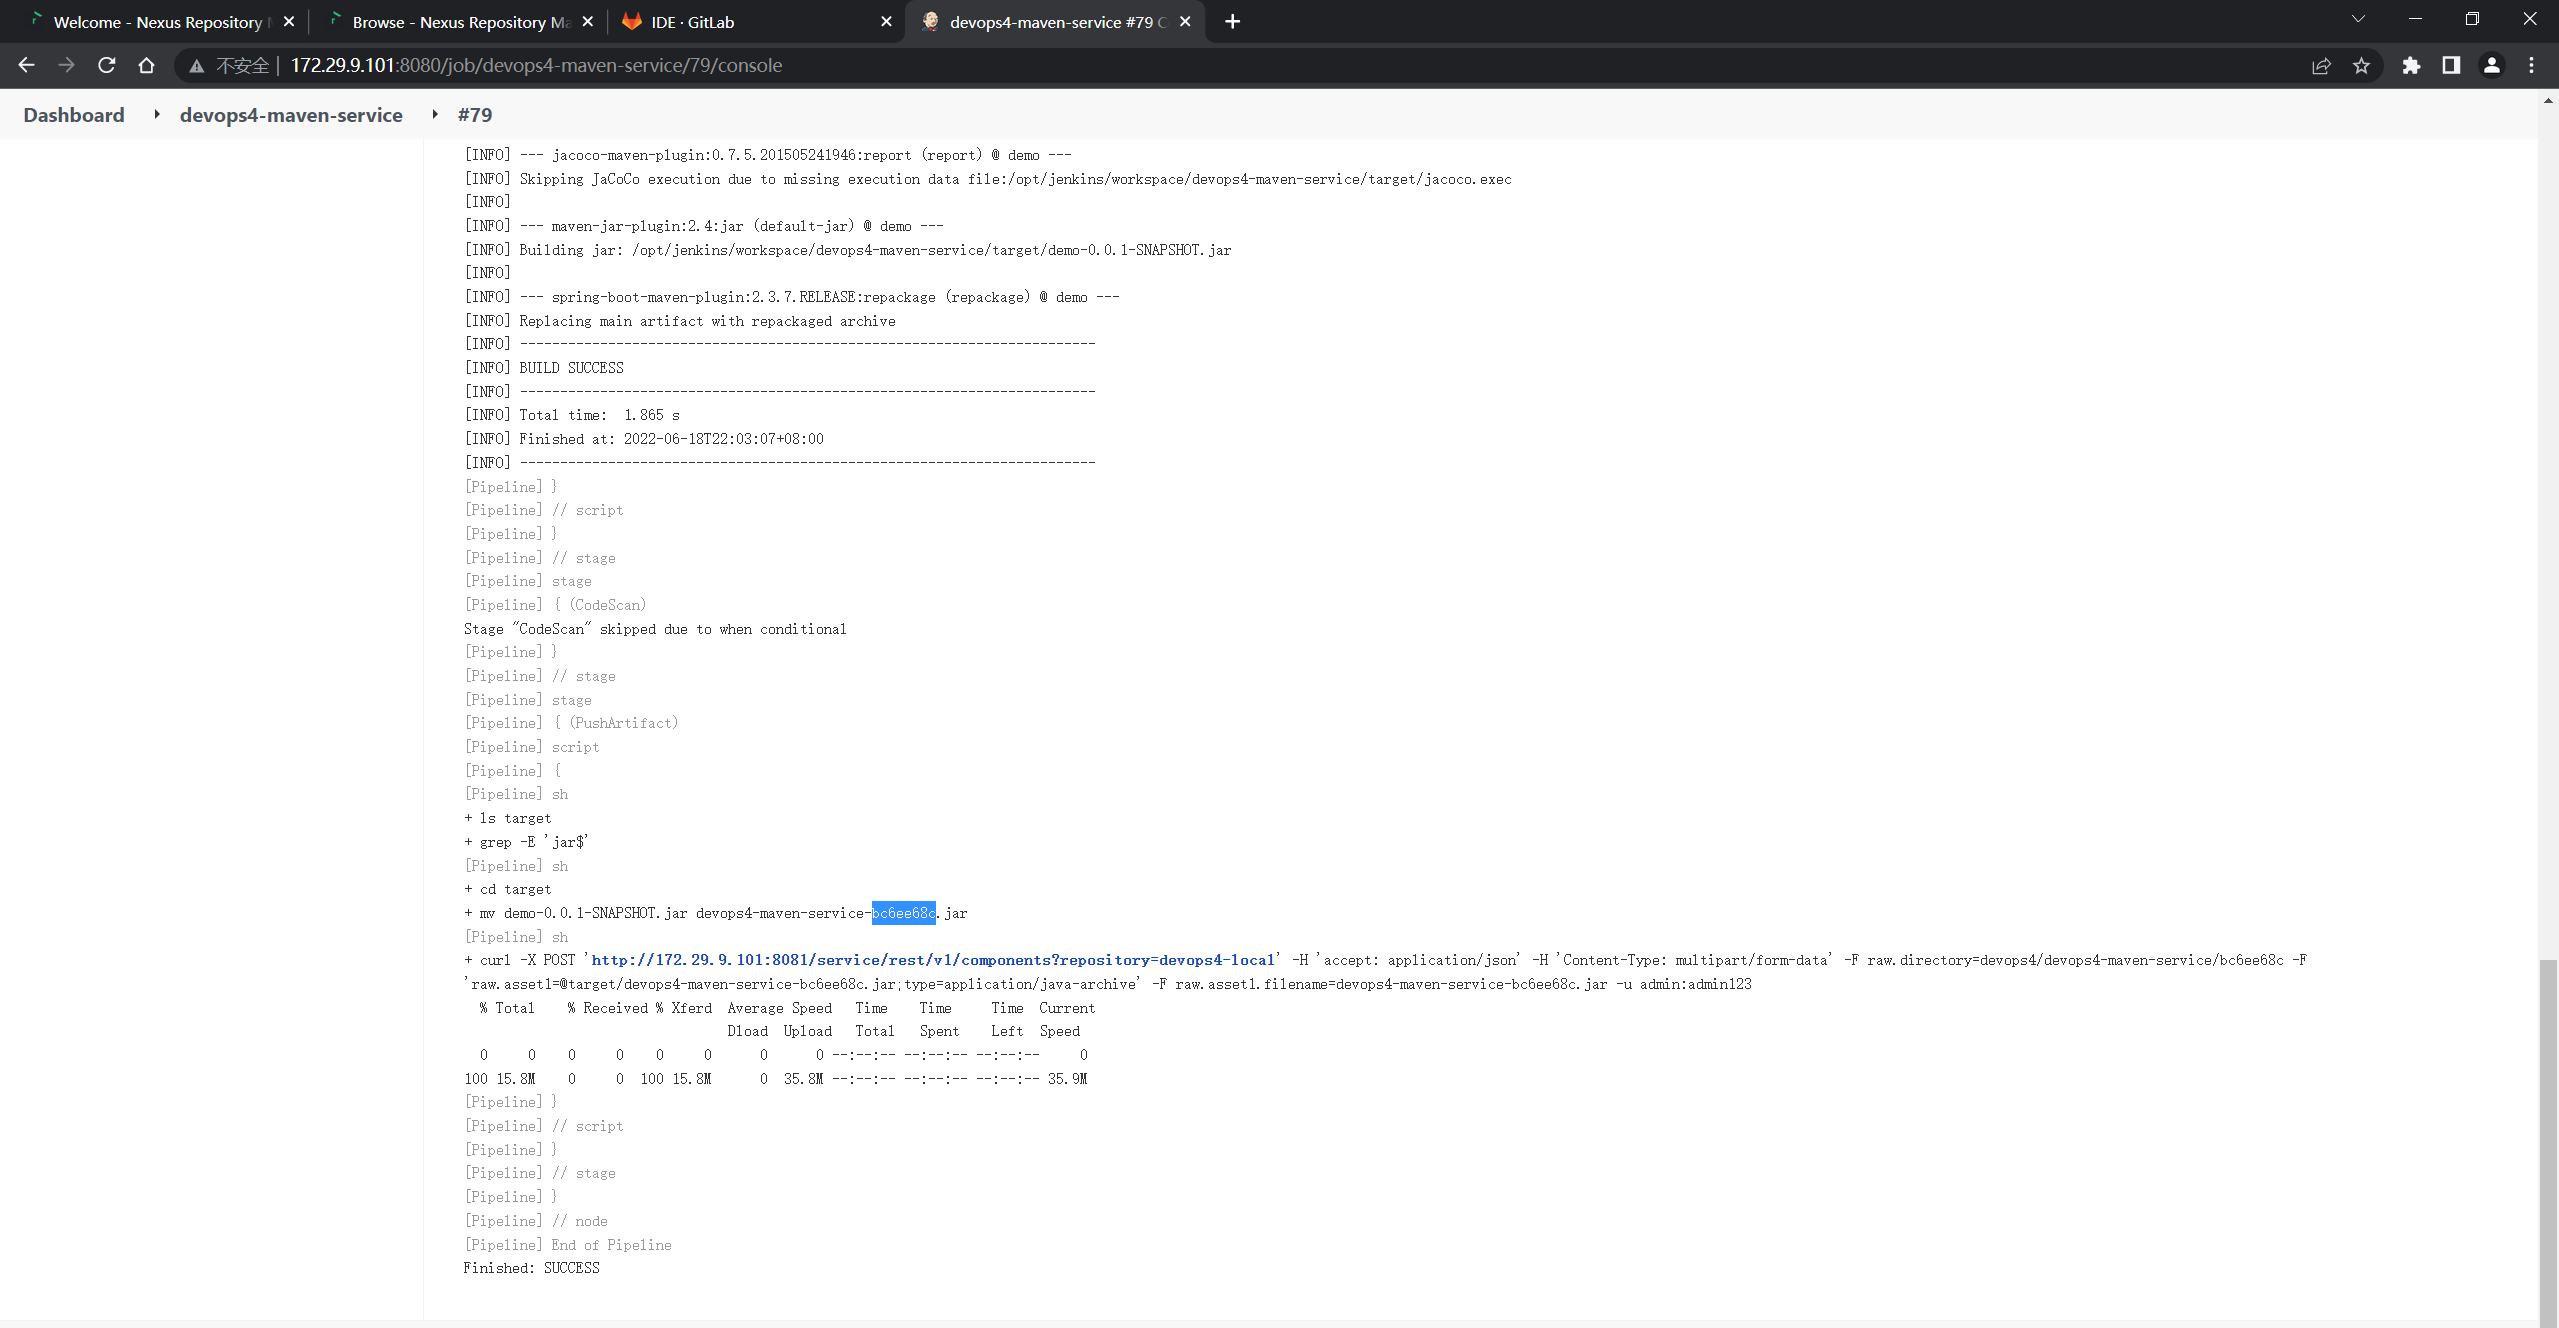
可以看到,当前的commitID就变成了短的8位了:
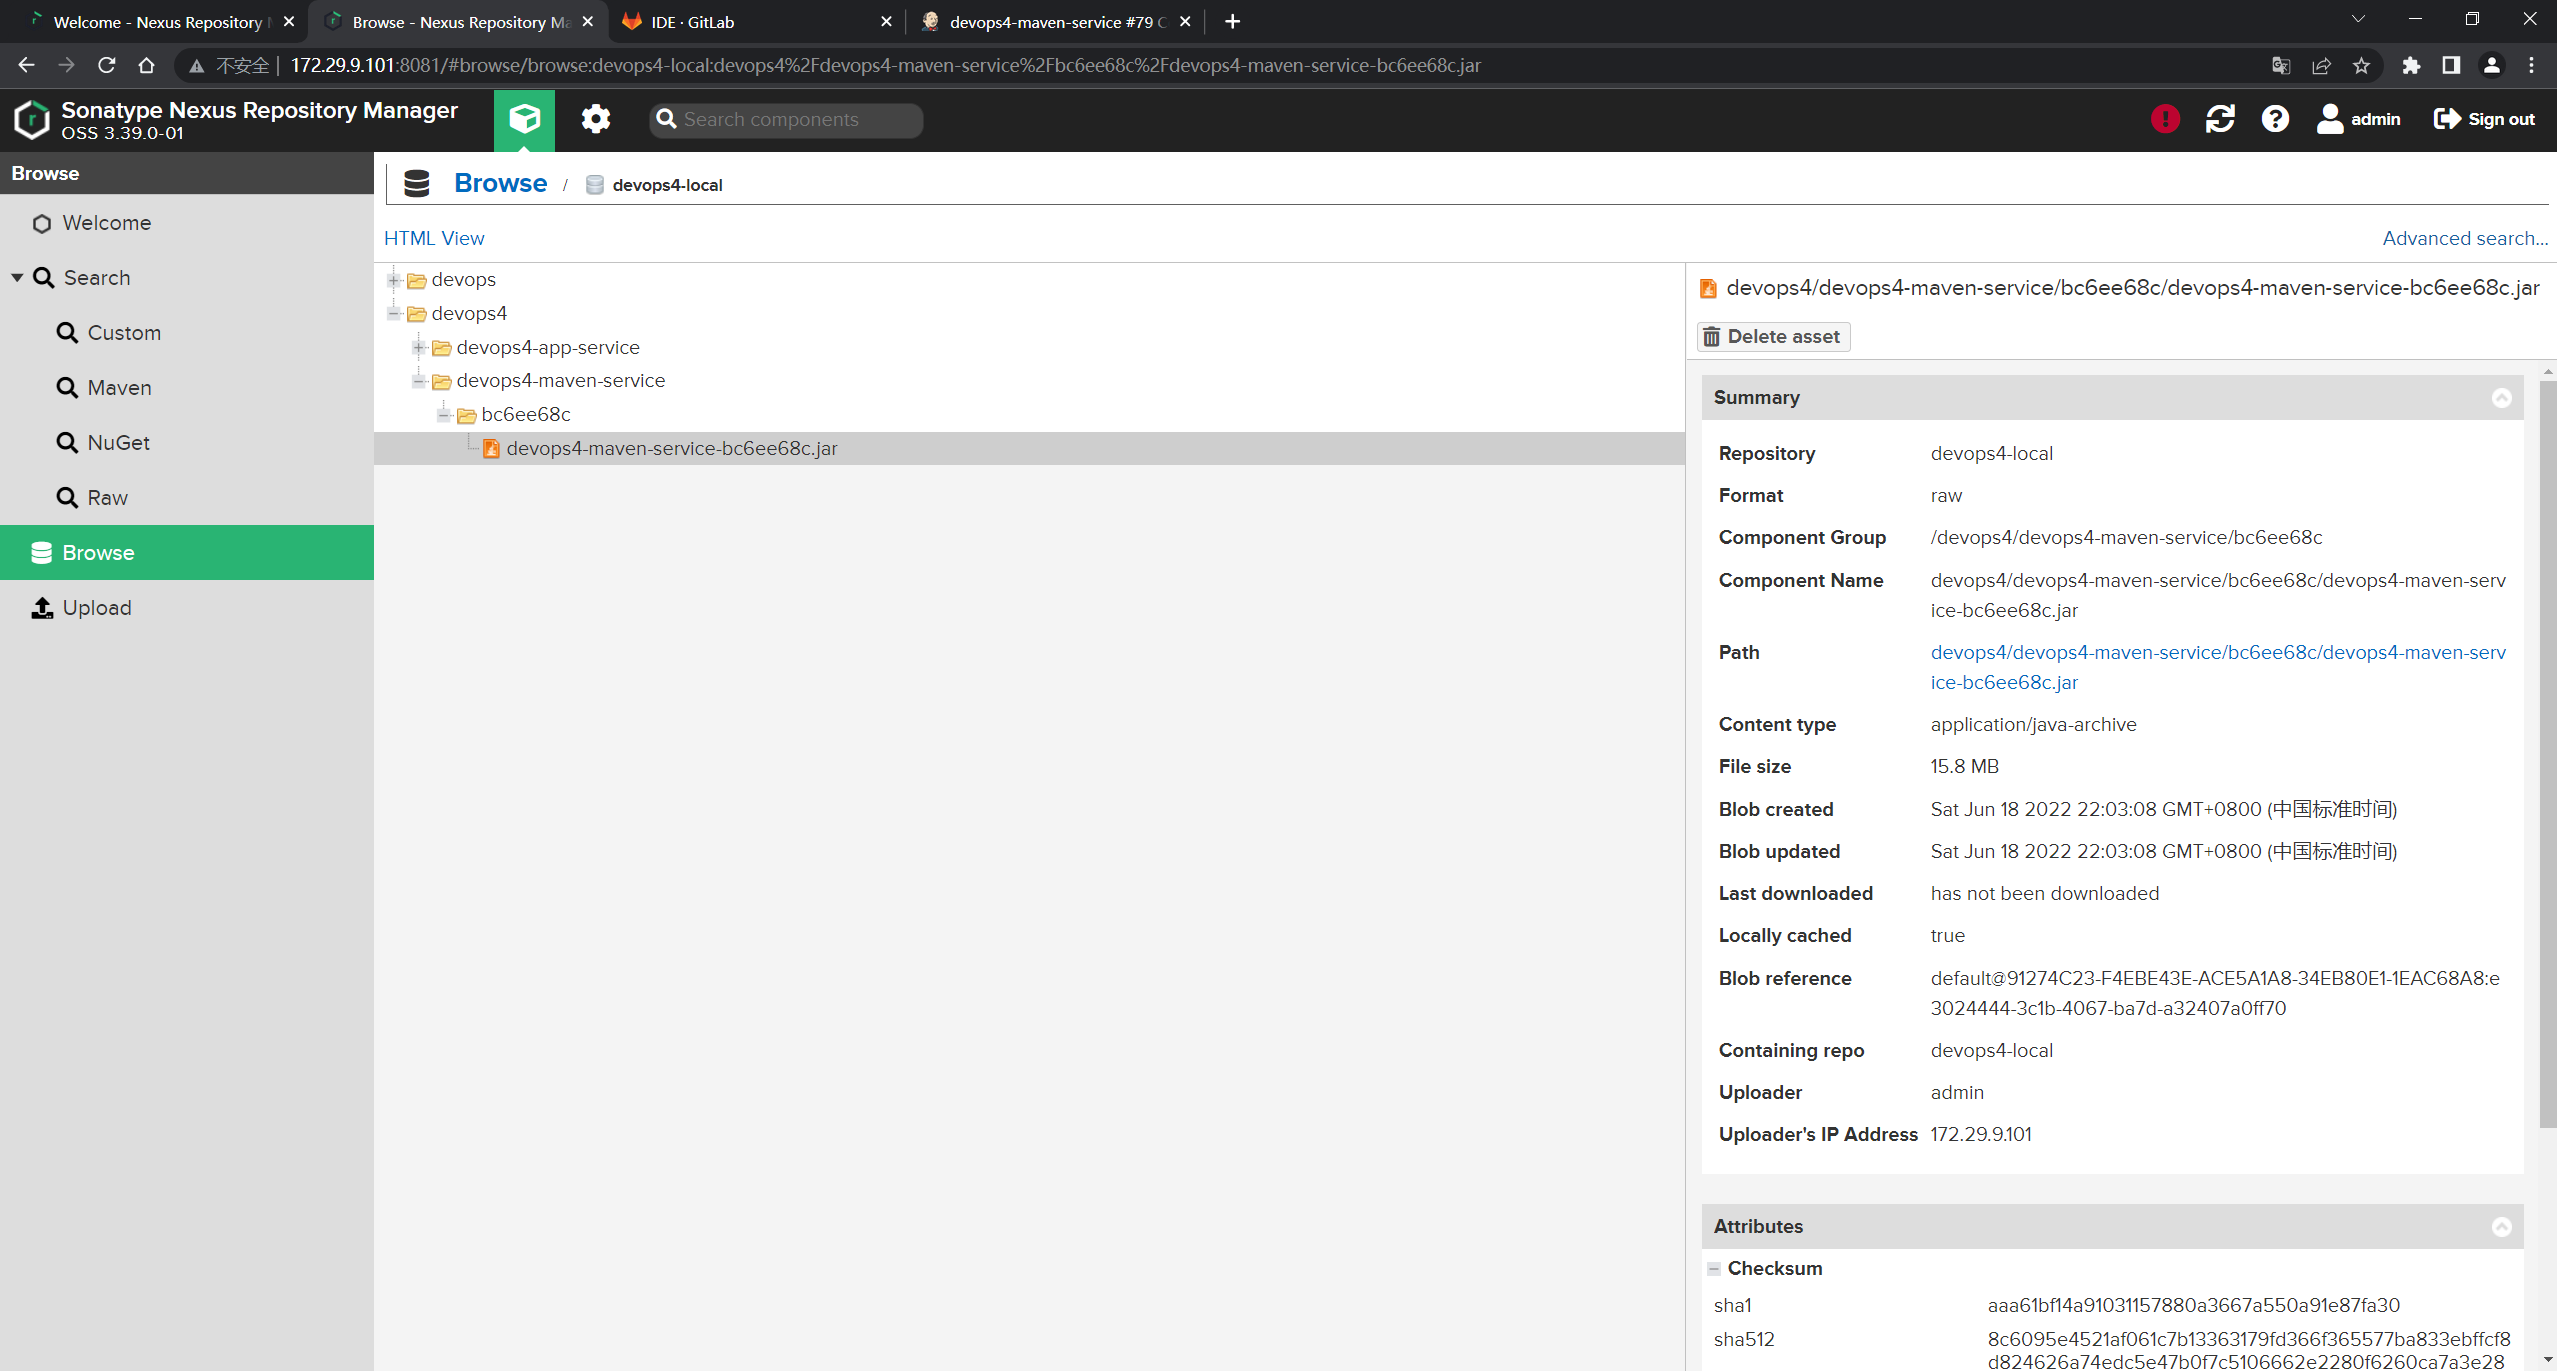
制品也上传成功了。
- 此时,我们再修改下,改成分支加上commitID :
之前的代码:
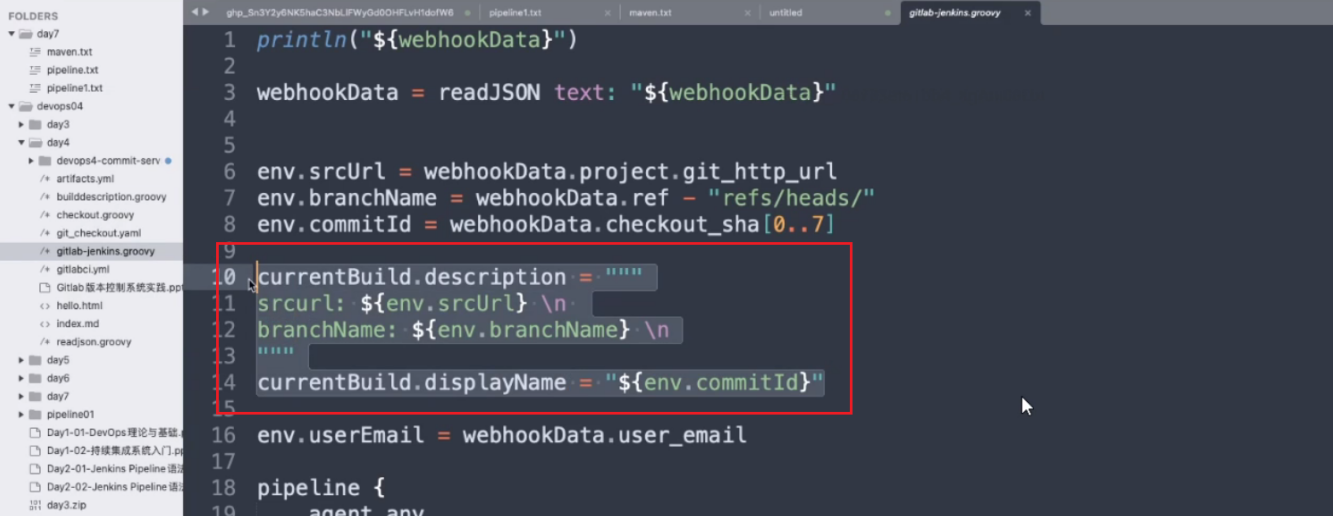
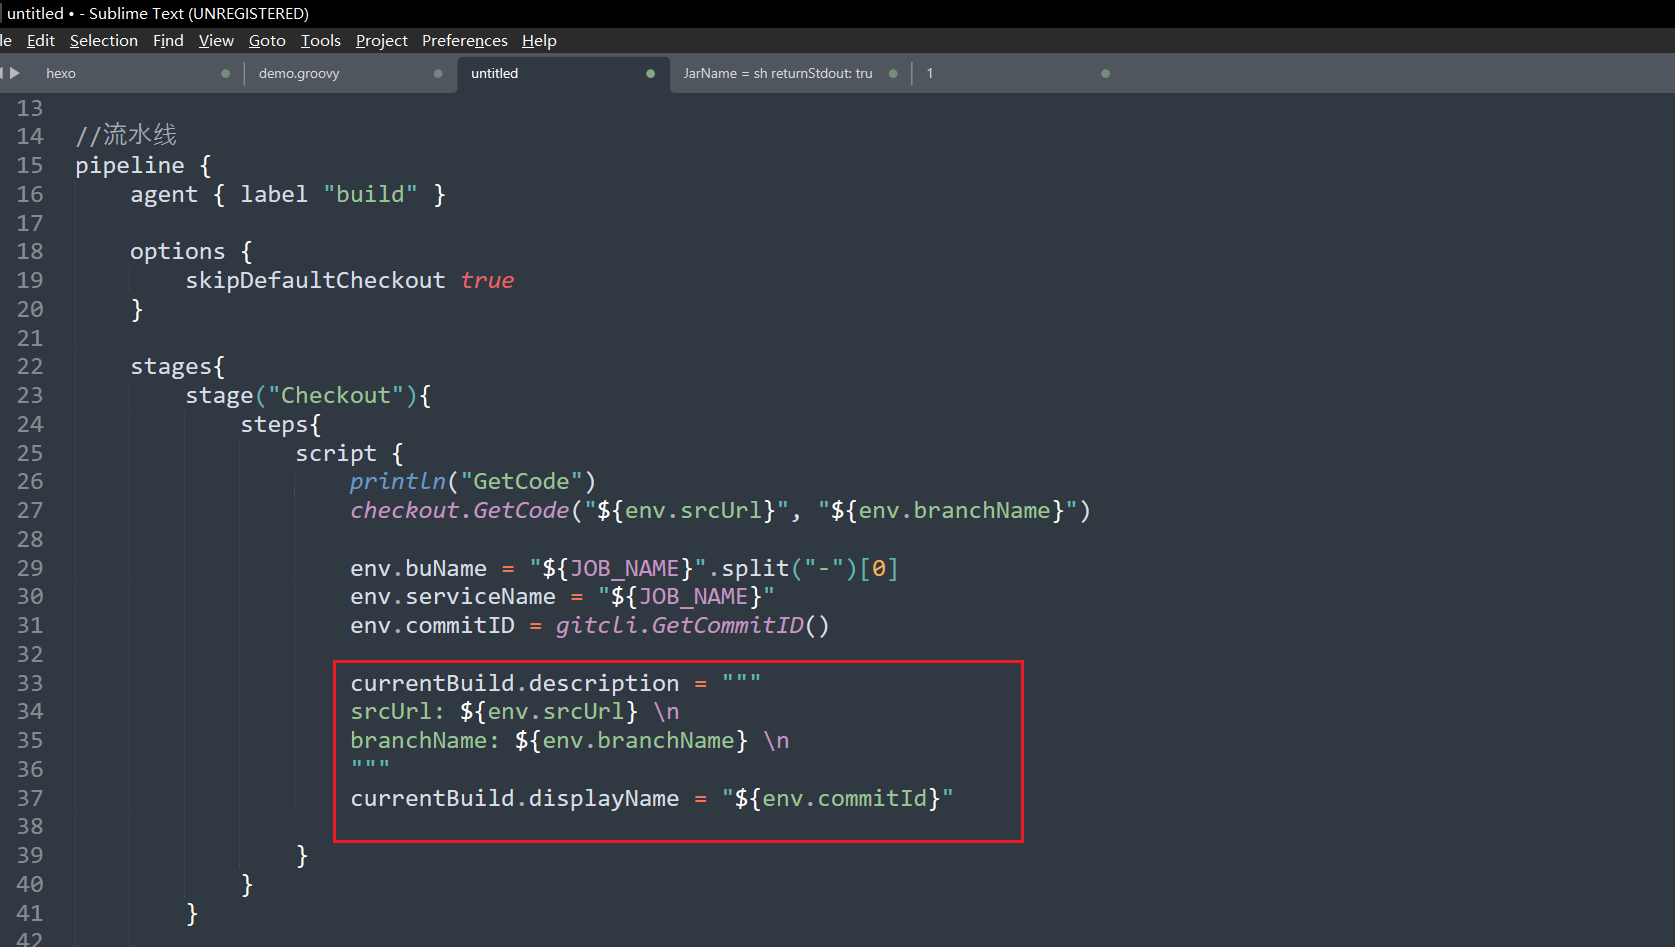
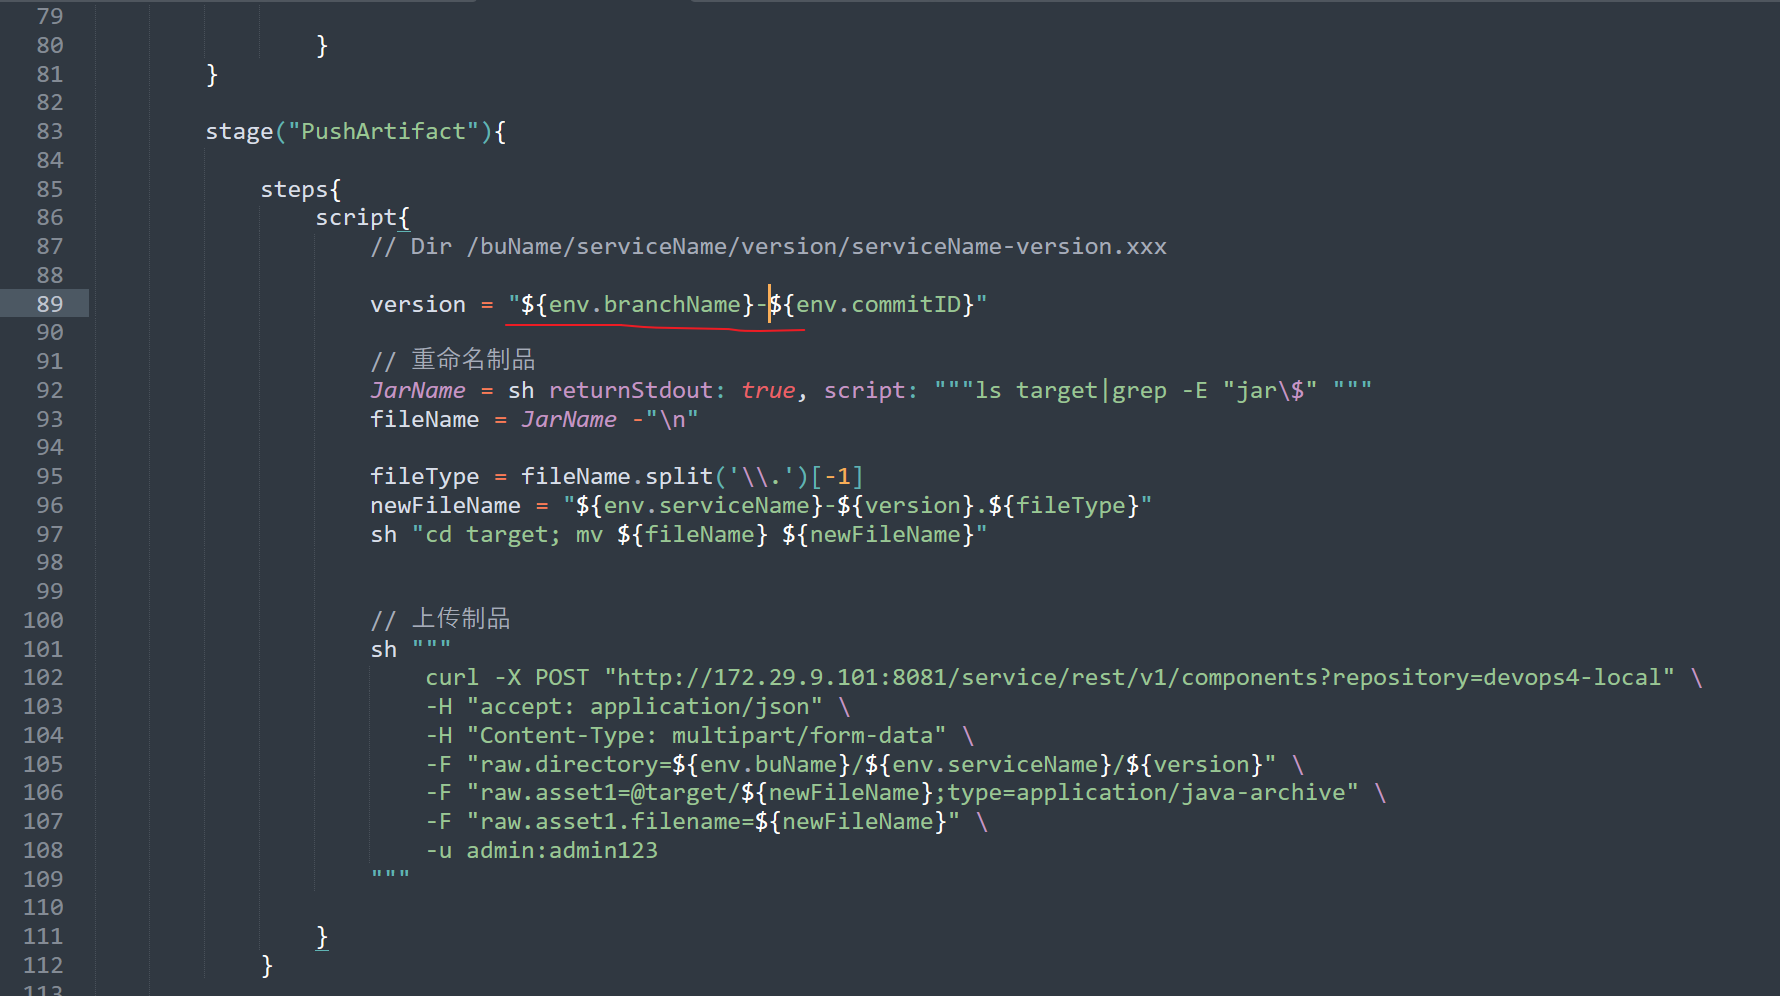
再次运行并观察效果:
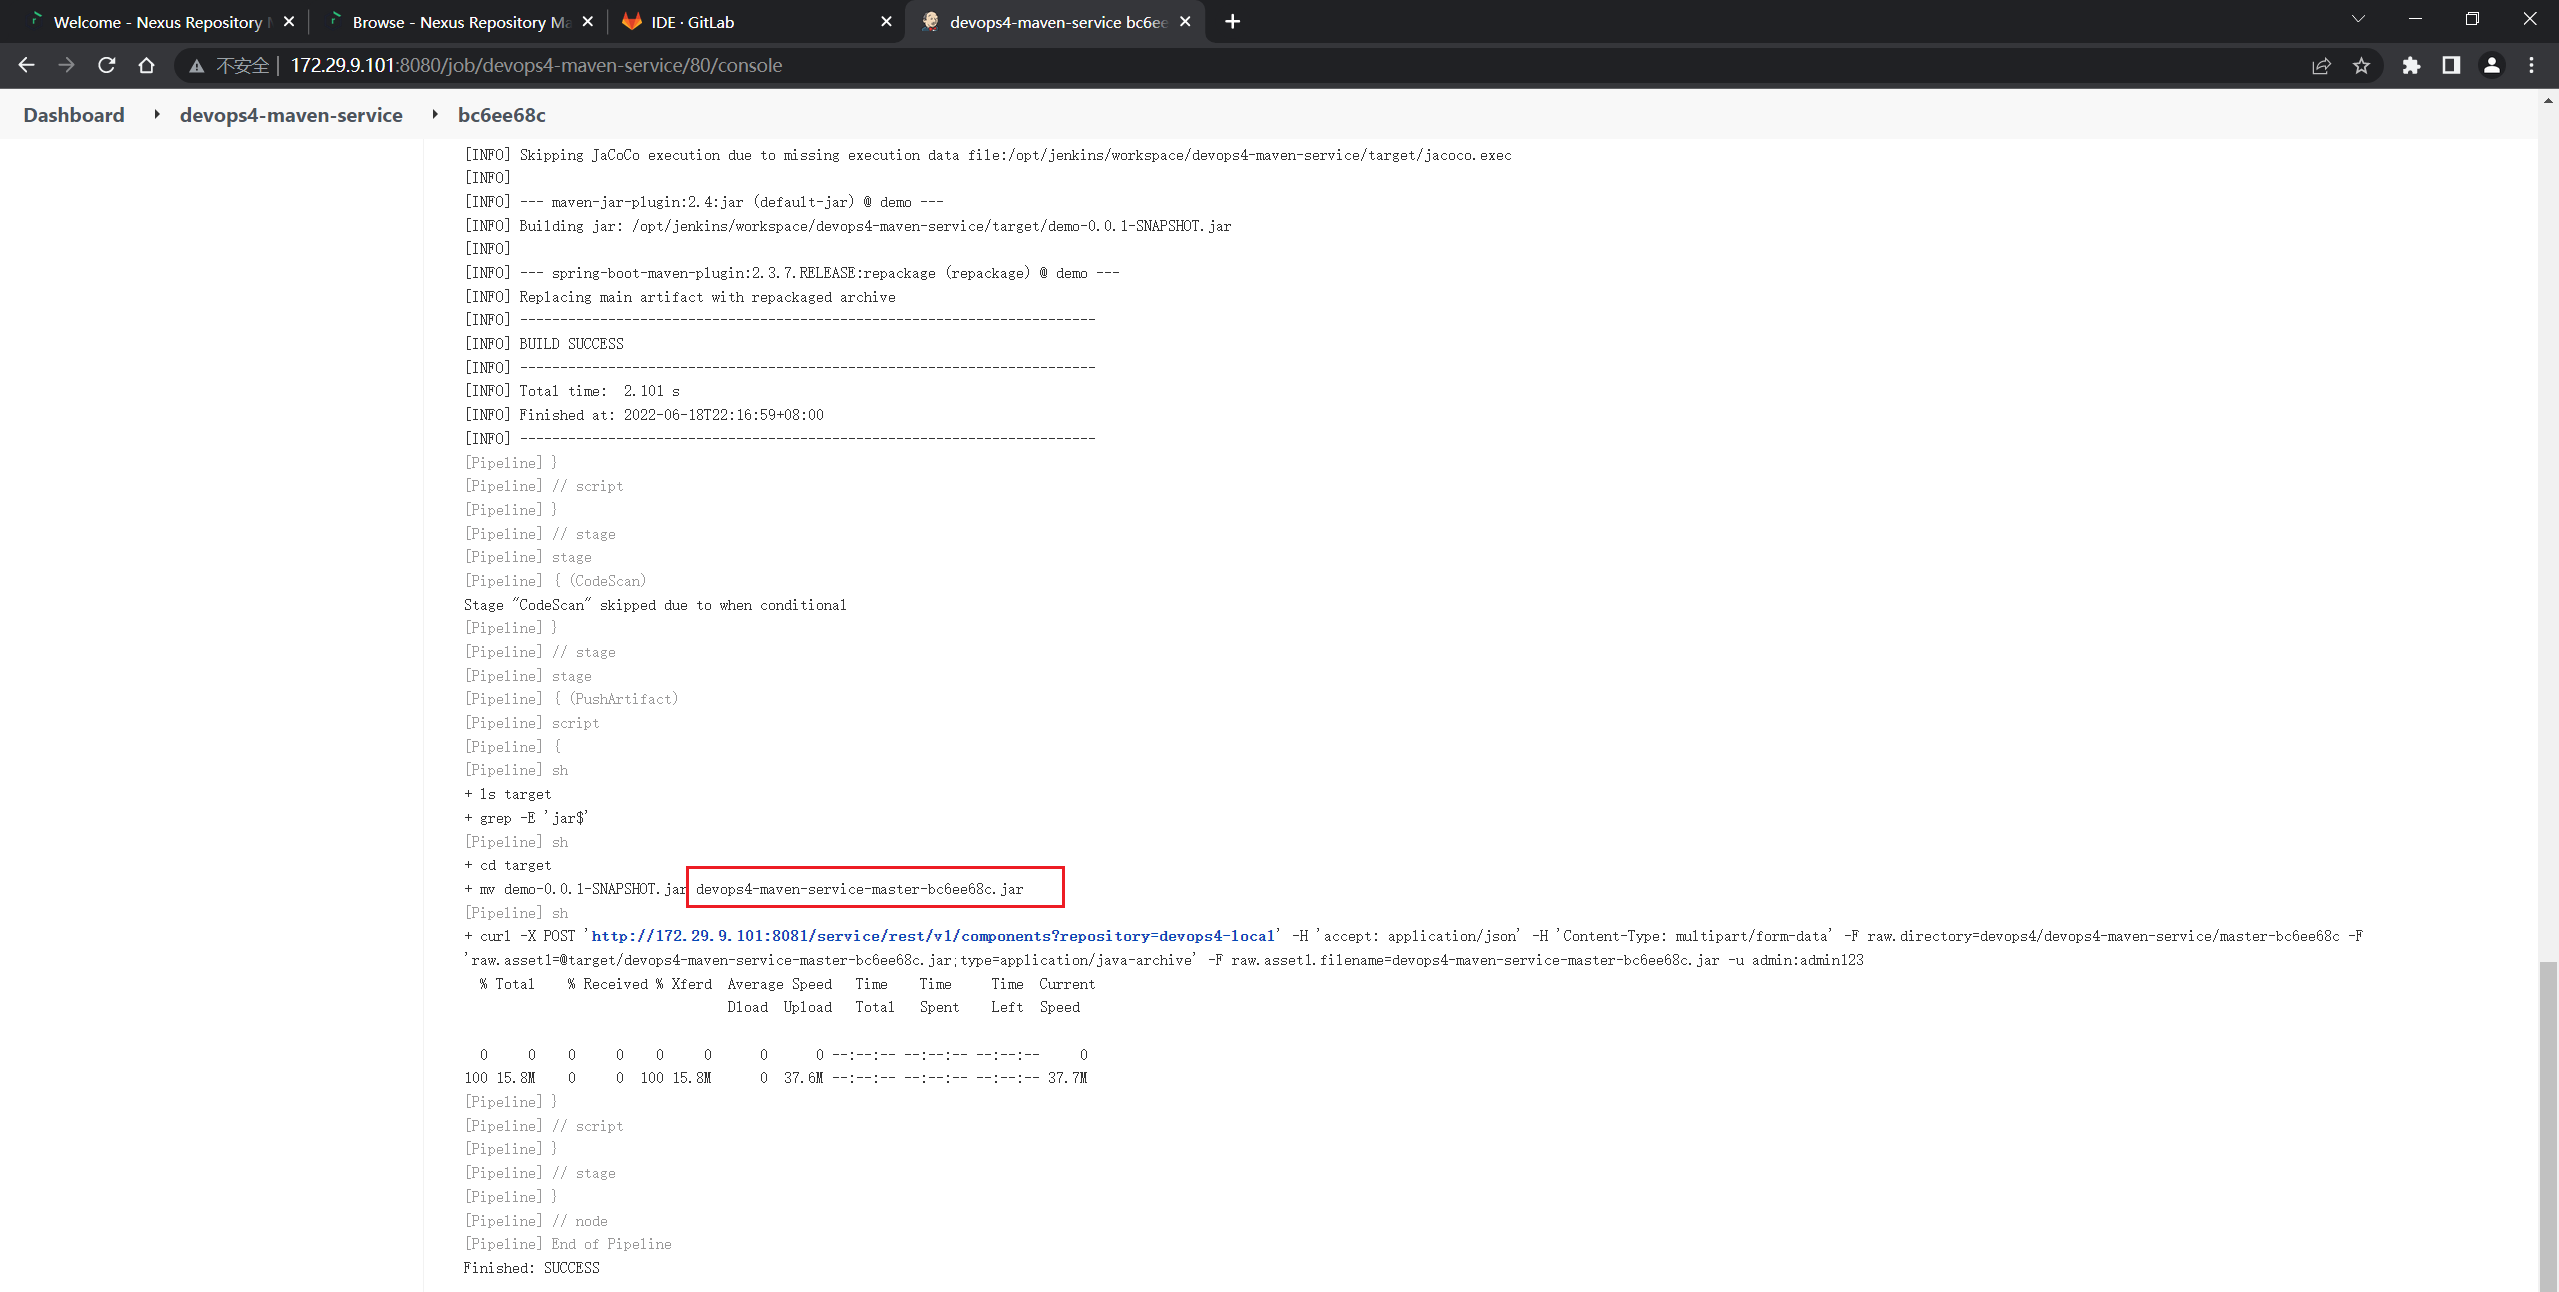
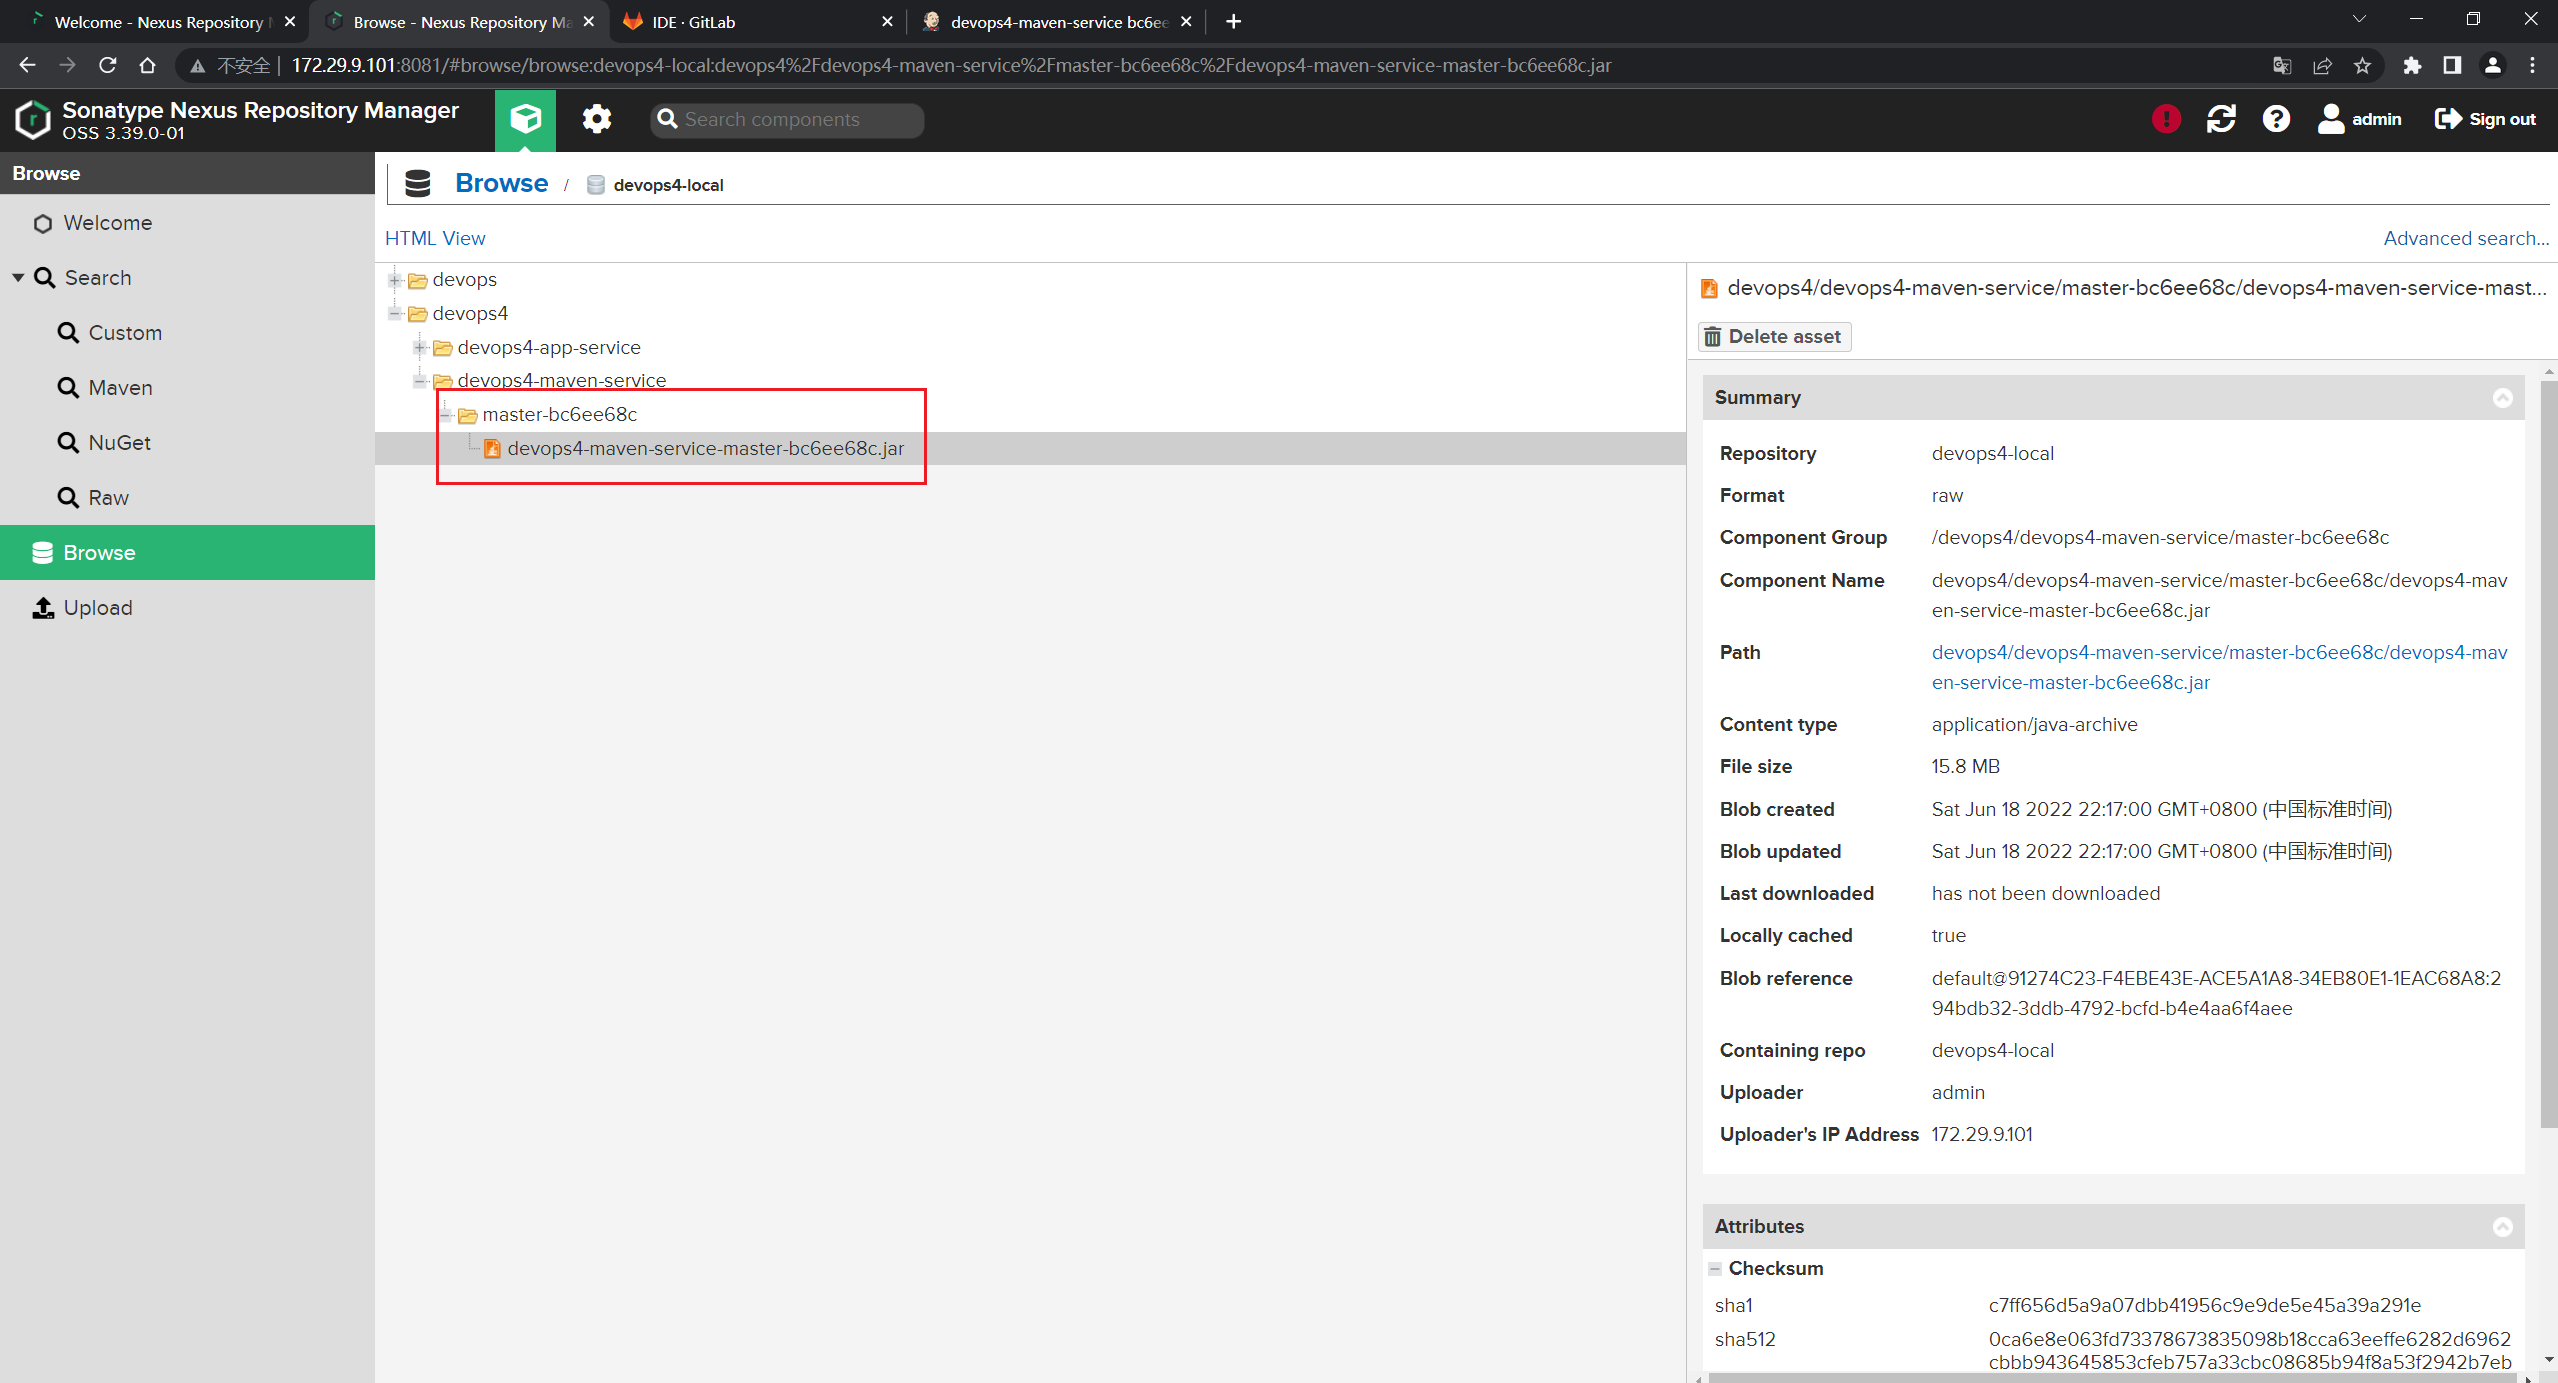
这里是有些乱,后面再处理下:
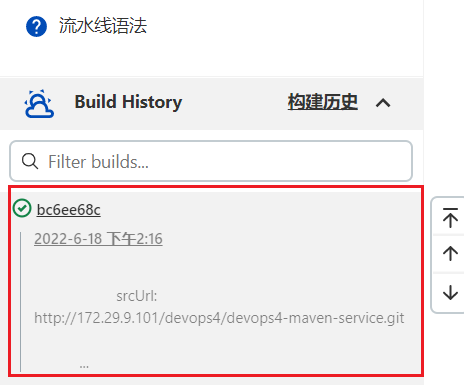
测试成功。😘
完整代码如下:
@Library("mylib@main") _     //加载共享库
import org.devops.*						// 导入库

def checkout = new Checkout()    //New实例化
def build = new Build()
def unittest = new UnitTest()
def sonar = new Sonar()
def gitcli = new GitLab()

//env.buildType = "${JOB_NAME}".split("-")[1]


//流水线
pipeline {
    agent { label "build" }

    options {
        skipDefaultCheckout true
    }

    stages{
        stage("Checkout"){
            steps{
                script {
                    println("GetCode")
                    checkout.GetCode("${env.srcUrl}", "${env.branchName}")

                    env.buName = "${JOB_NAME}".split("-")[0]
                    env.serviceName = "${JOB_NAME}"
                    env.commitID = gitcli.GetCommitID()

                    currentBuild.description = """
                    srcUrl: ${env.srcUrl} \n
                    branchName: ${env.branchName} \n
                    """
                    currentBuild.displayName = "${env.commitId}"

                }
            }
        }

        stage("Build"){
            steps{
                script{
                    println("Build")
                    //build.CodeBuild("${env.buildType}")
                    sh "${env.buildShell}"

                }
            }
        }

        /*stage("UnitTest"){
            steps{
                script{
                    unittest.CodeTest("${env.buildType}")
                }
            }
        }*/

        stage("CodeScan"){
            when {
                environment name: 'skipSonar', value: 'false'
            }
            steps{
                script{
                    profileName = "${JOB_NAME}".split("-")[0]
                    sonar.Init("${JOB_NAME}", "java", profileName)


                    //commit-status

                    groupName =profileName
                    projectID = gitcli.GetProjectID("${JOB_NAME}", groupName)
                    sonar.CodeScan("${env.branchName}", env.commitID, projectID)
                    println("${env.commitID}")
                    }

                }
        }

        stage("PushArtifact"){

            steps{
                script{
                    // Dir /buName/serviceName/version/serviceName-version.xxx

                    version = "${env.branchName}-${env.commitID}"

                    // 重命名制品
                    JarName = sh returnStdout: true, script: """ls target|grep -E "jar\$" """
                    fileName = JarName -"\n"

                    fileType = fileName.split('\\.')[-1]
                    newFileName = "${env.serviceName}-${version}.${fileType}"
                    sh "cd target; mv ${fileName} ${newFileName}"


                    // 上传制品
                    sh """
                        curl -X POST "http://172.29.9.101:8081/service/rest/v1/components?repository=devops4-local" \
                        -H "accept: application/json" \
                        -H "Content-Type: multipart/form-data" \
                        -F "raw.directory=${env.buName}/${env.serviceName}/${version}" \
                        -F "raw.asset1=@target/${newFileName};type=application/java-archive" \
                        -F "raw.asset1.filename=${newFileName}" \
                        -u admin:admin123
                    """

                }
            }


        }

    }
}
- 现在,对上面的代码再优化下:
把上传制品步骤分装成一个函数:
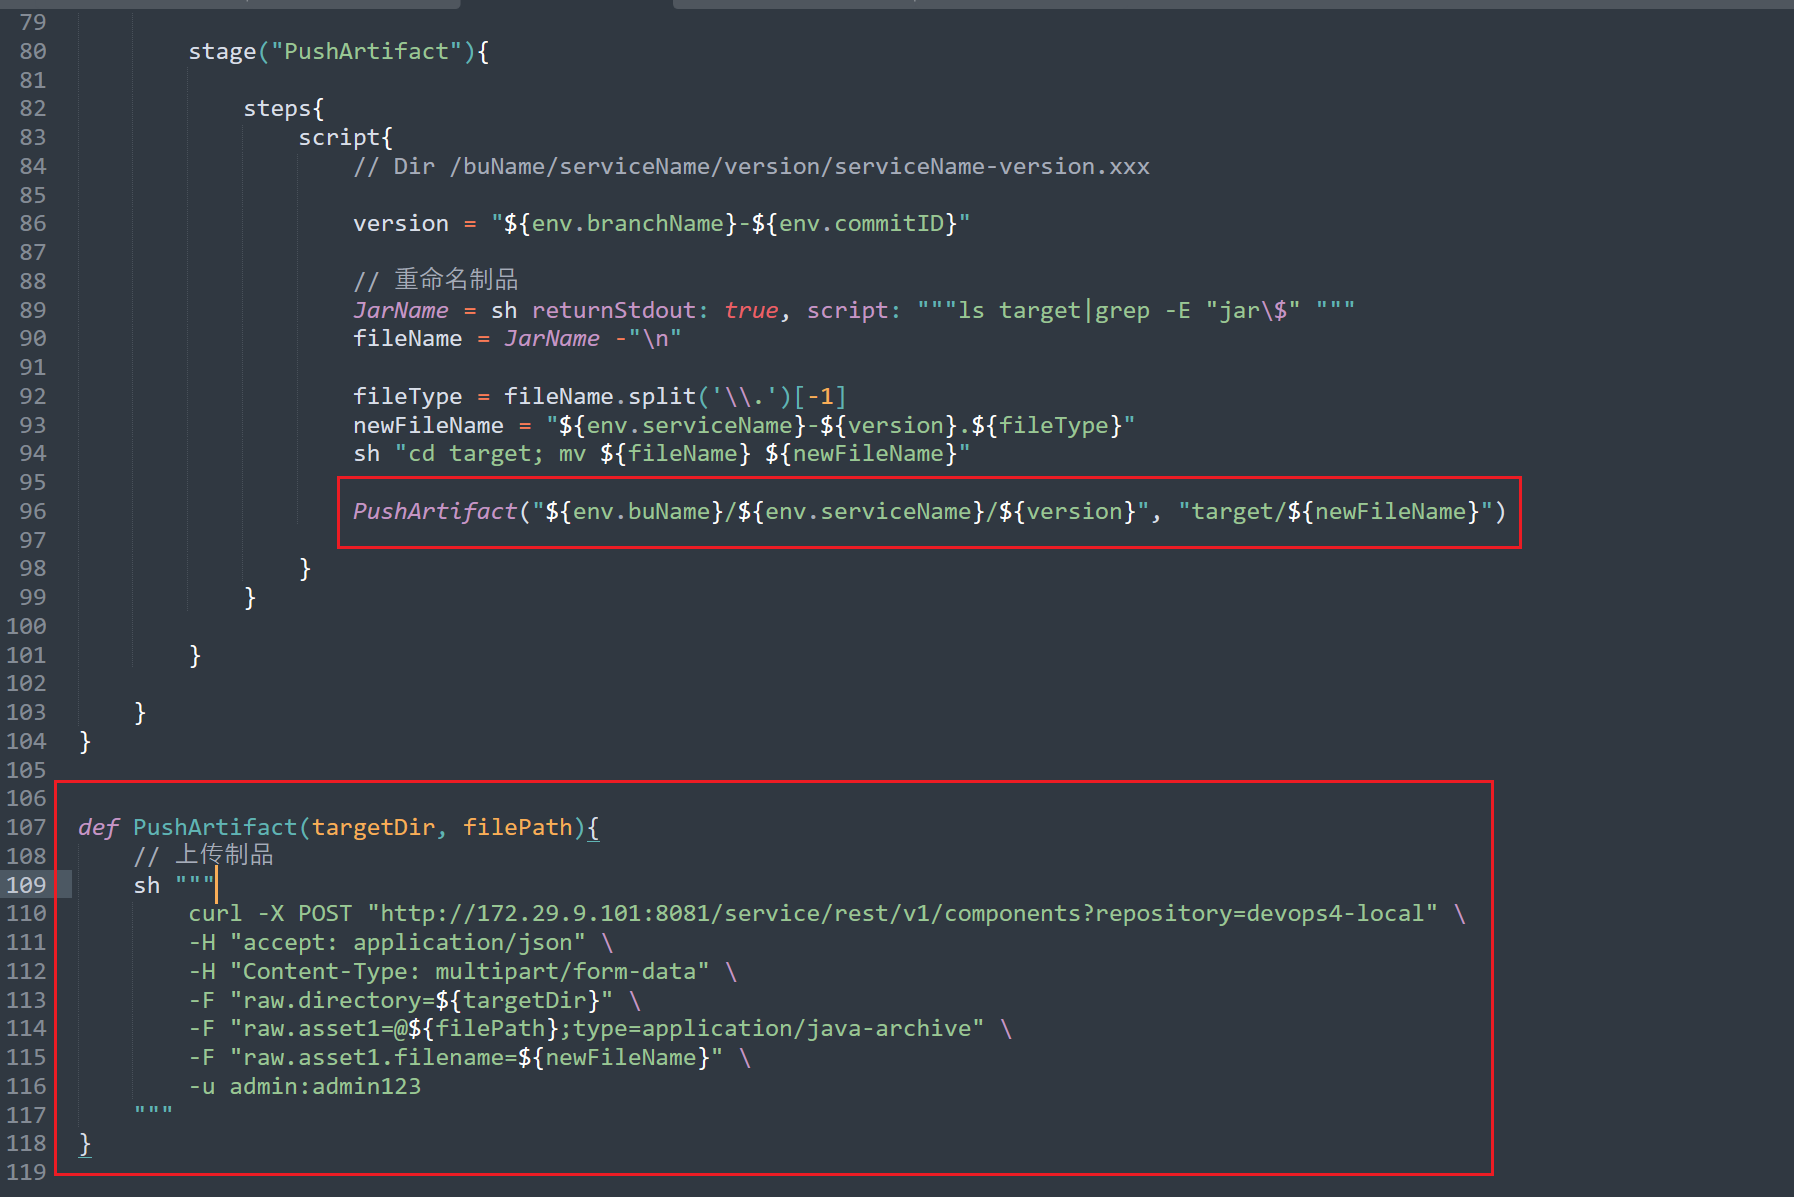
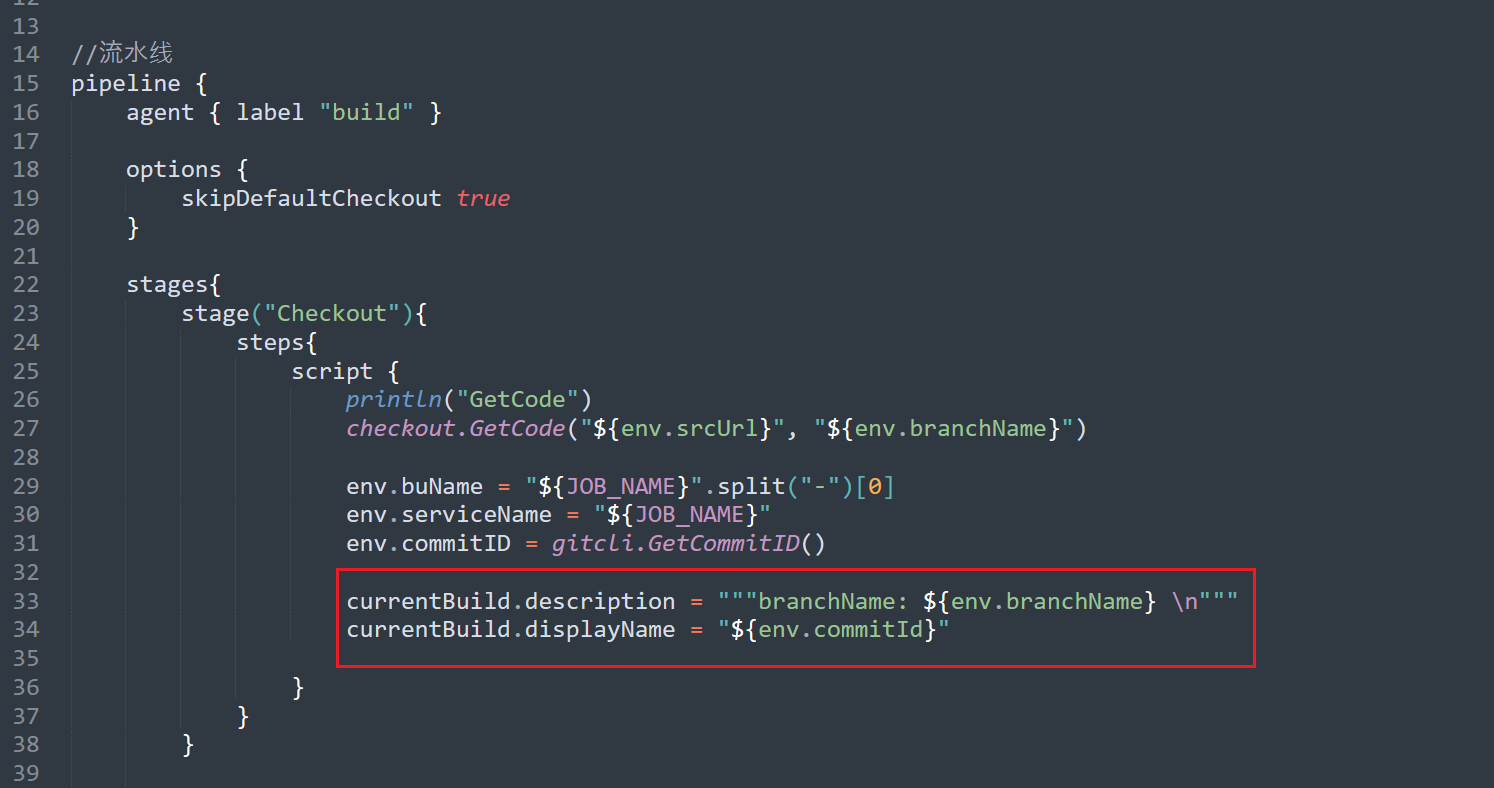
再次运行,观察效果:
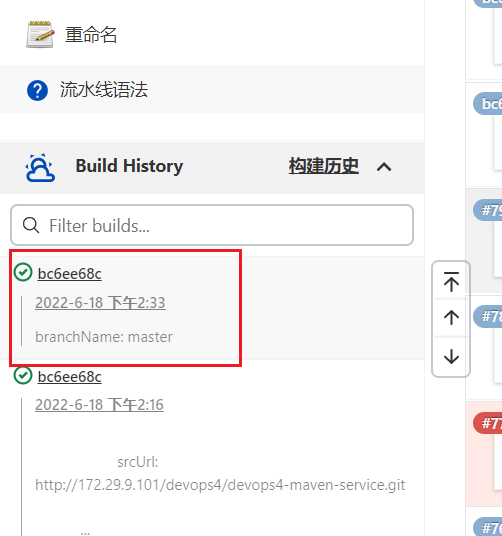

完整代码如下:
@Library("mylib@main") _     //加载共享库
import org.devops.*						// 导入库

def checkout = new Checkout()    //New实例化
def build = new Build()
def unittest = new UnitTest()
def sonar = new Sonar()
def gitcli = new GitLab()

//env.buildType = "${JOB_NAME}".split("-")[1]


//流水线
pipeline {
    agent { label "build" }

    options {
        skipDefaultCheckout true
    }

    stages{
        stage("Checkout"){
            steps{
                script {
                    println("GetCode")
                    checkout.GetCode("${env.srcUrl}", "${env.branchName}")

                    env.buName = "${JOB_NAME}".split("-")[0]
                    env.serviceName = "${JOB_NAME}"
                    env.commitID = gitcli.GetCommitID()

                    currentBuild.description = """branchName: ${env.branchName} \n"""
                    currentBuild.displayName = "${env.commitId}"

                }
            }
        }

        stage("Build"){
            steps{
                script{
                    println("Build")
                    //build.CodeBuild("${env.buildType}")
                    sh "${env.buildShell}"

                }
            }
        }

        /*stage("UnitTest"){
            steps{
                script{
                    unittest.CodeTest("${env.buildType}")
                }
            }
        }*/

        stage("CodeScan"){
            when {
                environment name: 'skipSonar', value: 'false'
            }
            steps{
                script{
                    profileName = "${JOB_NAME}".split("-")[0]
                    sonar.Init("${JOB_NAME}", "java", profileName)


                    //commit-status

                    groupName =profileName
                    projectID = gitcli.GetProjectID("${JOB_NAME}", groupName)
                    sonar.CodeScan("${env.branchName}", env.commitID, projectID)
                    println("${env.commitID}")
                    }

                }
        }

        stage("PushArtifact"){

            steps{
                script{
                    // Dir /buName/serviceName/version/serviceName-version.xxx

                    version = "${env.branchName}-${env.commitID}"

                    // 重命名制品
                    JarName = sh returnStdout: true, script: """ls target|grep -E "jar\$" """
                    fileName = JarName -"\n"

                    fileType = fileName.split('\\.')[-1]
                    newFileName = "${env.serviceName}-${version}.${fileType}"
                    sh "cd target; mv ${fileName} ${newFileName}"

                    PushArtifact("${env.buName}/${env.serviceName}/${version}", "target/${newFileName}")

                }
            }

        }

    }
}


def PushArtifact(targetDir, filePath){
    // 上传制品
    sh """
        curl -X POST "http://172.29.9.101:8081/service/rest/v1/components?repository=devops4-local" \
        -H "accept: application/json" \
        -H "Content-Type: multipart/form-data" \
        -F "raw.directory=${targetDir}" \
        -F "raw.asset1=@${filePath};type=application/java-archive" \
        -F "raw.asset1.filename=${newFileName}" \
        -u admin:admin123
    """
}
3、下载制品
cURL:
curl -u admin:admin123 http://192.168.1.200:8081/repository/anyops/com/anyops/a
nyops-devops-service/1.1.1/anyops-devops-service-1.1.1.jar -o anyops-devops-service-1.1.1.jar
Wget:
wget --http-user=admin --http-passwd=admin123 http://192.168.1.200:8081/repos
itory/anyops/com/anyops/anyops-devops-service/1.1.1/anyops-devops-service-1.1.1.jar
🍀 分支策略:GitLab工作流
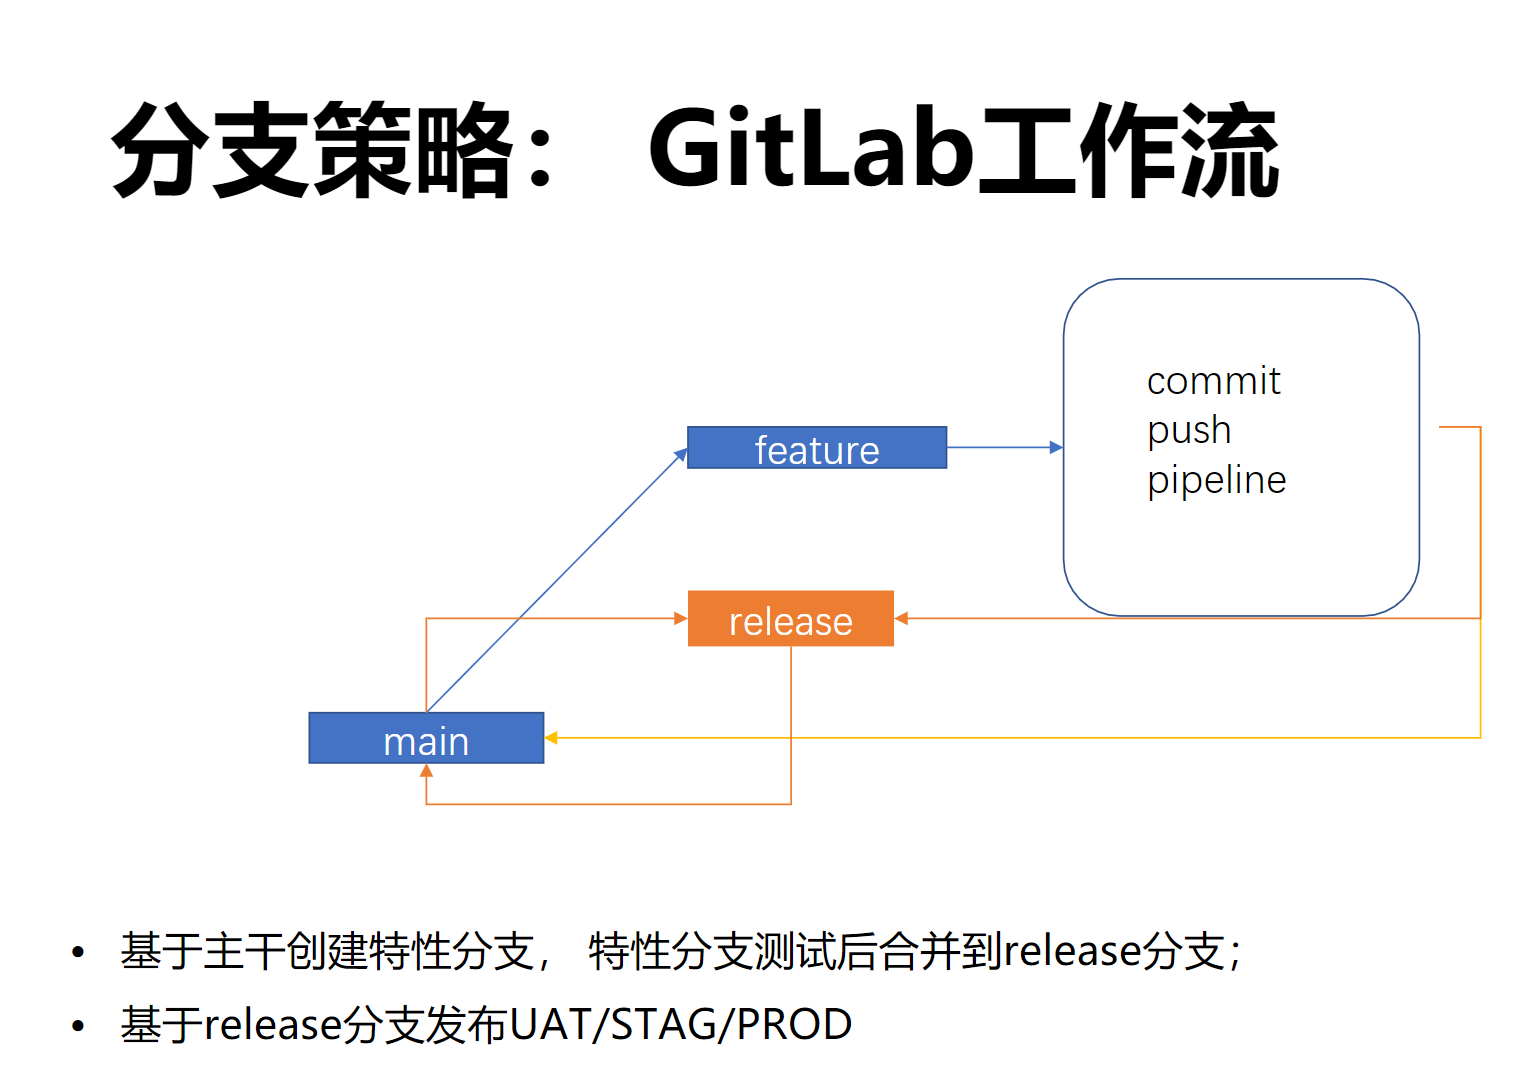
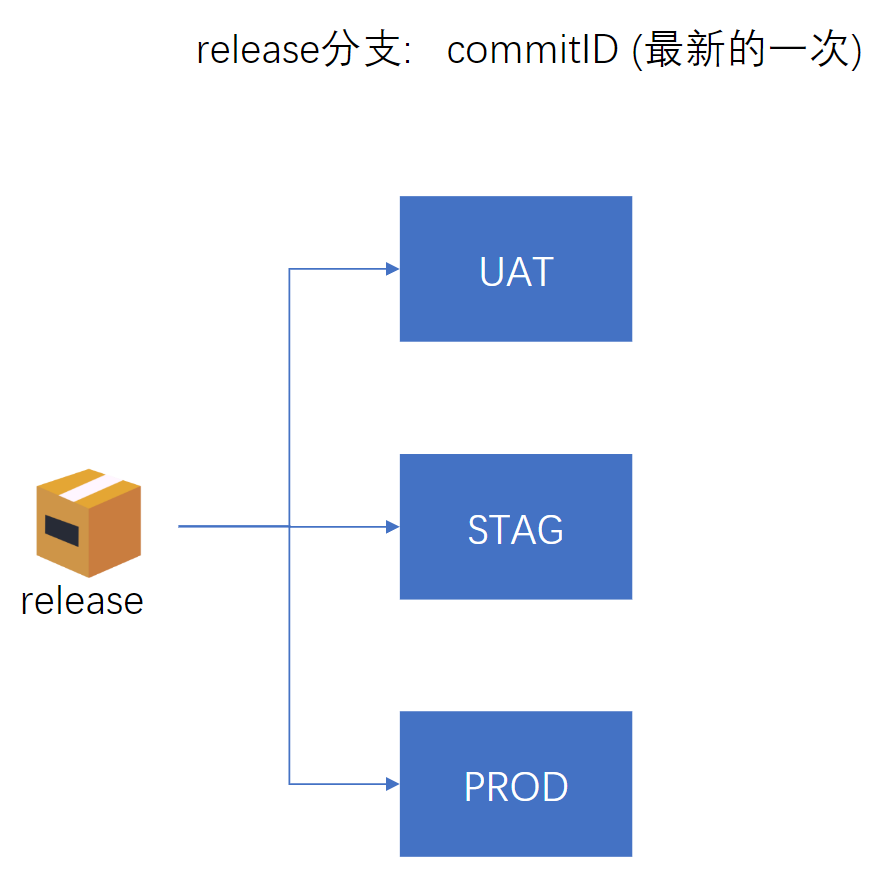
📍 自己测试过程:
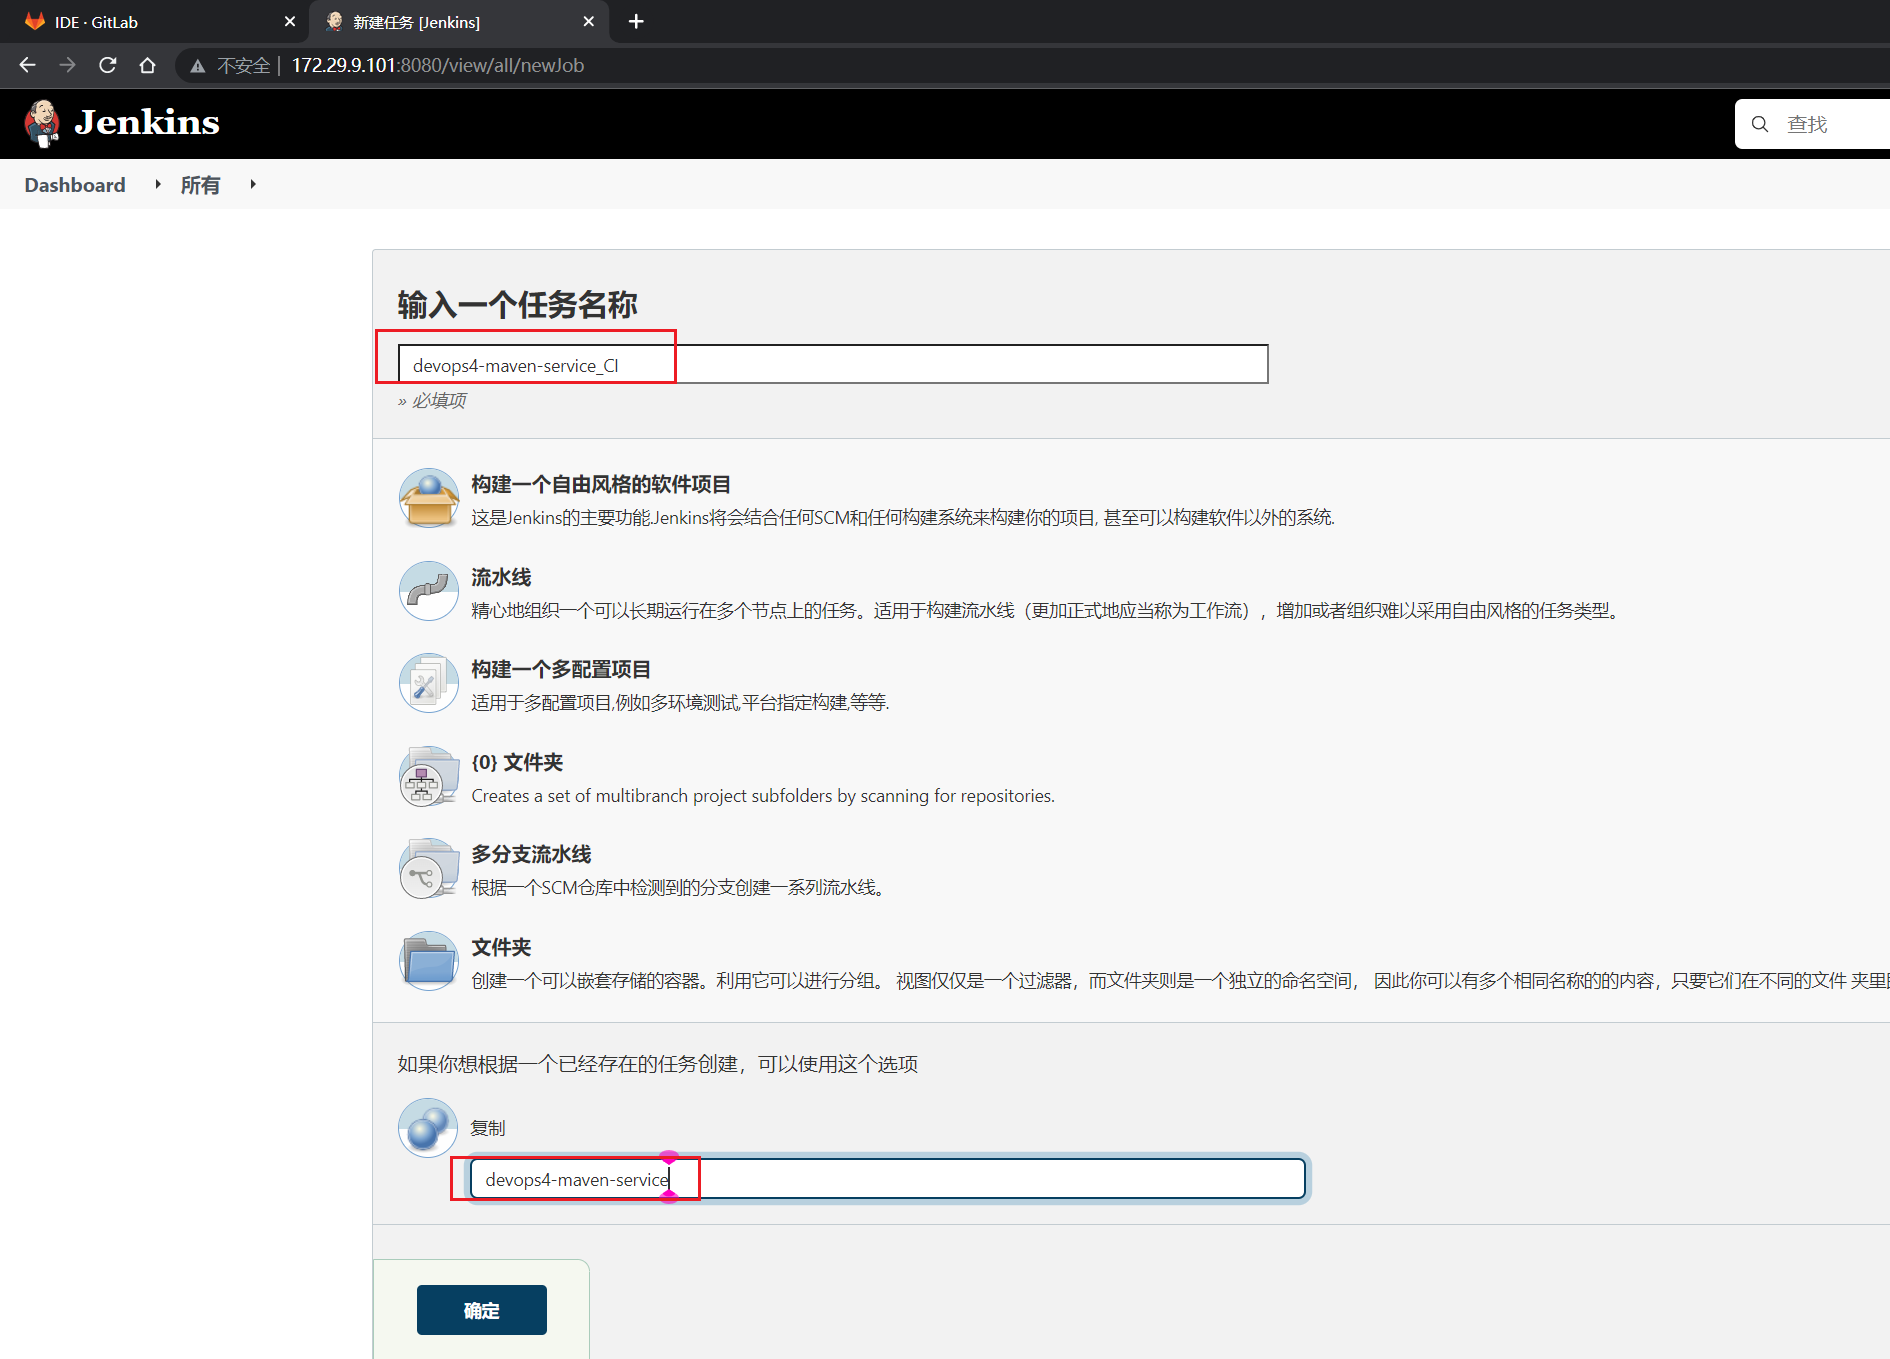
- 基于
devops4-maven-service创建一个devops4-maven-service_CI的流水线job:
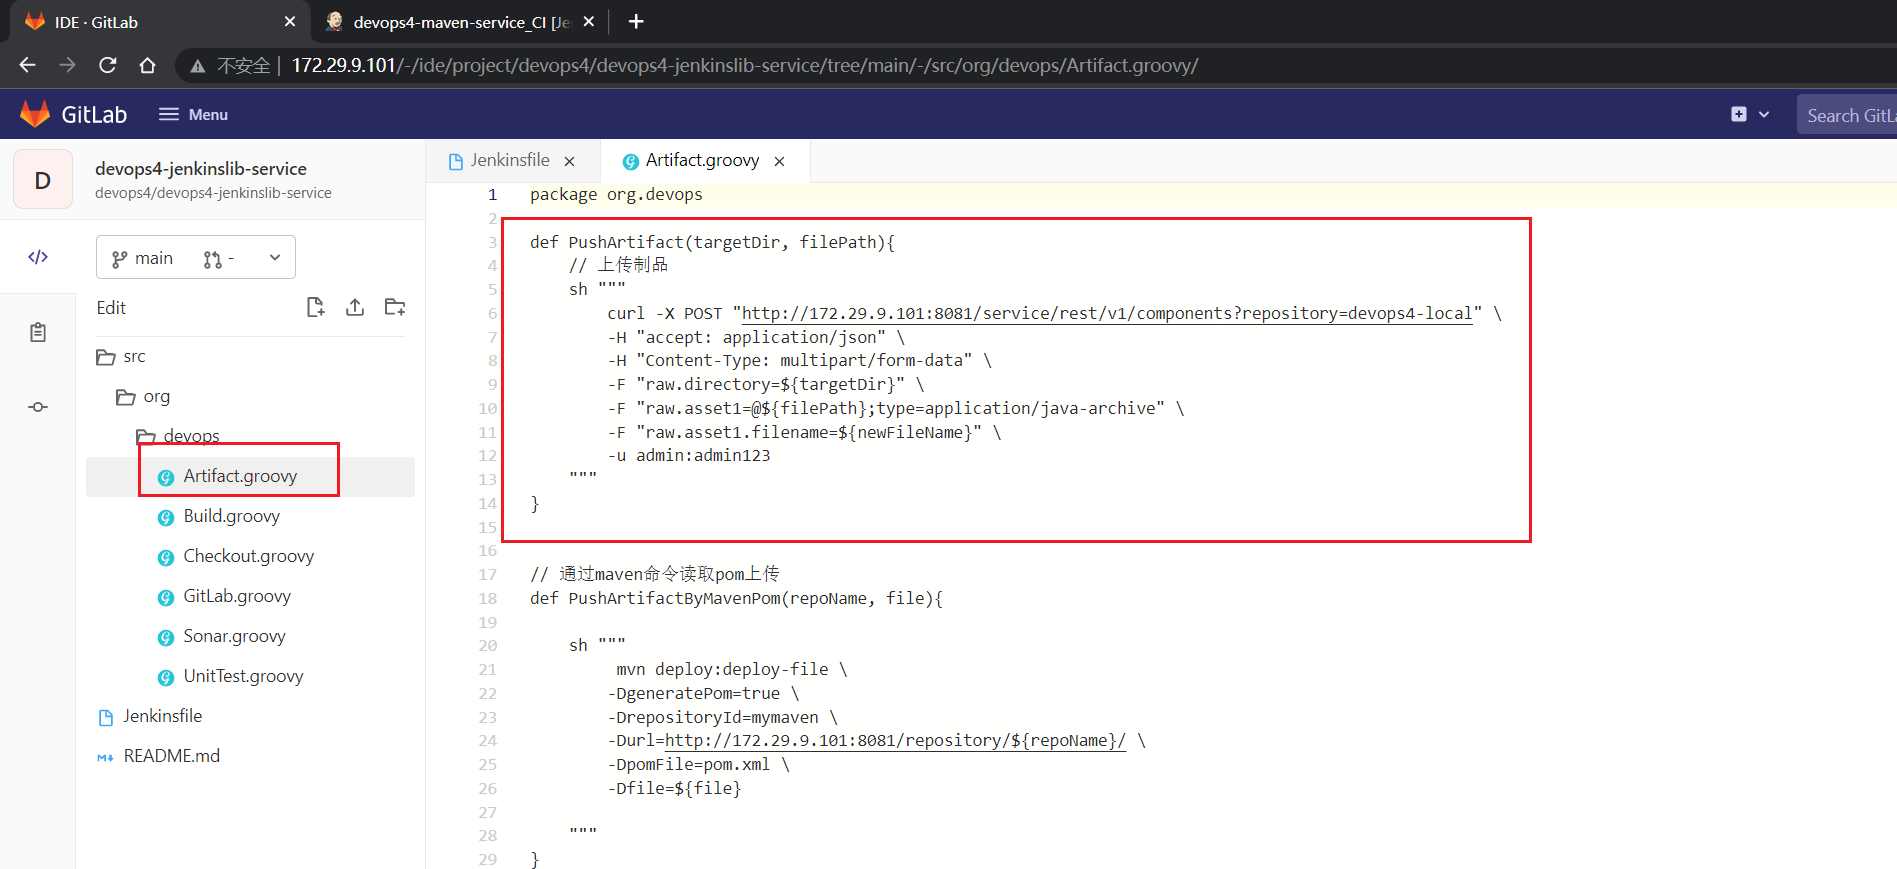
- 然后修改下
devops4-jenkinslib-service代码:
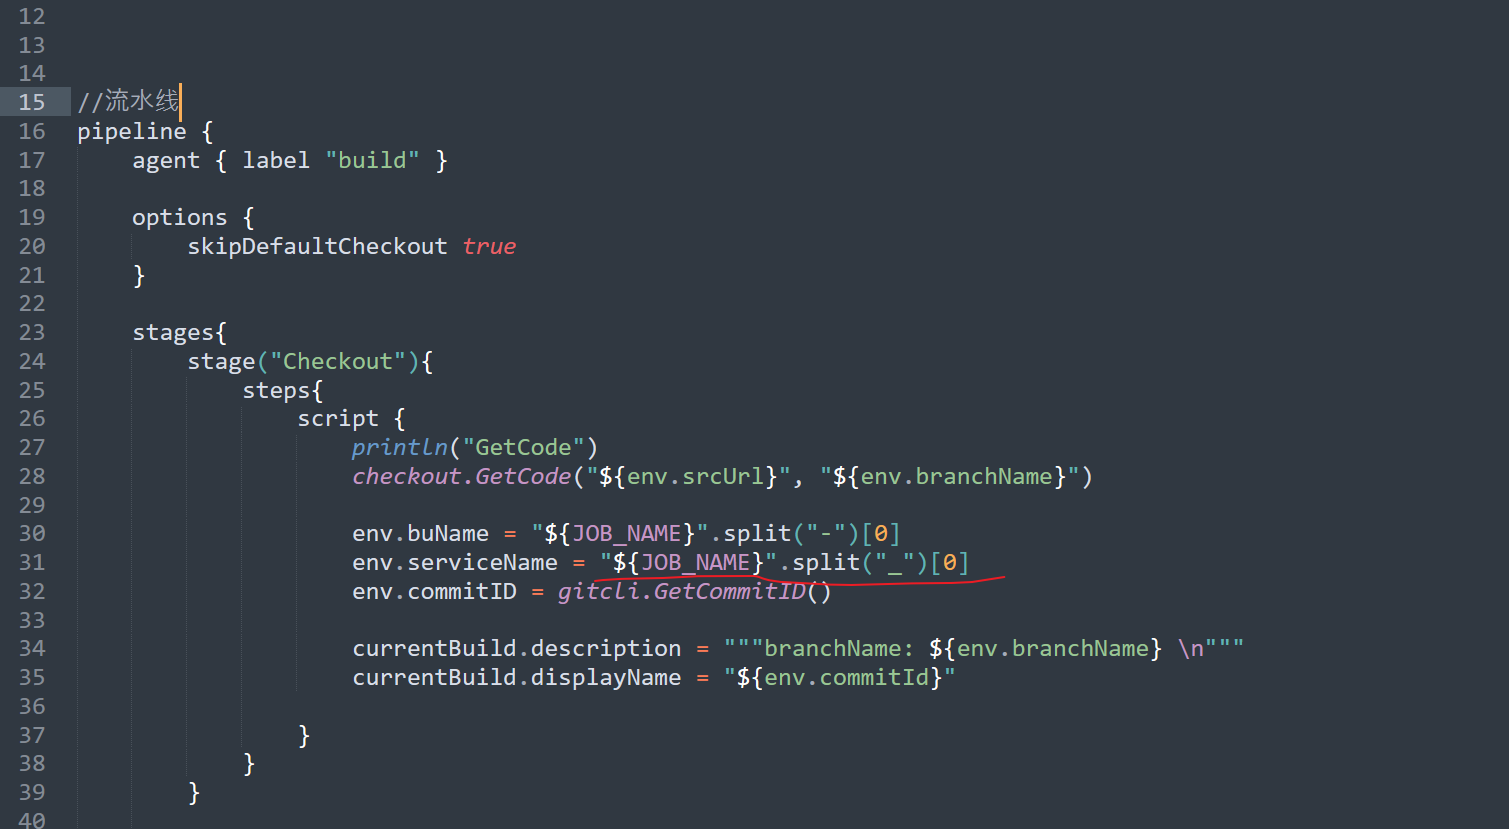
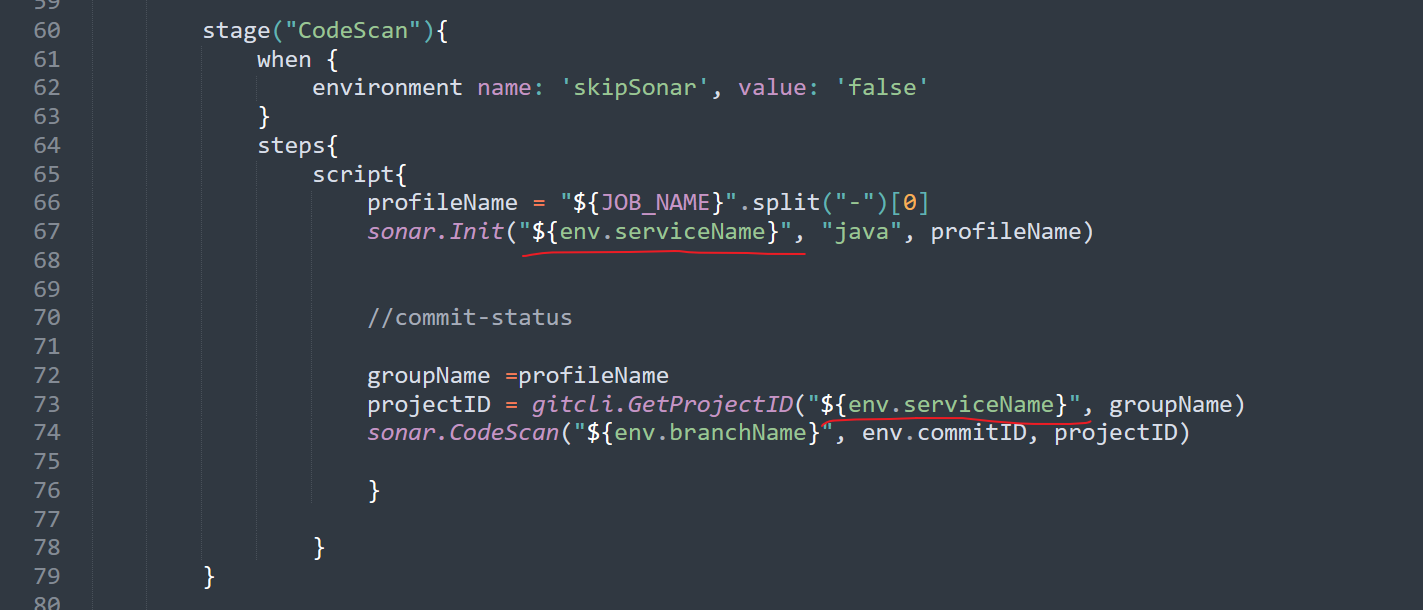


- 修改完成后,跑一下刚才新创建的流水线,观察效果
会发现,运行报错:
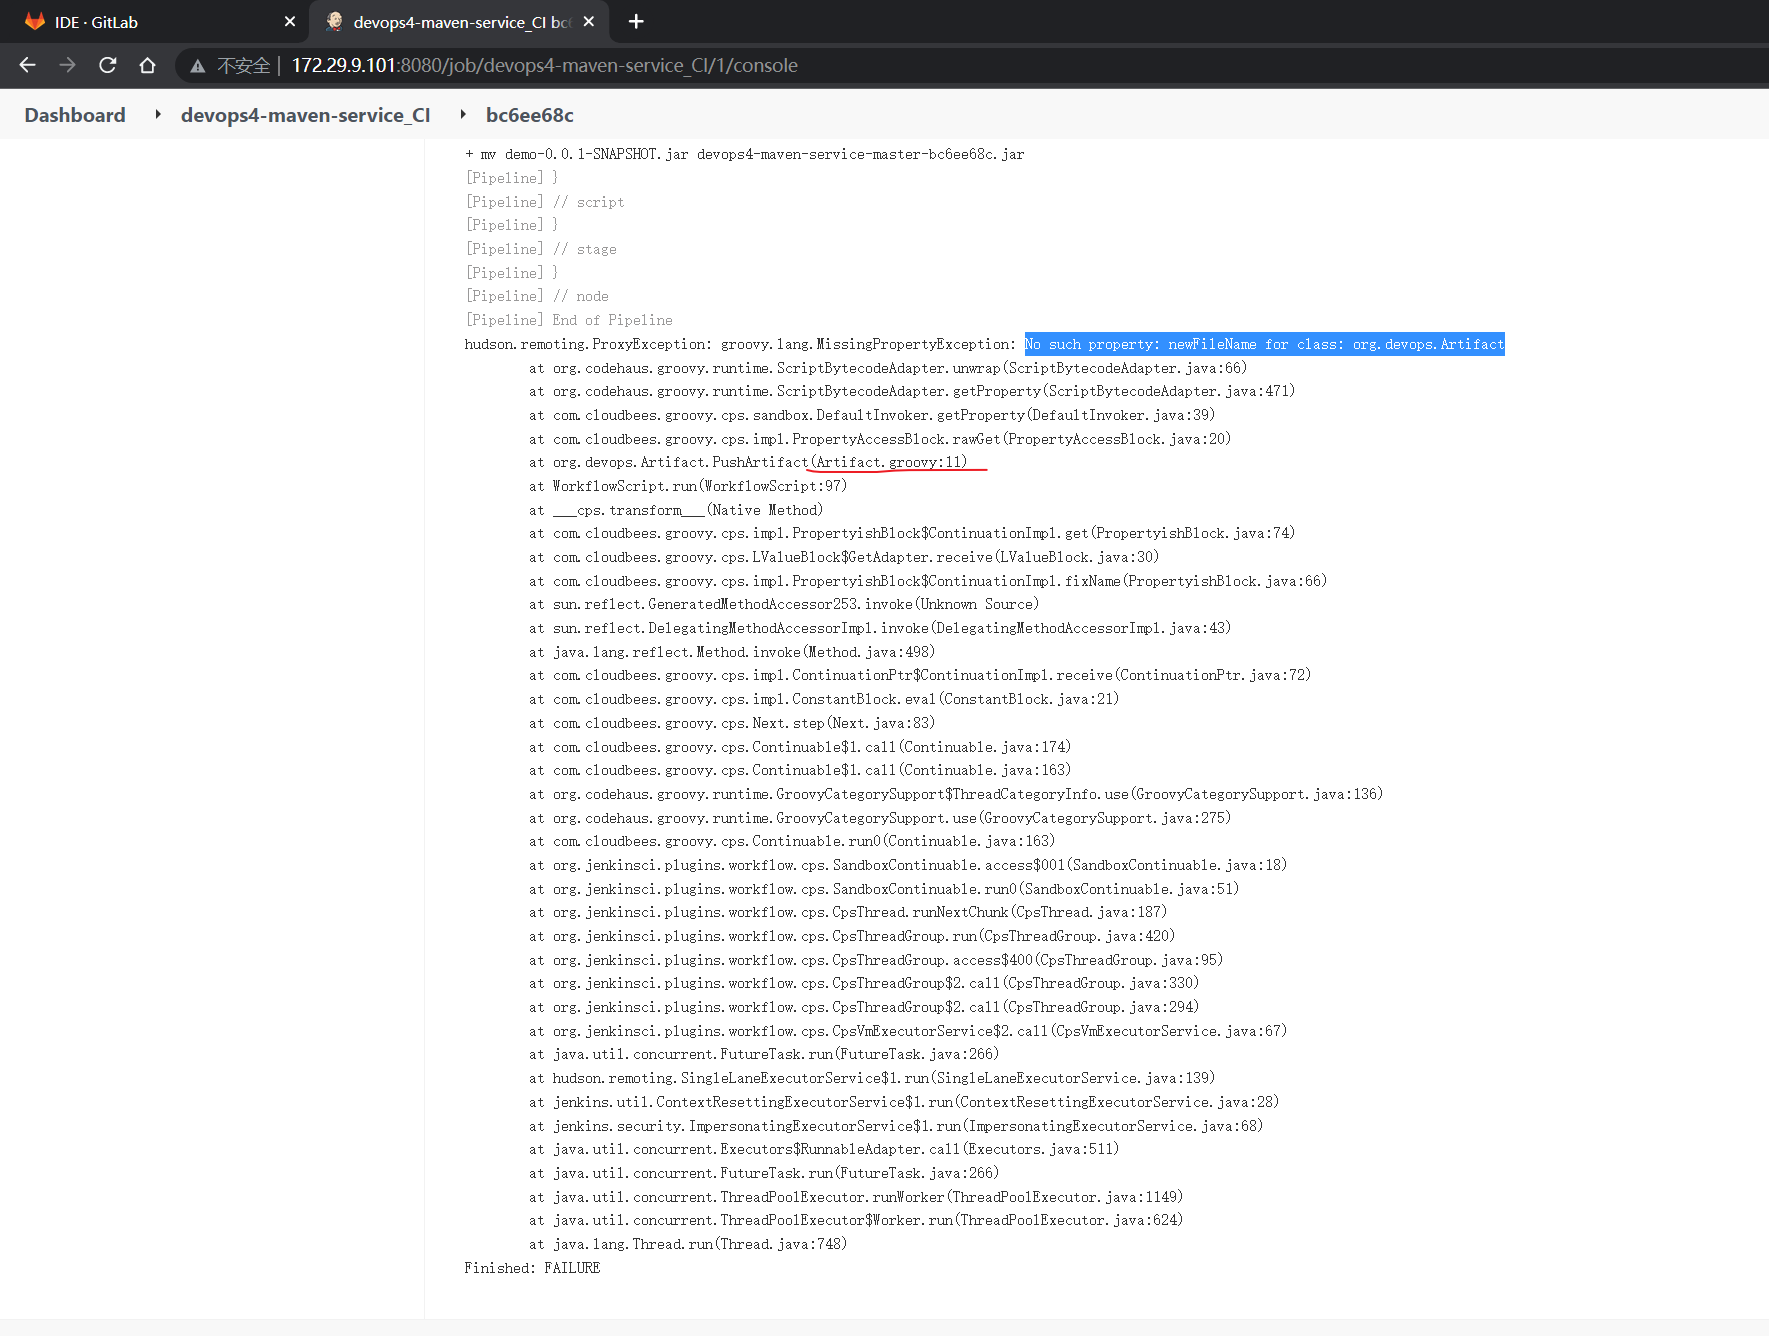
- 此时,我们再来修改下代码:
是这里的代码:
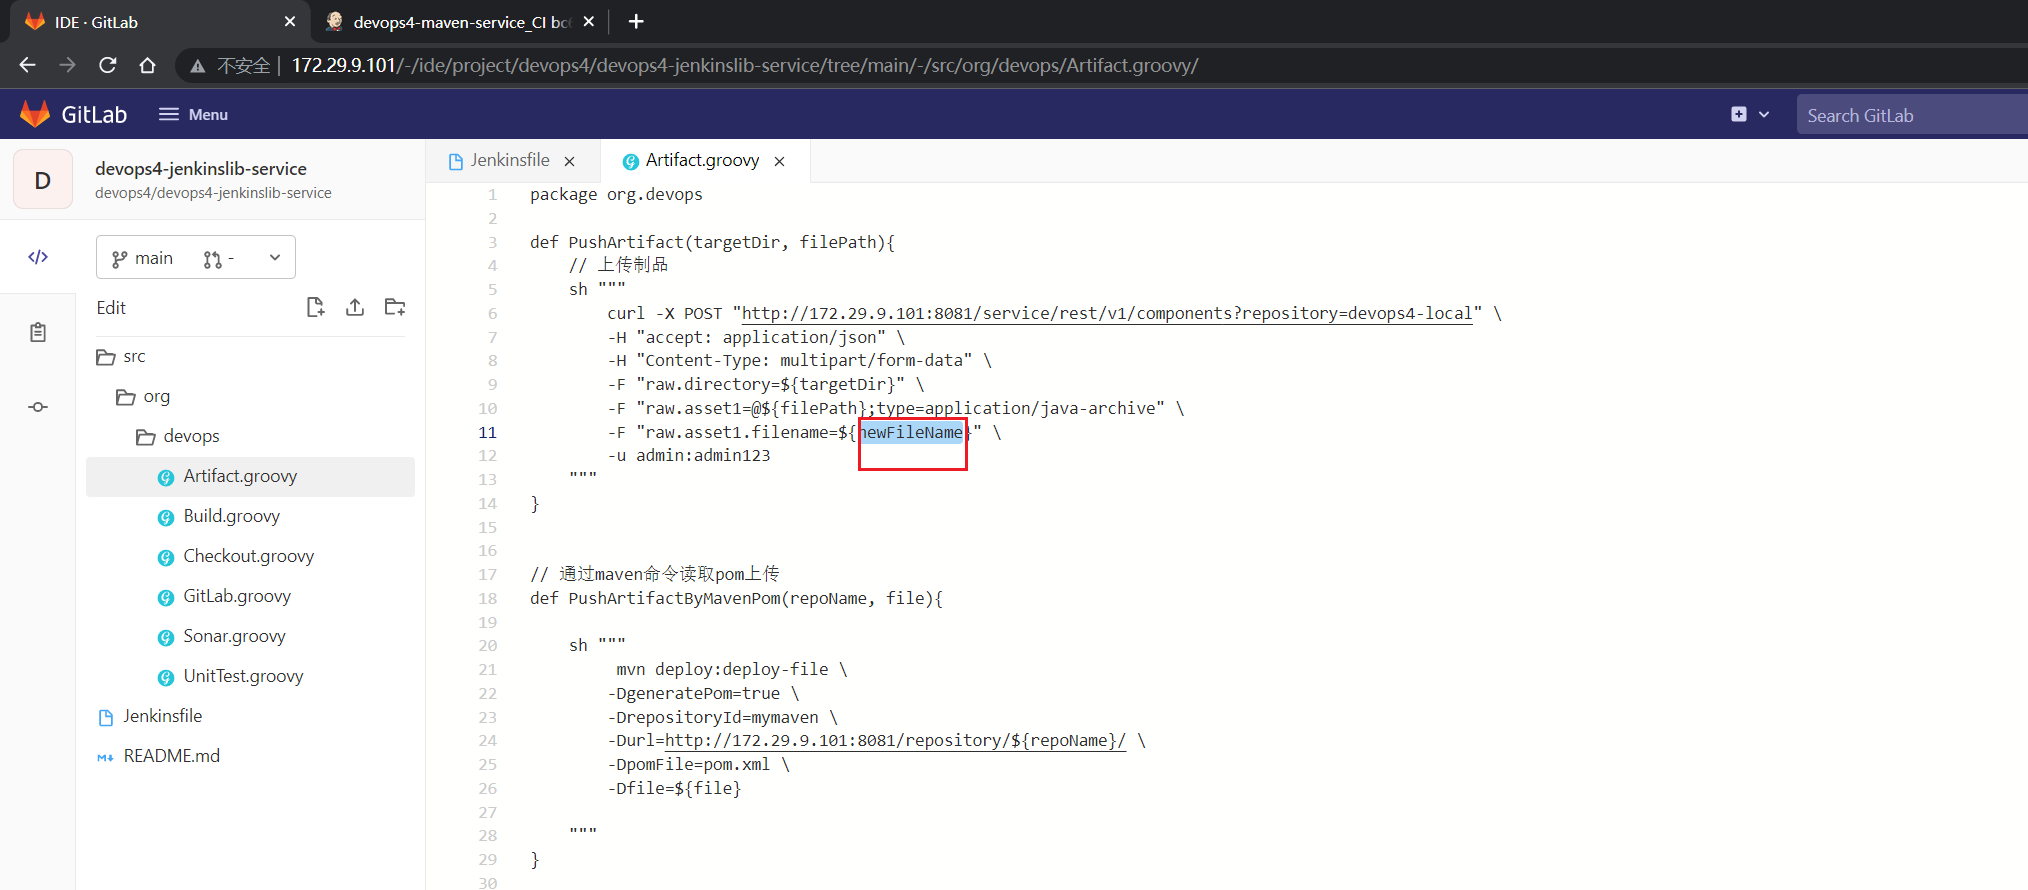
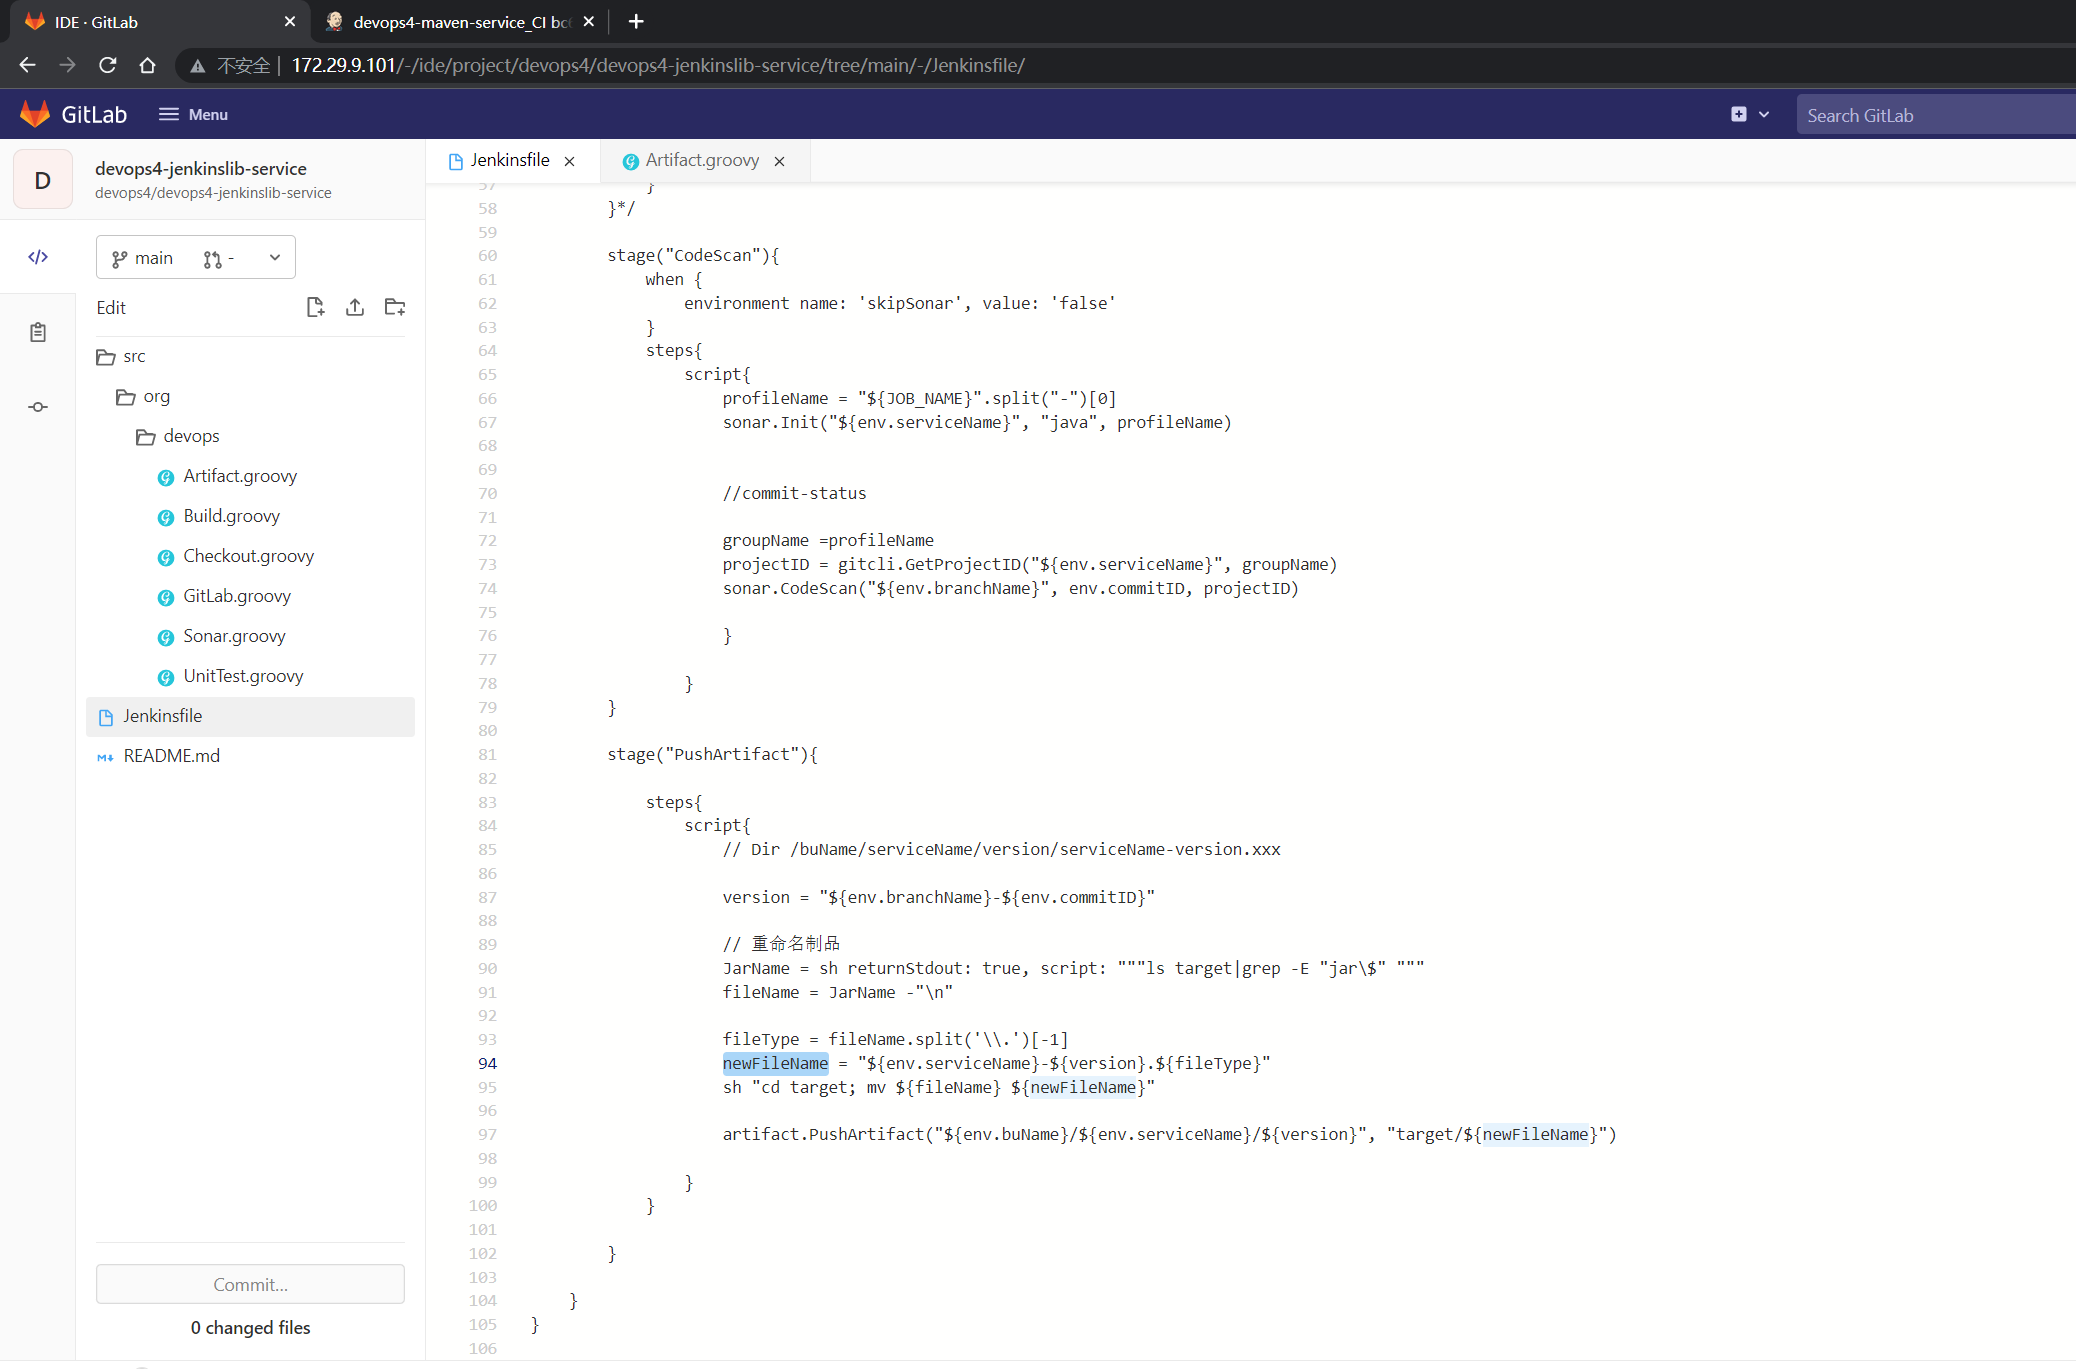
这里开始修改下代码:
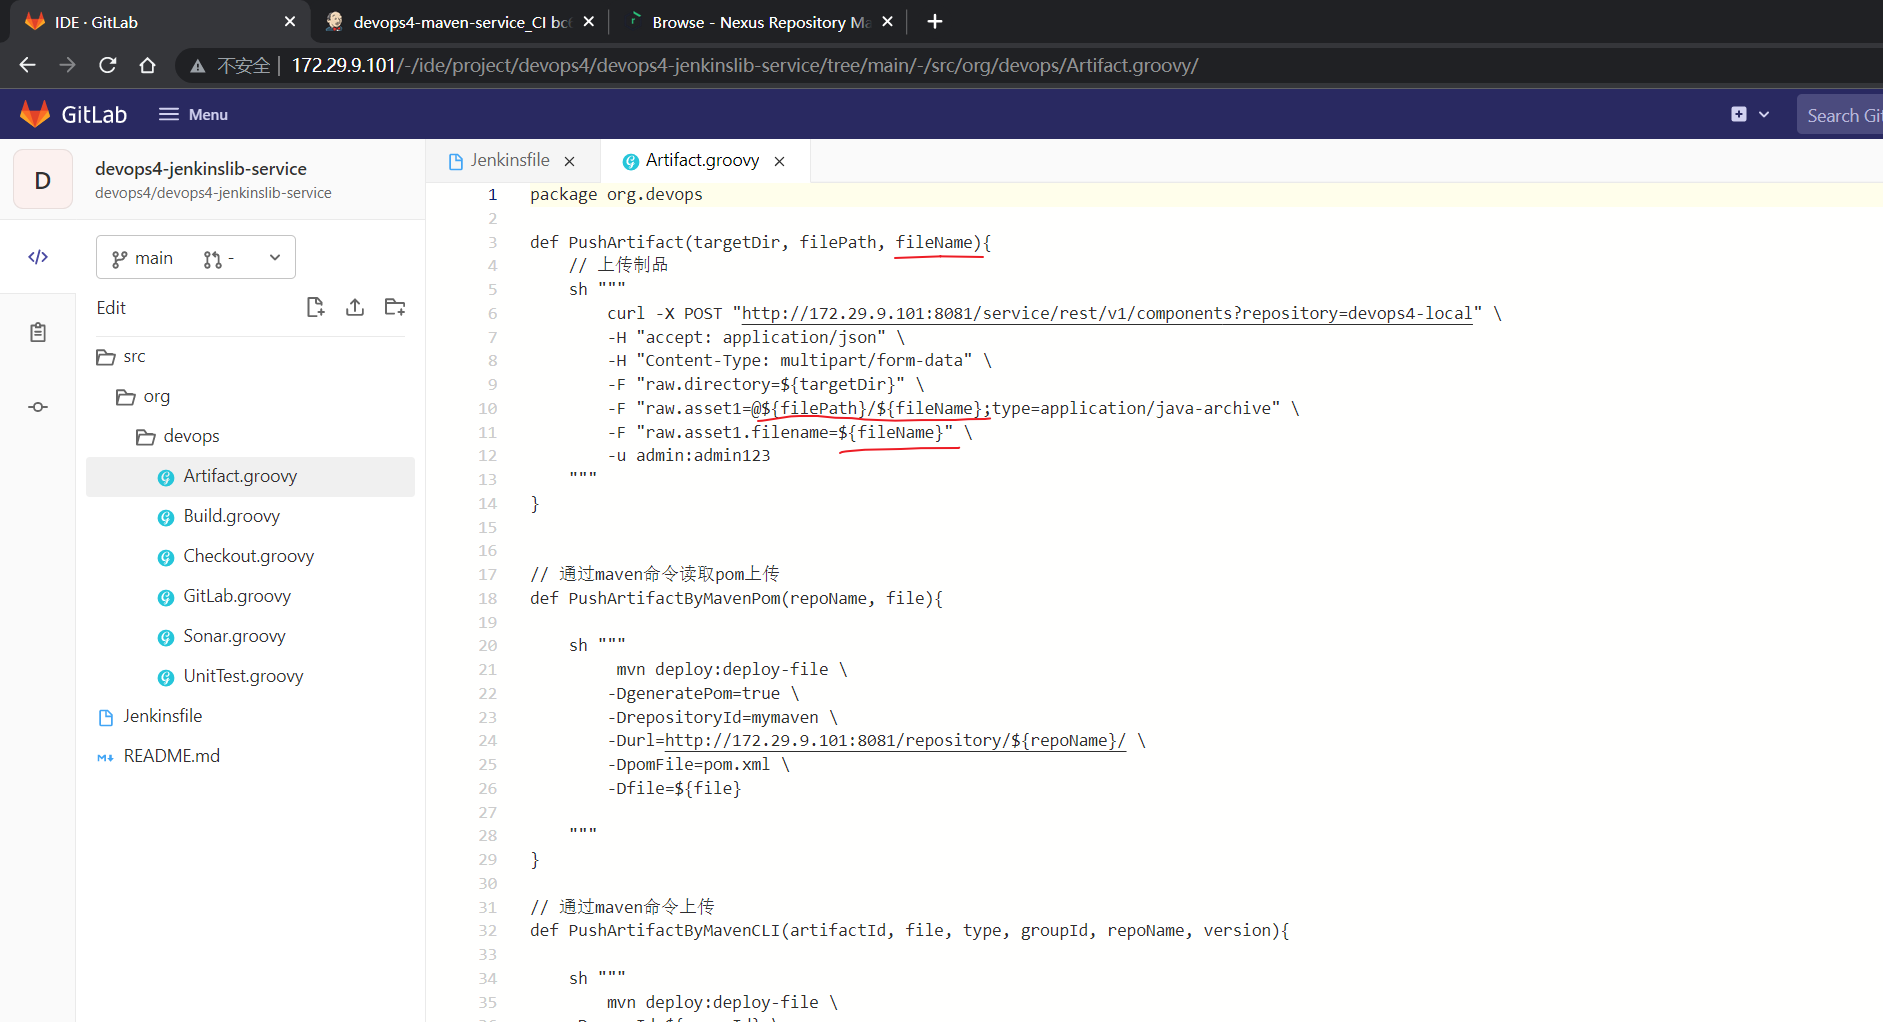
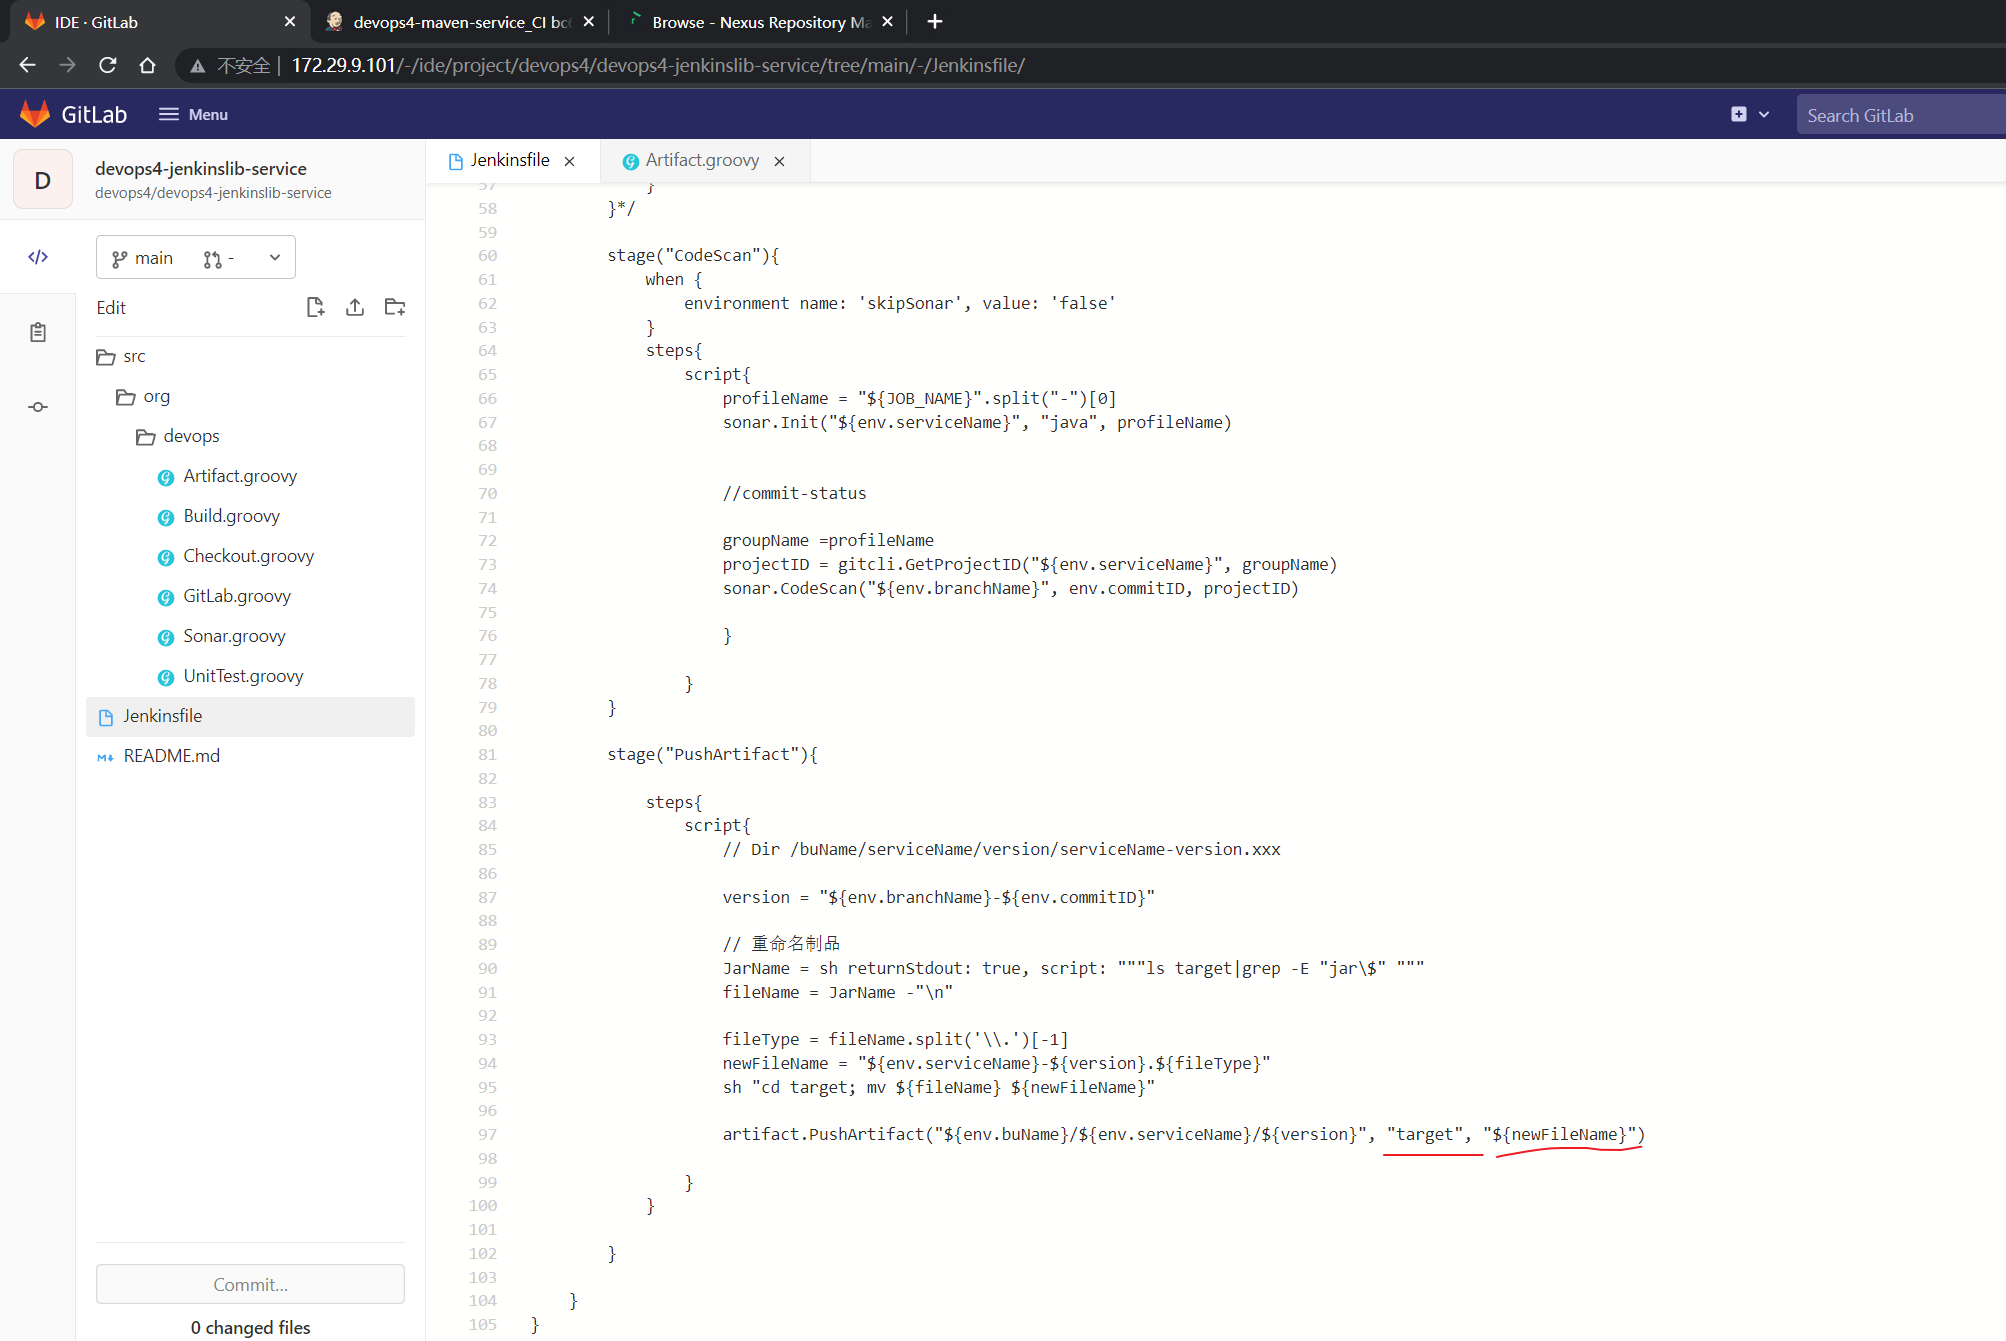
- 修改完后,并在此运行流水线,观察效果
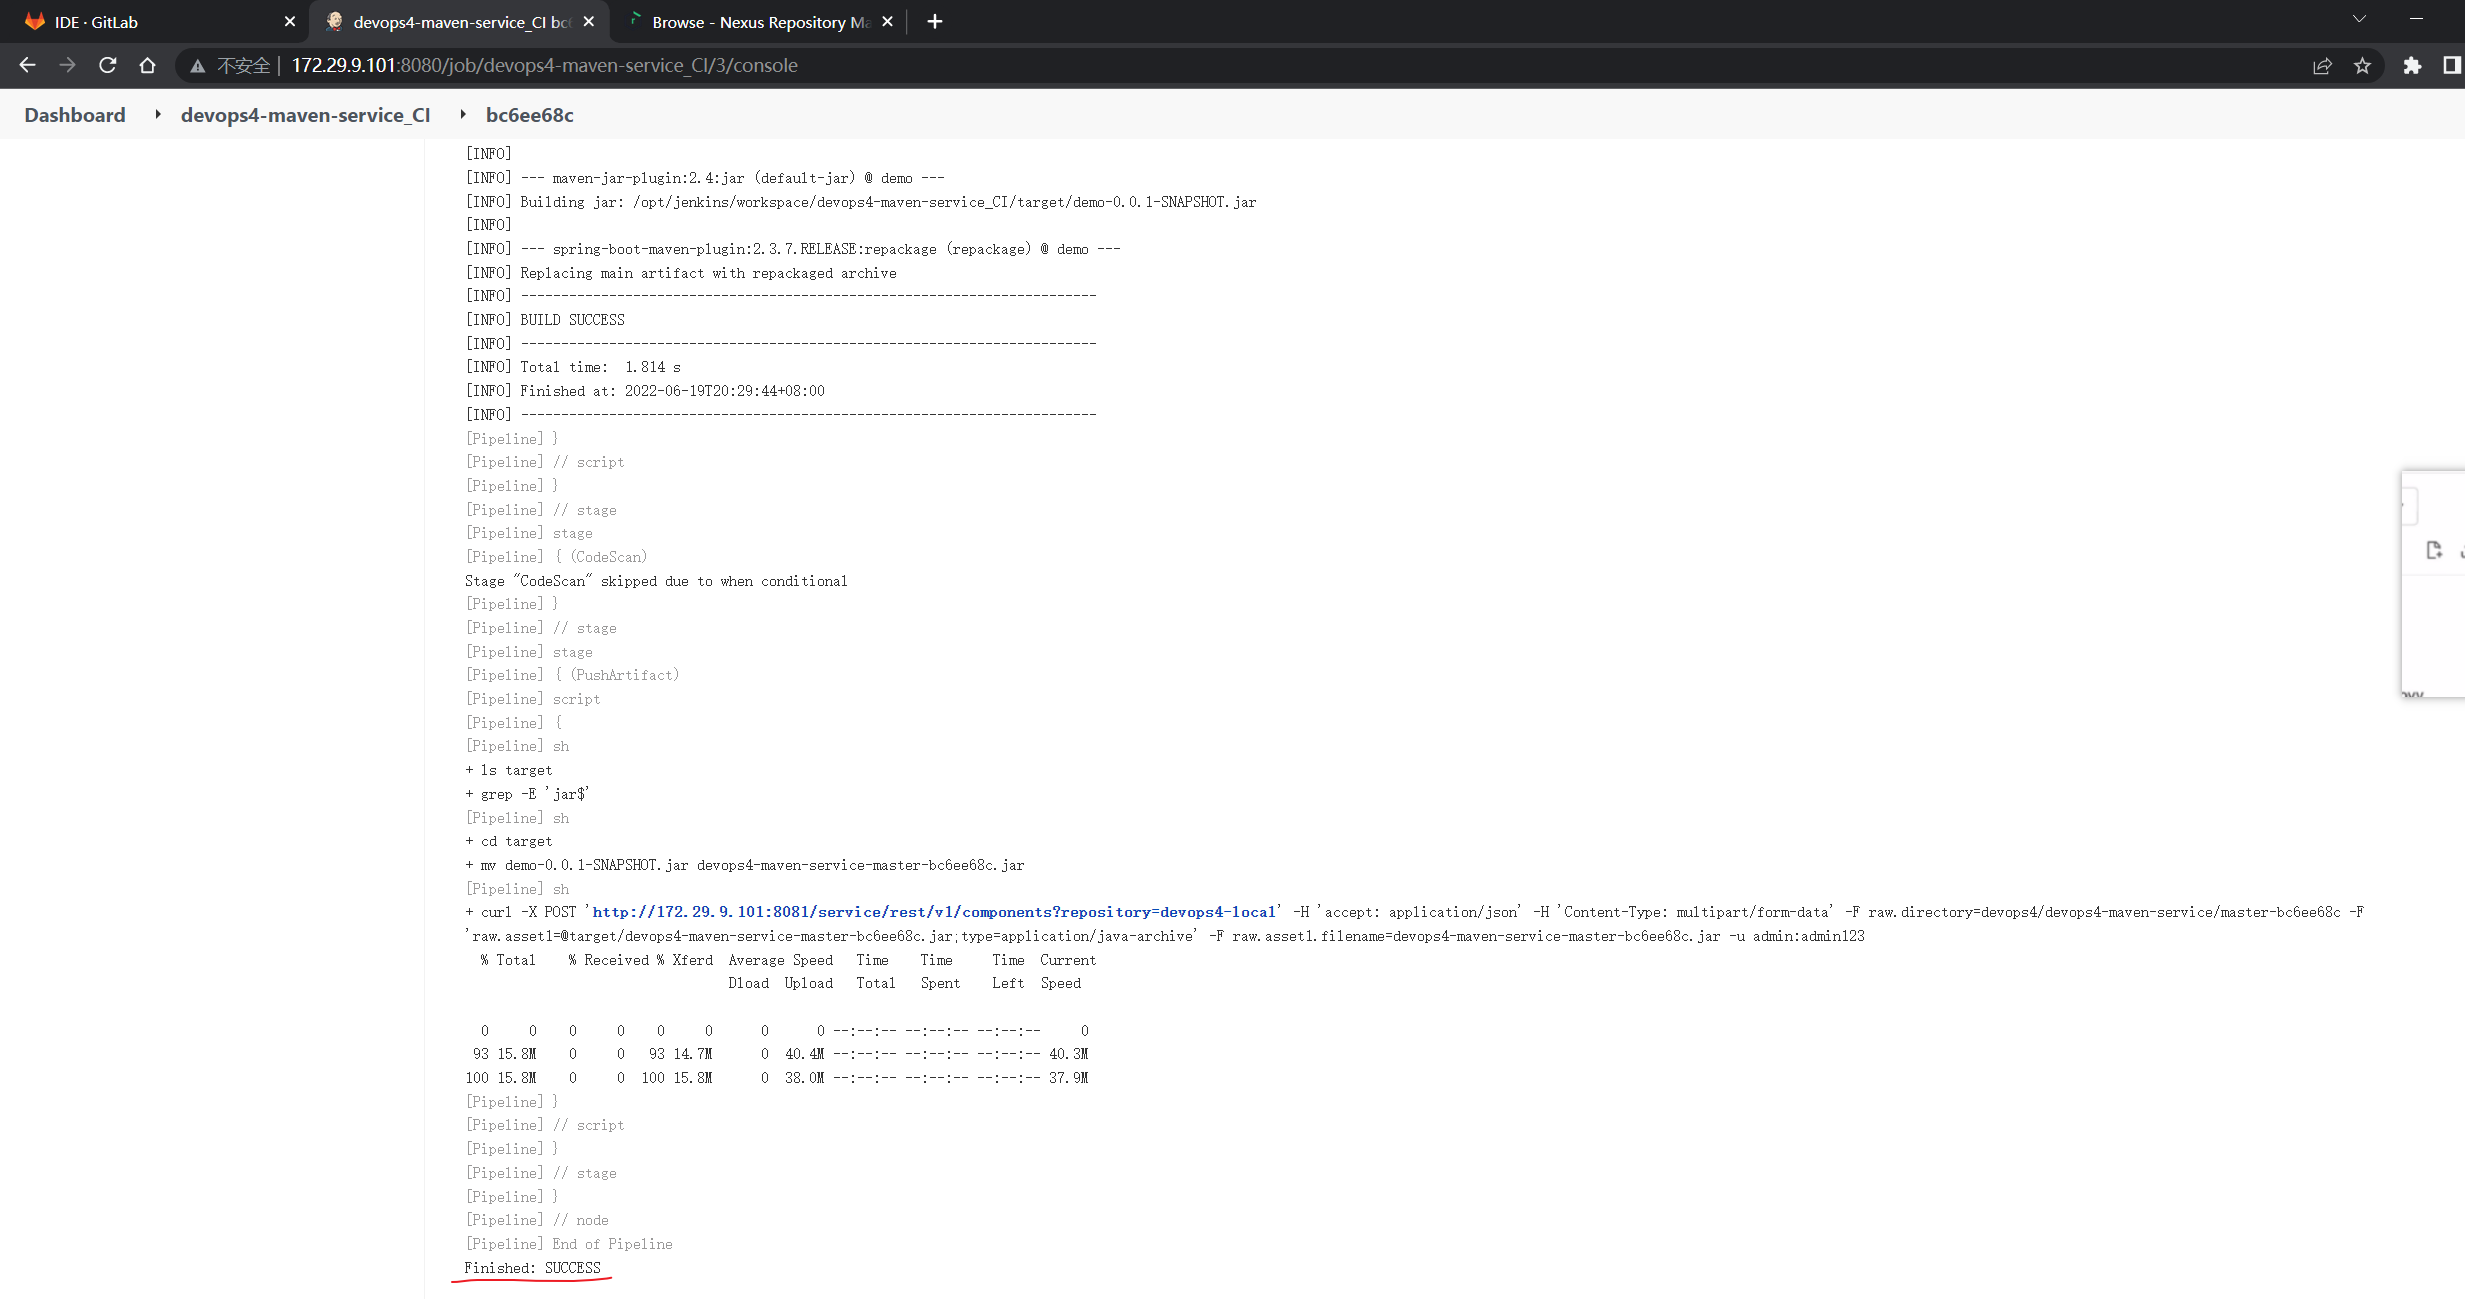
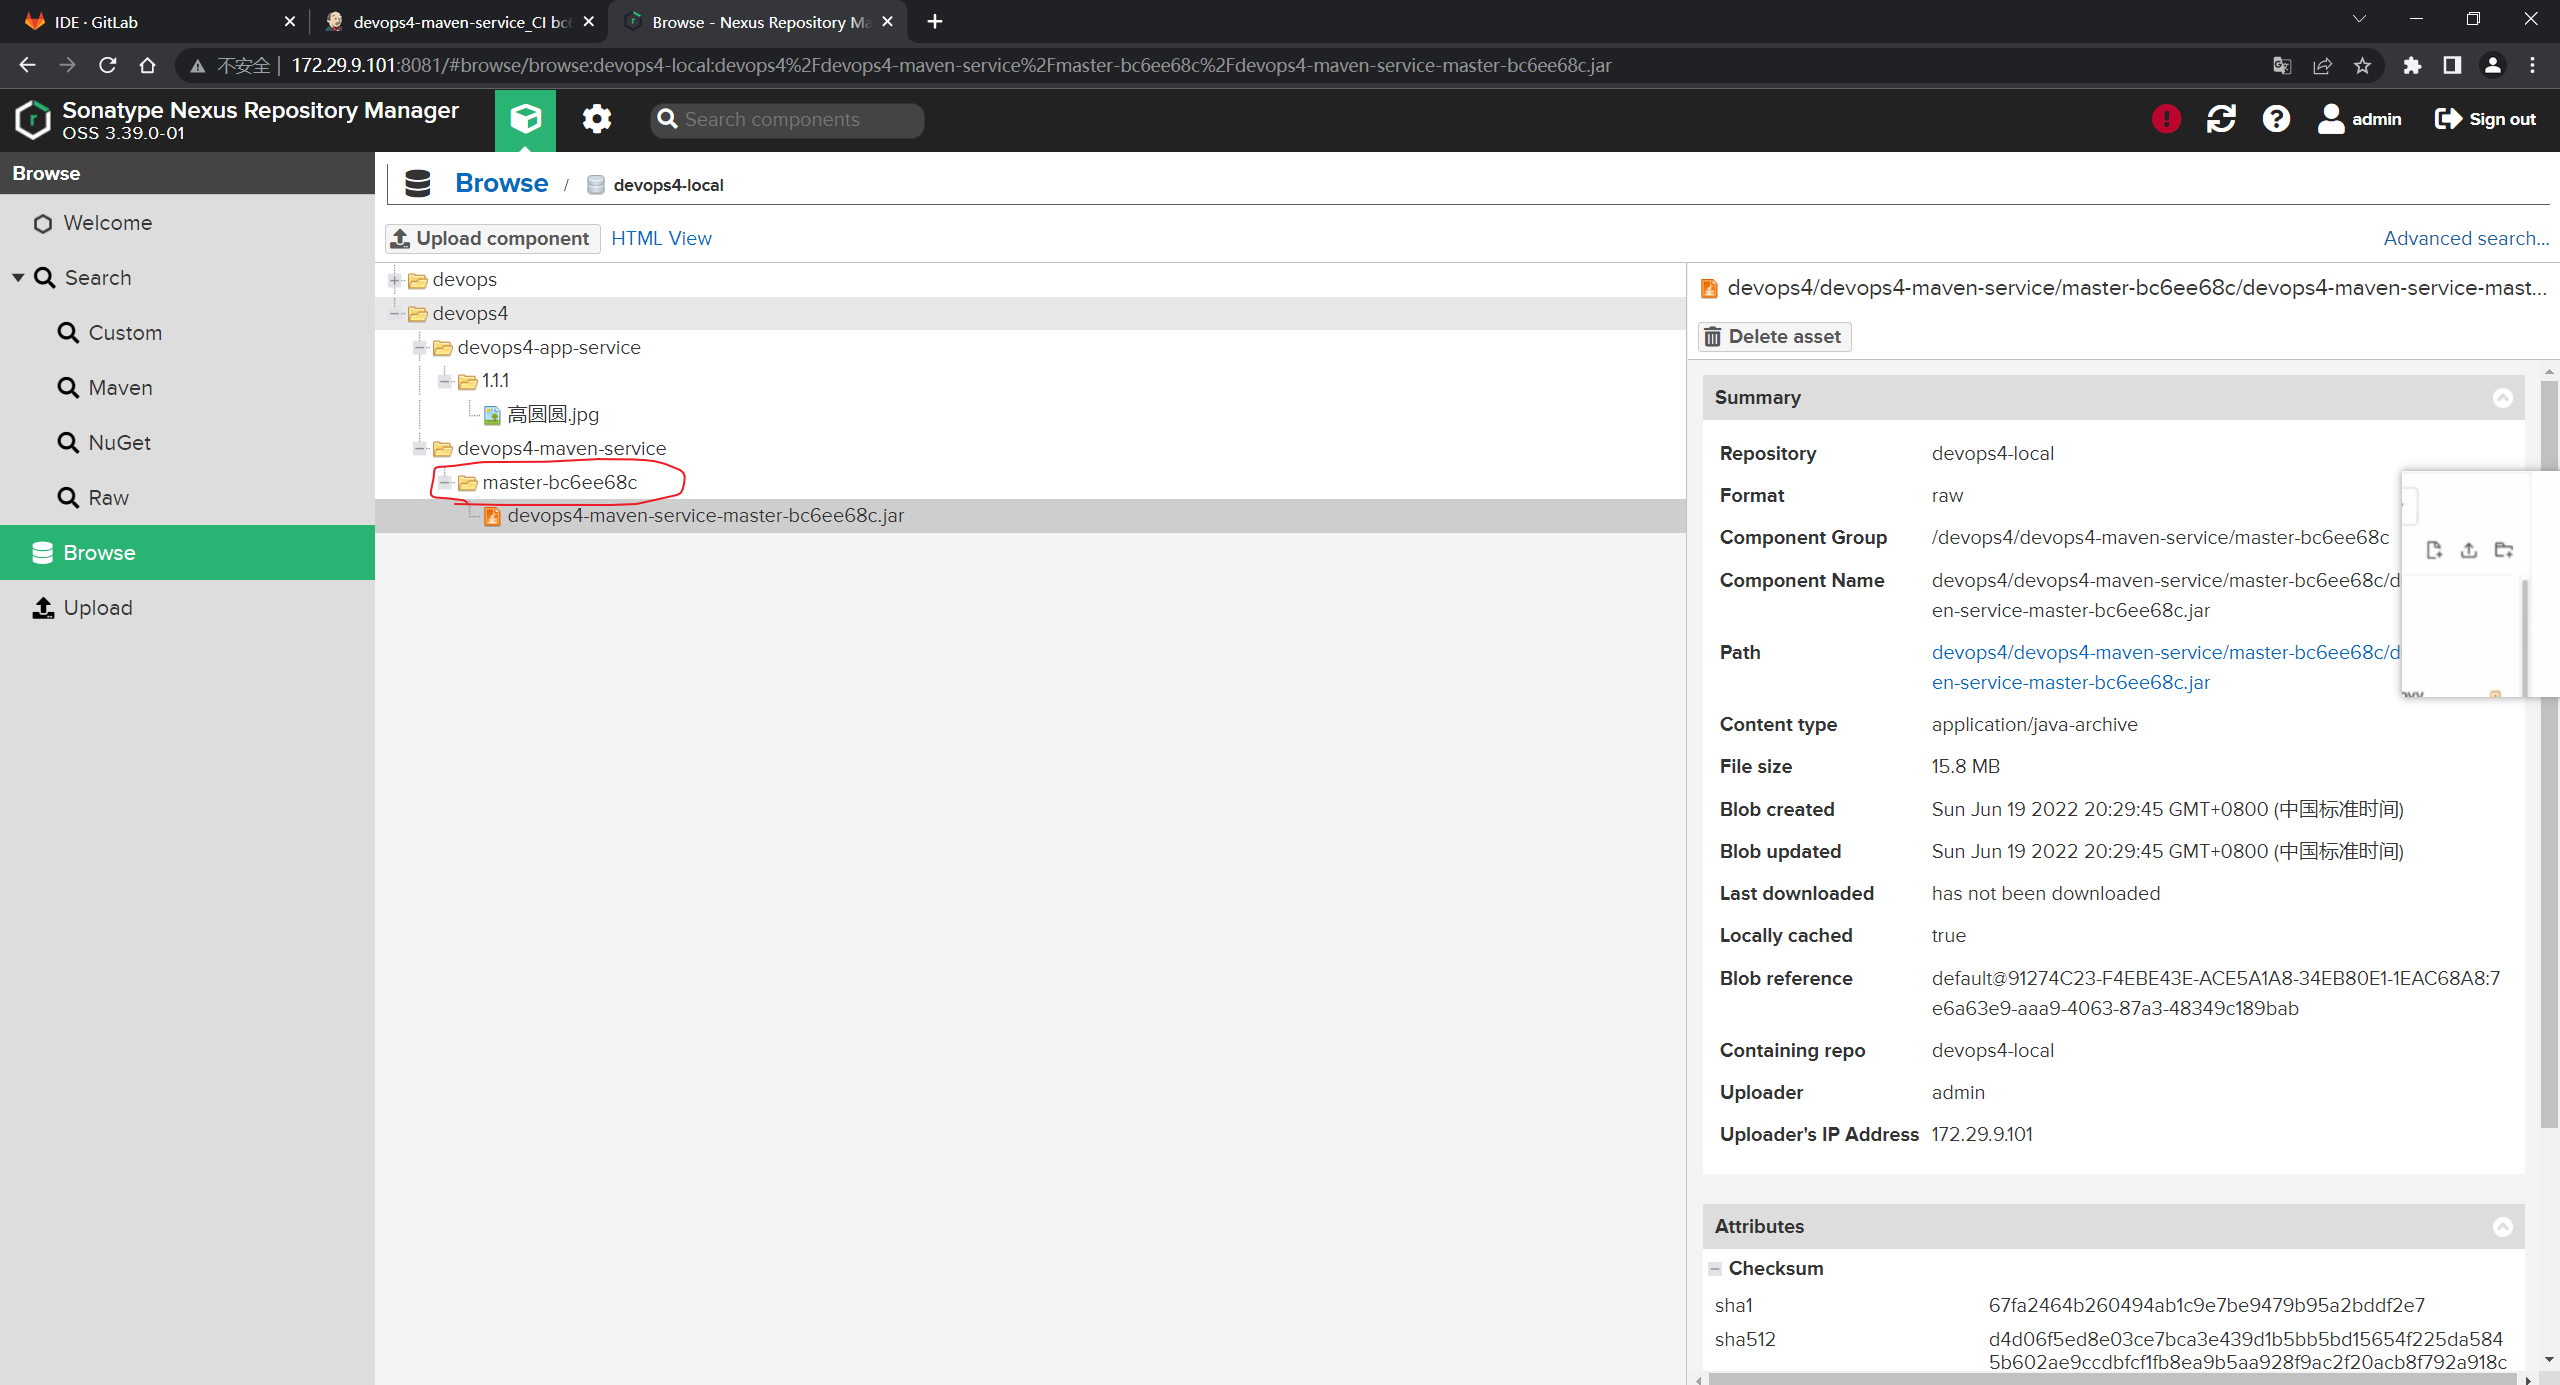
可以看到能够正常跑通流水线。
- 来到
devops4-maven-service项目:
创建一个特性分支,修改代码并提交:
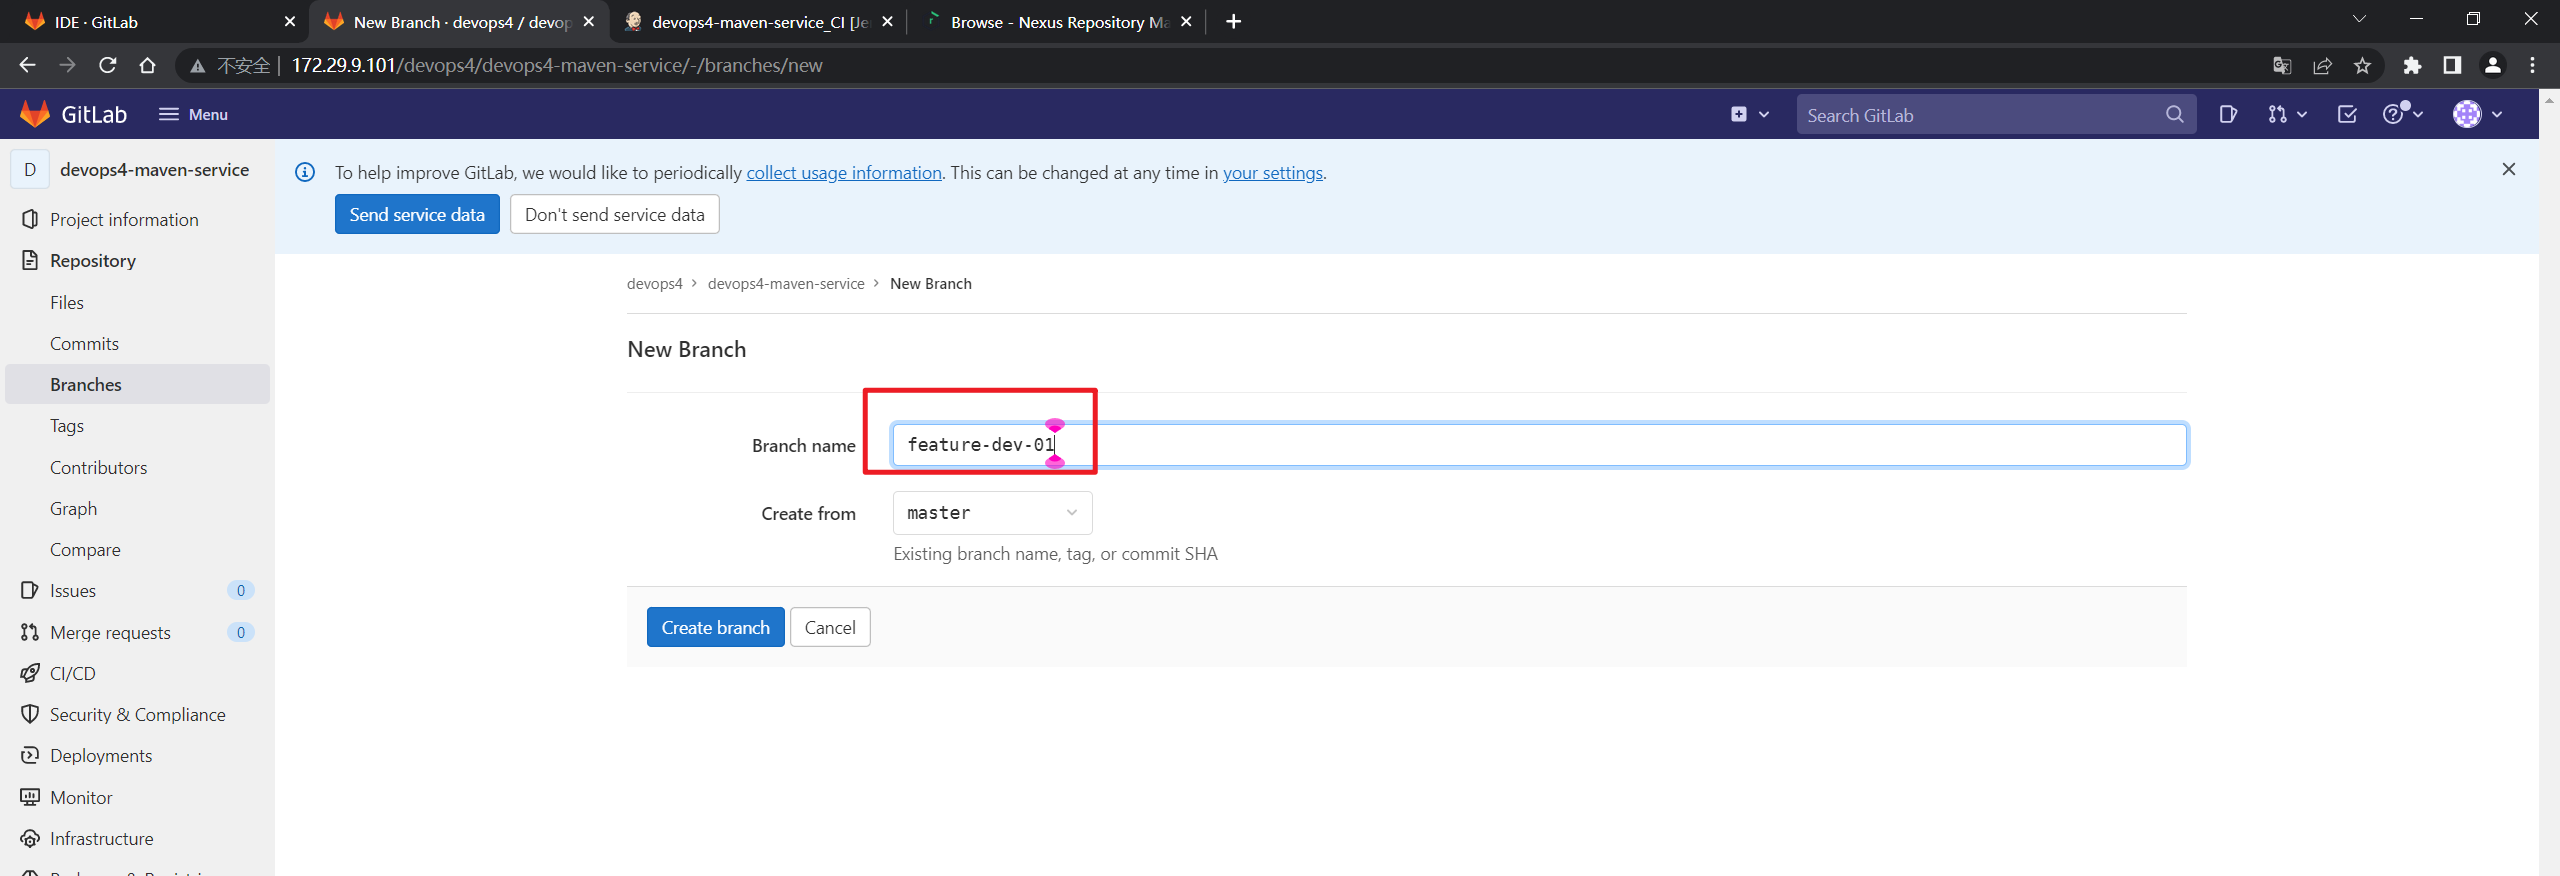
创建一个版本分支:
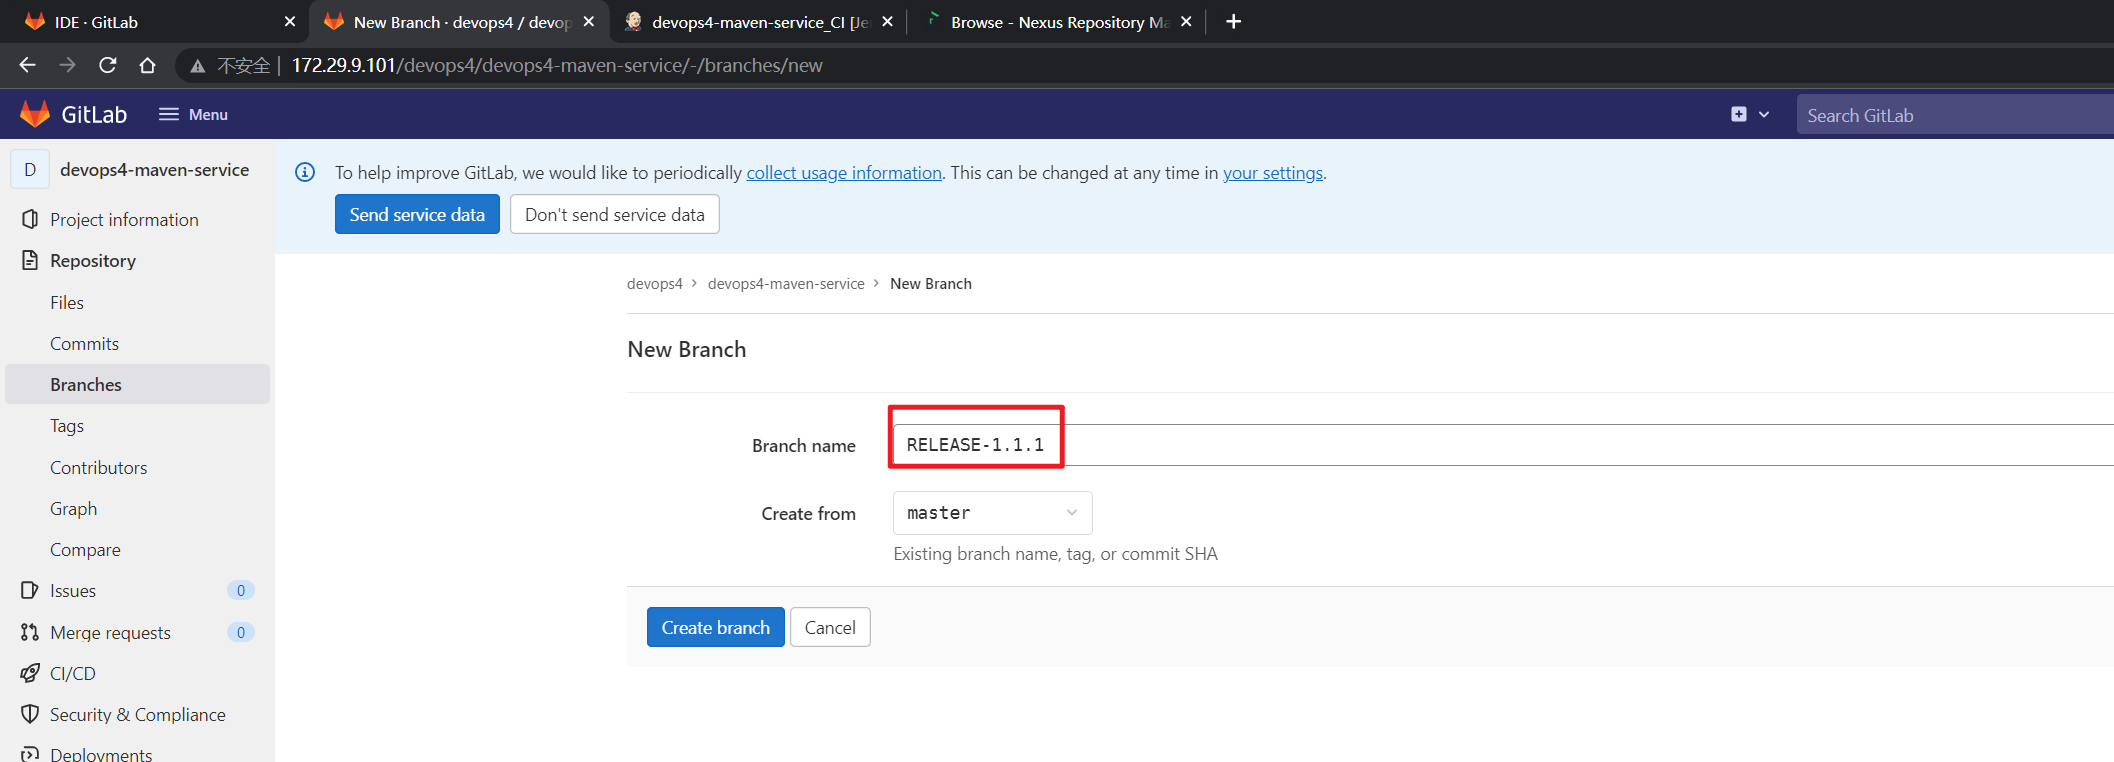
此时,版本分支已经测试过了,没问题了,此时就需要把它合并到release分支:
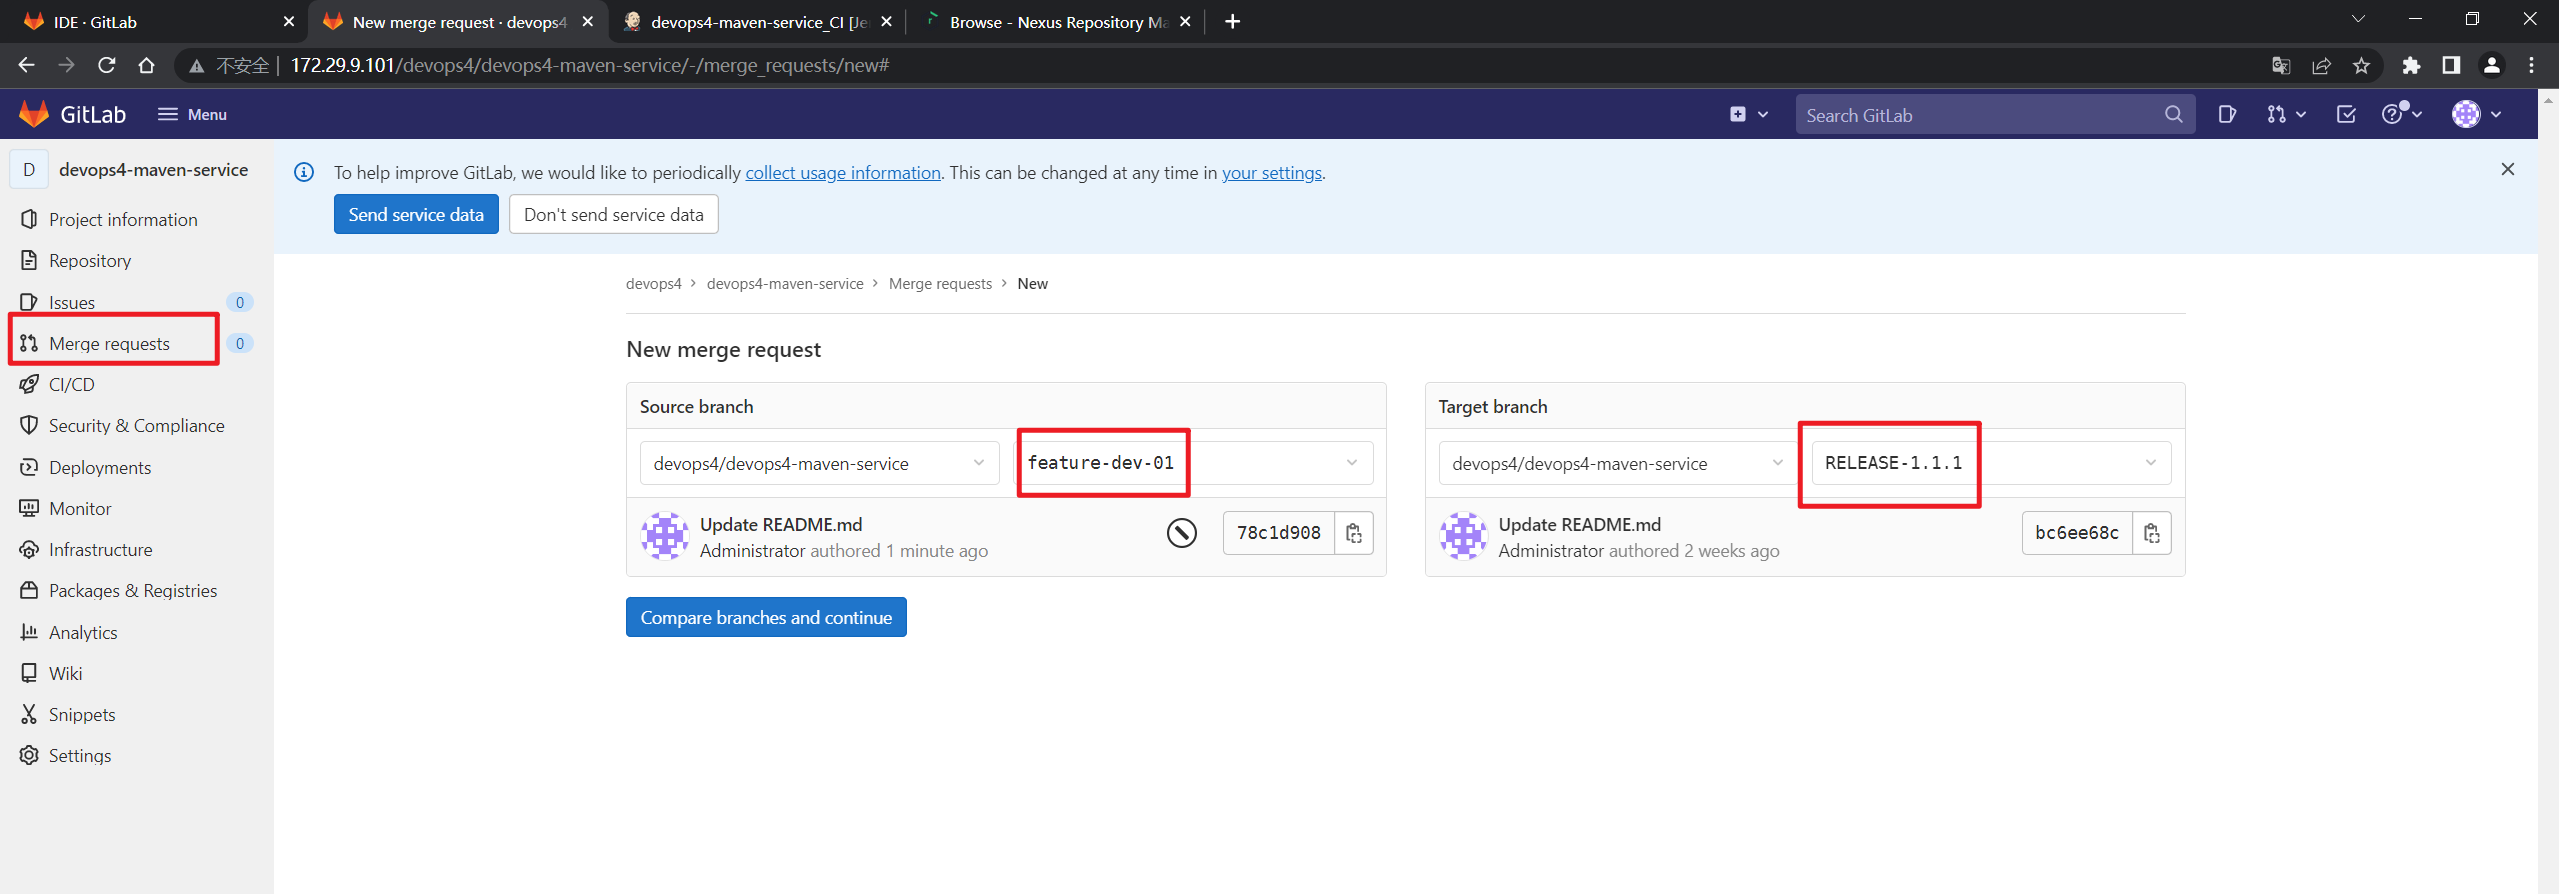
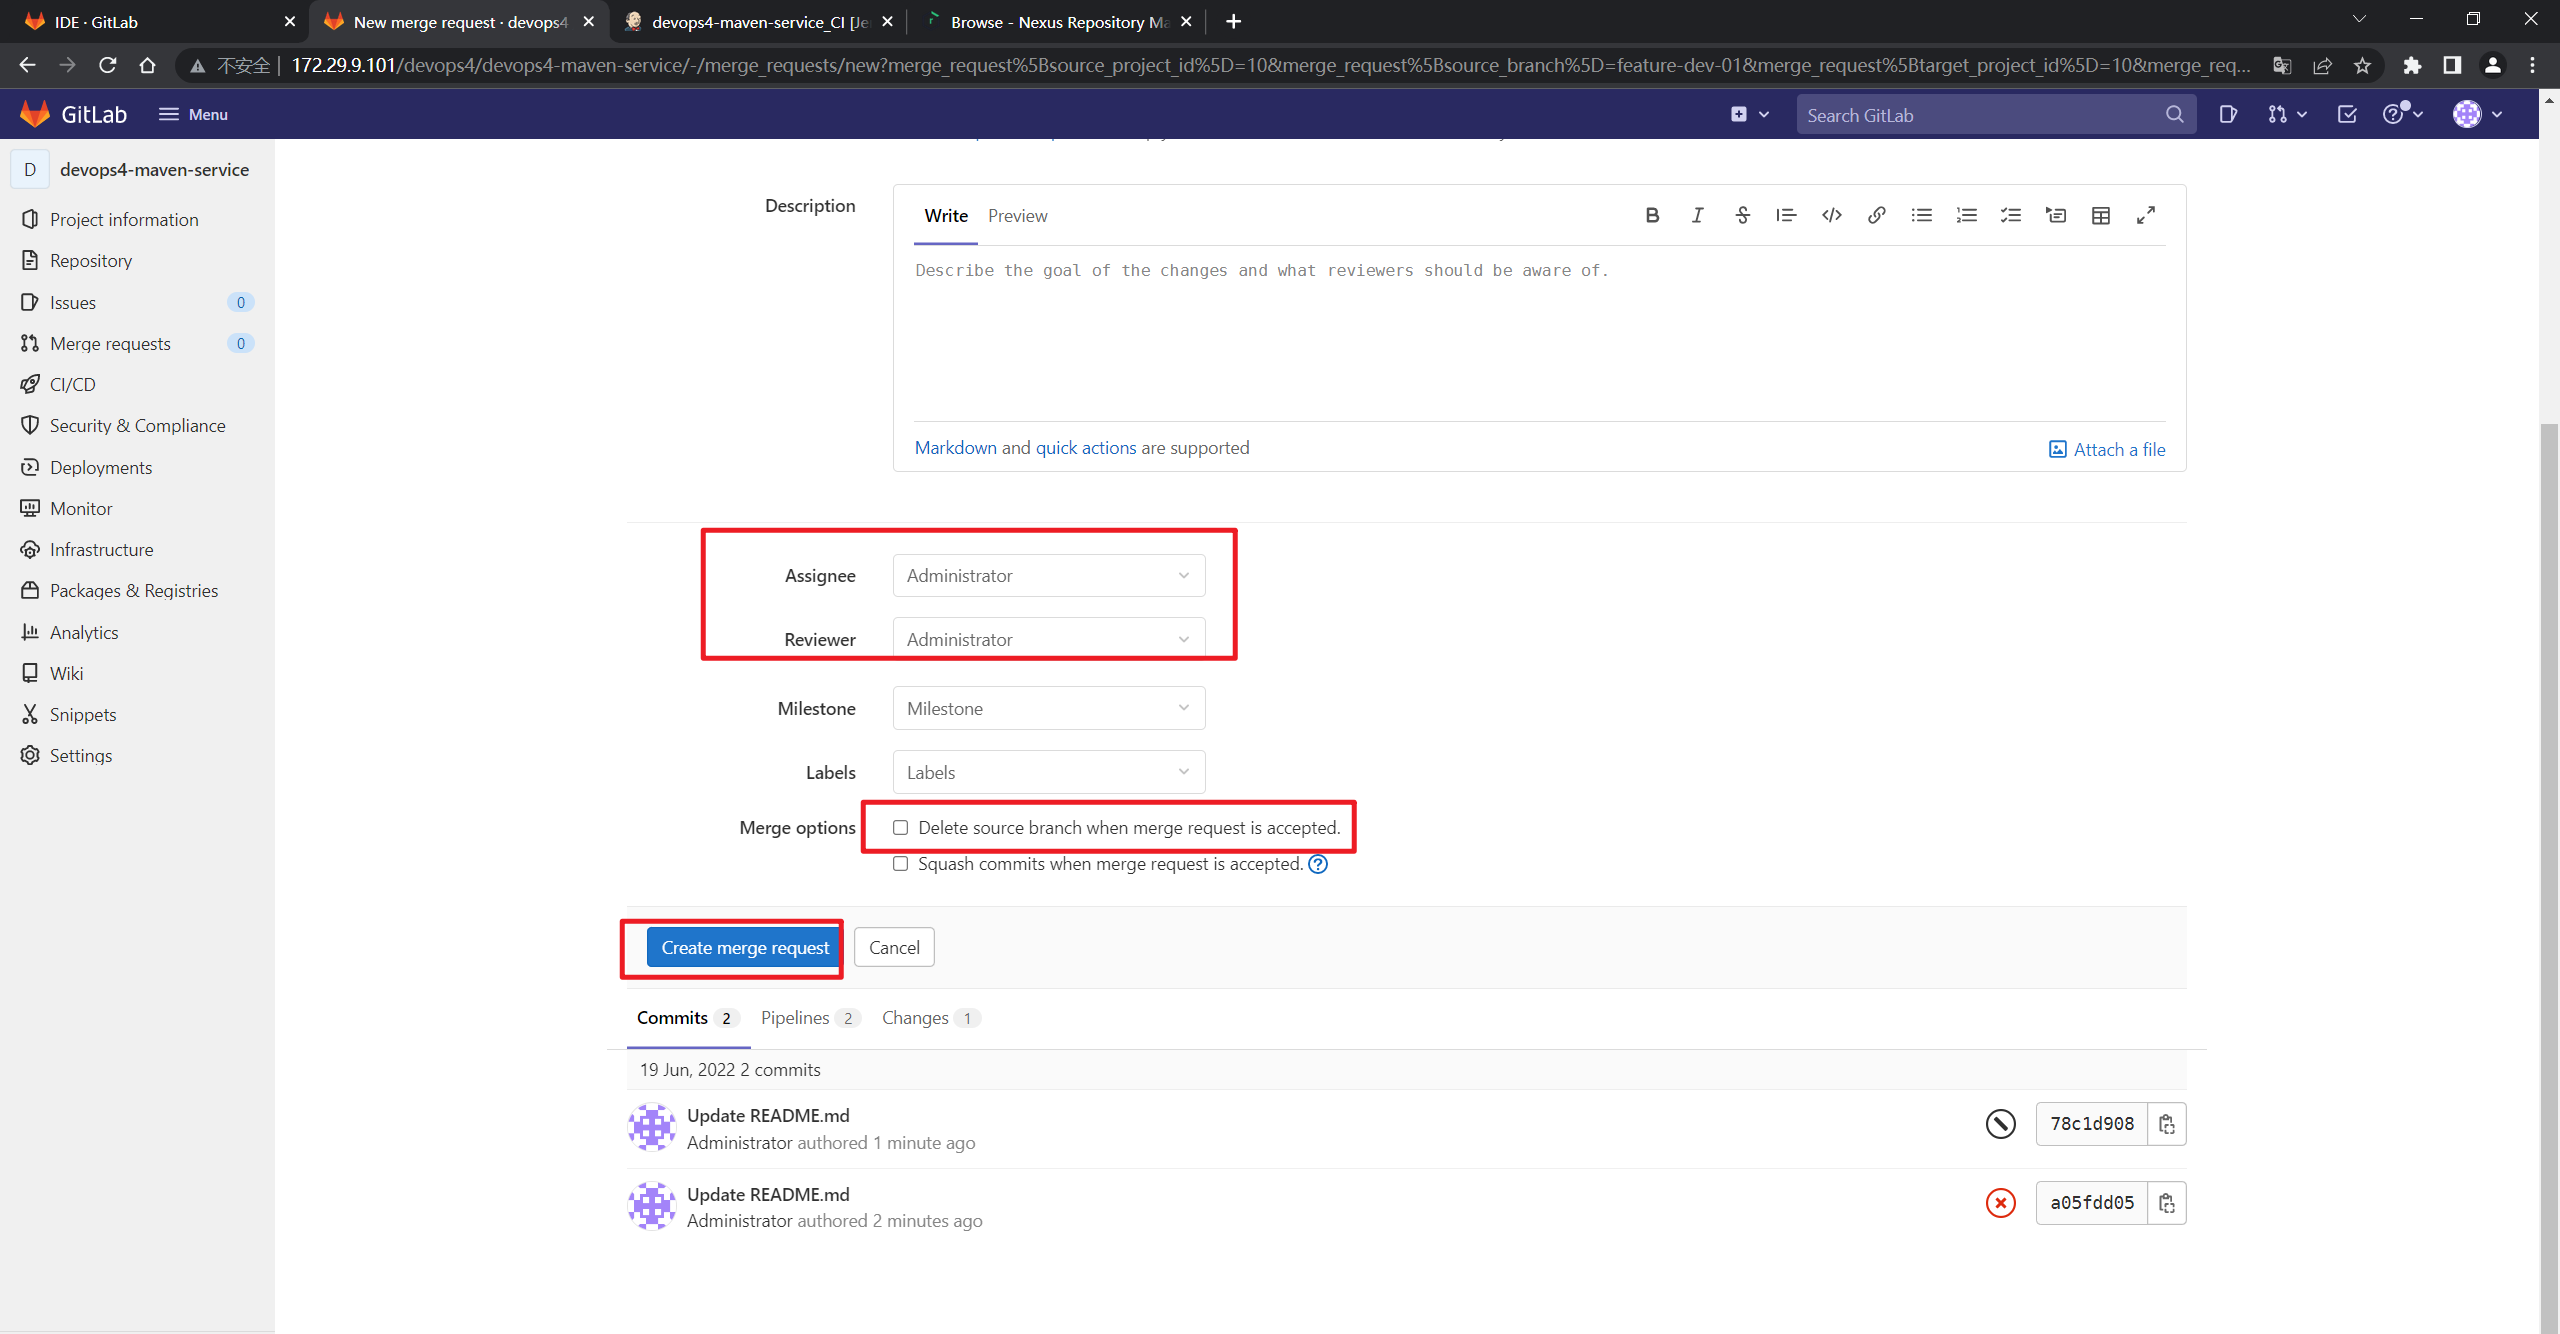

- 此时,来到
devops4-maven-service_CI流水线,运行观察效果:
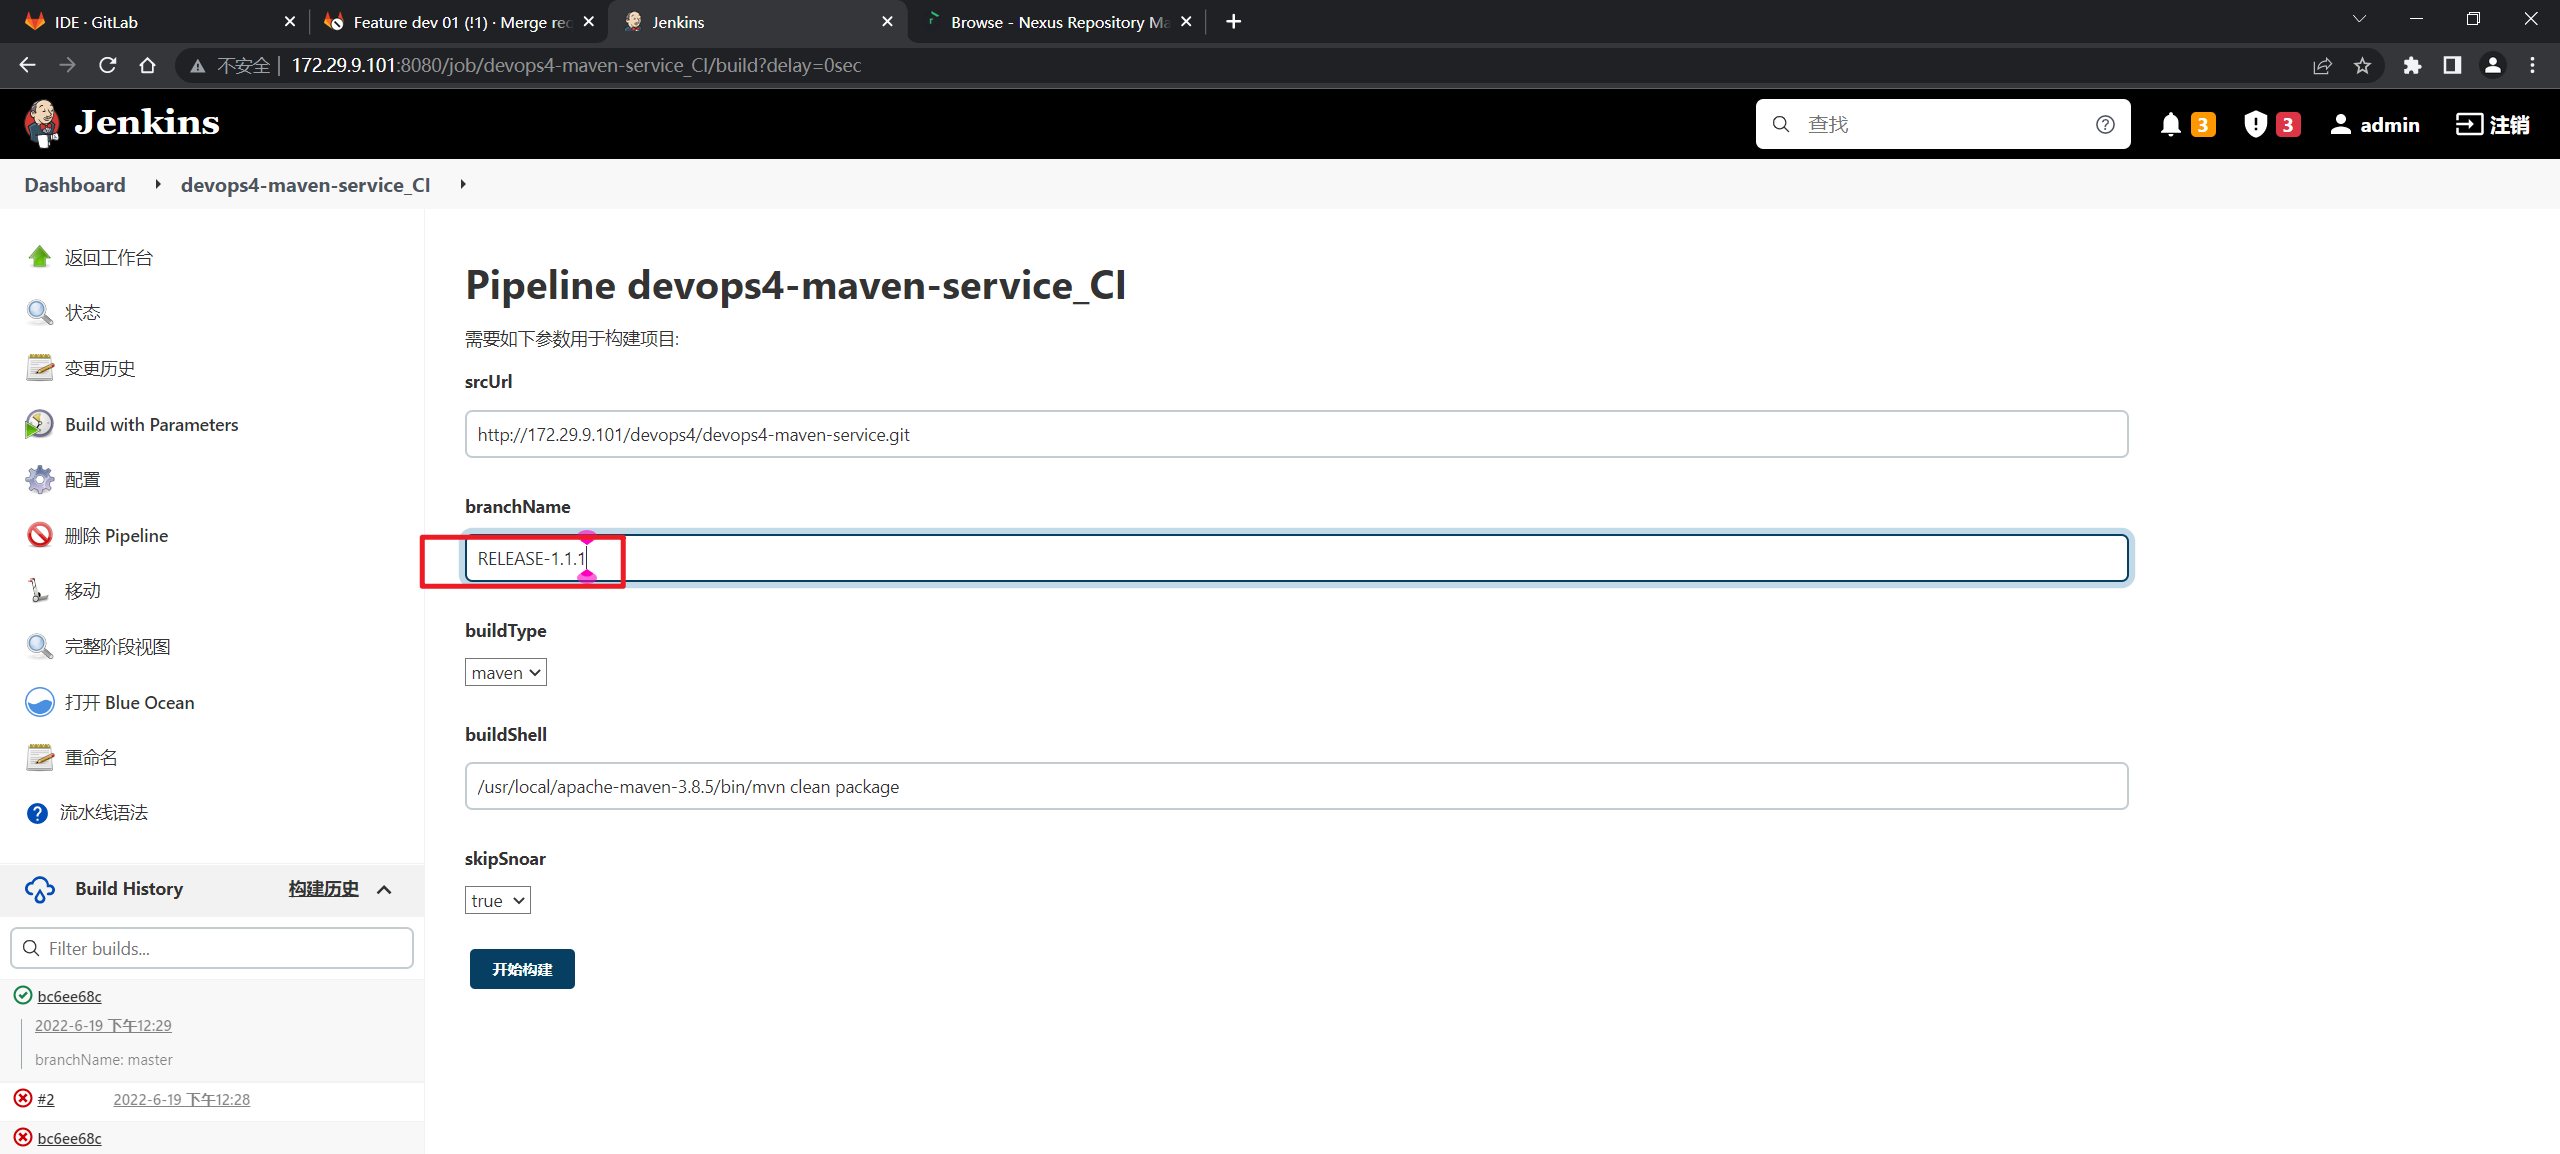
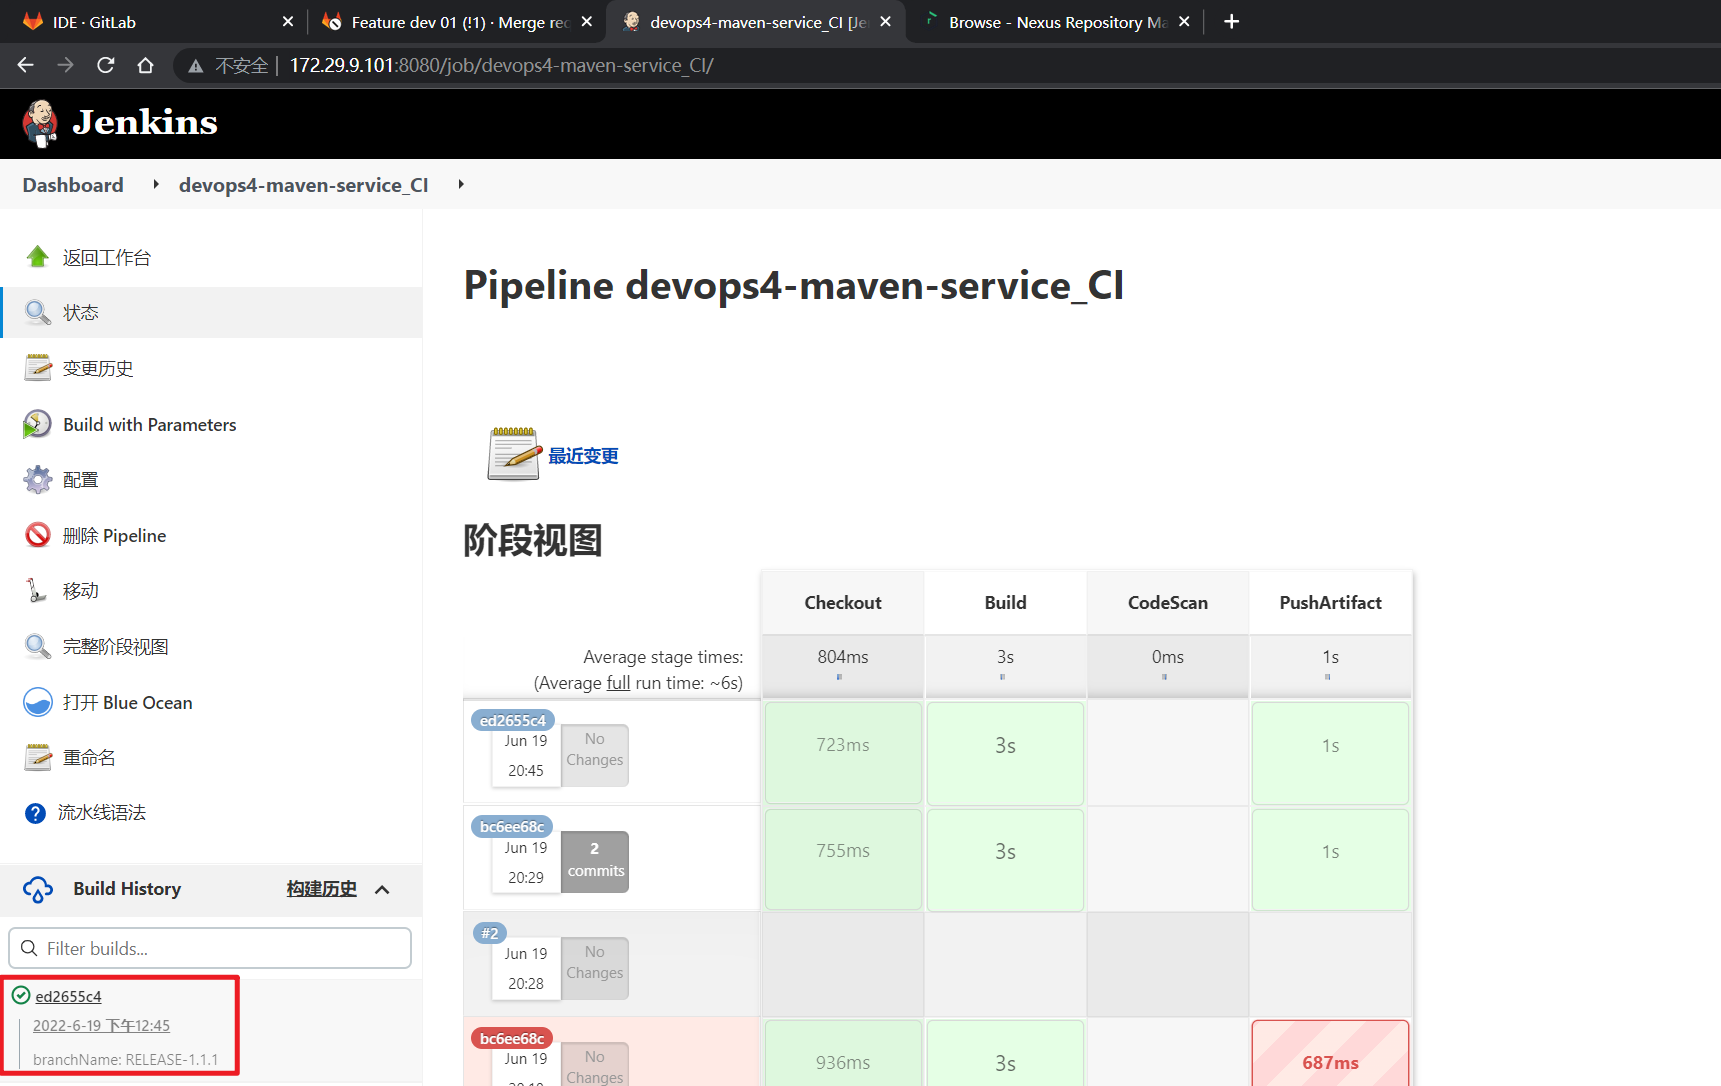
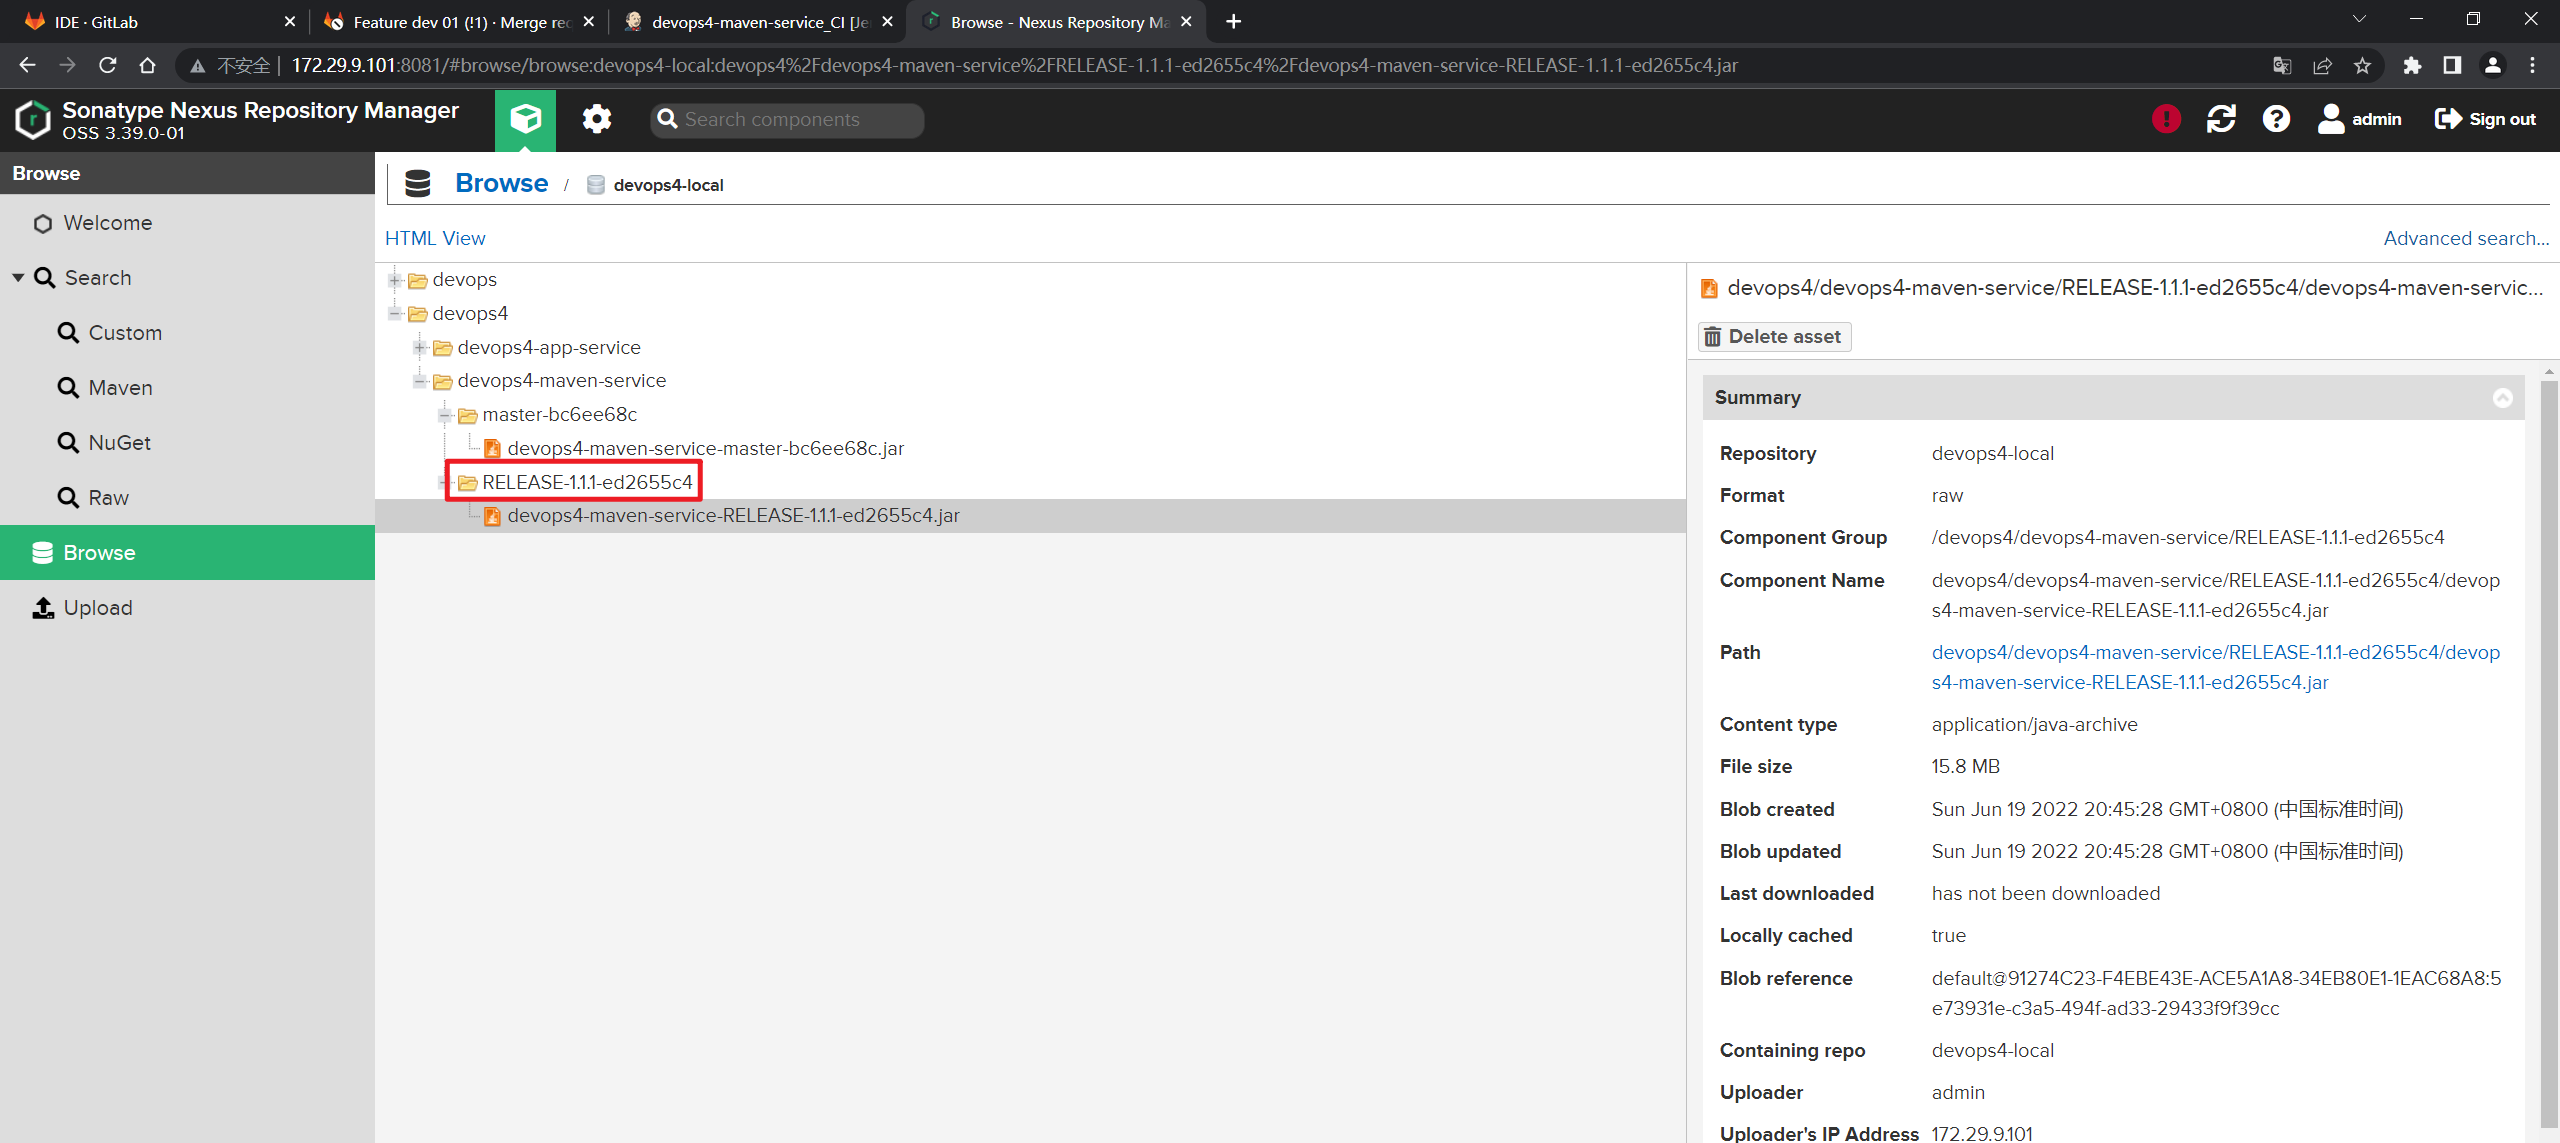
此时CI就完成了,接下来就是CD了;
- 创建一个CD的作业:
devops4-maven-service_CD
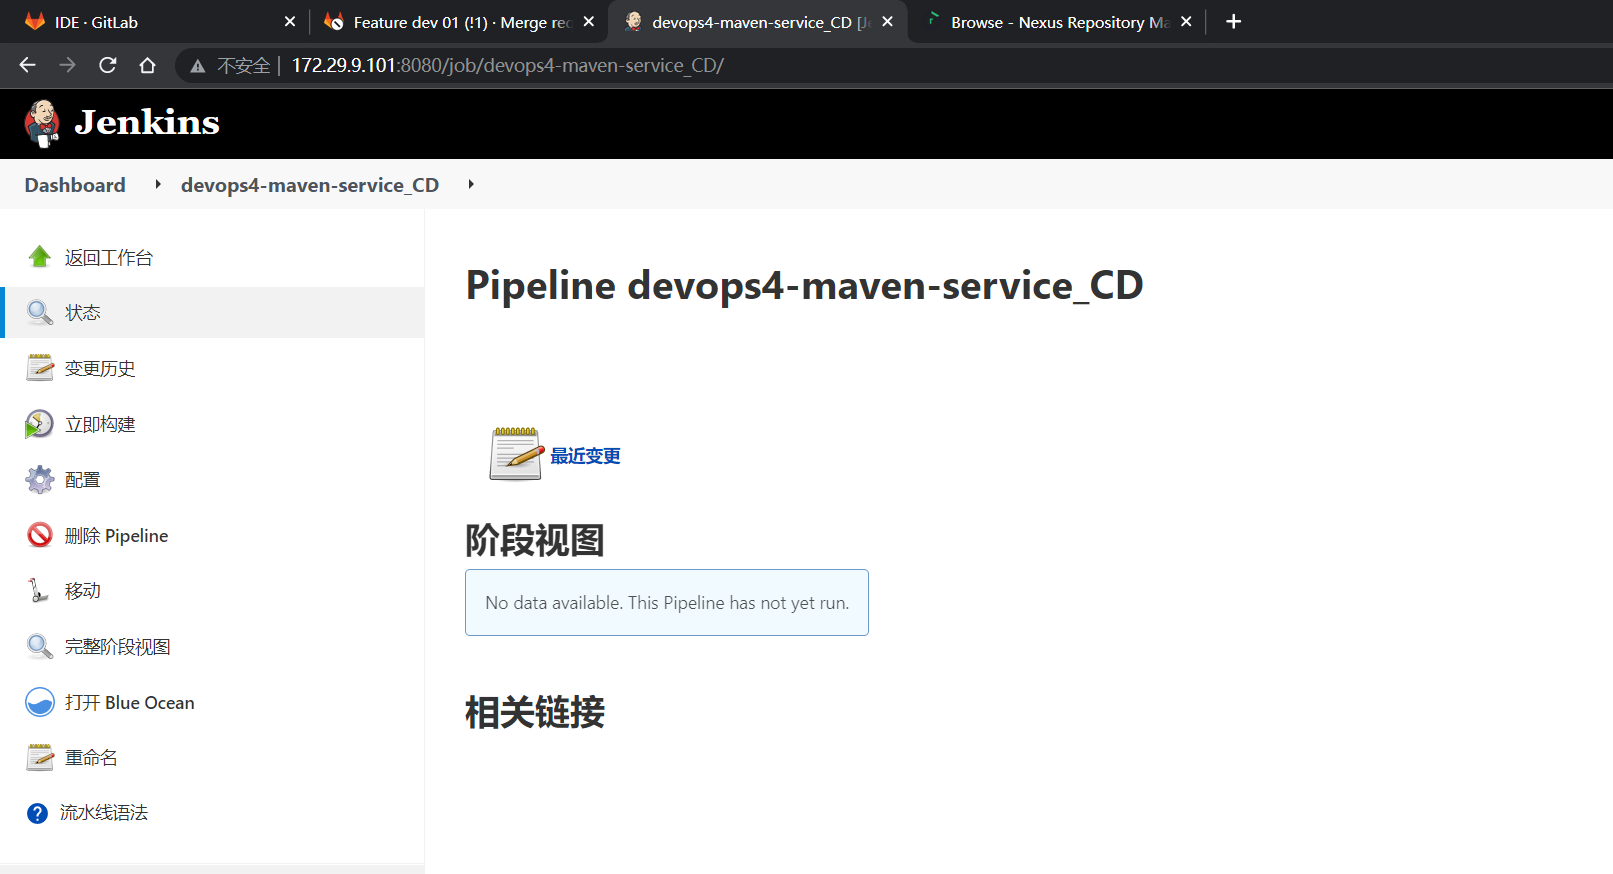
然后再添加几个参数:
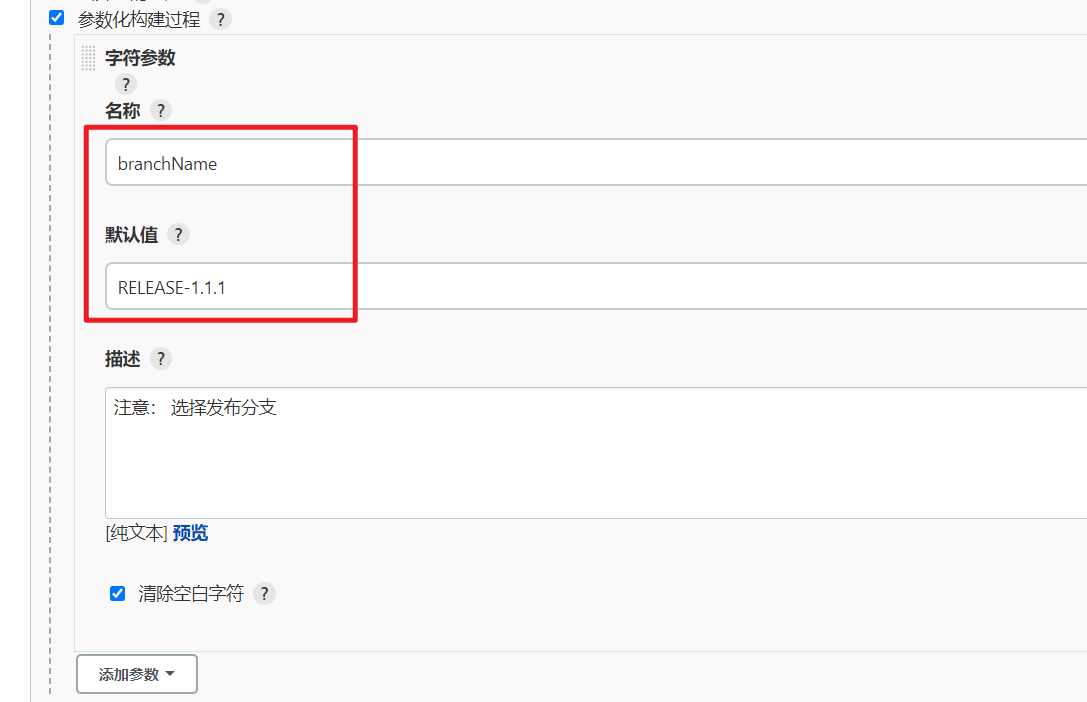
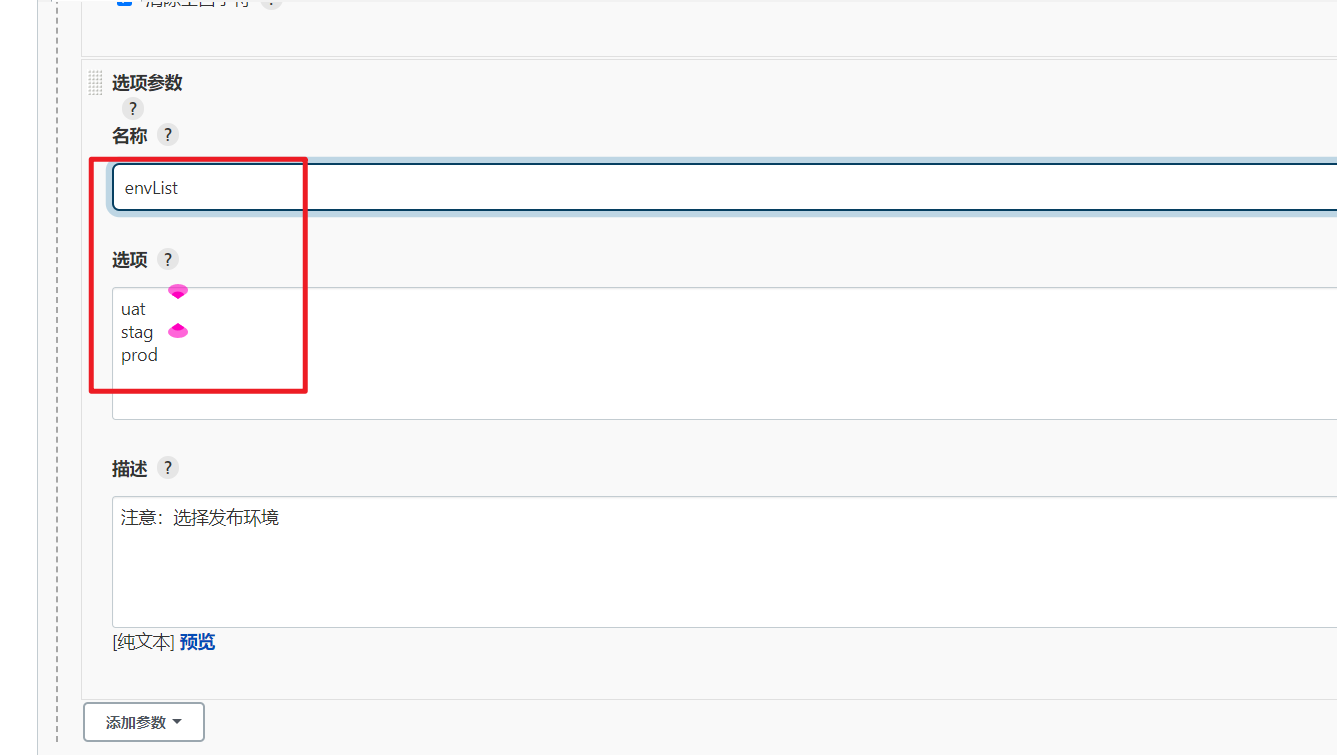
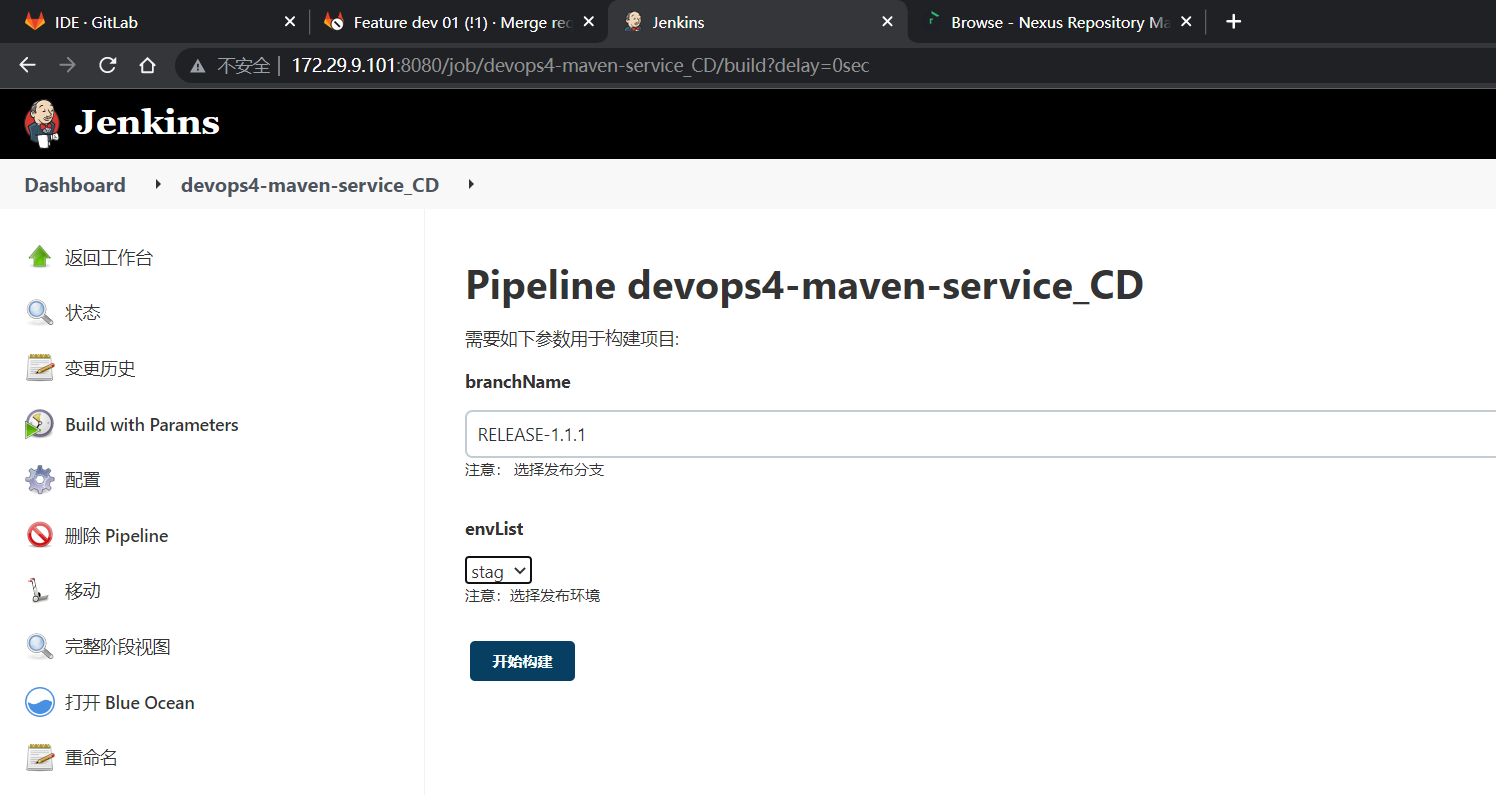
- 然后开始写CD流水线:
先写一部分代码:
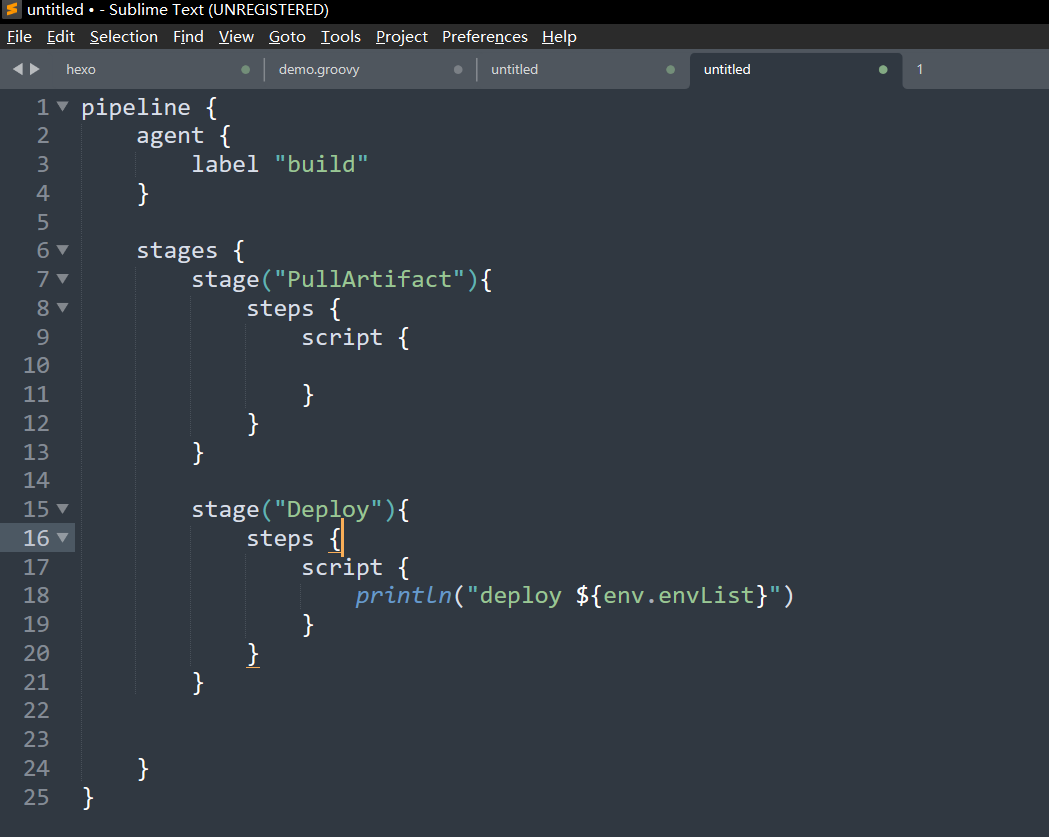
复制制品路径:
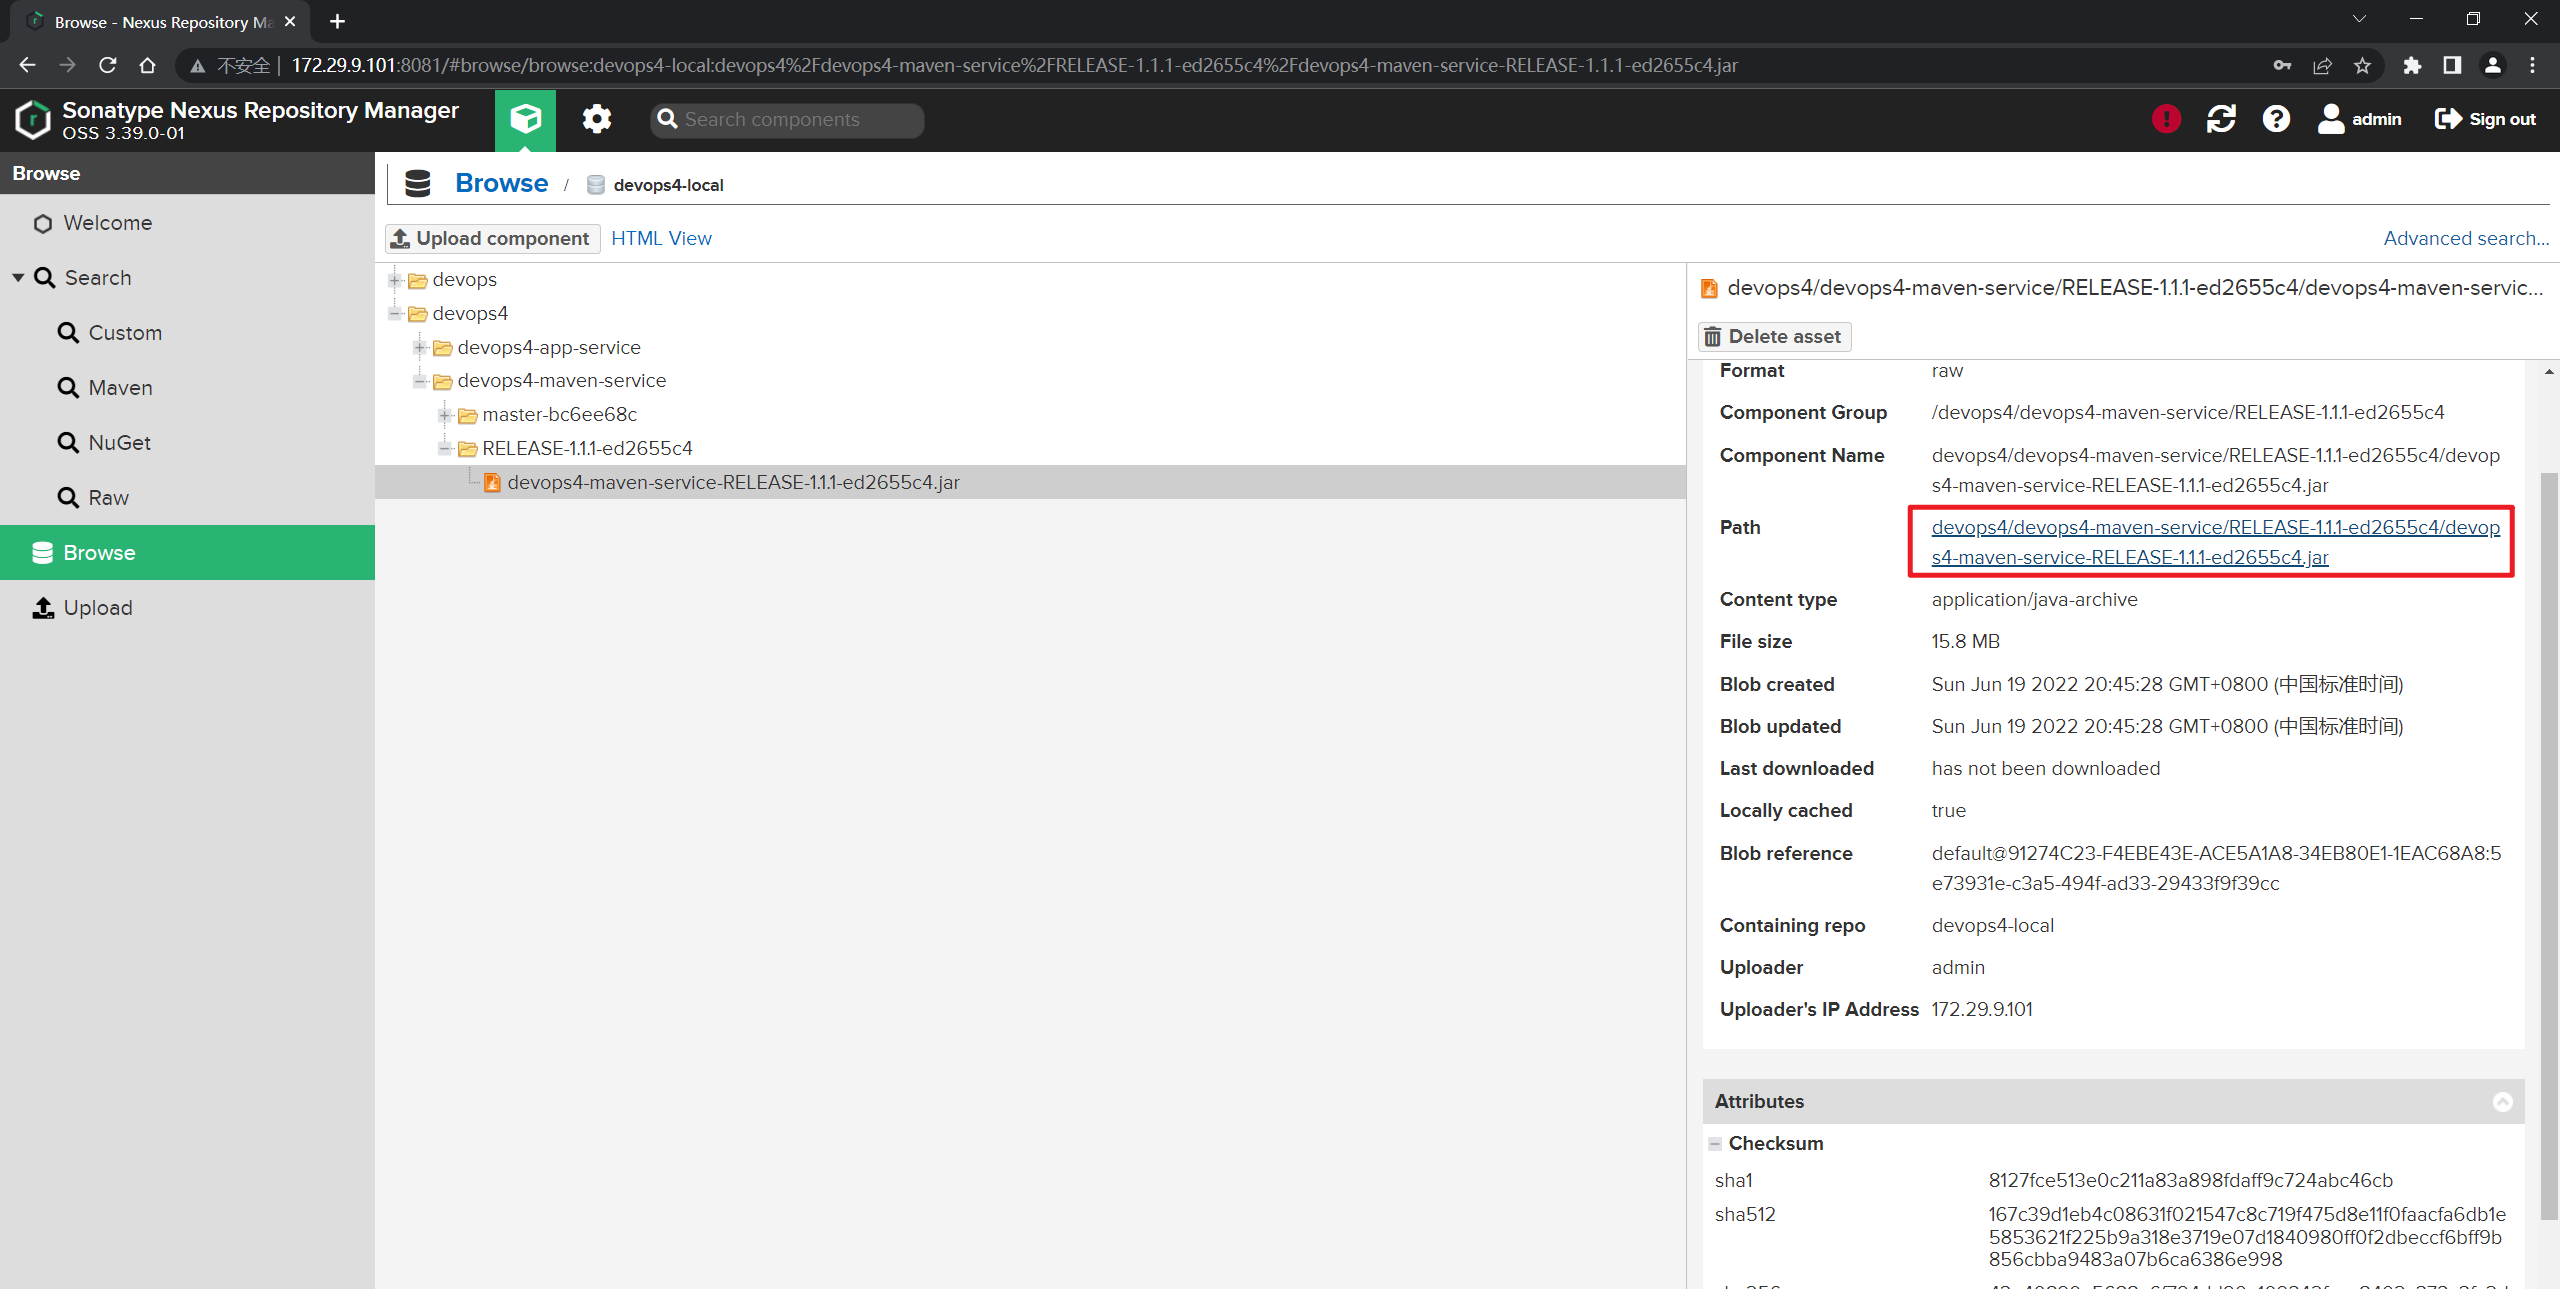
http://172.29.9.101:8081/repository/devops4-local/devops4/devops4-maven-service/RELEASE-1.1.1-ed2655c4/devops4-maven-service-RELEASE-1.1.1-ed2655c4.jar
这个commitID怎么来获取呢?

通过API去拿:
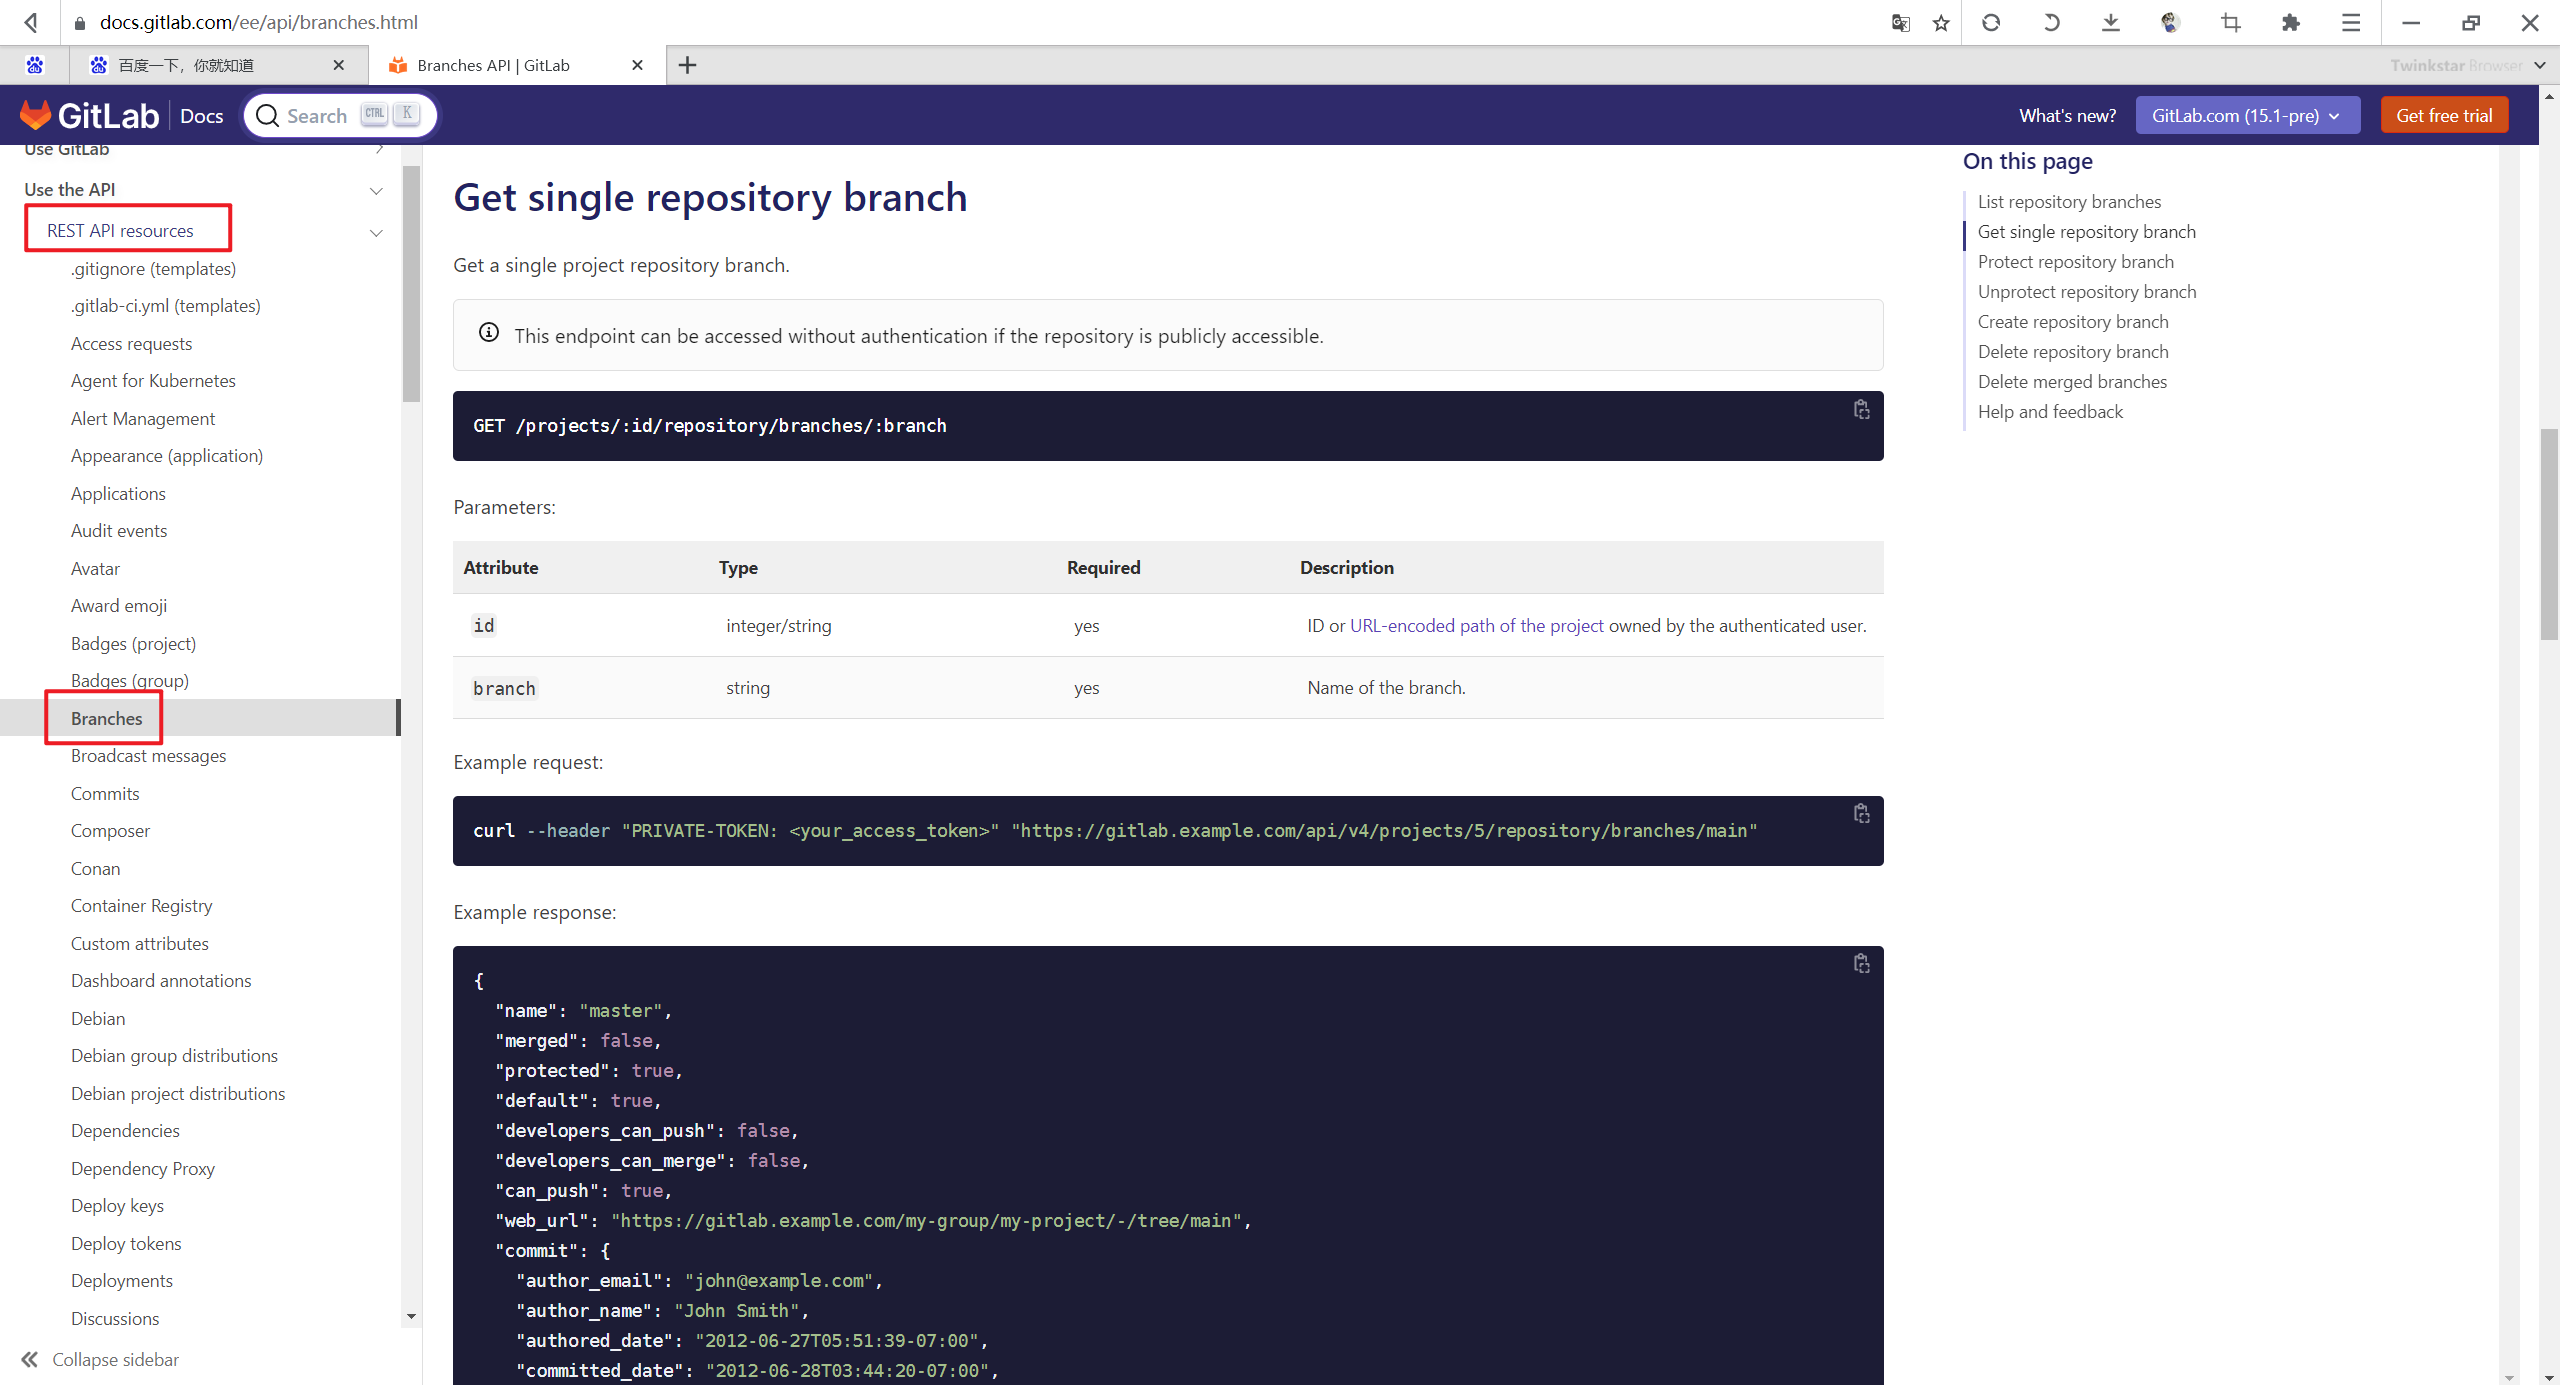
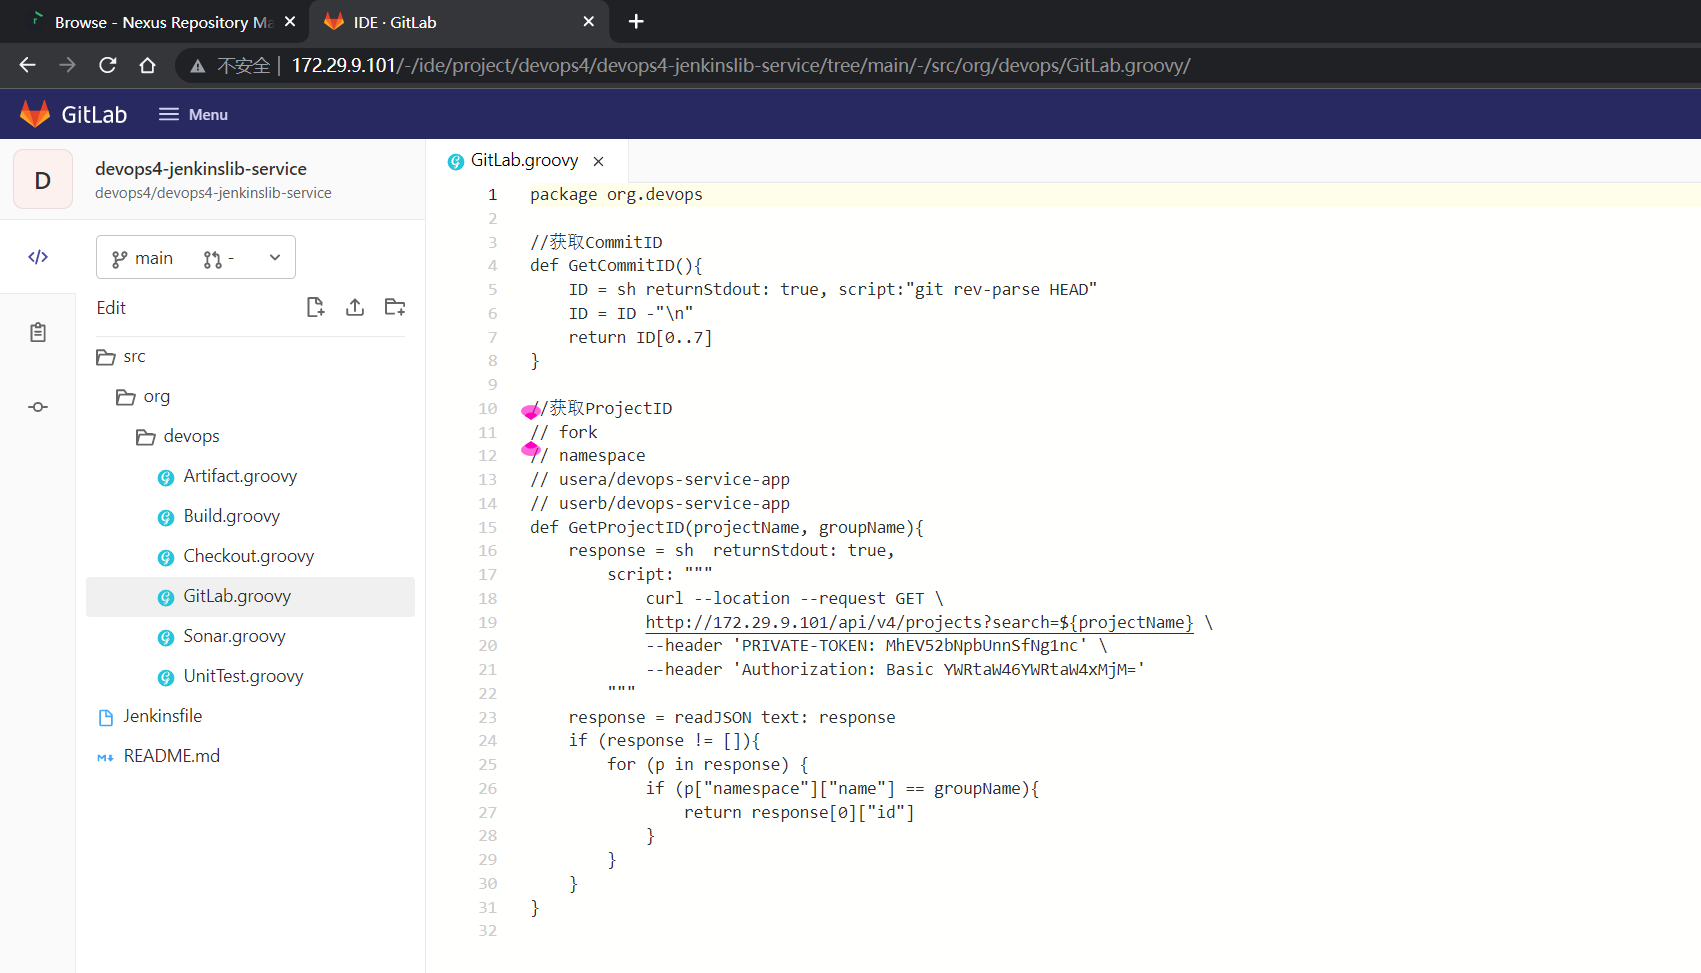
- 配置下projrctID:
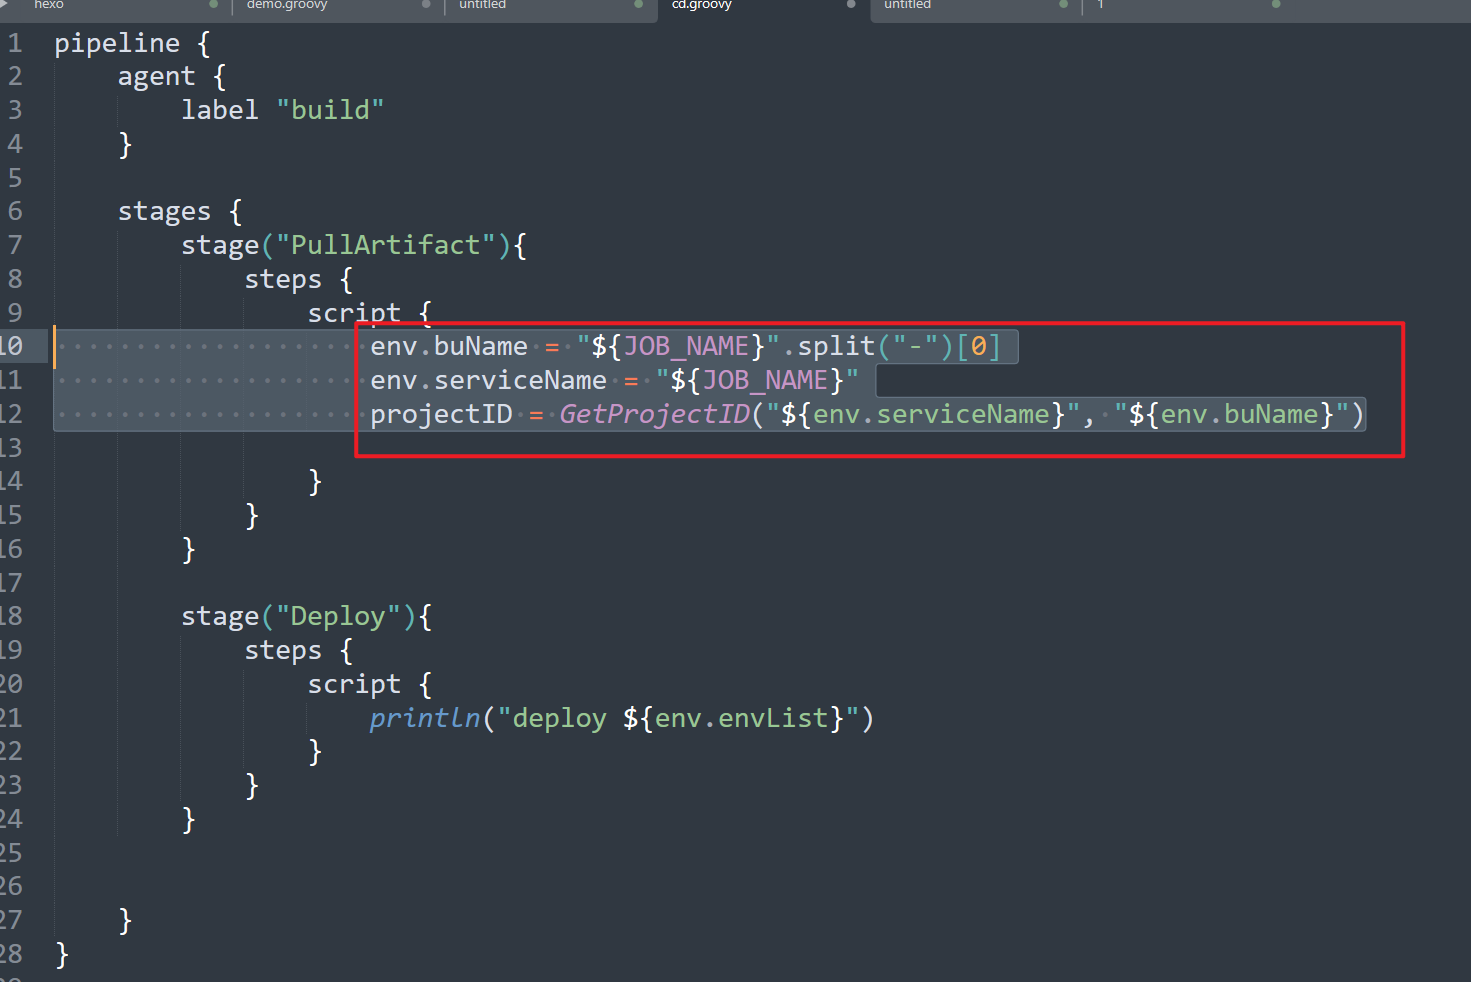
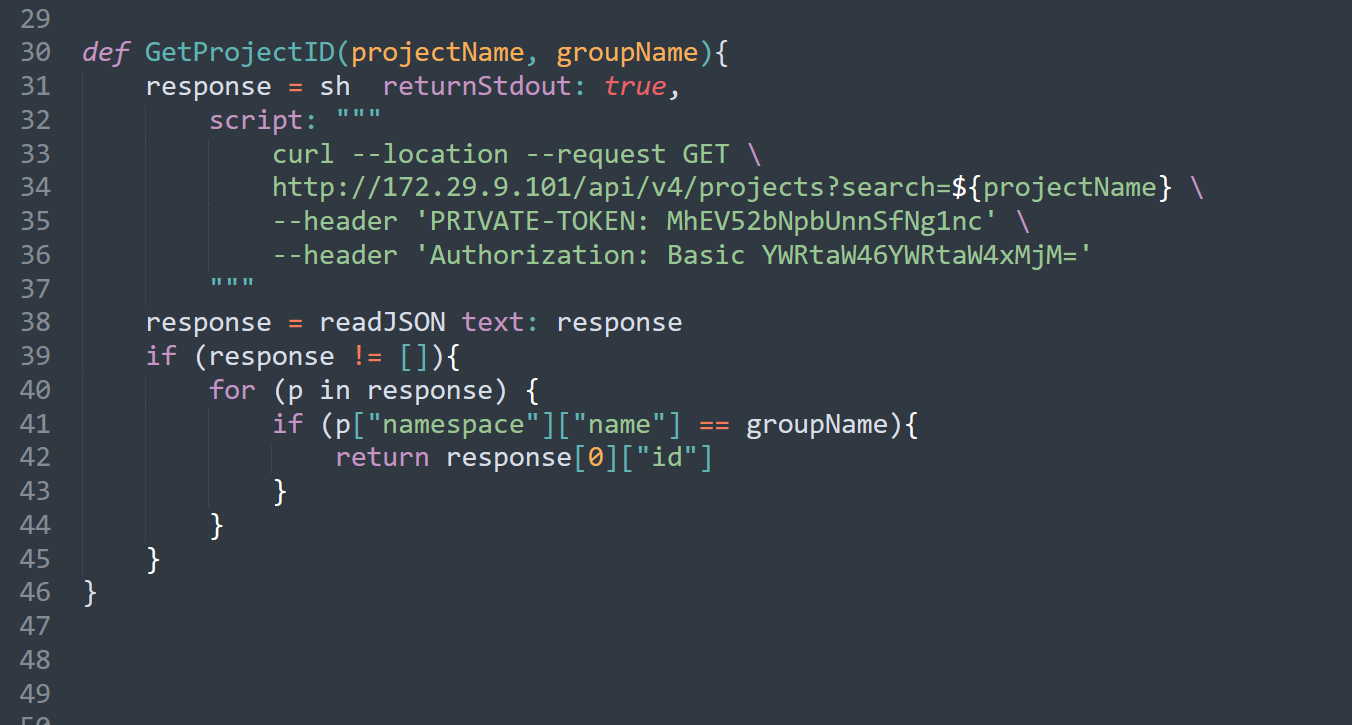
- 这里在写下代码:
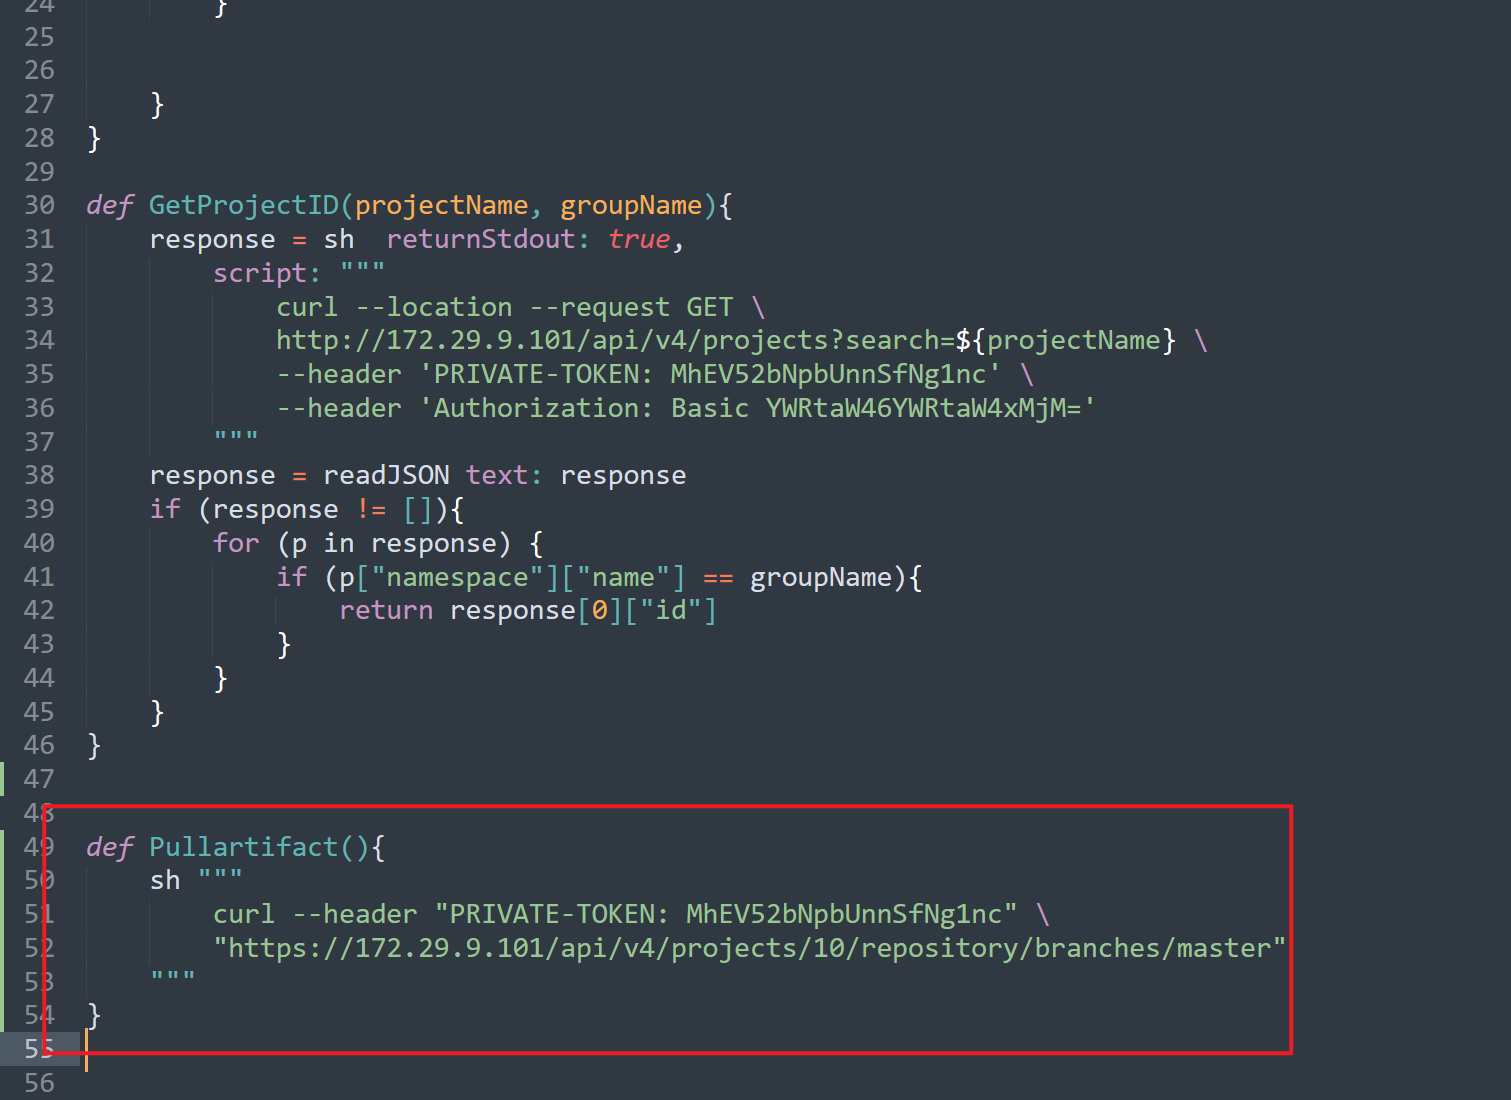
- 这里再优化下:

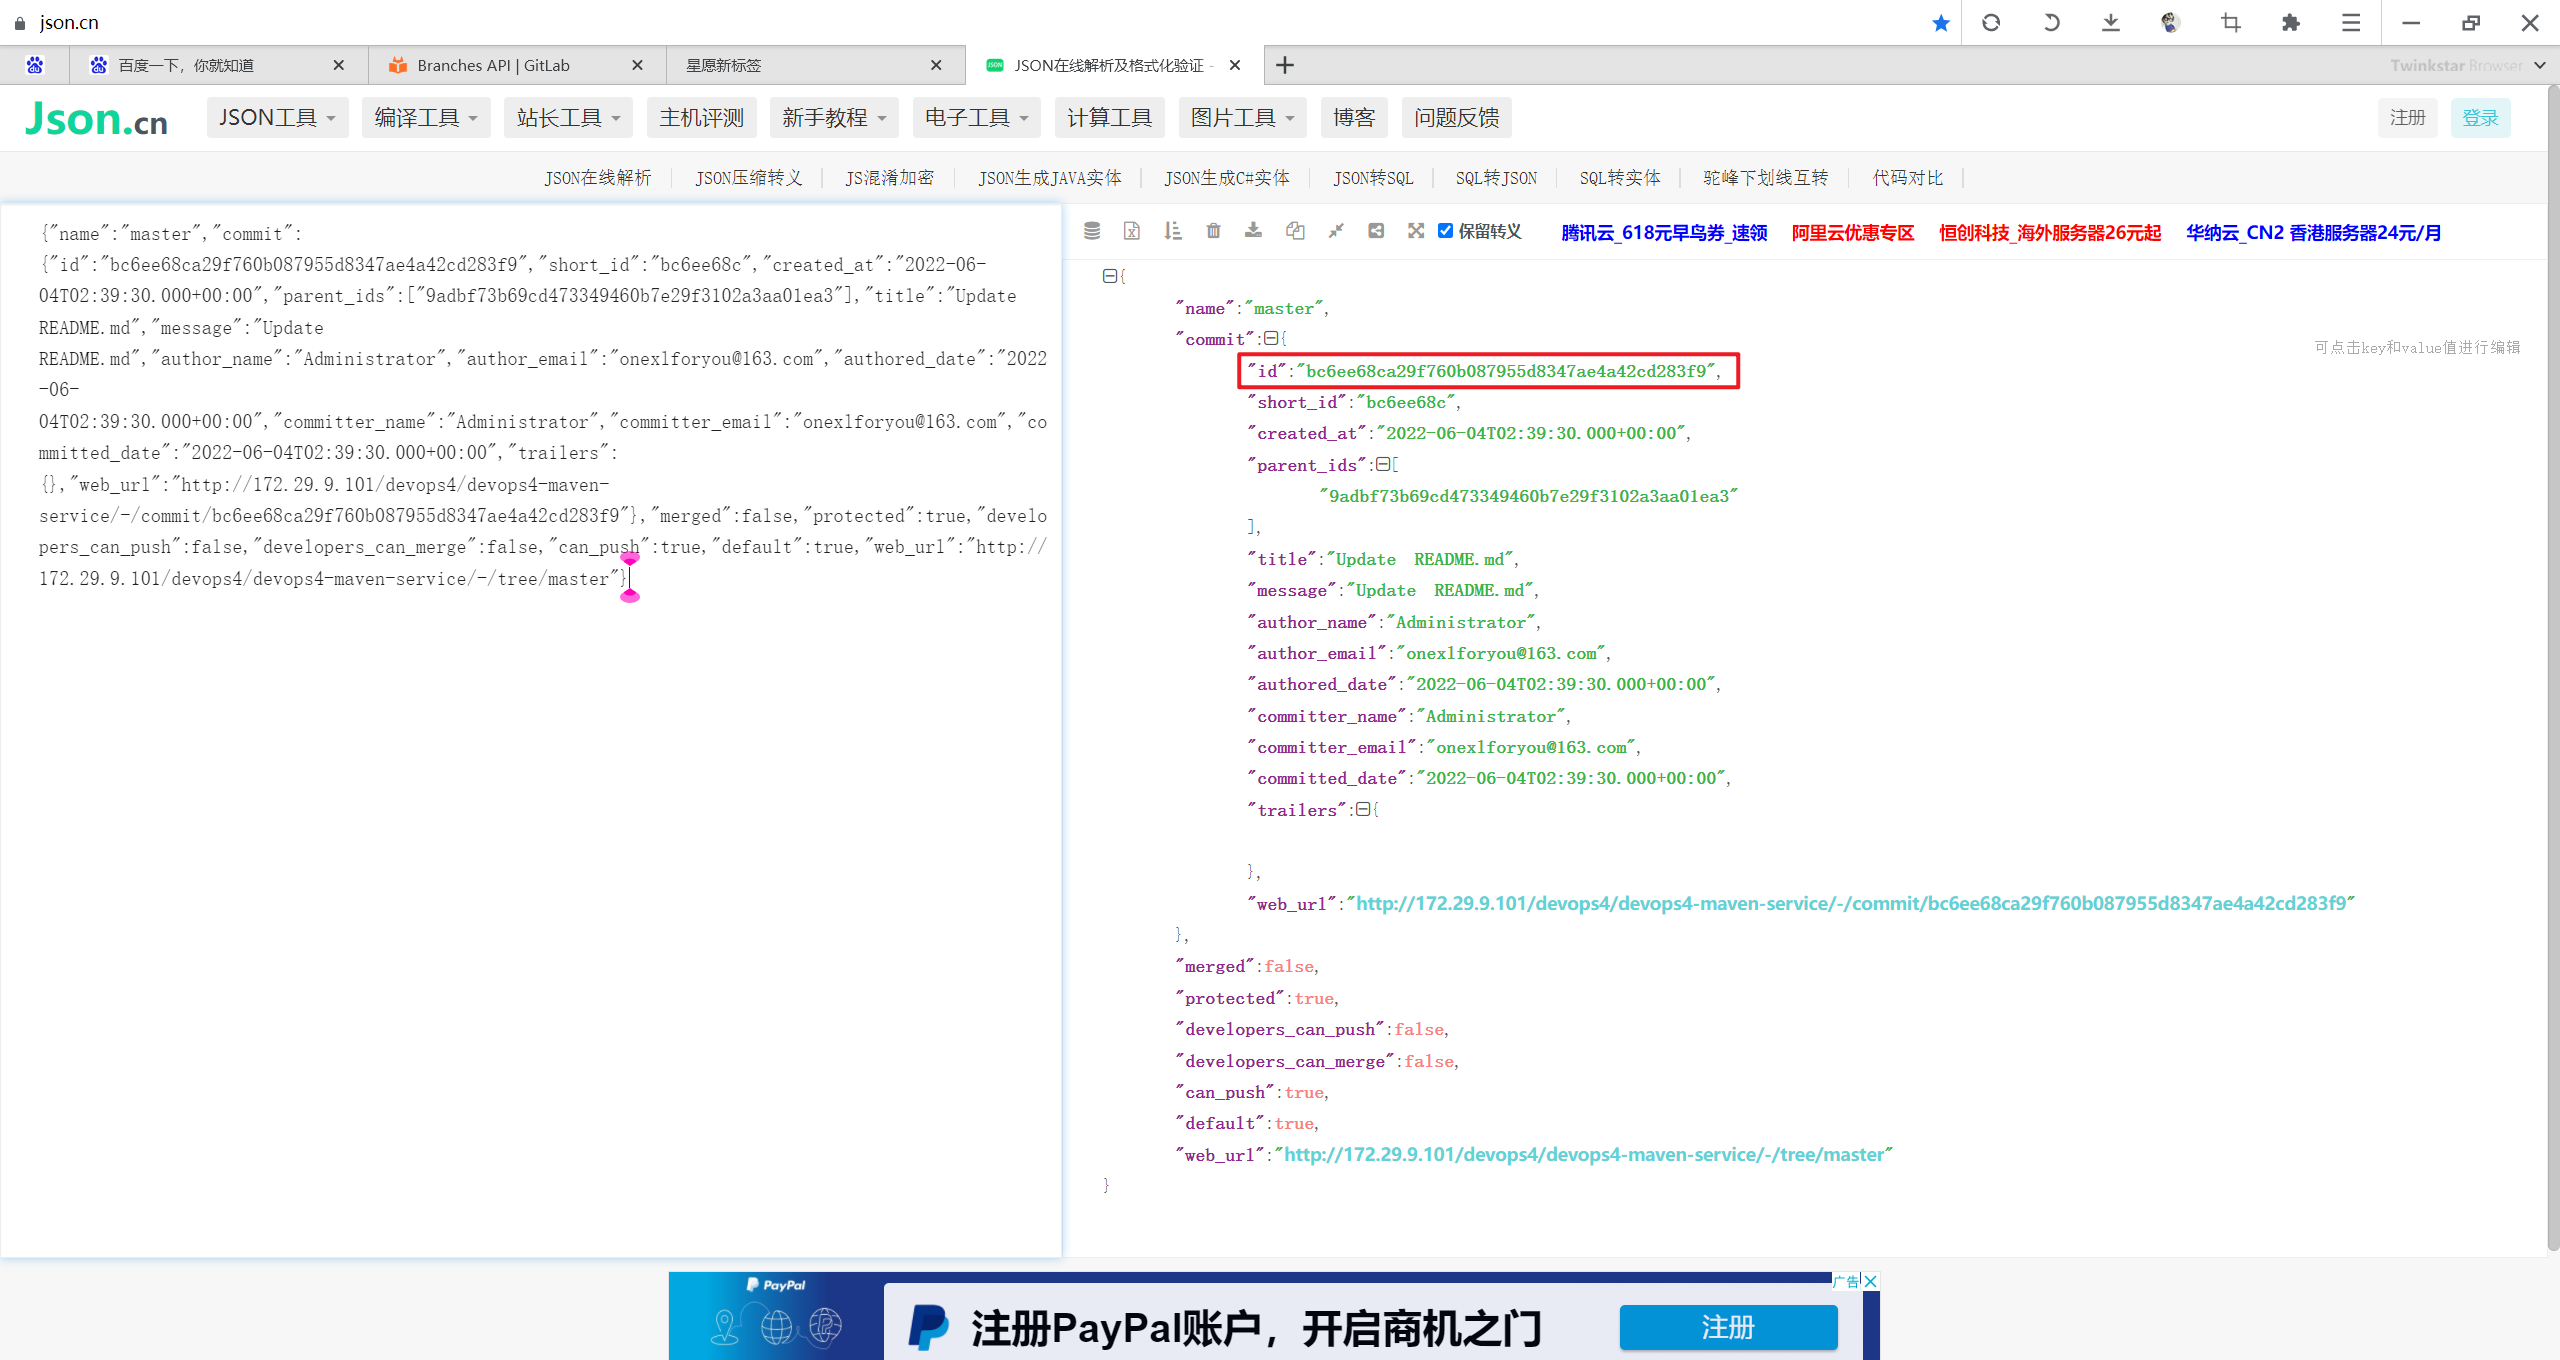


现在去拿制品:
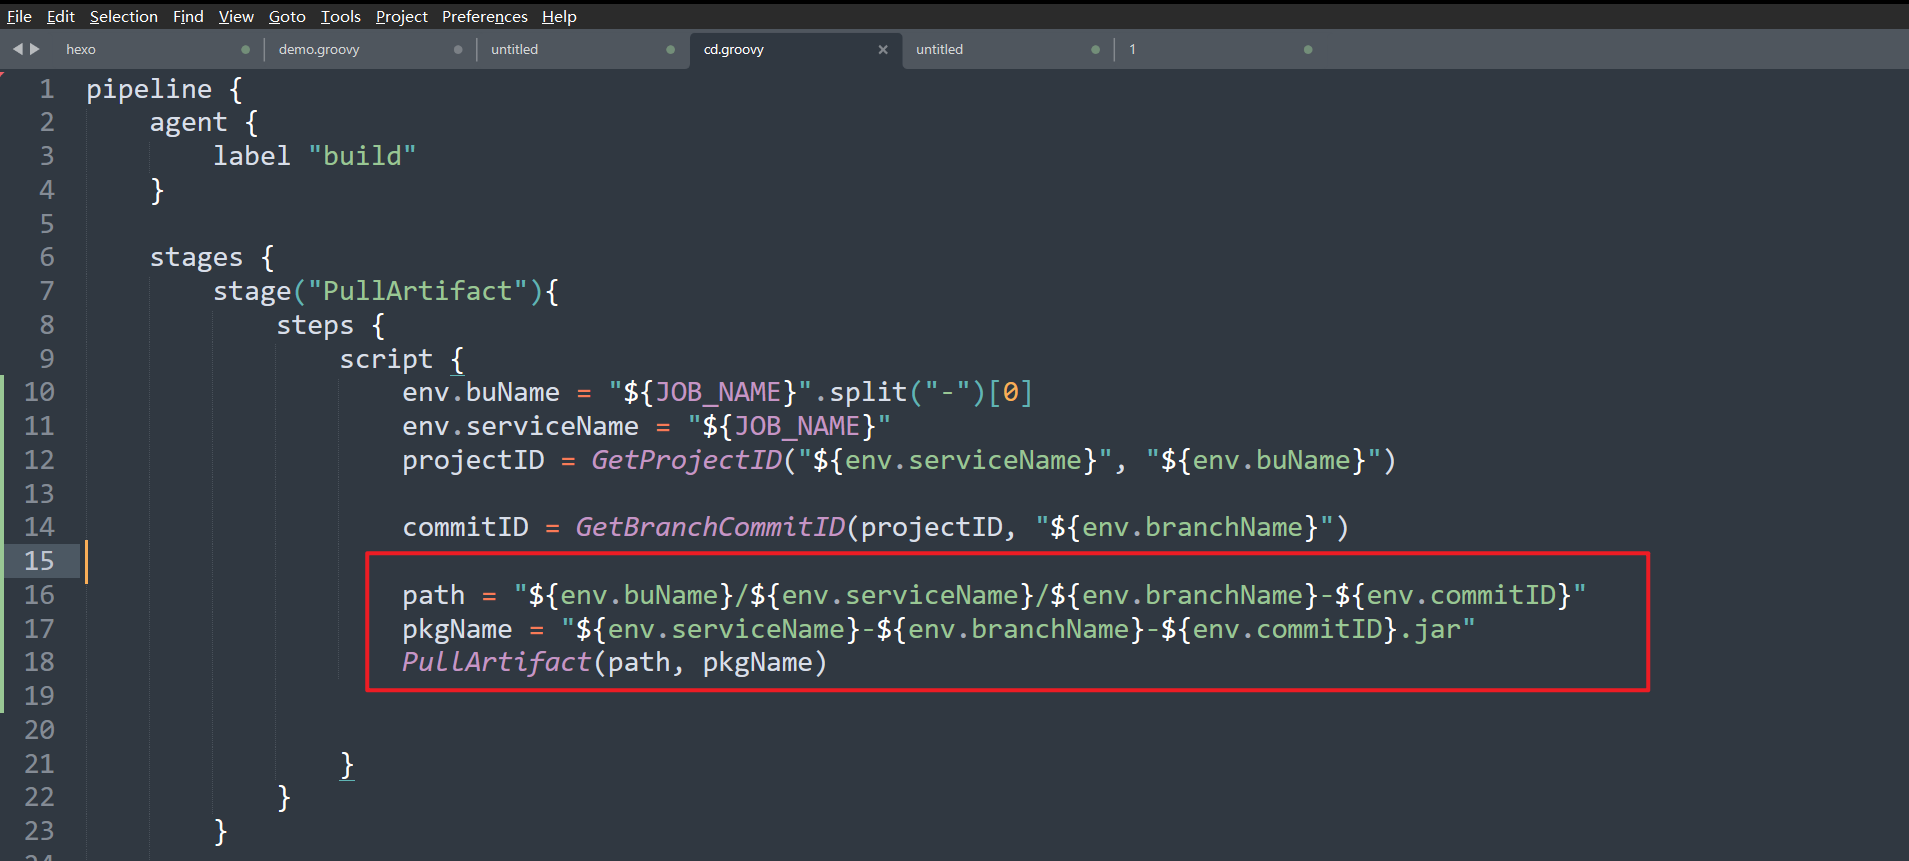

现在跑一次,看下效果:
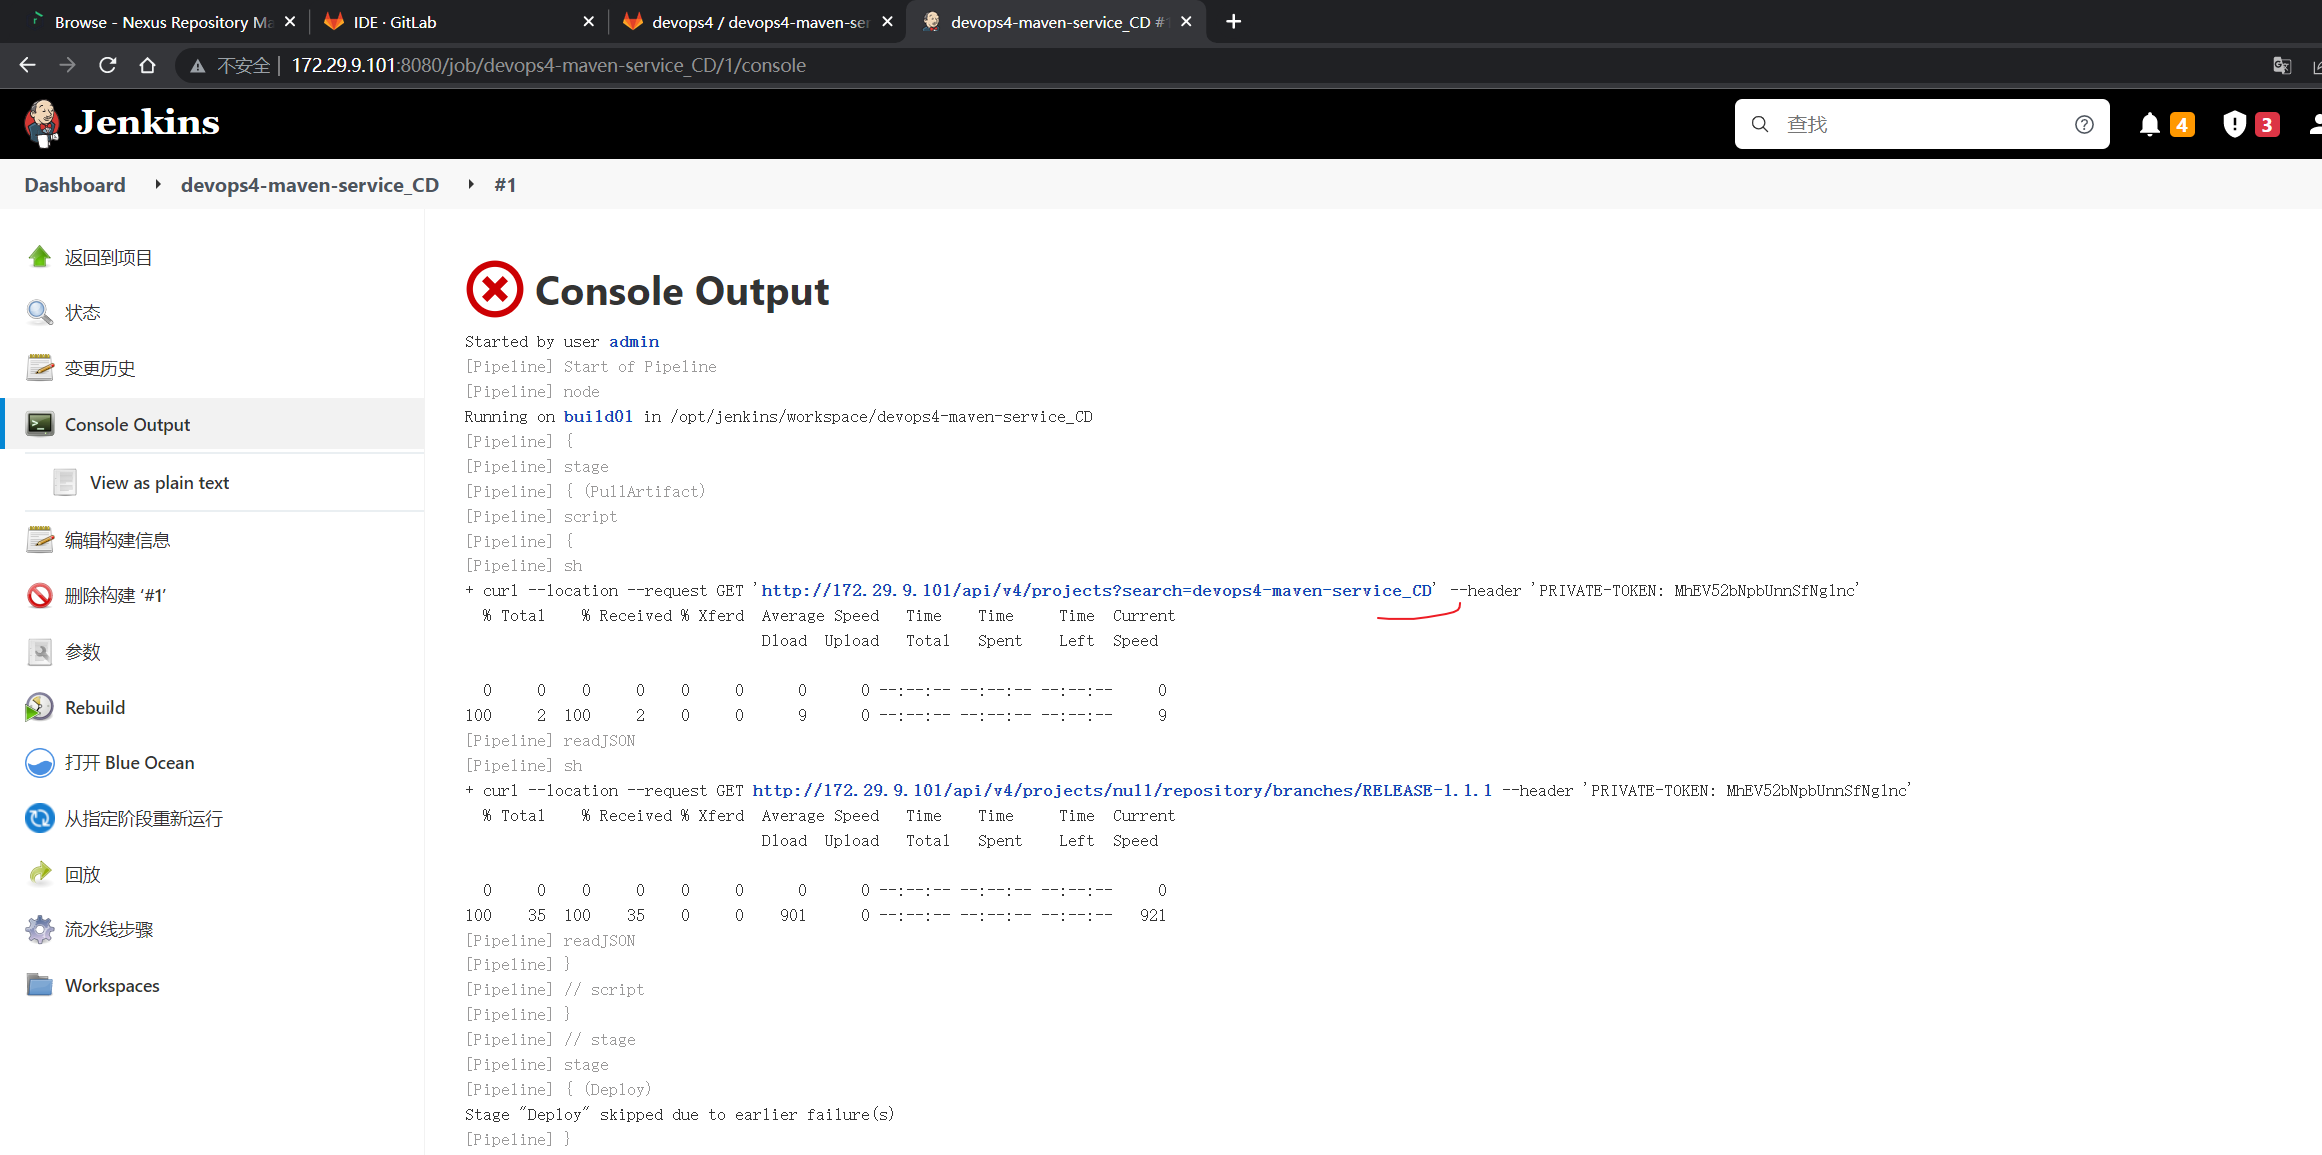
第一次跑了,失败了:……
这里有问题;
修改下,再次运行,观察下效果:
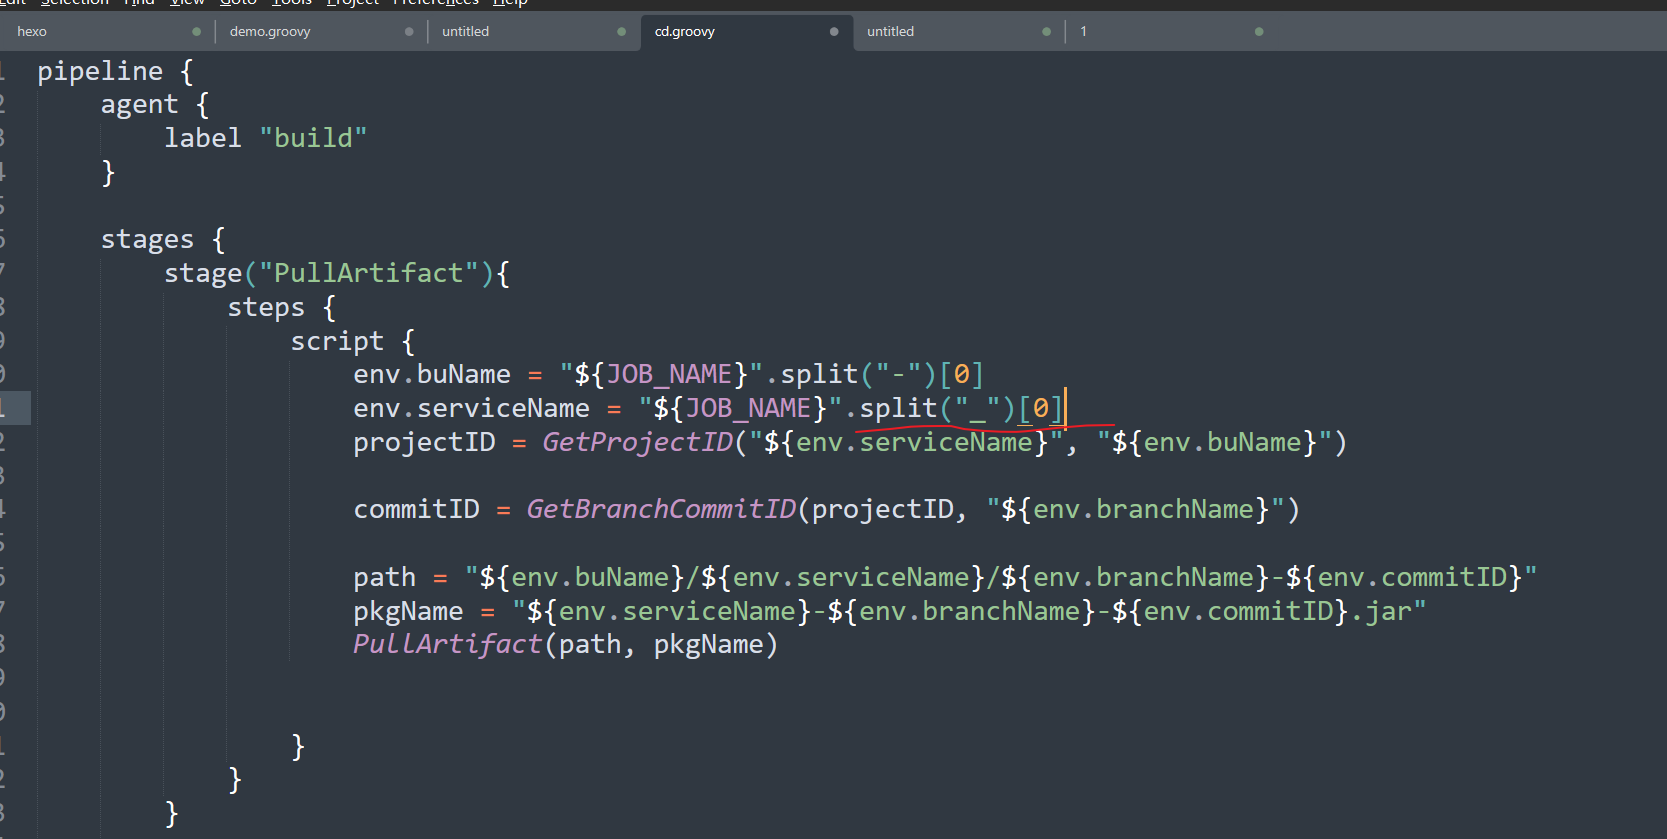
这里没拿到commitID:
这里的commitID变量写错了:
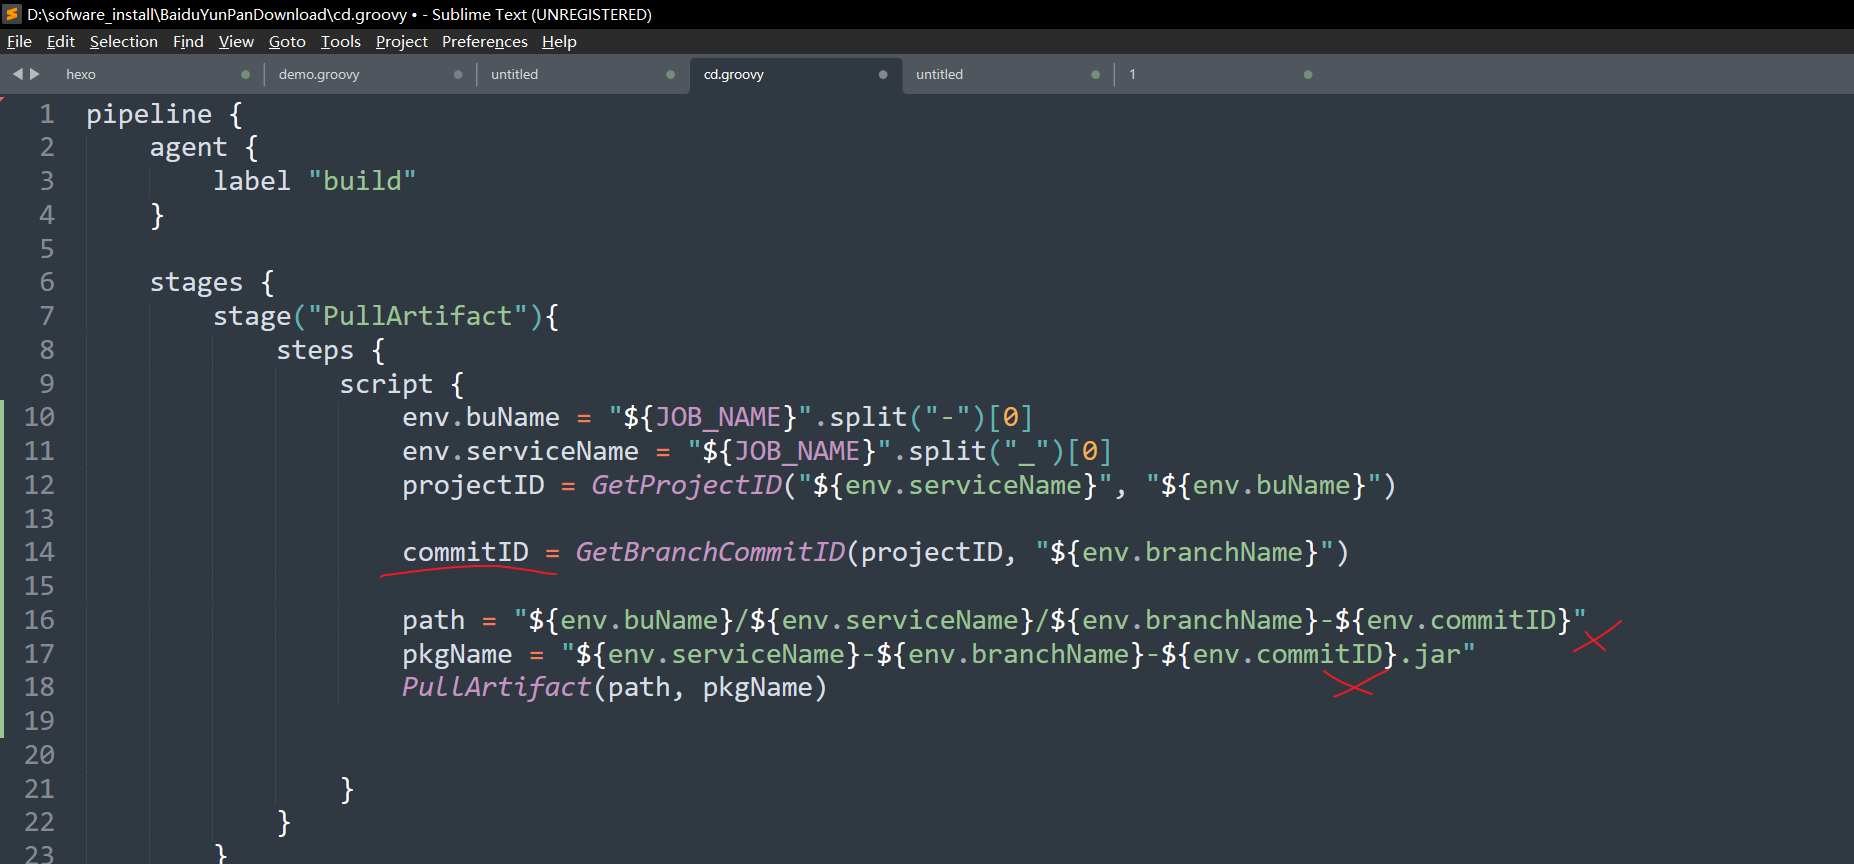
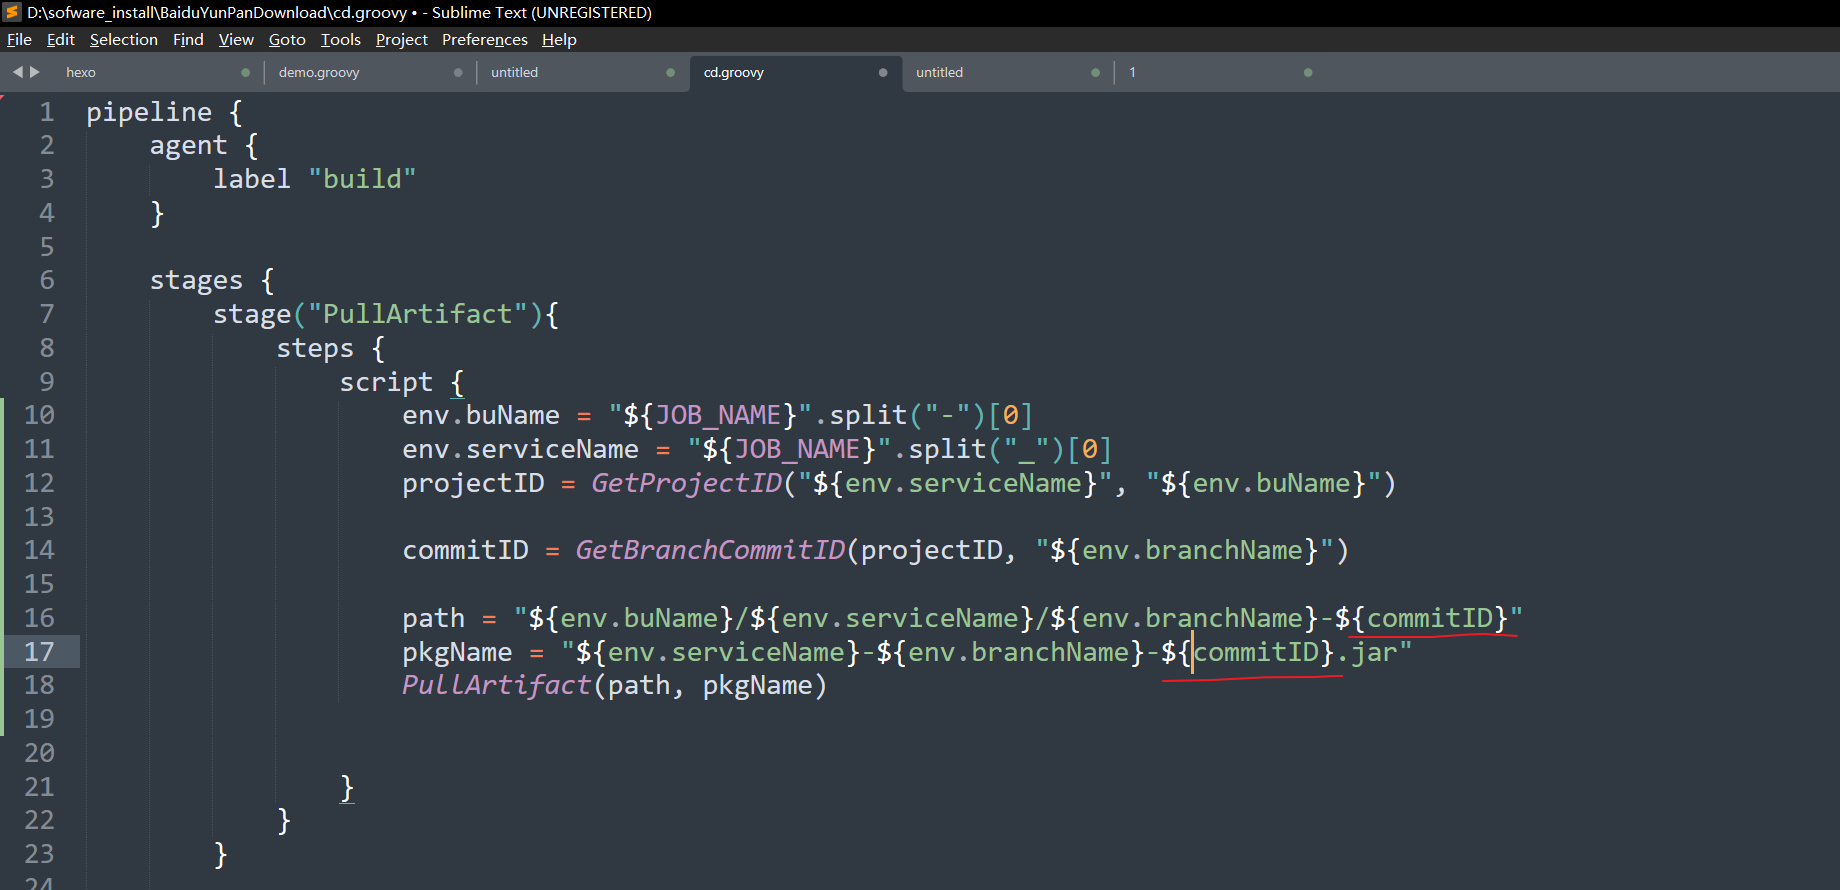

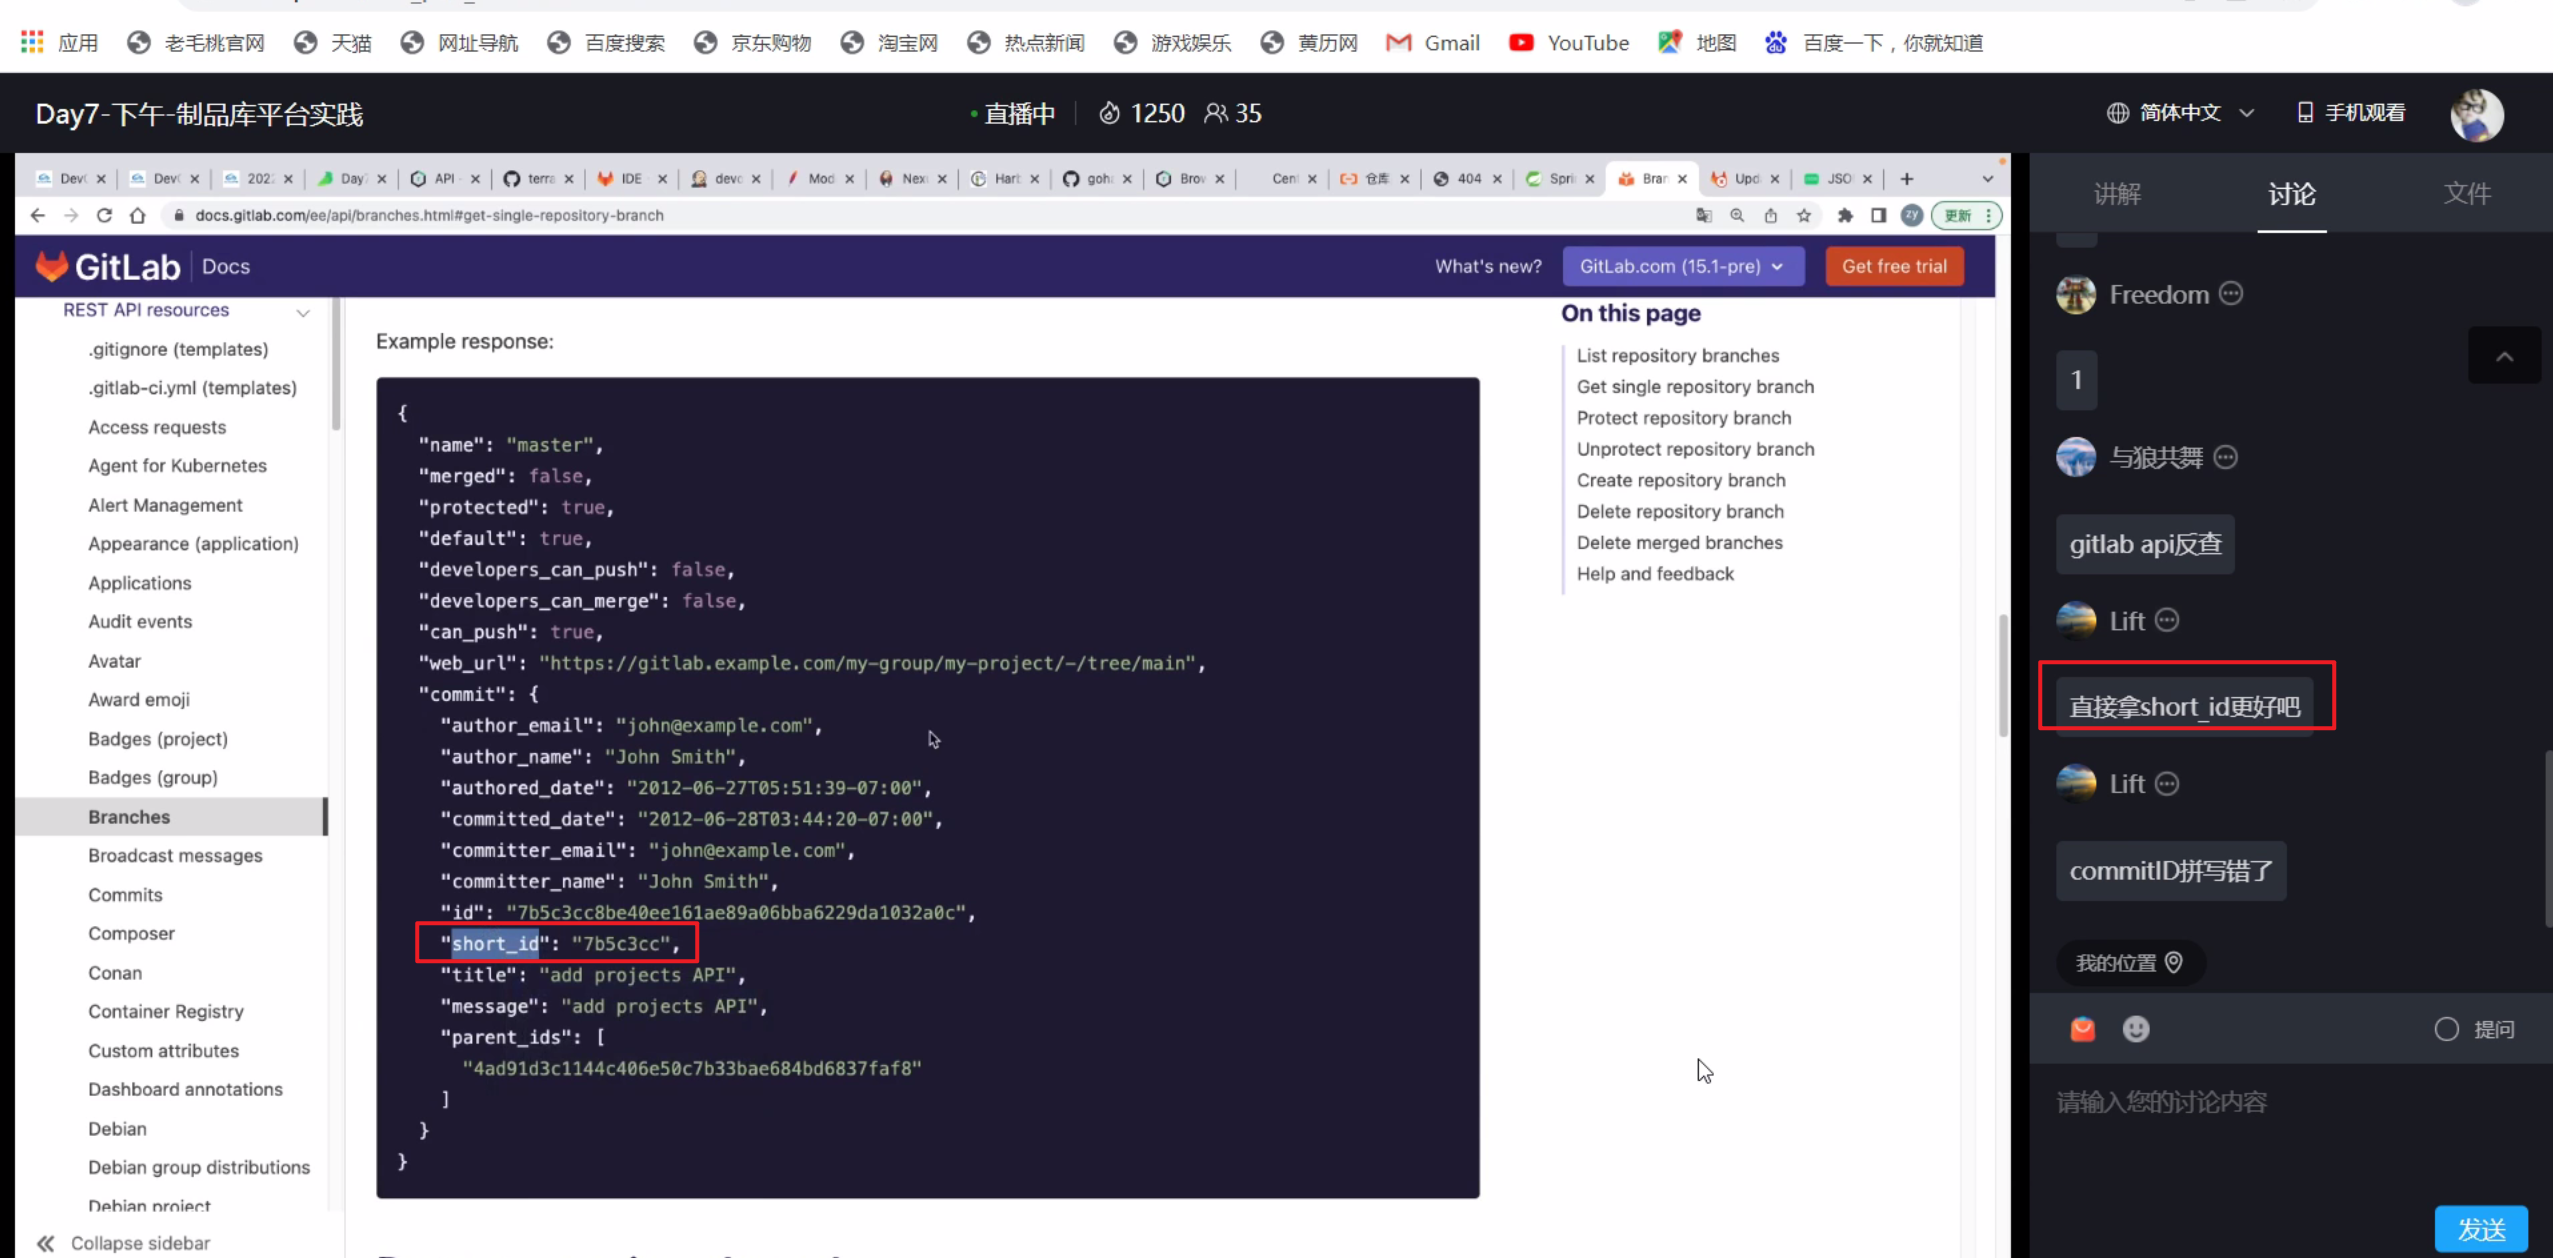
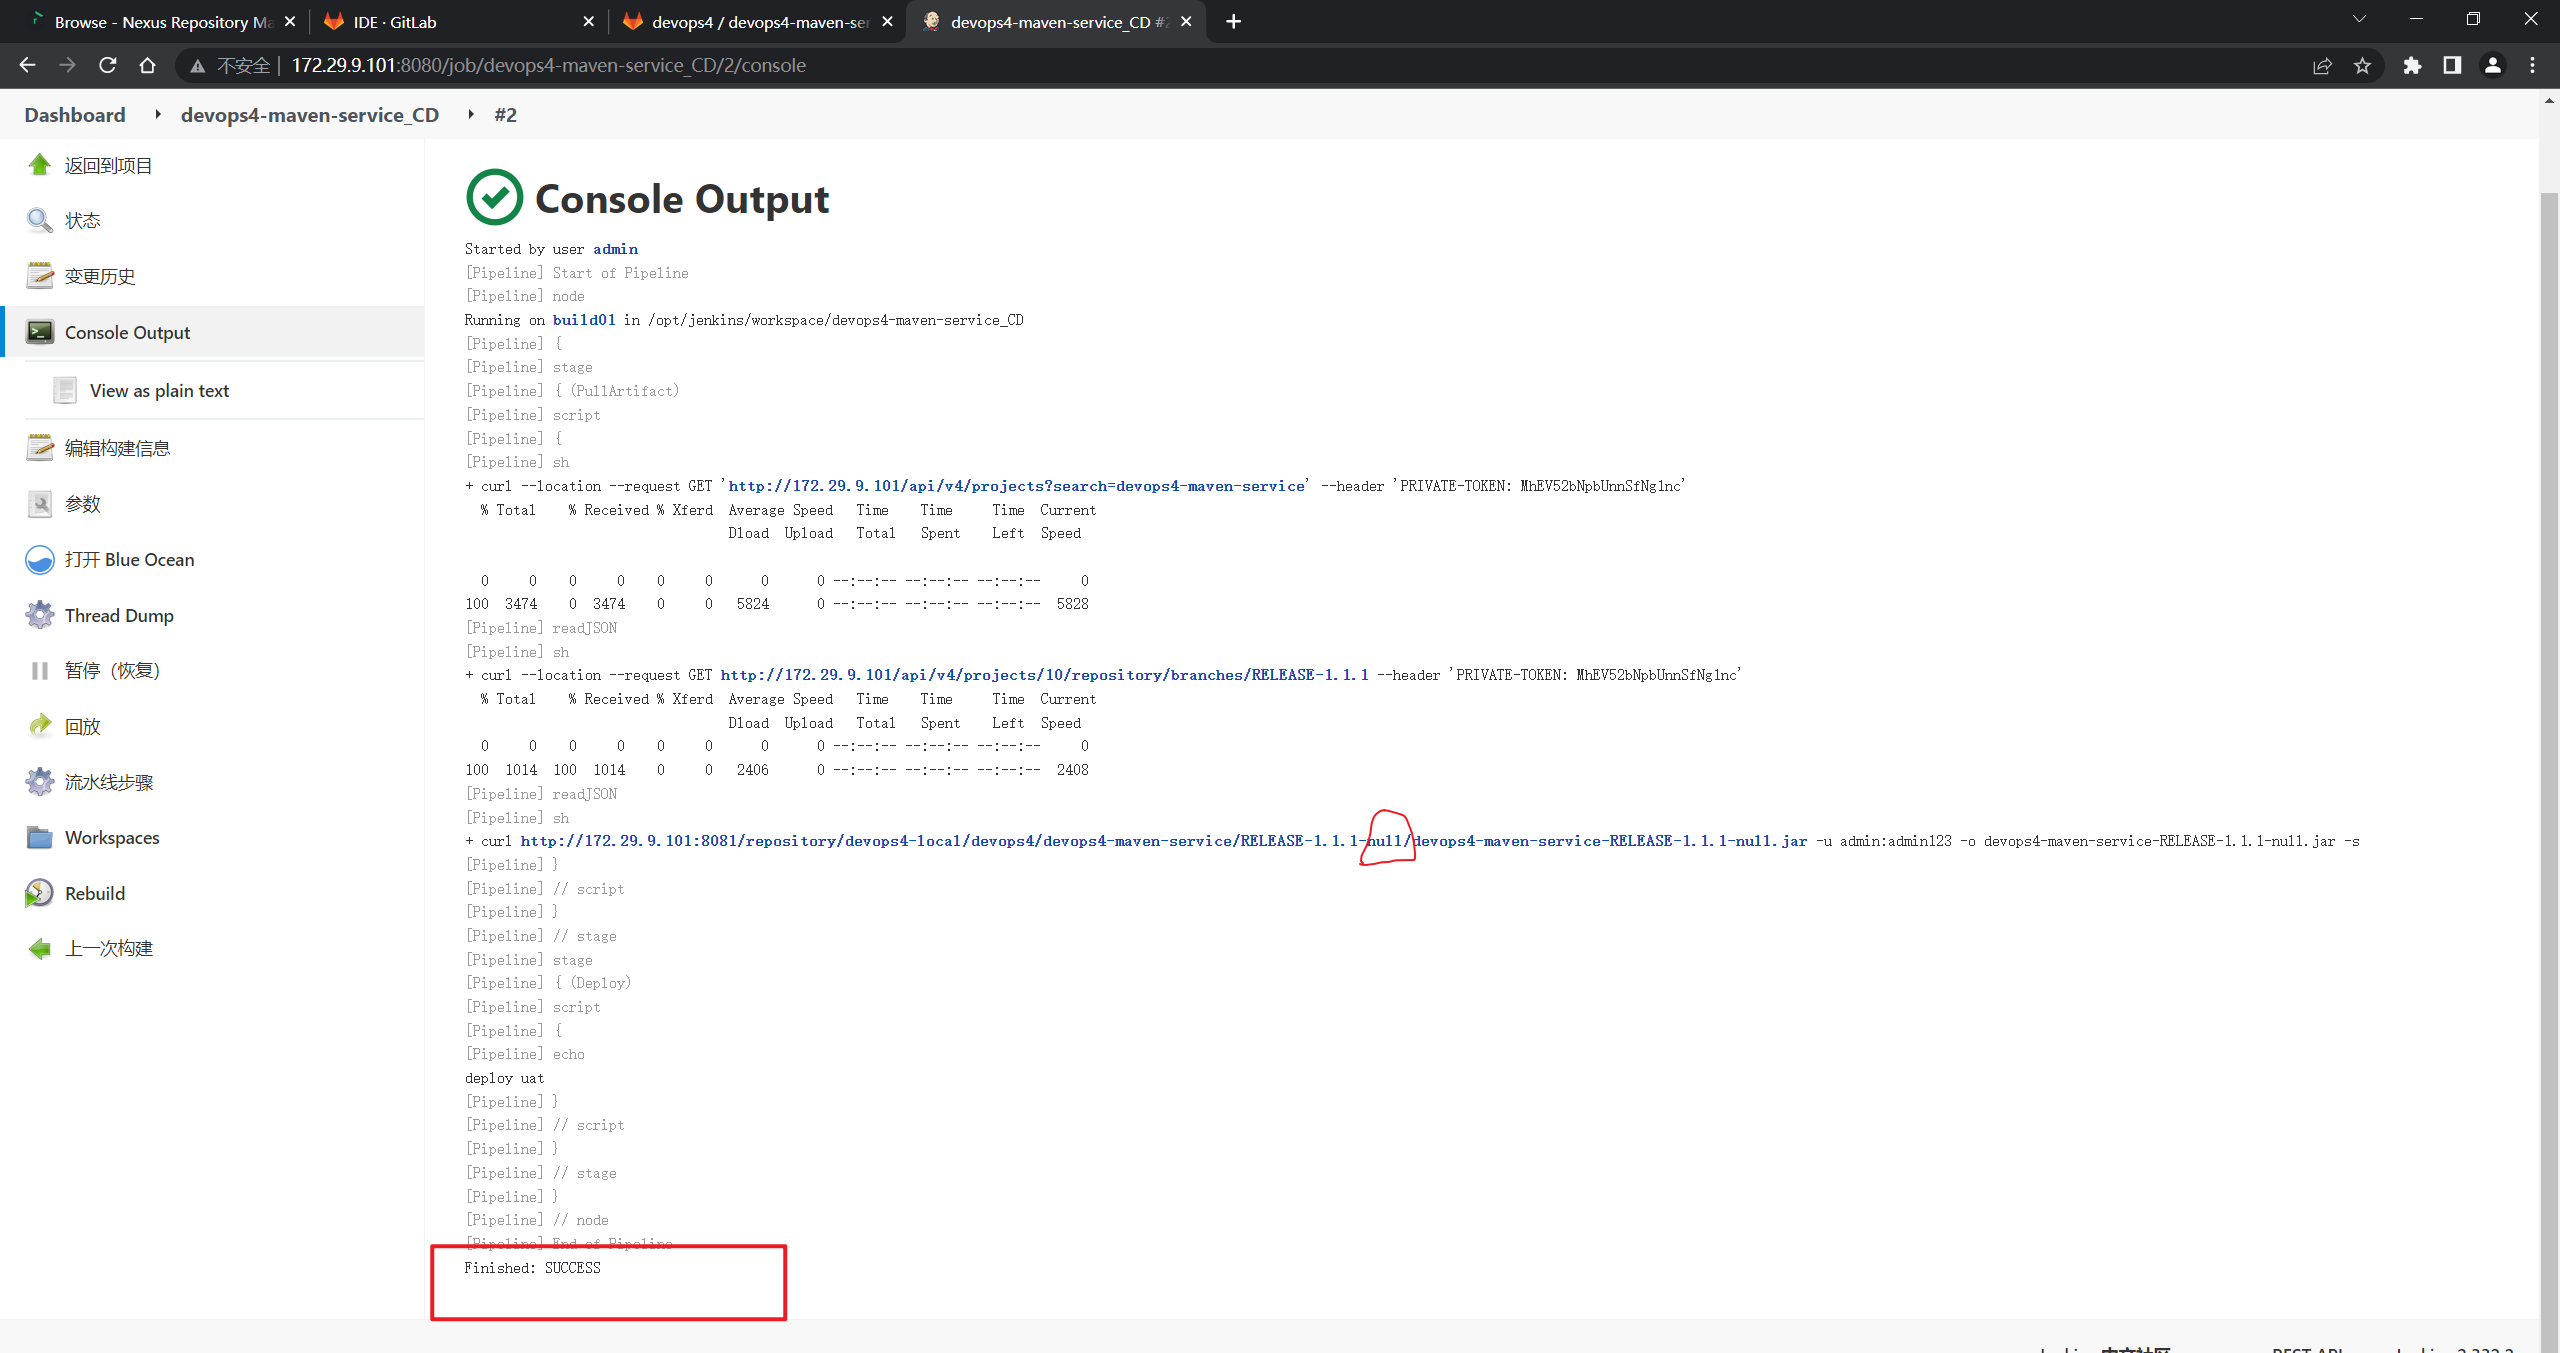
再跑一次,观察下效果:
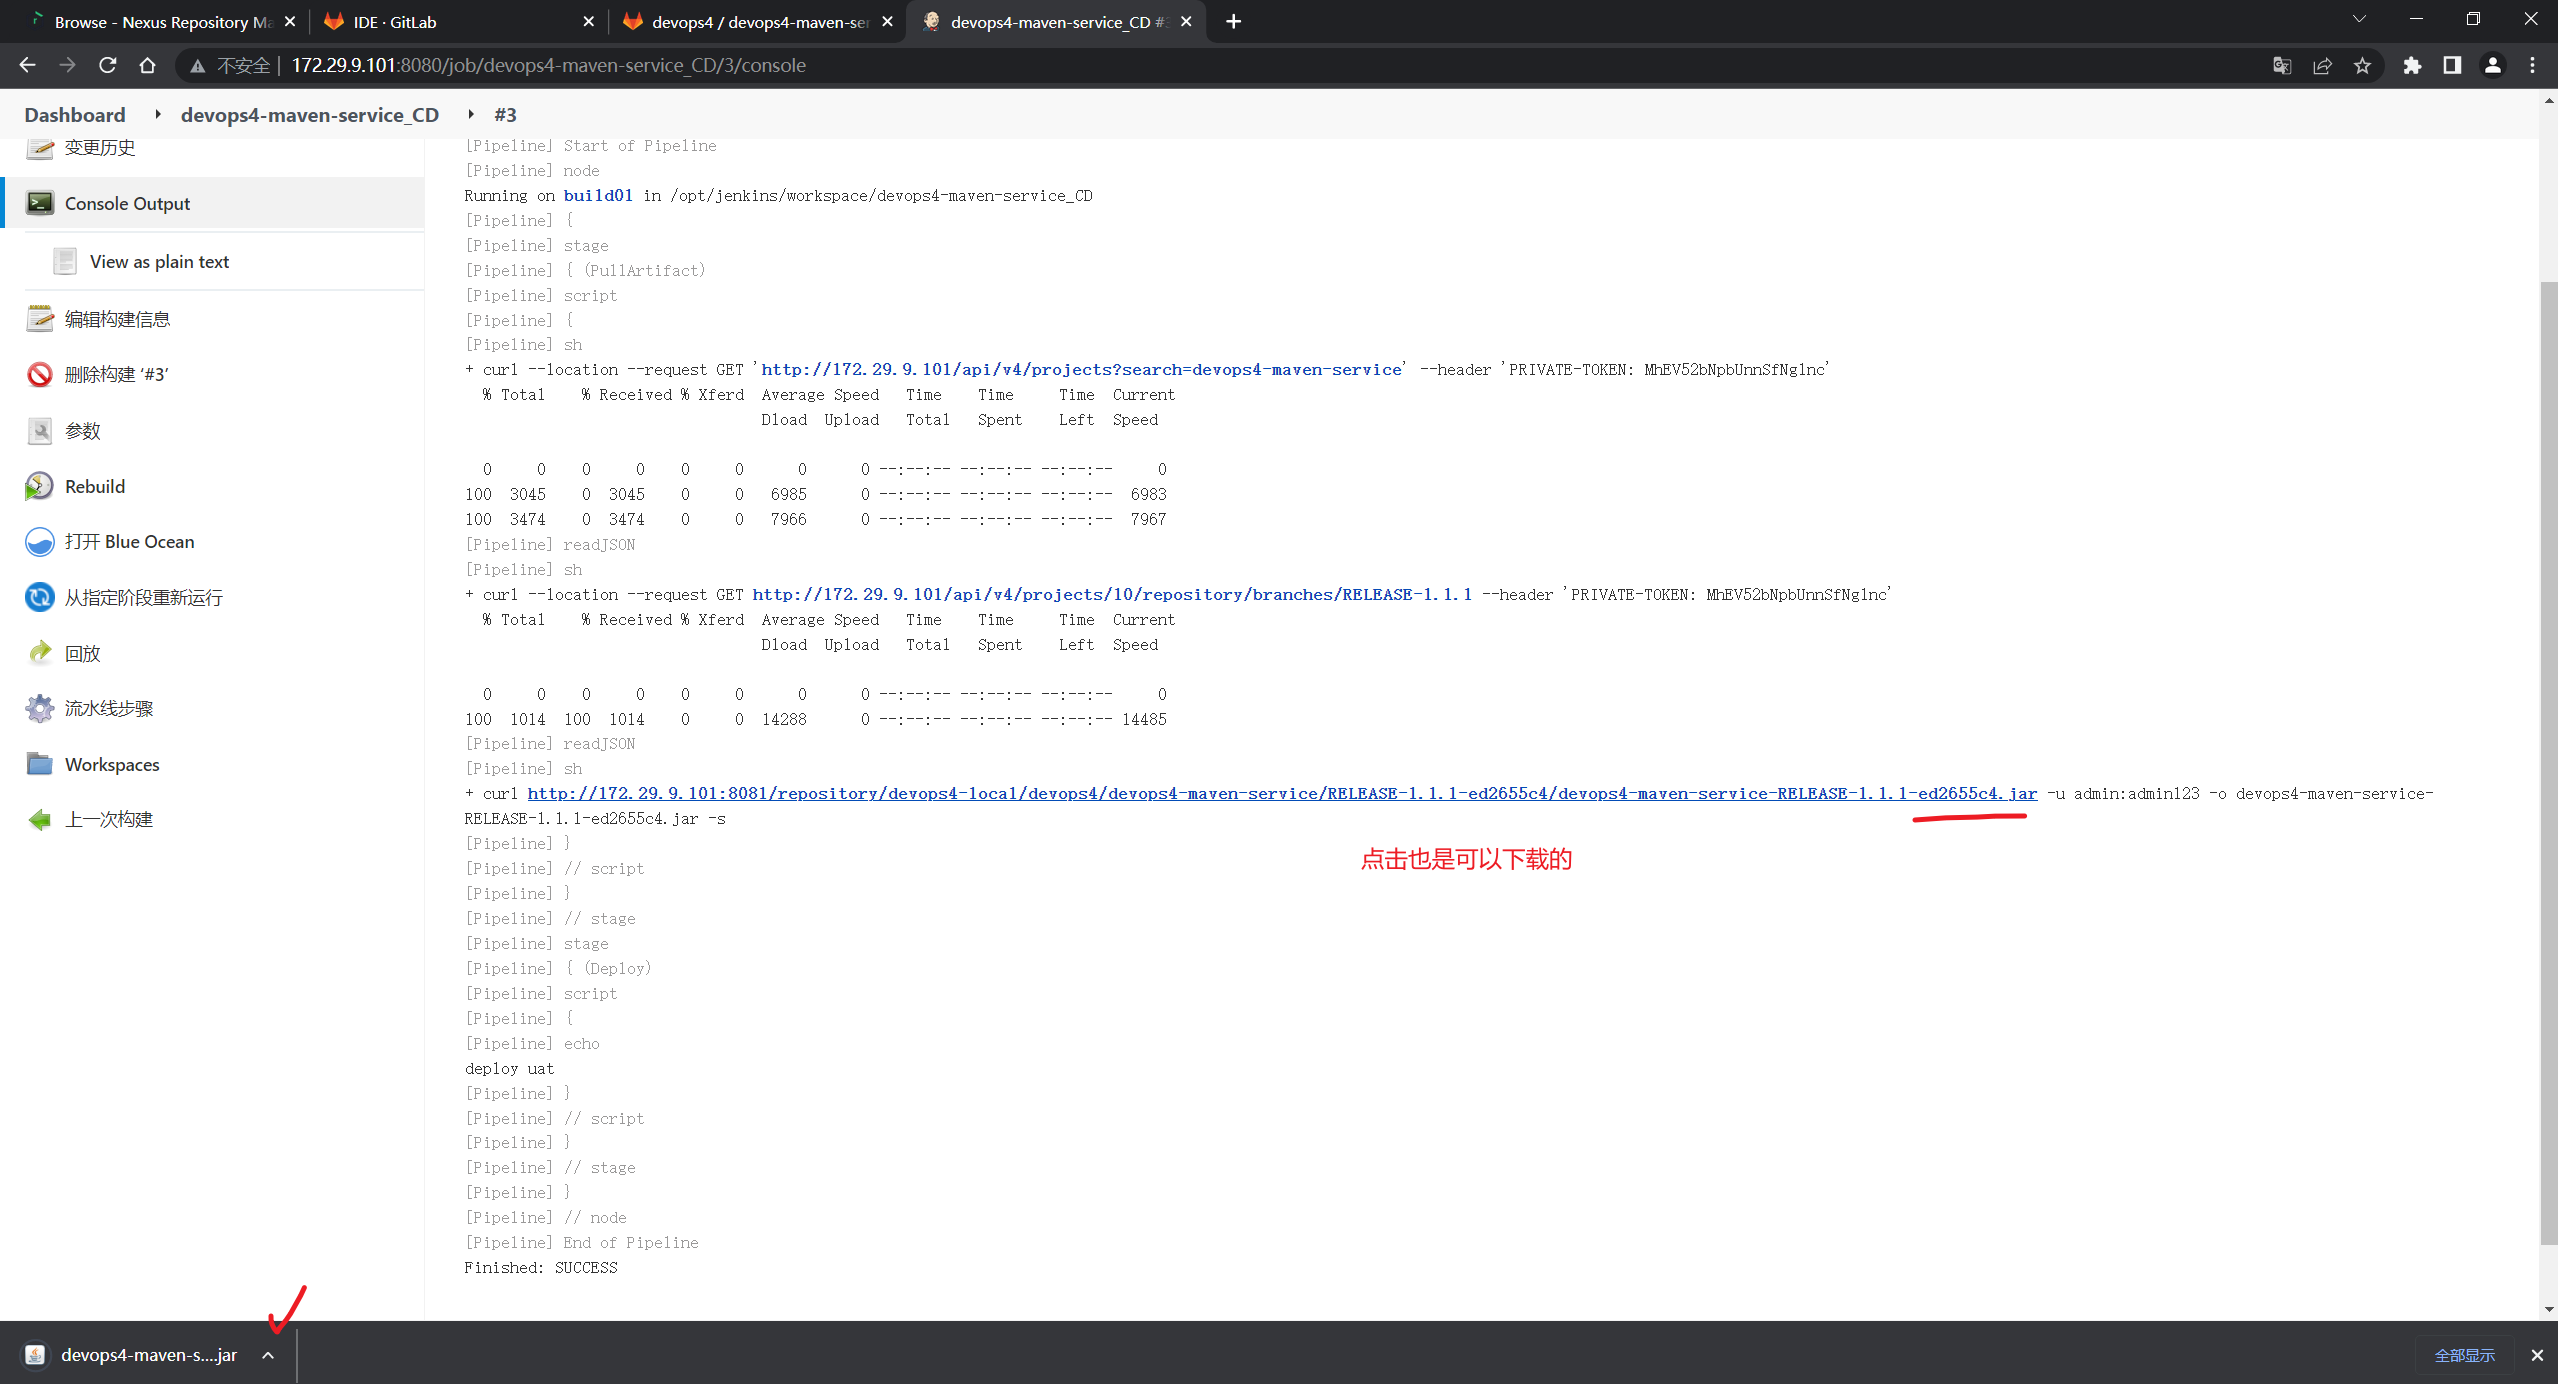

此时就已经完成了。
至此,完整代码如下:
pipeline {
    agent {
        label "build"
    }

    stages {
        stage("PullArtifact"){
            steps {
                script {
                    env.buName = "${JOB_NAME}".split("-")[0]
                    env.serviceName = "${JOB_NAME}".split("_")[0]
                    projectID = GetProjectID("${env.serviceName}", "${env.buName}")

                    commitID = GetBranchCommitID(projectID, "${env.branchName}")

                    path = "${env.buName}/${env.serviceName}/${env.branchName}-${commitID}"
                    pkgName = "${env.serviceName}-${env.branchName}-${commitID}.jar"
                    PullArtifact(path, pkgName)


                }
            }
        }

        stage("Deploy"){
            steps {
                script {
                    println("deploy ${env.envList}")
                }
            }
        }


    }
}

def HttpReq(method, apiUrl){
    response = sh  returnStdout: true,
    script: """
        curl --location --request ${method} \
        http://172.29.9.101/api/v4/${apiUrl} \
        --header 'PRIVATE-TOKEN: MhEV52bNpbUnnSfNg1nc' \
    """
    response = readJSON text: response - "\n"
    return response
}

def GetProjectID(projectName, groupName){
    response = sh  returnStdout: true,
        script: """
            curl --location --request GET \
            http://172.29.9.101/api/v4/projects?search=${projectName} \
            --header 'PRIVATE-TOKEN: MhEV52bNpbUnnSfNg1nc' \
        """
    response = readJSON text: response
    if (response != []){
        for (p in response) {
            if (p["namespace"]["name"] == groupName){
                return response[0]["id"]
            }
        }
    }
}


def GetBranchCommitID(projectID, branchName){
    apiUrl = "projects/${projectID}/repository/branches/${branchName}"
    response = HttpReq("GET", apiUrl)
    return response.commit.short_id
}


def PullArtifact(path, pkgName){
    // path = devops4/devops4-maven-service/RELEASE-1.1.1-ed2655c4
    // pkgName = devops4-maven-service-RELEASE-1.1.1-ed2655c4.jar
    sh """
        curl http://172.29.9.101:8081/repository/devops4-local/${path}/${pkgName} \
        -u admin:admin123 \
        -o ${pkgName} -s


    """
}
- 这里怎么会报错啊:

在其他java项目都是可以正常启动的,可能和这个项目代码有关系,先不用管了:
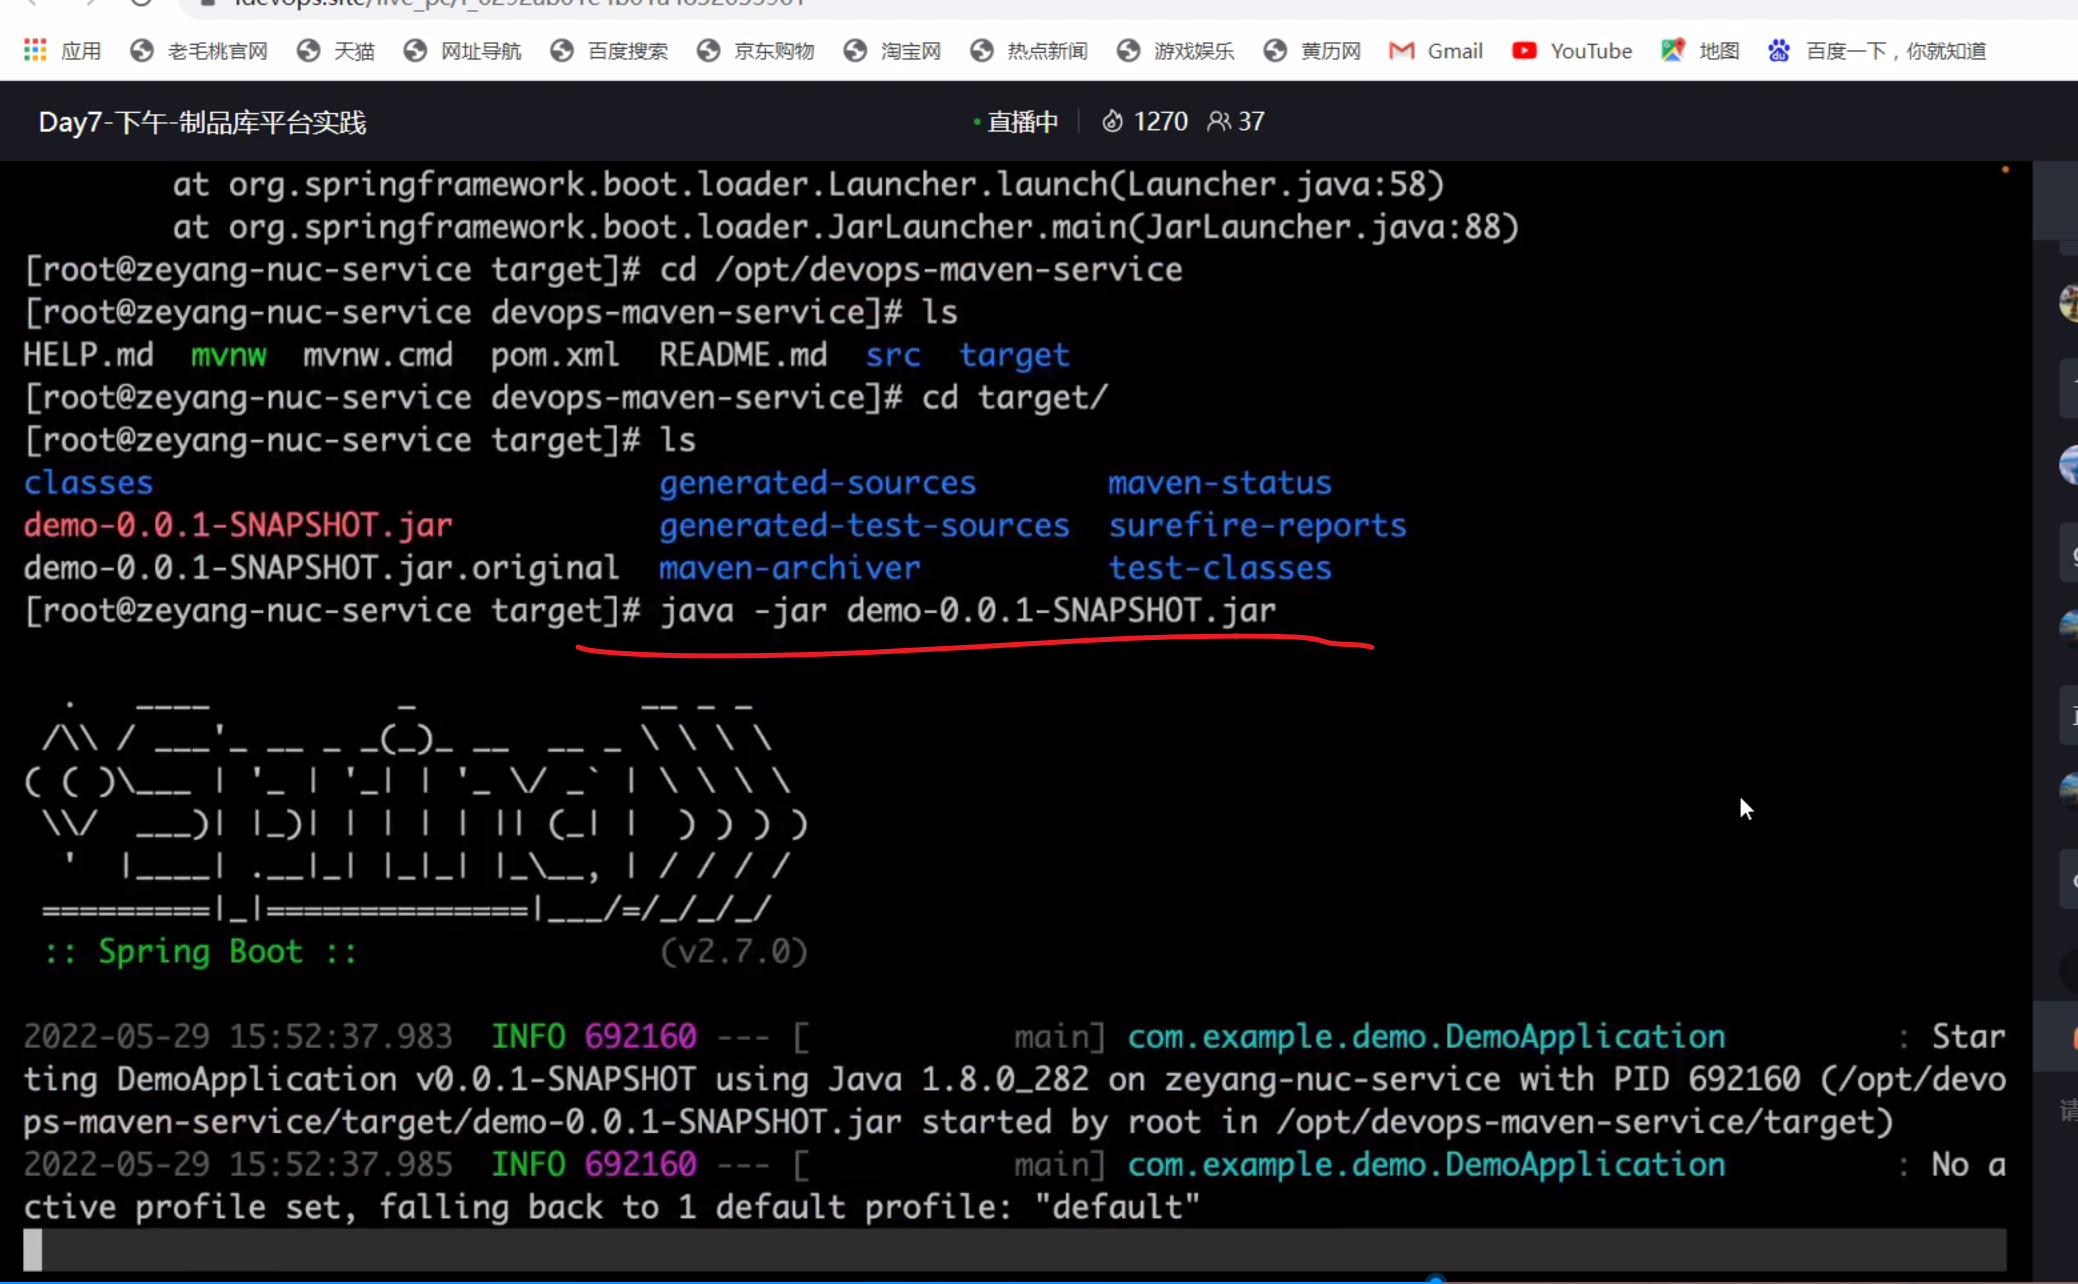
到此,CD就搞定了。
2、流水线集成
1、Jenkins
1.上传制品
stage("PushArtifact"){
            steps{
                script{
                    //Dir /buName/serviceName/version/serviceName-version.xxx
                    version = "${env.branchName}-${env.commitID}"
                    // 重命名
                    JarName = sh returnStdout: true, script: """ls target | grep -E "jar\$" """
                    fileName = JarName -"\n"
                    fileType = fileName.split('\\.')[-1]
                    newFileName = "${env.serviceName}-${version}.${fileType}"

                    sh "cd target ; mv ${fileName}  ${newFileName} "
                    artifact.PushArtifact("${env.buName}/${env.serviceName}/${version}", "target", "${newFileName}")


                }
            }
        }
2.CD部分的demo
pipeline {
    agent {
        label "build"
    }

    stages {
        stage("PullArtifact"){
            steps{
                script {
                    env.buName = "${JOB_NAME}".split("-")[0]
                    env.serviceName = "${JOB_NAME}".split("_")[0]


                    projectID = GetProjectID("${env.serviceName}", "${env.buName}")
                    commitID = GetBranchCommitID(projectID, "${env.branchName}")
                    currentBuild.description = """ branchName: ${env.branchName} \n"""
                    currentBuild.displayName = "${commitID}"

                    path = "${env.buName}/${env.serviceName}/${env.branchName}-${commitID}"
                    pkgName = "${env.serviceName}-${env.branchName}-${commitID}.jar"
                    PullArtifact(path, pkgName)
                }
            }
        }

        stage("Deploy"){
            steps{
                script{
                    println("deploy  ${env.envList}")
                }
            }
        }
    }
}


def PullArtifact(path, pkgName){
    // path = devops4/devops4-maven-service/RELEASE-1.1.1-03dfb8ee
    // pkgName = devops4-maven-service-RELEASE-1.1.1-03dfb8ee.jar

    sh """

    curl http://192.168.1.200:8081/repository/devops4-local/${path}/${pkgName} \
    -u admin:admin123 \
    -o ${pkgName}  -s

    """
}

def HttpReq(method, apiUrl){
    response = sh  returnStdout: true,
        script: """
            curl --location --request ${method} \
            http://192.168.1.200/api/v4/${apiUrl} \
            --header 'PRIVATE-TOKEN: N9mvJV4hq-z7yCcYEsC-'
        """
    response = readJSON text: response - "\n"
    return response

}


def GetProjectID(projectName, groupName){
    response = sh  returnStdout: true,
        script: """
            curl --location --request GET \
            http://192.168.1.200/api/v4/projects?search=${projectName} \
            --header 'PRIVATE-TOKEN: N9mvJV4hq-z7yCcYEsC-'
        """
    response = readJSON text: response
    if (response != []){
        for (p in response) {
            if (p["namespace"]["name"] == groupName){
                return response[0]["id"]
            }
        }
    }
}

def GetBranchCommitID(projectID, branchName){
    apiUrl = "projects/${projectID}/repository/branches/${branchName}"
    response = HttpReq("GET", apiUrl)
    return response.commit.short_id
}
2、GitLabCI
| 💘 实践:GitLabCI的Nexus的CI/CD(测试成功)-2022.6.21 |
1.Nexus
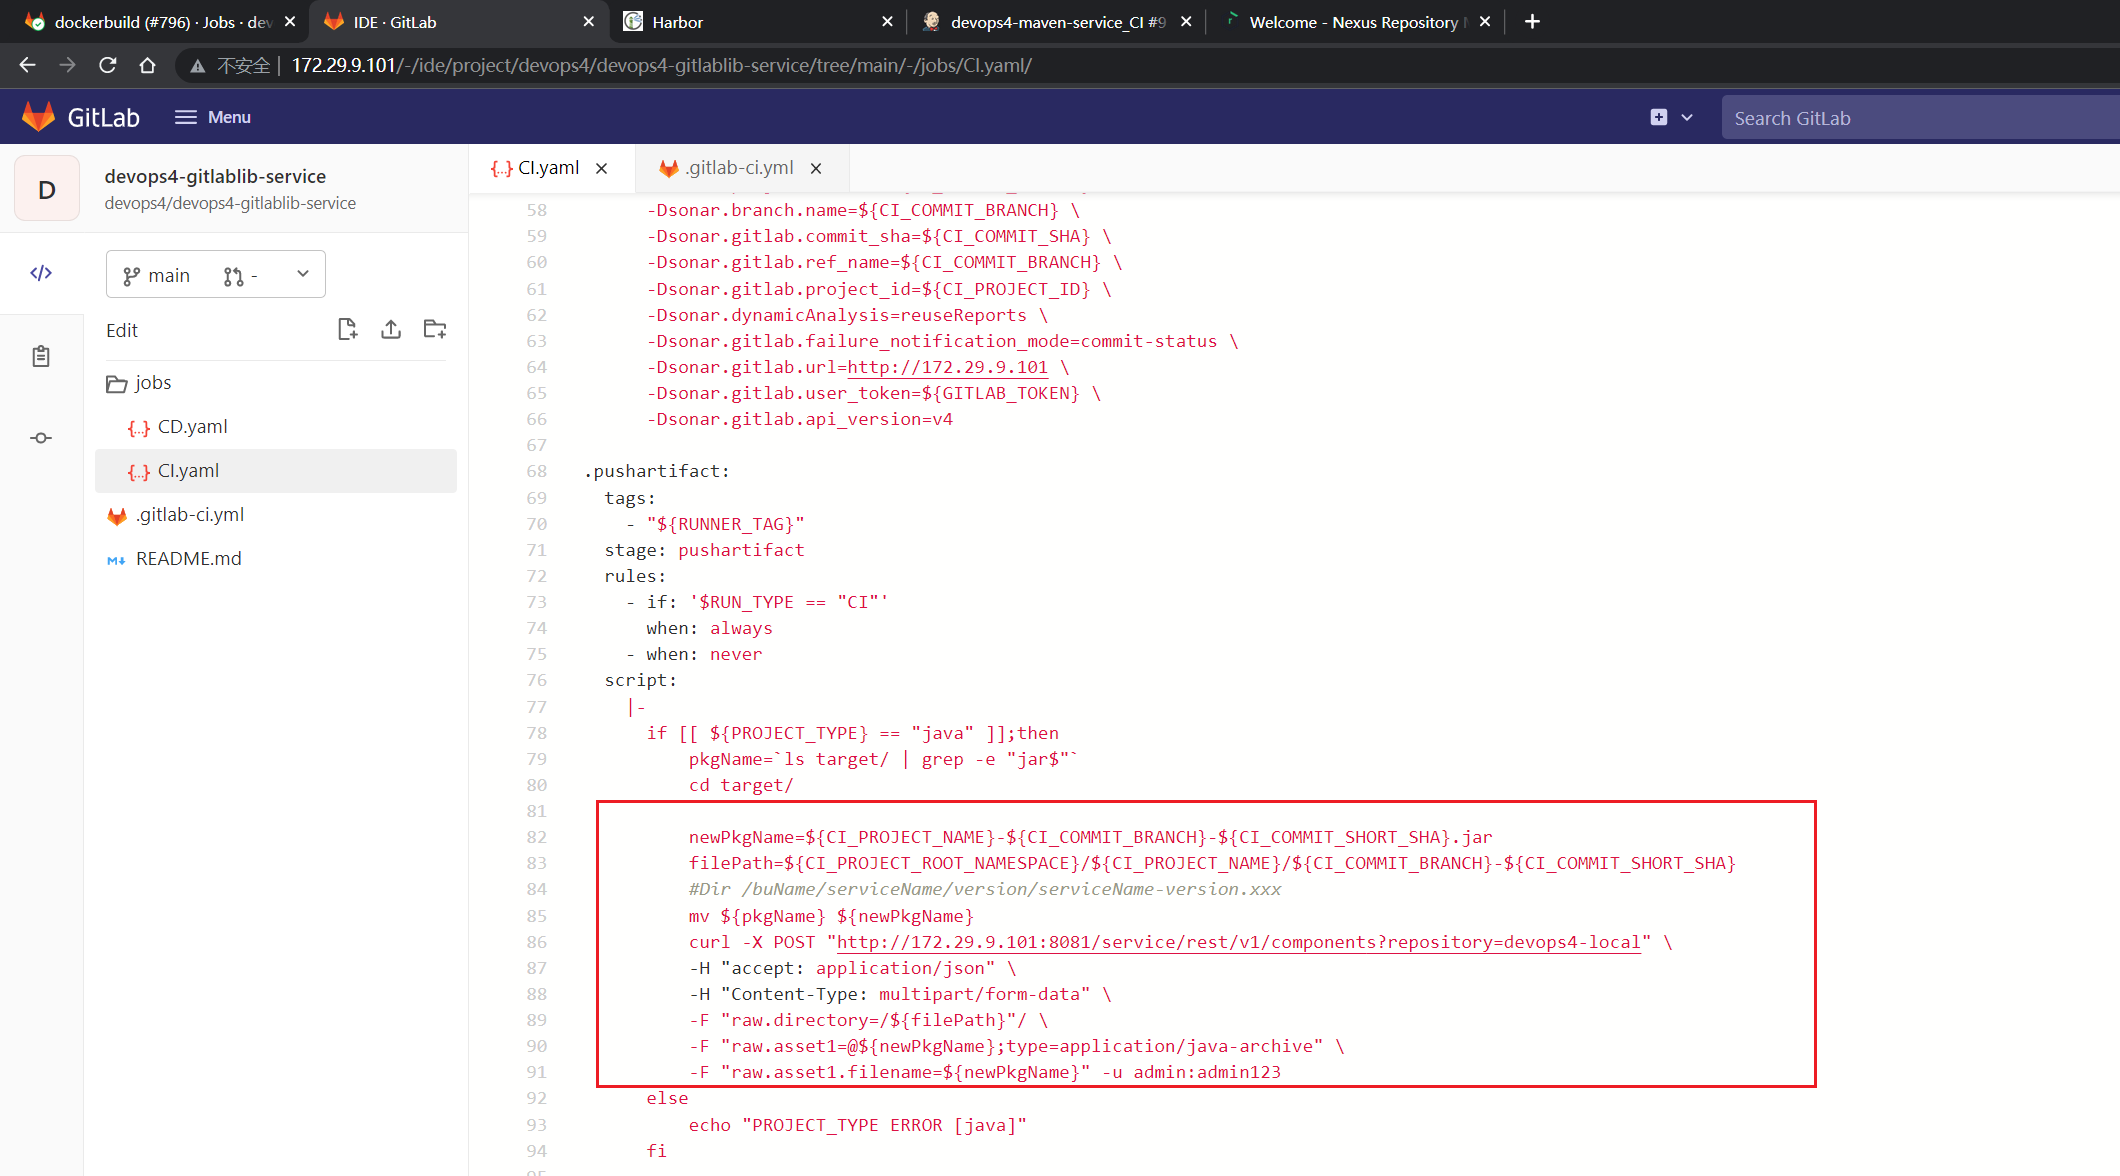
.pushartifact:
  tags:
    - "${RUNNER_TAG}"
  stage: pushartifact
  rules:
    - if: '$RUN_TYPE == "CI"'
      when: always
    - when: never
  script:
    |-
      if [[ ${PROJECT_TYPE} == "java" ]];then
          pkgName=`ls target/ | grep -e "jar$"`
          cd target/
          newPkgName=${CI_PROJECT_NAME}-${CI_COMMIT_BRANCH}-${CI_COMMIT_SHORT_SHA}.jar
          filePath=${CI_PROJECT_ROOT_NAMESPACE}/${CI_PROJECT_NAME}/${CI_COMMIT_BRANCH}-${CI_COMMIT_SHORT_SHA}
          #Dir /buName/serviceName/version/serviceName-version.xxx
          mv ${pkgName} ${newPkgName}
          curl -X POST "http://192.168.1.200:8081/service/rest/v1/components?repository=devops4-local" \
          -H "accept: application/json" \
          -H "Content-Type: multipart/form-data" \
          -F "raw.directory=${filePath}" \
          -F "raw.asset1=@${newPkgName};type=application/java-archive" \
          -F "raw.asset1.filename=${newPkgName}" -u admin:admin123
      else
          echo "PROJECT_TYPE ERROR [java]"
      fi
📍 本次测试过程
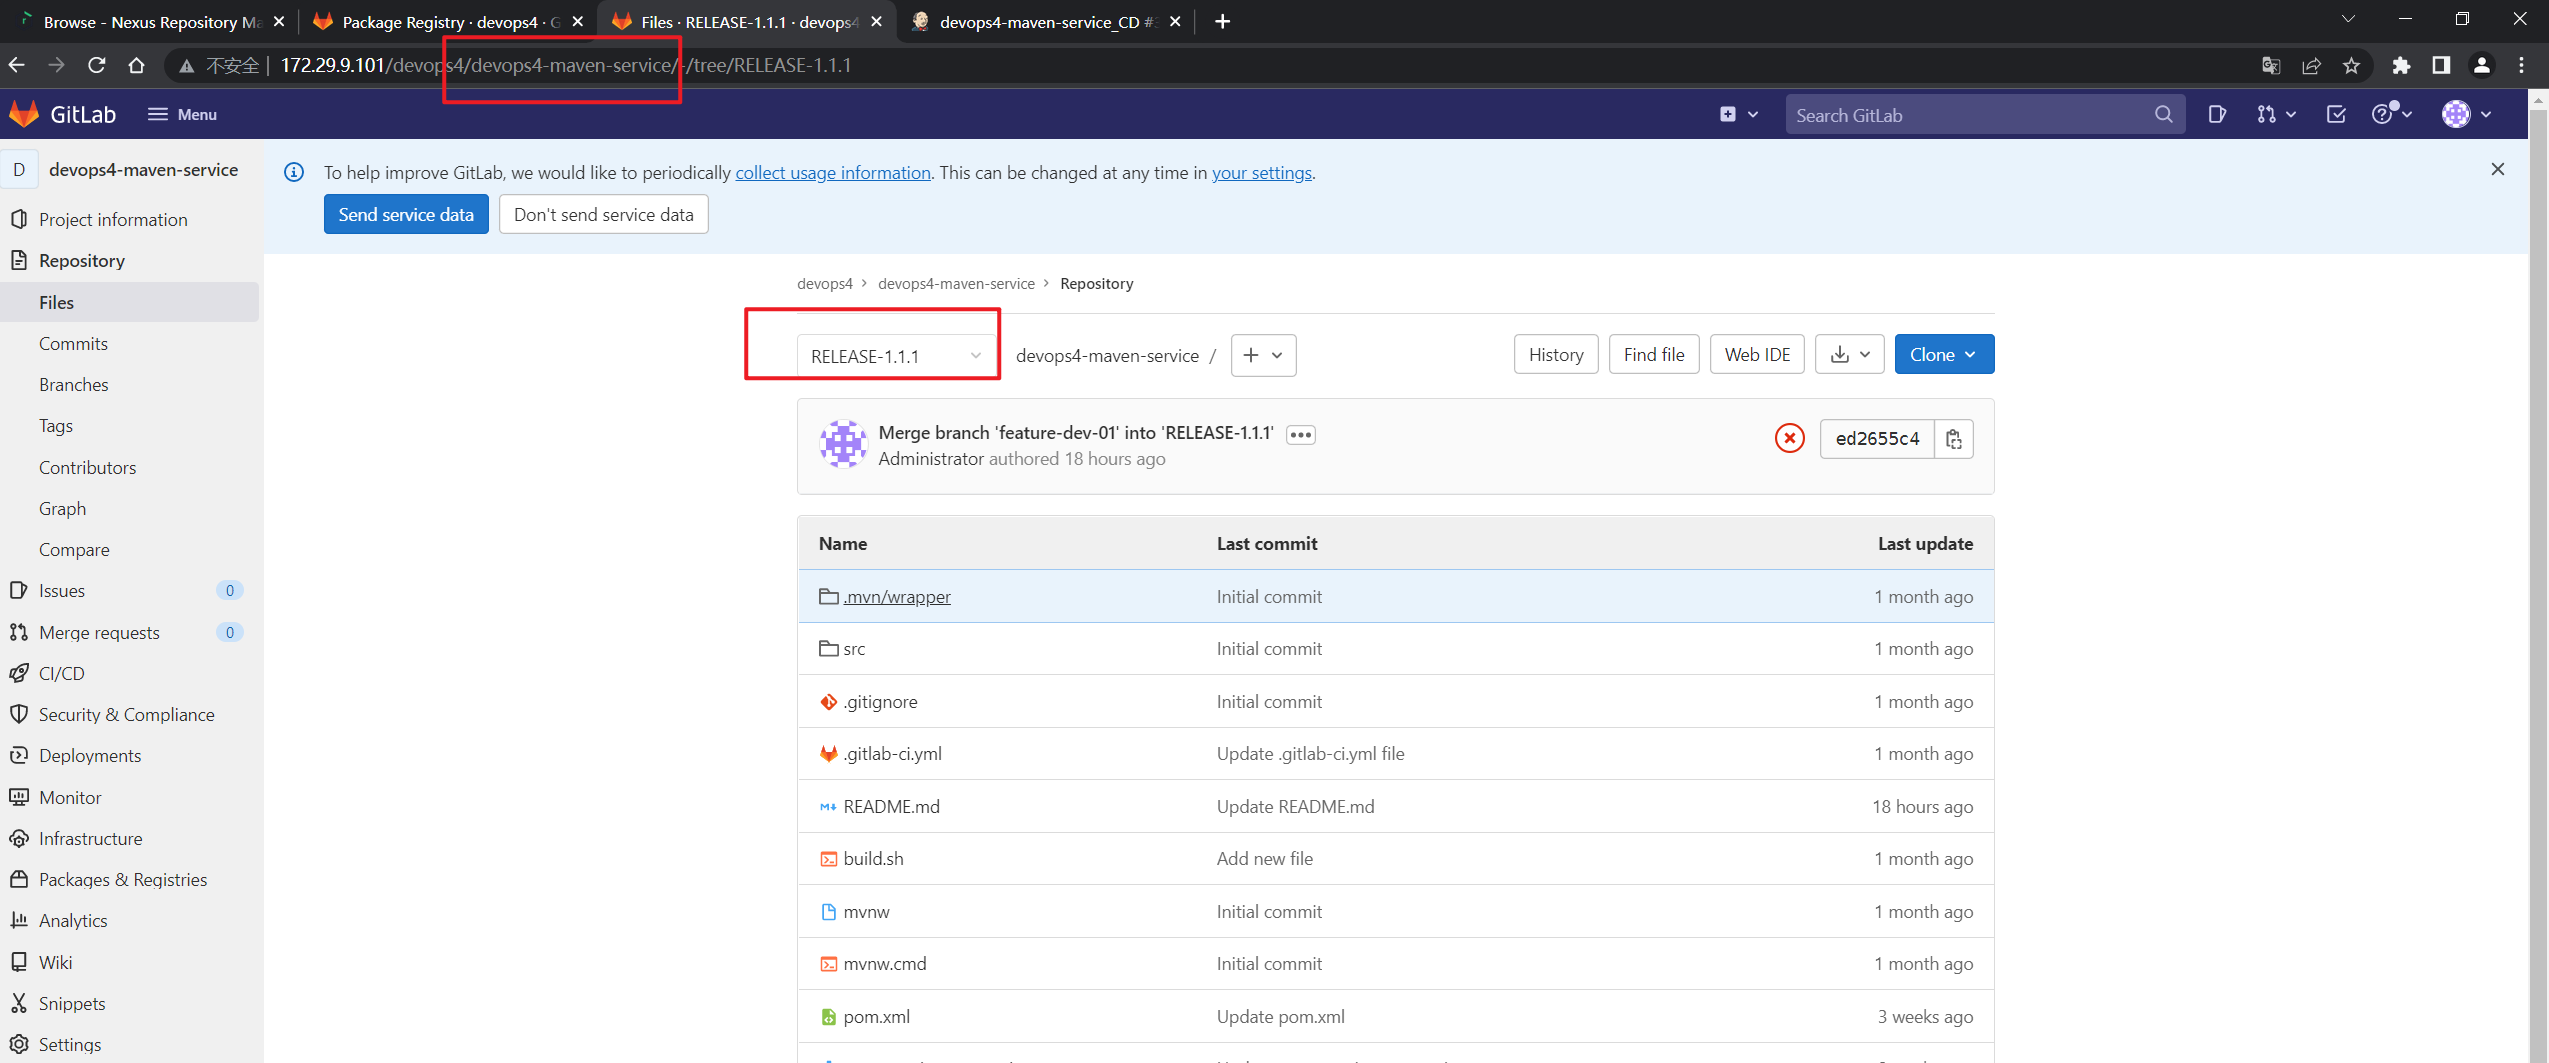

- 先跑一次流水线,看下效果:
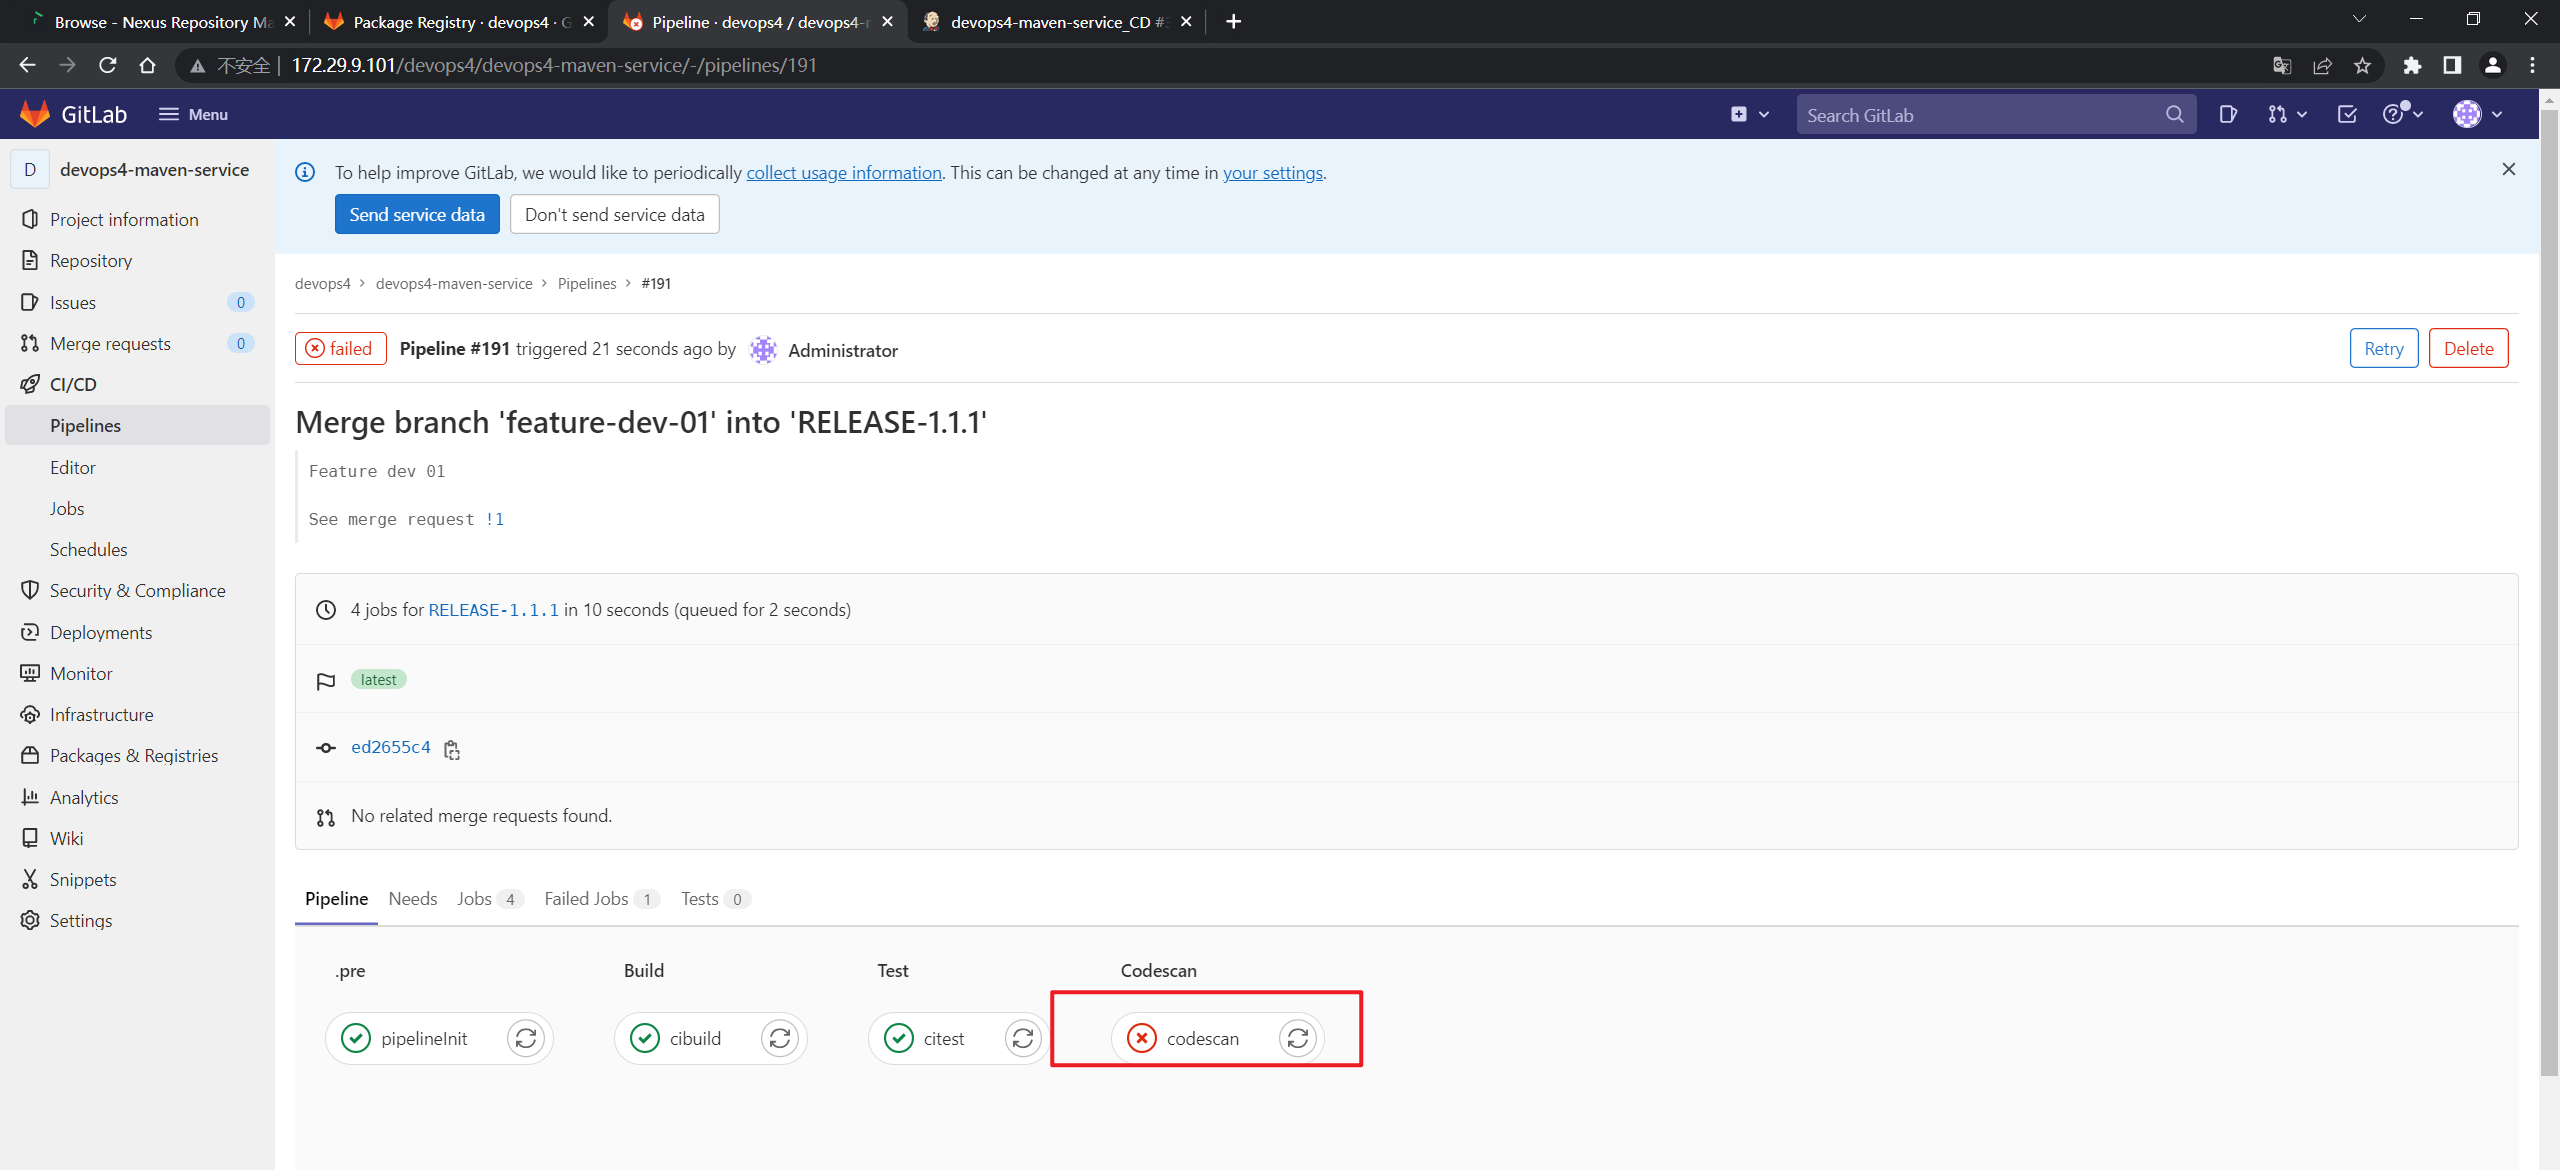
报错了:

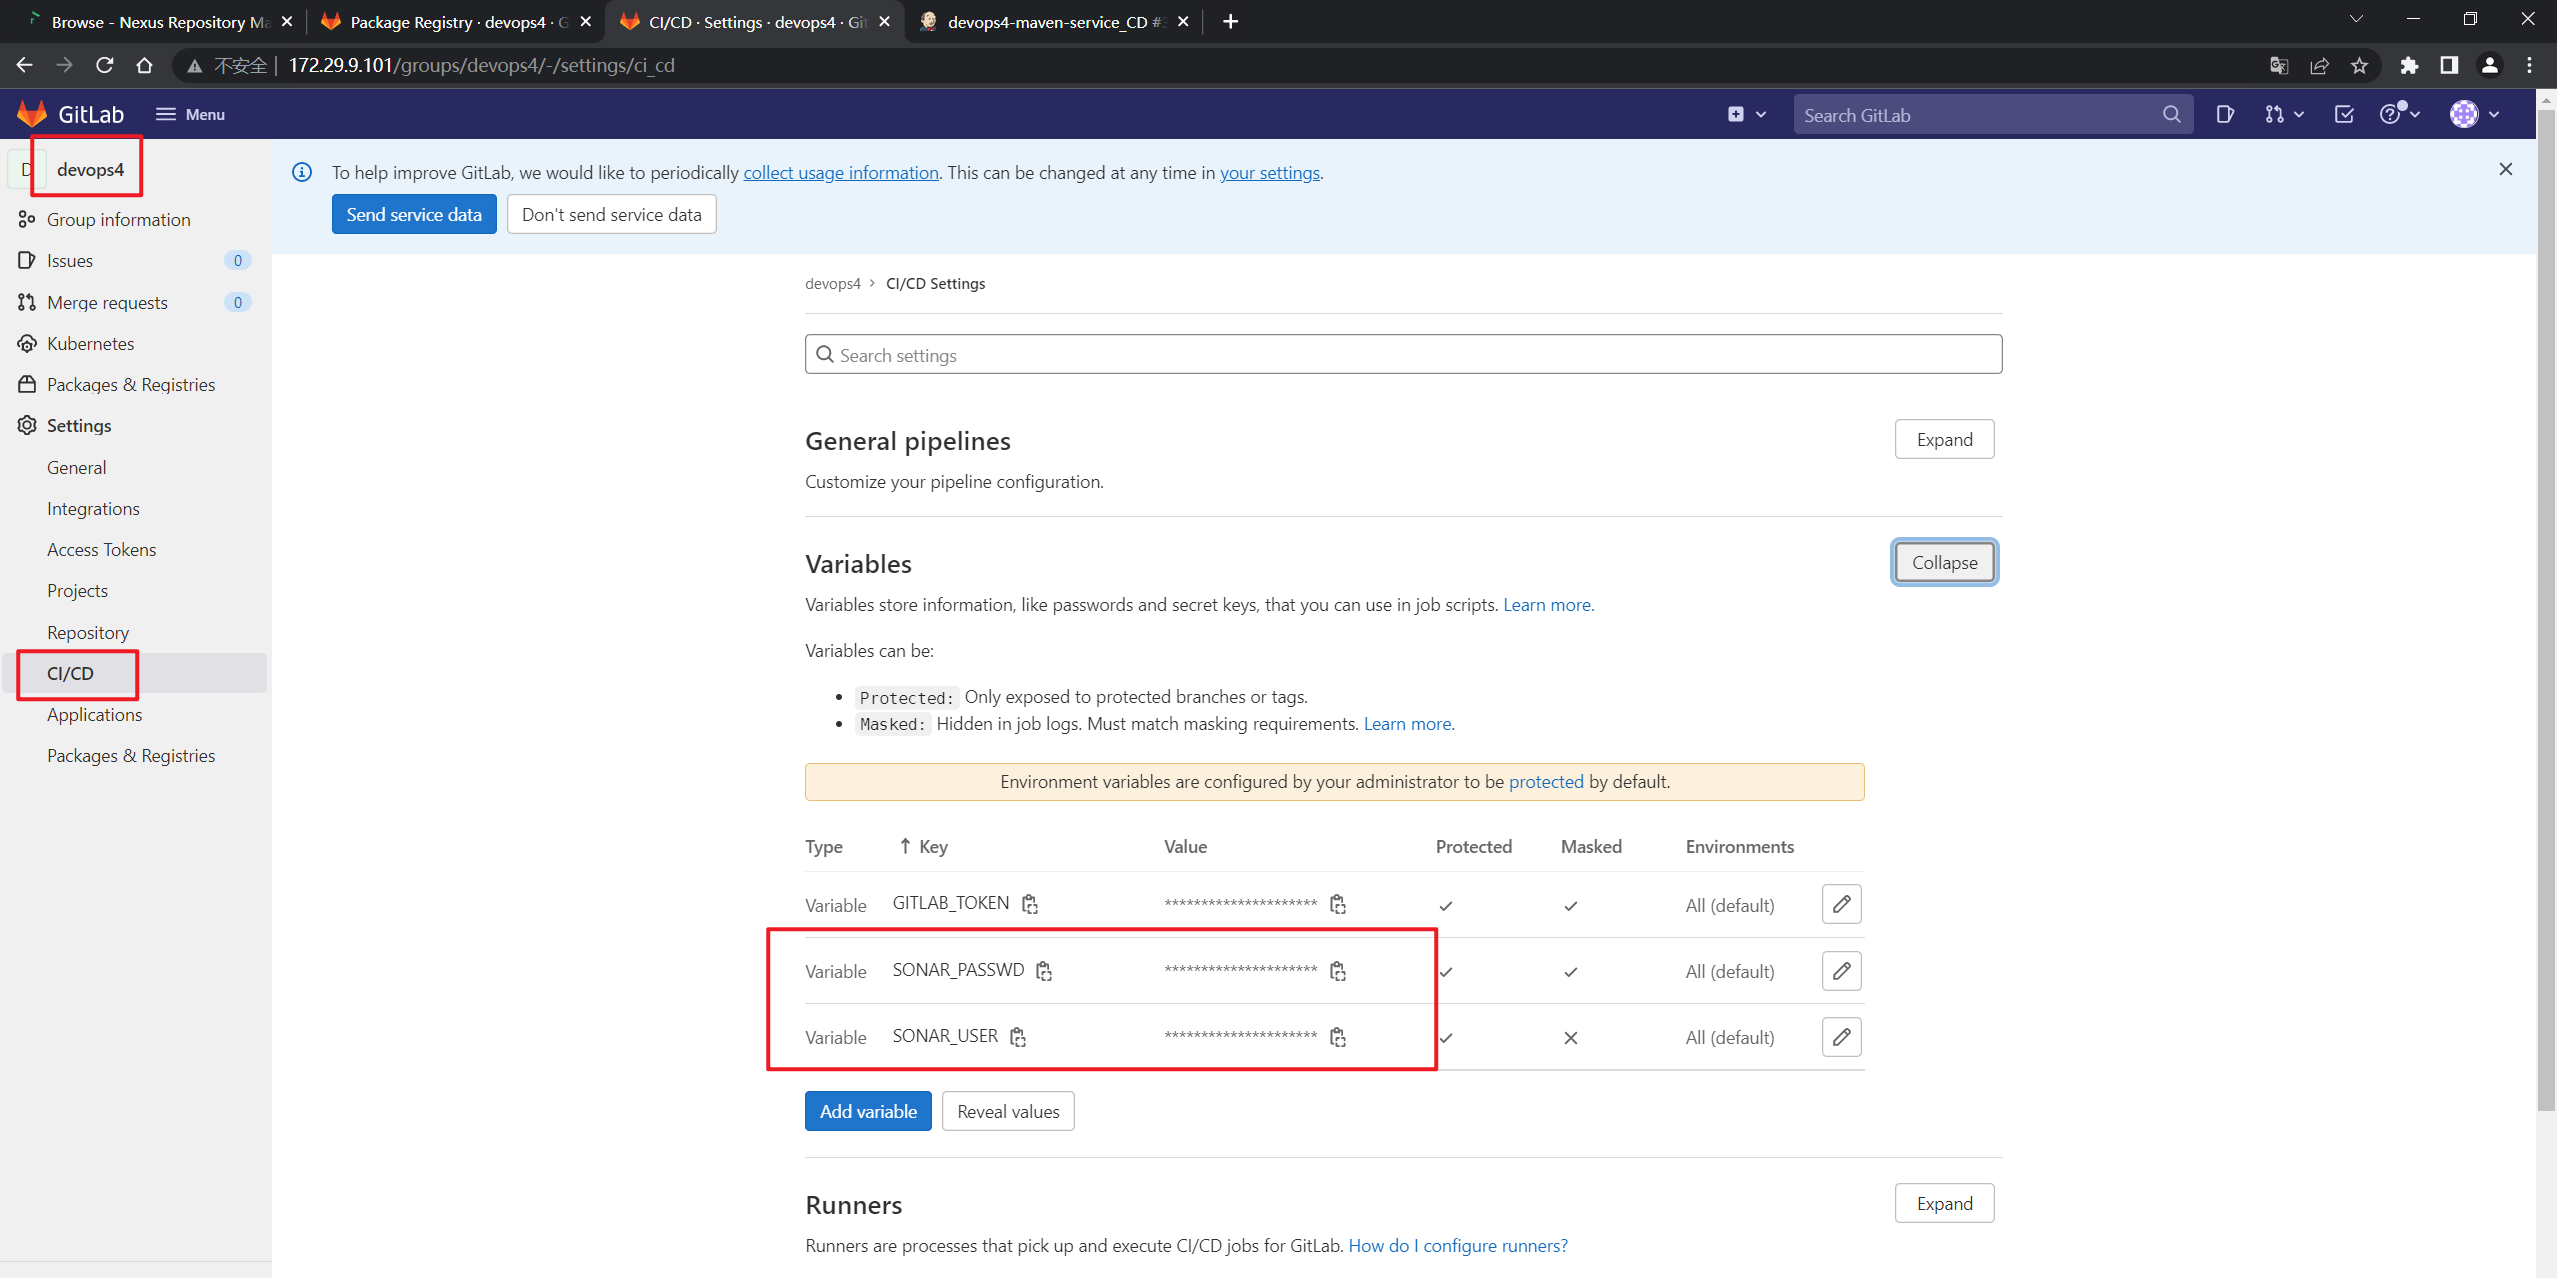
这里之前是配置过用户名和密码的了:

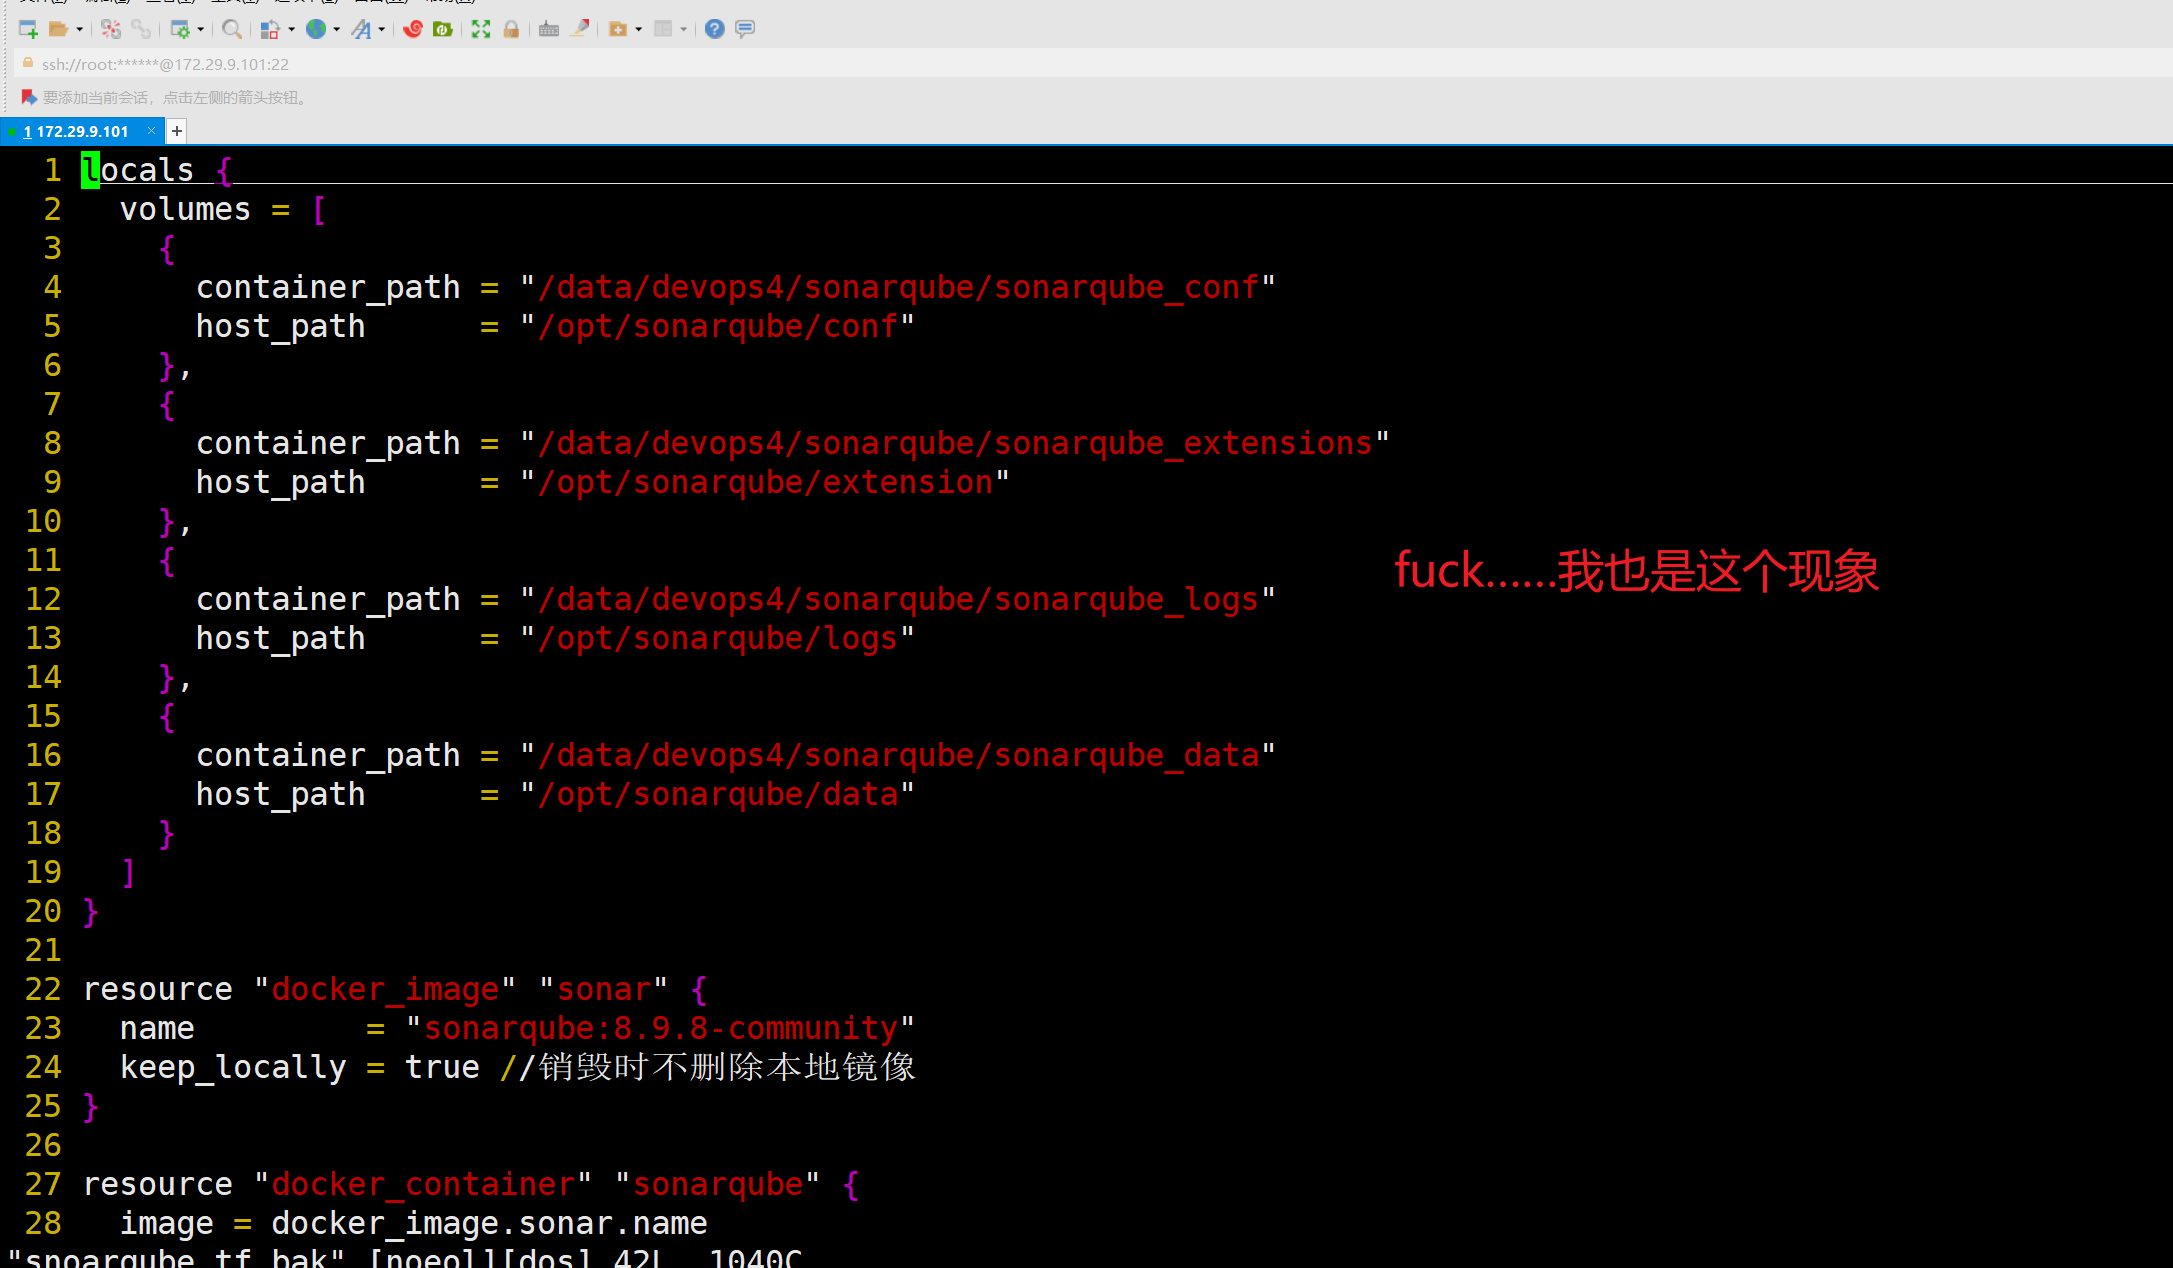
后面还要看下这个容器:……要重装下的!!!!
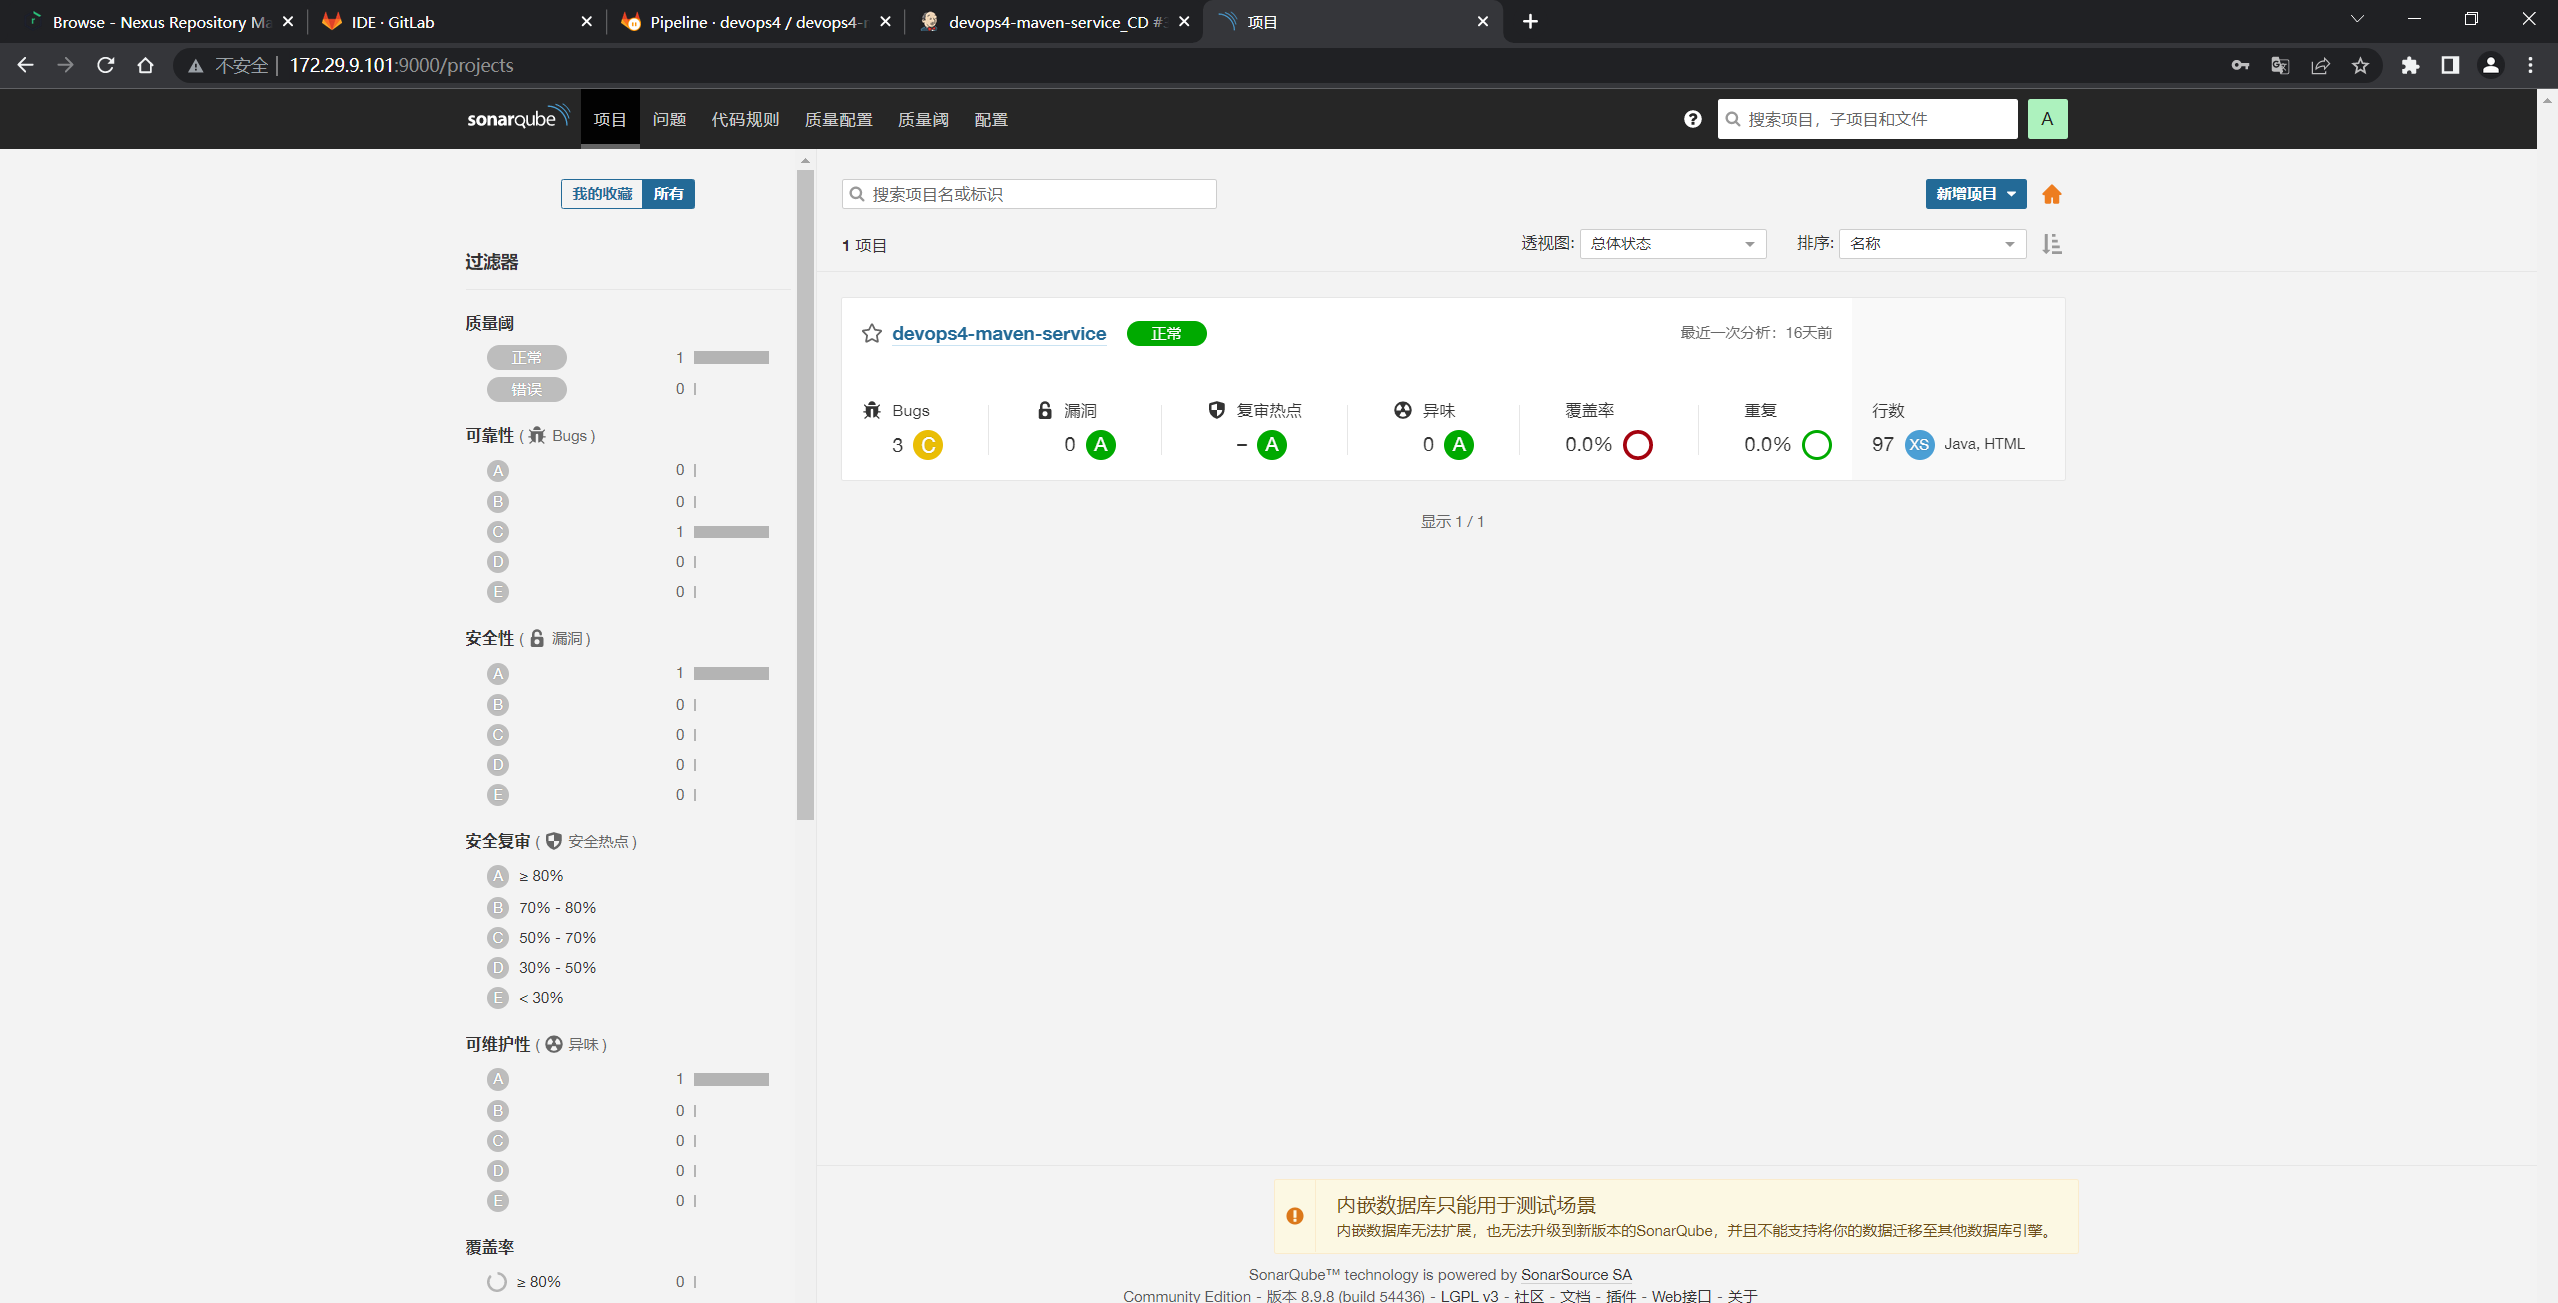
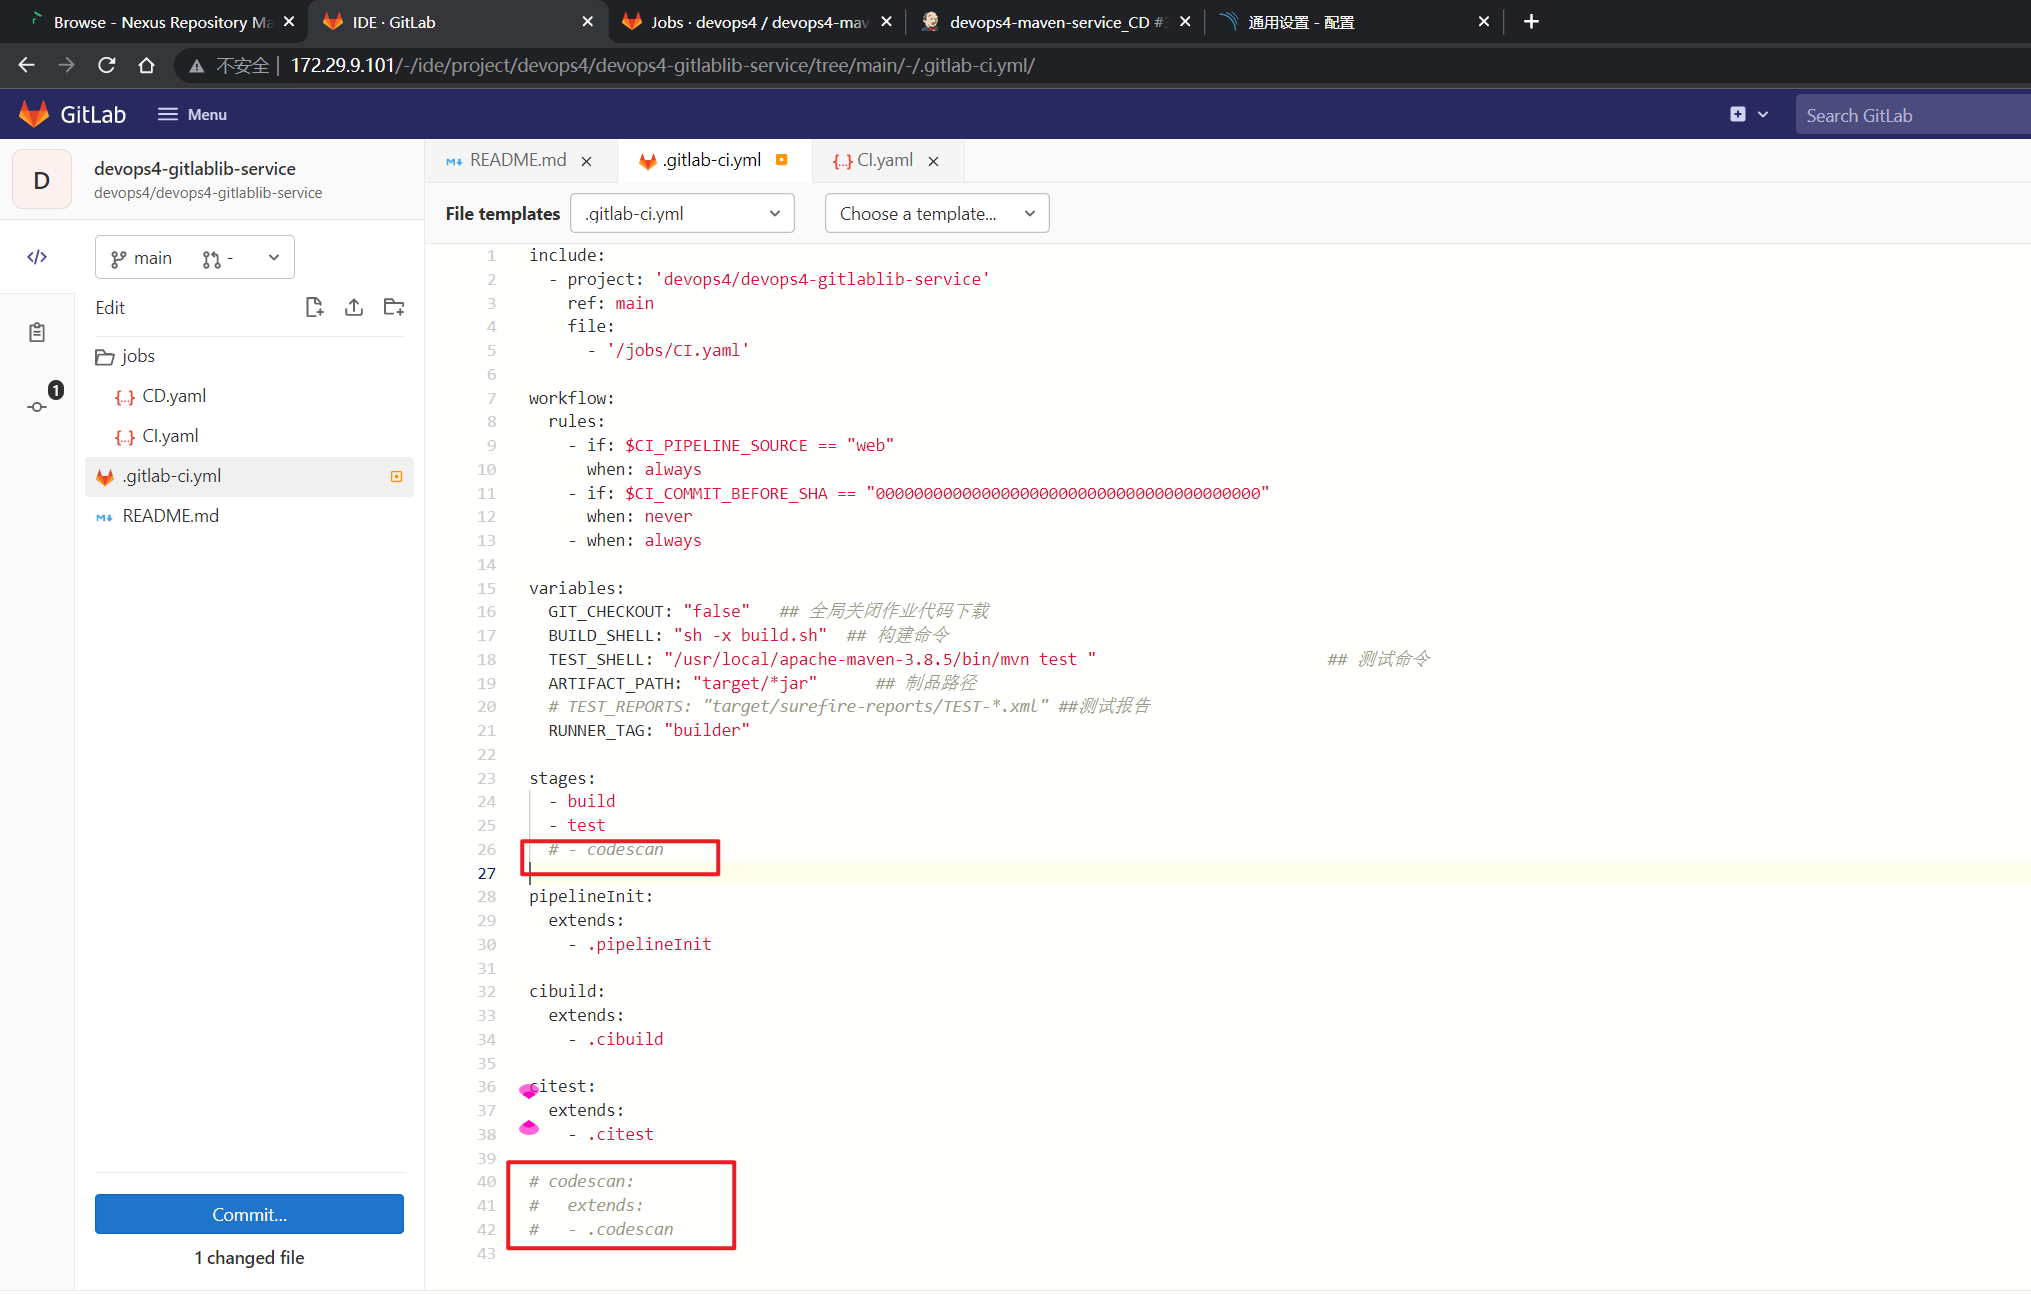
- 这里先把代码扫描给跳过:
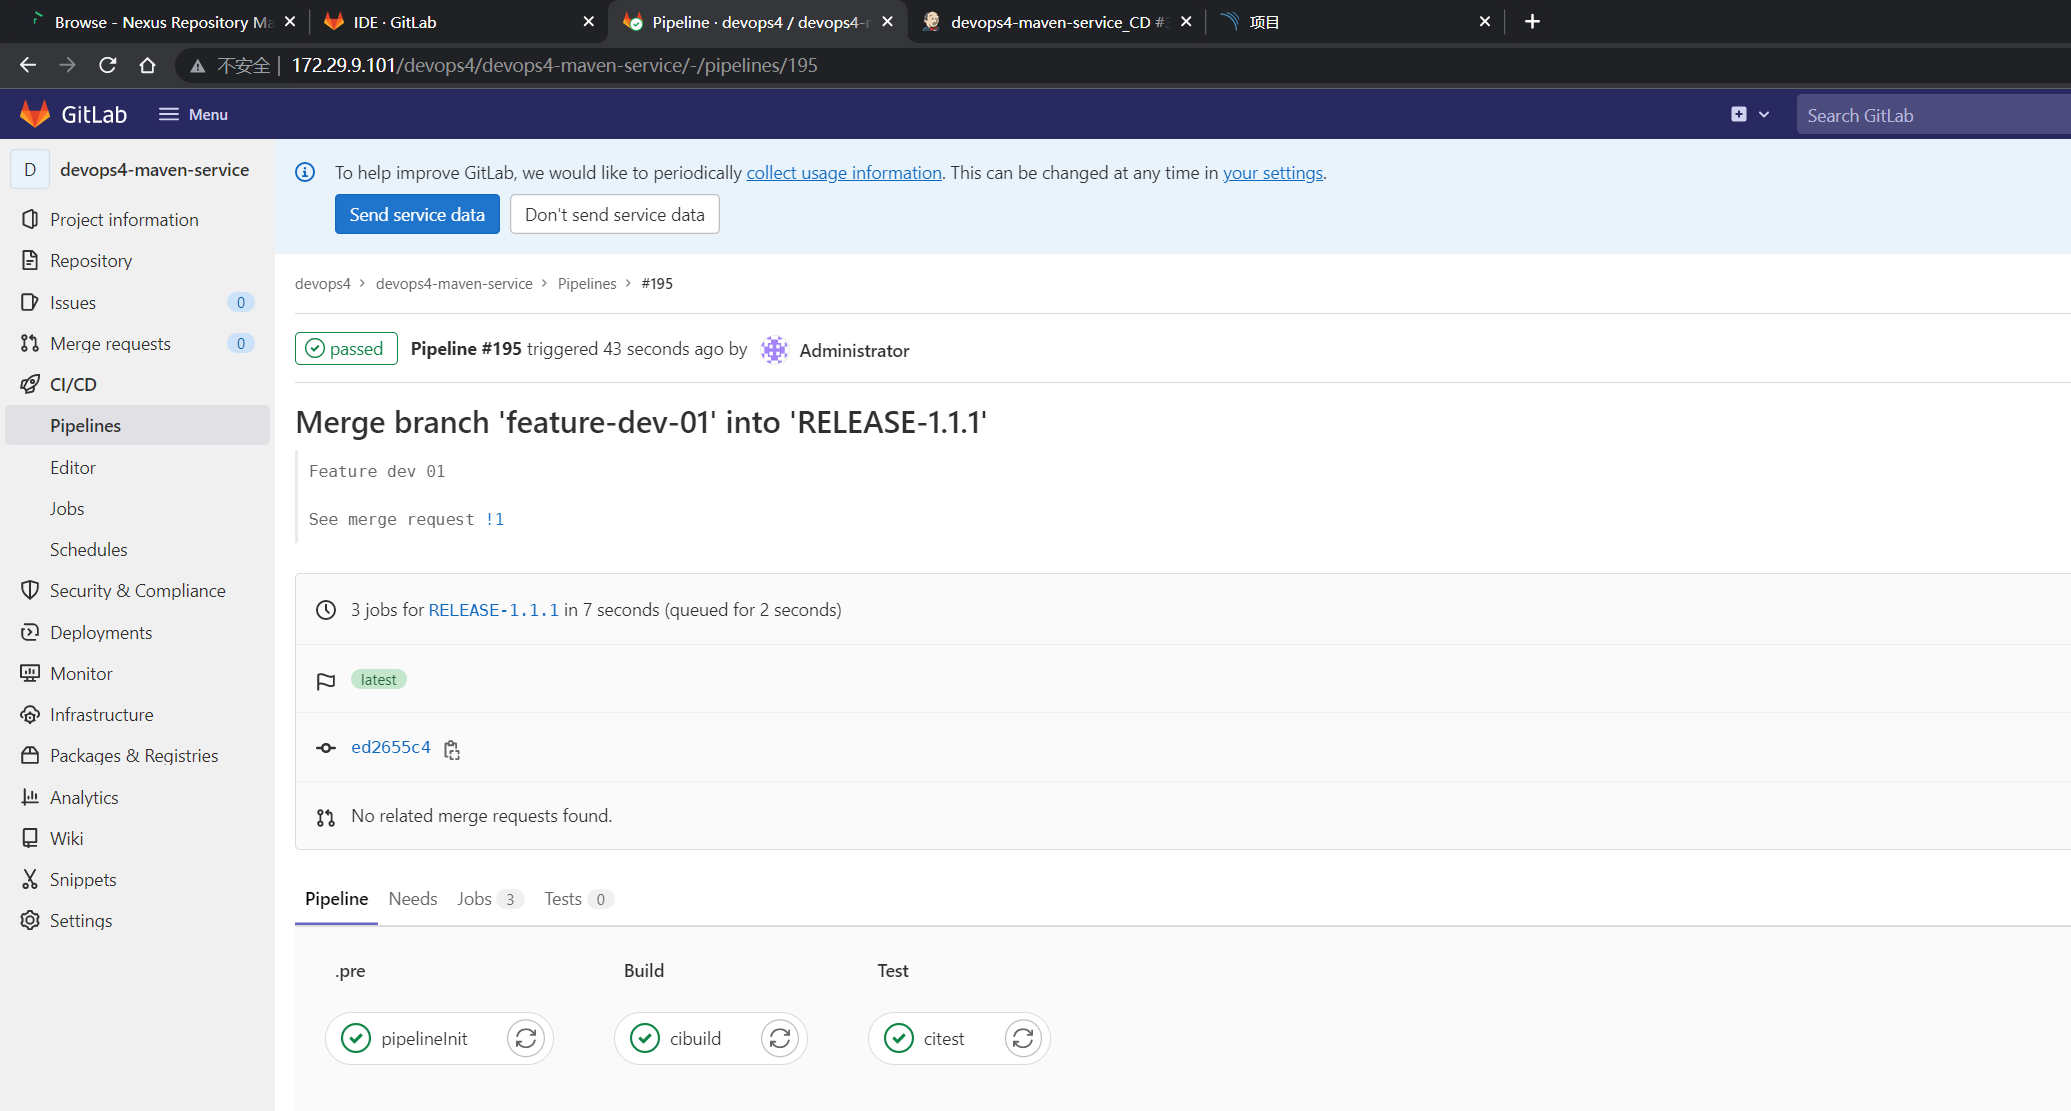
再跑一次流水线:
- 现在开始写代码:
找一下gitlabci的预定义环境变量

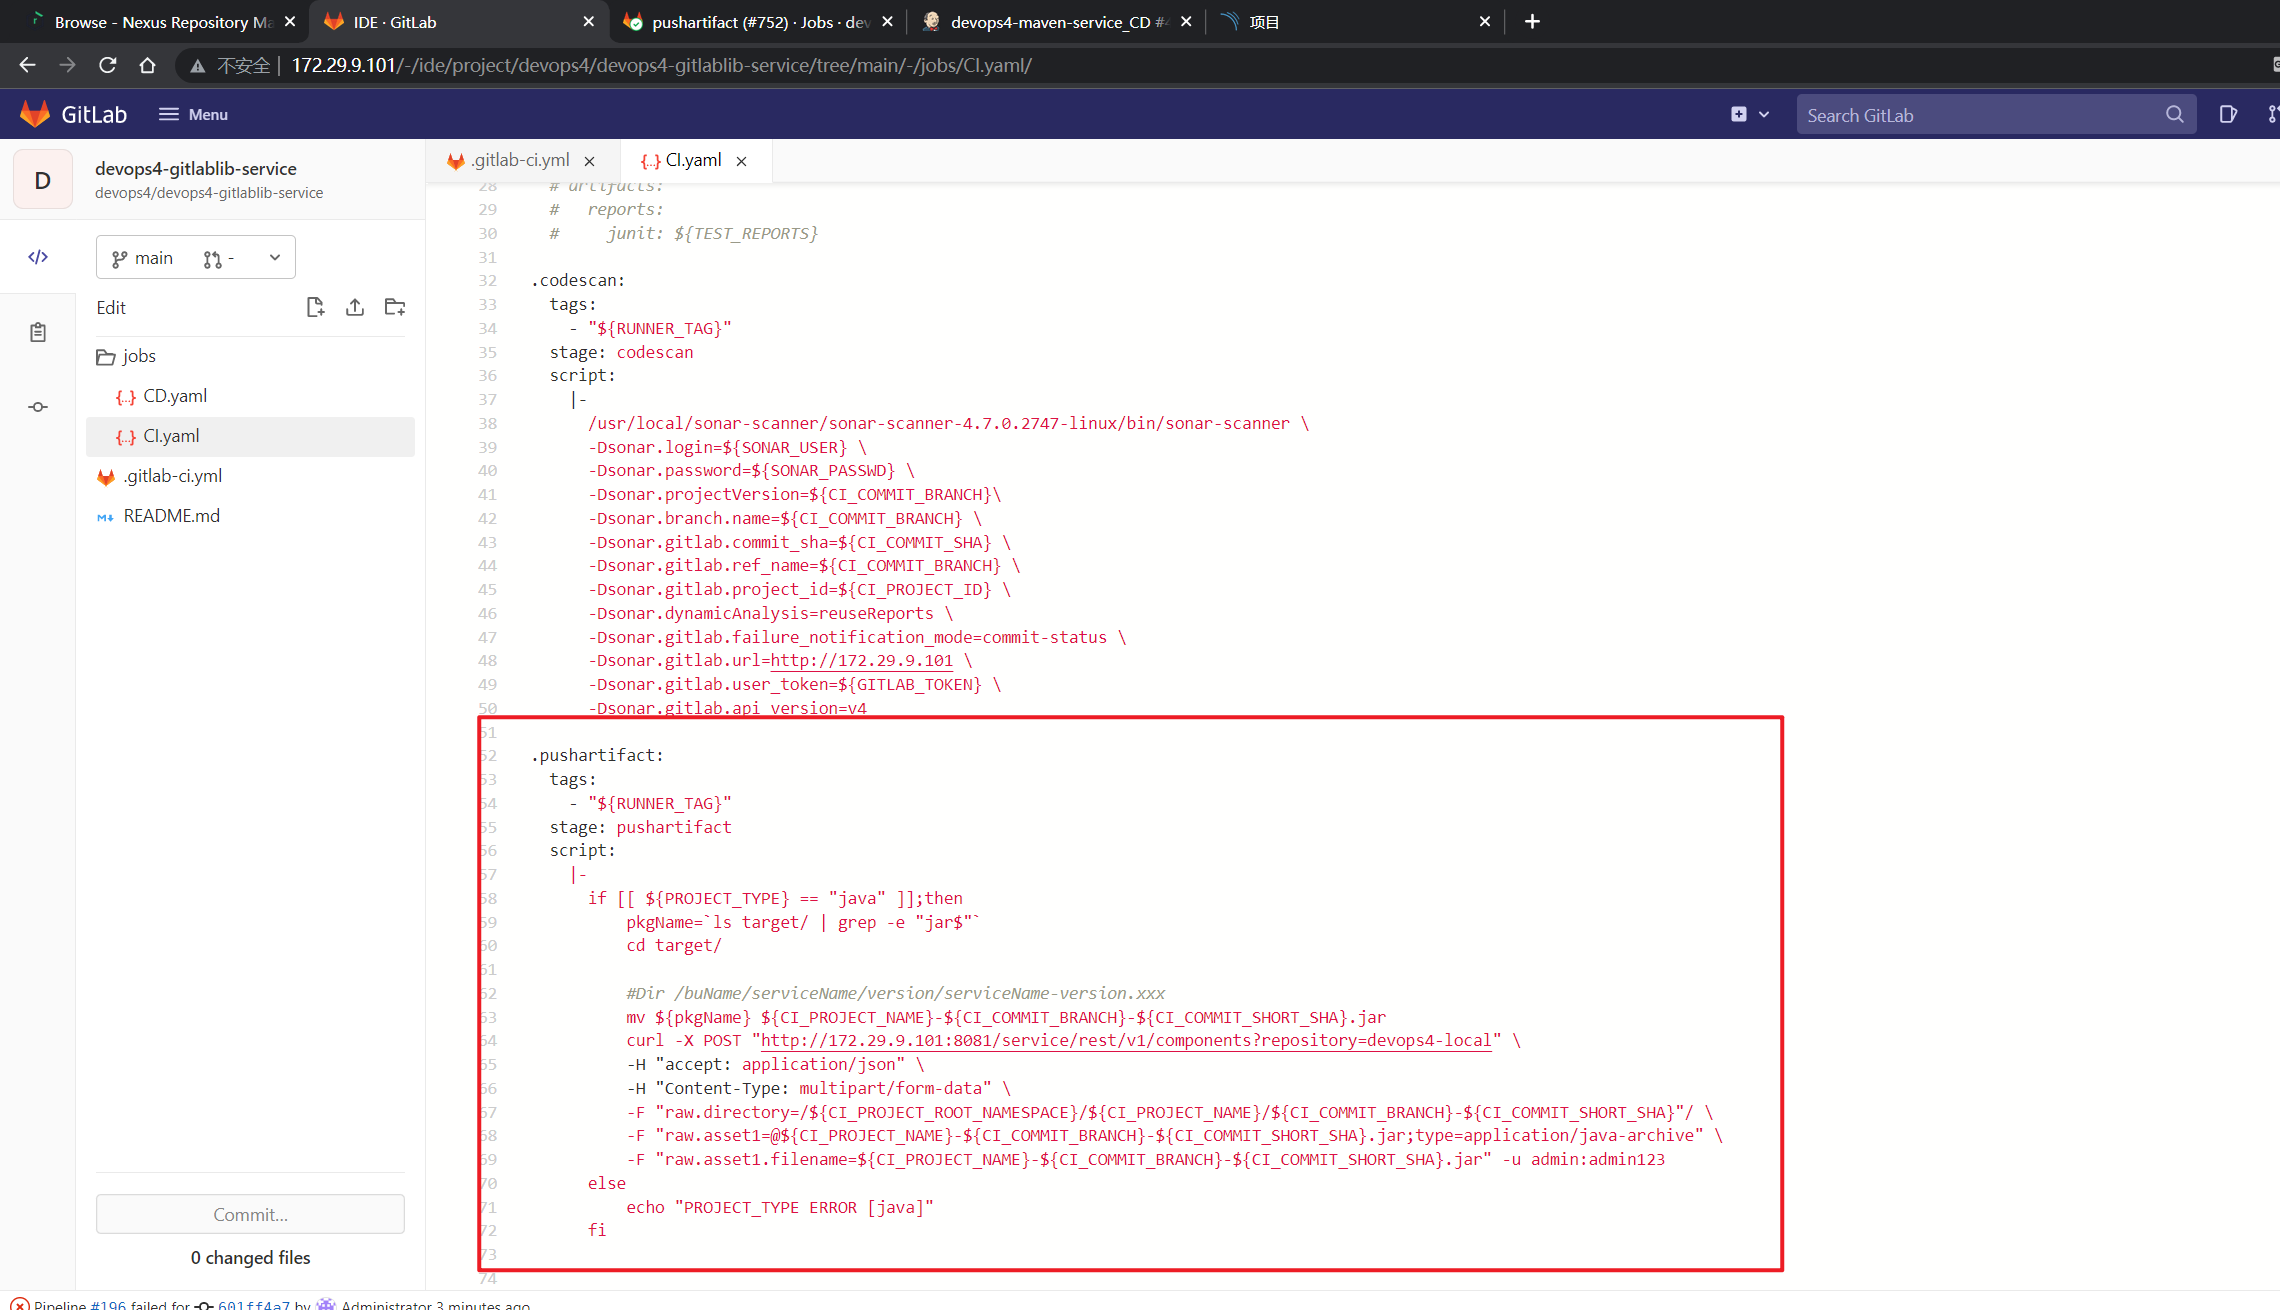
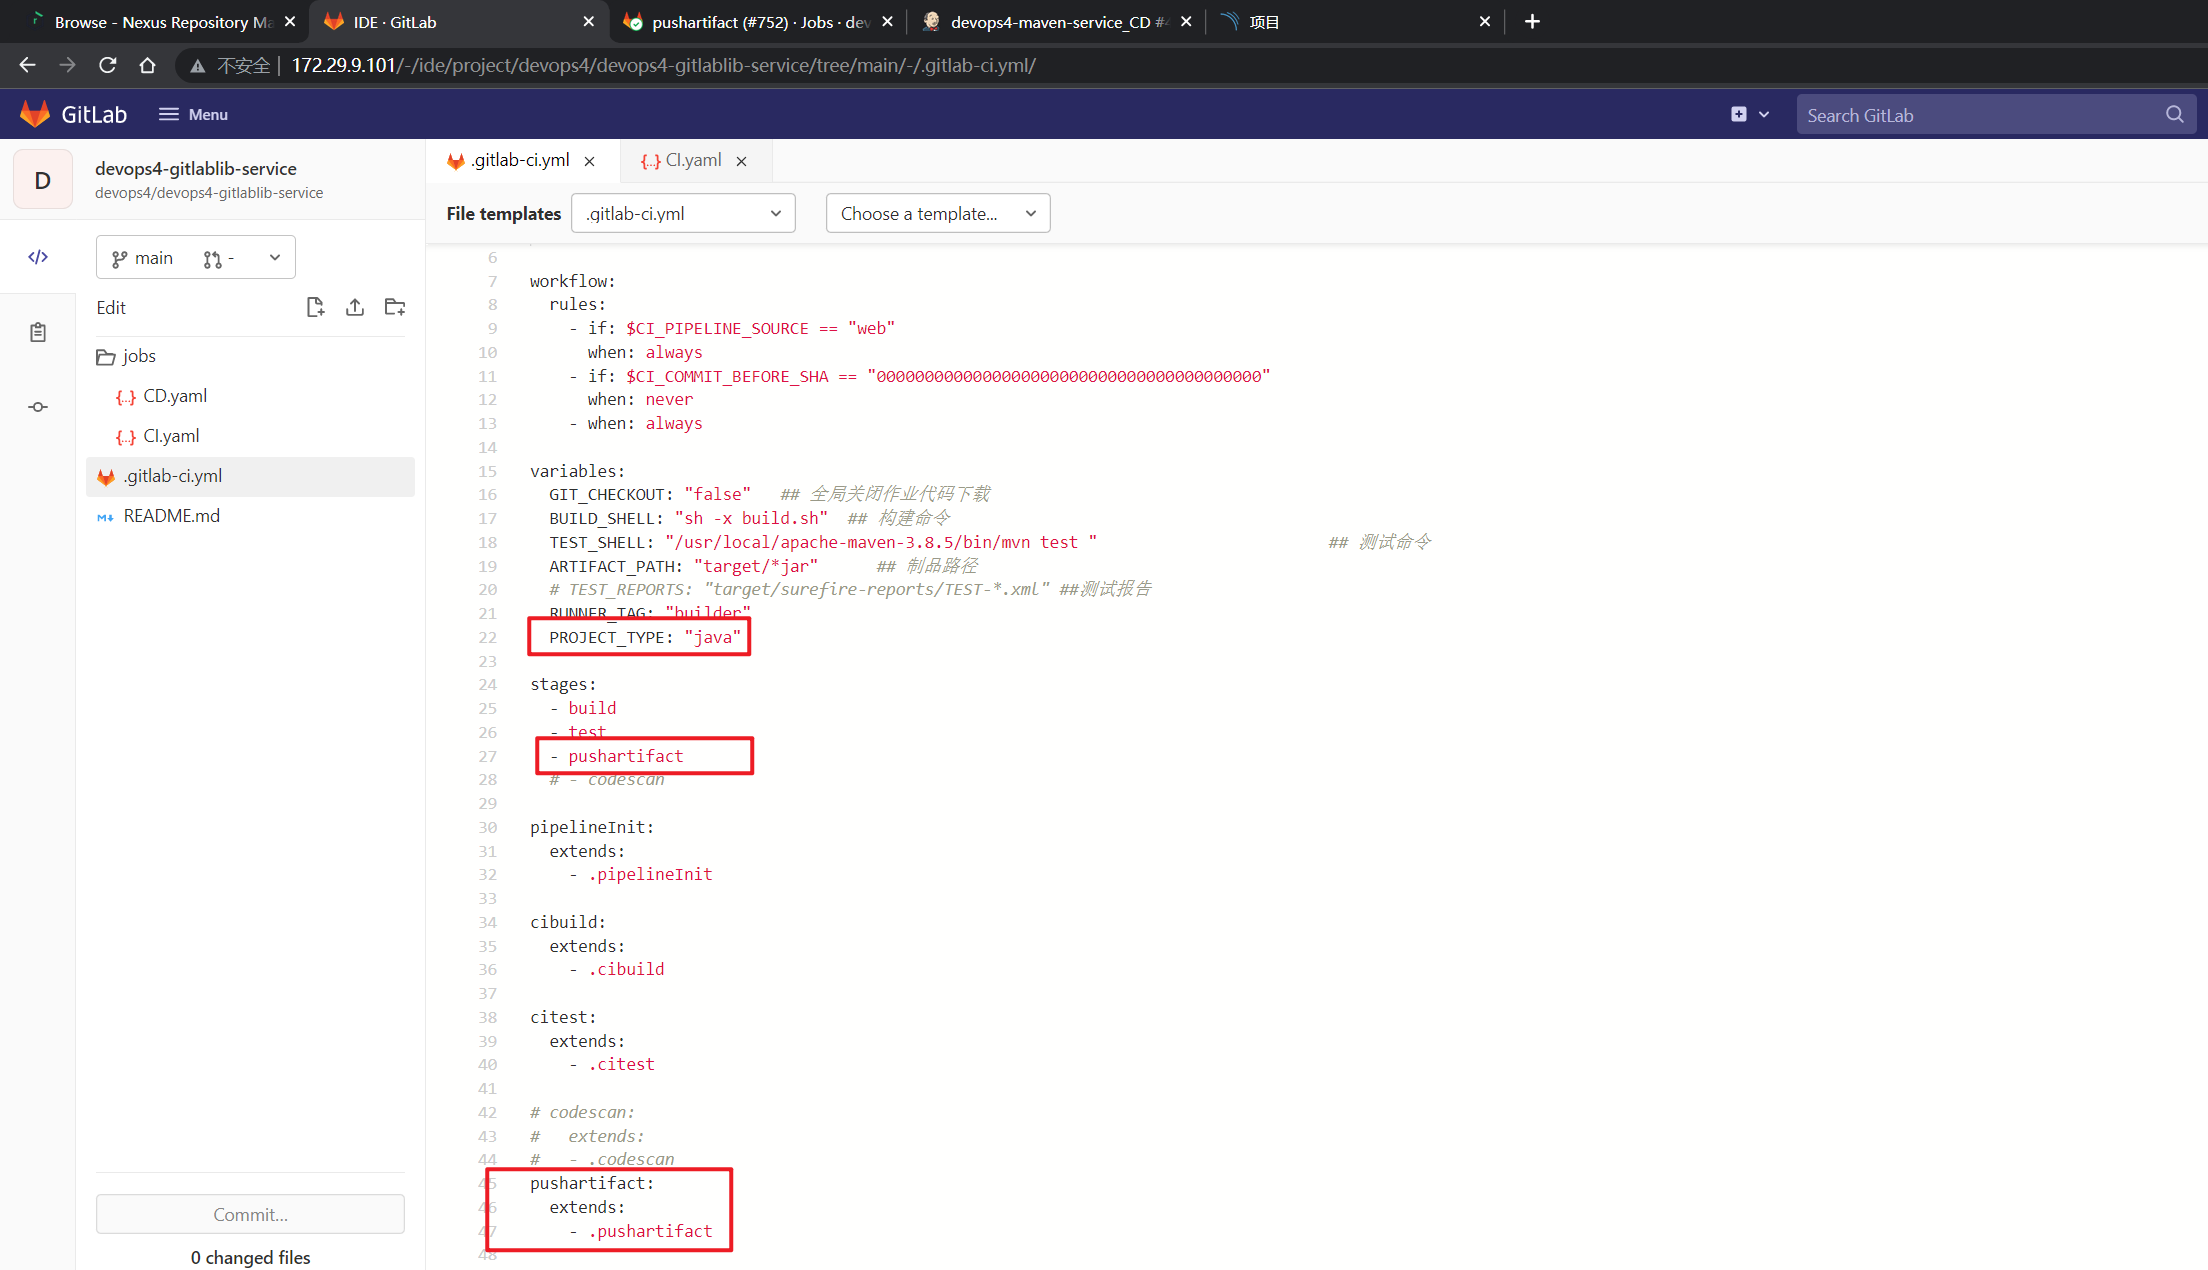
此时,在RELEASE-1.1.1里加一些代码,并提交:
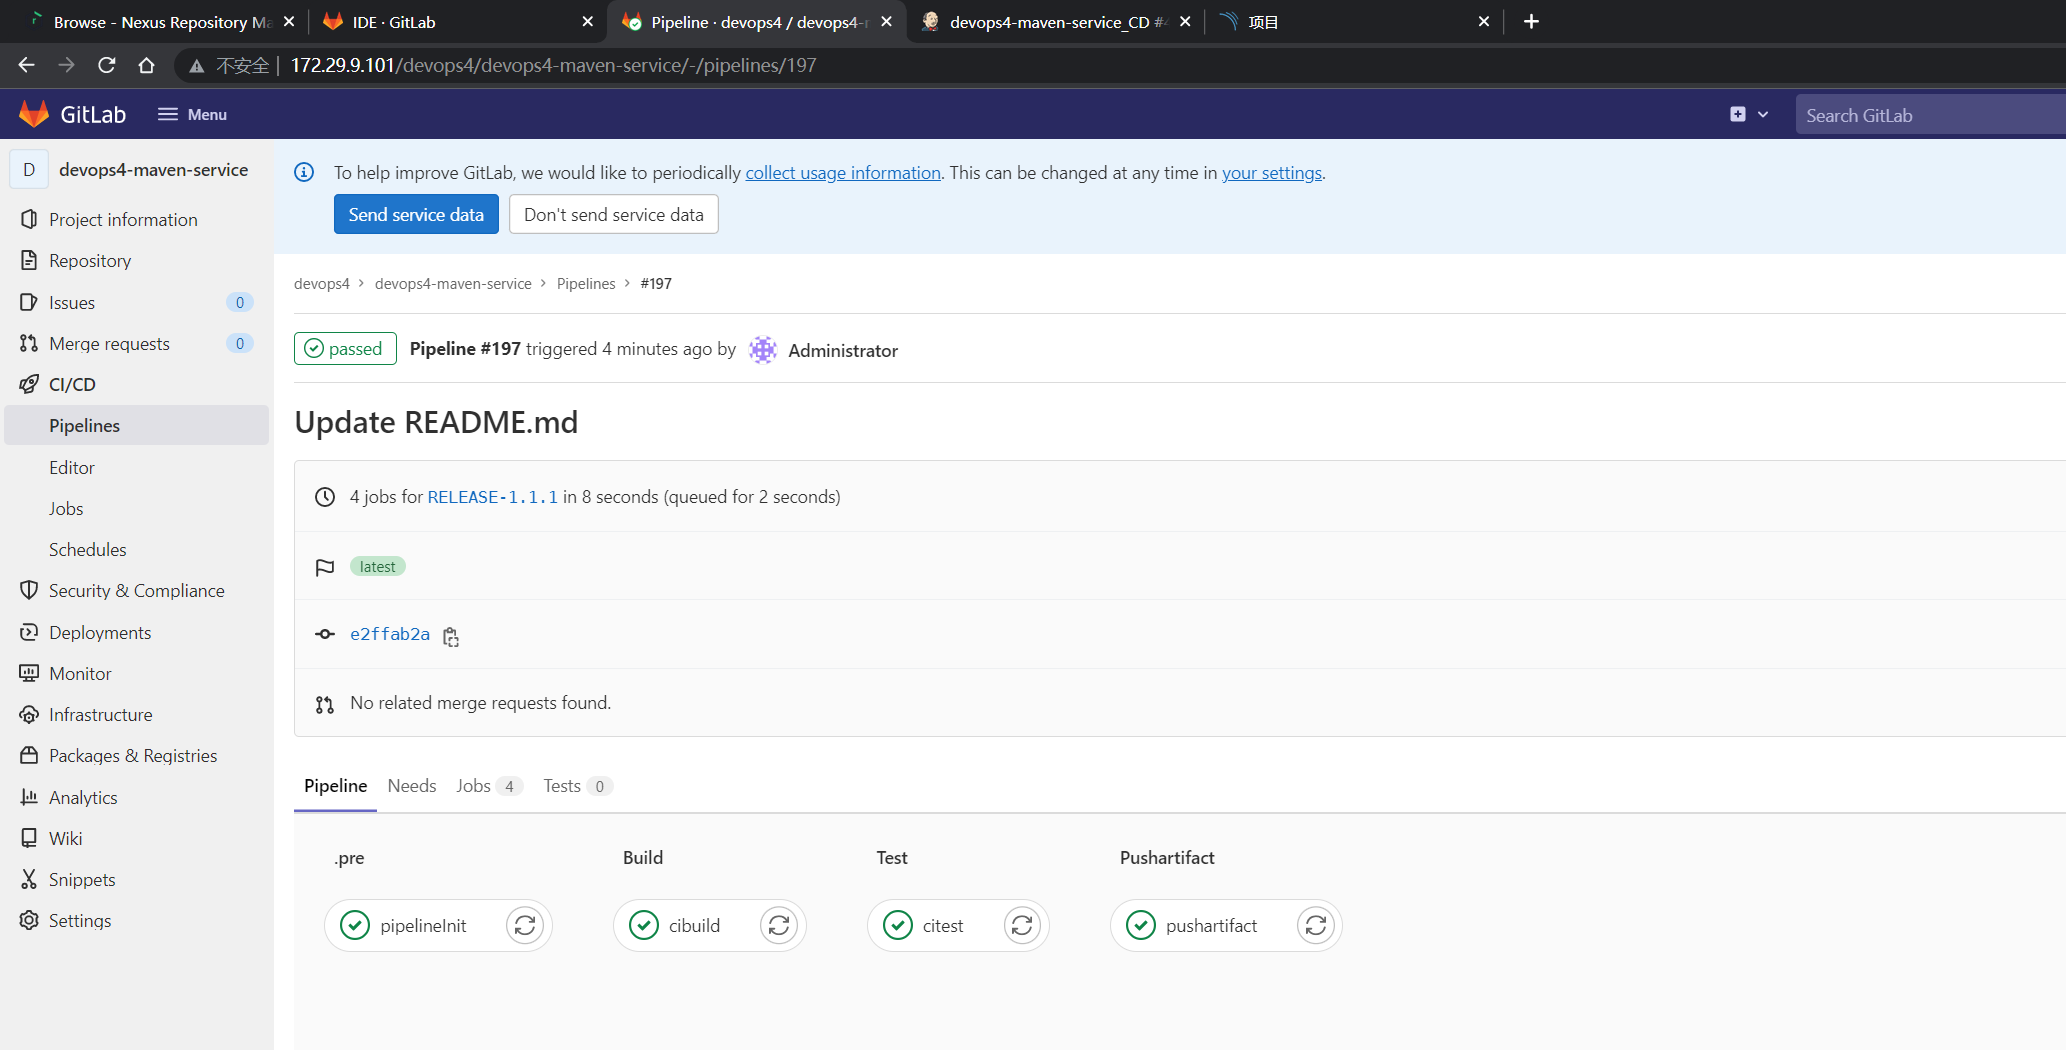
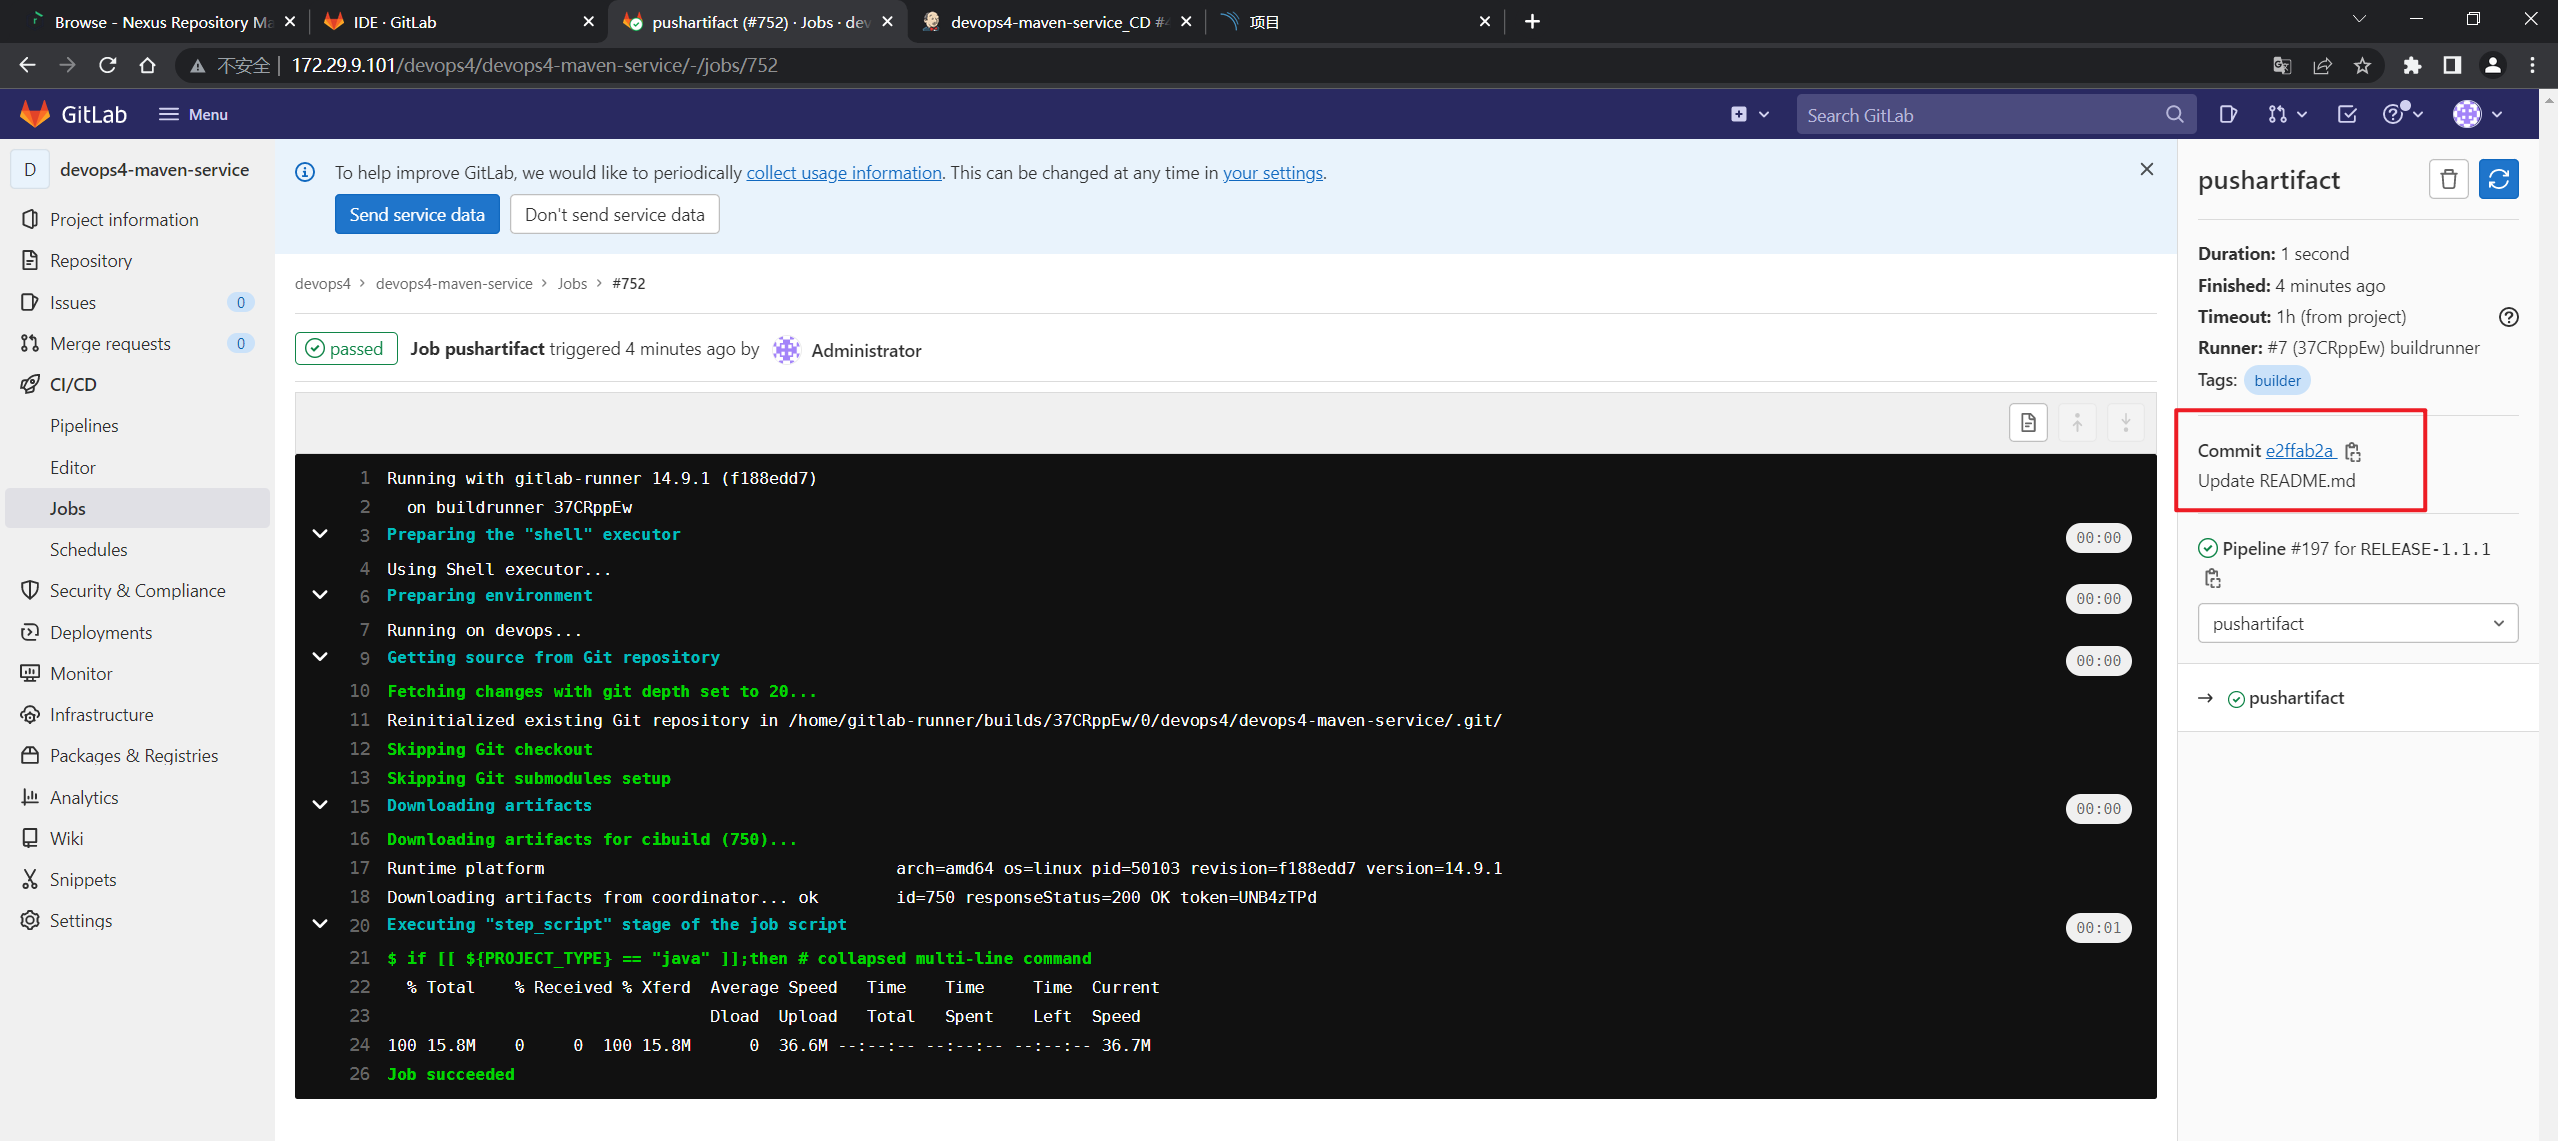
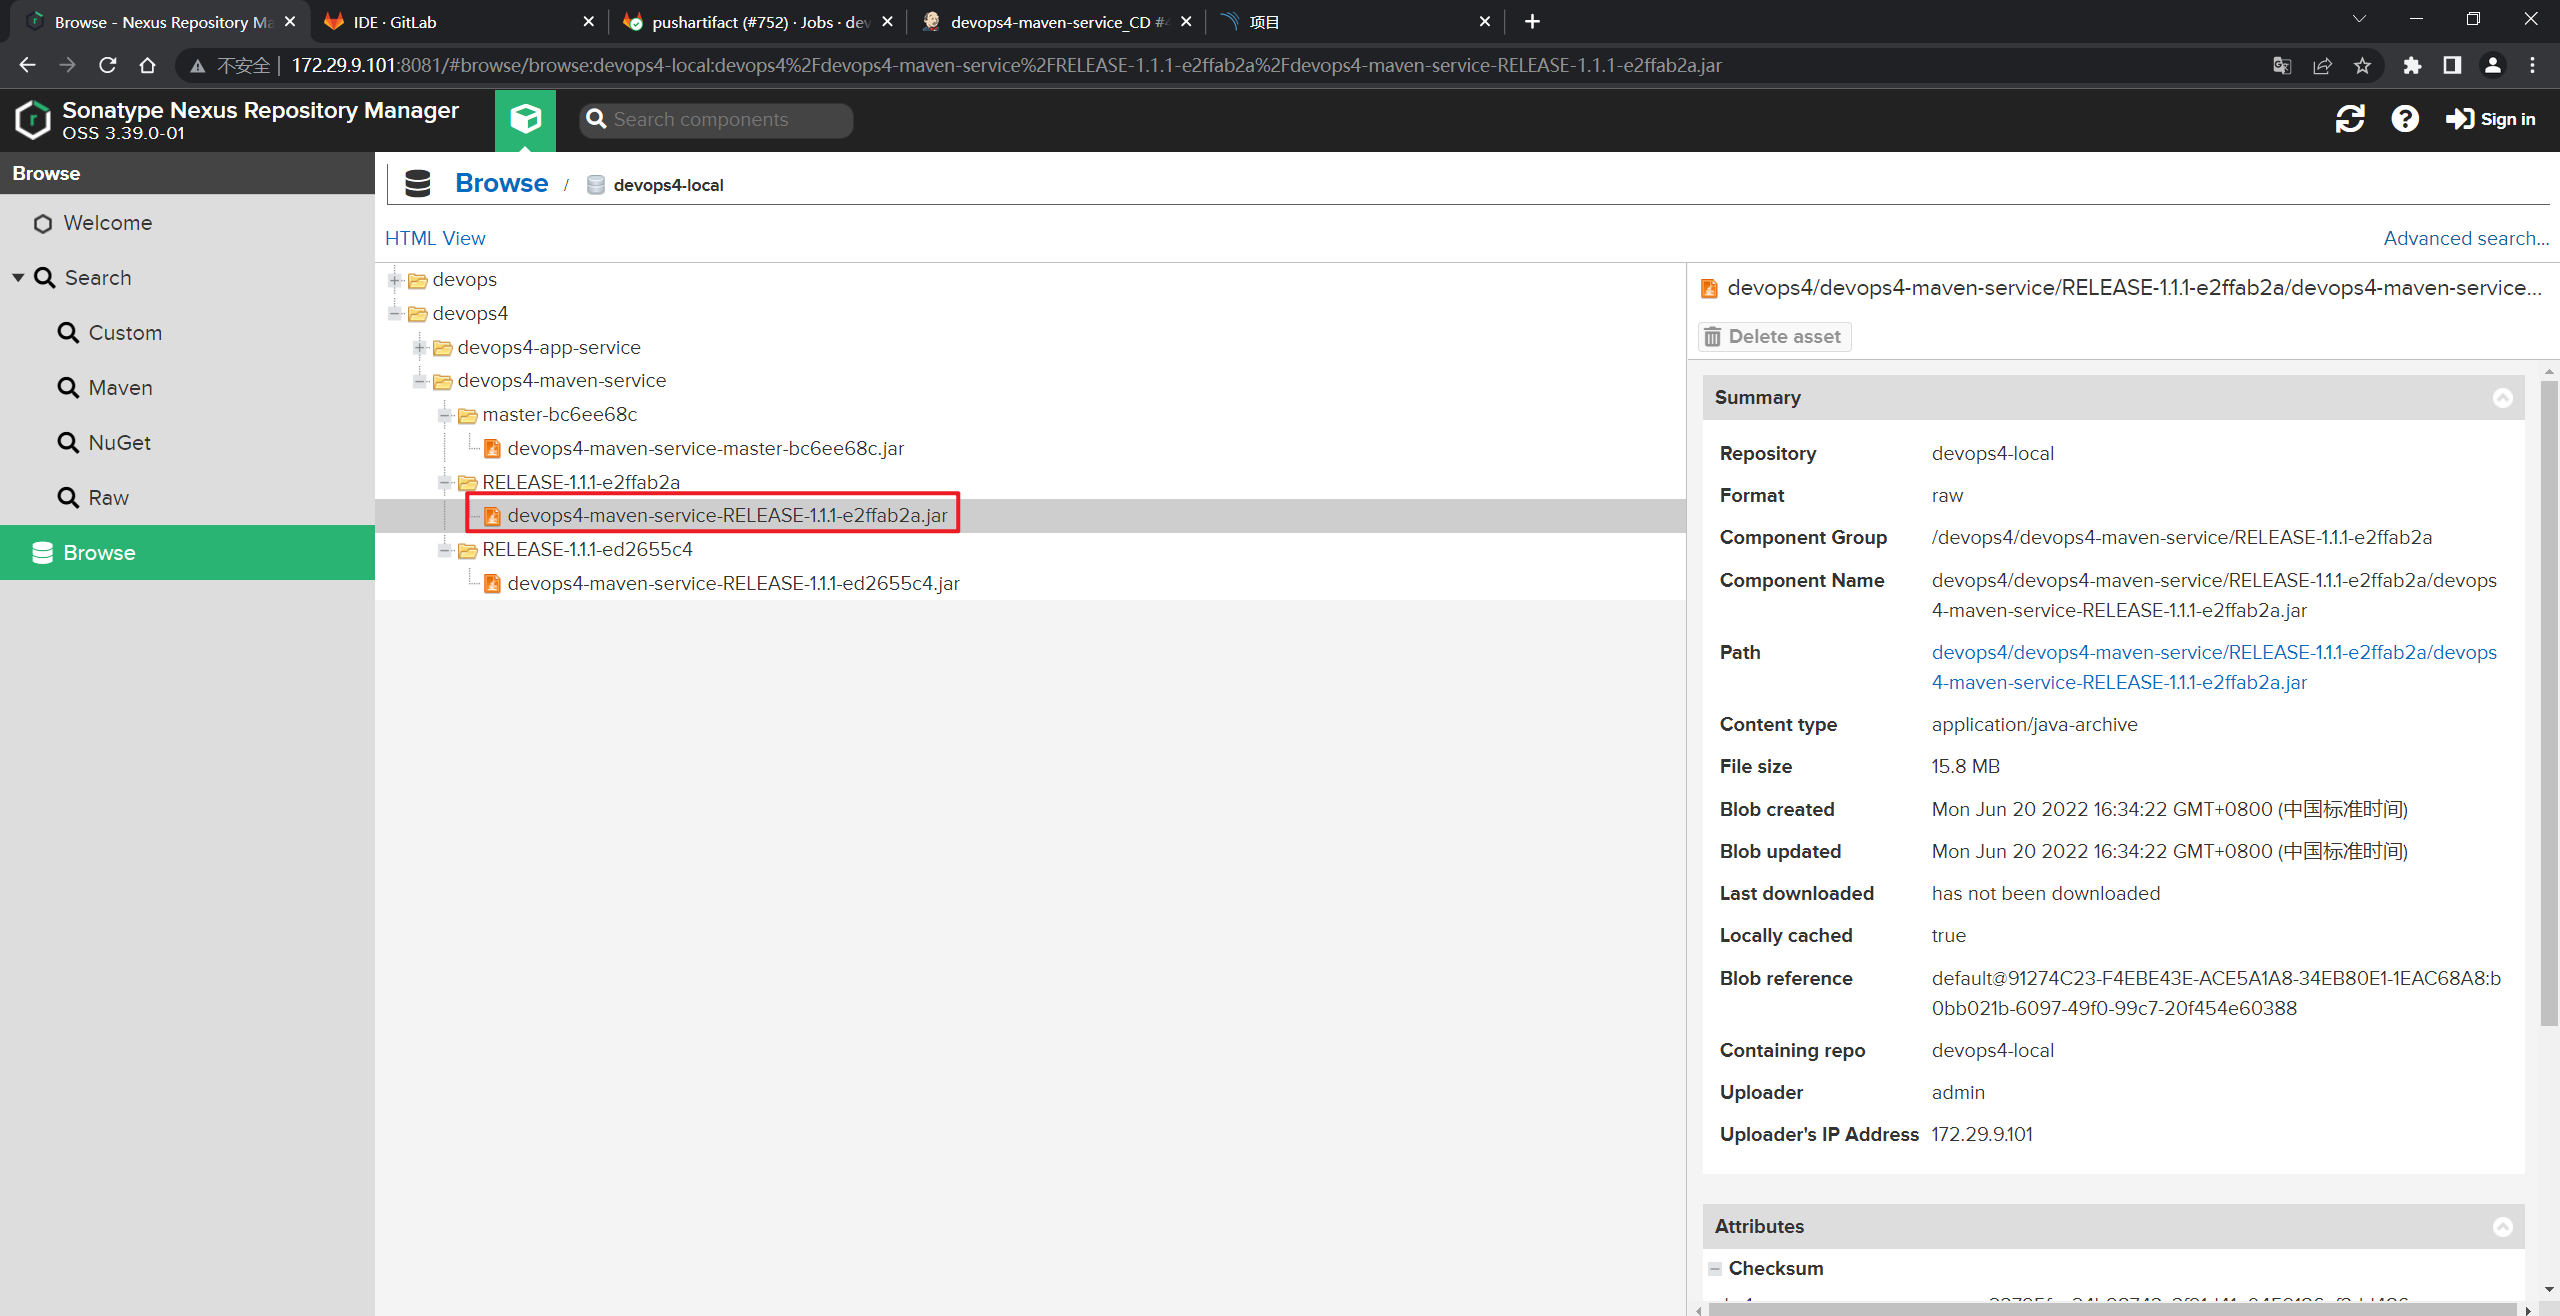
符合预期。
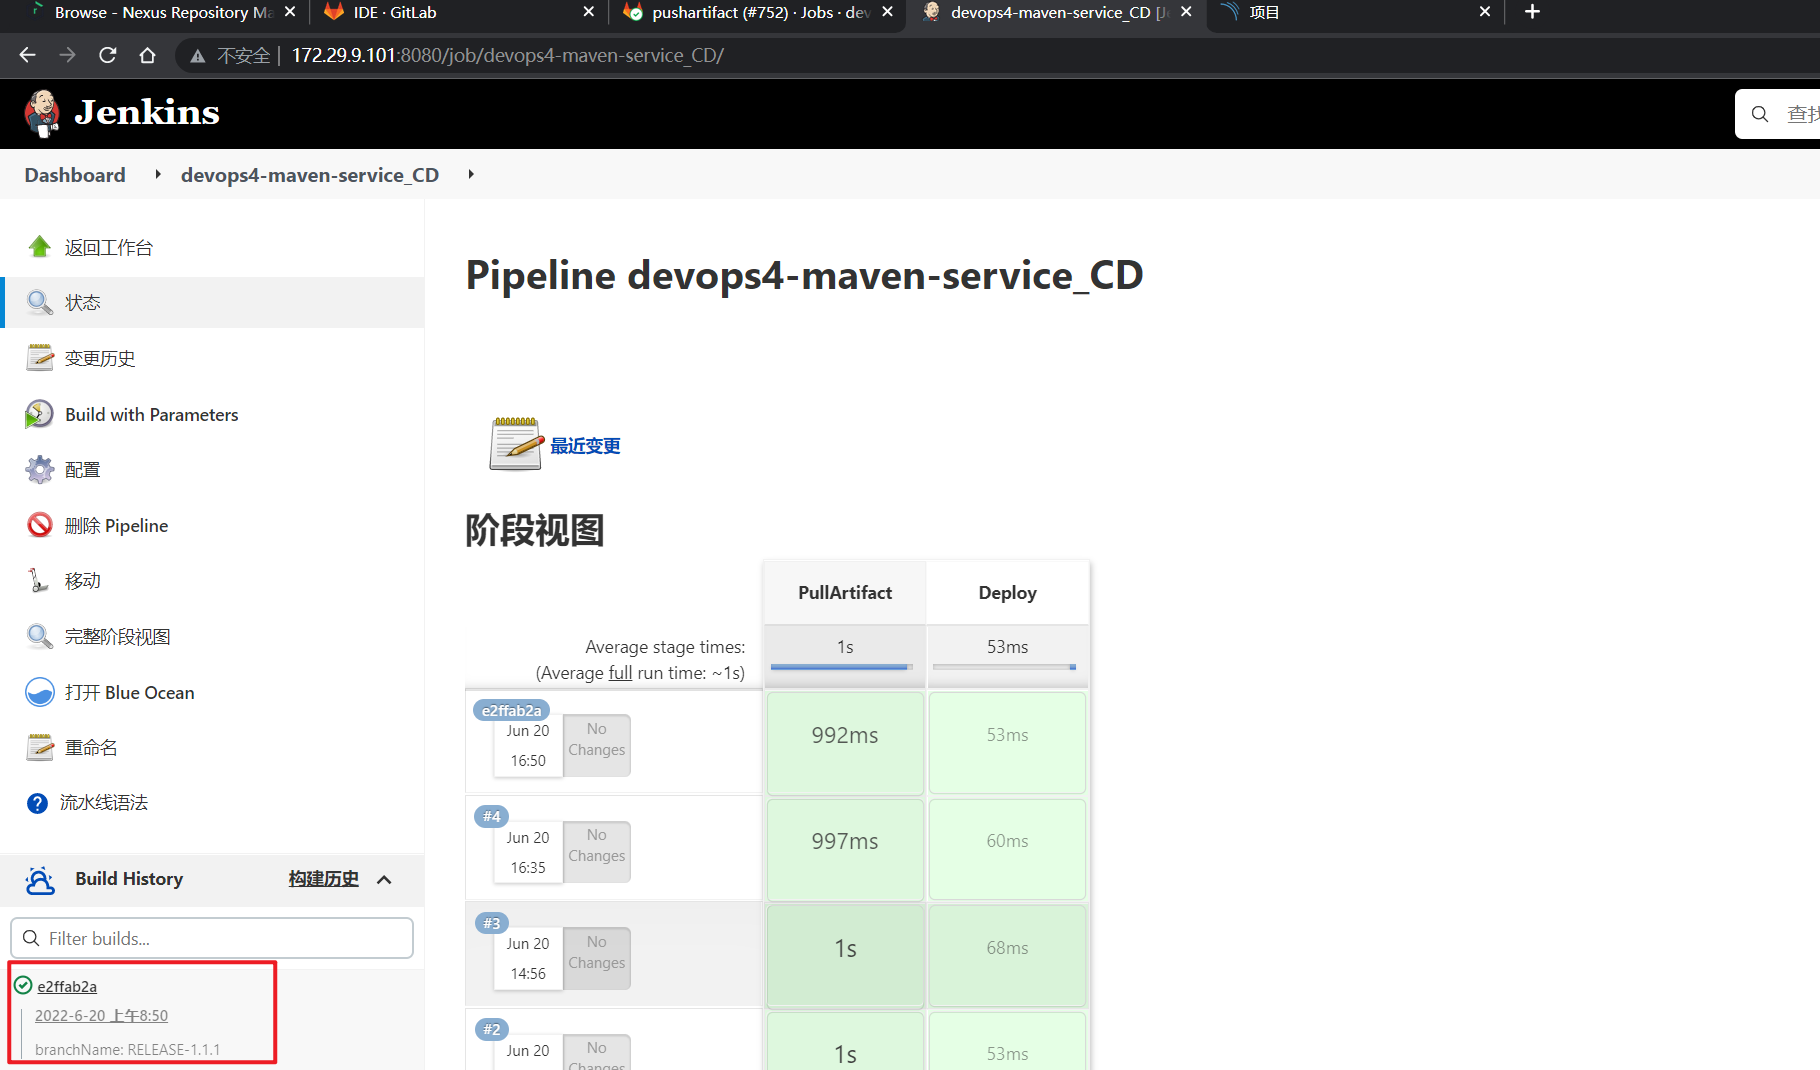
- 此时有个问题,那么jenkins里再跑一次CD,会下载哪个包呢?
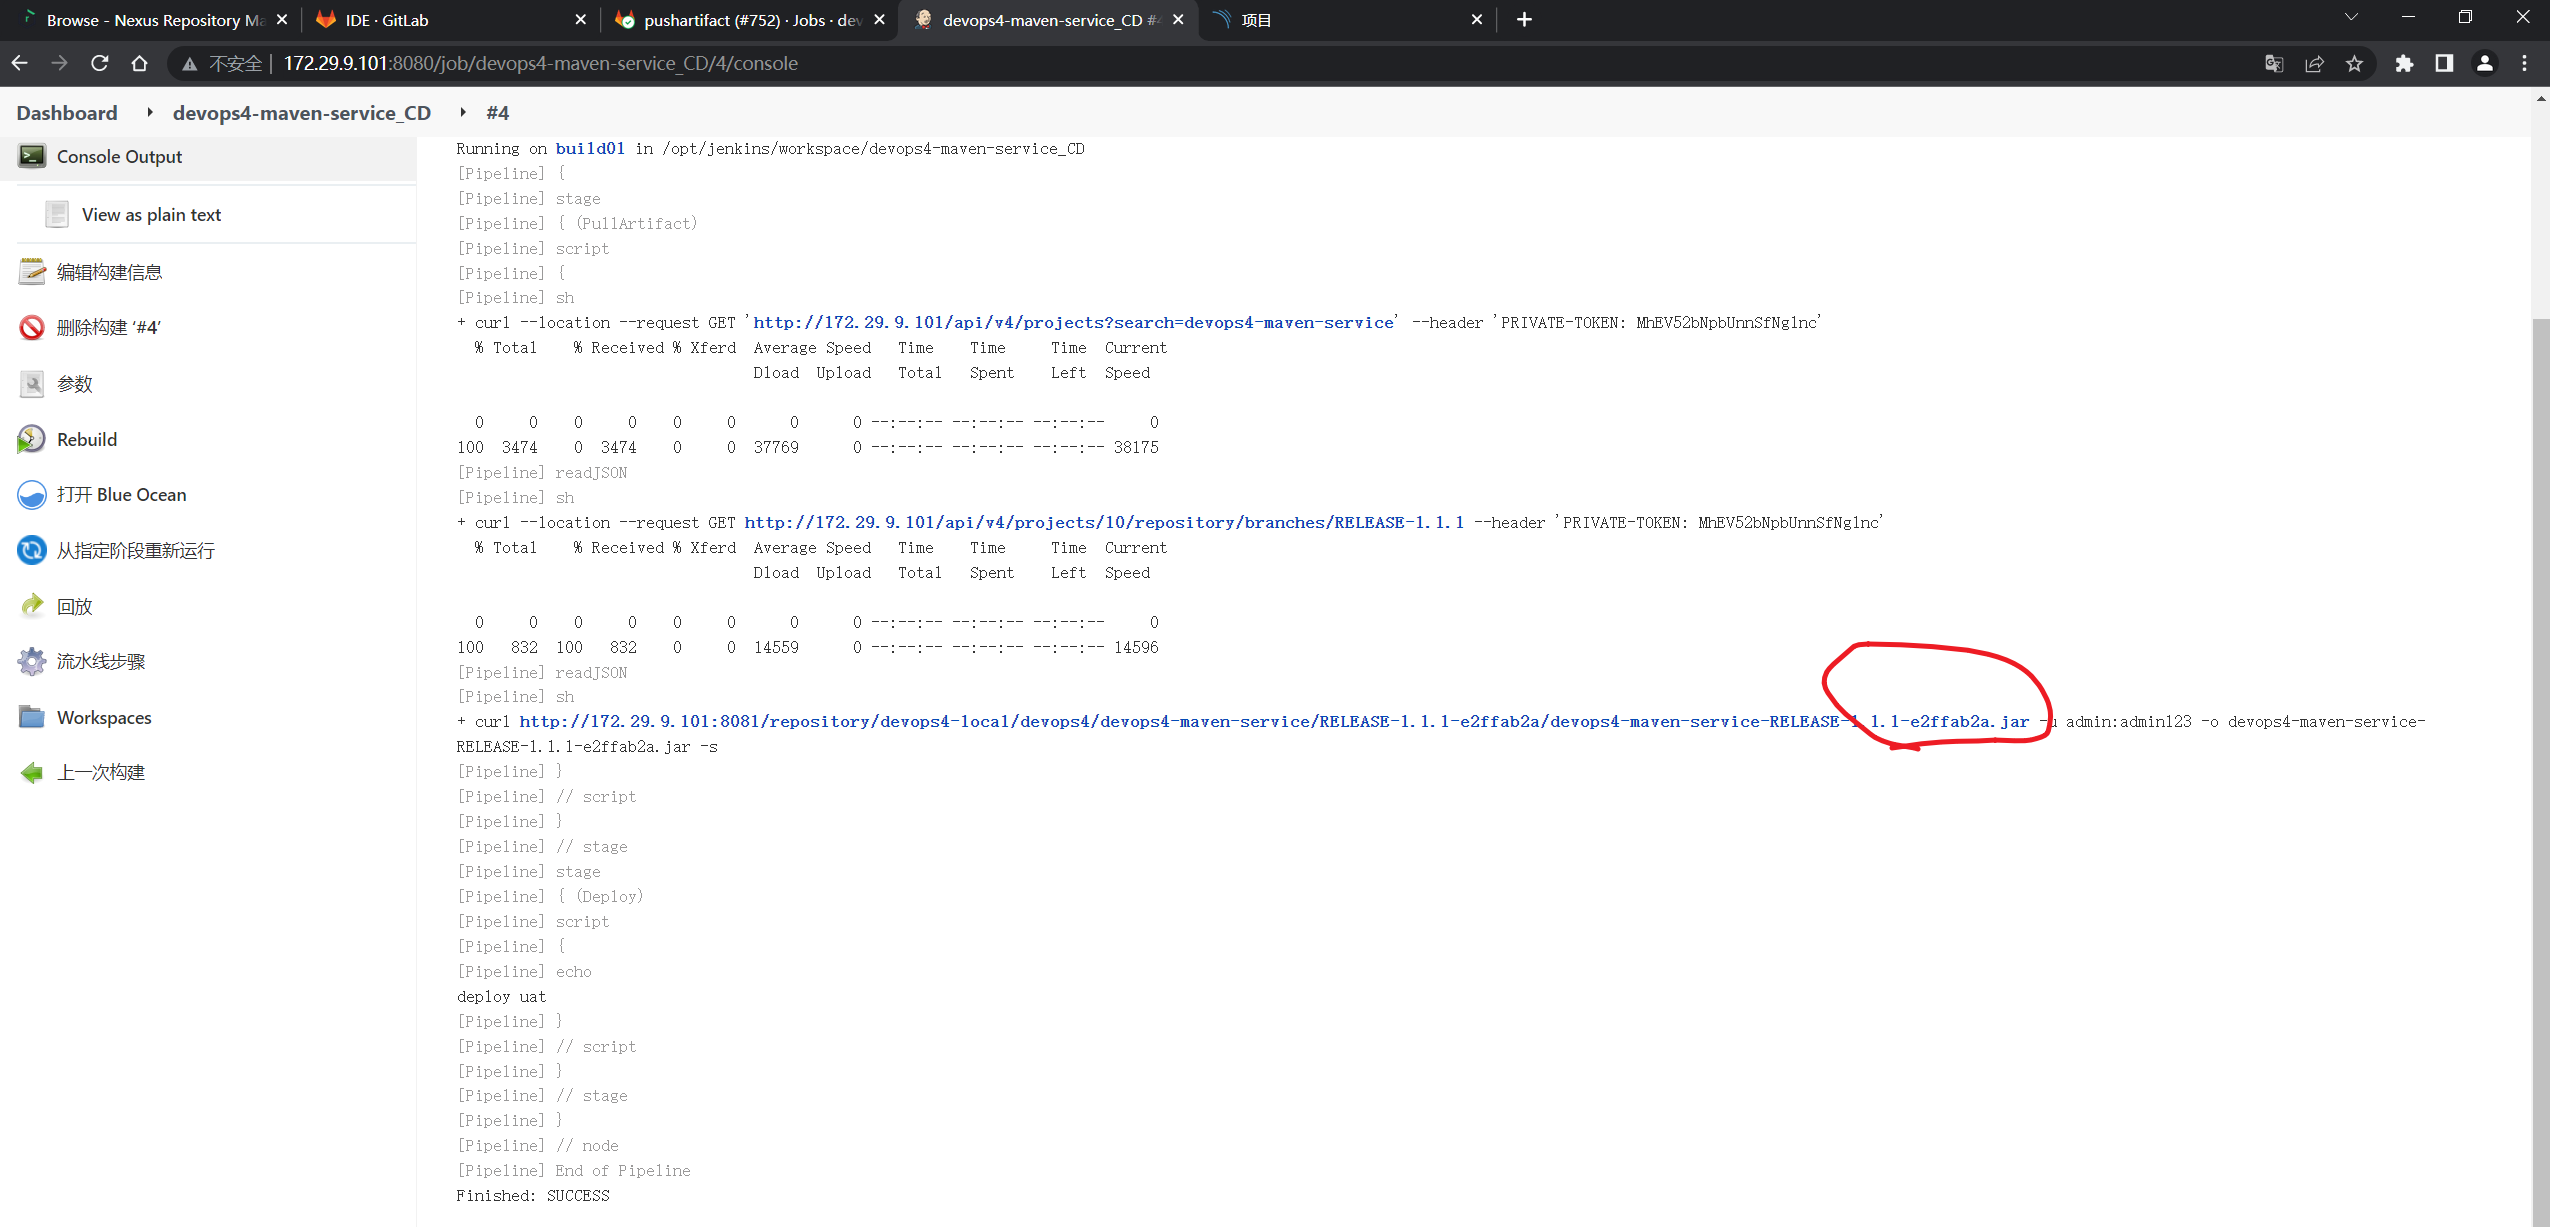
可以看到拿的是最新那个包。
以上完整代码如下:
.pipelineInit:
  tags:
    - "${RUNNER_TAG}"
  stage: .pre
  variables:
    GIT_CHECKOUT: "true"   ##局部开启作业的代码下载
  script:
    - ls -l

.cibuild:
  tags:
    - "${RUNNER_TAG}"
  stage: build
  script:
    - echo "${BUILD_SHELL}"
    - ${BUILD_SHELL}
  artifacts:
     paths:
      - ${ARTIFACT_PATH}

.citest:
  tags:
    - "${RUNNER_TAG}"
  stage: test
  script:
    - echo "${TEST_SHELL}"
    - ${TEST_SHELL}
  # artifacts:
  #   reports:
  #     junit: ${TEST_REPORTS}

.codescan:
  tags:
    - "${RUNNER_TAG}"
  stage: codescan
  script:
    |-
      /usr/local/sonar-scanner/sonar-scanner-4.7.0.2747-linux/bin/sonar-scanner \
      -Dsonar.login=${SONAR_USER} \
      -Dsonar.password=${SONAR_PASSWD} \
      -Dsonar.projectVersion=${CI_COMMIT_BRANCH}\
      -Dsonar.branch.name=${CI_COMMIT_BRANCH} \
      -Dsonar.gitlab.commit_sha=${CI_COMMIT_SHA} \
      -Dsonar.gitlab.ref_name=${CI_COMMIT_BRANCH} \
      -Dsonar.gitlab.project_id=${CI_PROJECT_ID} \
      -Dsonar.dynamicAnalysis=reuseReports \
      -Dsonar.gitlab.failure_notification_mode=commit-status \
      -Dsonar.gitlab.url=http://172.29.9.101 \
      -Dsonar.gitlab.user_token=${GITLAB_TOKEN} \
      -Dsonar.gitlab.api_version=v4

.pushartifact:
  tags:
    - "${RUNNER_TAG}"
  stage: pushartifact
  script:
    |-
      if [[ ${PROJECT_TYPE} == "java" ]];then
          pkgName=`ls target/ | grep -e "jar$"`
          cd target/

          #Dir /buName/serviceName/version/serviceName-version.xxx
          mv ${pkgName} ${CI_PROJECT_NAME}-${CI_COMMIT_BRANCH}-${CI_COMMIT_SHORT_SHA}.jar
          curl -X POST "http://172.29.9.101:8081/service/rest/v1/components?repository=devops4-local" \
          -H "accept: application/json" \
          -H "Content-Type: multipart/form-data" \
          -F "raw.directory=/${CI_PROJECT_ROOT_NAMESPACE}/${CI_PROJECT_NAME}/${CI_COMMIT_BRANCH}-${CI_COMMIT_SHORT_SHA}"/ \
          -F "raw.asset1=@${CI_PROJECT_NAME}-${CI_COMMIT_BRANCH}-${CI_COMMIT_SHORT_SHA}.jar;type=application/java-archive" \
          -F "raw.asset1.filename=${CI_PROJECT_NAME}-${CI_COMMIT_BRANCH}-${CI_COMMIT_SHORT_SHA}.jar" -u admin:admin123
      else
          echo "PROJECT_TYPE ERROR [java]"
      fi
include:
  - project: 'devops4/devops4-gitlablib-service'
    ref: main
    file:
      - '/jobs/CI.yaml'

workflow:
  rules:
    - if: $CI_PIPELINE_SOURCE == "web"
      when: always
    - if: $CI_COMMIT_BEFORE_SHA == "0000000000000000000000000000000000000000"
      when: never
    - when: always

variables:
  GIT_CHECKOUT: "false"   ## 全局关闭作业代码下载
  BUILD_SHELL: "sh -x build.sh"  ## 构建命令
  TEST_SHELL: "/usr/local/apache-maven-3.8.5/bin/mvn test "                        ## 测试命令
  ARTIFACT_PATH: "target/*jar"      ## 制品路径
  # TEST_REPORTS: "target/surefire-reports/TEST-*.xml" ##测试报告
  RUNNER_TAG: "builder"
  PROJECT_TYPE: "java"

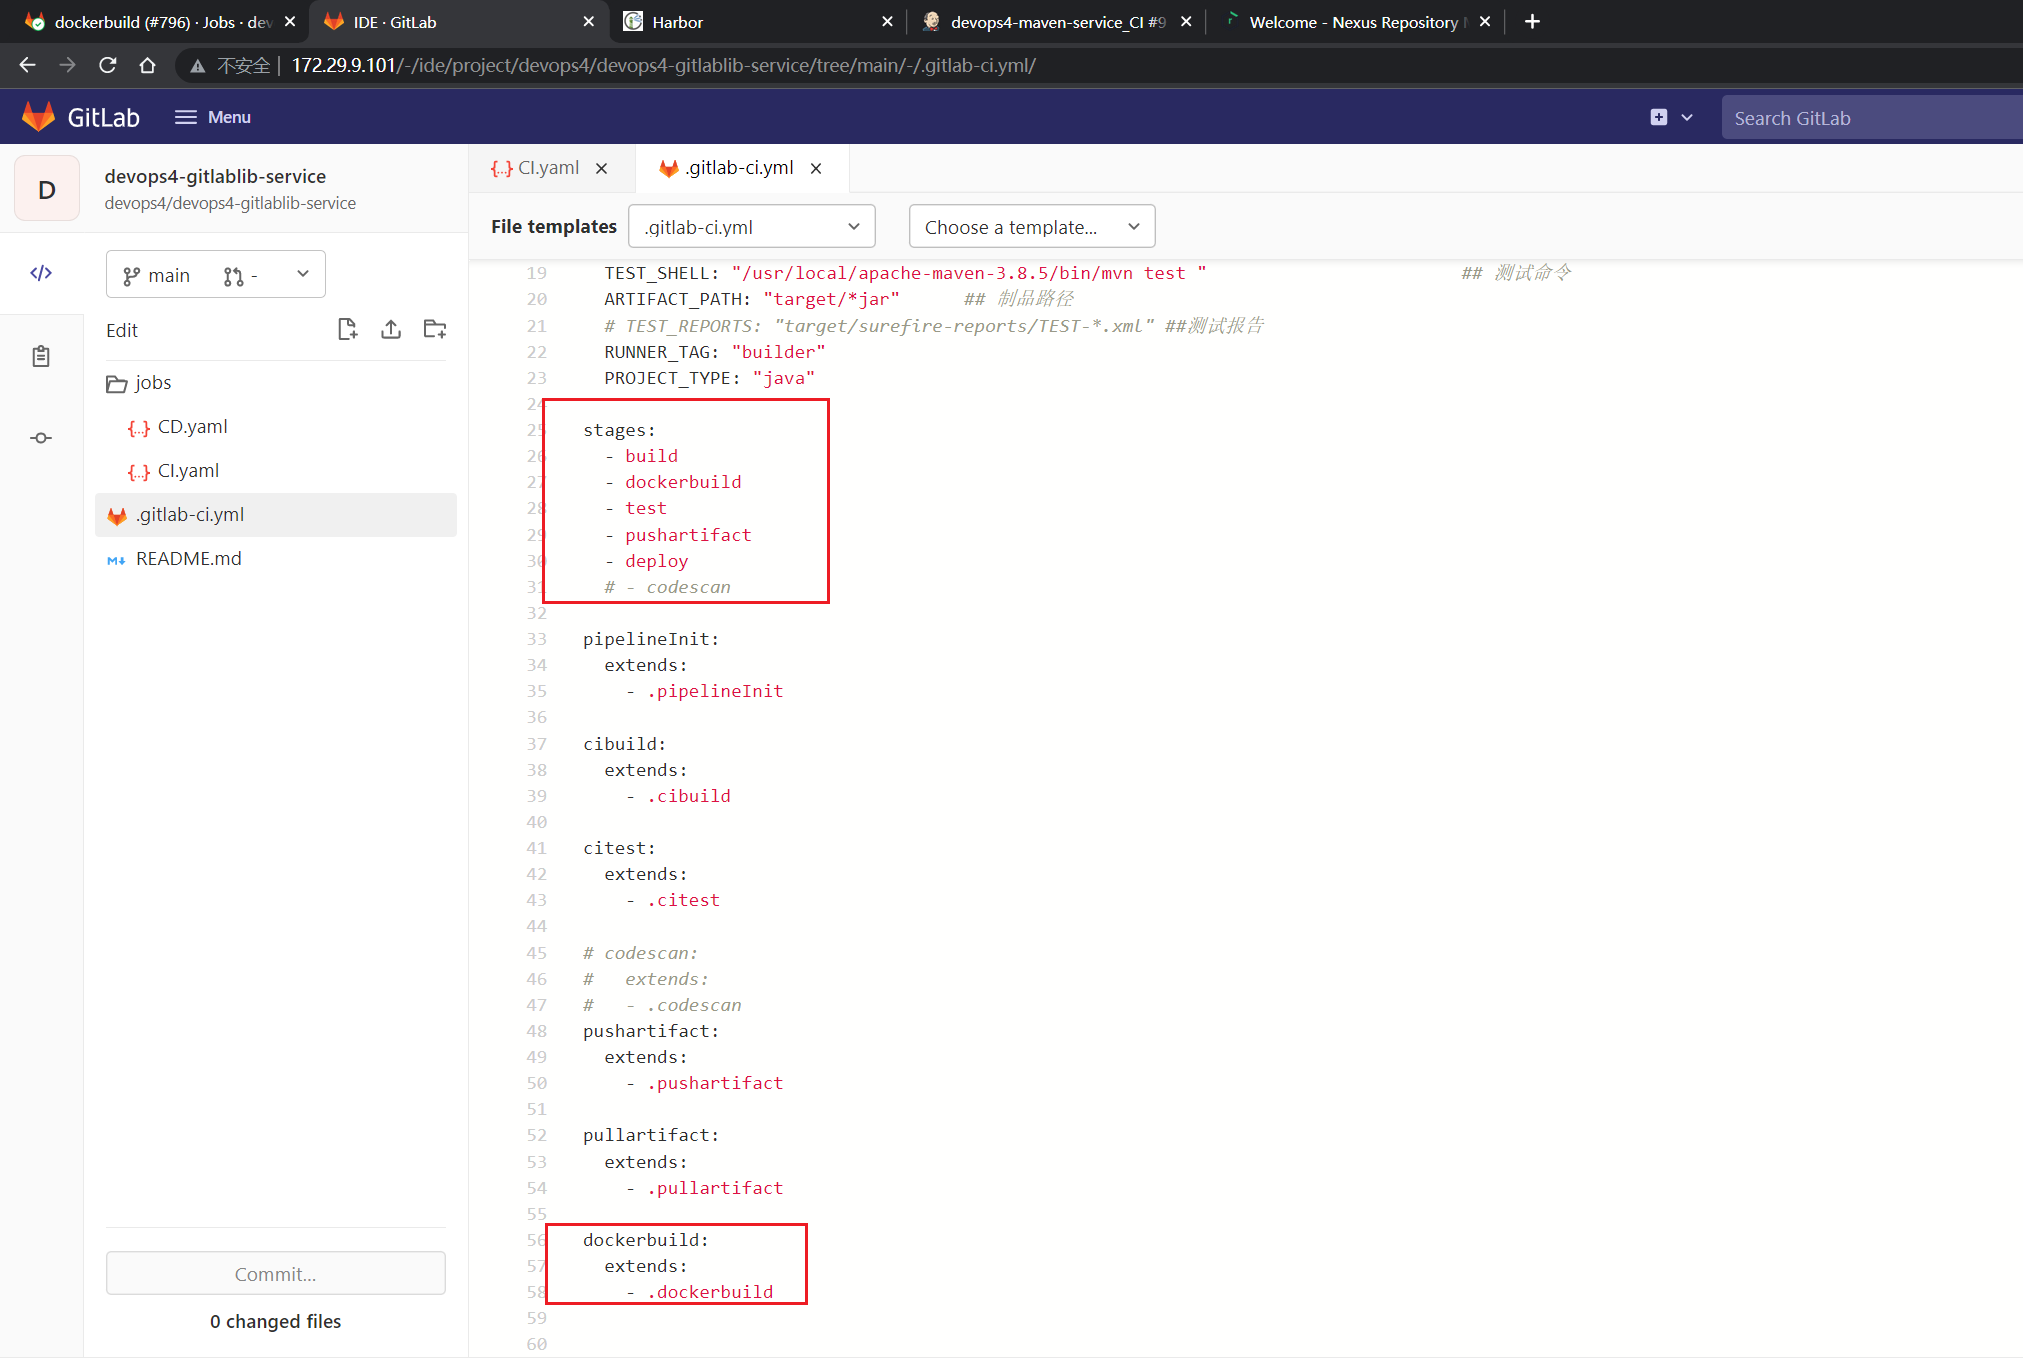
stages:
  - build
  - test
  - pushartifact
  # - codescan

pipelineInit:
  extends:
    - .pipelineInit

cibuild:
  extends:
    - .cibuild

citest:
  extends:
    - .citest

# codescan:
#   extends:
#   - .codescan
pushartifact:
  extends:
    - .pushartifact
- 这里在把之前的jenkins的CD代码优化下:

符合预期:
- gitlabCI完成了,如何完成CD呢?
这里改造下代码:
如何限制作业的运行?
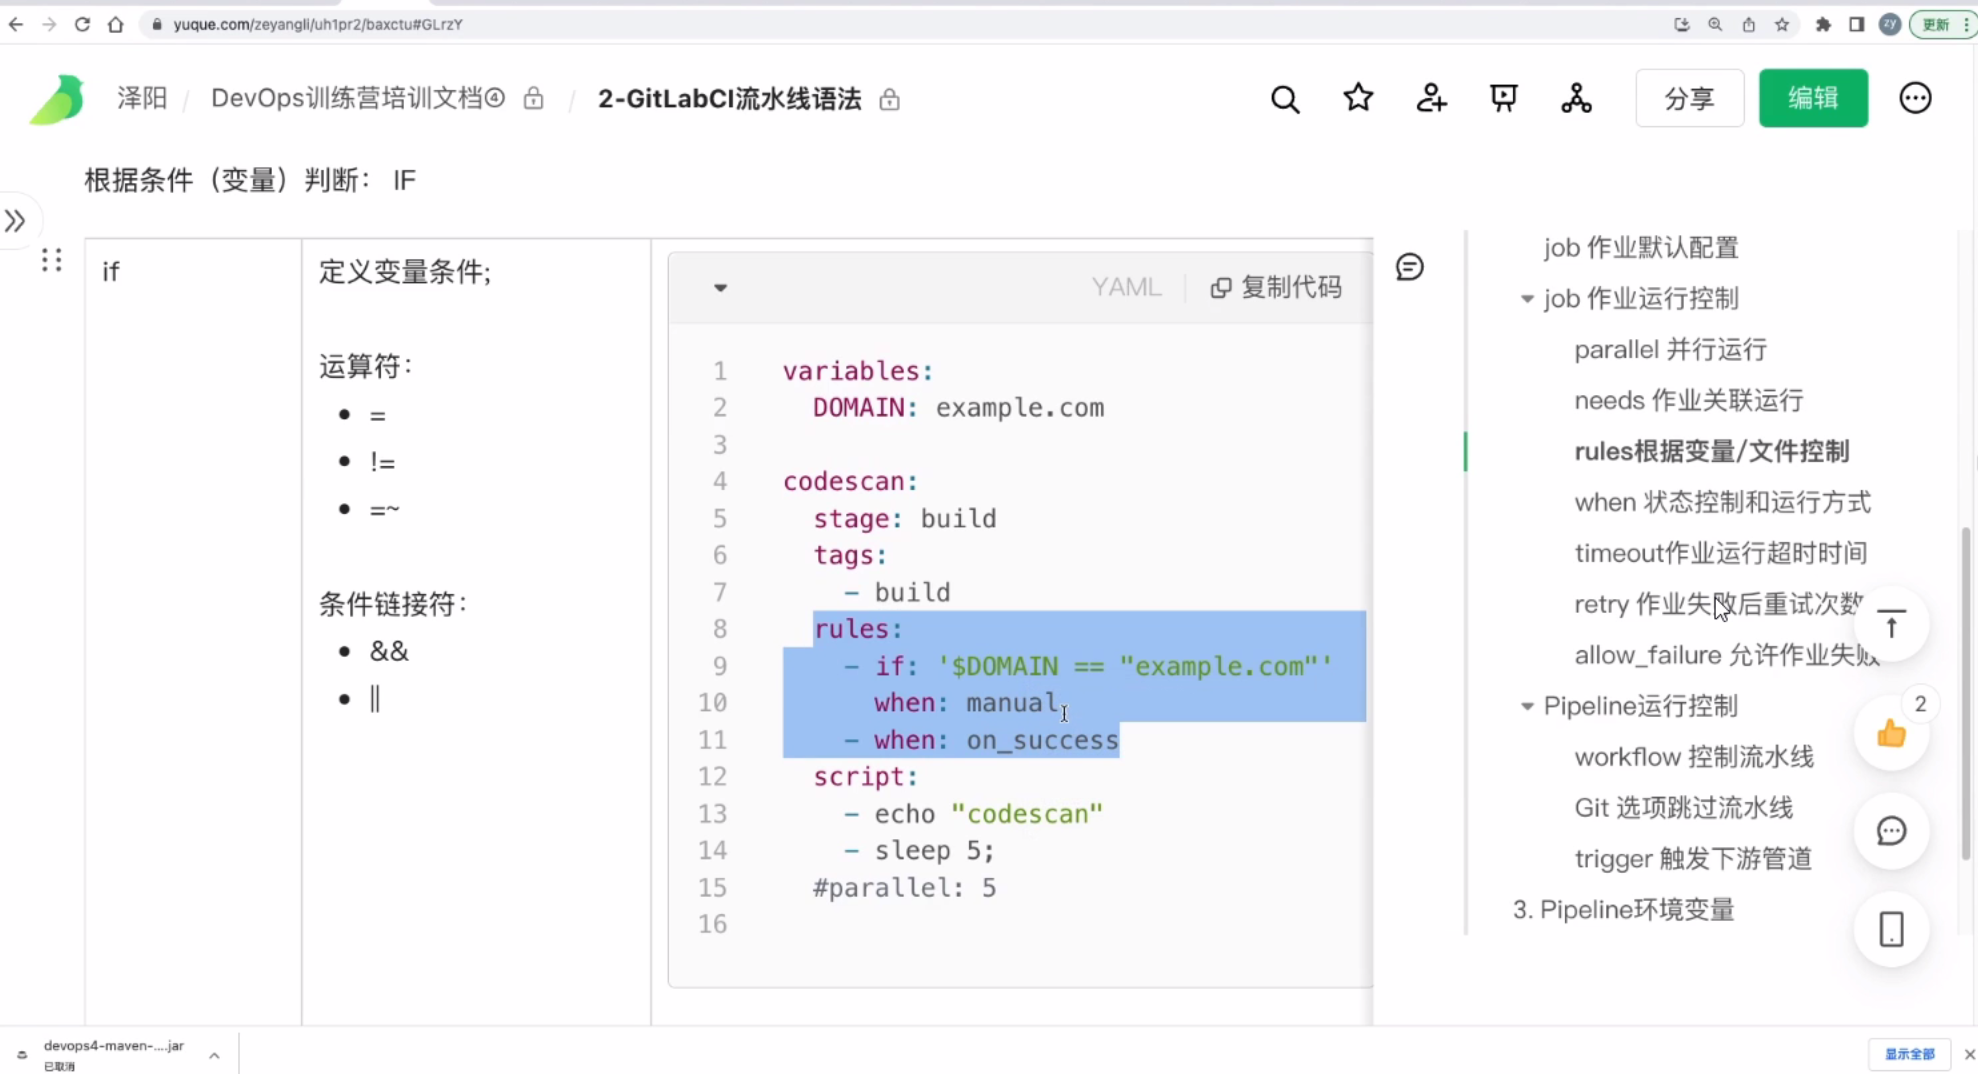
配置代码:
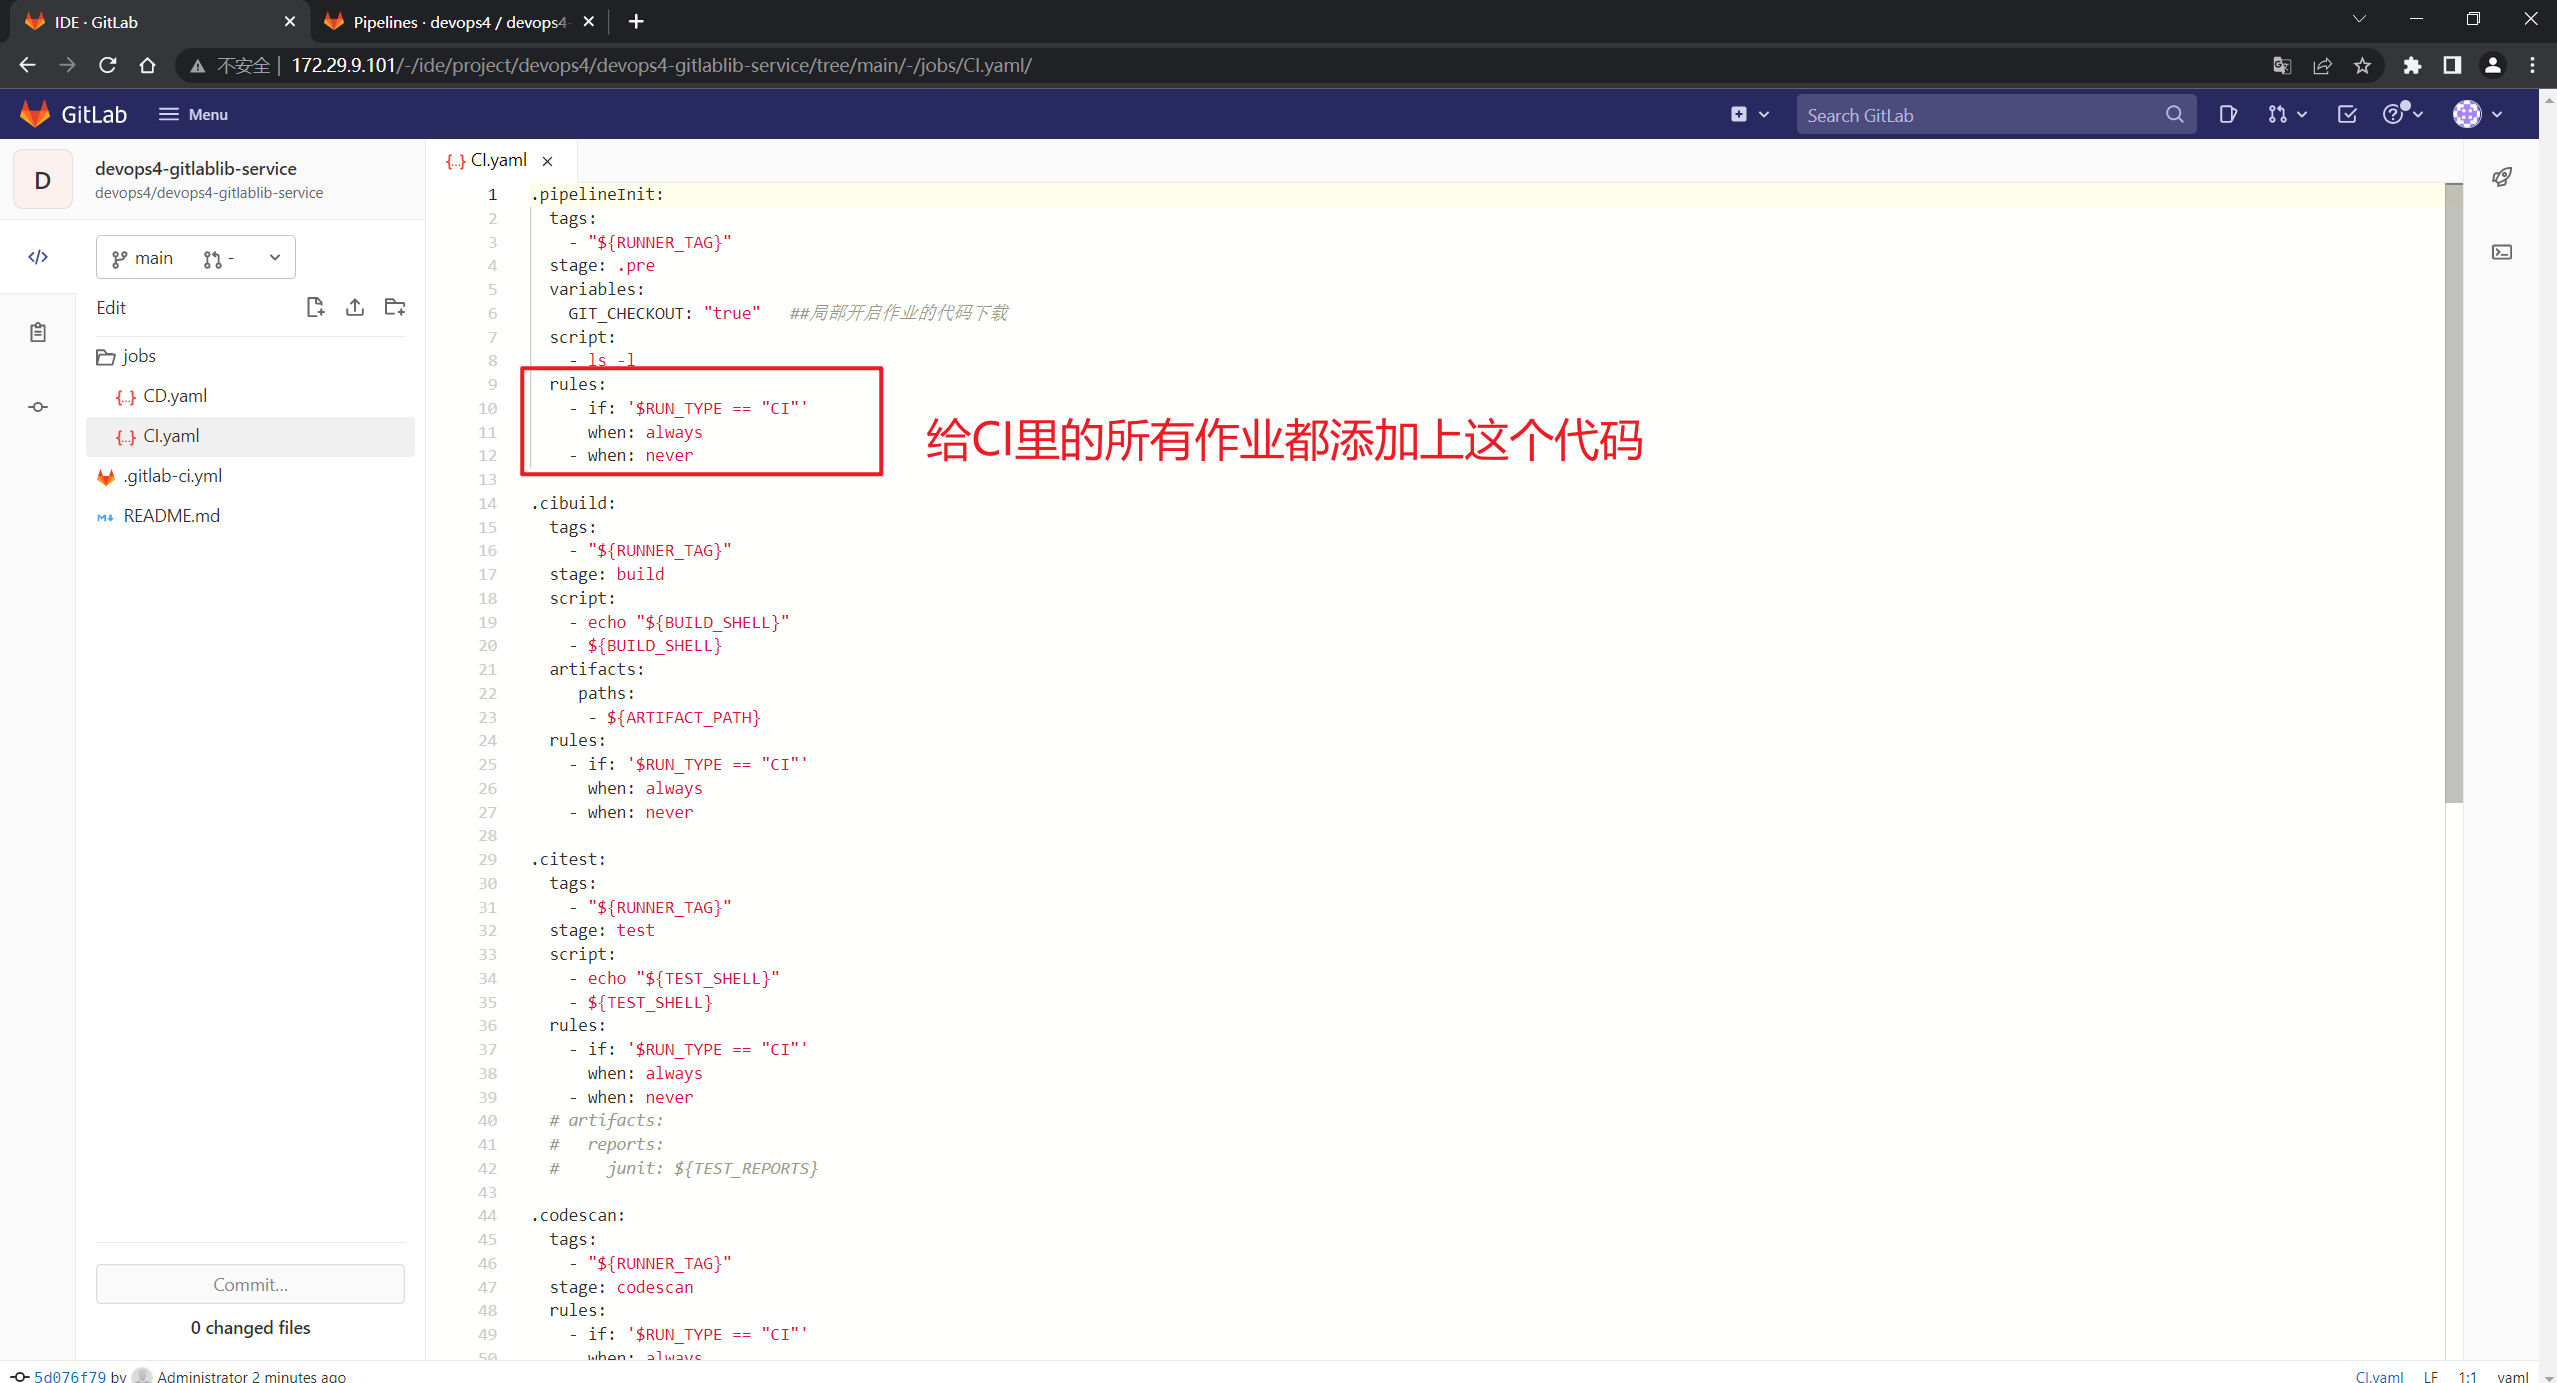
运行测试:
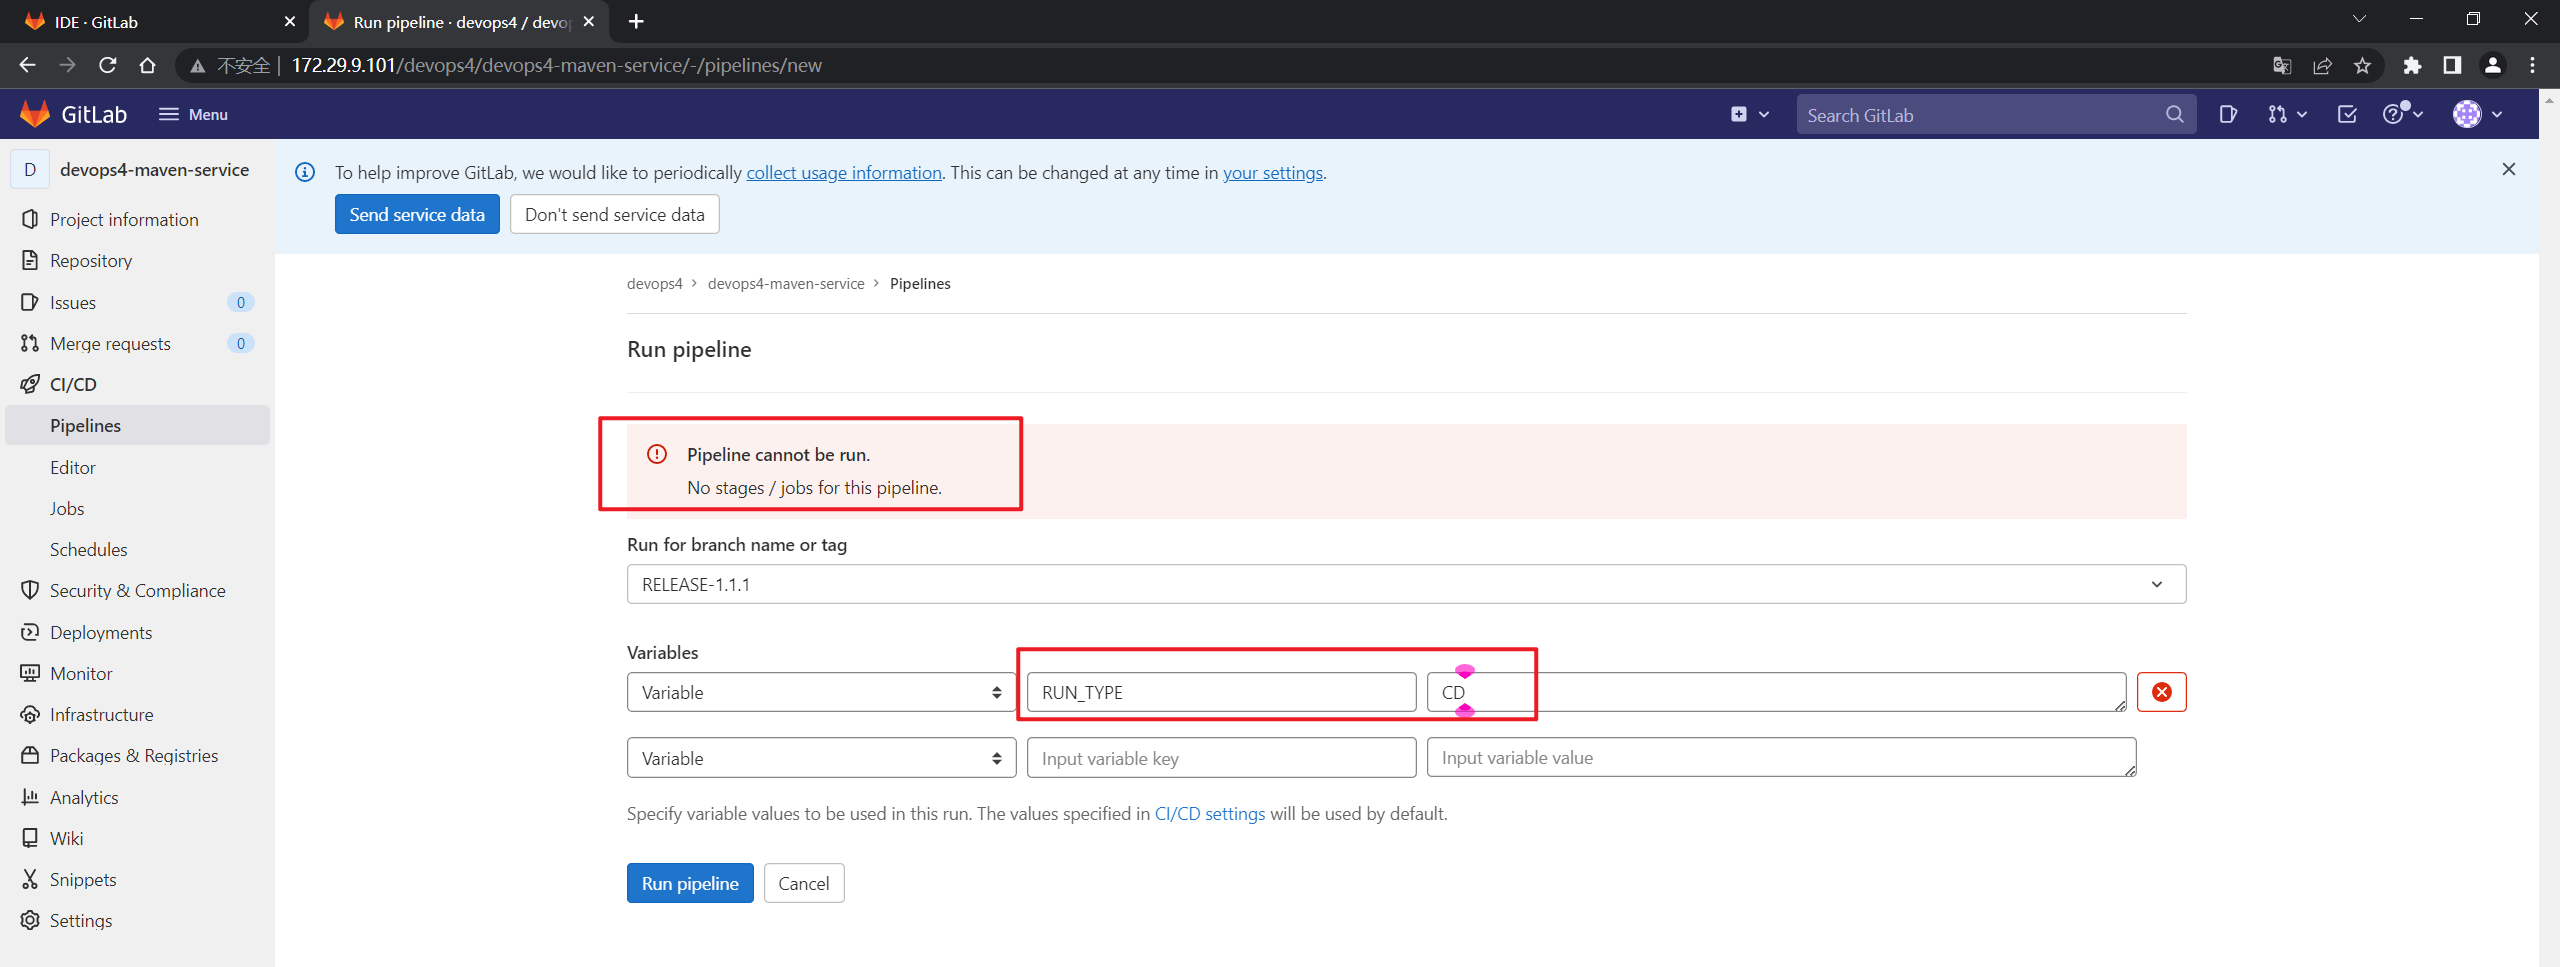
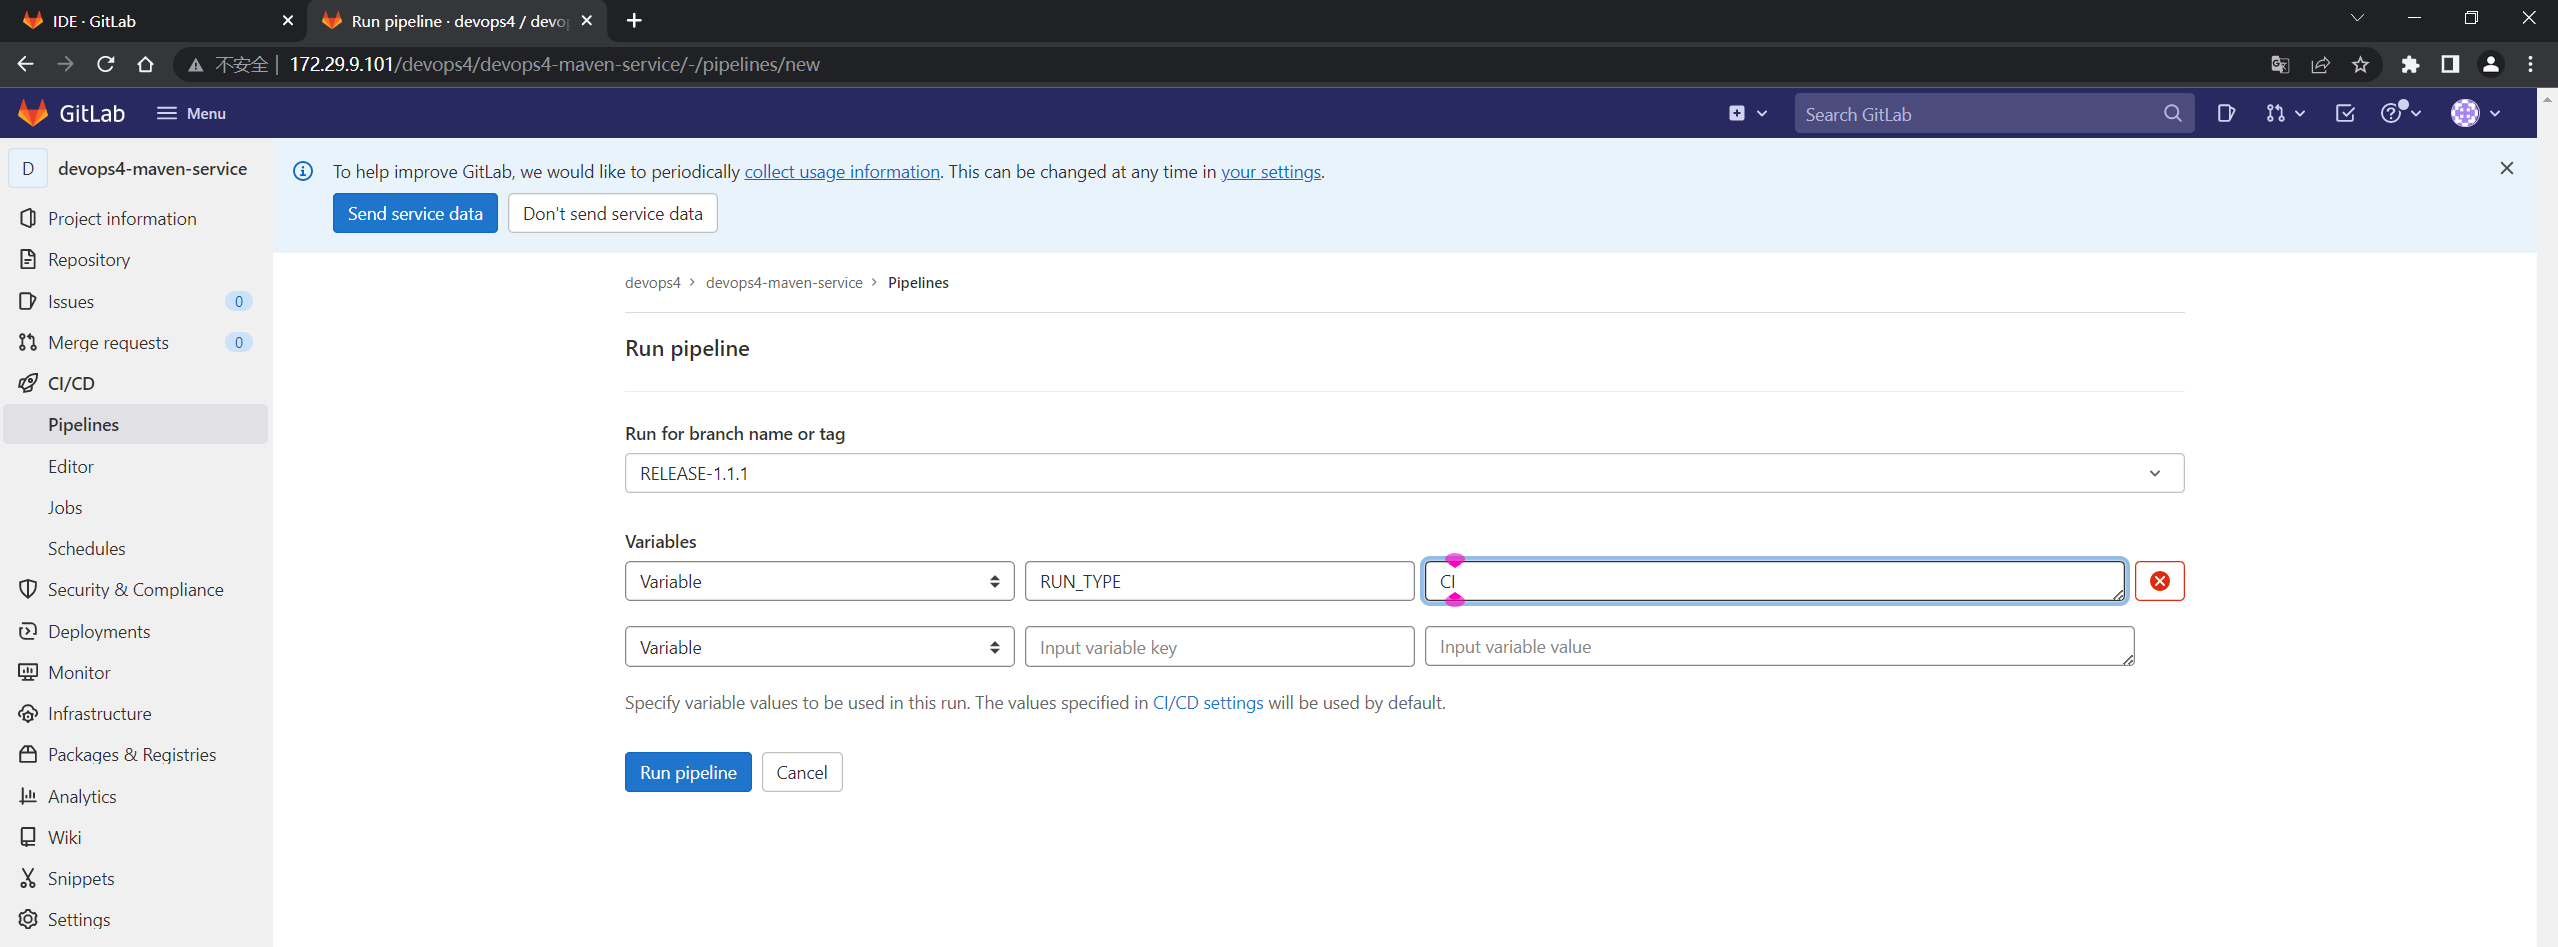
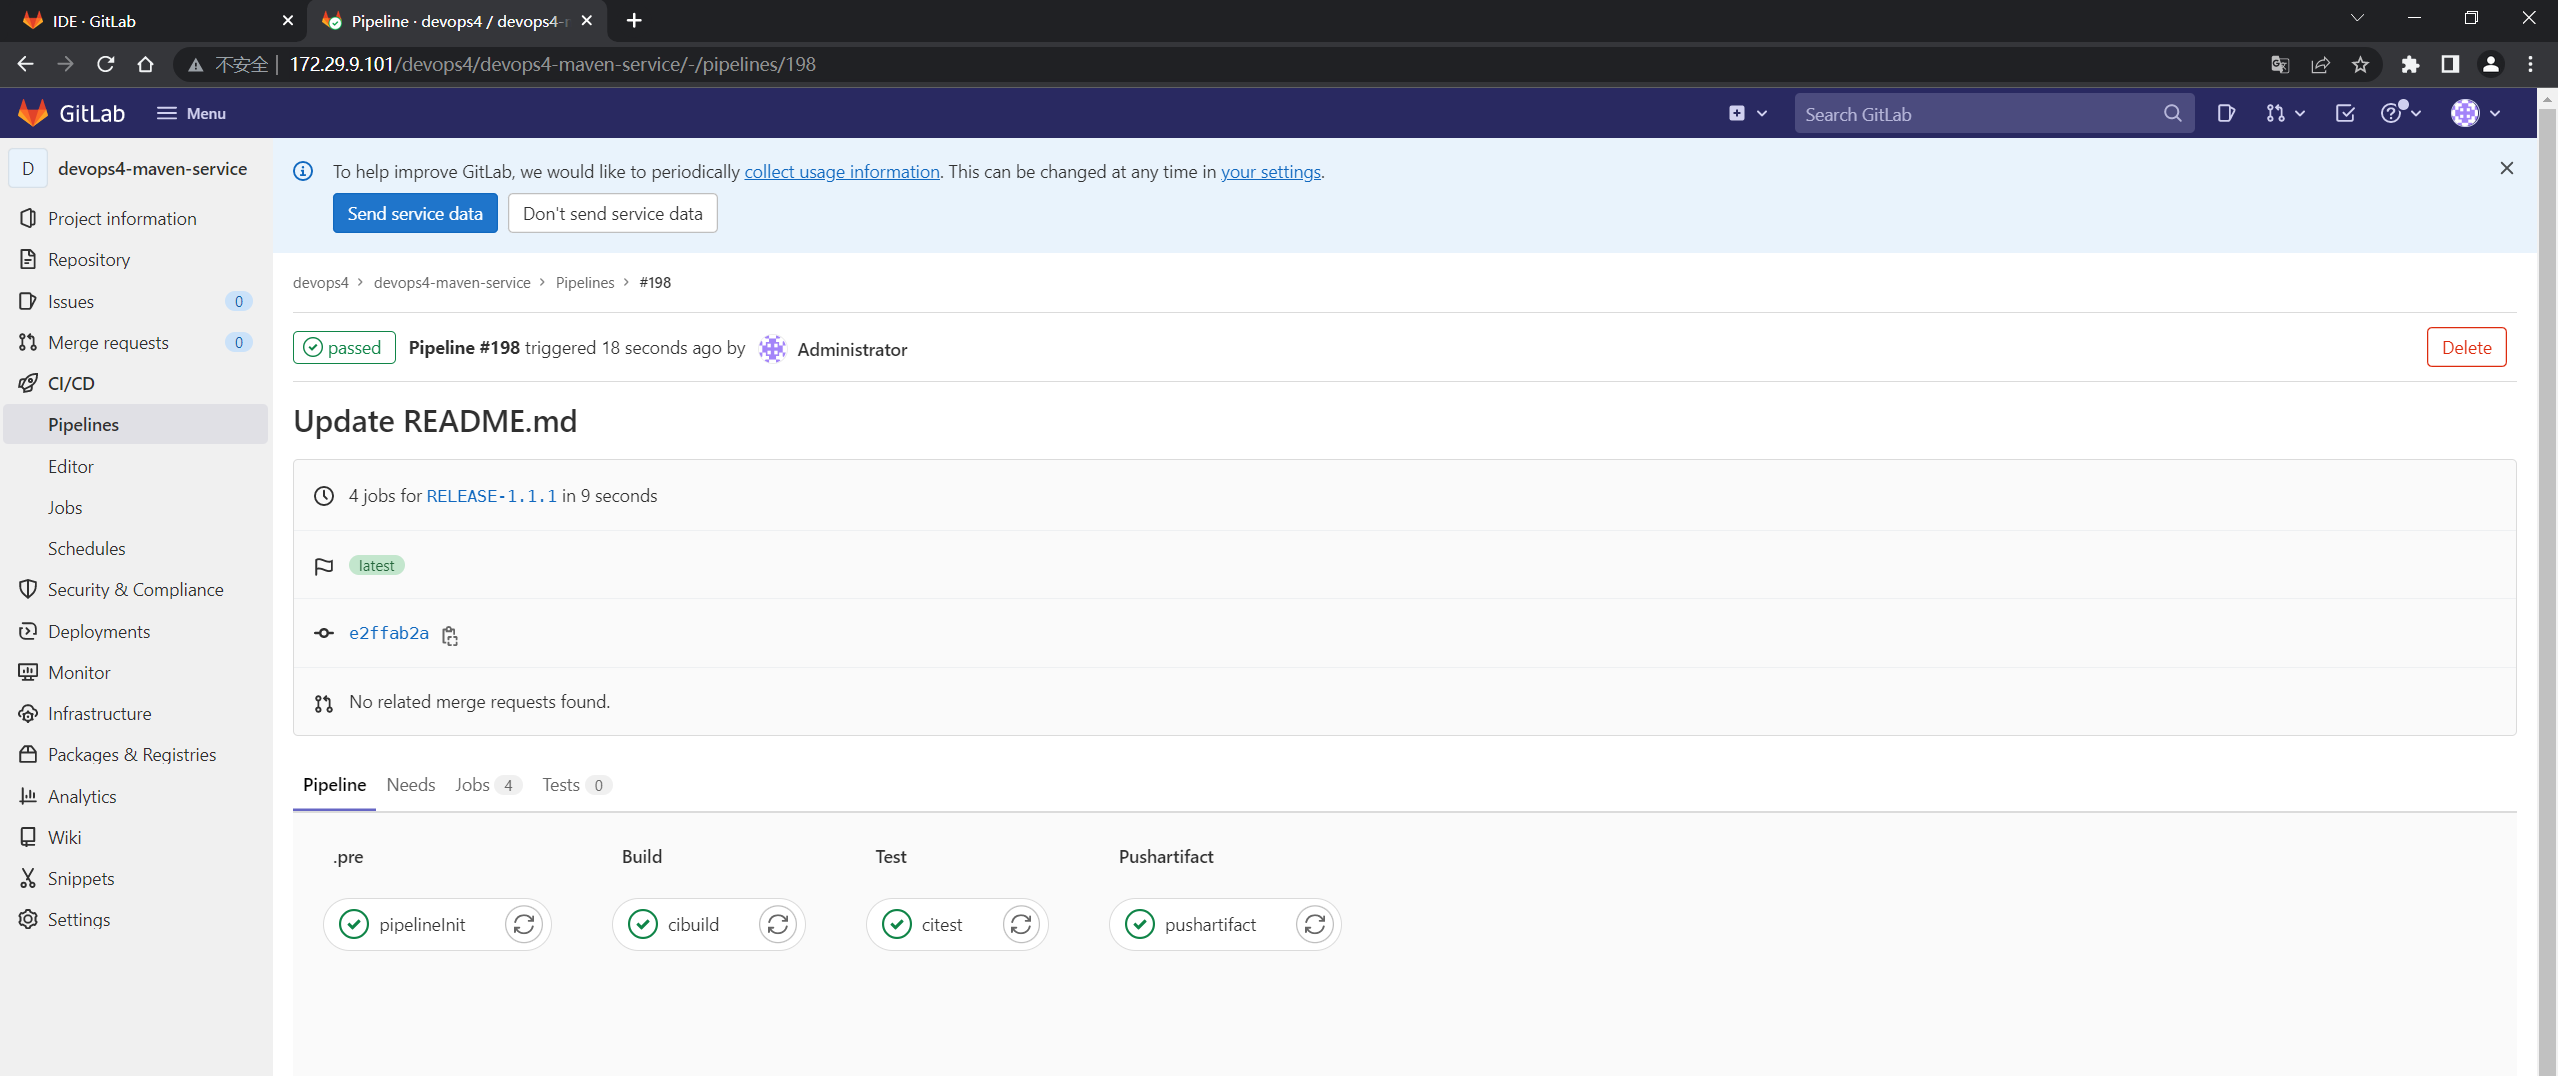
符合预期。
- 现在开始写CD:
把这一部分拿过来:
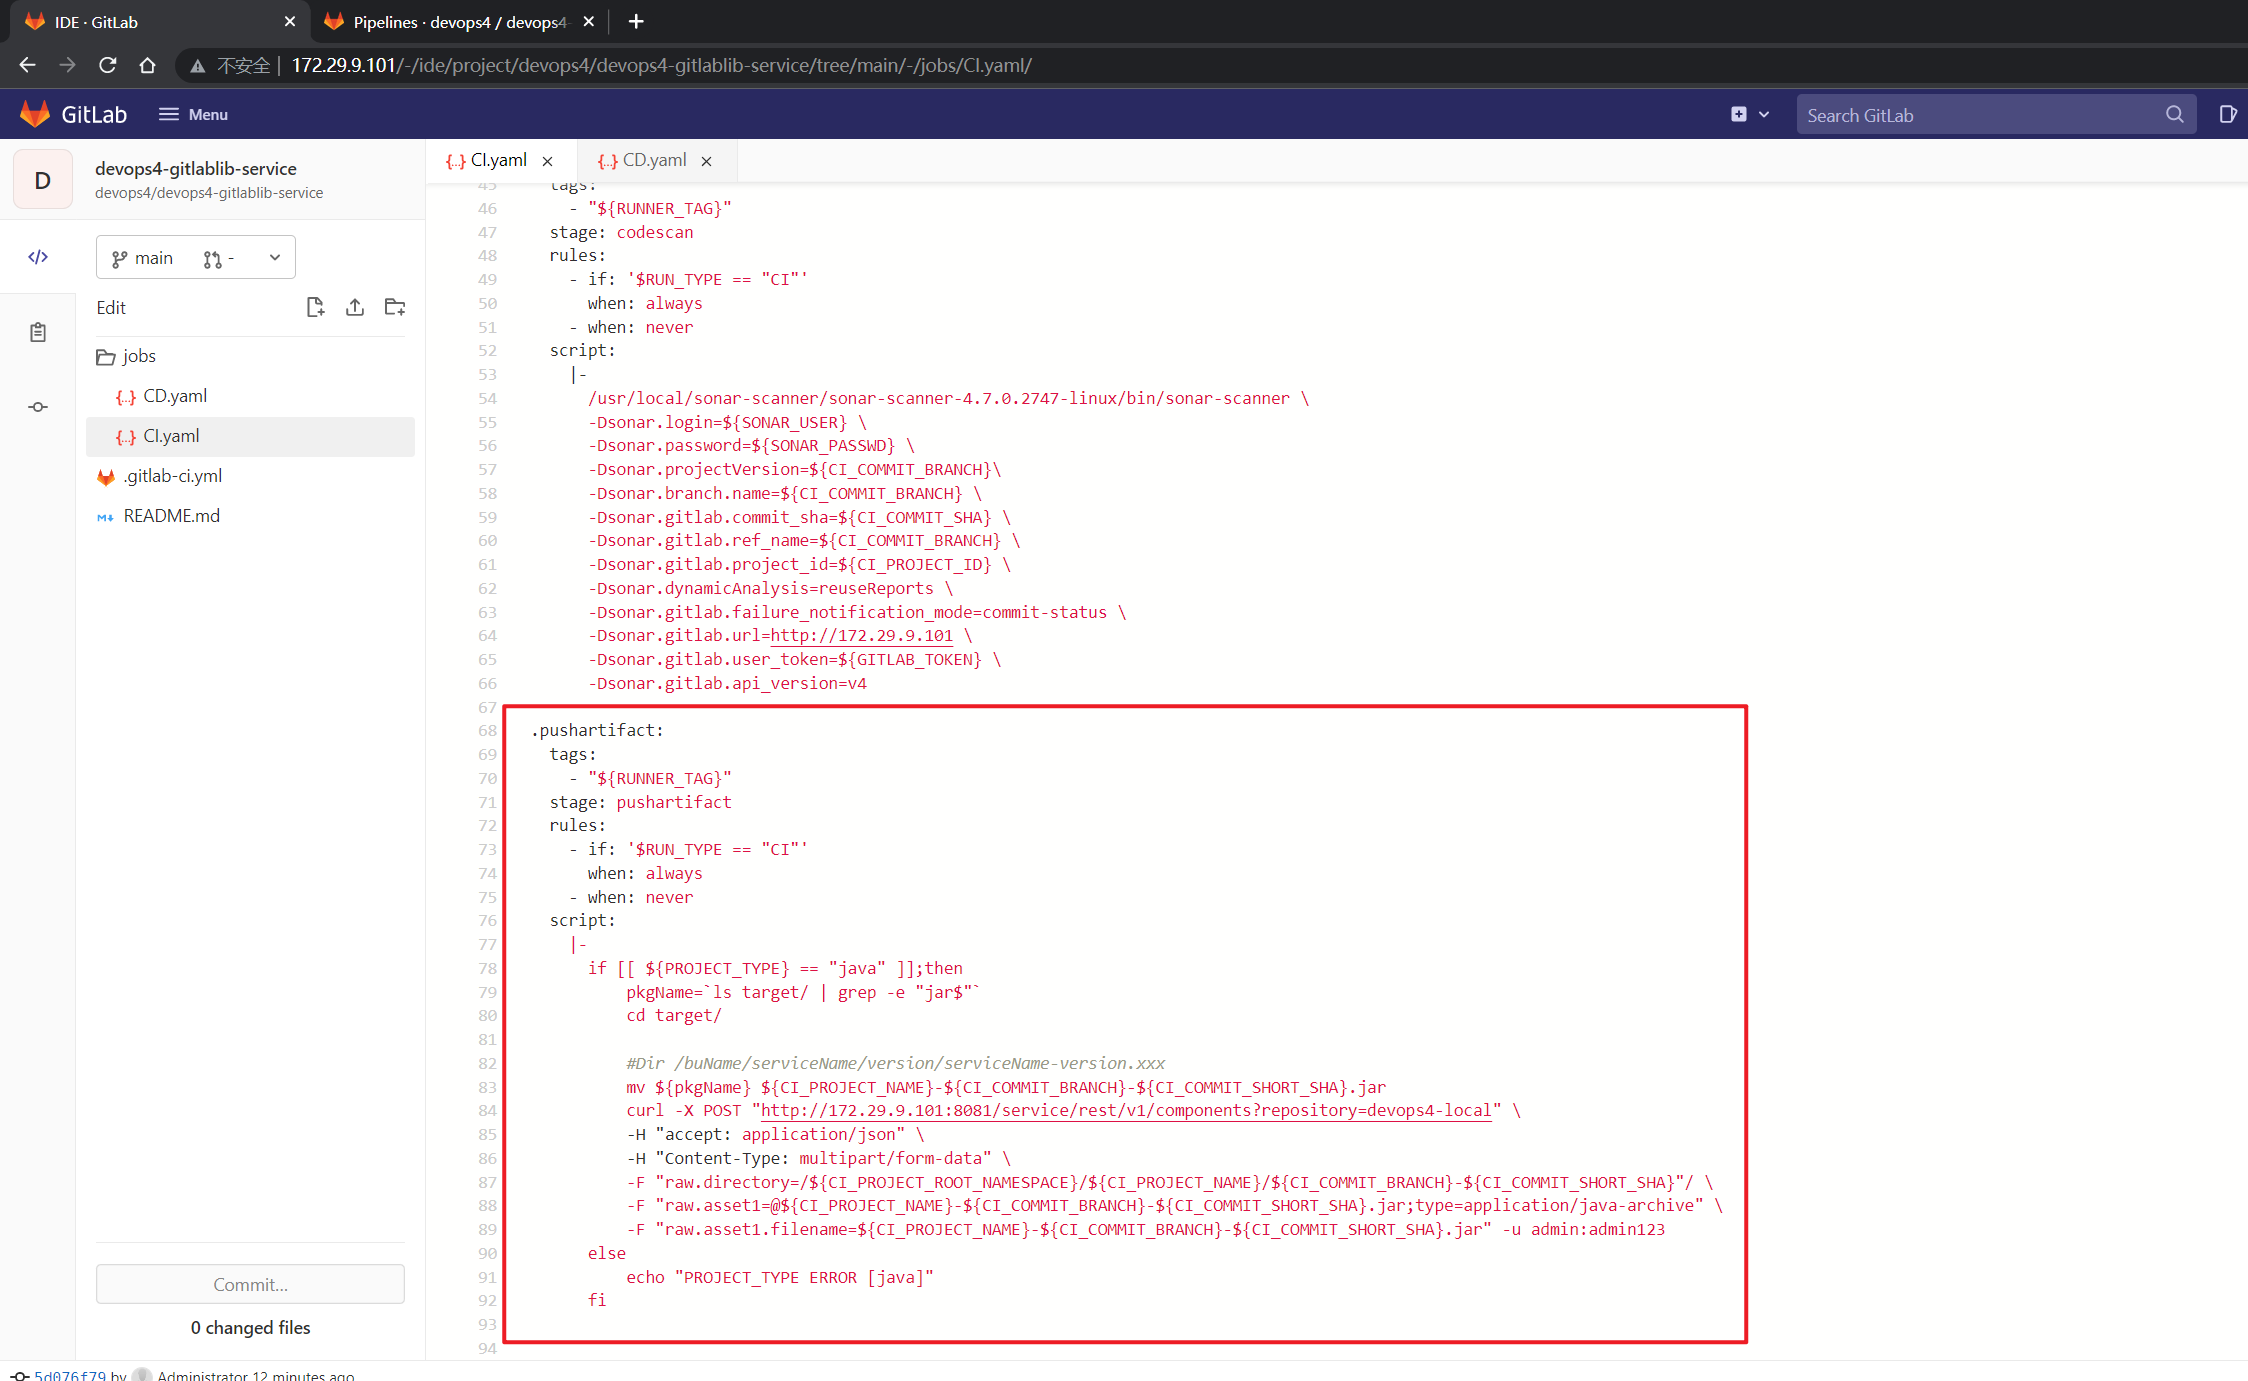

配置如下:

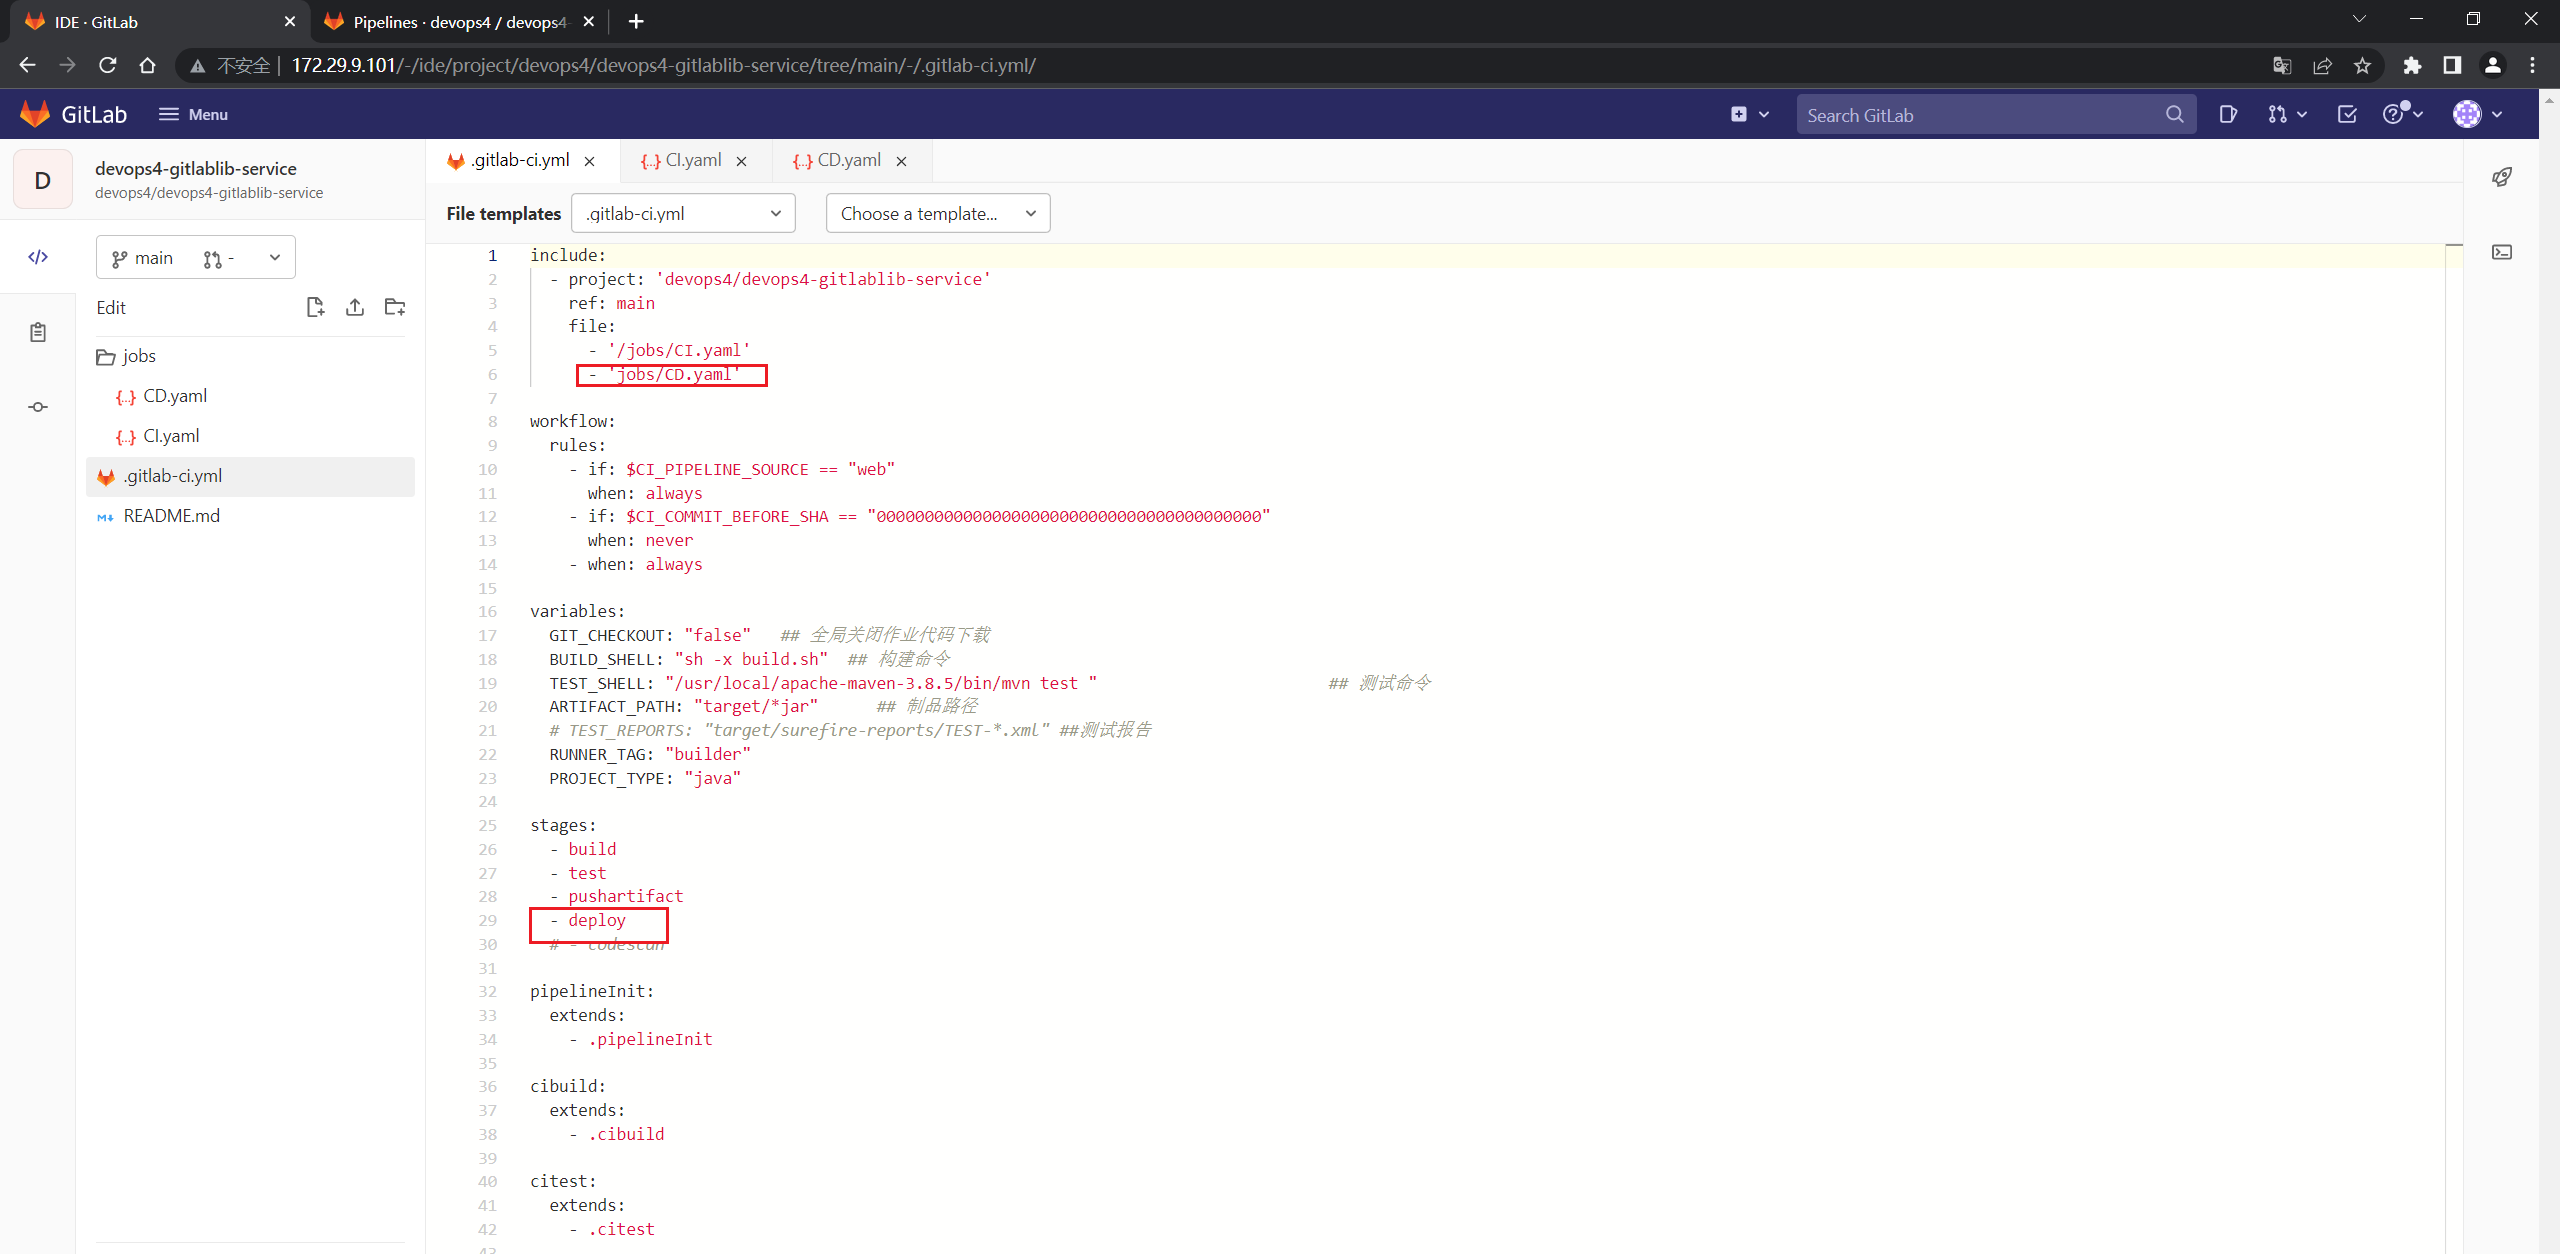
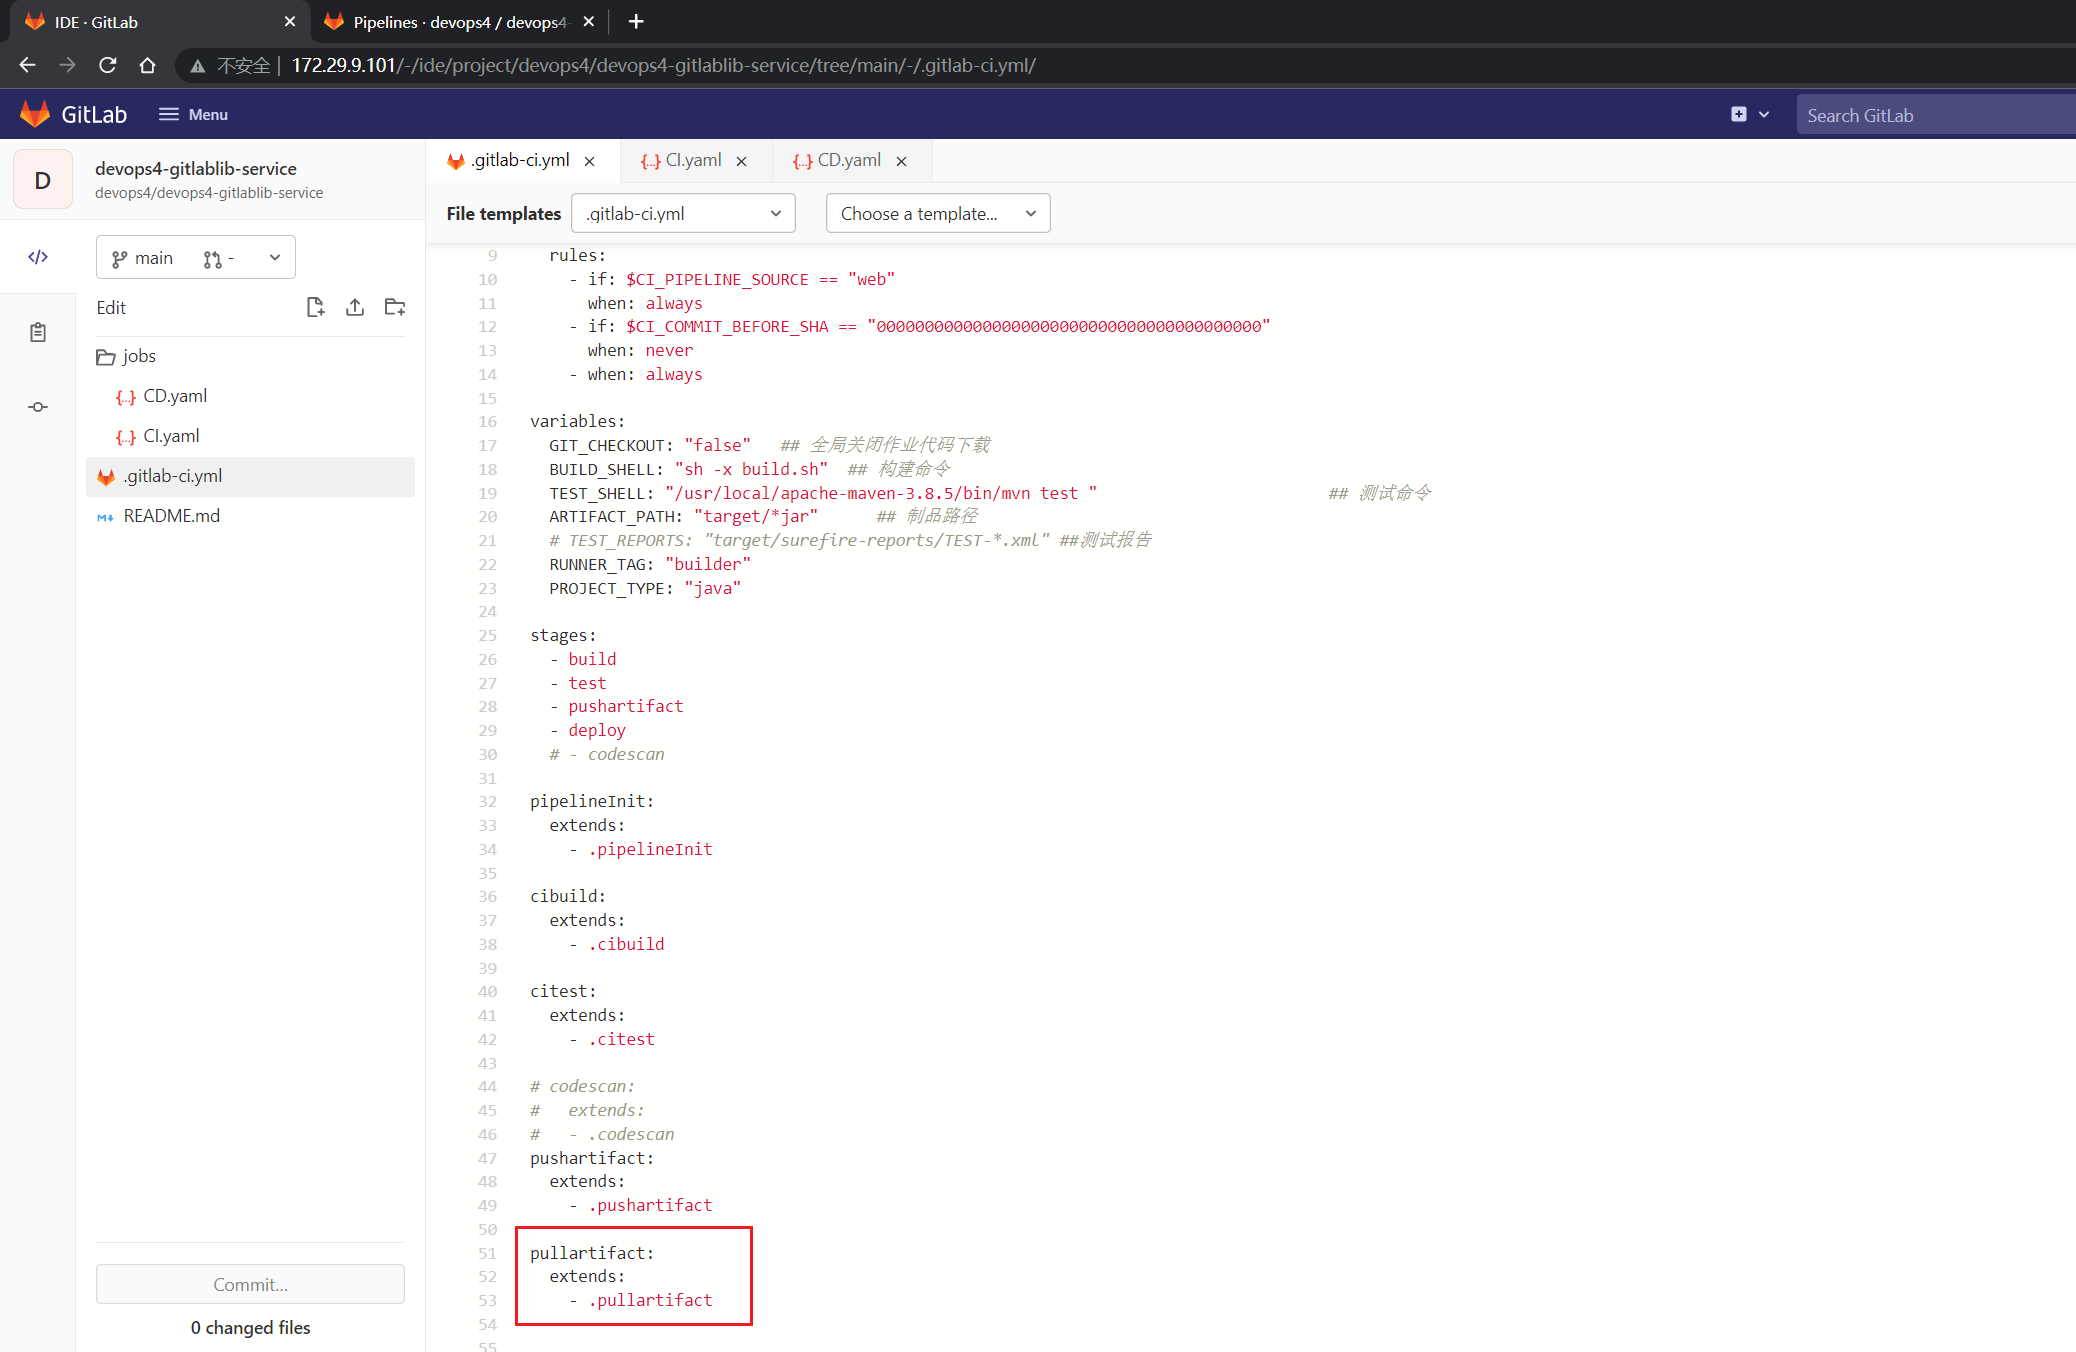
运行测试:

此时发现,他把代码给下载下来了,但是我们不需要下载代码,这个该如何优化下呢?
我们可以借助这里来配置下:
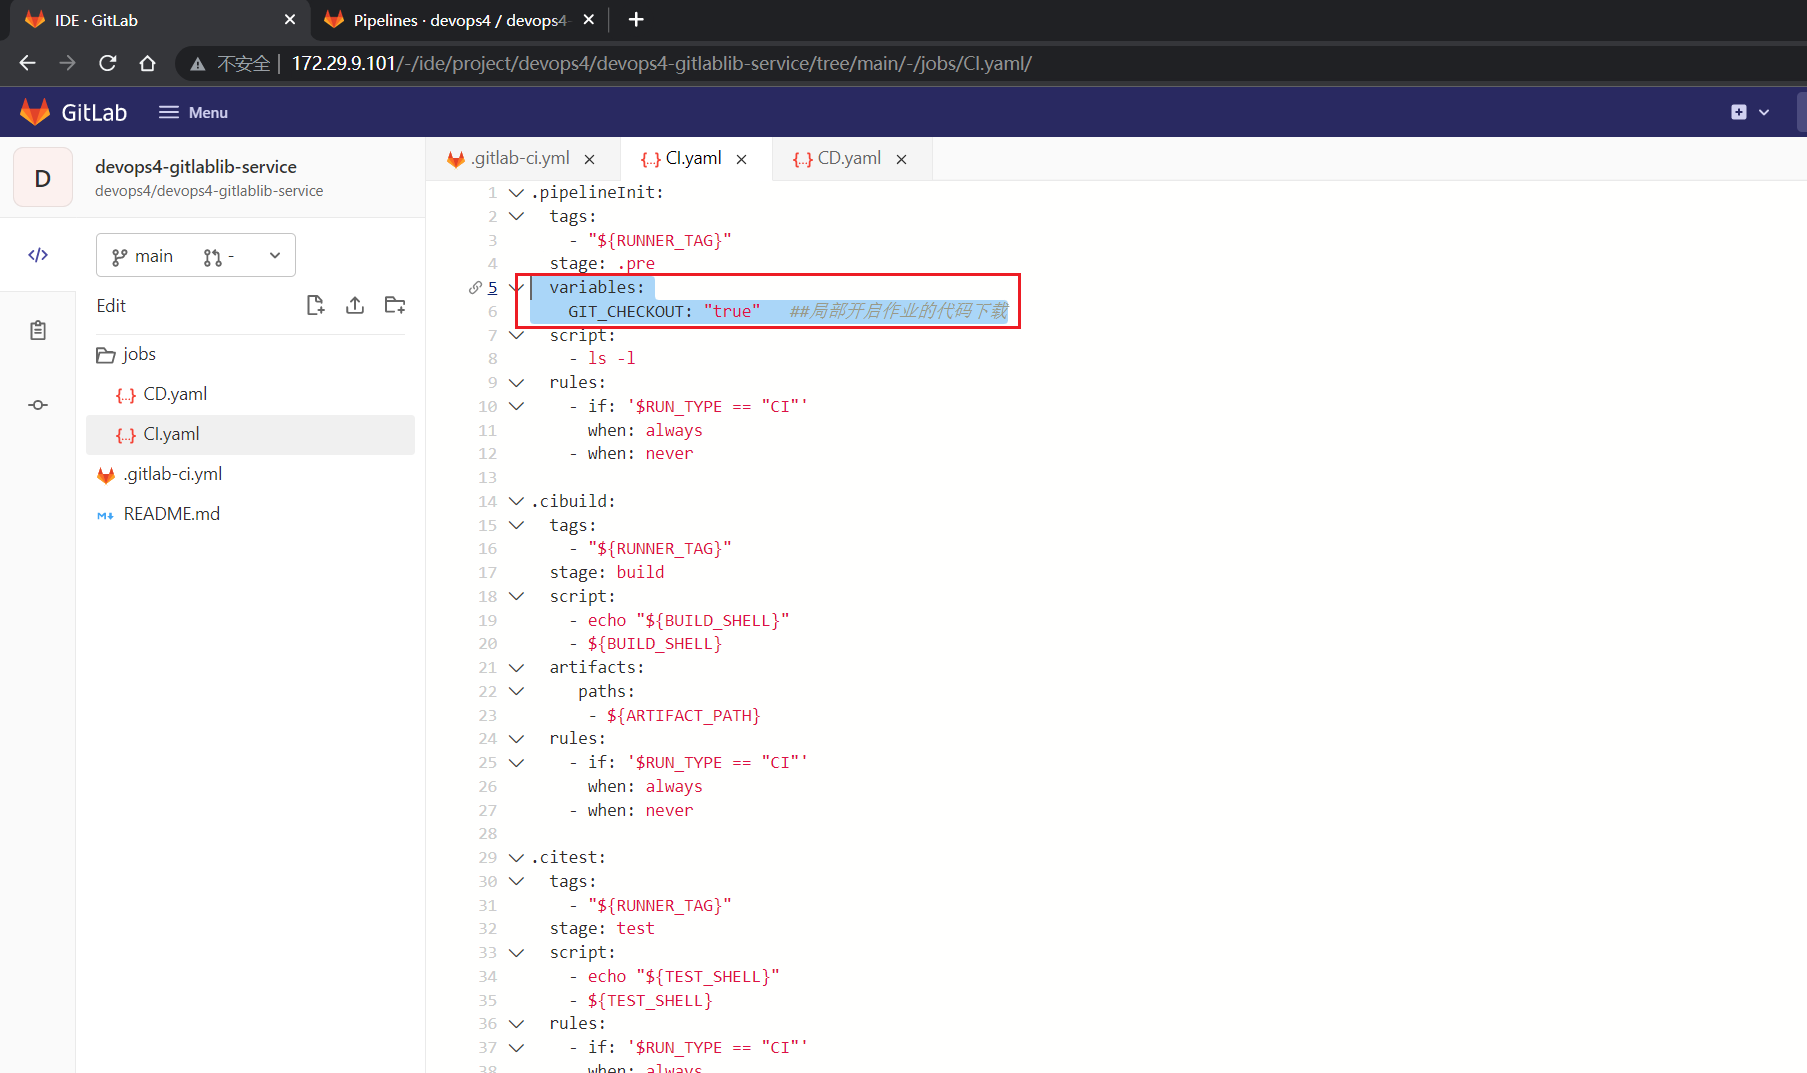
但是这里已经全局关闭了代码下载的,为什么CD里还会再下一次代码呢:
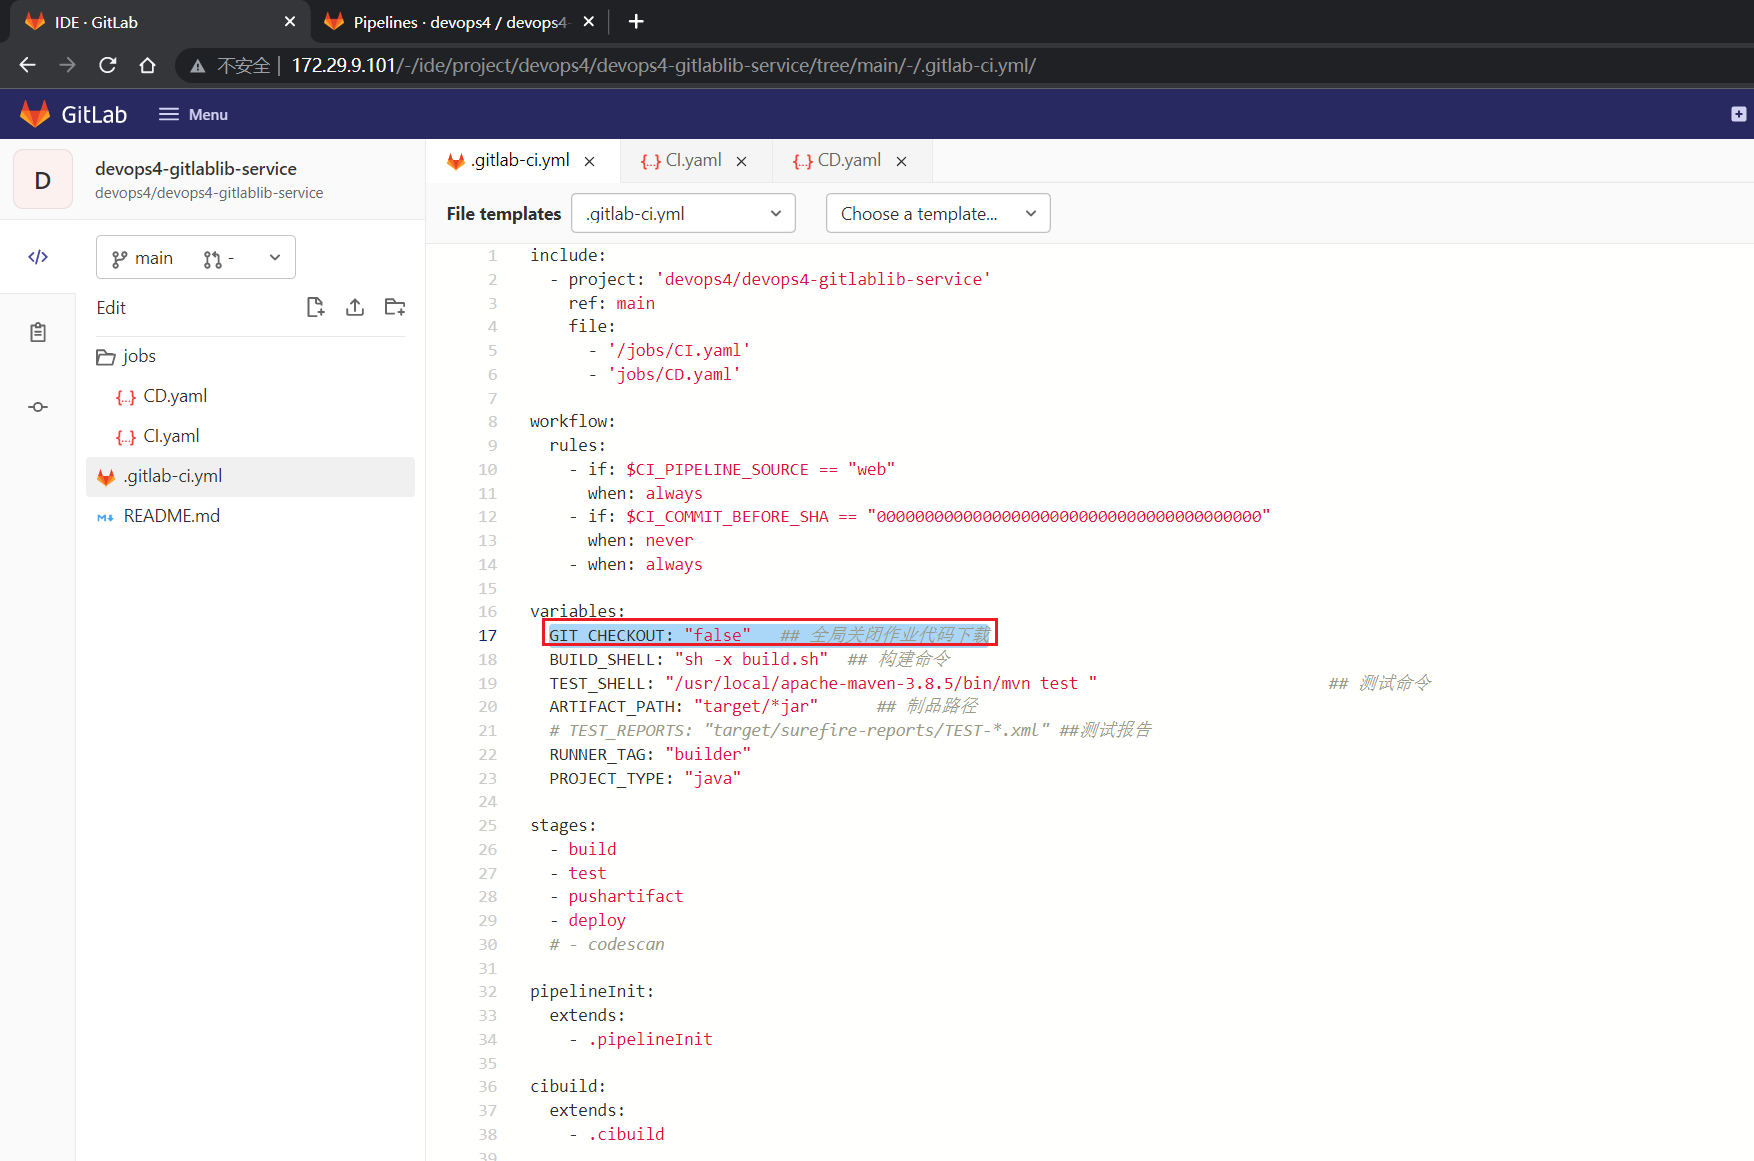
我们这里再配置下,并观察效果:
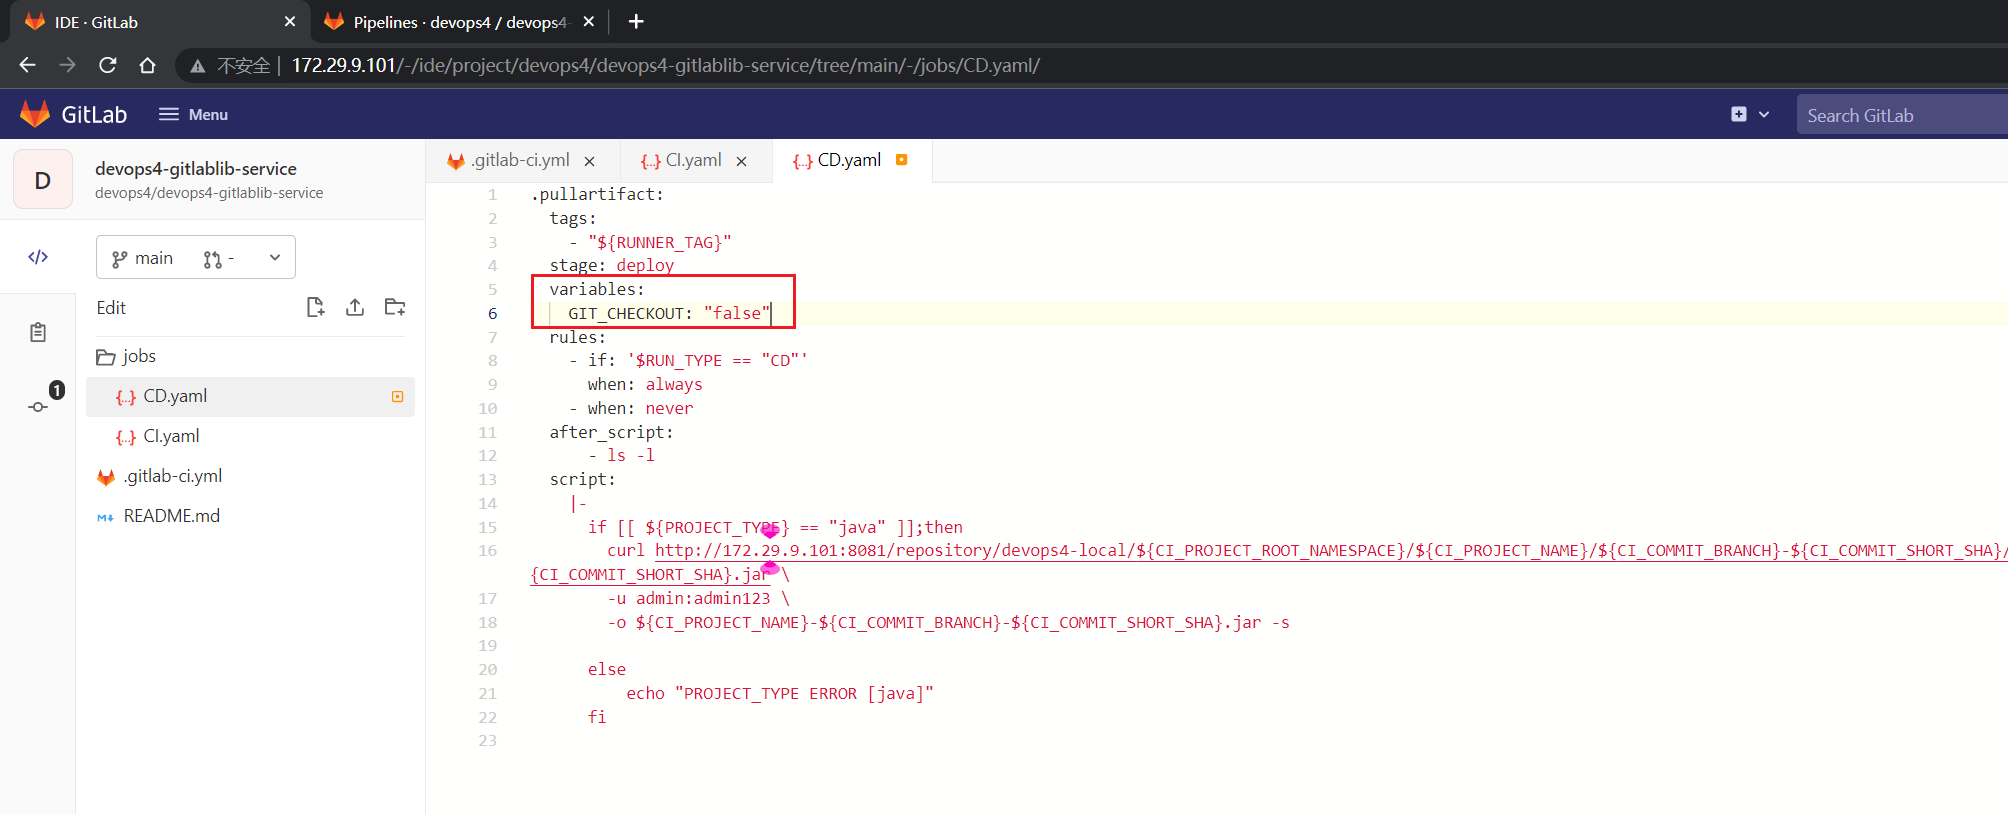
经观察,这里还是会下载代码的:……
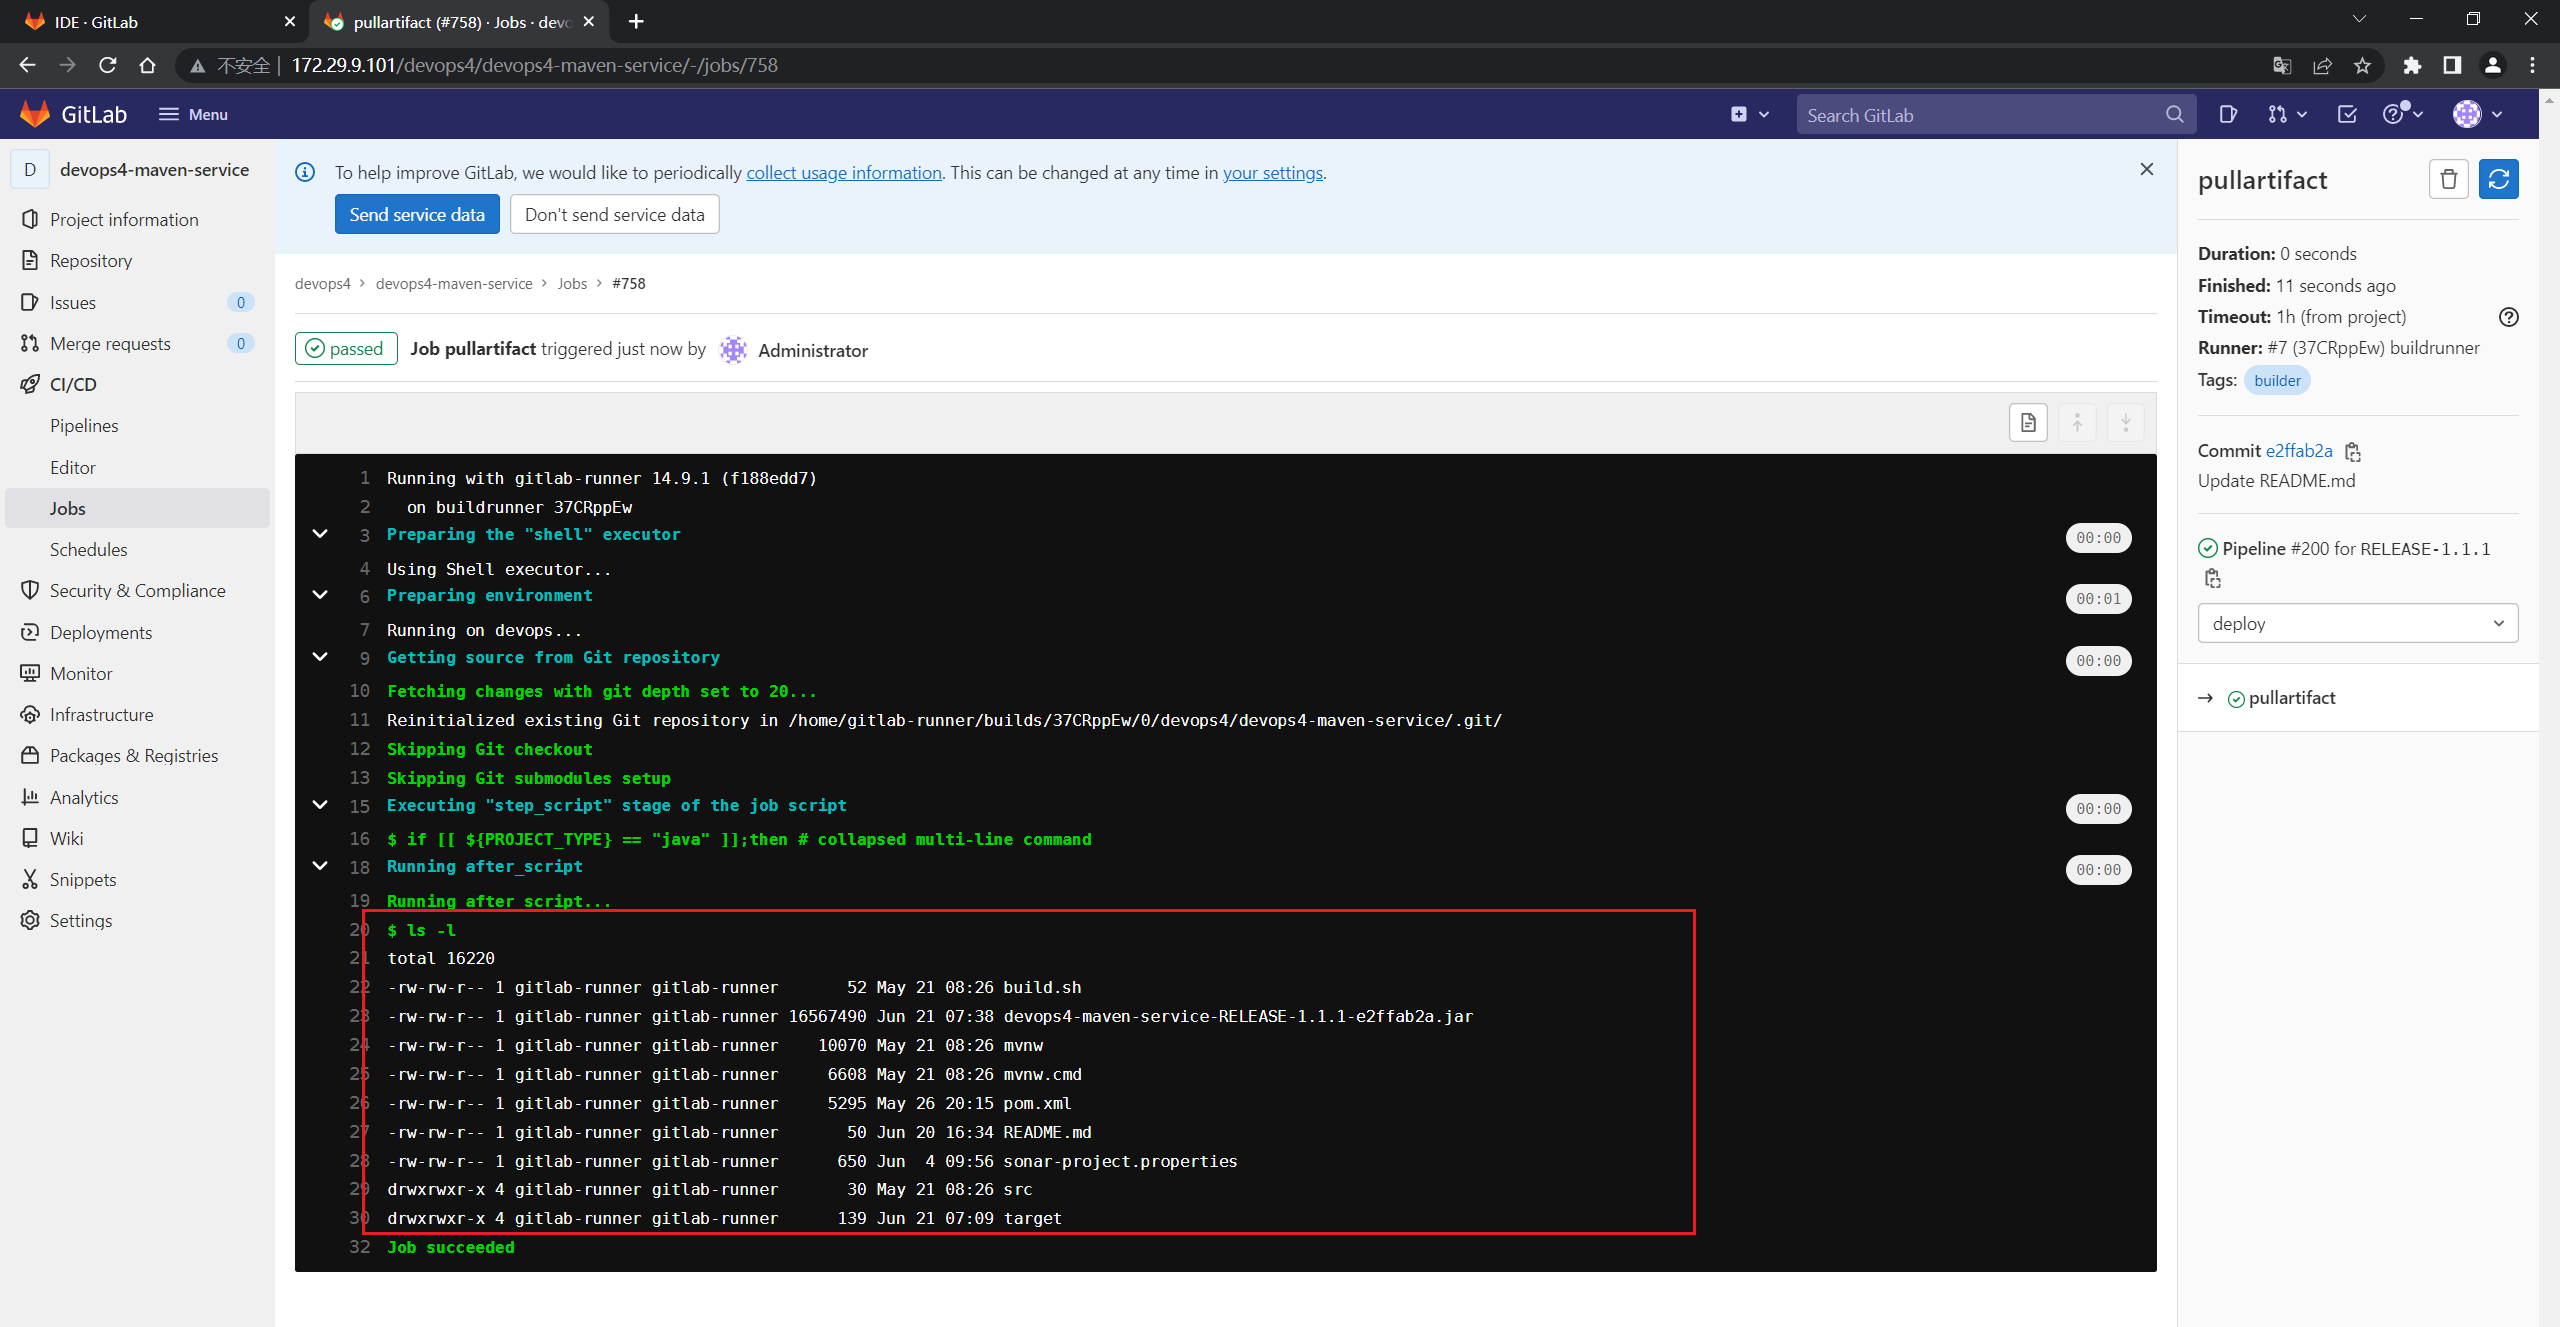
至此,GITLABCI的CI/CD实验结束。😘
2.GitLab Package【扩展】

curl --header "PRIVATE-TOKEN: apF1R9s9JJBYJzLF5mYd" \
     --upload-file sonar-gitlab-plugin-4.1.0-SNAPSHOT.jar \
     "http://192.168.1.200/api/v4/projects/33/packages/generic/devops03-maven-service/0.0.1/sonar-gitlab-plugin-4.1.0-SNAPSHOT.jar?status=default"
.pushartforgitlab:
  tags:
    - build
  stage: pushartifact
  script:
    |-
      if [[ ${PROJECT_TYPE} == "java" ]];then
          newPkgName=${CI_PROJECT_NAME}-${CI_COMMIT_SHA}.jar
          pkgName=`ls target/ | grep -e "jar$"`
          cd target/
          mv ${pkgName} ${newPkgName}
          curl --header "JOB-TOKEN: ${CI_JOB_TOKEN}" \
          --upload-file ${newPkgName} \
          "http://192.168.1.200/api/v4/projects/${CI_PROJECT_ID}/packages/generic/${CI_PROJECT_NAME}/${CI_COMMIT_SHA}/${newPkgName}?status=default"
      else
          echo "PROJECT_TYPE ERROR [java]"
      fi
3、Harbor镜像库实践
1.Harbor基本功能简介
2.Harbor安装部署配置
参考如下文档:

csdn文章:
https://blog.csdn.net/weixin_39246554/article/details/123195073?ops_request_misc=%257B%2522request%255Fid%2522%253A%2522165582064416780366594950%2522%252C%2522scm%2522%253A%252220140713.130102334.pc%255Fblog.%2522%257D&request_id=165582064416780366594950&biz_id=0&utm_medium=distribute.pc_search_result.none-task-blog-2blogfirst_rank_ecpm_v1~rank_v31_ecpm-1-123195073-null-null.nonecase&utm_term=harbor&spm=1018.2226.3001.4450
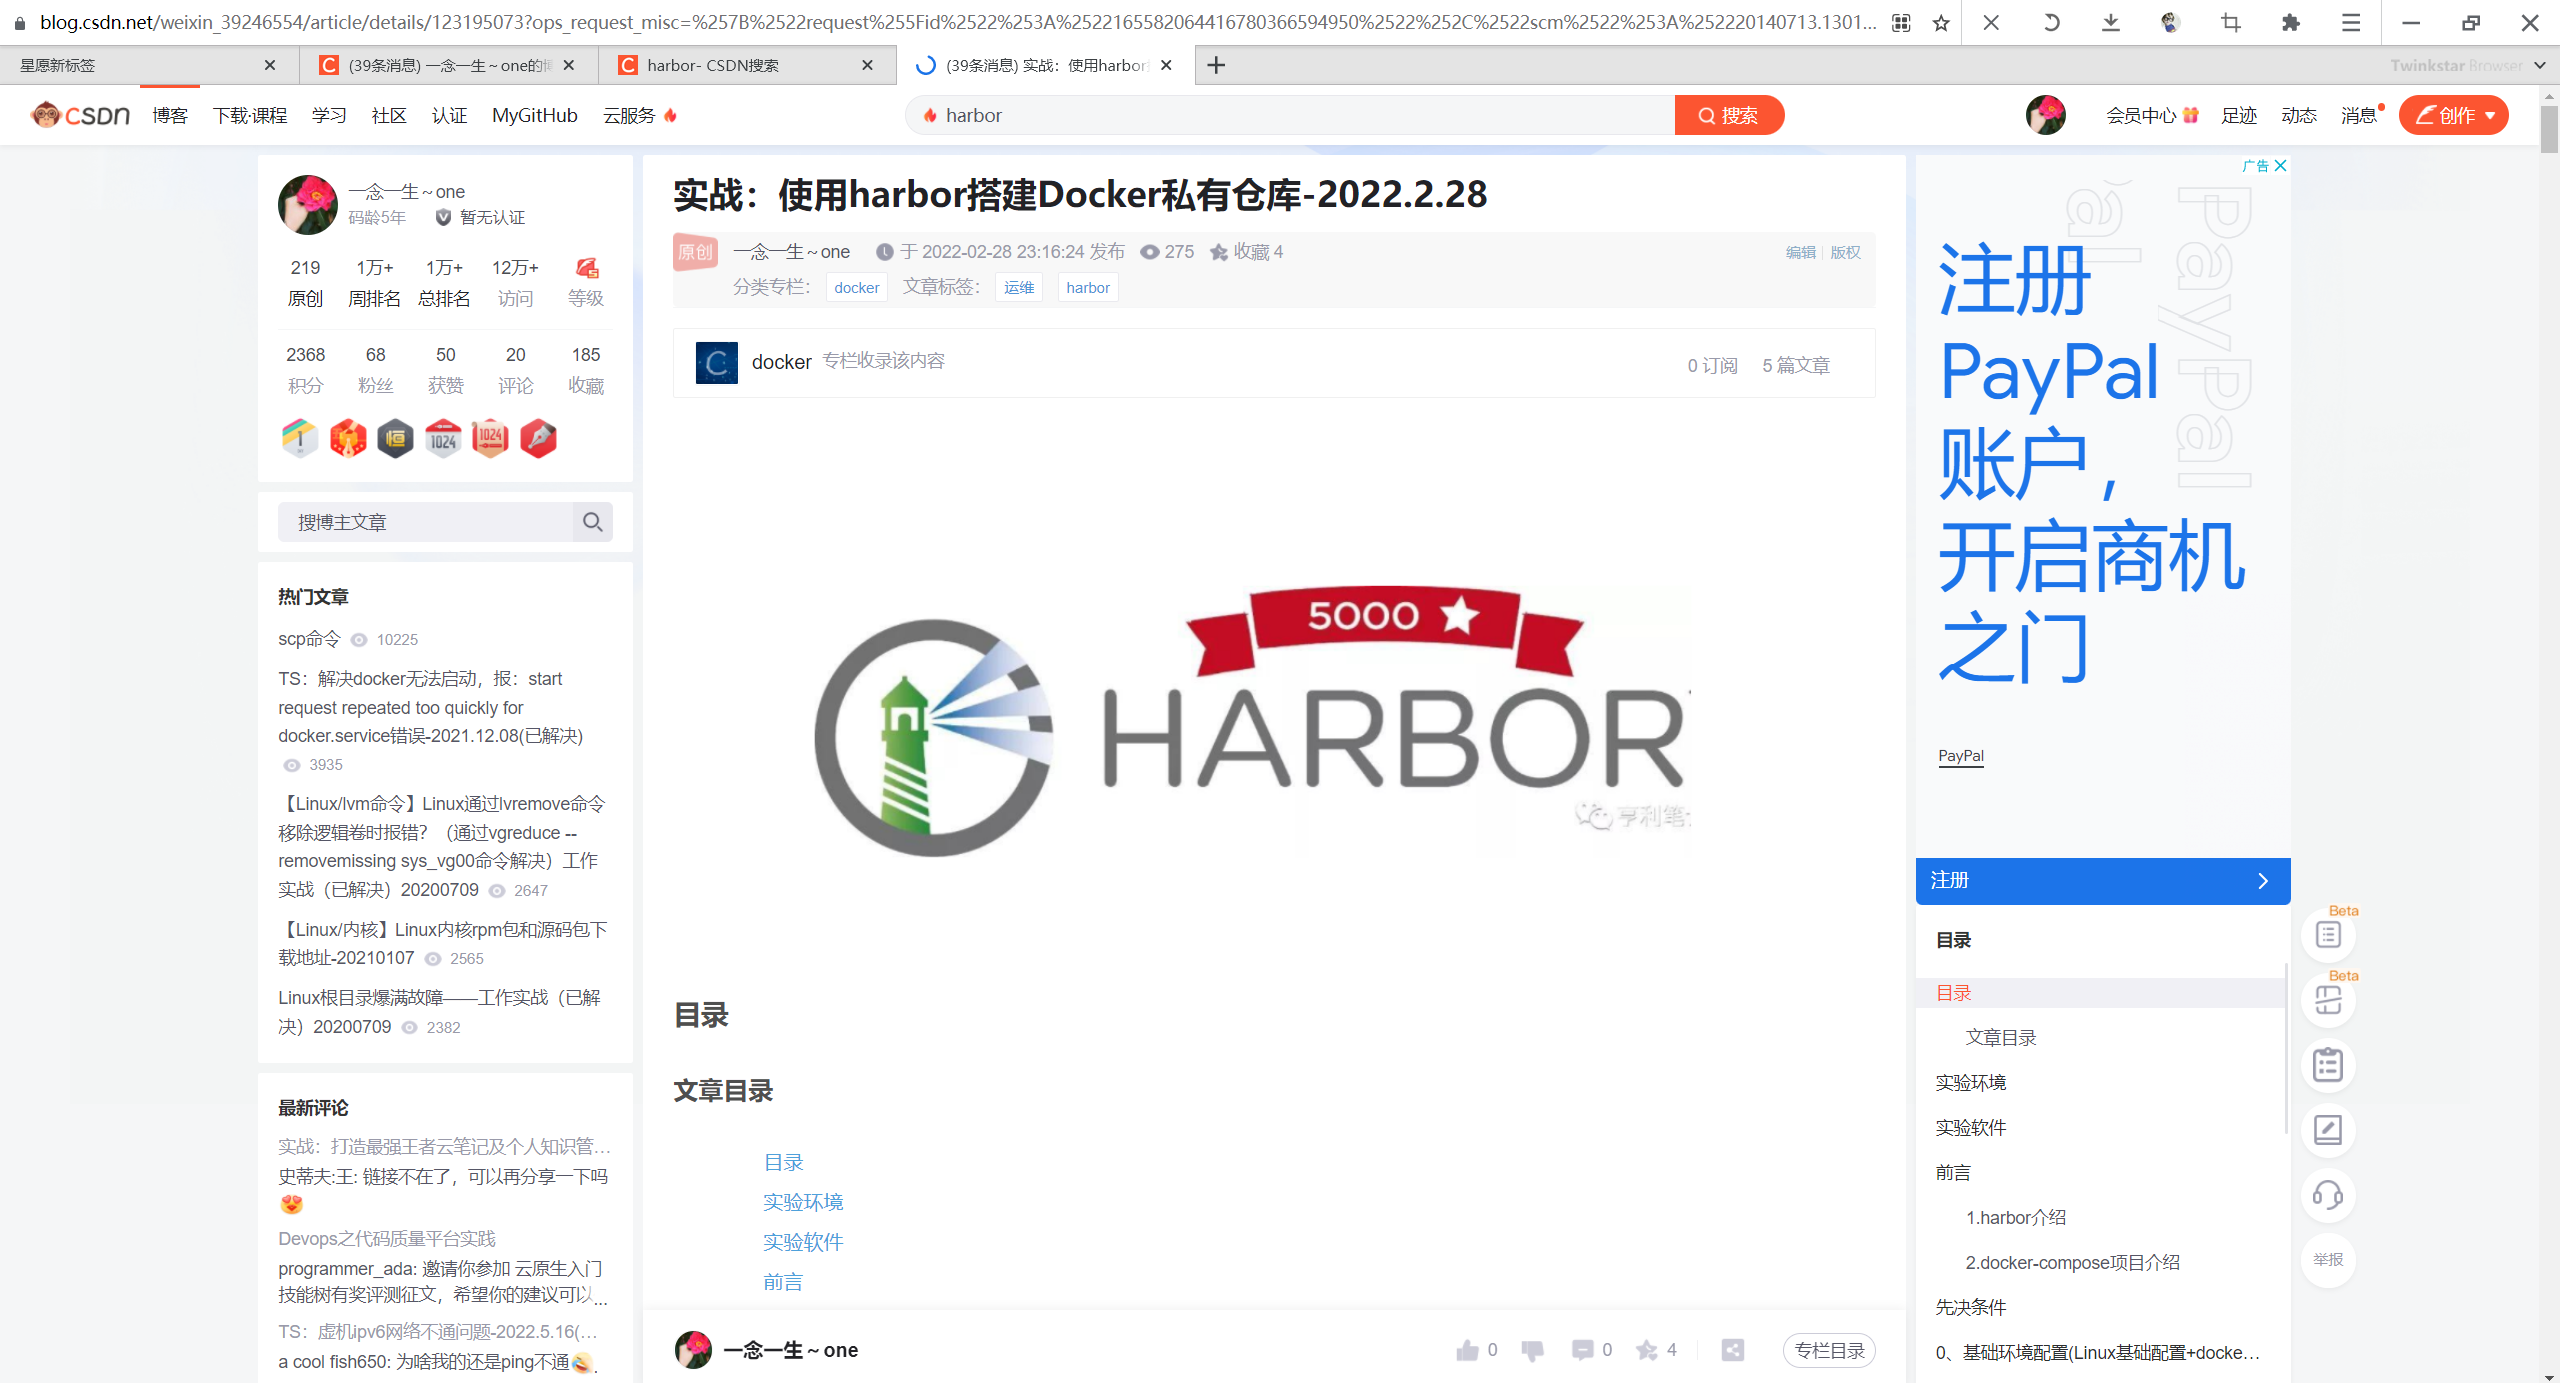
3.创建镜像仓库
创建一个叫做devops4的仓库:
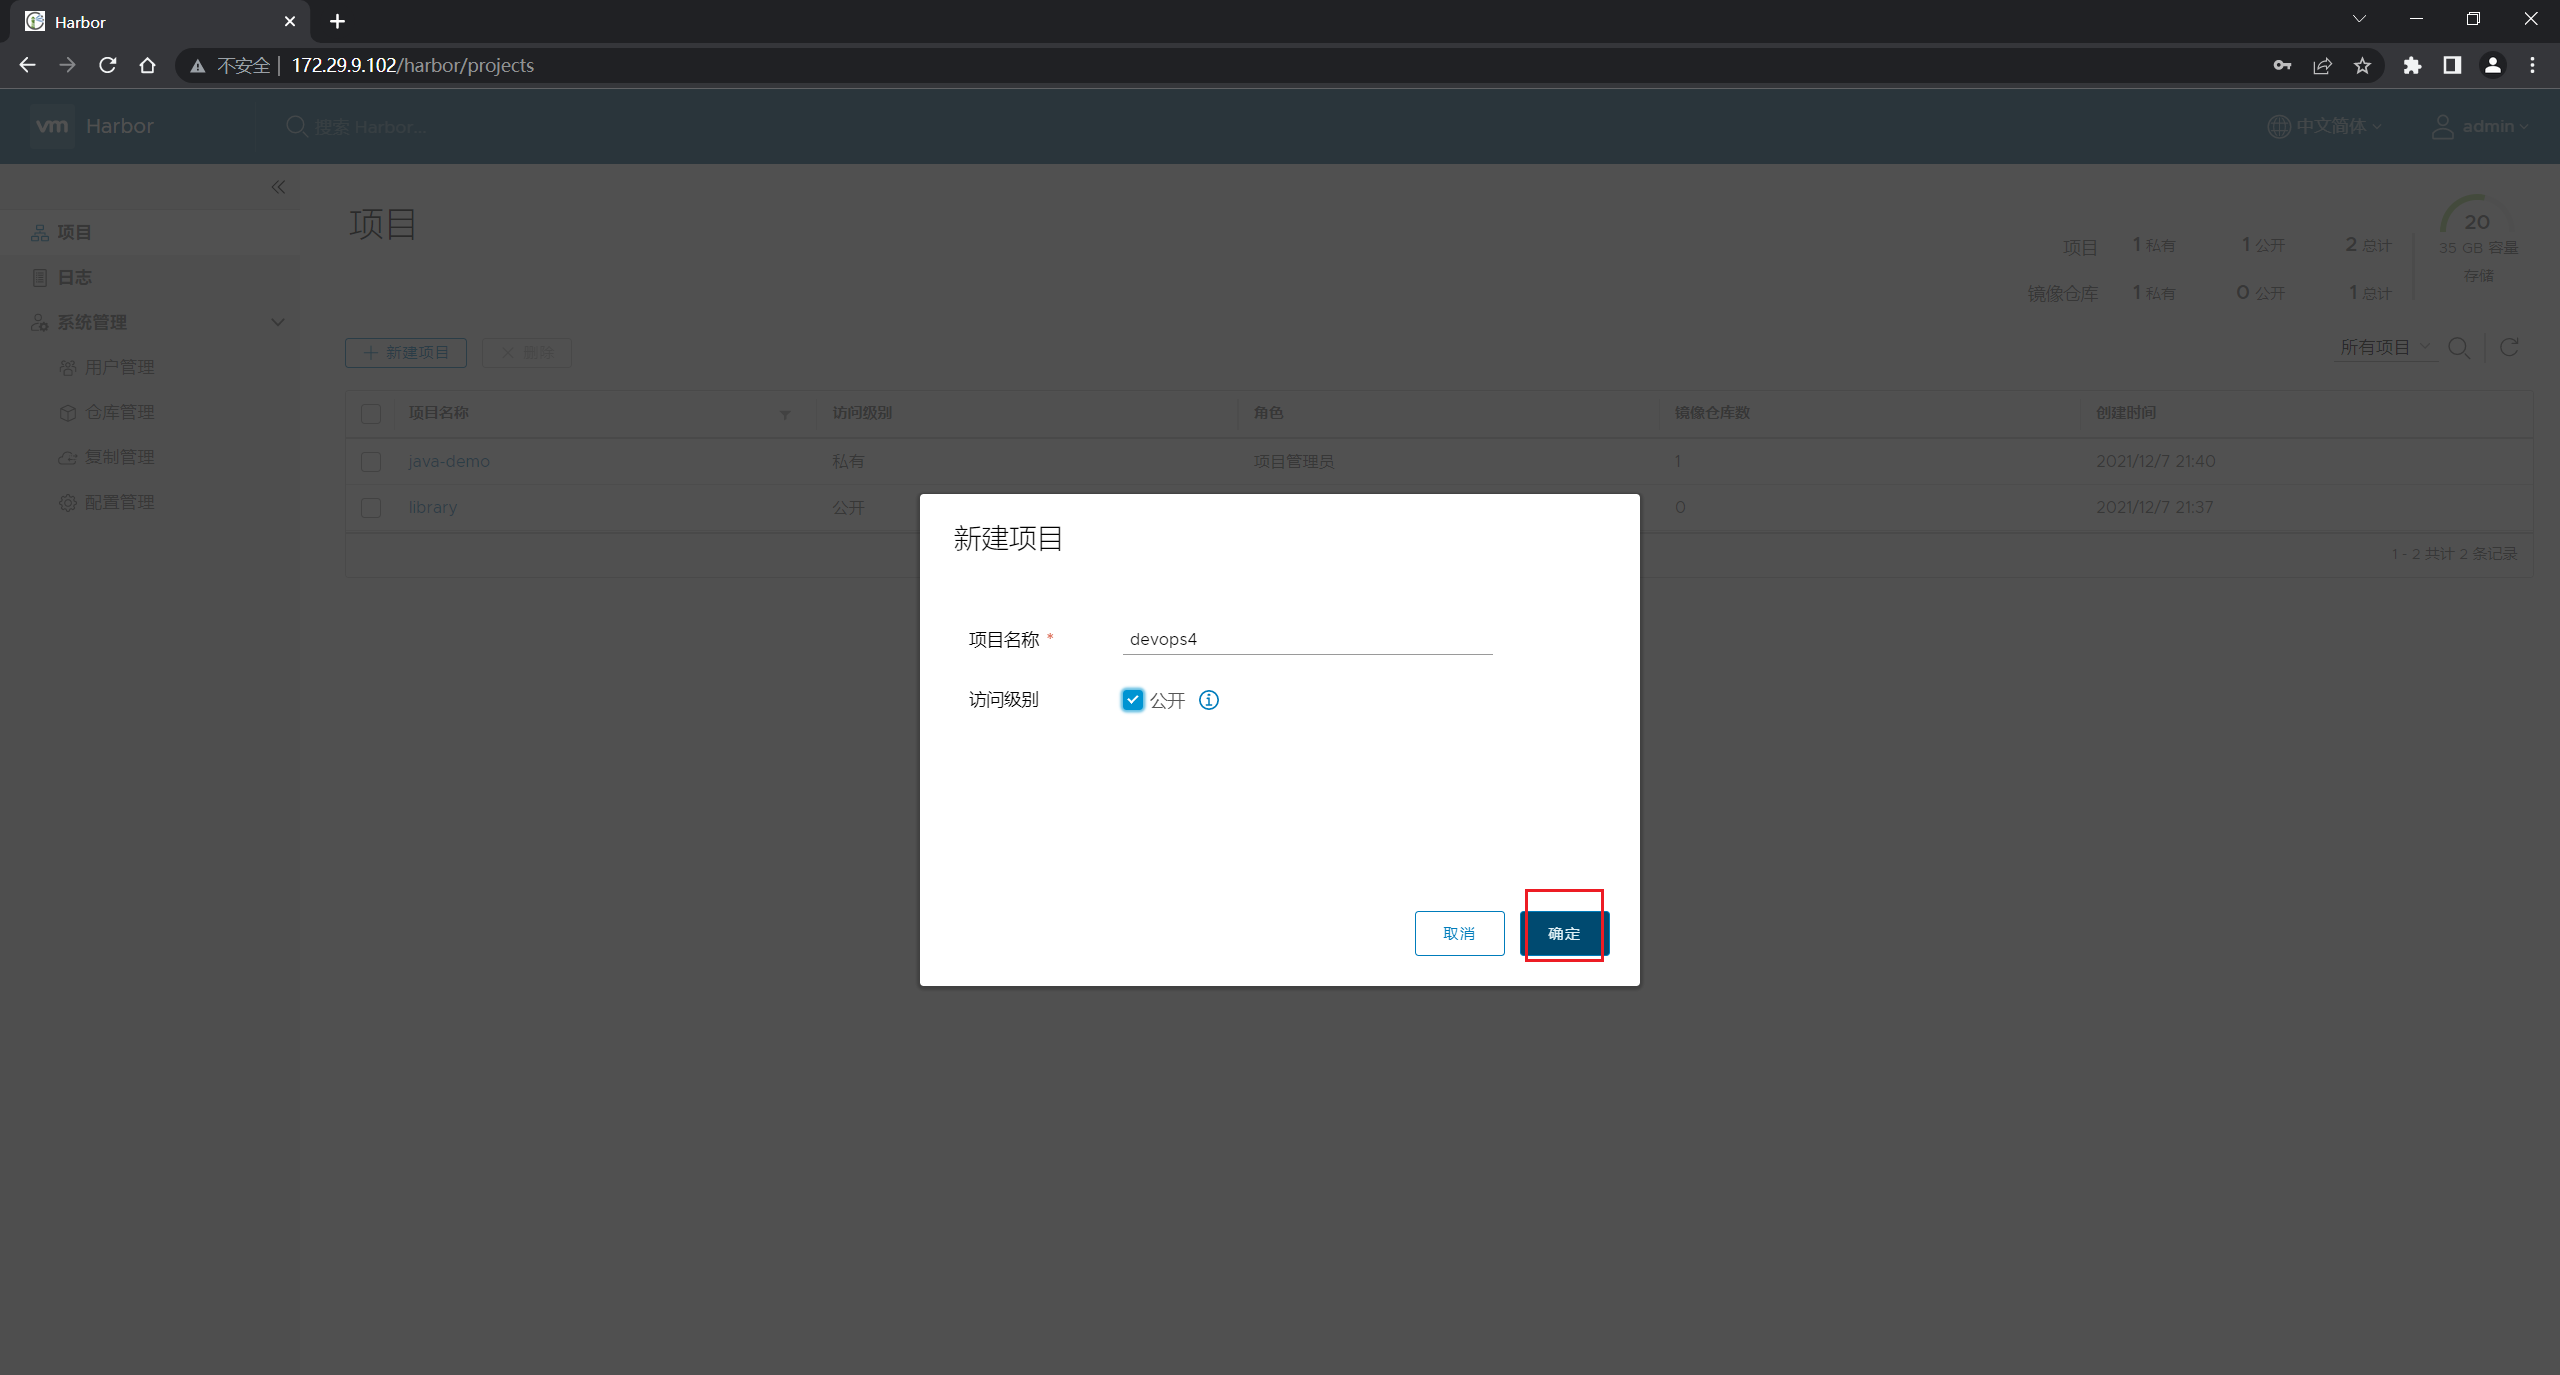
4.CI流水线中制品库集成
镜像规范
业务/服务:commitId
镜像上传
docker login 192.168.1.200:8088
Username: admin
Password:
WARNING! Your password will be stored unencrypted in /root/.docker/config.json.
Configure a credential helper to remove this warning. See
https://docs.docker.com/engine/reference/commandline/login/#credentials-store

Login Succeeded

docker tag nginx:1.9.1 192.168.1.200:8088/devops03/devops03-maven-service:1.9.1
docker push 192.168.1.200:8088/devops03/devops03-maven-service:1.9.1
镜像下载
docker pull 192.168.1.200:8088/devops03/devops03-maven-service:1.9.1
5.CI流水线集成
| 💘 实践:harbor CI流水线中制品库集成(测试成功)-2022.6.25 |
1.Jenkins
pipeline {
    agent {
        label "build"
    }

    stages {
        stage("DockerBuild"){
            steps{
                script{
                  imageName = "${env.buName}/${env.serviceName}"
                  imageTag = "${env.branchName}-${env.commitID}"
                  sh """
                    #登录镜像仓库
                    docker login -u admin -p Harbor12345 192.168.1.200:8088

                    # 构建镜像
                    docker build -t 192.168.1.200:8088/${imageName}:${imageTag} .

                    # 上传镜像
                    docker push 192.168.1.200:8088/${imageName}:${imageTag}

                    # 删除镜像
                    sleep 2
                    docker rmi 192.168.1.200:8088/${imageName}:${imageTag}
                  """
                    }
                }
            }
        }
    }
}
- 我们先手动上传下镜像到harbor里:
自己的构建机器要配置下这个:


- 来到
devops4-maven-service项目,创建一个dockerfile:

- 先给它加进去看下效果:
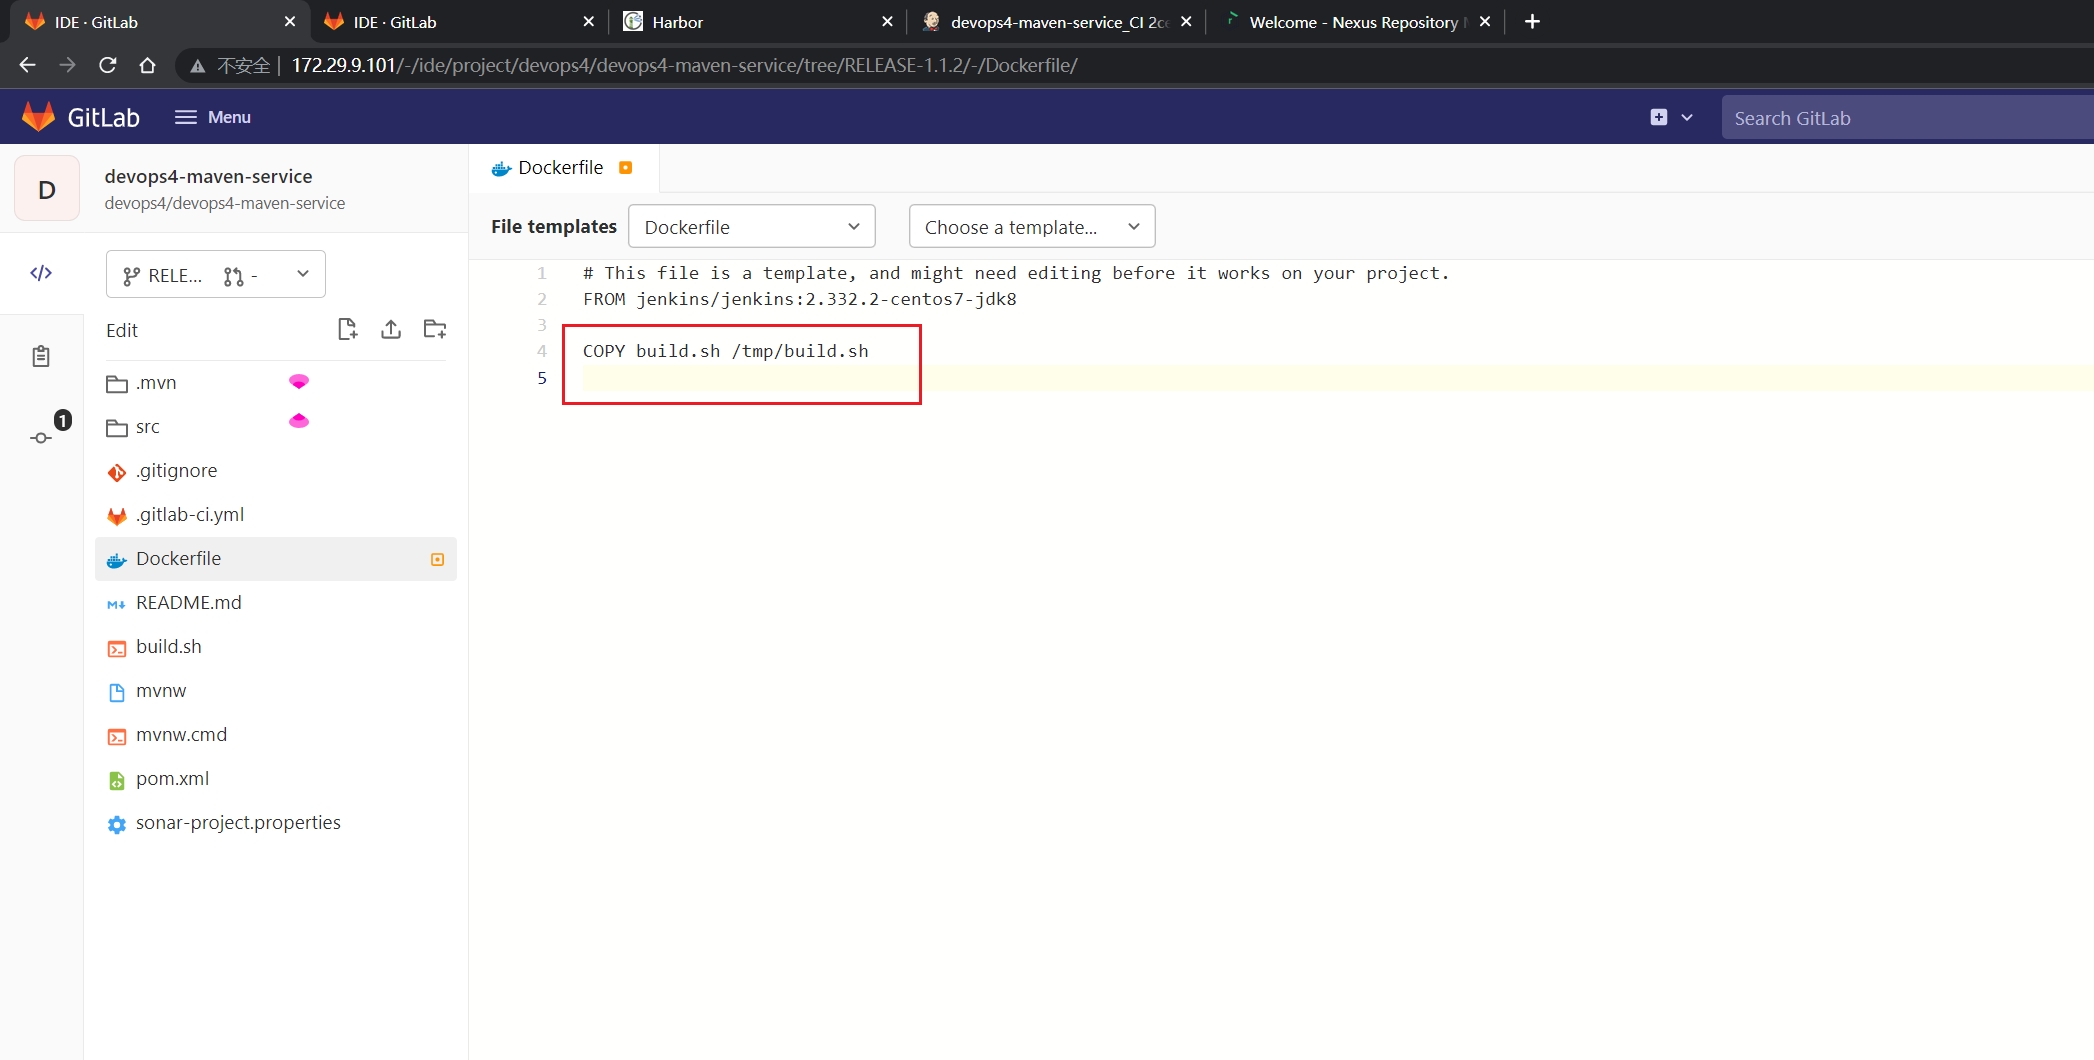
来到devops4-maven-service,给它创建一个Dockerfile文件:
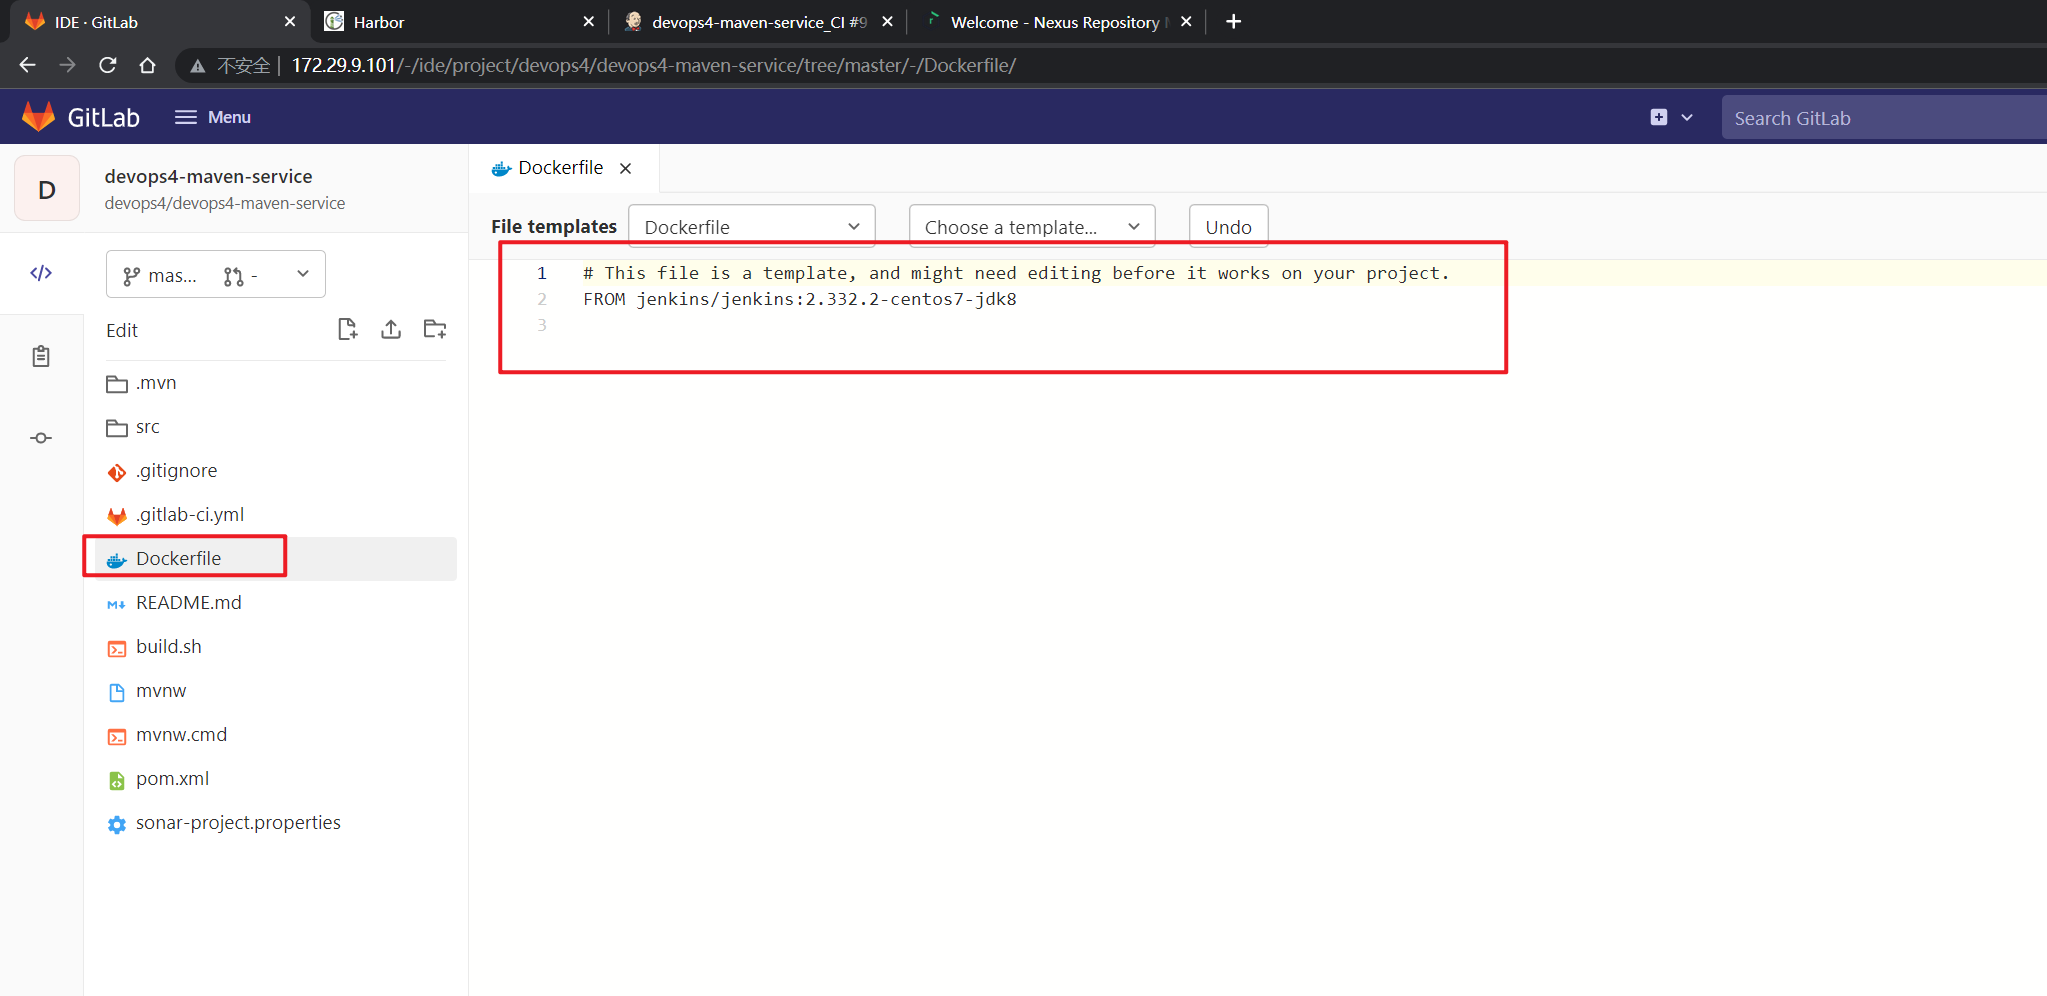
再将本次代码拷贝到共享库里,看下效果:
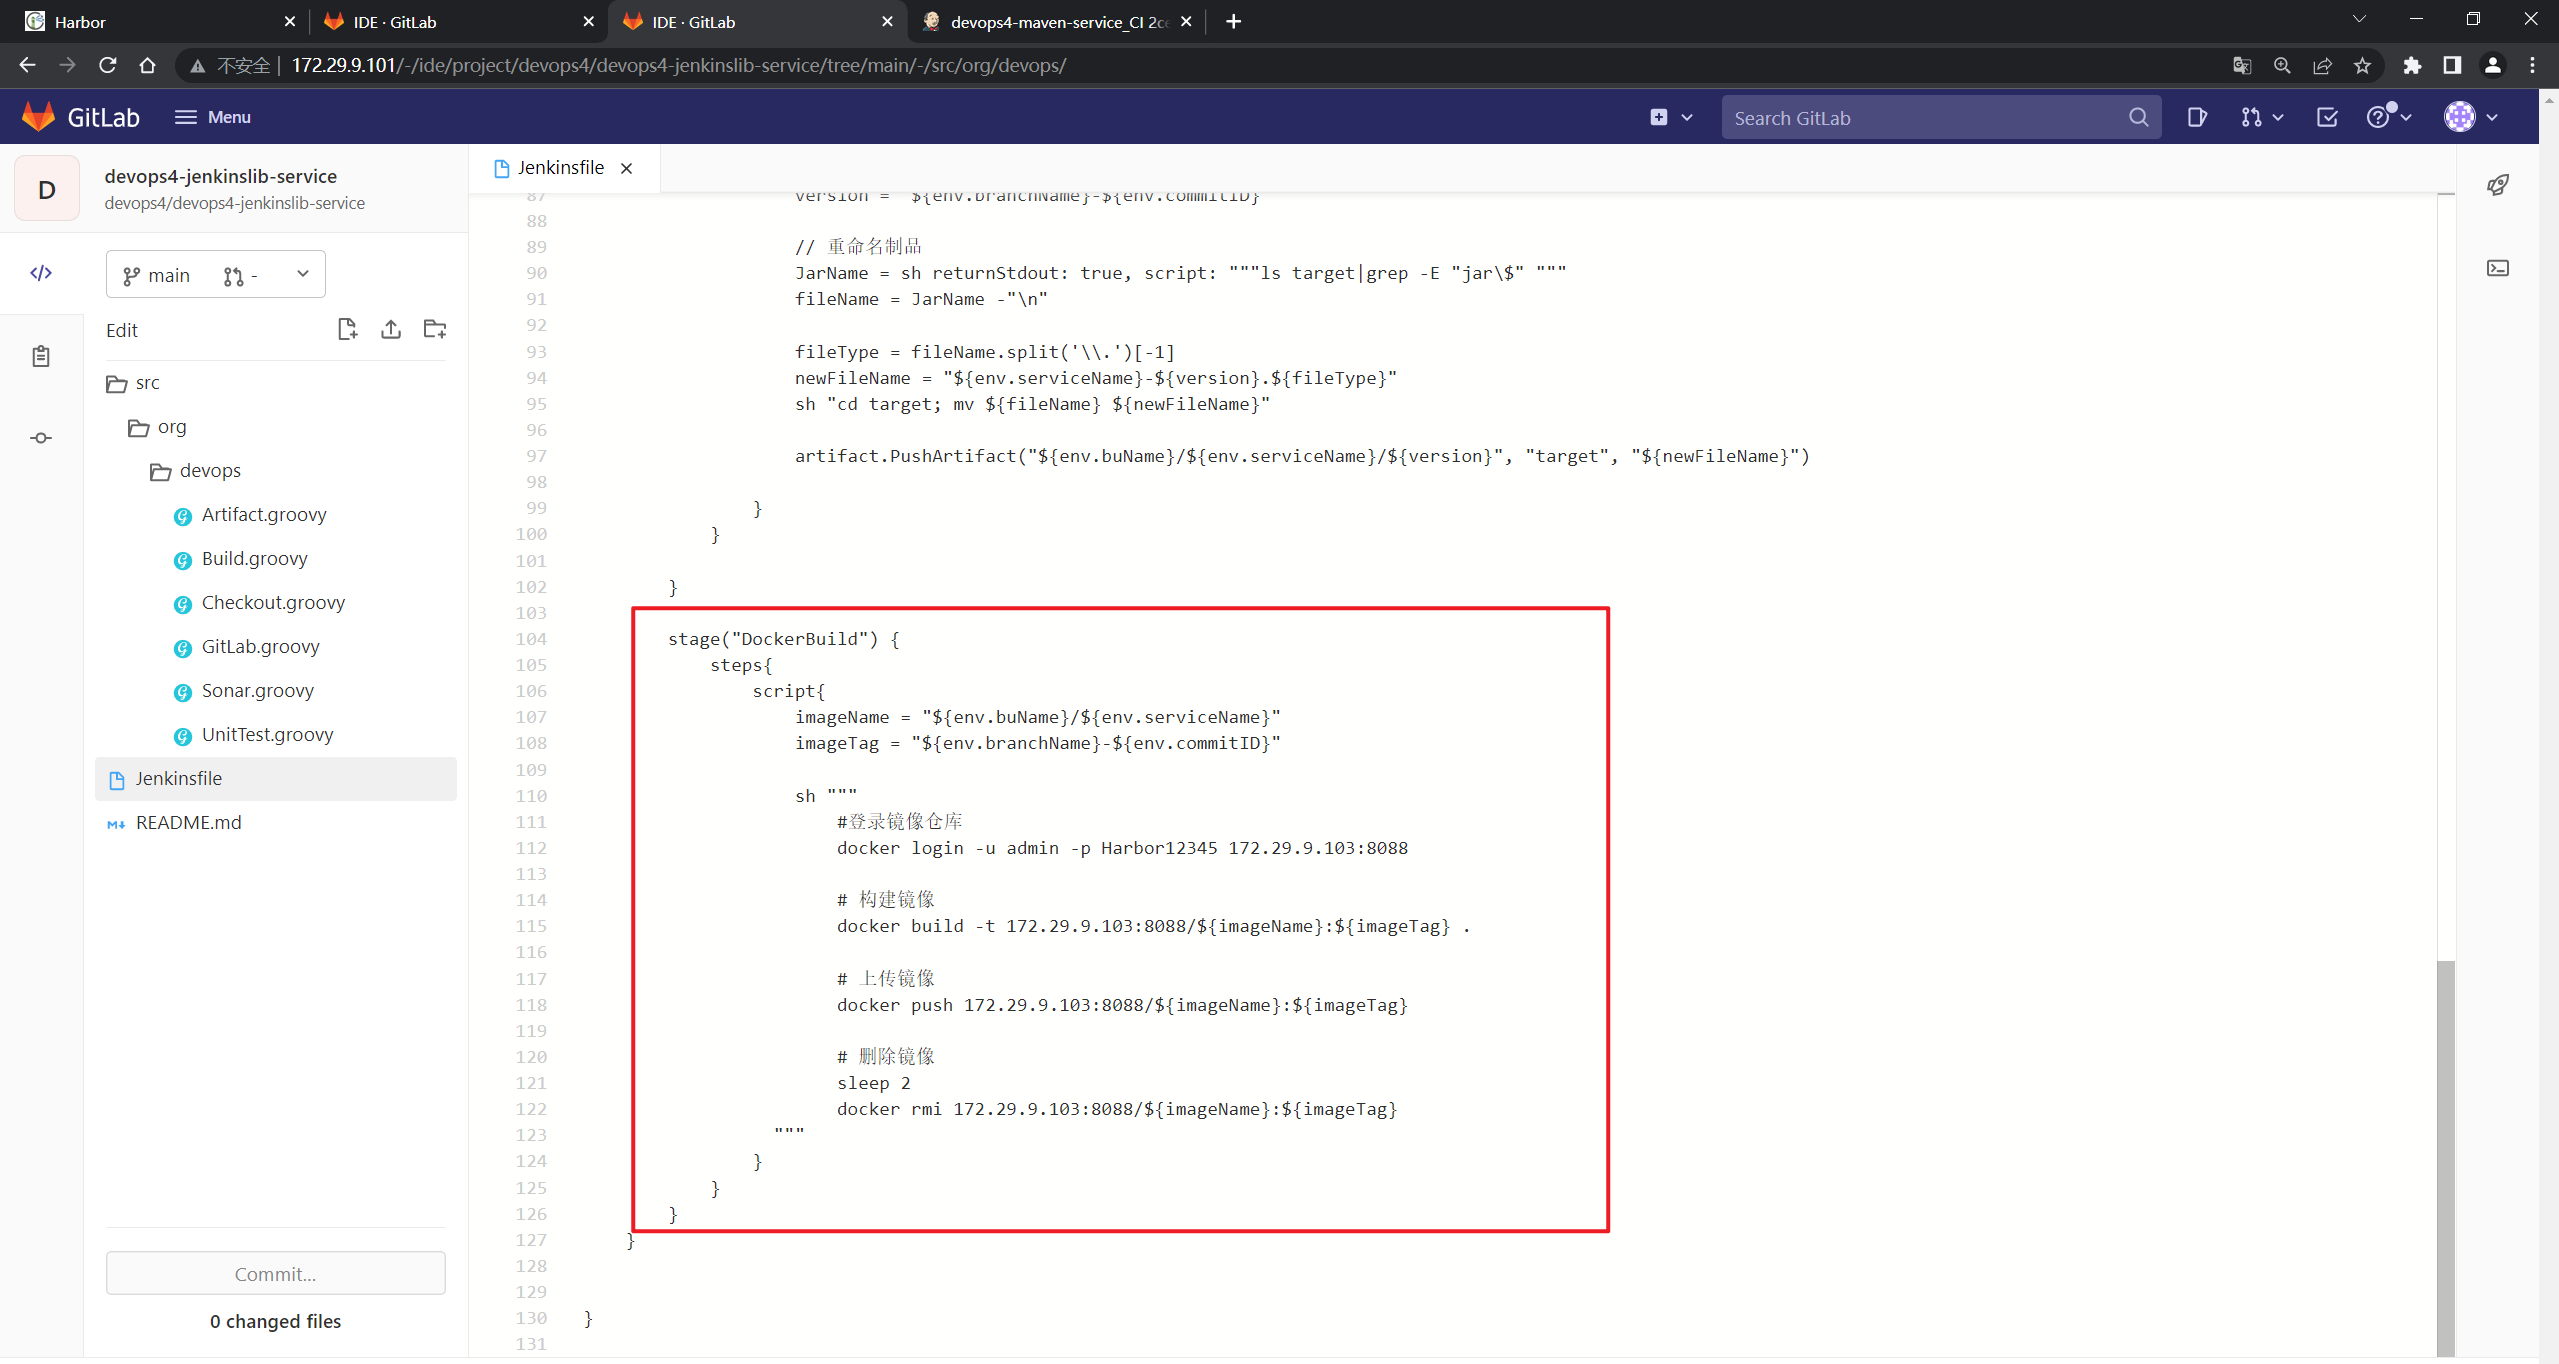
- 构建并观察效果
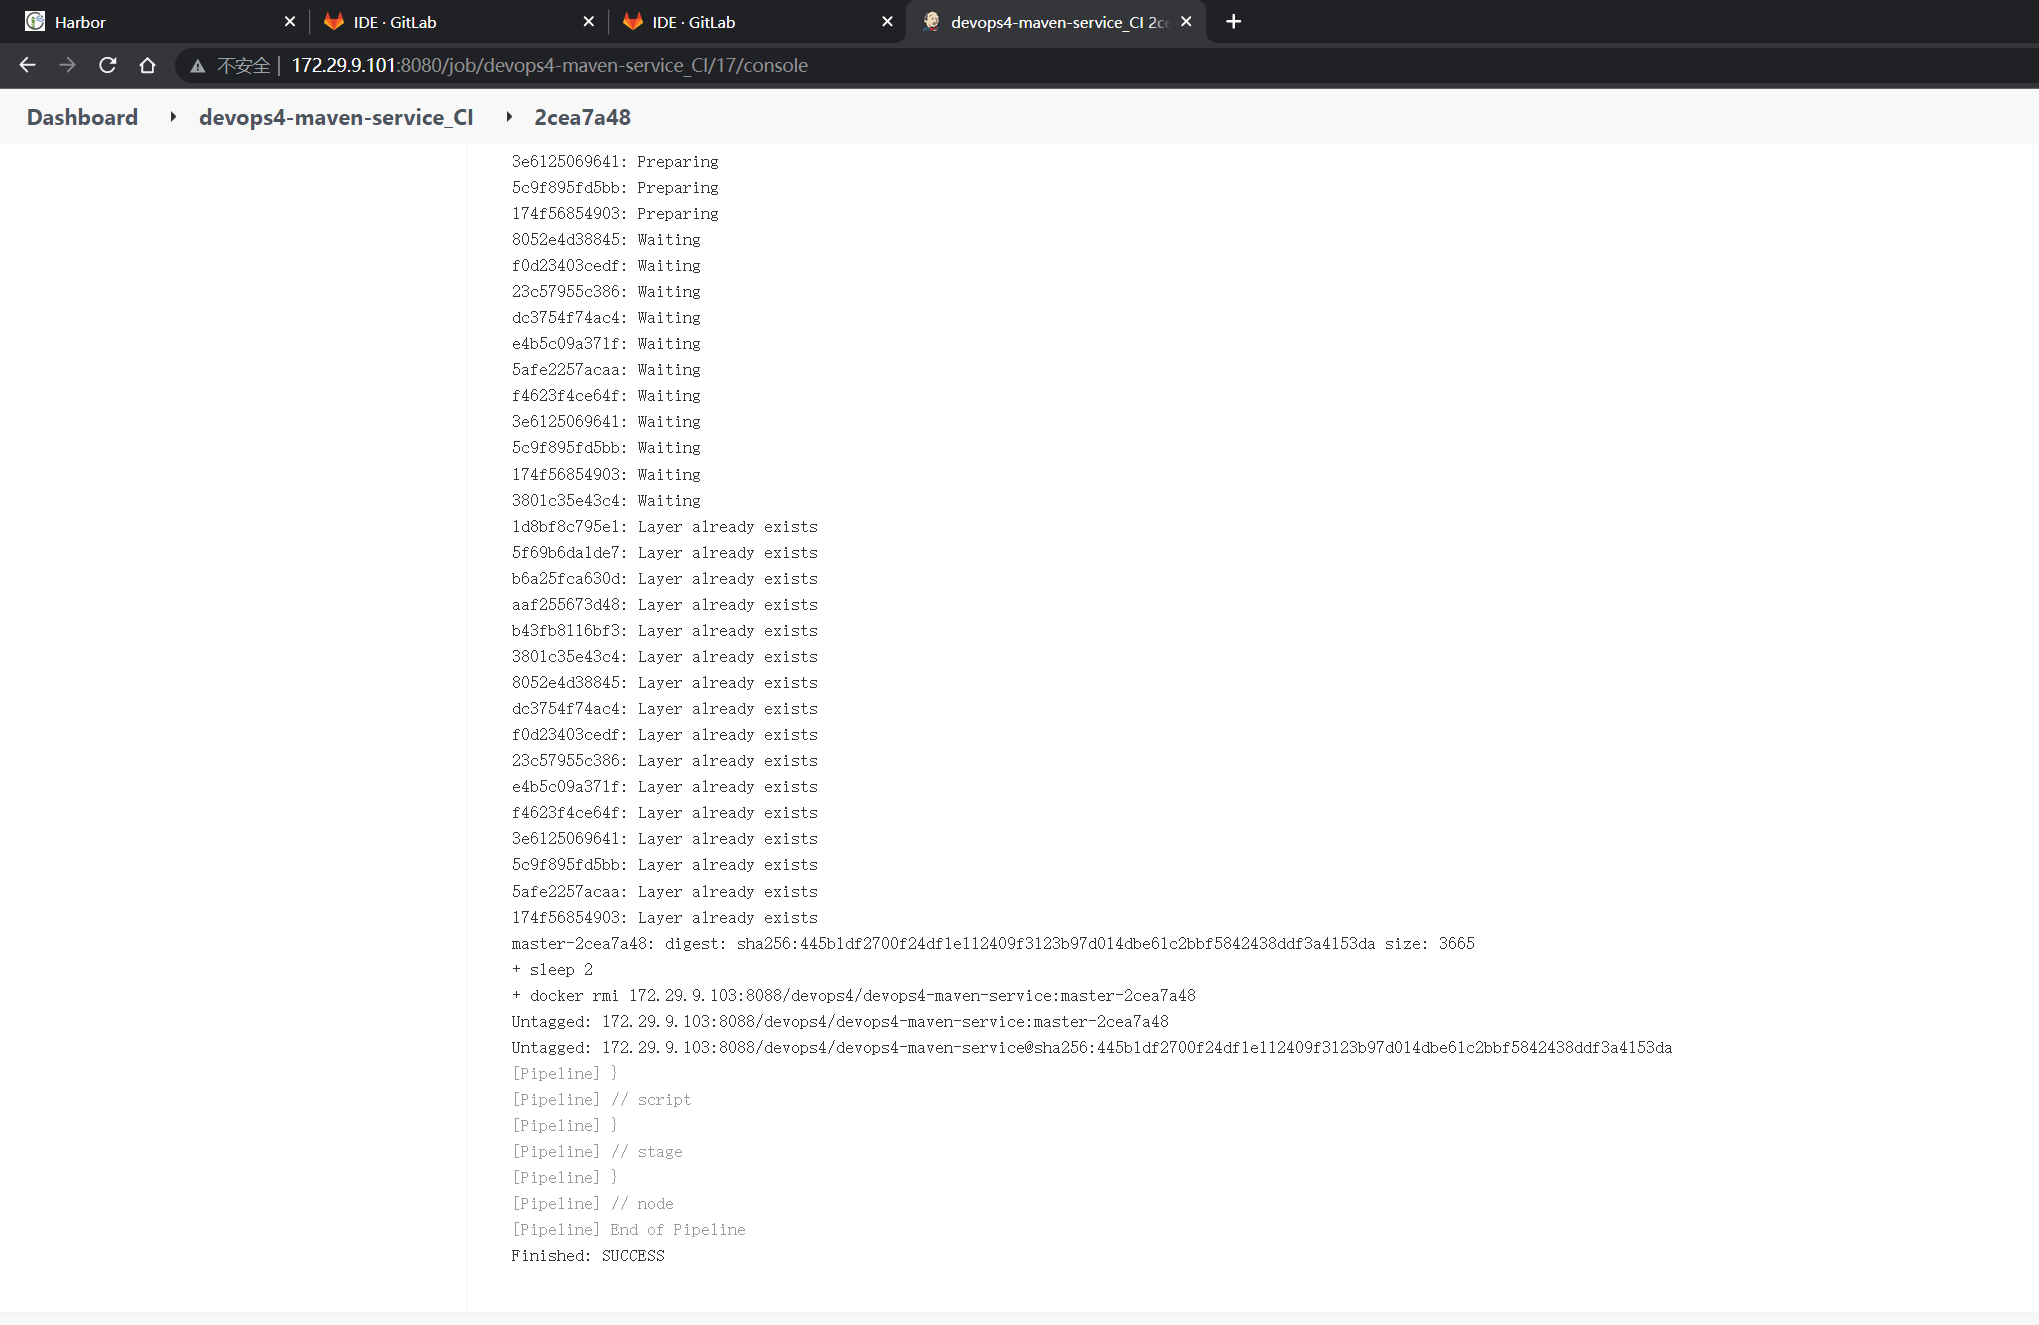
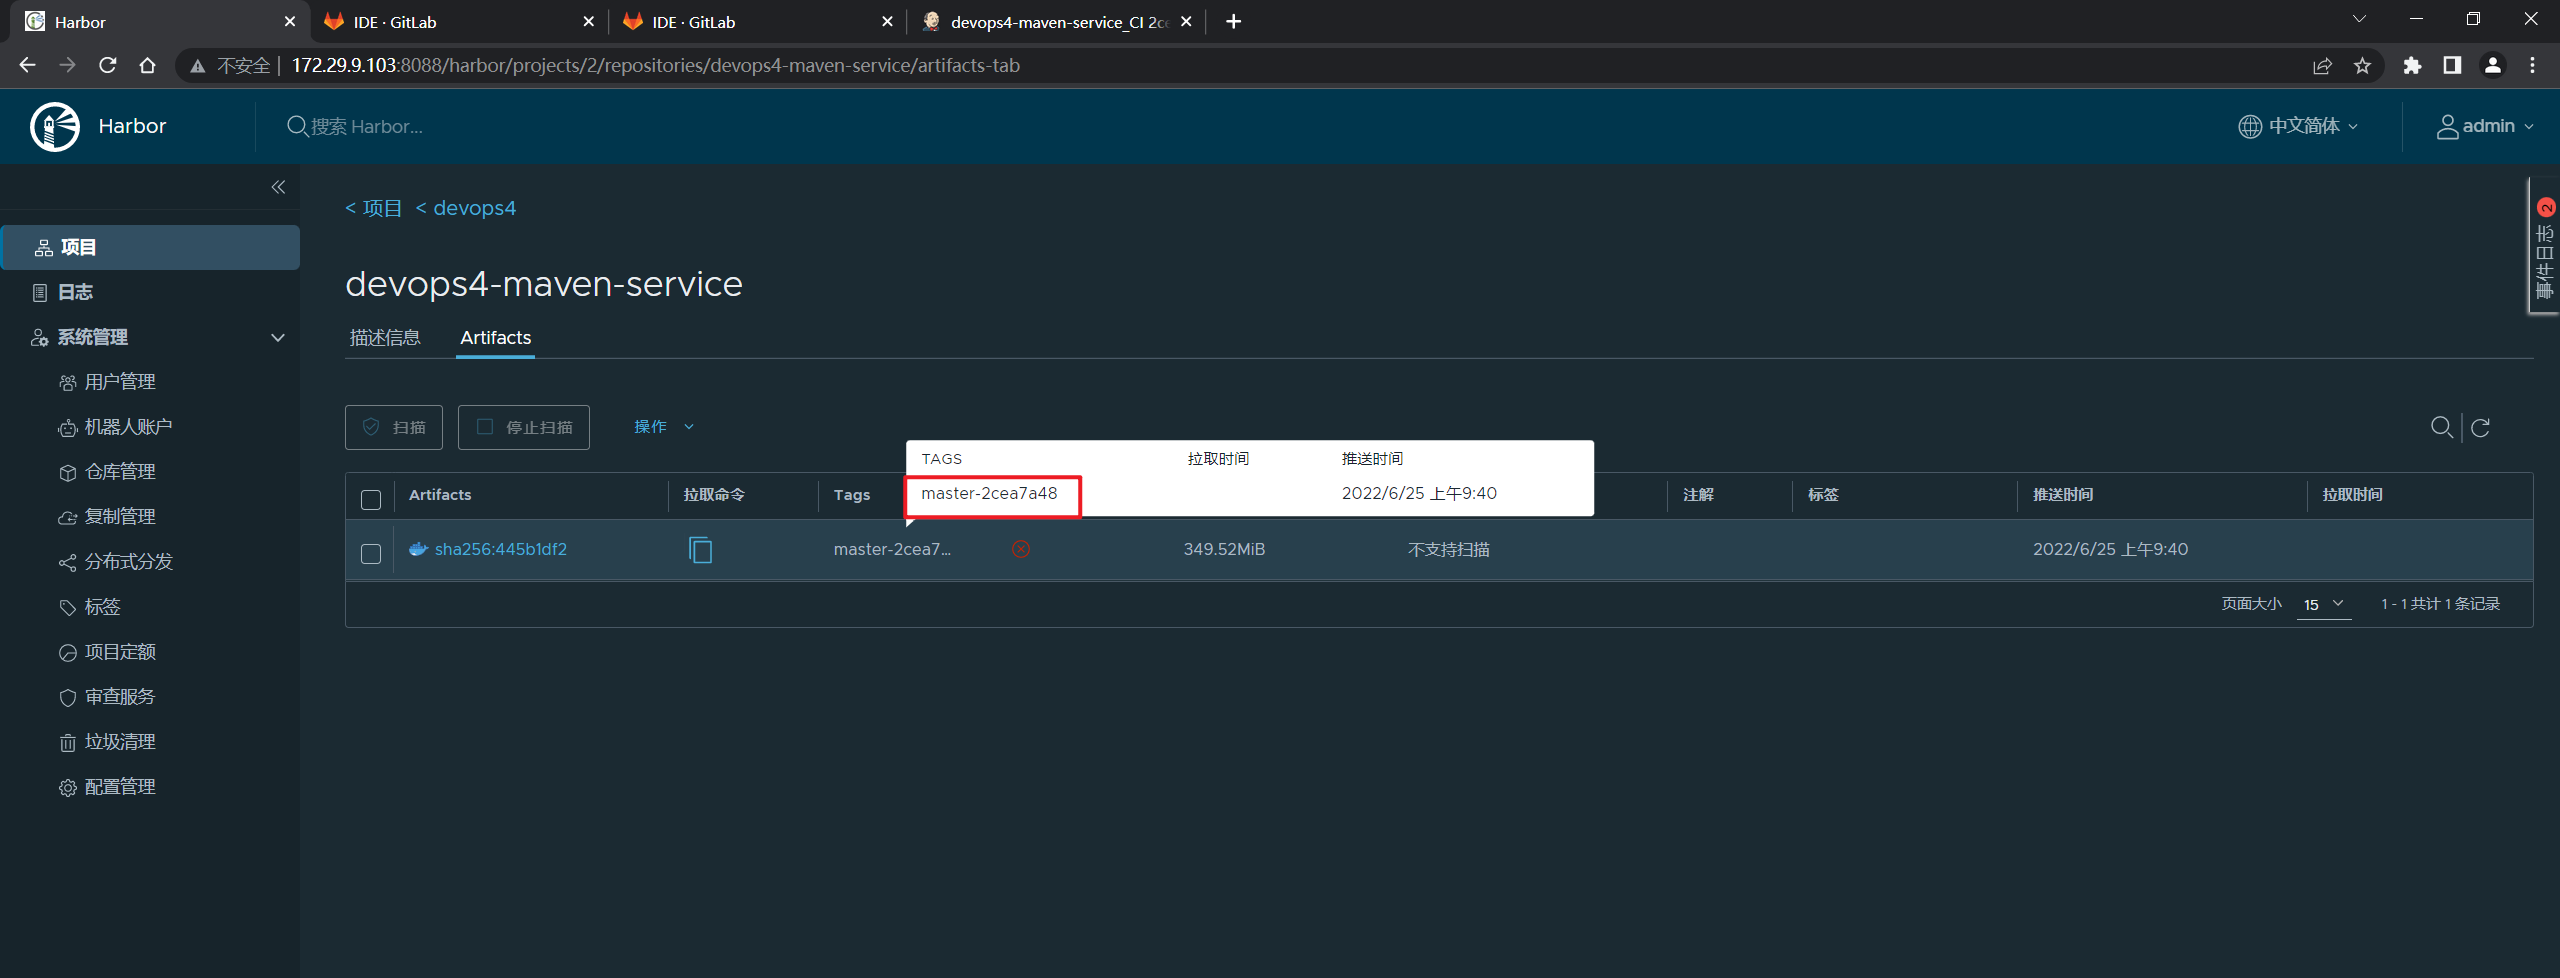
符合预期。😘
2.GitLabCI
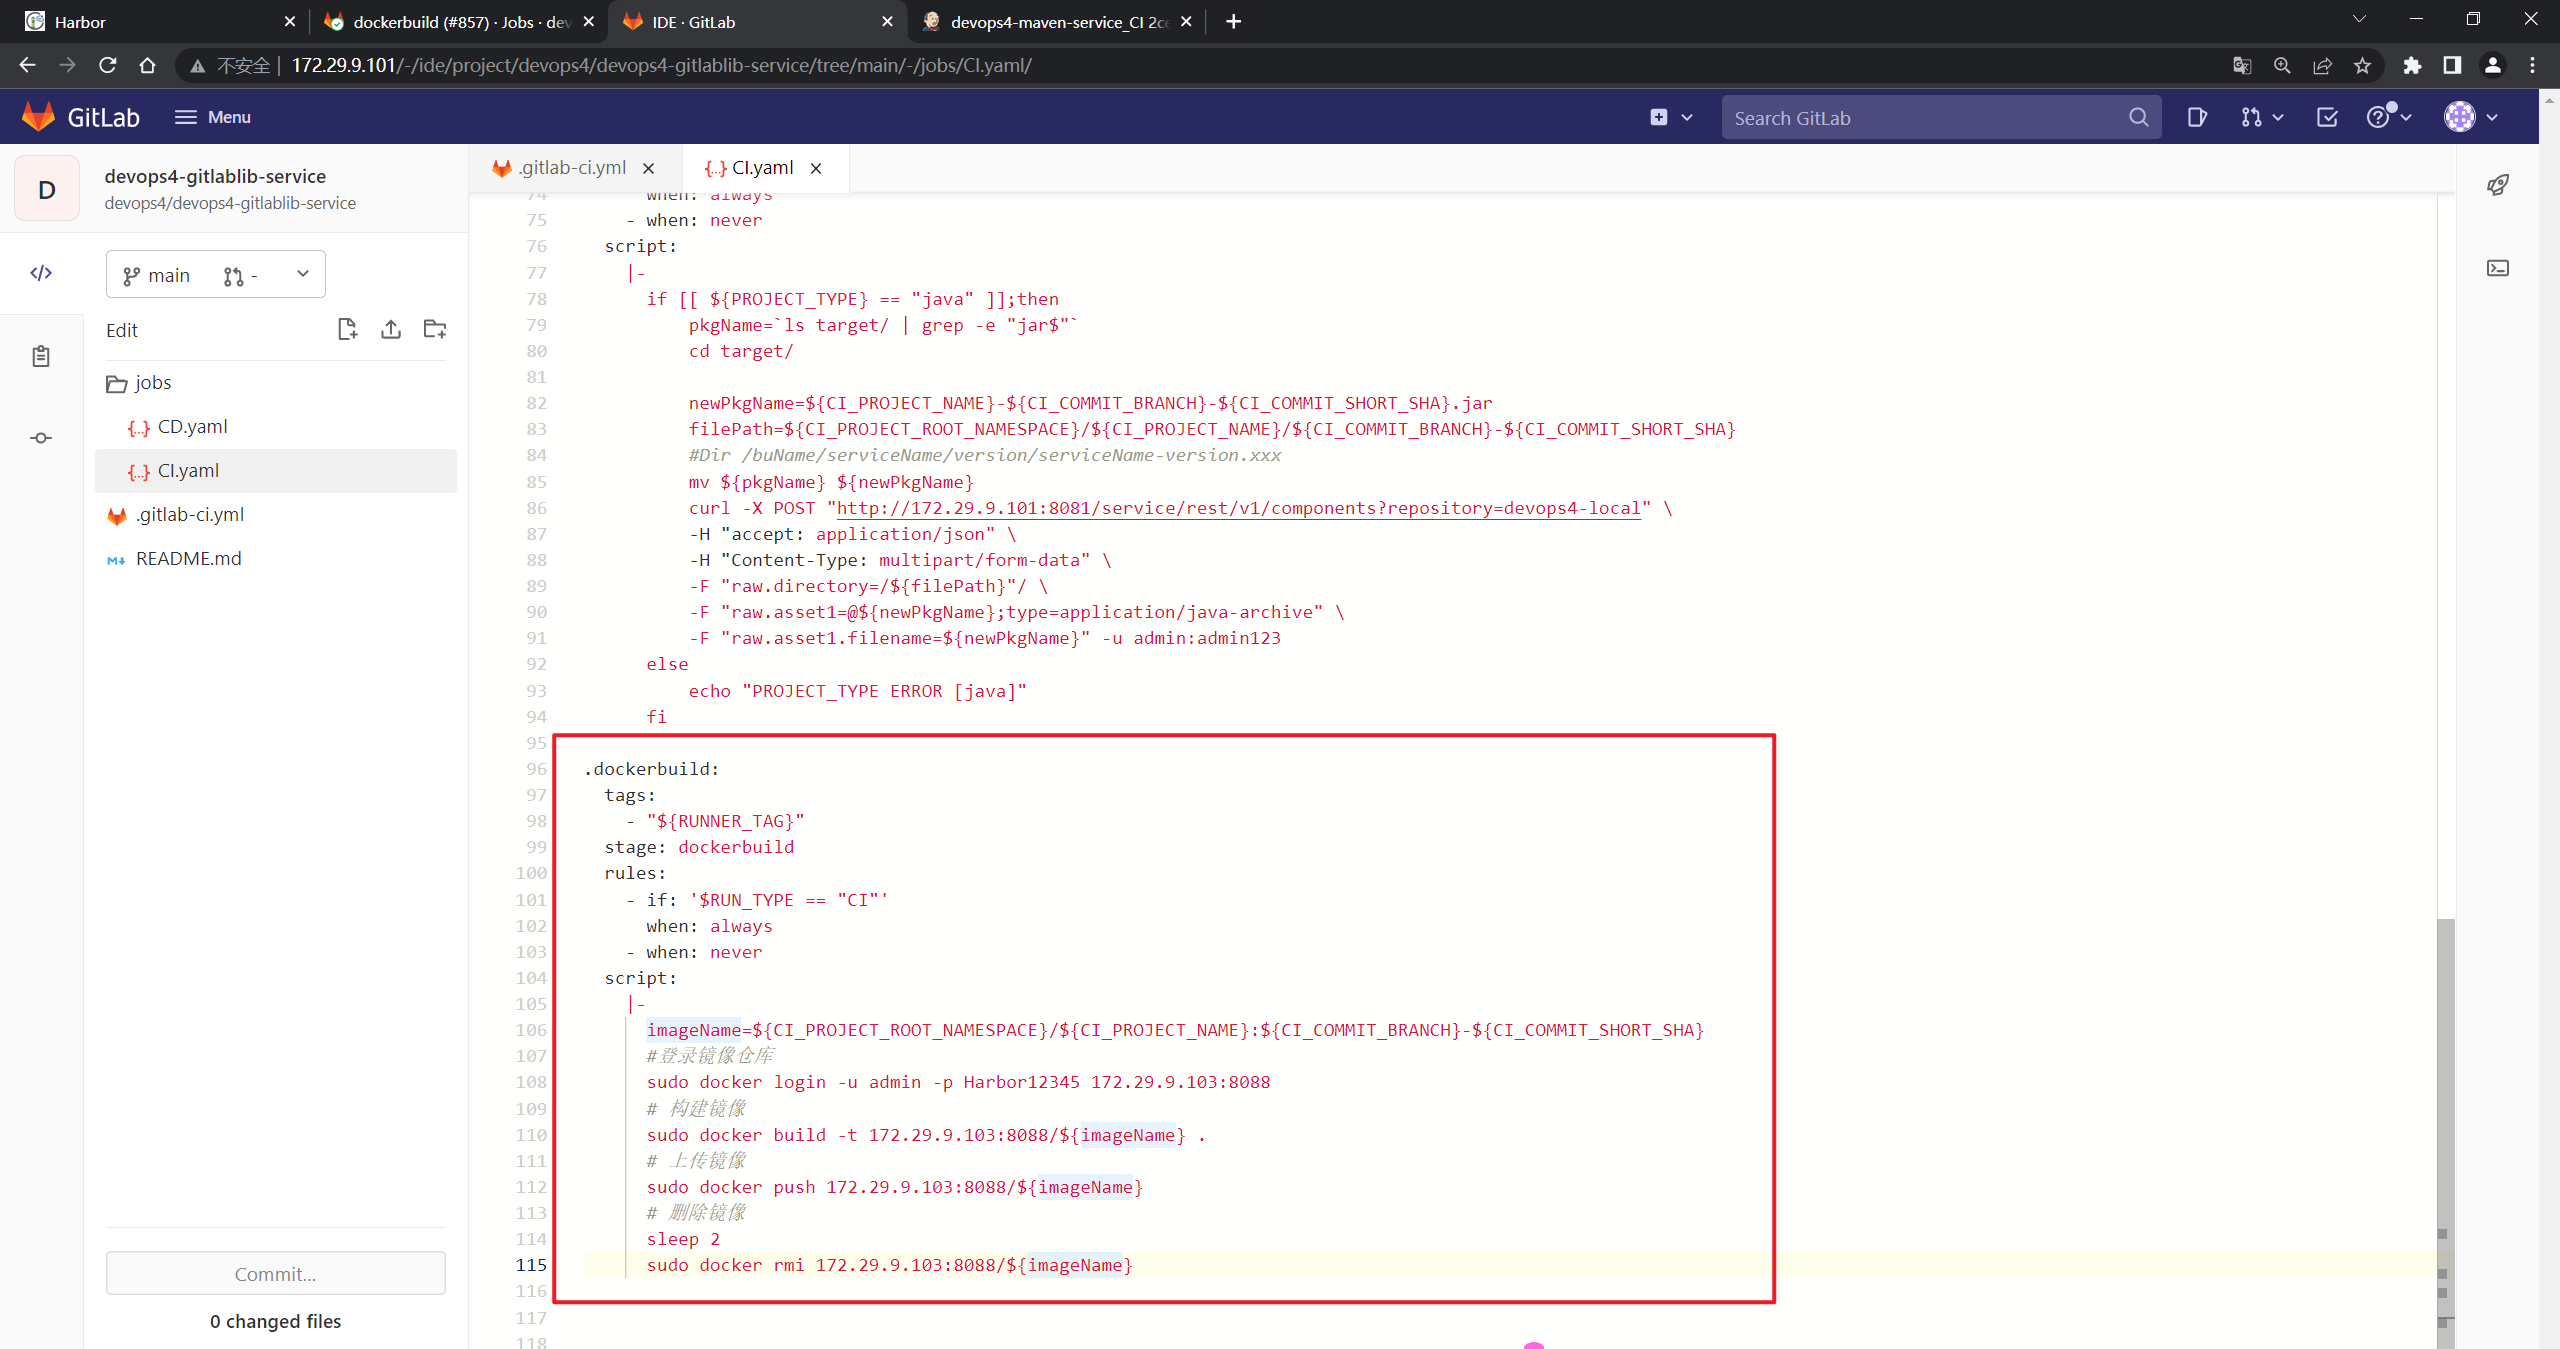
.dockerbuild:
  tags:
    - "${RUNNER_TAG}"
  stage: dockerbuild
  rules:
    - if: '$RUN_TYPE == "CI"'
      when: always
    - when: never
  script:
    |-
      imageName=${CI_PROJECT_ROOT_NAMESPACE}/${CI_PROJECT_NAME}:${CI_COMMIT_BRANCH}-${CI_COMMIT_SHORT_SHA}
      #登录镜像仓库
      docker login -u admin -p Harbor12345 192.168.1.200:8088
      # 构建镜像
      docker build -t 192.168.1.200:8088/${imageName} .
      # 上传镜像
      docker push 192.168.1.200:8088/${imageName}
      # 删除镜像
      sleep 2
      docker rmi 192.168.1.200:8088/${imageName}
📍 自己测试过程:
- 配置代码:
我这里为啥报了这个错误呢?
串行和并行都测试过了的啊:
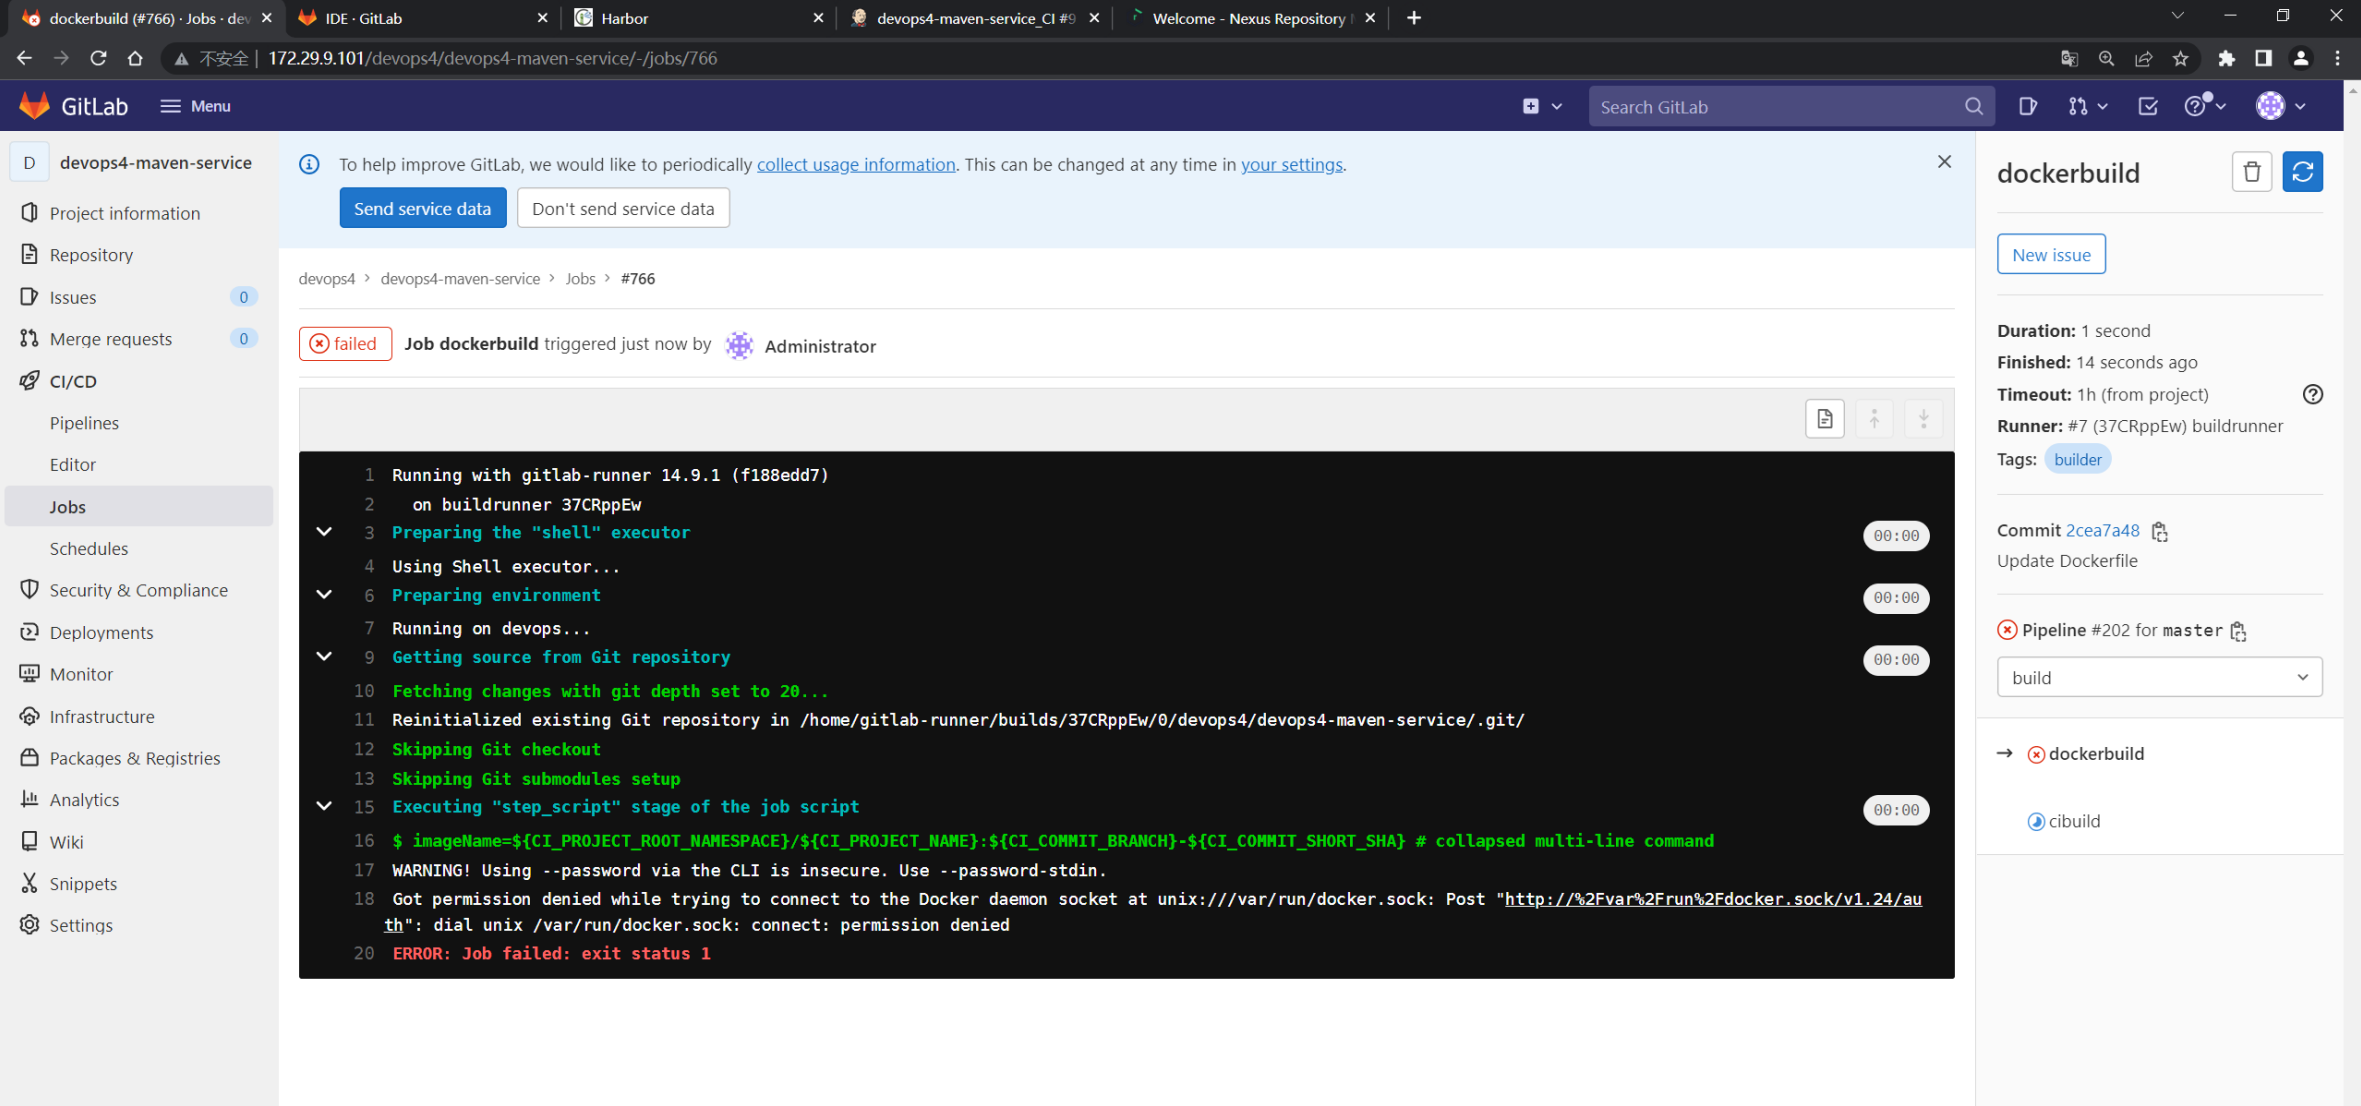
估计是自己的gitlab-runner用户权限不对,这里在上面配置上sudo:

再次尝试就可以了。。
记得上次老师没做过这个配置啊……
- 并行测试:
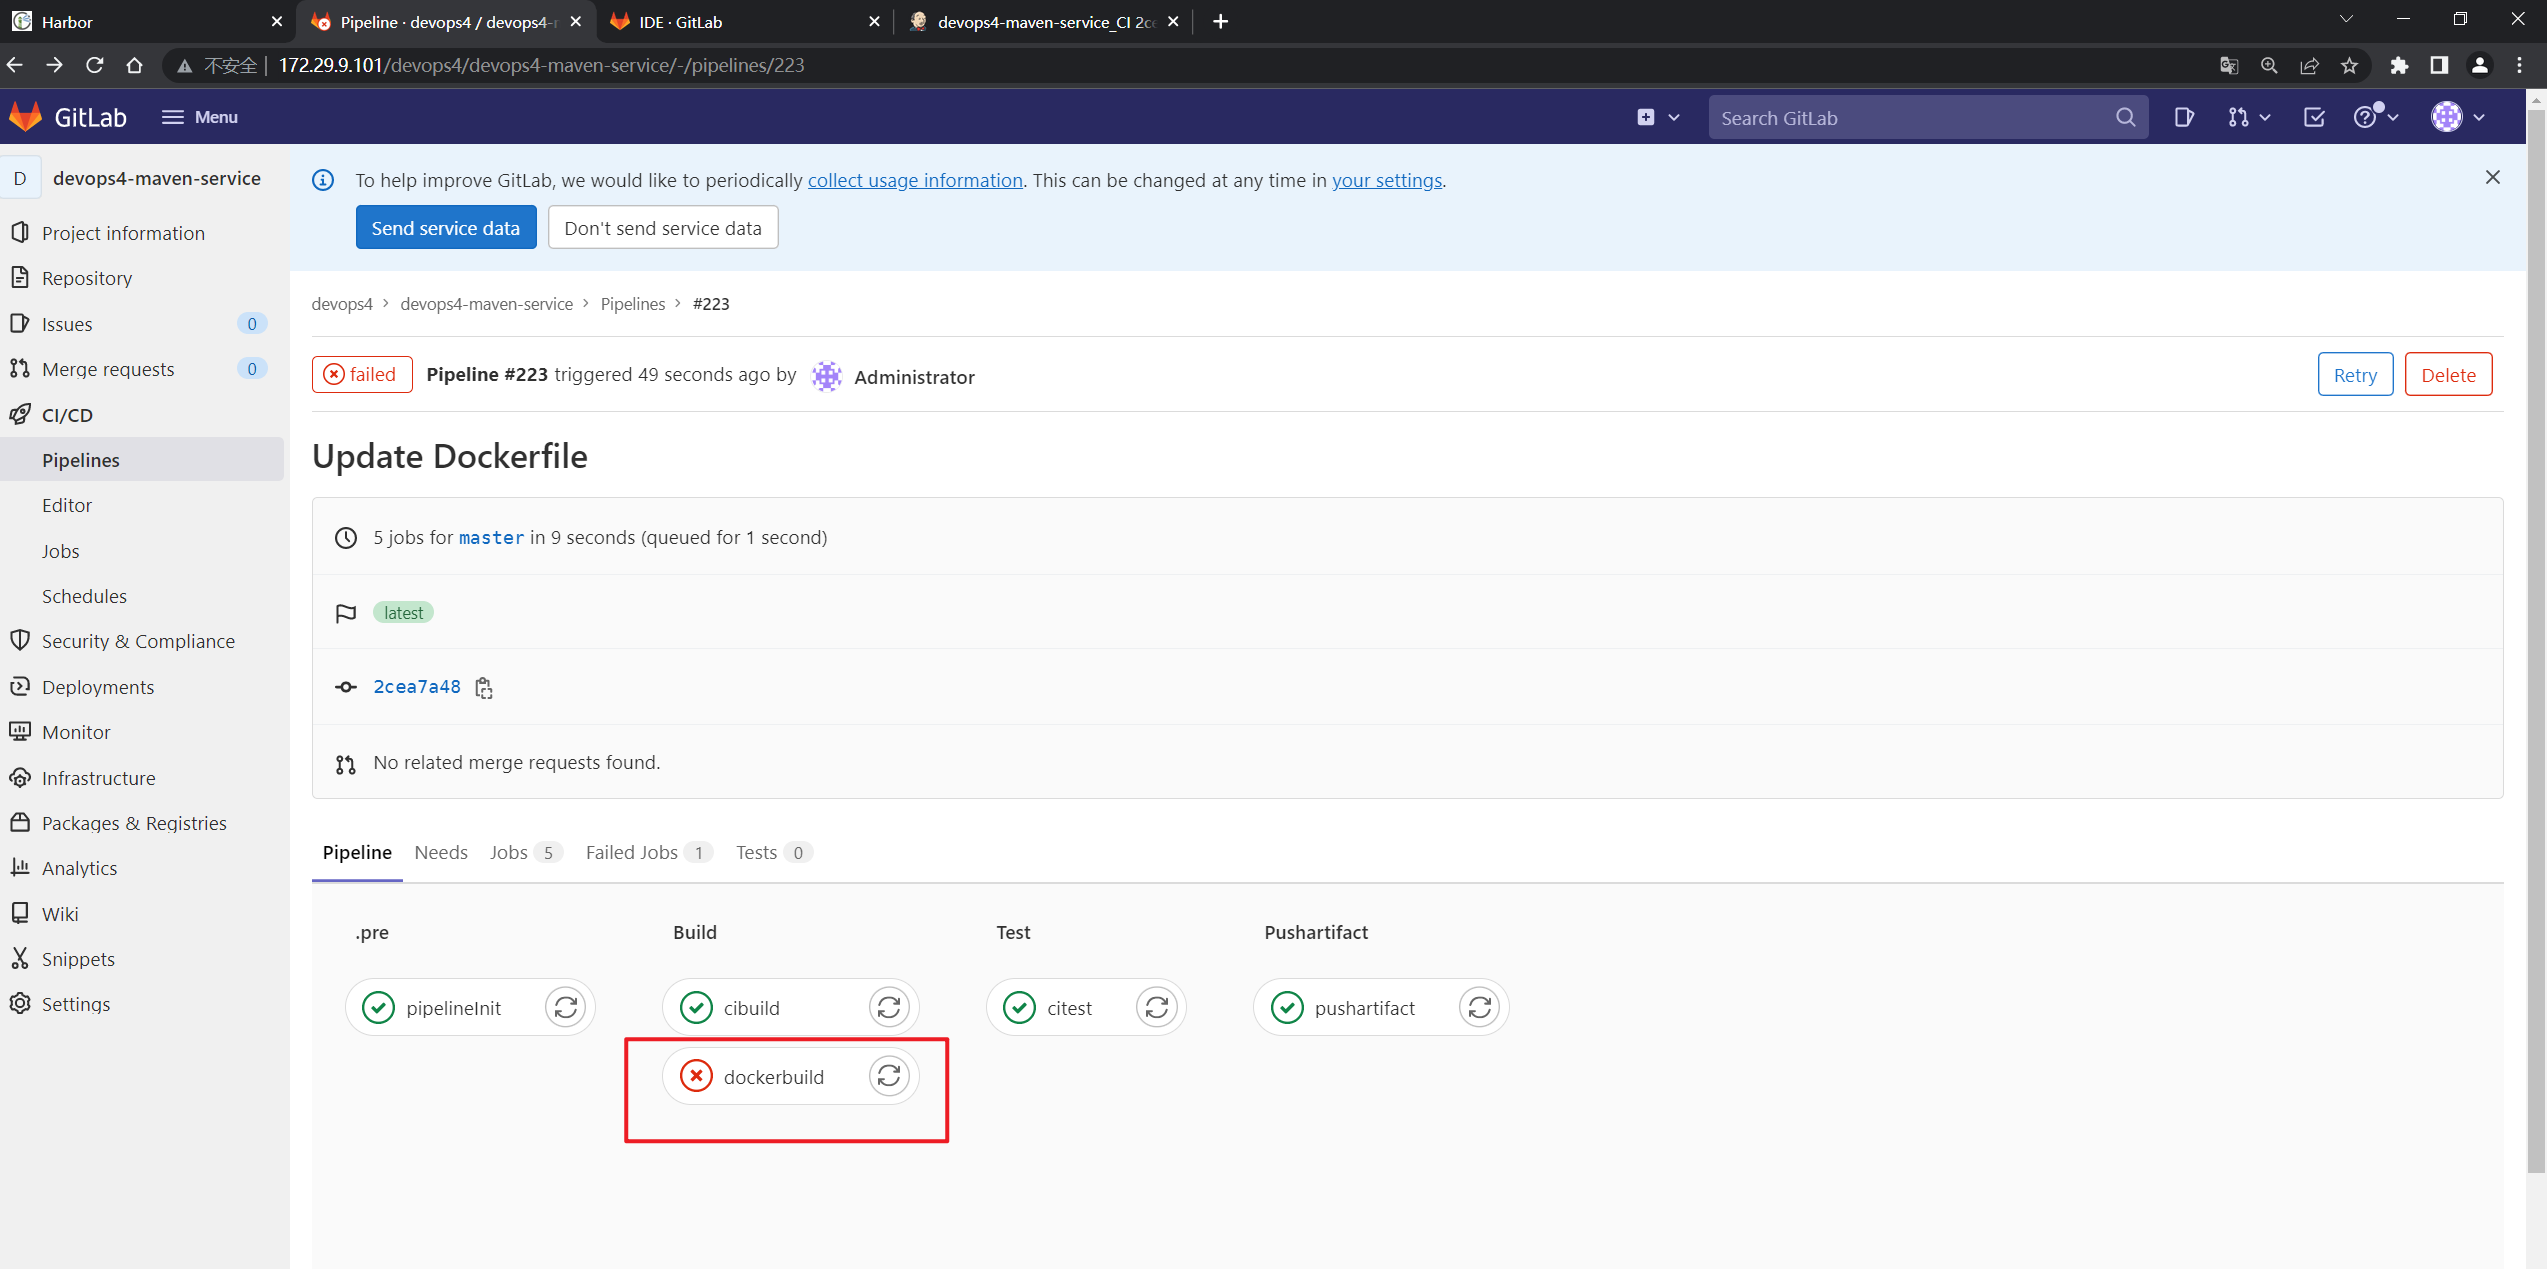
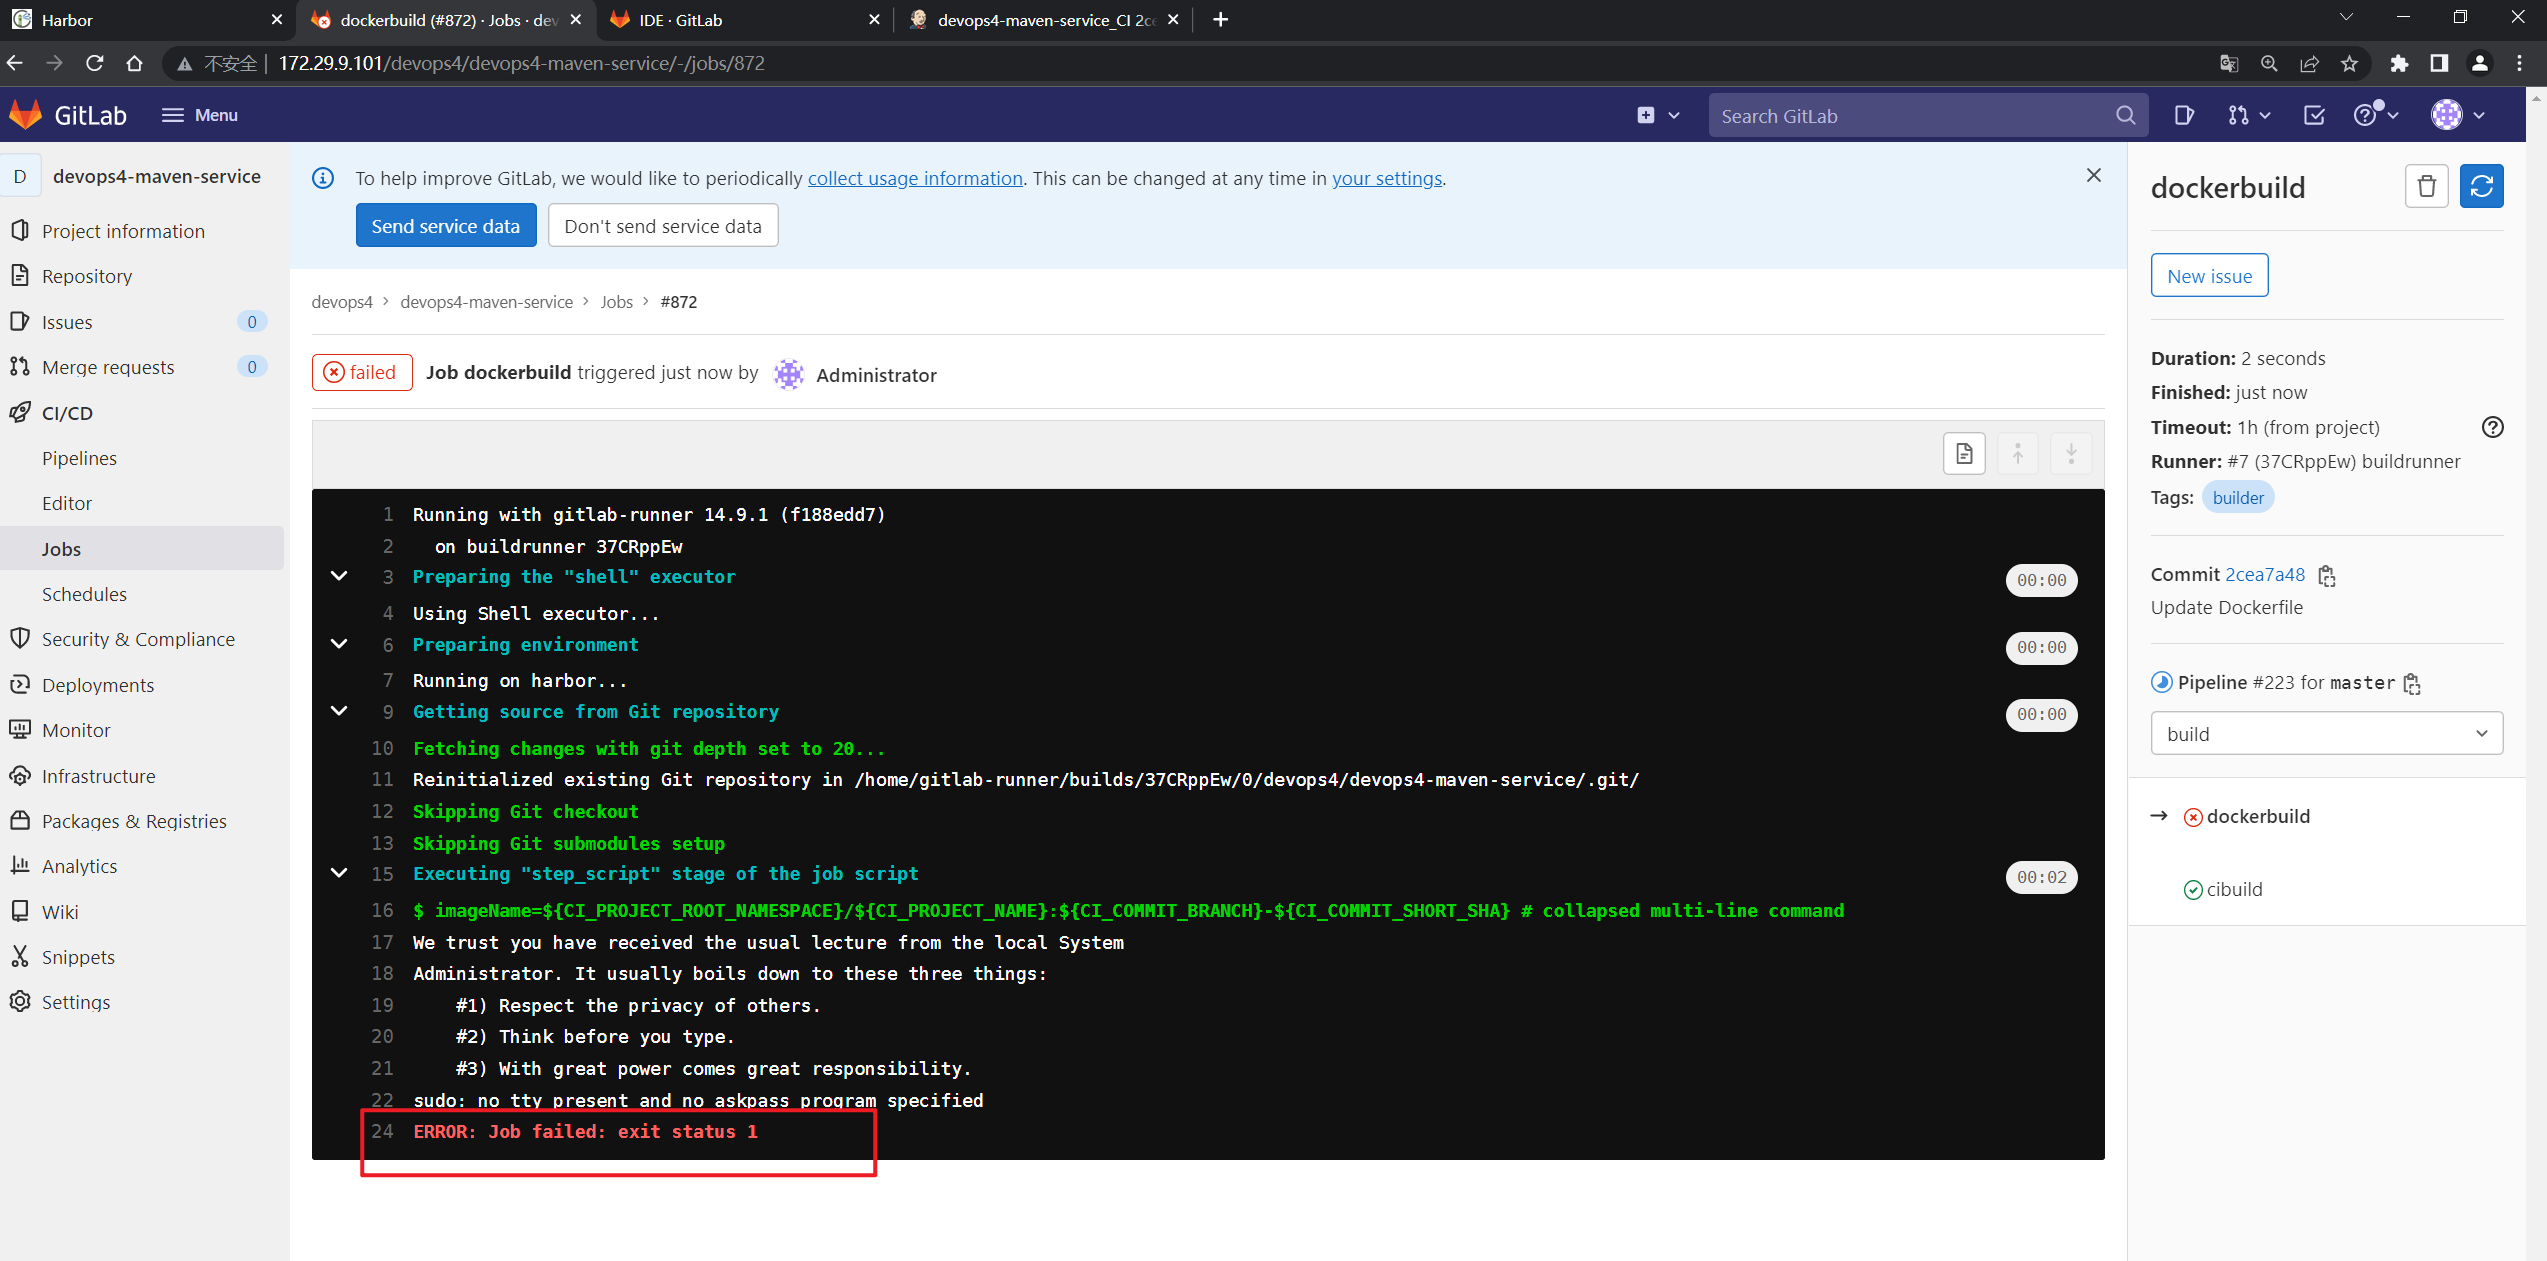
奇怪啊,老师,当时记得是并行测试时有问题的……
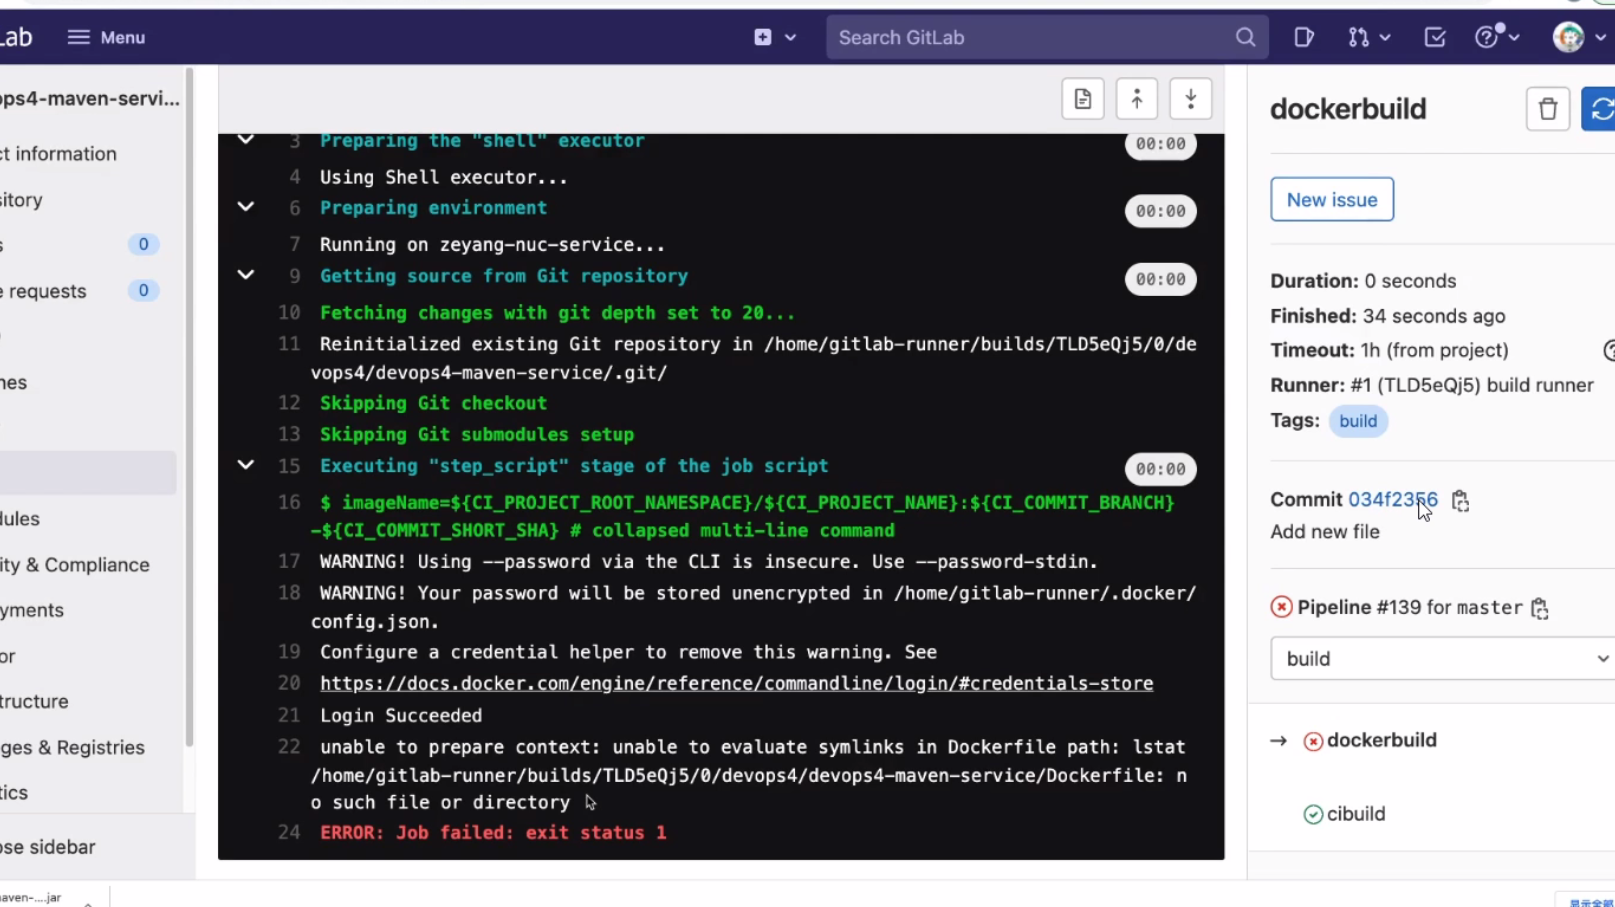
- 串行测试:
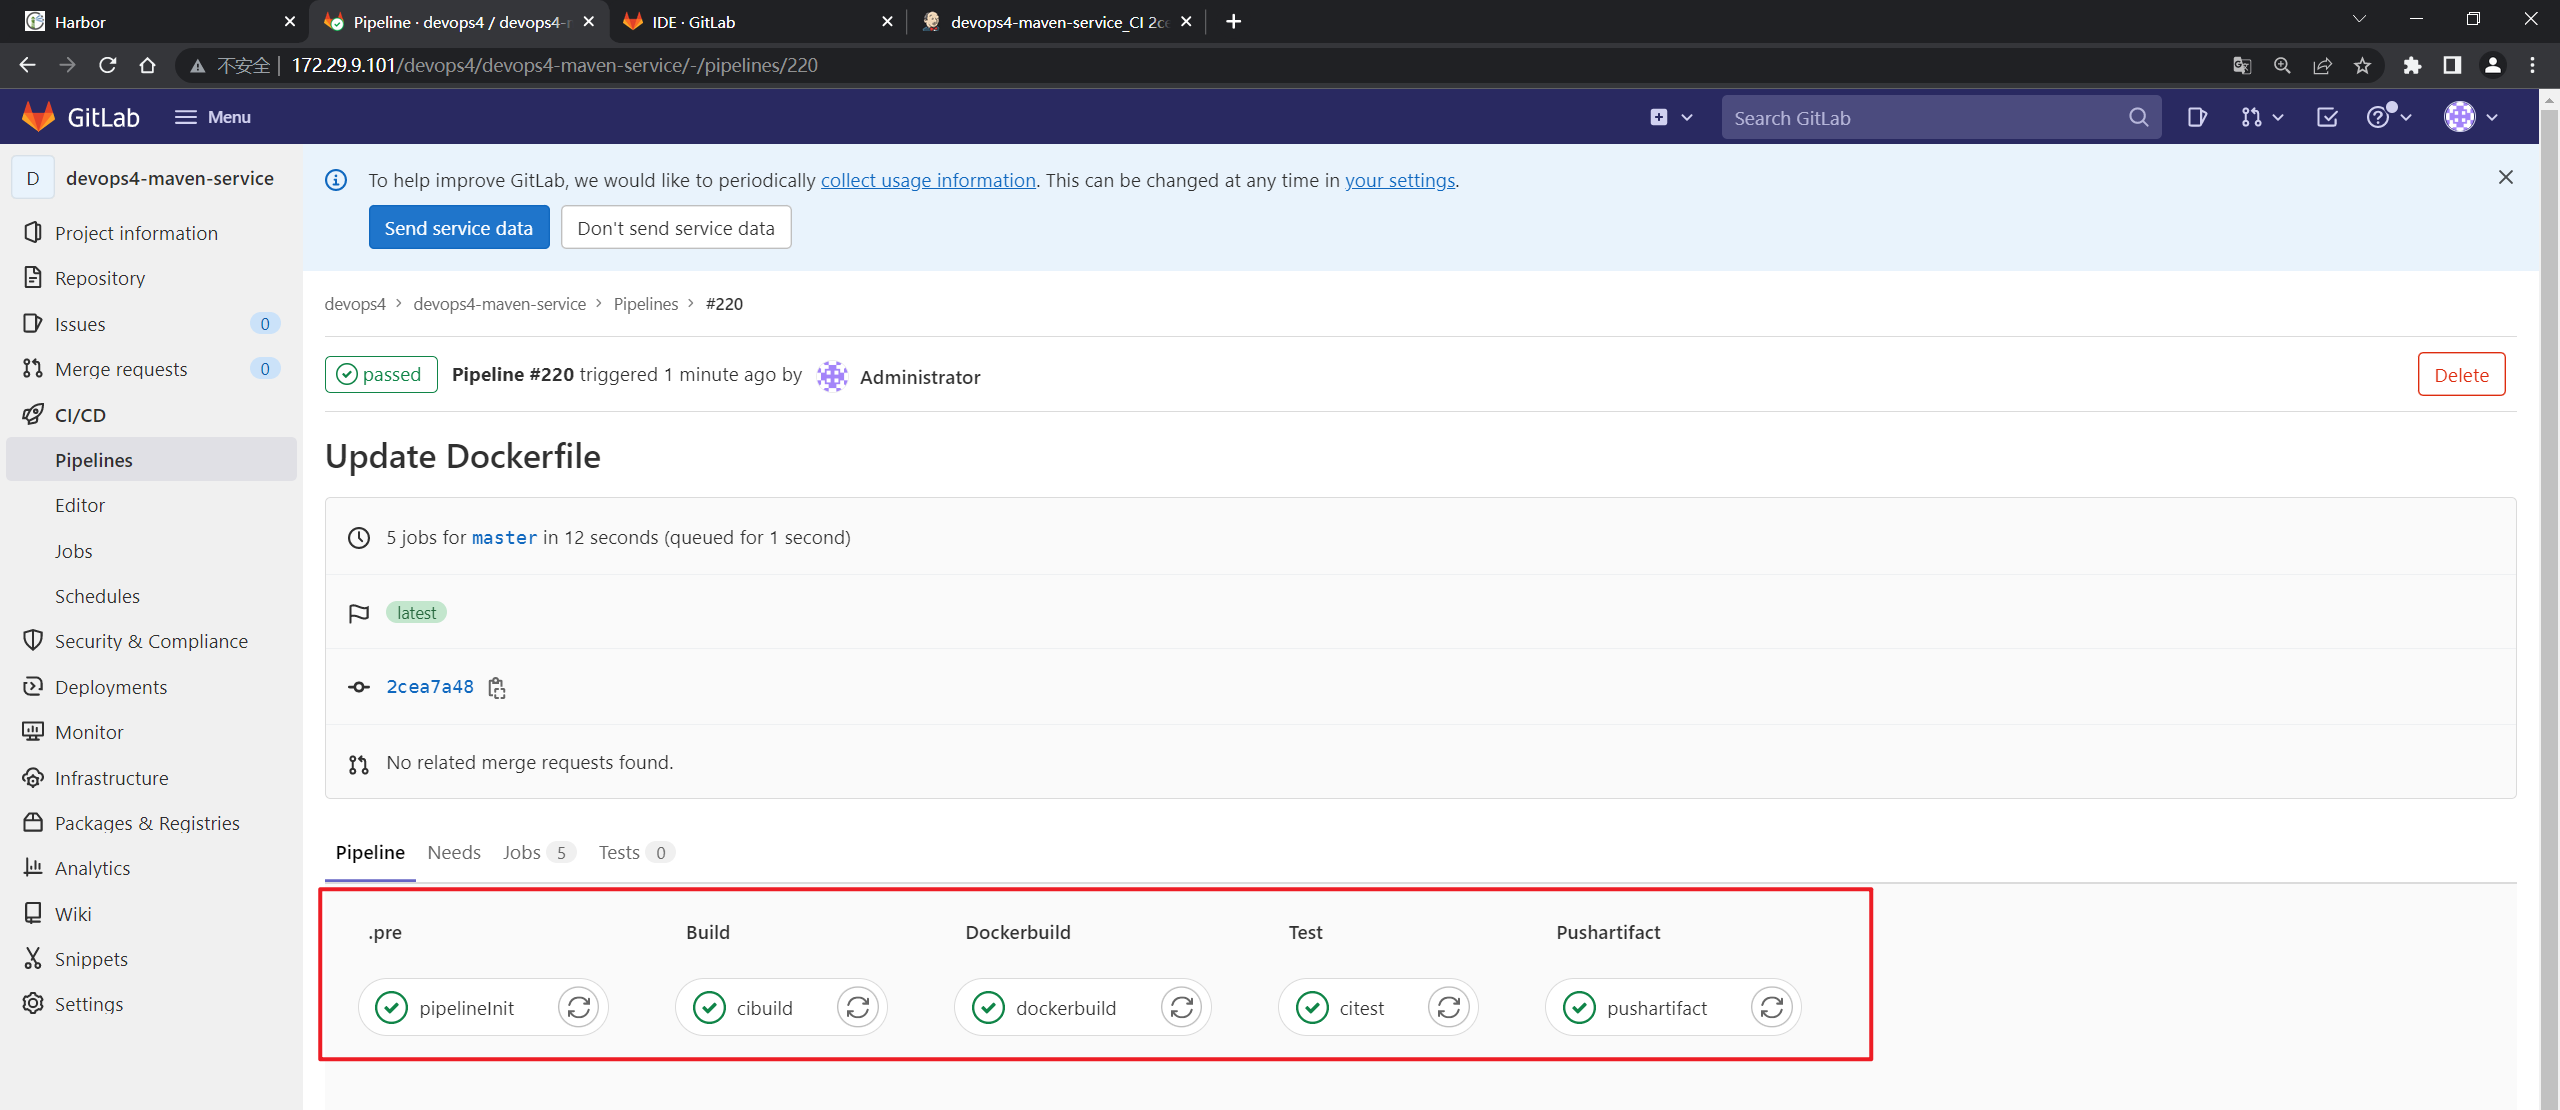
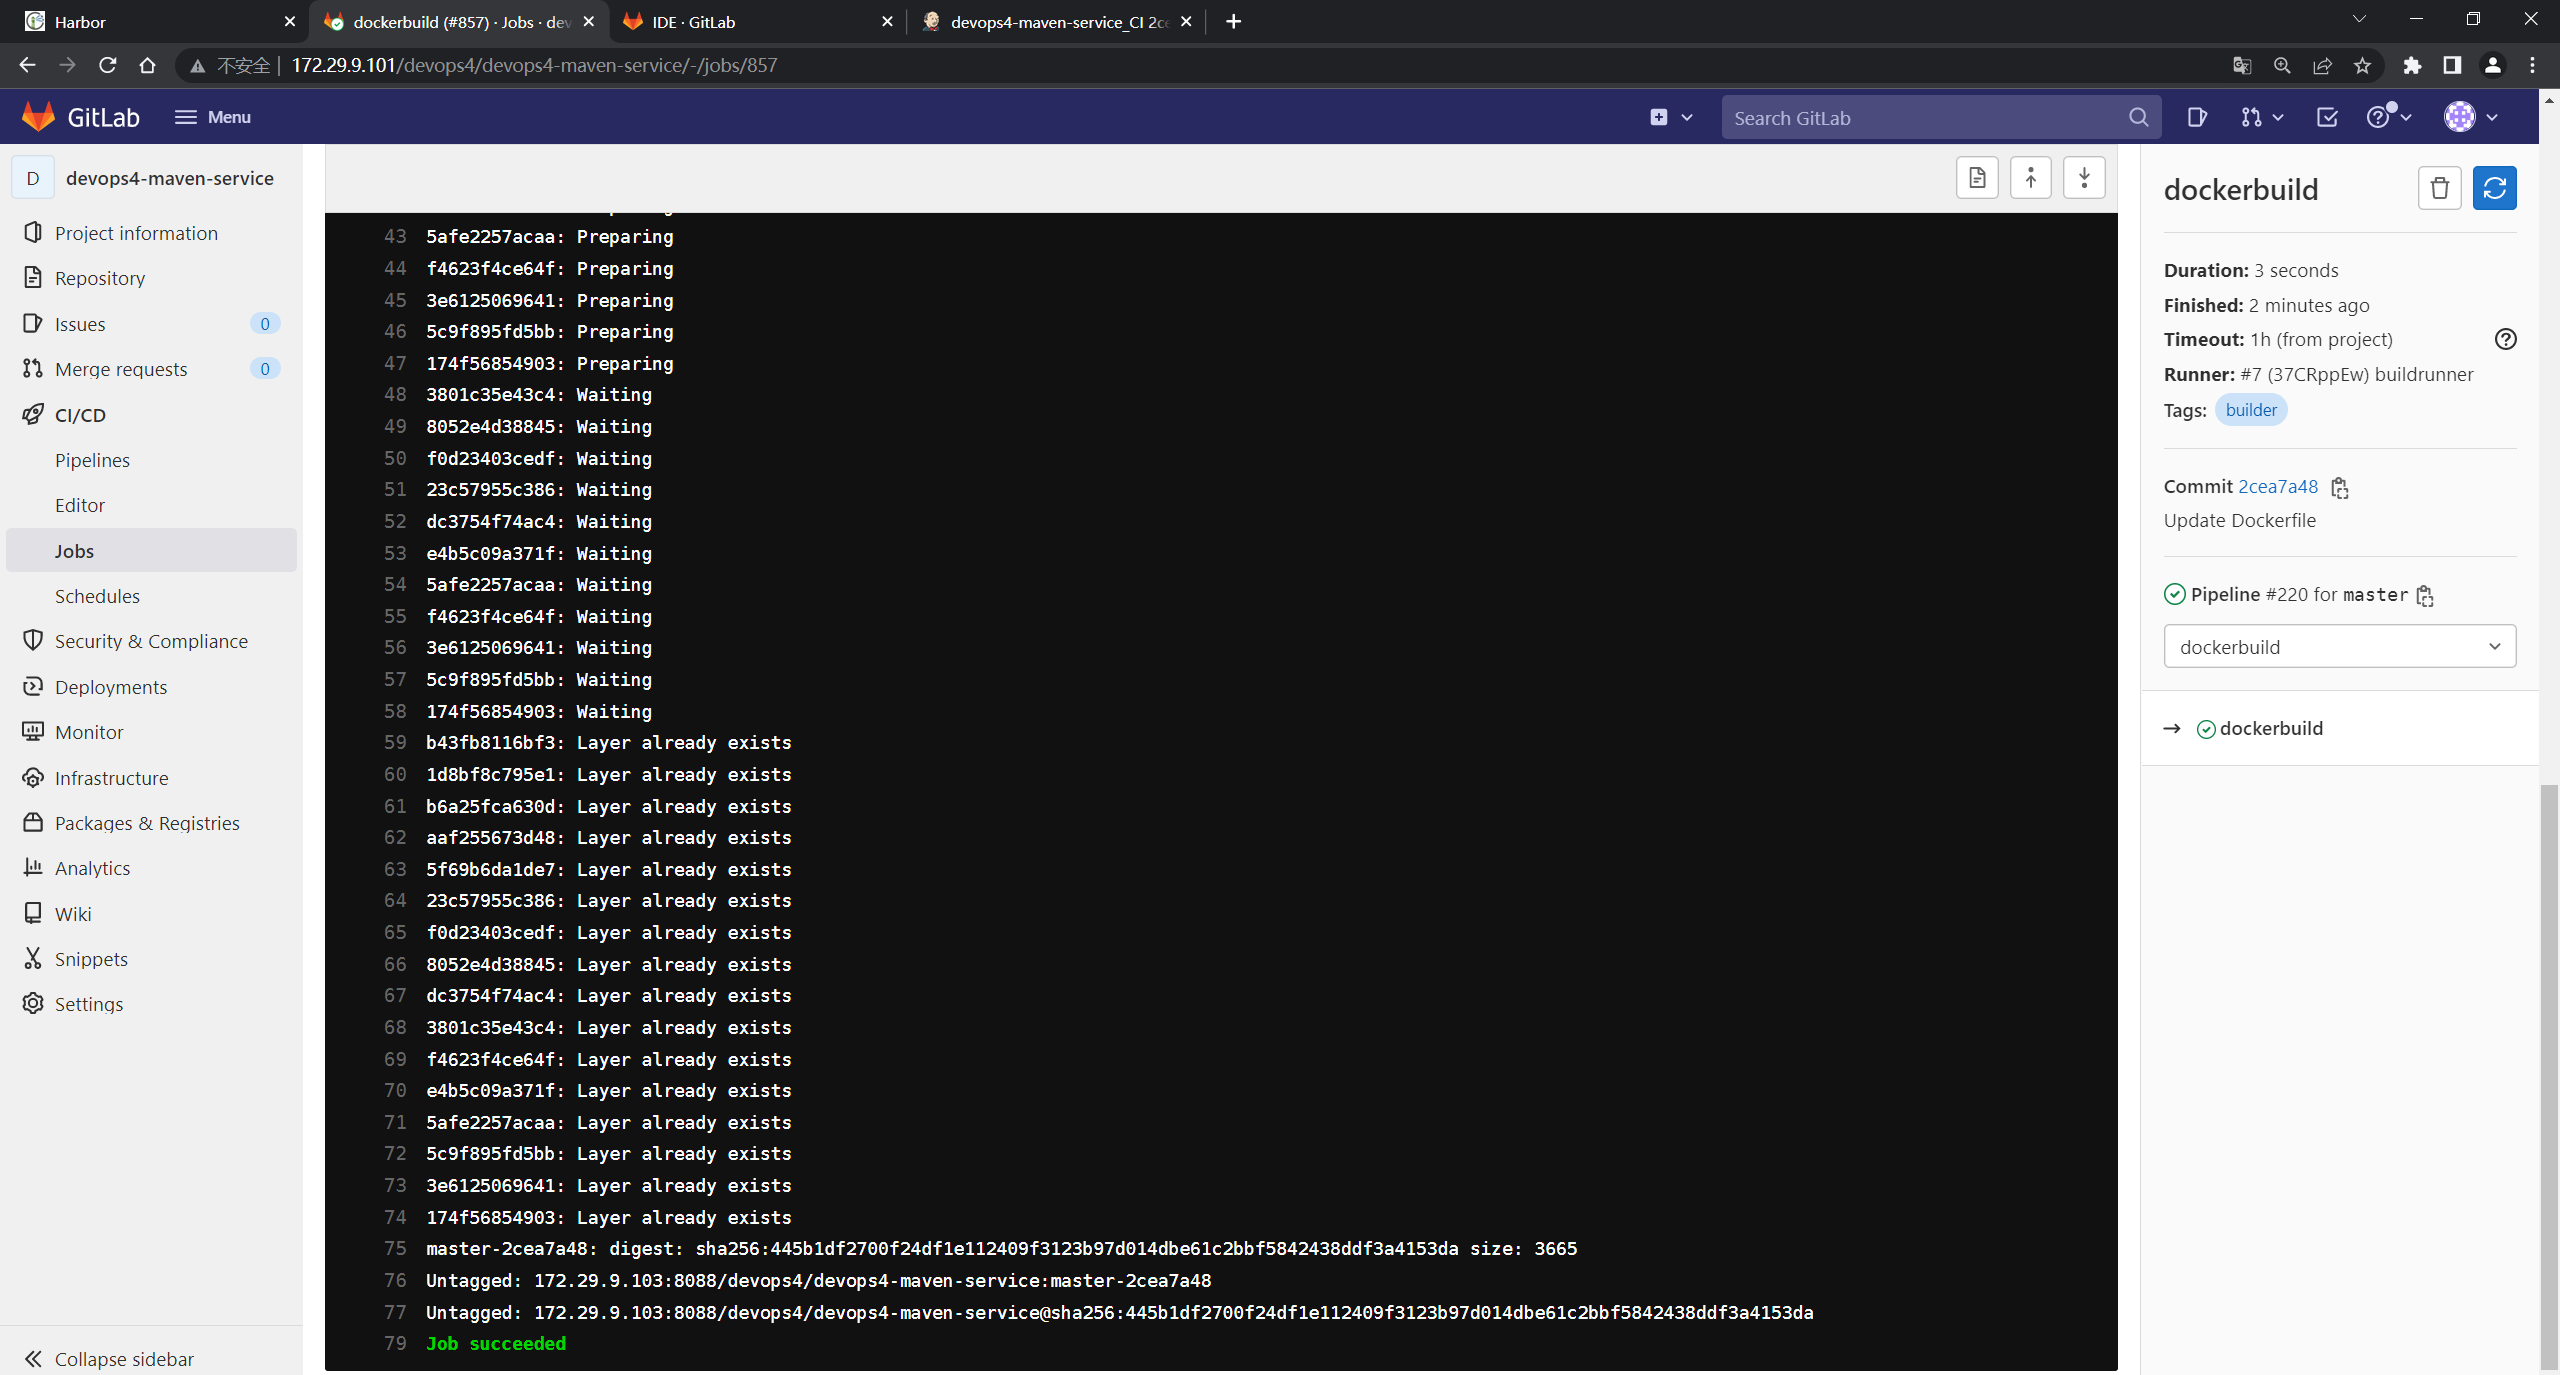
注意:因为前面jenkins那里已经上传了一个相同镜像,所以这里只显示为一个;
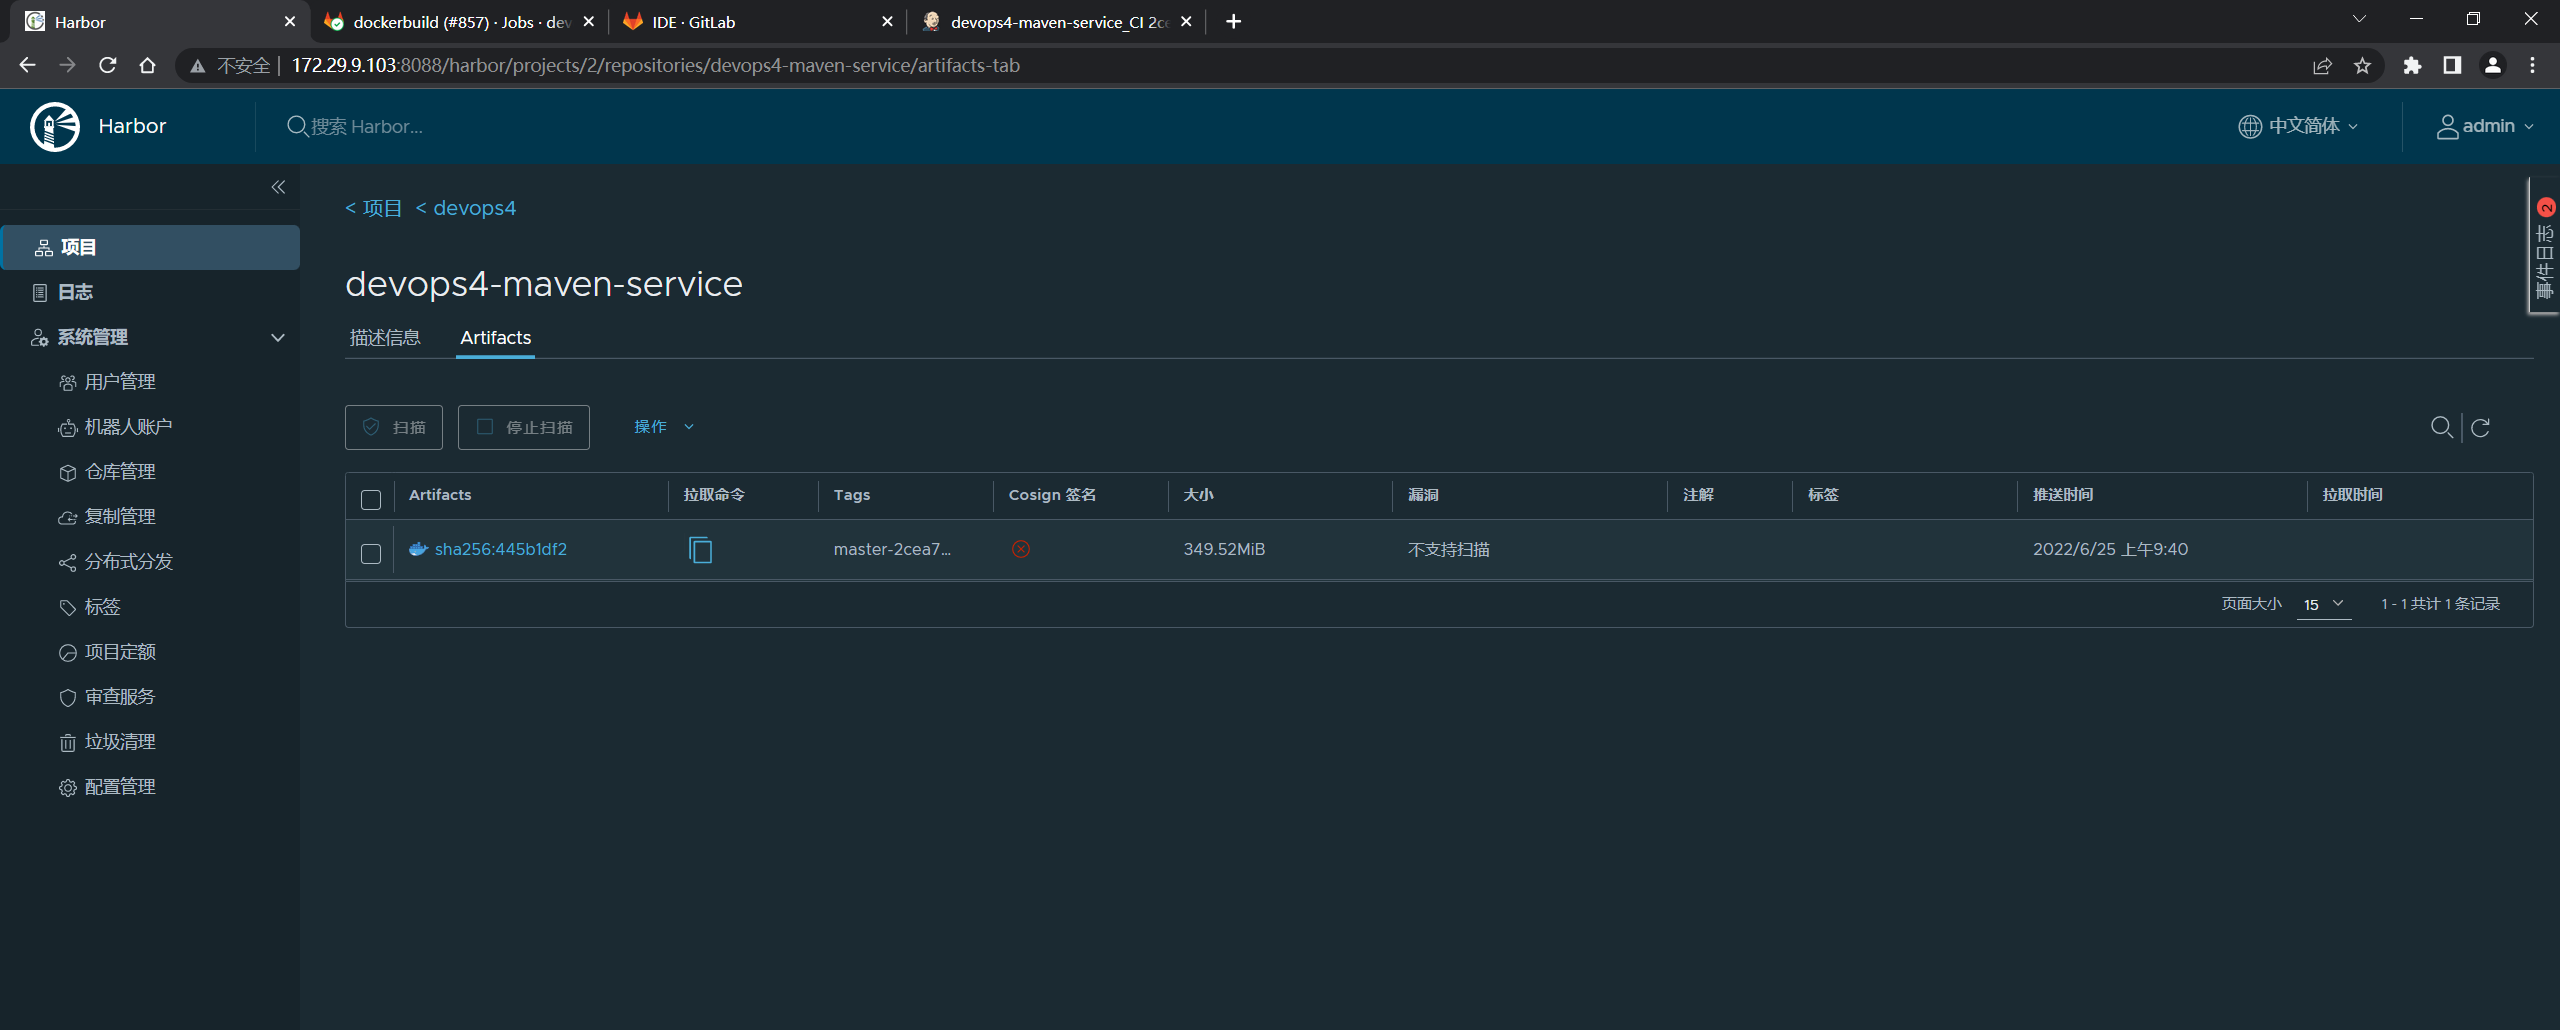
符合预期。😘
🍀 问题
- 问题现象
之前老版本harbor测试,都没报这个错误来着的;
新版本测试,为啥报这个错误了呢?
jenkins上都可以正常推送上去,但是gitlab-CI就有问题了;
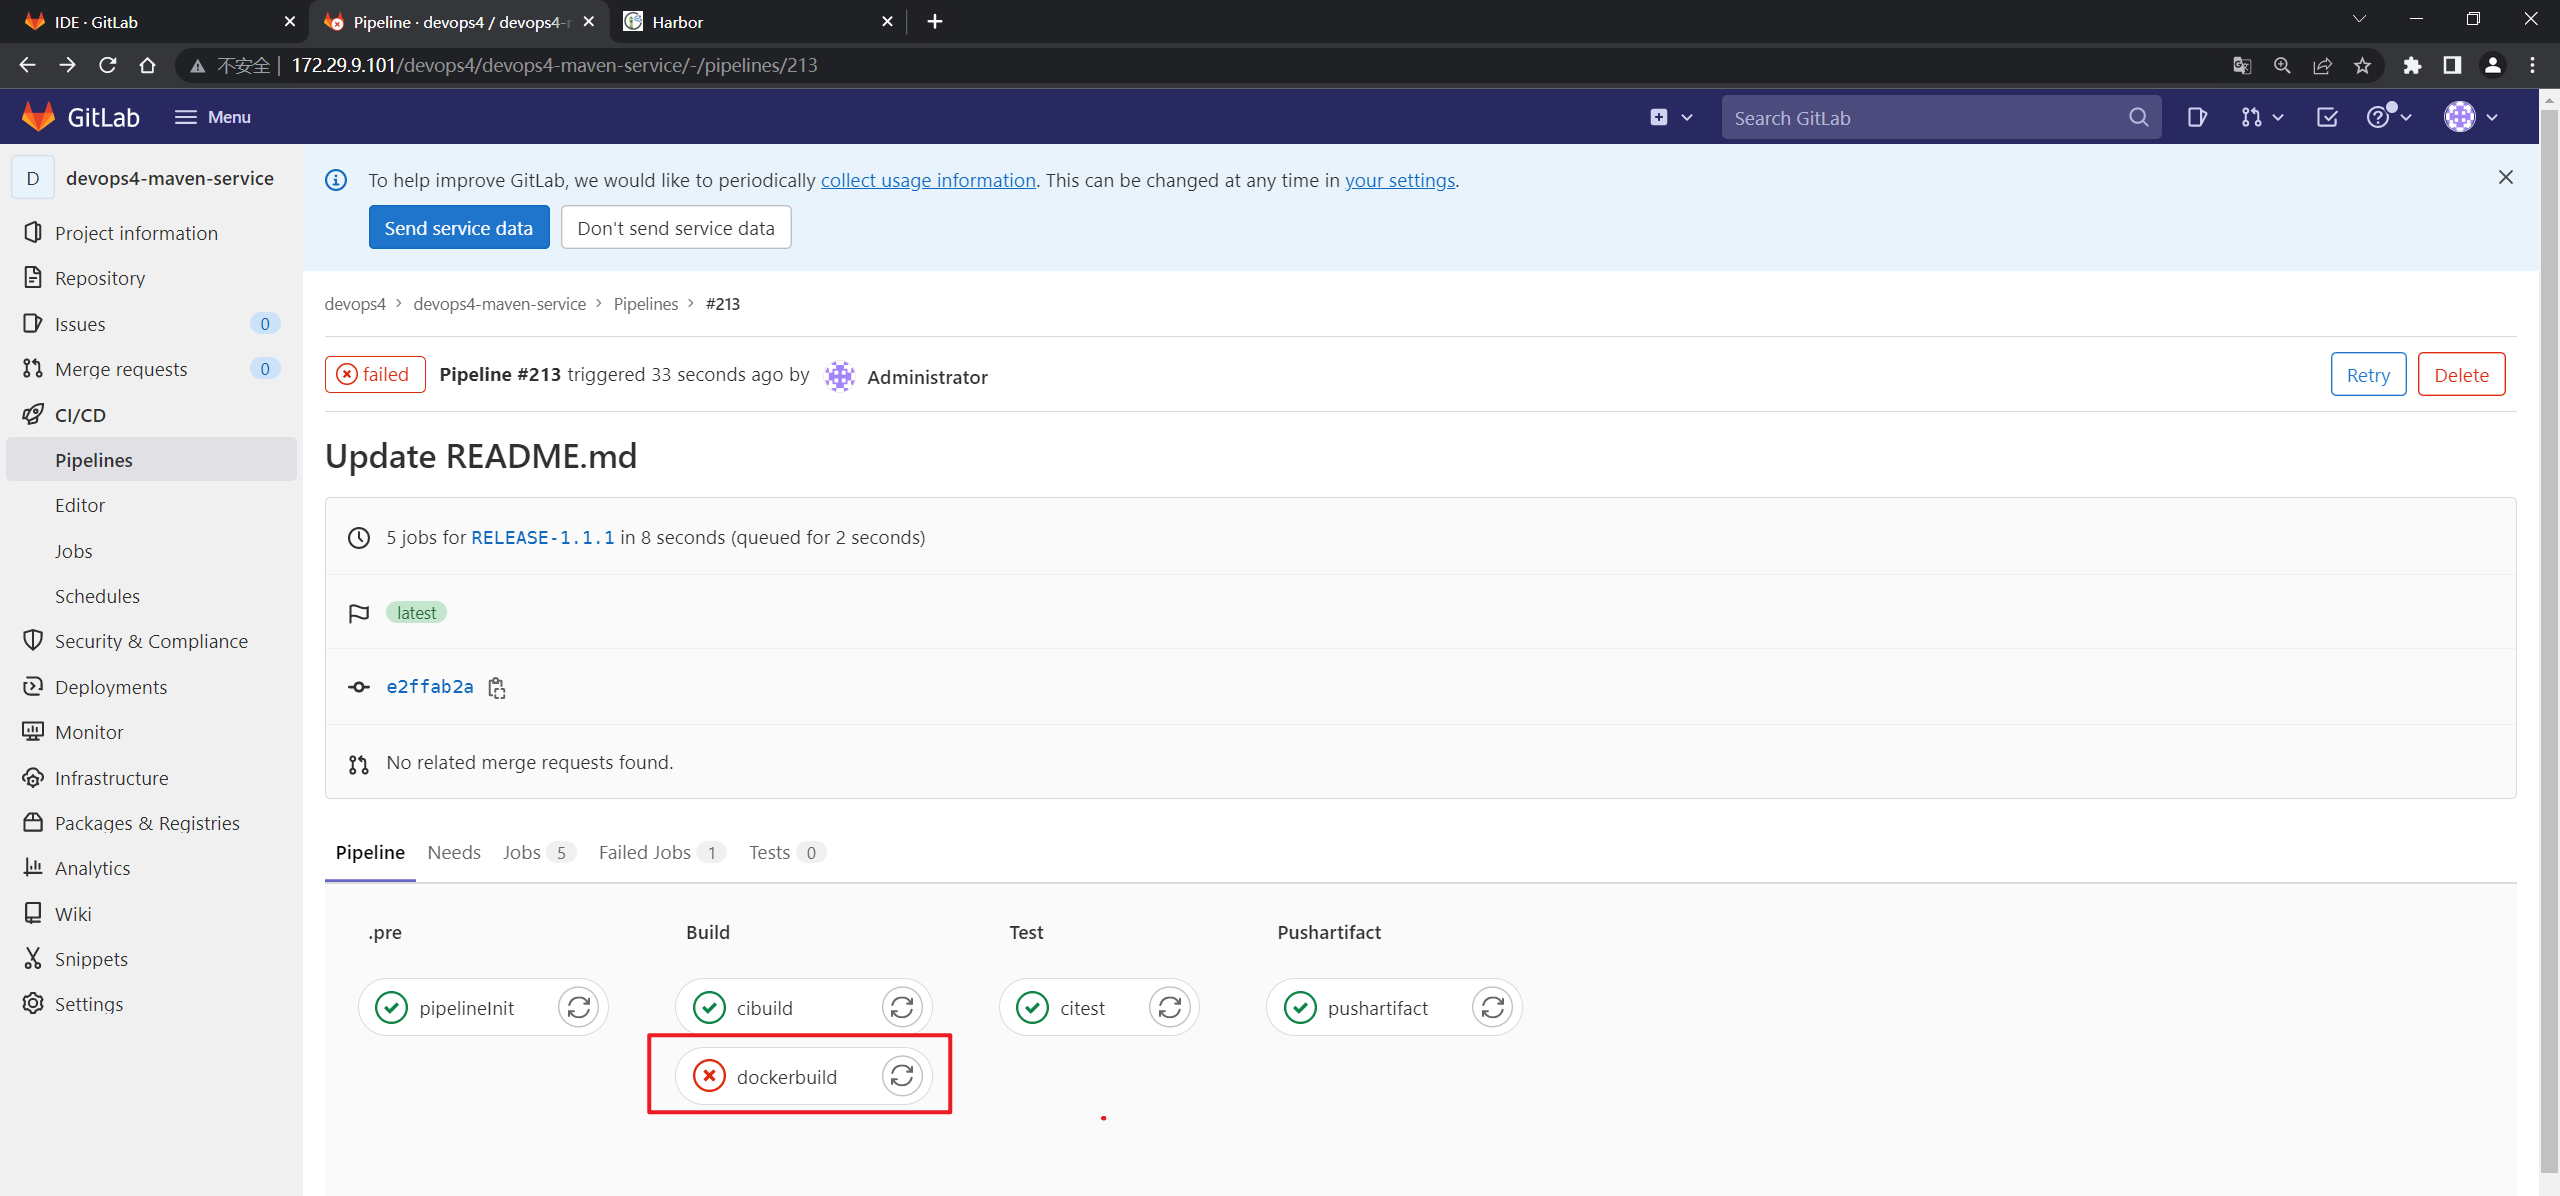
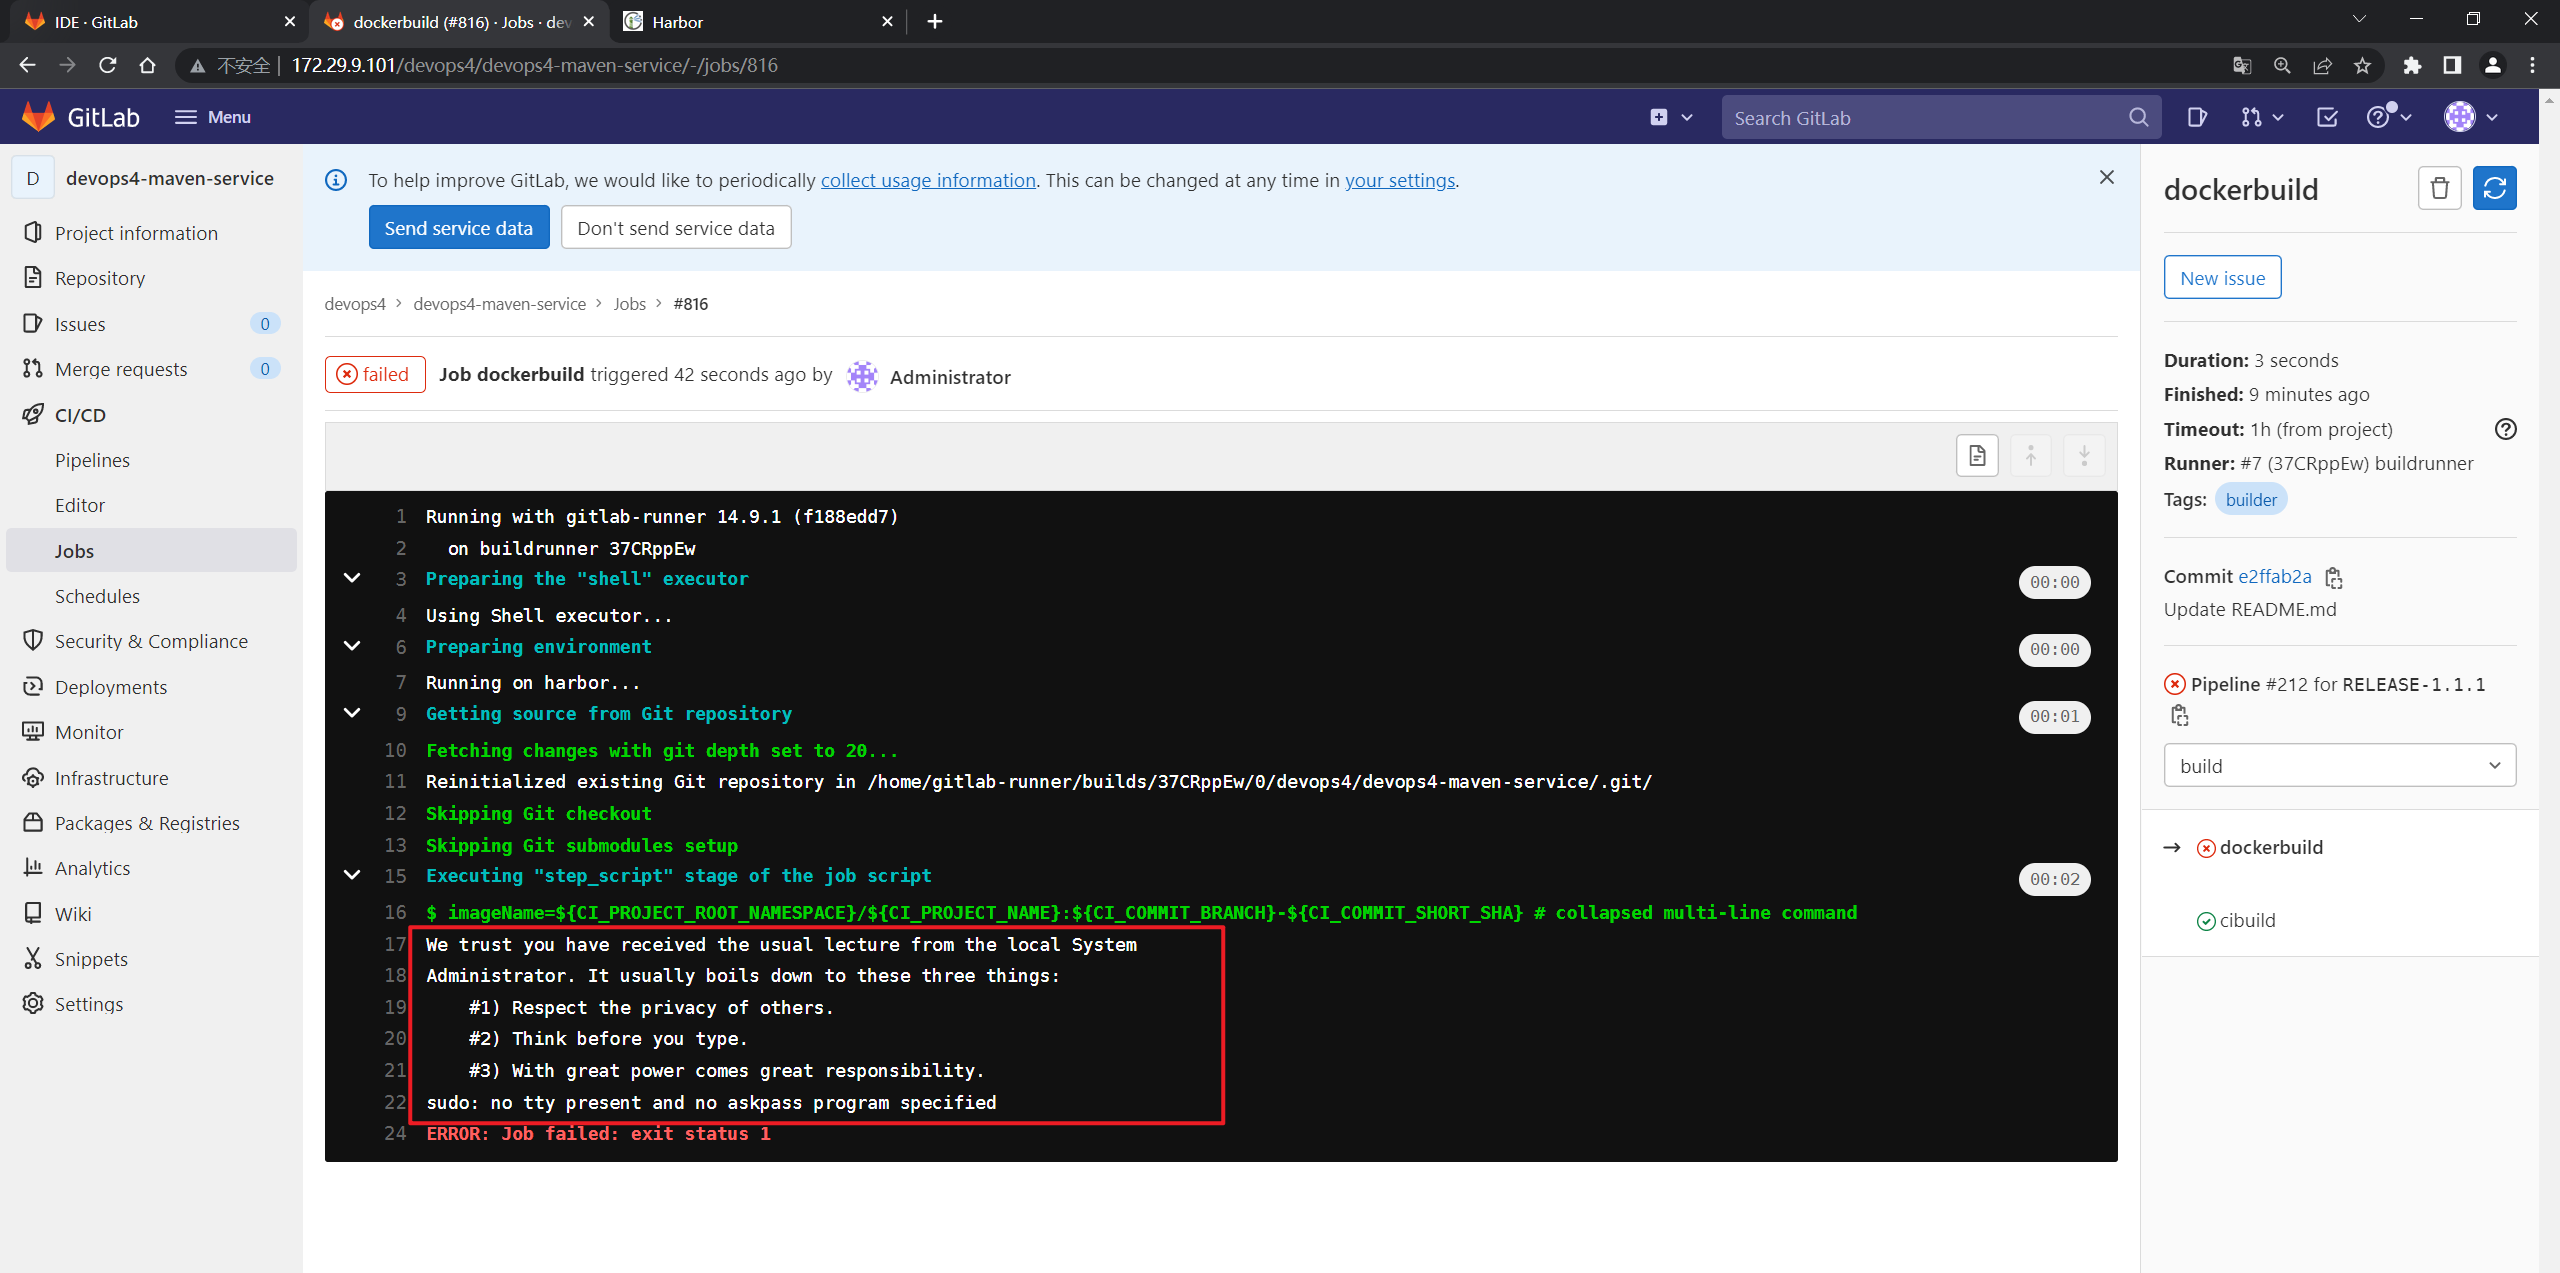
We trust you have received the usual lecture from the local System
18Administrator. It usually boils down to these three things:
19 #1) Respect the privacy of others.
20 #2) Think before you type.
21 #3) With great power comes great responsibility.
22sudo: no tty present and no askpass program specified

- 这里测试都是可以使用sudo命令的啊……

- 最后发现,串行测试没问题,但是并行测试一直报这个错误……奇怪
6.Harbor REST API
http://192.168.1.200:8088/devcenter-api-2.0
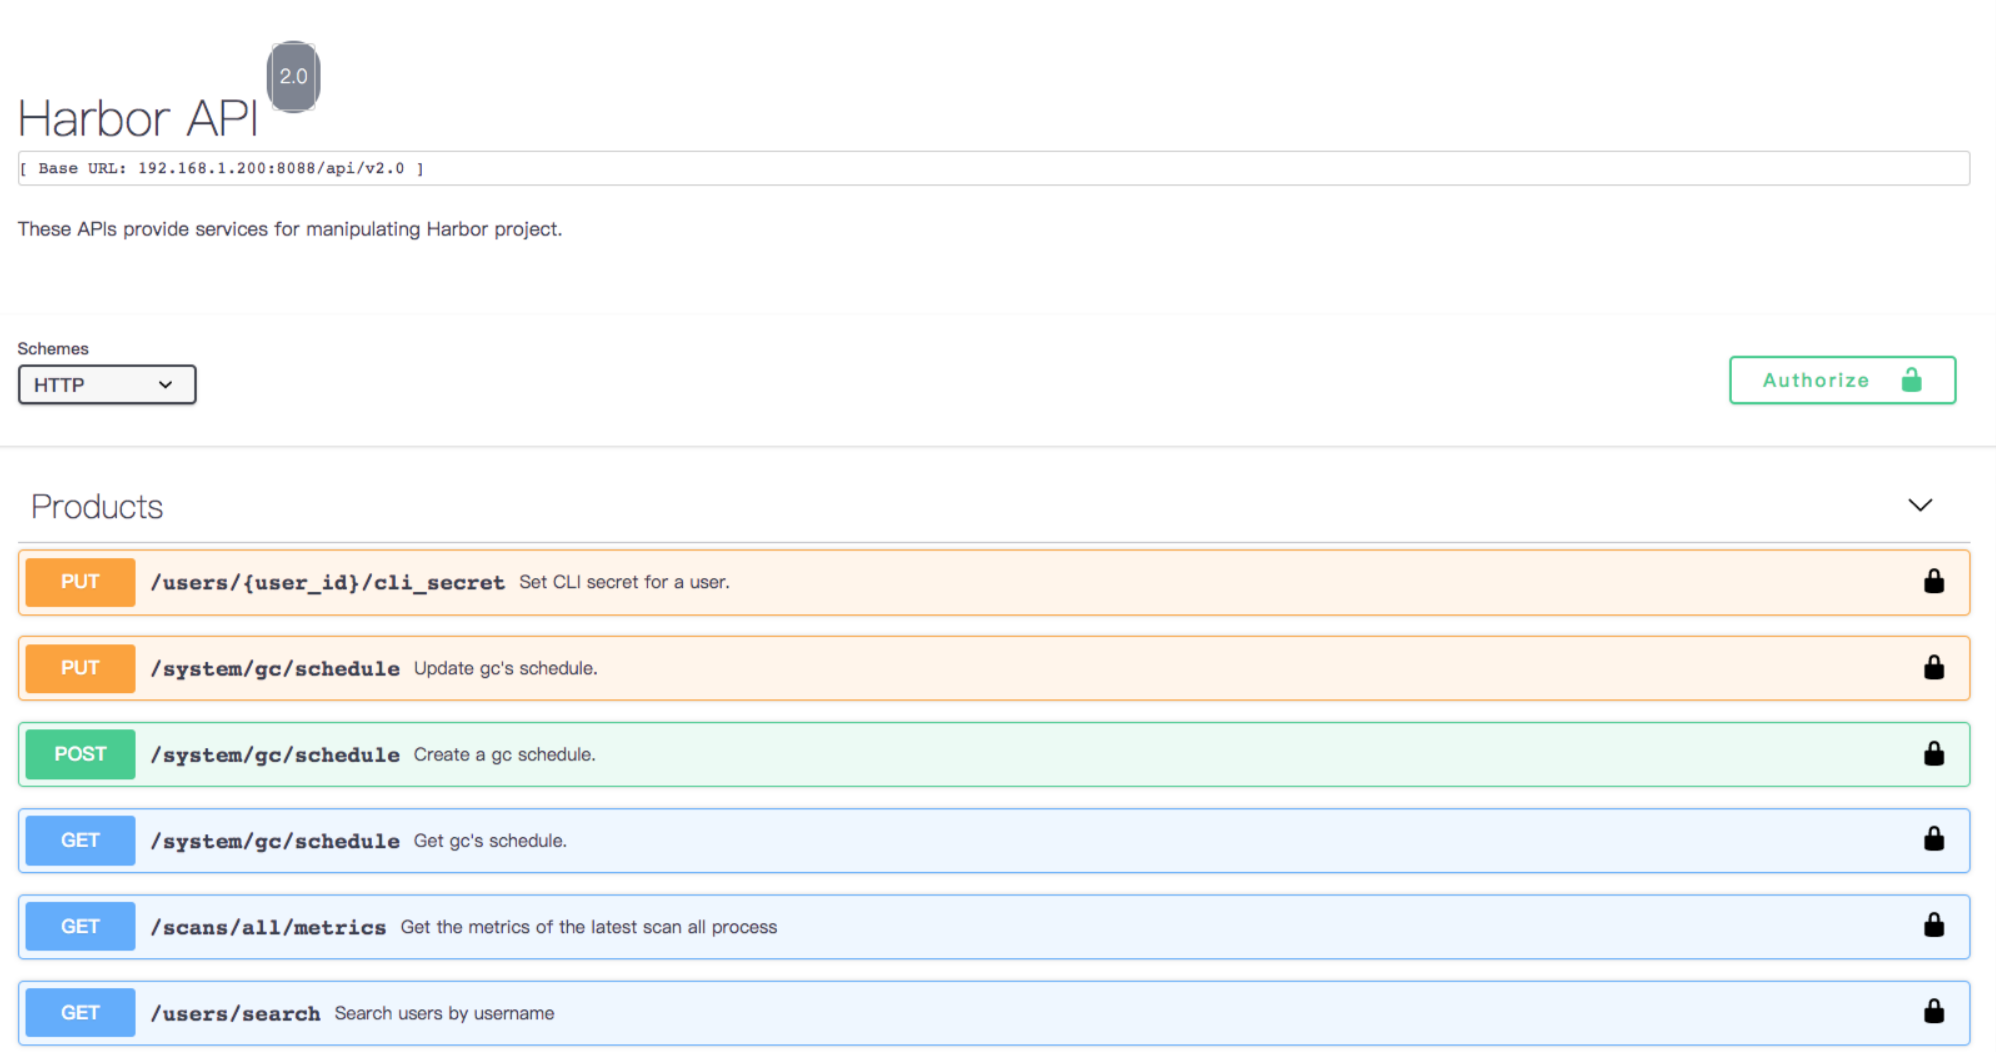
7.Harbor API 实践【New】
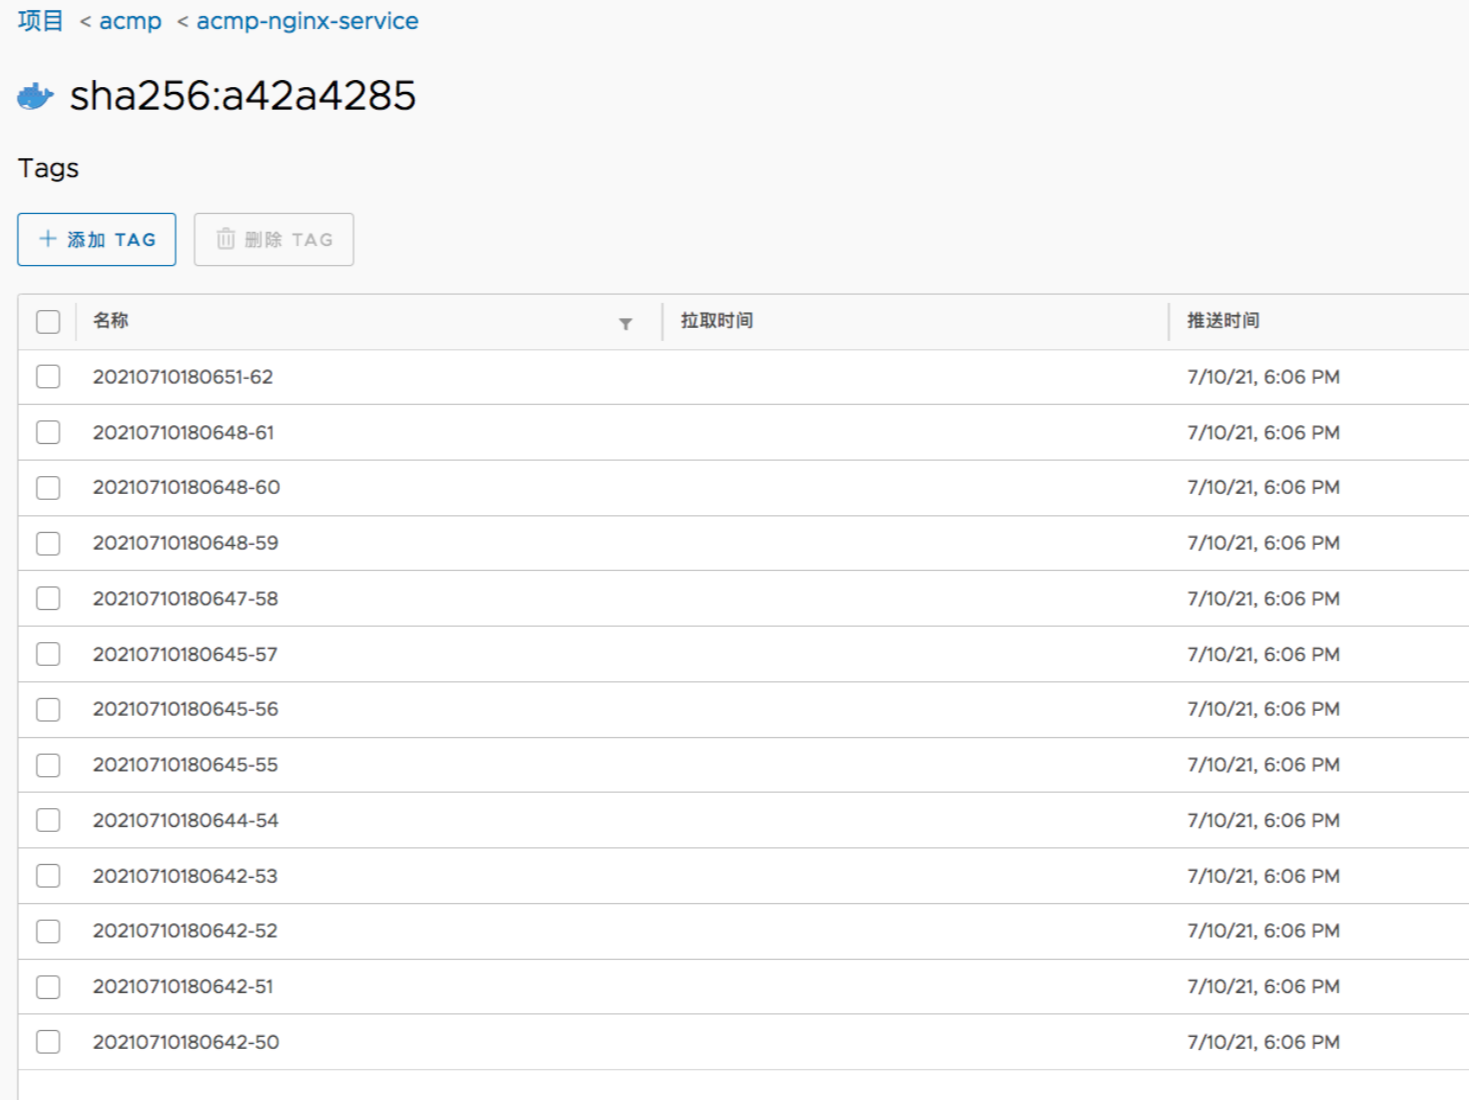
| 💘 实践:Harbor API 实践(批量删除docker镜像)-2022.6.25 |
在Harbor中批量的创建一些标签
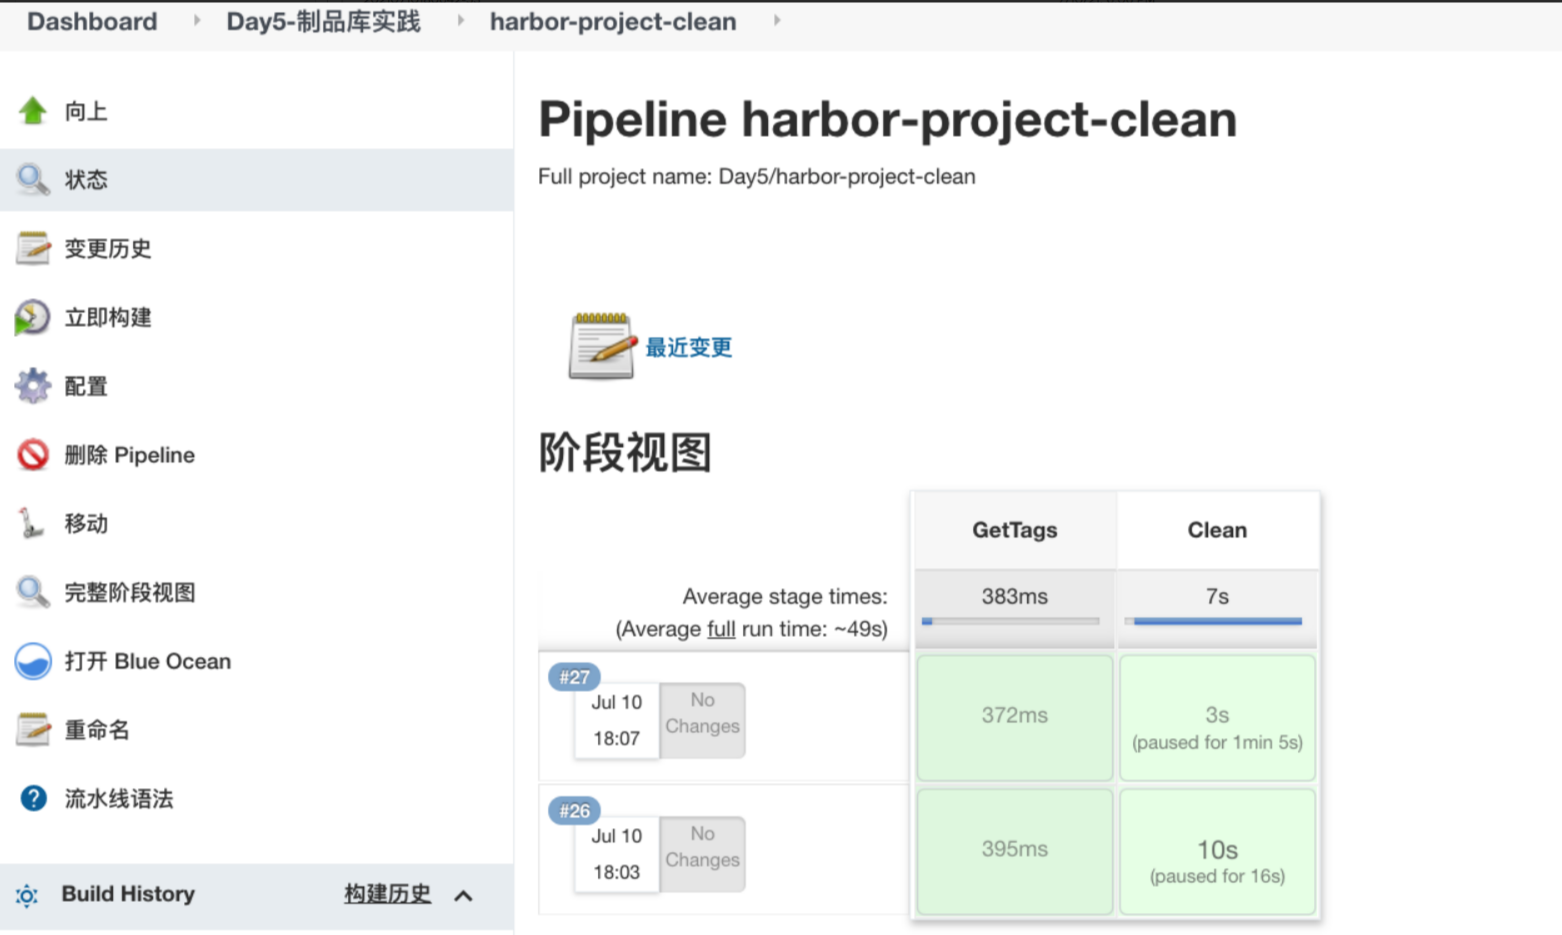
创建一个Jenkins作业, 不需要配置任何参数。 只需要把Jenkinfile内容放进去。
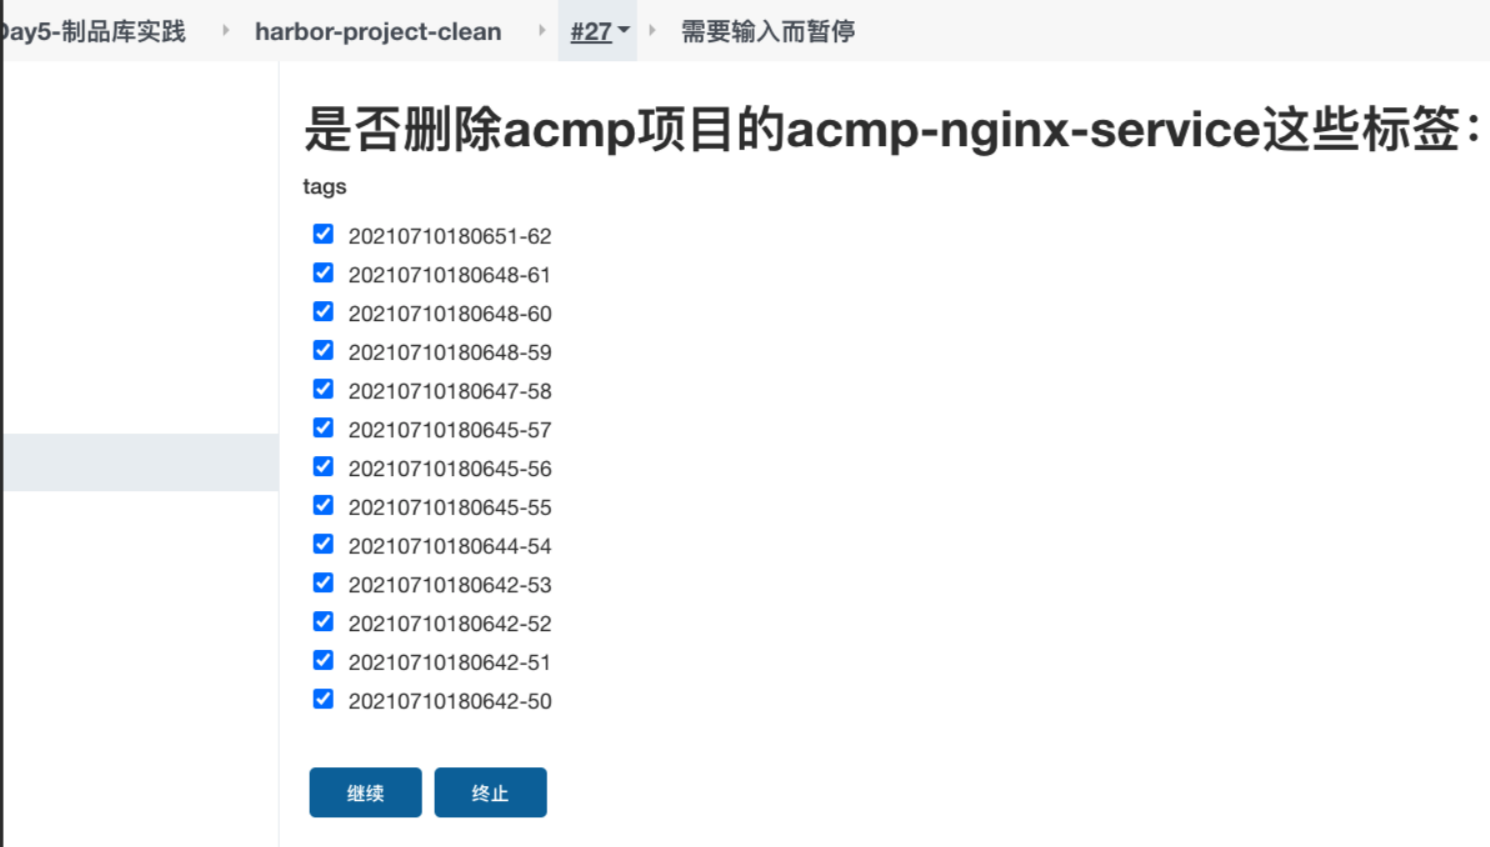
jenkinsfile内容:
- 通过API 获取所有的tag标签列表。
- 将标签信息用INPUT交互式的展示。
- 调用删除接口,删除镜像标签。
import groovy.json.JsonSlurper

/*
清理docker镜像

1. 获取镜像列表
2. 用户选择删除
3. 调用api删除

*/
pipeline {
    agent {
        label "build"
    }

    stages{

        stage("GetTags"){
            steps{
                script{
                    env.projectName = "acmp"
                    env.repoName = "acmp-nginx-service"
                    env.result = GetArtifactTag(env.projectName, env.repoName)
                    env.result = env.result - '[' - ']'
                }
            }
        }

        stage("Clean"){
            steps{
                script{

                    def result = input  message: "是否删除${env.projectName}项目的${env.repoName}这些标签:",
                                        parameters: [extendedChoice(defaultValue: "${env.result}",
                                                                    multiSelectDelimiter: ',',
                                                                    name: 'taga',
                                                                    quoteValue: false,
                                                                    saveJSONParameterToFile: false,
                                                                    type: 'PT_CHECKBOX',
                                                                    value: "${env.result}",
                                                                    visibleItemCount: 20)]
                    println("${result}")
                    // println("Delete  ${taga}, doing.......")
                    // tags = "${taga}" - '[' - ']'

                    for(t in result.split(',')){
                        println("Delete >>>>" + t.trim())
                        DeleteArtifactTag(env.projectName,env.repoName, t.trim())
                    }
                }
            }

        }
    }
}


// 删除镜像tag
def DeleteArtifactTag(projectName,repoName, tagName){
    harborAPI = "http://192.168.1.200:8088/api/v2.0/projects/${projectName}/repositories/${repoName}"
    apiURL = "artifacts/${tagName}/tags/${tagName}"
    sh """ curl -X DELETE "${harborAPI}/${apiURL}" -H "accept: application/json"  -u admin:Harbor12345 """
}

// 获取镜像的所有标签
// acmp-nginx-service
def GetArtifactTag(projectName,repoName ){
    harborAPI = "http://192.168.1.200:8088/api/v2.0/projects/${projectName}/repositories/${repoName}"
    apiURL = "artifacts?page=1&page_size=10"
    response = sh returnStdout: true, script:  """curl -X GET "${harborAPI}/${apiURL}" -H "accept: application/json" -u admin:Harbor12345 """
    response = readJSON text: """${response - "\n"}"""
    tags = []
    for (t in response[0].tags){
        tags << t.name
    }

    return tags
}
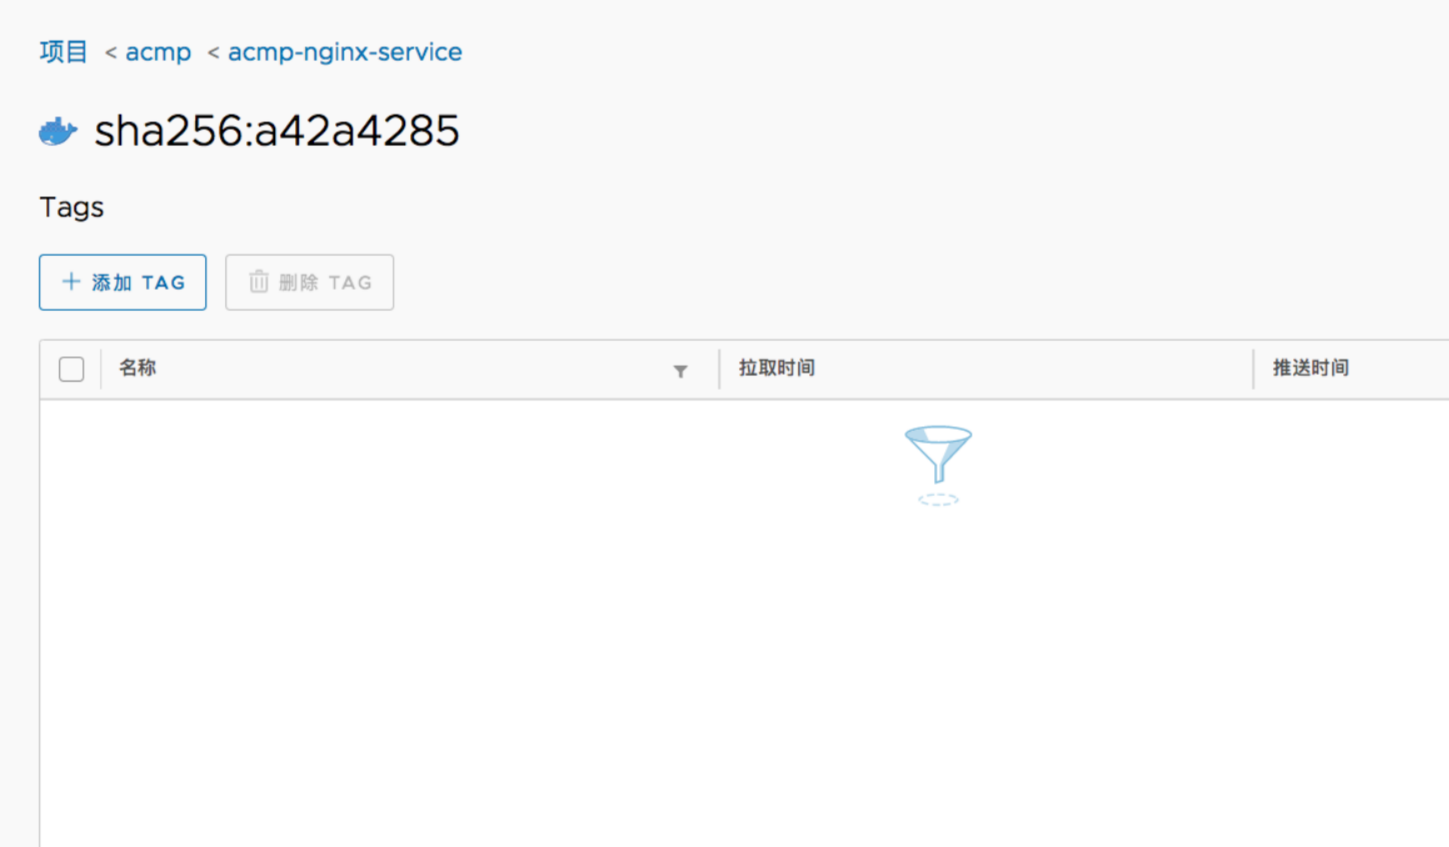
最终效果:【Harbor镜像已经清空了】
📍 自己测试过程:
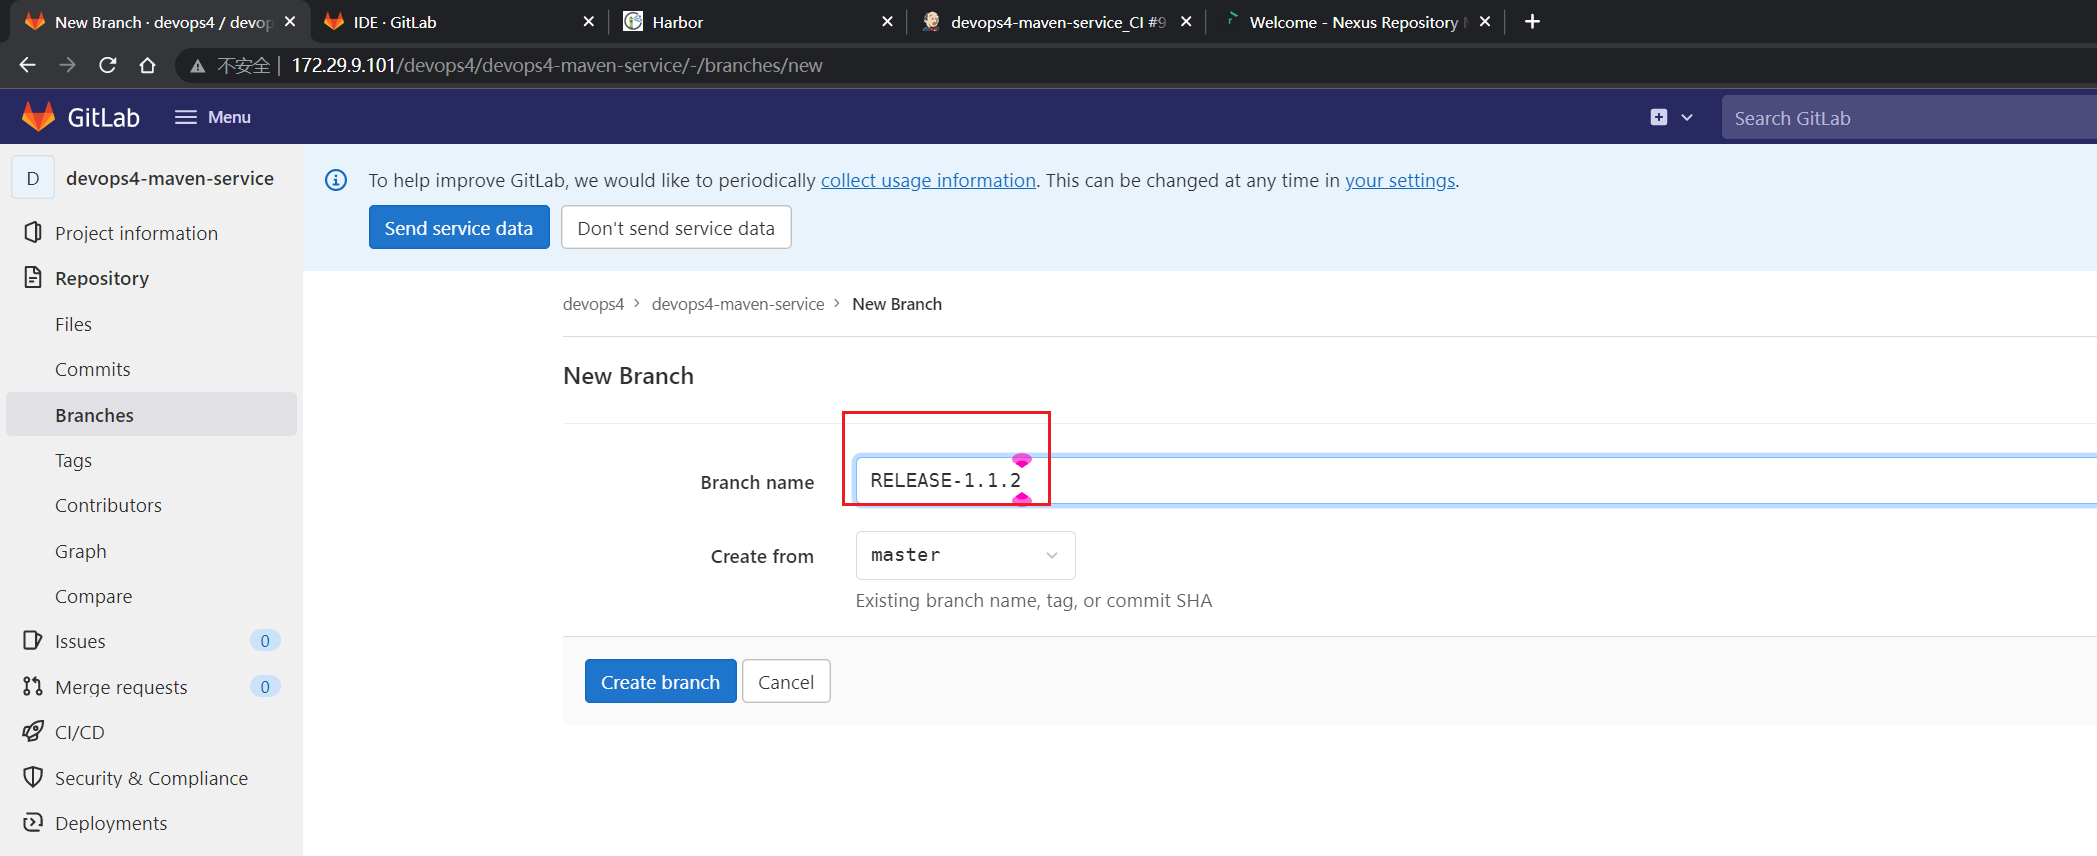
- 来到
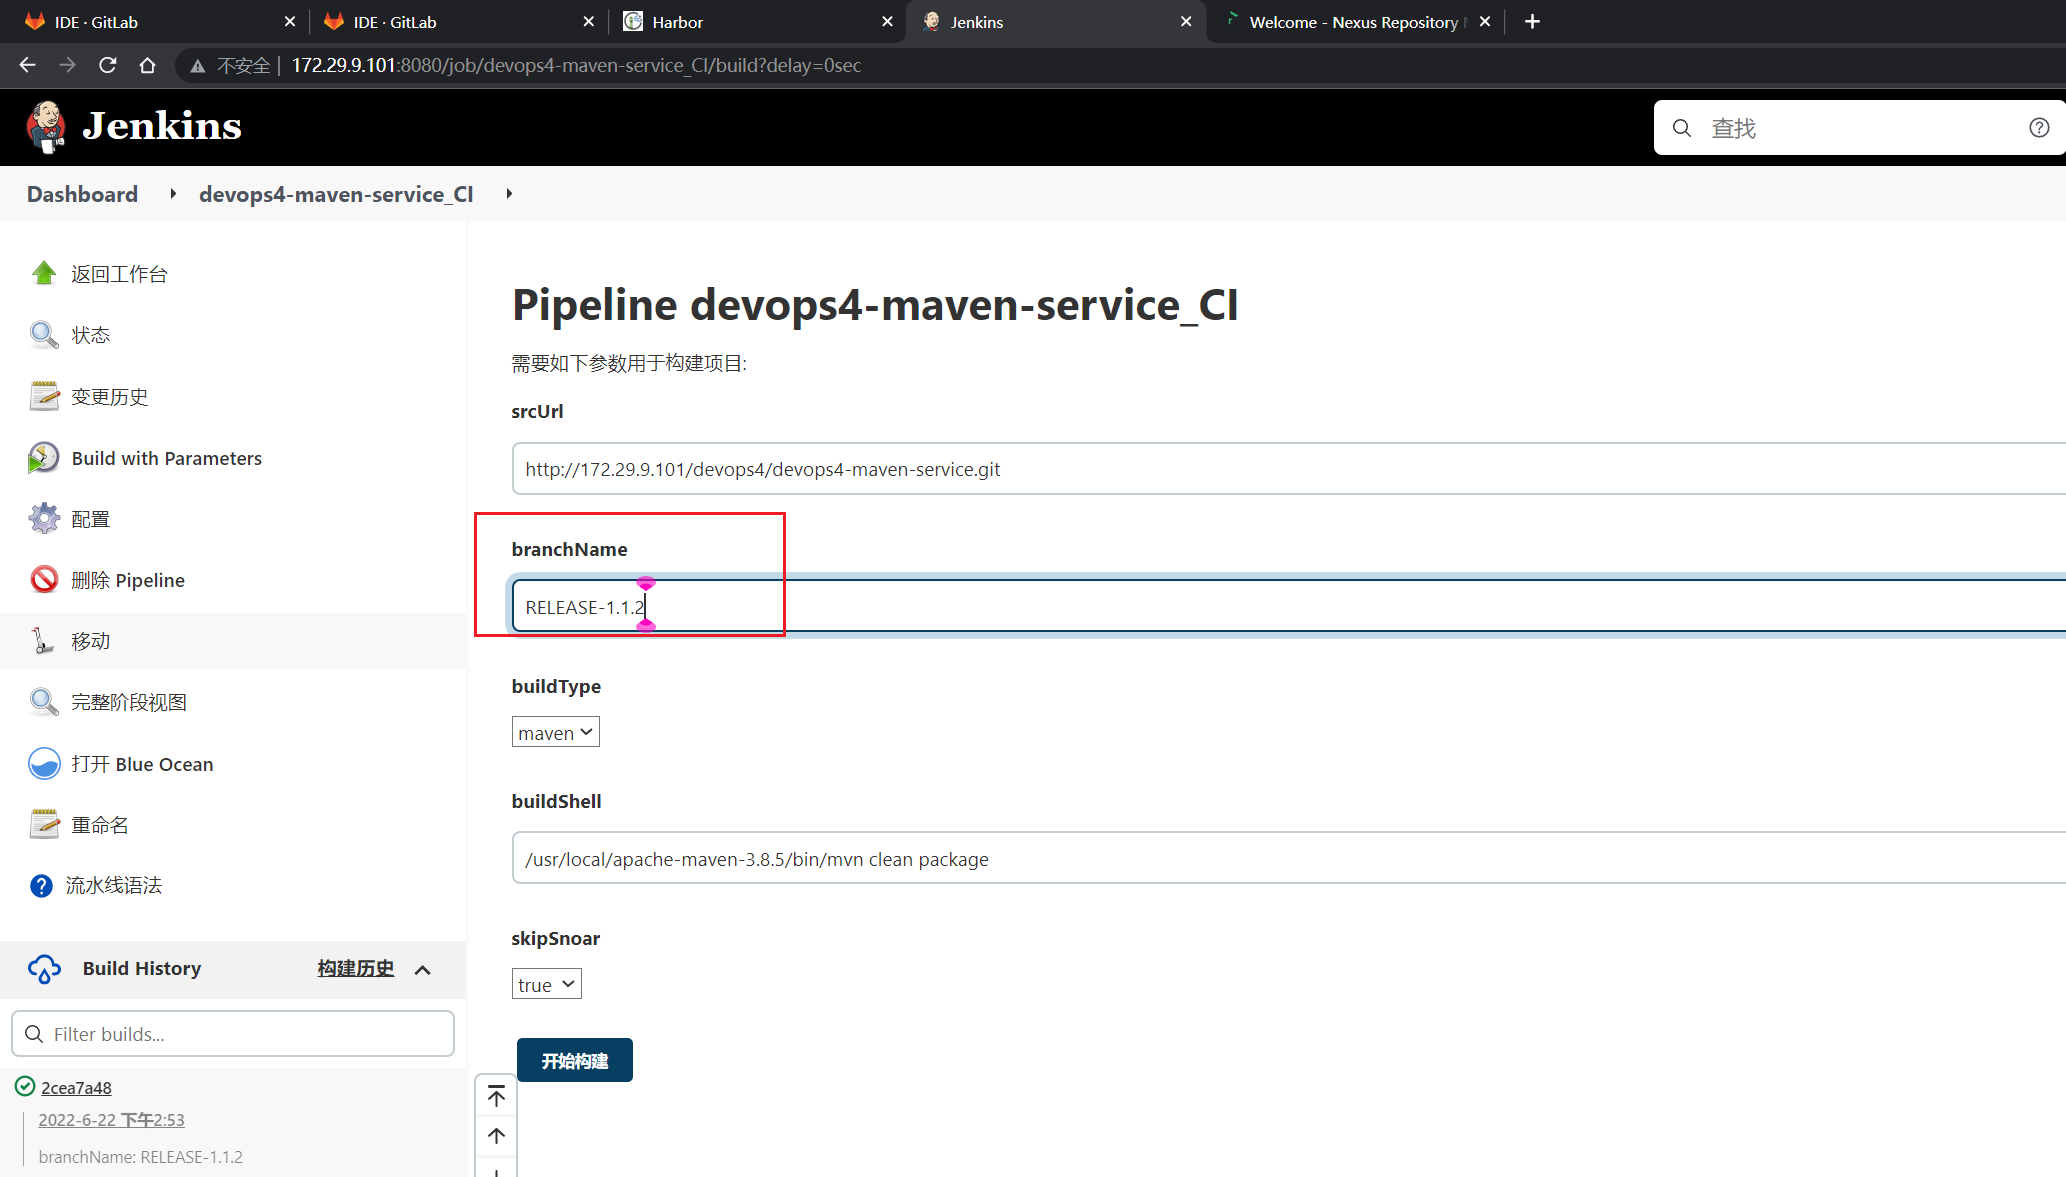
devops4-maven-service仓库,创建一个新分支:
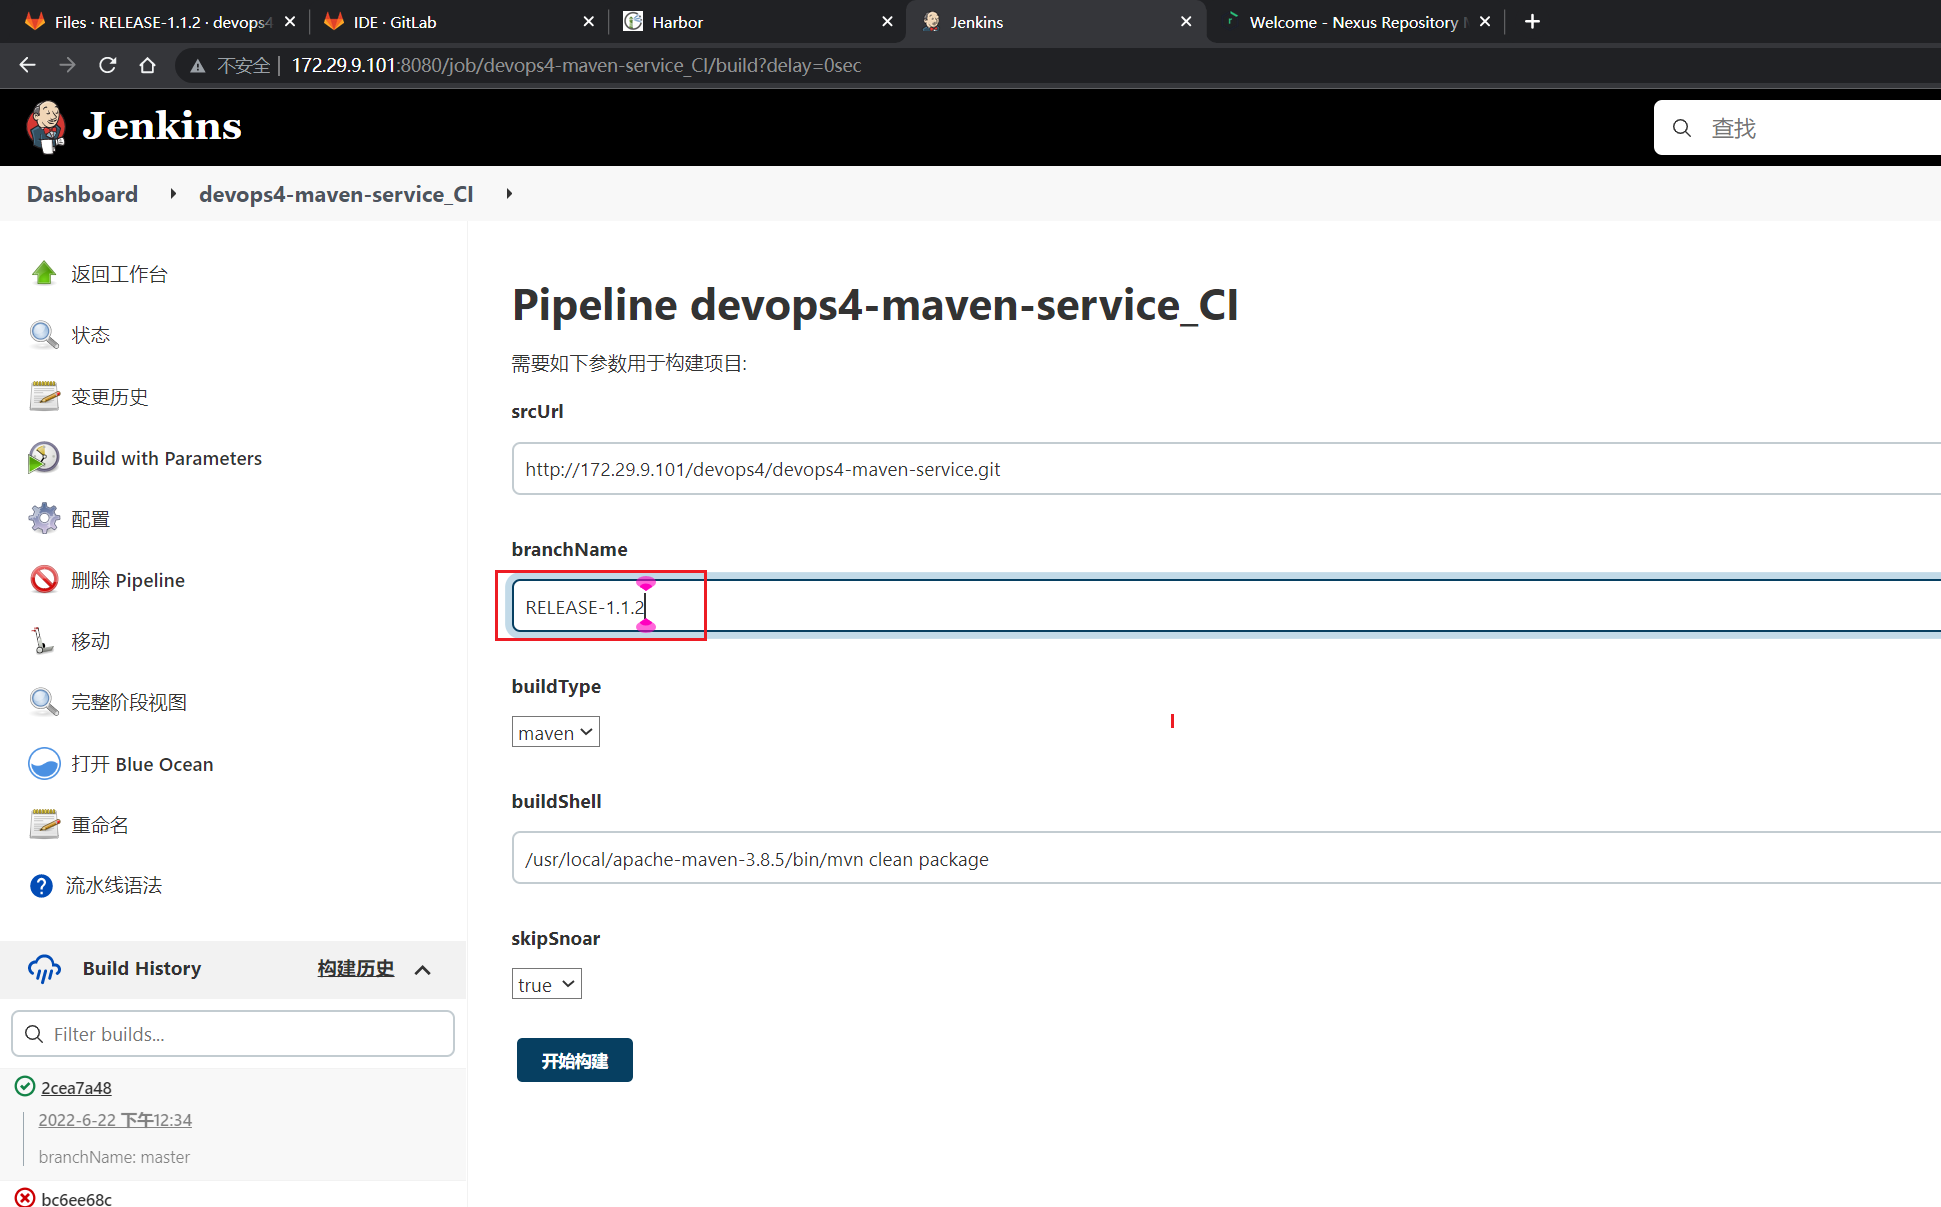
然后在jenkins里跑一次流水线:
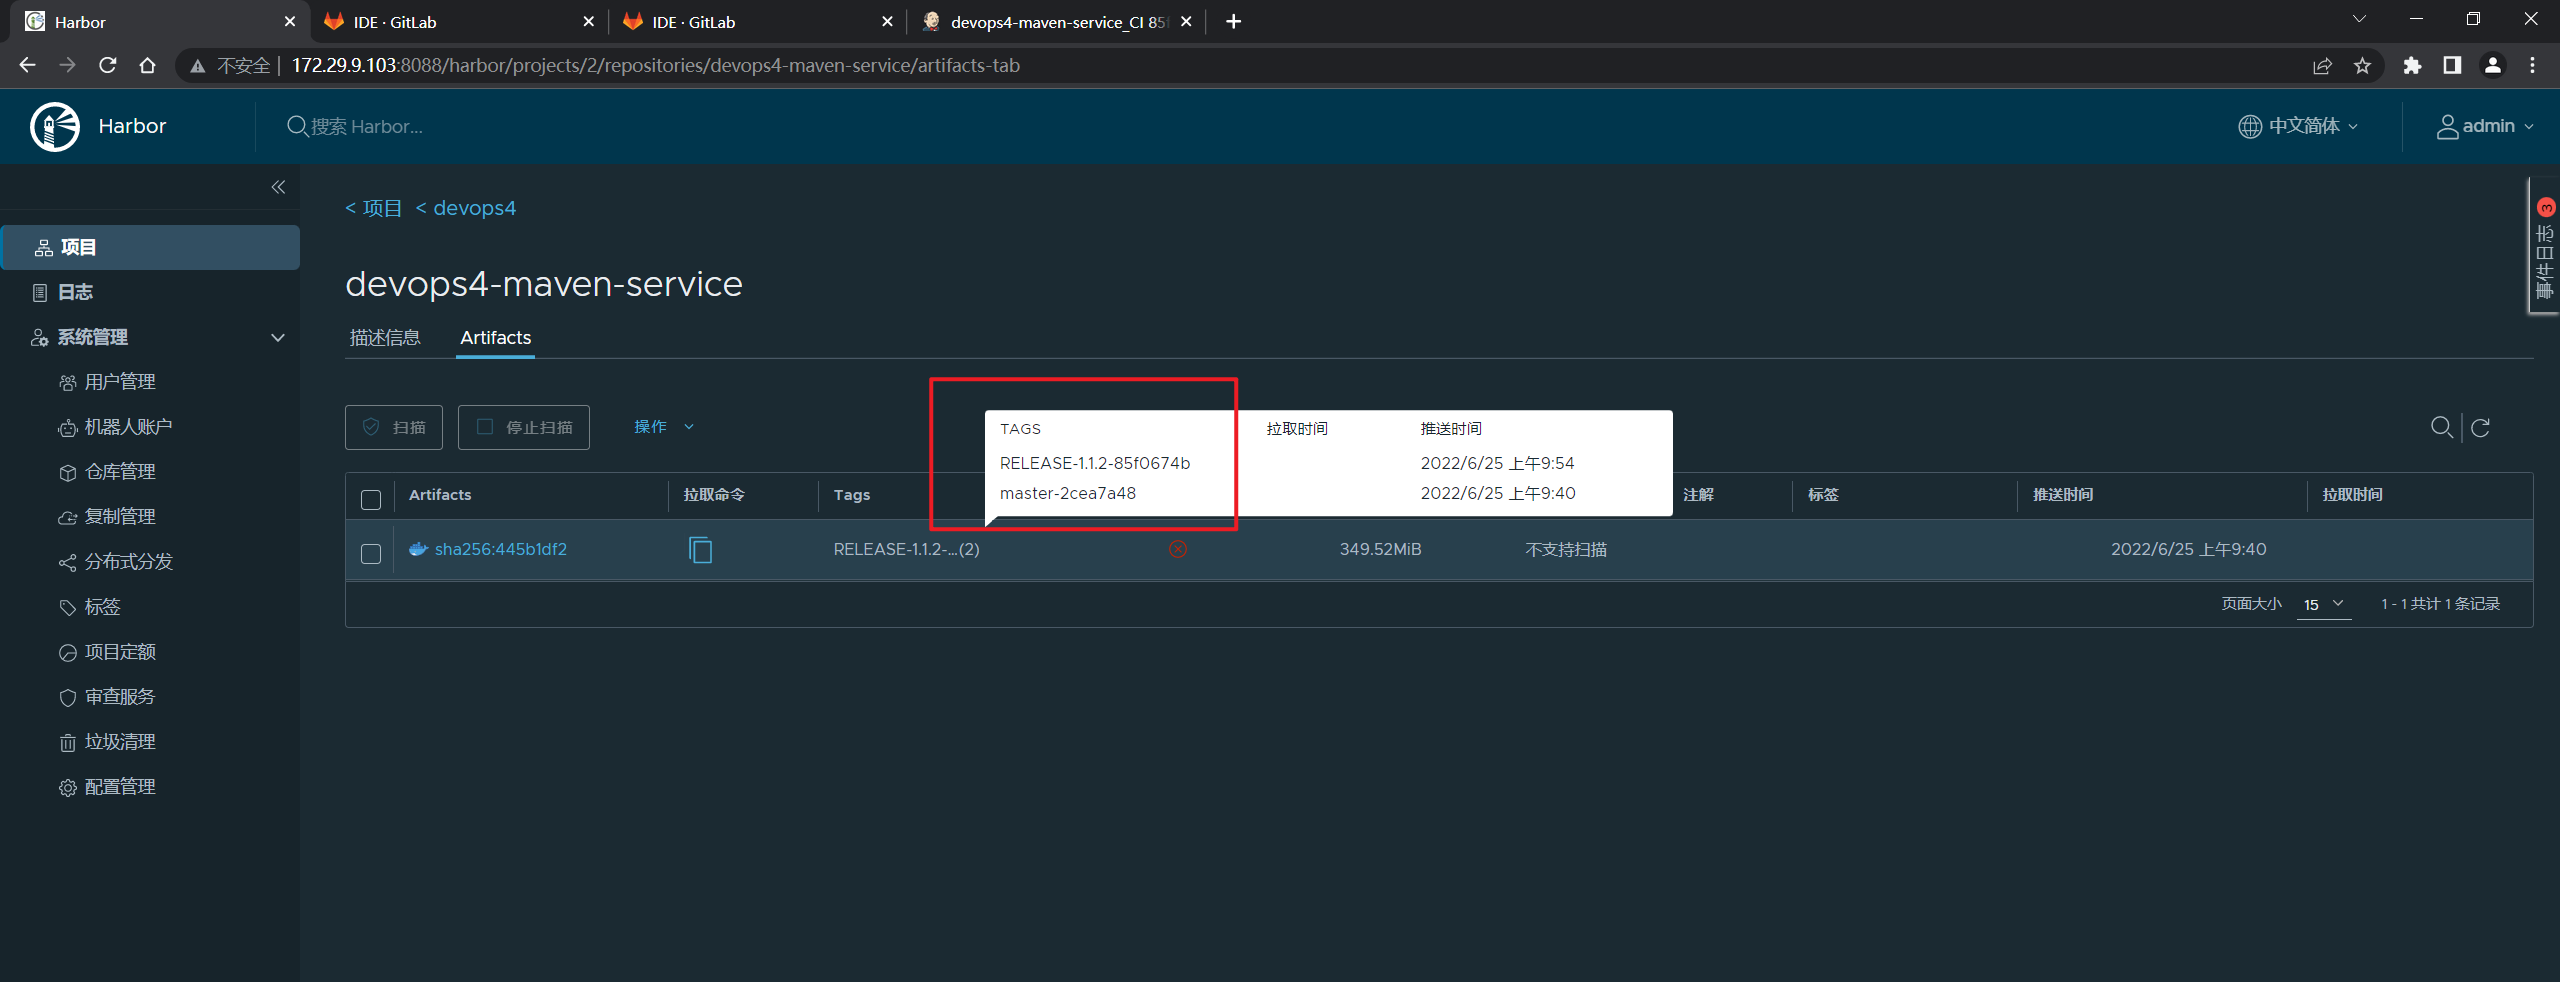
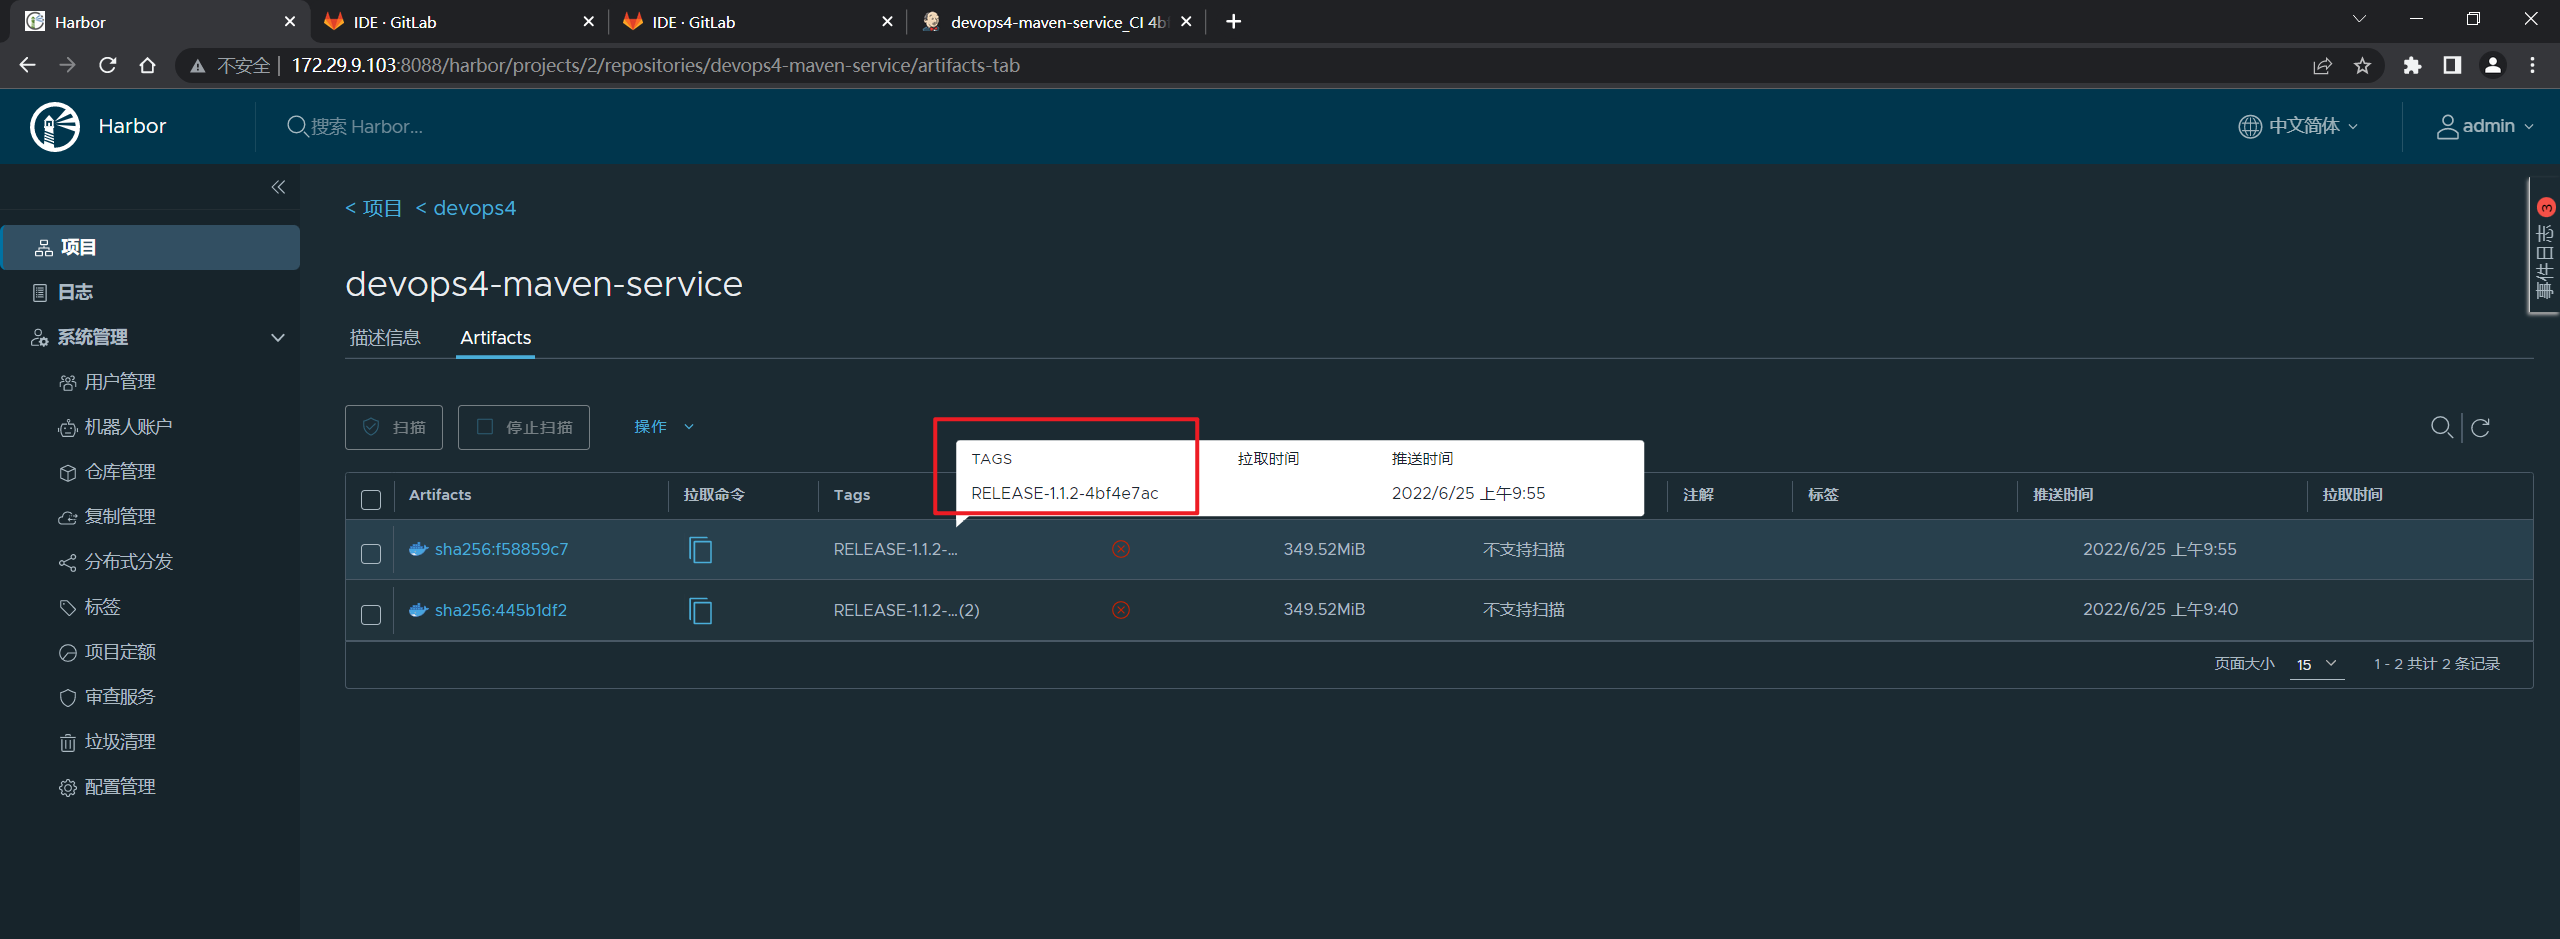
相同的镜像,harbor就自动给你归类了:
- 这里在做一个小小的改动:
- 创建一个jeninks job:
devops4-clean-harbor
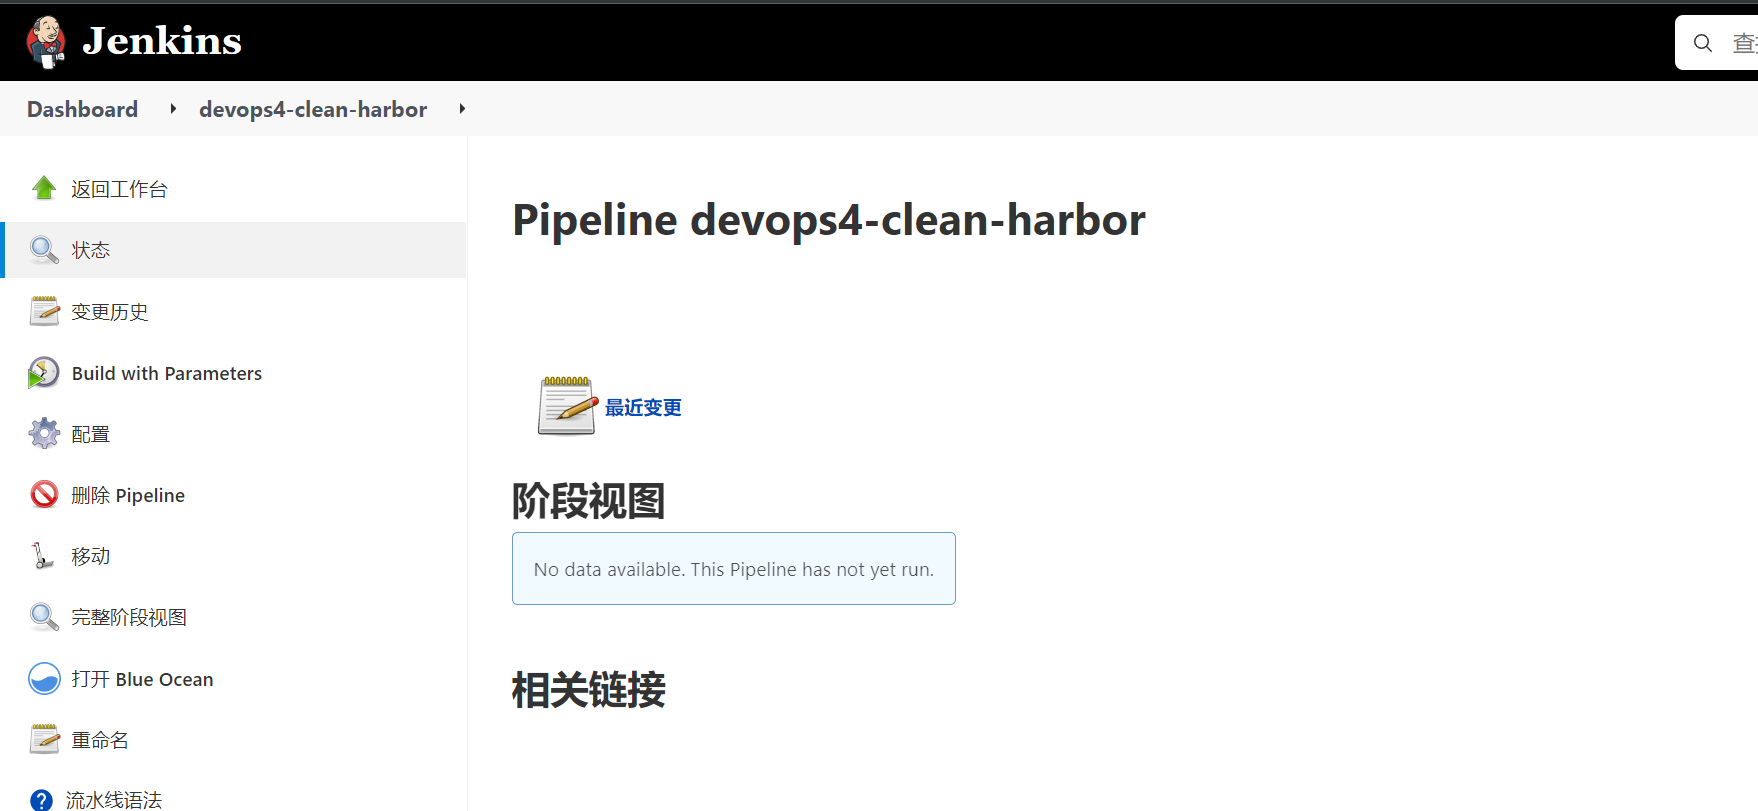
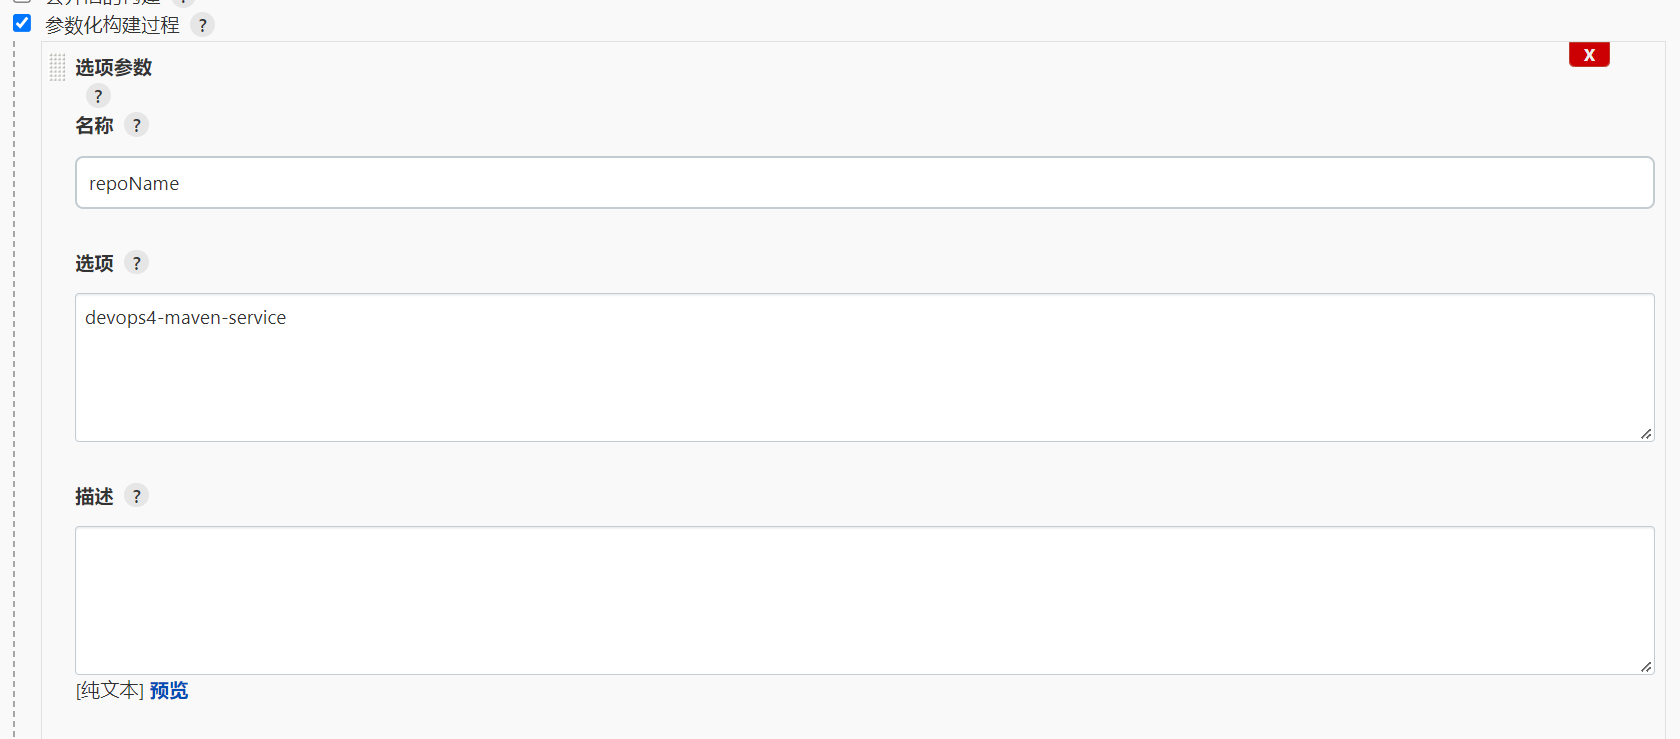
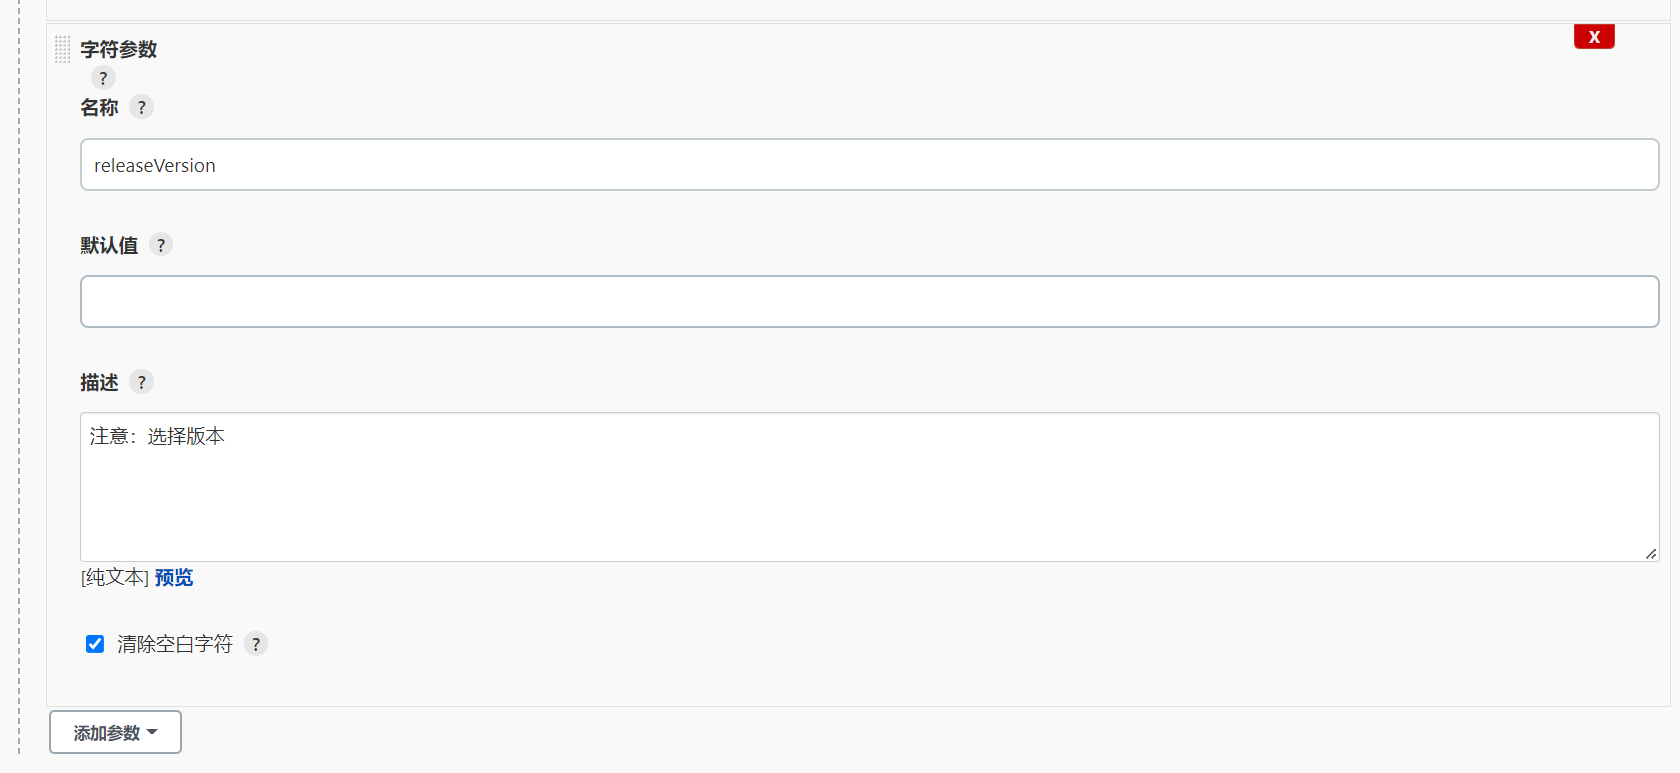
- 安装插件
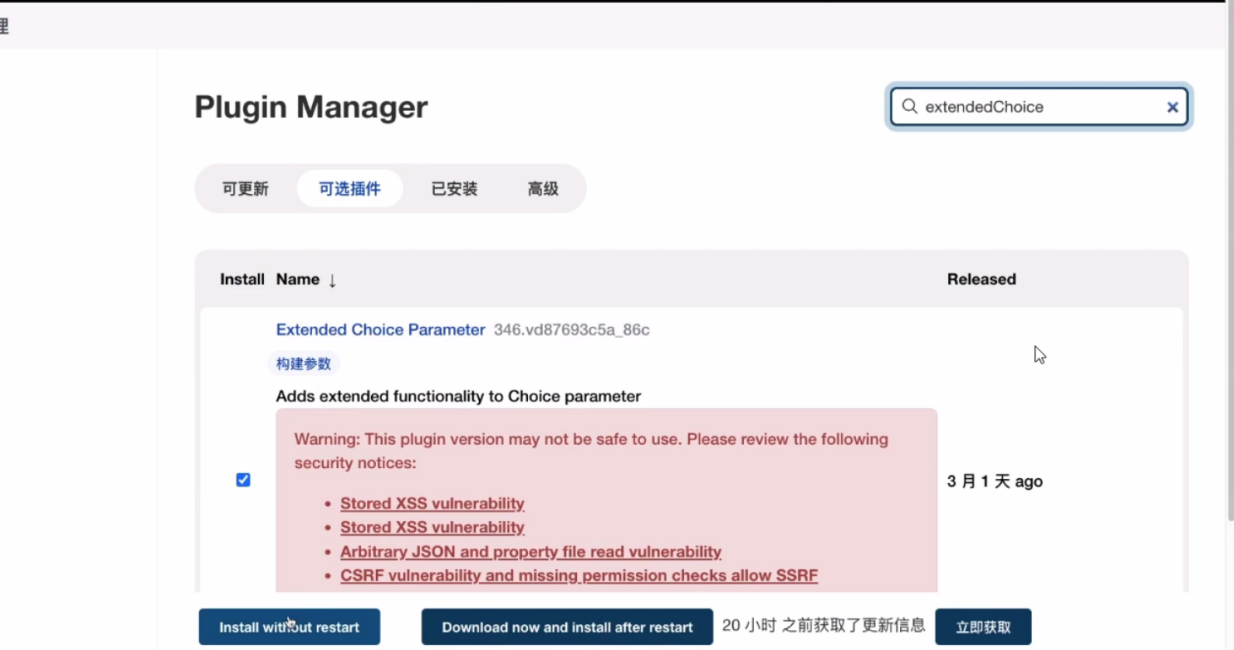
- 开始构建:
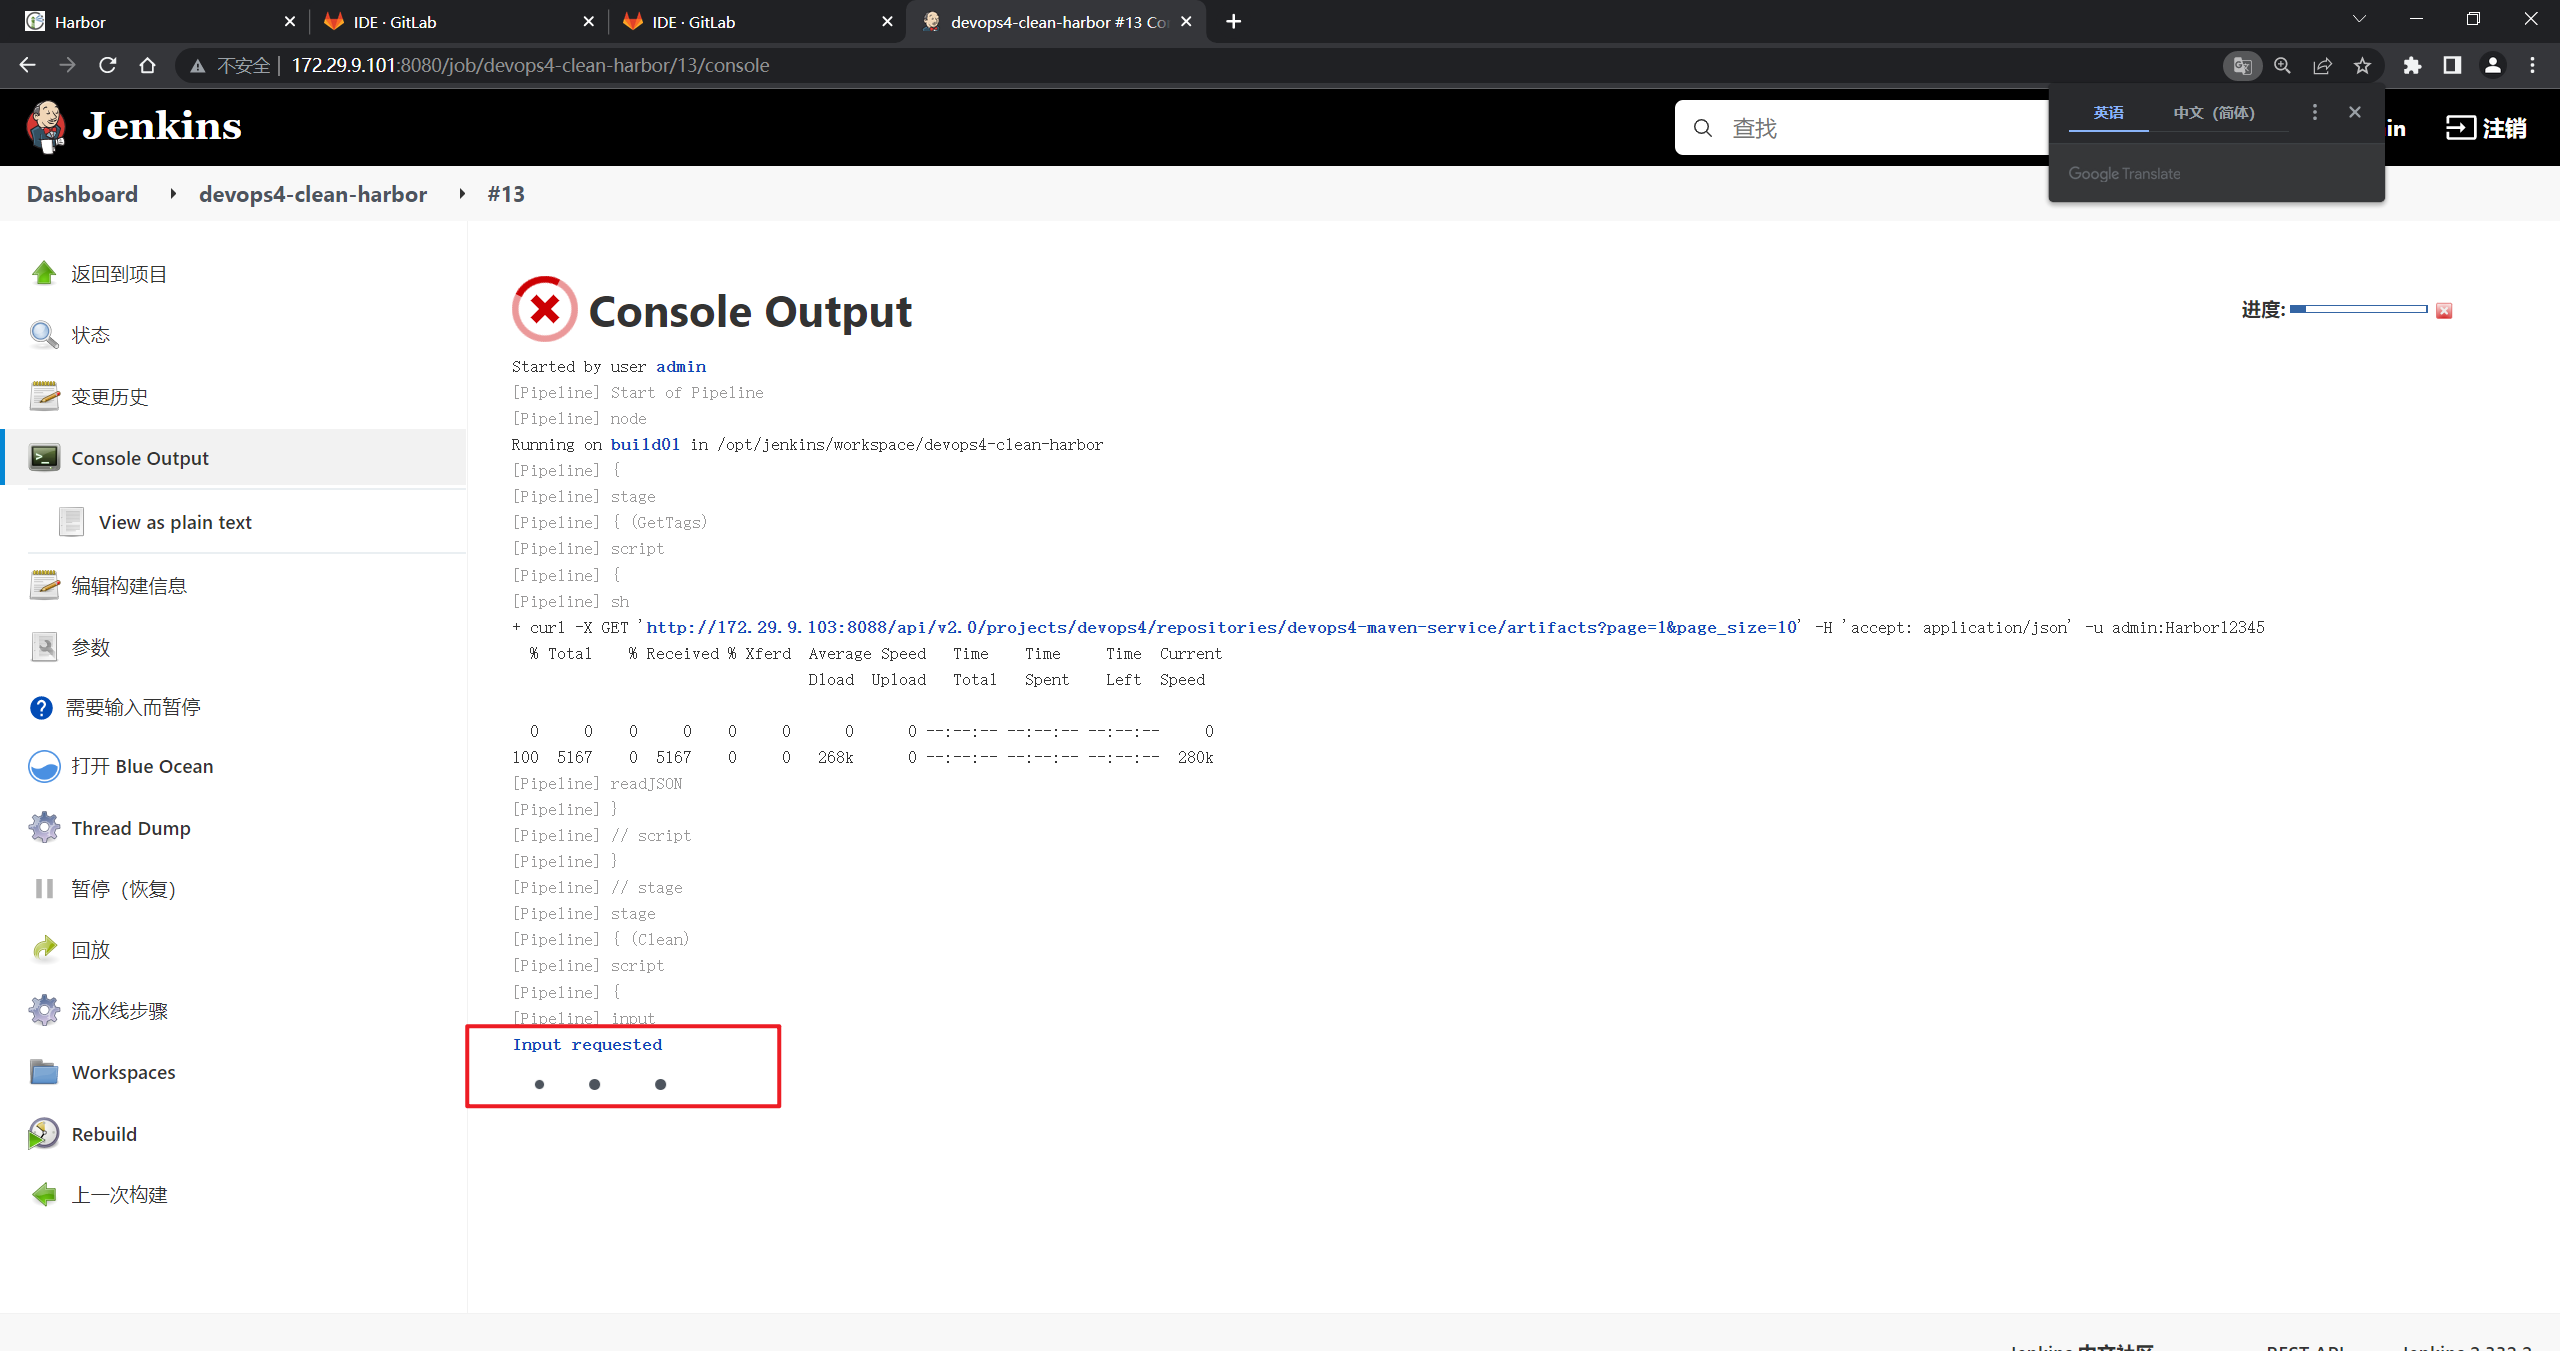
点击这个Input requested:

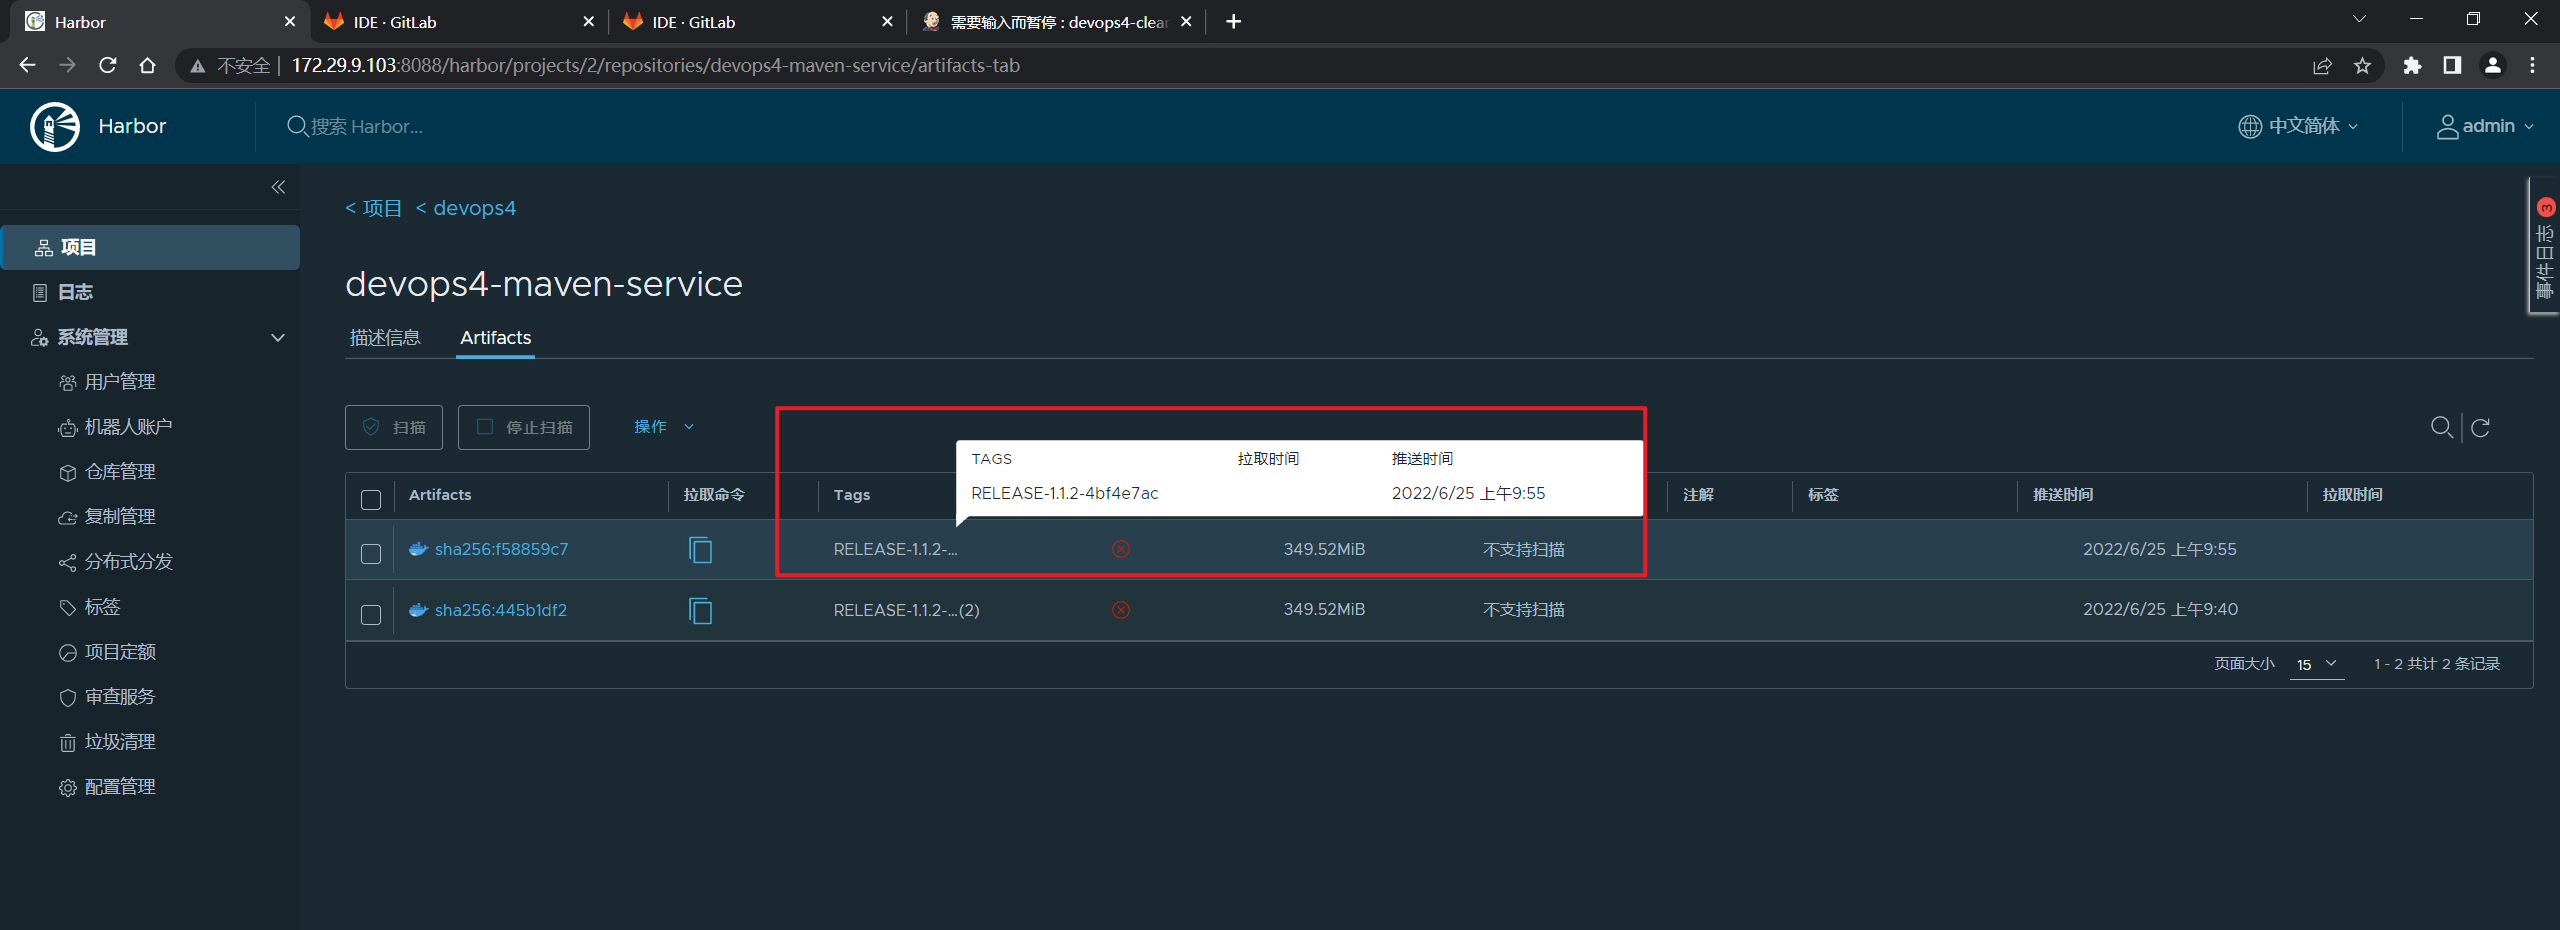
老师这里当时好像也是只选择了一个镜像,次问题暂且搁置吧……🤣
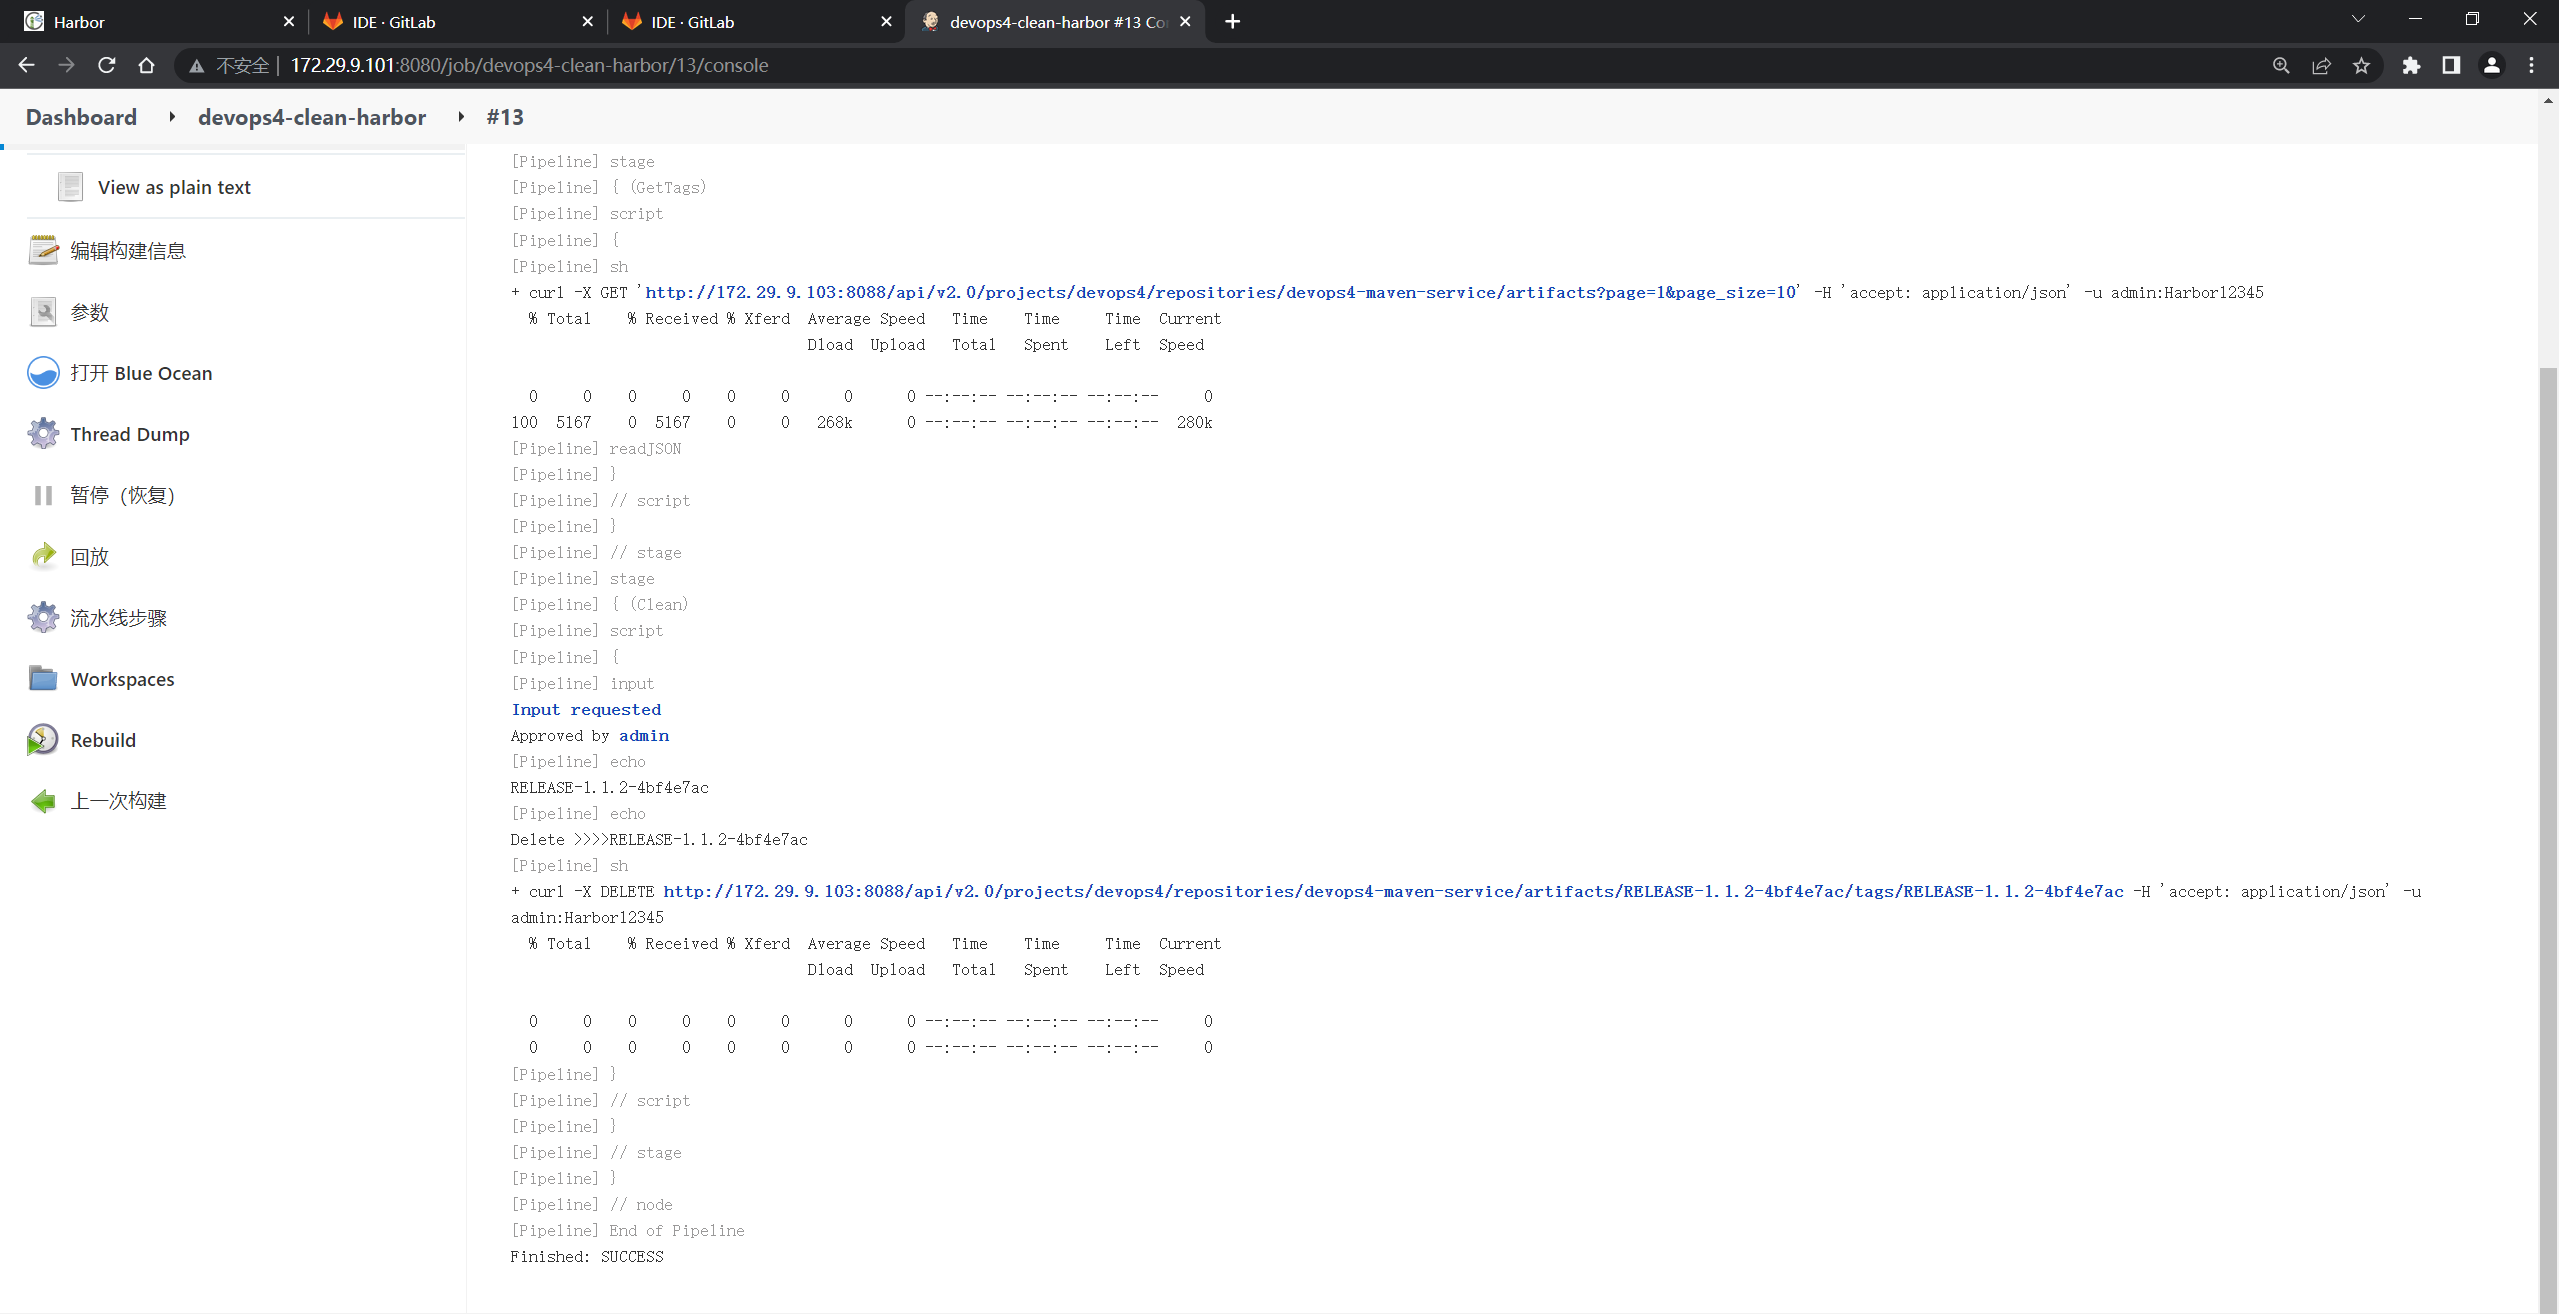
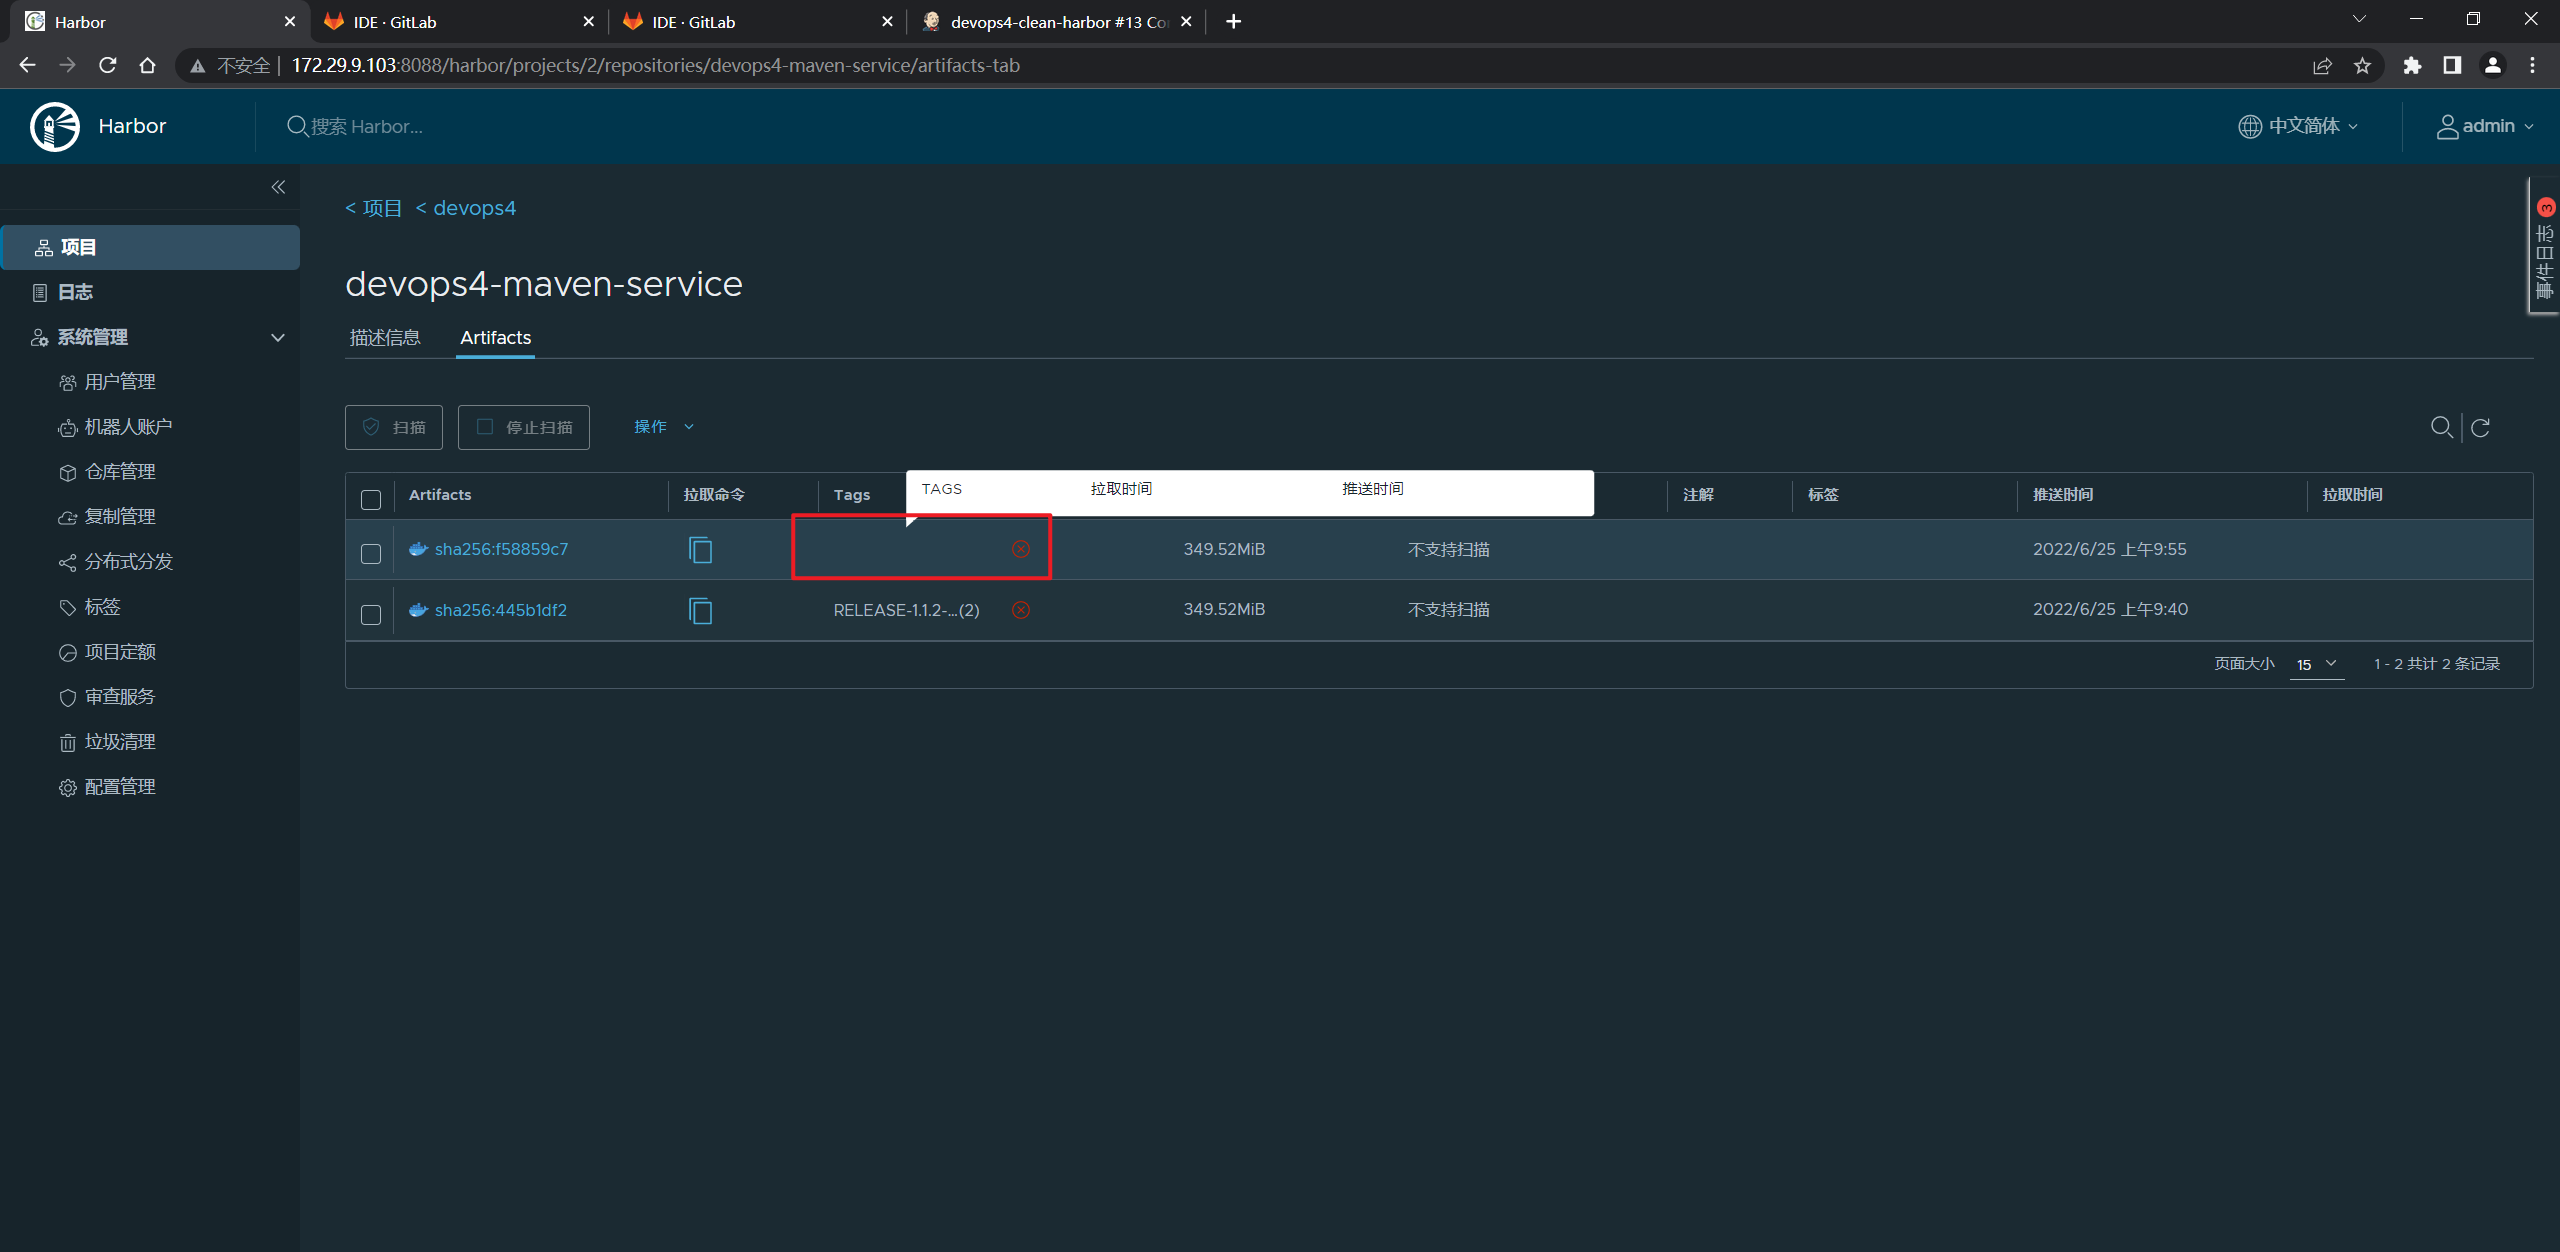
这里只是把tag给去掉了:
但是,再跑一次的话就会报错……
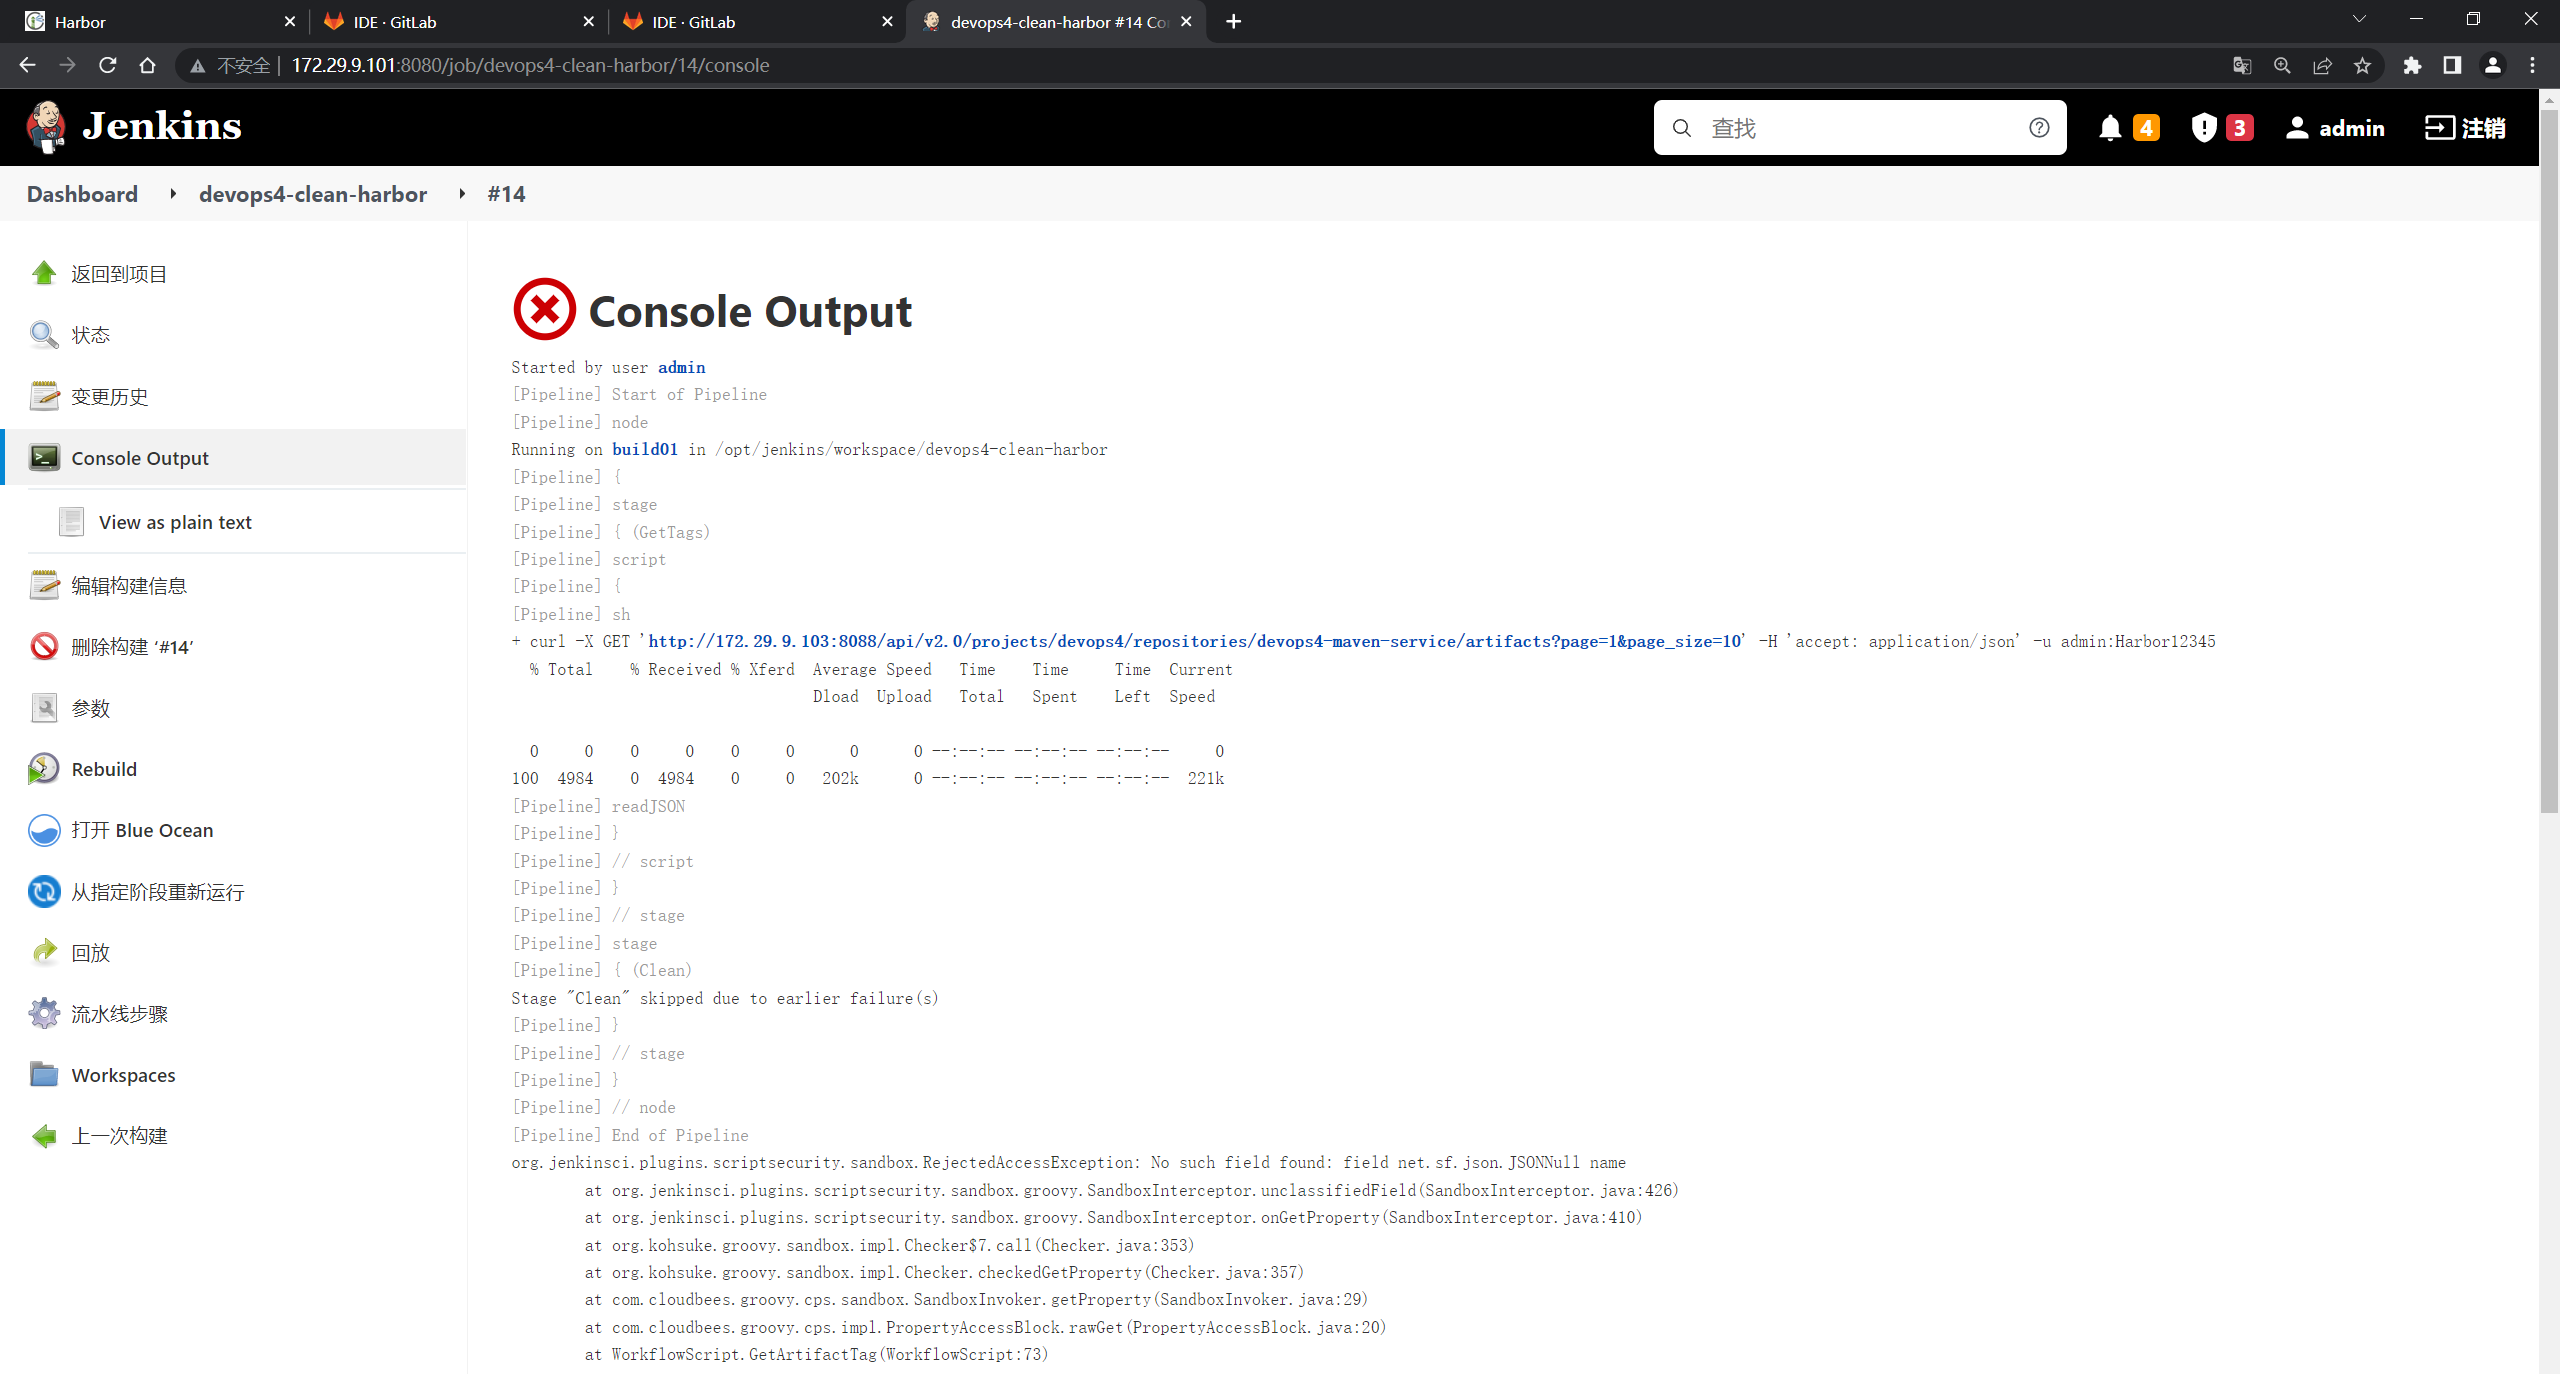
实验结束。
本次完整代码如下:
import groovy.json.JsonSlurper

/*
清理docker镜像

1. 获取镜像列表
2. 用户选择删除
3. 调用api删除

*/
pipeline {
    agent {
        label "build"
    }

    stages{

        stage("GetTags"){
            steps{
                script{
                    env.projectName = "${env.repoName}".split("-")[0]
                    env.result = GetArtifactTag(env.projectName, env.repoName)
                    env.result = env.result - '[' - ']'
                }
            }
        }

        stage("Clean"){
            steps{
                script{

                    def result = input  message: "是否删除${env.projectName}项目的${env.repoName}这些标签:",
                                        parameters: [extendedChoice(defaultValue: "${env.result}",
                                                                    multiSelectDelimiter: ',',
                                                                    name: 'taga',
                                                                    quoteValue: false,
                                                                    saveJSONParameterToFile: false,
                                                                    type: 'PT_CHECKBOX',
                                                                    value: "${env.result}",
                                                                    visibleItemCount: 20)]
                    println("${result}")
                    // println("Delete  ${taga}, doing.......")
                    // tags = "${taga}" - '[' - ']'

                    for(t in result.split(',')){
                        println("Delete >>>>" + t.trim())
                        DeleteArtifactTag(env.projectName,env.repoName, t.trim())
                    }
                }
            }

        }
    }
}


// 删除镜像tag
def DeleteArtifactTag(projectName,repoName, tagName){
    harborAPI = "http://172.29.9.103:8088/api/v2.0/projects/${projectName}/repositories/${repoName}"
    apiURL = "artifacts/${tagName}/tags/${tagName}"
    sh """ curl -X DELETE "${harborAPI}/${apiURL}" -H "accept: application/json"  -u admin:Harbor12345 """
}

// 获取镜像的所有标签
// acmp-nginx-service
def GetArtifactTag(projectName,repoName ){
    harborAPI = "http://172.29.9.103:8088/api/v2.0/projects/${projectName}/repositories/${repoName}"
    apiURL = "artifacts?page=1&page_size=10"
    response = sh returnStdout: true, script:  """curl -X GET "${harborAPI}/${apiURL}" -H "accept: application/json" -u admin:Harbor12345 """
    response = readJSON text: """${response - "\n"}"""
    tags = []
    for (t in response[0].tags){
        tags << t.name
    }

    return tags
}
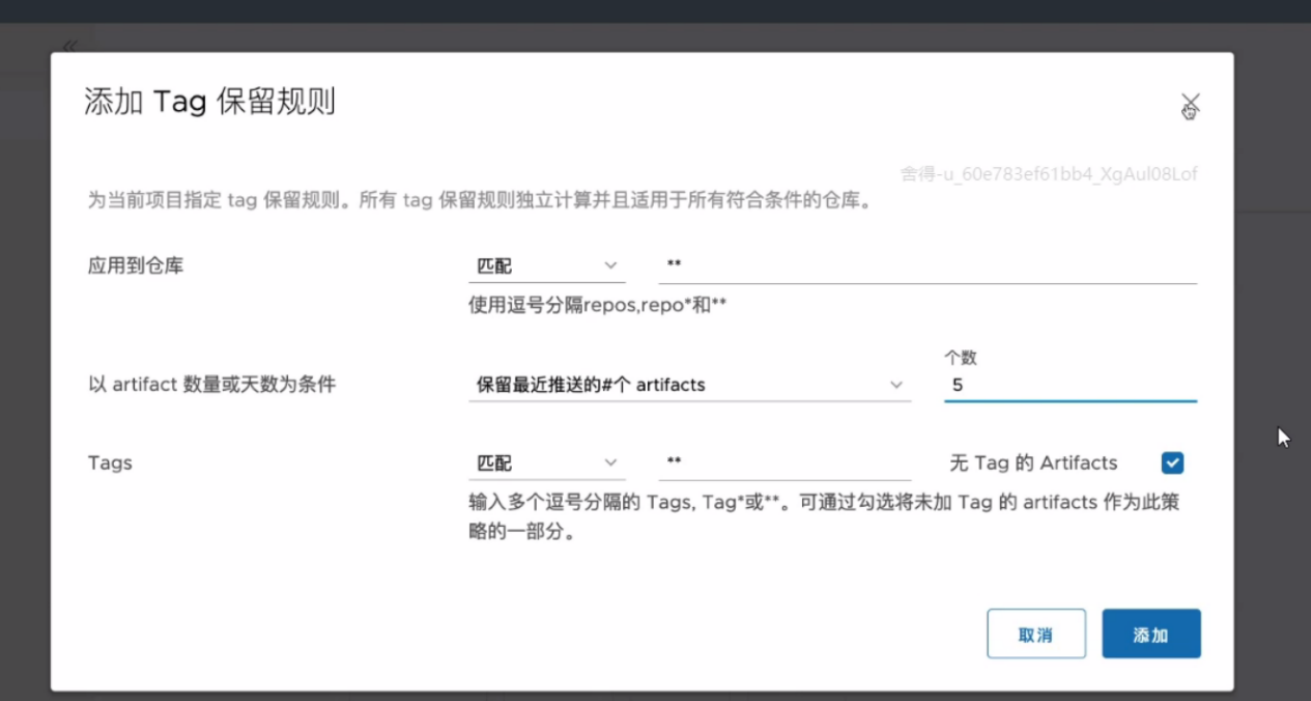
8.注意:harbor是自带镜像删除策略的

关于我
我的博客主旨:
- 排版美观,语言精炼;
- 文档即手册,步骤明细,拒绝埋坑,提供源码;
- 本人实战文档都是亲测成功的,各位小伙伴在实际操作过程中如有什么疑问,可随时联系本人帮您解决问题,让我们一起进步!
🍀 微信二维码
x2675263825 (舍得), qq:2675263825。

🍀 微信公众号
《云原生架构师实战》

🍀 csdn
https://blog.csdn.net/weixin_39246554?spm=1010.2135.3001.5421

🍀 博客
www.onlyyou520.com

🍀 知乎
https://www.zhihu.com/people/foryouone

🍀 语雀
https://www.yuque.com/books/share/34a34d43-b80d-47f7-972e-24a888a8fc5e?# 《不服来怼:宇宙中最好用的云笔记!》

最后
好了,关于本次就到这里了,感谢大家阅读,最后祝大家生活快乐,每天都过的有意义哦,我们下期见!


 972
972


 被折叠的 条评论
为什么被折叠?


