


内容纯属外网搬砖,无创新内容,只是 初学者 能让代码跑起来也不容易,此处记下过程,希望来者少走弯路。
示例来源:https://kitware.github.io/vtk-examples/site/Python/Medical/MedicalDemo2/
这位大佬:Bill Lorensen, the owner of this site died on December 12 2019.
无私奉献者万岁!
电脑:macbook air + andconda环境配置 python3.9.12 (VTK 9.0.3)+ pycharm
新建一个 pythonproject 再新建一个python文件 MedicalDemo2.py,代码如下
#!/usr/bin/env python

# noinspection PyUnresolvedReferences
import vtkmodules.vtkInteractionStyle
# noinspection PyUnresolvedReferences
import vtkmodules.vtkRenderingOpenGL2
from vtkmodules.vtkCommonColor import vtkNamedColors
from vtkmodules.vtkCommonCore import (
    VTK_VERSION_NUMBER,
    vtkVersion
)
from vtkmodules.vtkFiltersCore import (
    vtkFlyingEdges3D,
    vtkMarchingCubes,
    vtkStripper
)
from vtkmodules.vtkFiltersModeling import vtkOutlineFilter
from vtkmodules.vtkIOImage import vtkMetaImageReader
from vtkmodules.vtkRenderingCore import (
    vtkActor,
    vtkCamera,
    vtkPolyDataMapper,
    vtkProperty,
    vtkRenderWindow,
    vtkRenderWindowInteractor,
    vtkRenderer
)


def main():
    # vtkFlyingEdges3D was introduced in VTK >= 8.2
    use_flying_edges = vtk_version_ok(8, 2, 0)

    colors = vtkNamedColors()

    file_name = get_program_parameters()

    colors.SetColor('SkinColor', [240, 184, 160, 255])
    colors.SetColor('BackfaceColor', [255, 229, 200, 255])
    colors.SetColor('BkgColor', [51, 77, 102, 255])

    # Create the renderer, the render window, and the interactor. The renderer
    # draws into the render window, the interactor enables mouse- and
    # keyboard-based interaction with the data within the render window.
    #
    a_renderer = vtkRenderer()
    ren_win = vtkRenderWindow()
    ren_win.AddRenderer(a_renderer)

    iren = vtkRenderWindowInteractor()
    iren.SetRenderWindow(ren_win)

    # The following reader is used to read a series of 2D slices (images)
    # that compose the volume. The slice dimensions are set, and the
    # pixel spacing. The data Endianness must also be specified. The reader
    # uses the FilePrefix in combination with the slice number to construct
    # filenames using the format FilePrefix.%d. (In this case the FilePrefix
    # is the root name of the file: quarter.)
    reader = vtkMetaImageReader()
    reader.SetFileName(file_name)

    # An isosurface, or contour value of 500 is known to correspond to the
    # skin of the patient.
    # The triangle stripper is used to create triangle strips from the
    # isosurface these render much faster on many systems.
    if use_flying_edges:
        try:
            skin_extractor = vtkFlyingEdges3D()
        except AttributeError:
            skin_extractor = vtkMarchingCubes()
    else:
        skin_extractor = vtkMarchingCubes()
    skin_extractor.SetInputConnection(reader.GetOutputPort())
    skin_extractor.SetValue(0, 500)

    skin_stripper = vtkStripper()
    skin_stripper.SetInputConnection(skin_extractor.GetOutputPort())

    skin_mapper = vtkPolyDataMapper()
    skin_mapper.SetInputConnection(skin_stripper.GetOutputPort())
    skin_mapper.ScalarVisibilityOff()

    skin = vtkActor()
    skin.SetMapper(skin_mapper)
    skin.GetProperty().SetDiffuseColor(colors.GetColor3d('SkinColor'))
    skin.GetProperty().SetSpecular(0.3)
    skin.GetProperty().SetSpecularPower(20)
    skin.GetProperty().SetOpacity(0.5)

    back_prop = vtkProperty()
    back_prop.SetDiffuseColor(colors.GetColor3d('BackfaceColor'))
    skin.SetBackfaceProperty(back_prop)

    # An isosurface, or contour value of 1150 is known to correspond to the
    # bone of the patient.
    # The triangle stripper is used to create triangle strips from the
    # isosurface these render much faster on may systems.
    if use_flying_edges:
        try:
            bone_extractor = vtkFlyingEdges3D()
        except AttributeError:
            bone_extractor = vtkMarchingCubes()
    else:
        bone_extractor = vtkMarchingCubes()
    bone_extractor.SetInputConnection(reader.GetOutputPort())
    bone_extractor.SetValue(0, 1150)

    bone_stripper = vtkStripper()
    bone_stripper.SetInputConnection(bone_extractor.GetOutputPort())

    bone_mapper = vtkPolyDataMapper()
    bone_mapper.SetInputConnection(bone_stripper.GetOutputPort())
    bone_mapper.ScalarVisibilityOff()

    bone = vtkActor()
    bone.SetMapper(bone_mapper)
    bone.GetProperty().SetDiffuseColor(colors.GetColor3d('Ivory'))

    # An outline provides context around the data.
    #
    outline_data = vtkOutlineFilter()
    outline_data.SetInputConnection(reader.GetOutputPort())

    map_outline = vtkPolyDataMapper()
    map_outline.SetInputConnection(outline_data.GetOutputPort())

    outline = vtkActor()
    outline.SetMapper(map_outline)
    outline.GetProperty().SetColor(colors.GetColor3d('Black'))

    # It is convenient to create an initial view of the data. The FocalPoint
    # and Position form a vector direction. Later on (ResetCamera() method)
    # this vector is used to position the camera to look at the data in
    # this direction.
    a_camera = vtkCamera()
    a_camera.SetViewUp(0, 0, -1)
    a_camera.SetPosition(0, -1, 0)
    a_camera.SetFocalPoint(0, 0, 0)
    a_camera.ComputeViewPlaneNormal()
    a_camera.Azimuth(30.0)
    a_camera.Elevation(30.0)

    # Actors are added to the renderer. An initial camera view is created.
    # The Dolly() method moves the camera towards the FocalPoint,
    # thereby enlarging the image.
    a_renderer.AddActor(outline)
    a_renderer.AddActor(skin)
    a_renderer.AddActor(bone)
    a_renderer.SetActiveCamera(a_camera)
    a_renderer.ResetCamera()
    a_camera.Dolly(1.5)

    # Set a background color for the renderer and set the size of the
    # render window (expressed in pixels).
    a_renderer.SetBackground(colors.GetColor3d('BkgColor'))
    ren_win.SetSize(640, 480)
    ren_win.SetWindowName('MedicalDemo2')

    # Note that when camera movement occurs (as it does in the Dolly()
    # method), the clipping planes often need adjusting. Clipping planes
    # consist of two planes: near and far along the view direction. The
    # near plane clips out objects in front of the plane the far plane
    # clips out objects behind the plane. This way only what is drawn
    # between the planes is actually rendered.
    a_renderer.ResetCameraClippingRange()

    # Initialize the event loop and then start it.
    iren.Initialize()
    iren.Start()


def get_program_parameters():
    import argparse
    description = 'The skin and bone is extracted from a CT dataset of the head.'
    epilogue = '''
    Derived from VTK/Examples/Cxx/Medical2.cxx
    This example reads a volume dataset, extracts two isosurfaces that
     represent the skin and bone, and then displays it.
    '''
    parser = argparse.ArgumentParser(description=description, epilog=epilogue,
                                     formatter_class=argparse.RawDescriptionHelpFormatter)
    parser.add_argument('filename', help='FullHead.mhd.')
    args = parser.parse_args()
    return args.filename


def vtk_version_ok(major, minor, build):
    """
    Check the VTK version.

    :param major: Major version.
    :param minor: Minor version.
    :param build: Build version.
    :return: True if the requested VTK version is greater or equal to the actual VTK version.
    """
    needed_version = 10000000000 * int(major) + 100000000 * int(minor) + int(build)
    try:
        vtk_version_number = VTK_VERSION_NUMBER
    except AttributeError:  # as error:
        ver = vtkVersion()
        vtk_version_number = 10000000000 * ver.GetVTKMajorVersion() + 100000000 * ver.GetVTKMinorVersion() \
                             + ver.GetVTKBuildVersion()
    if vtk_version_number >= needed_version:
        return True
    else:
        return False


if __name__ == '__main__':
    main()
文件名 MedicalDemo2.py 可于上面网站上下载
另需两个数据文件 FullHead.mhd(352字节)和 FullHead.raw (12.3M)下载下来 和 MedicalDemo2.py 放在同一目录下(两个文件都需要,文件名不要更改,其中后一个文件是压缩包,要解压,注意文件大小是否正确,我因为下载错了搞了很久)
https://raw.githubusercontent.com/lorensen/VTKExamples/master/src/Testing/Data/FullHead.mhd
https://github.com/lorensen/VTKExamples/blob/master/src/Testing/Data/FullHead.raw.gz?raw=true
或者
VTKExamples/src/Testing/Data at master · lorensen/VTKExamples · GitHub
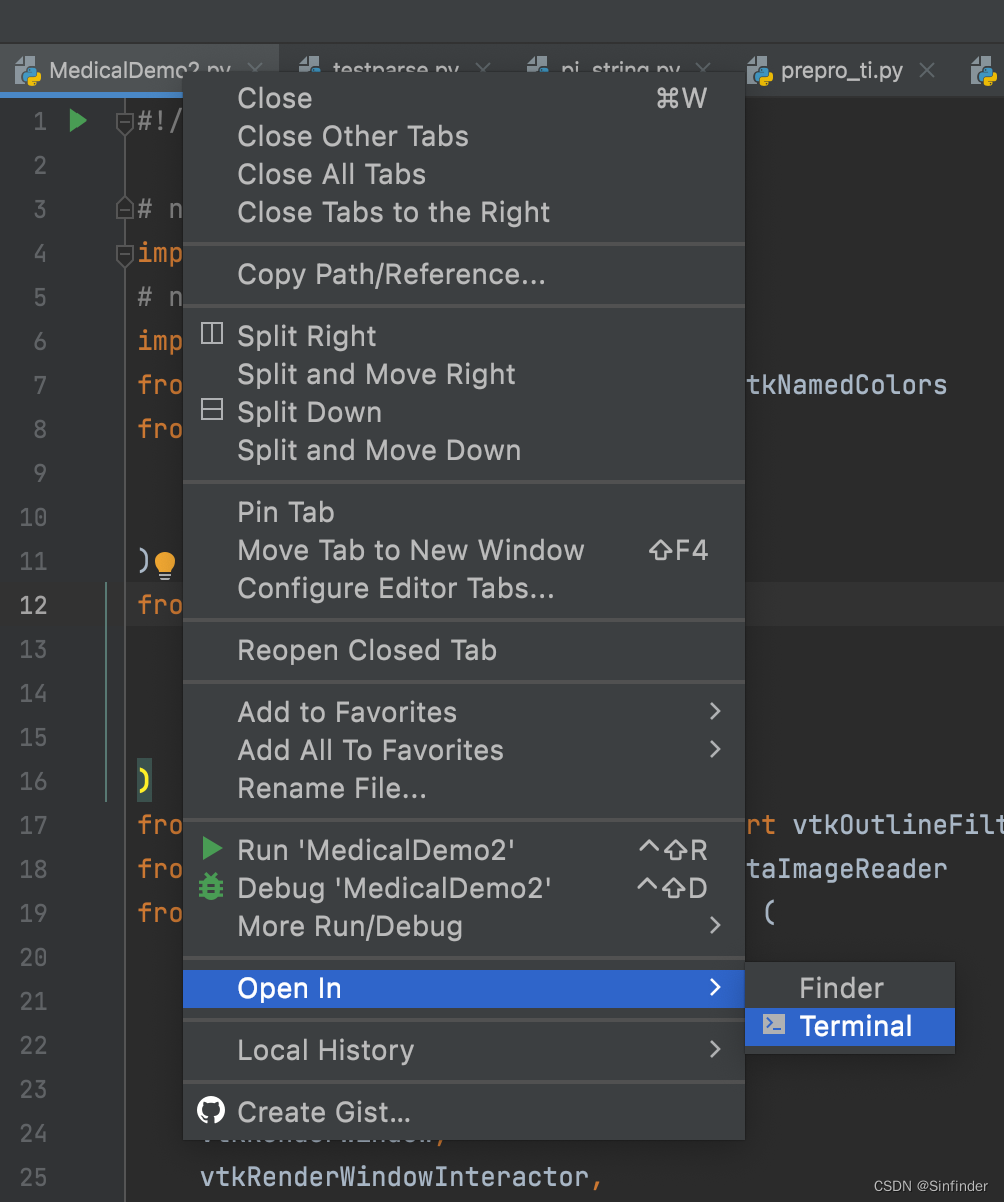
pycharm环境下 右键 MedicalDemo2.py -->Open in -->Terminal
在下方弹出的 命令行窗口输入 python MedicalDemo2.py FullHead.mhd
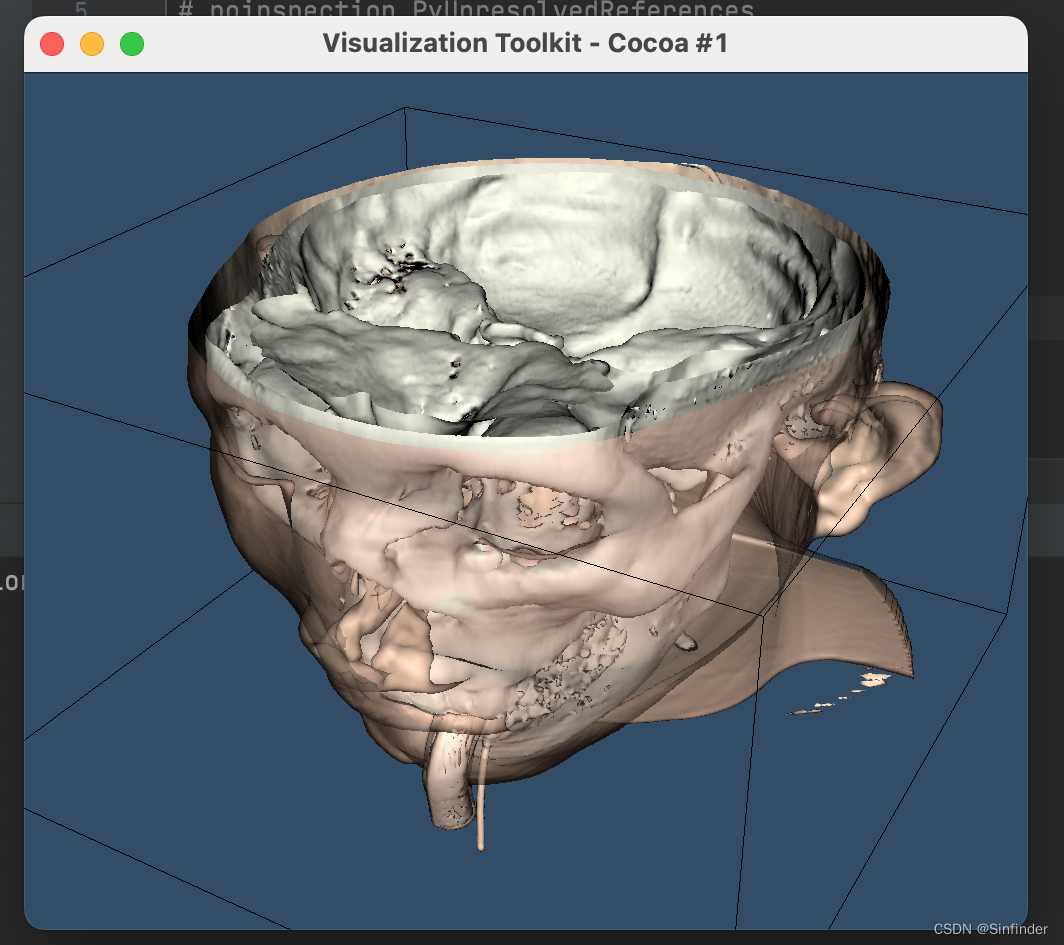
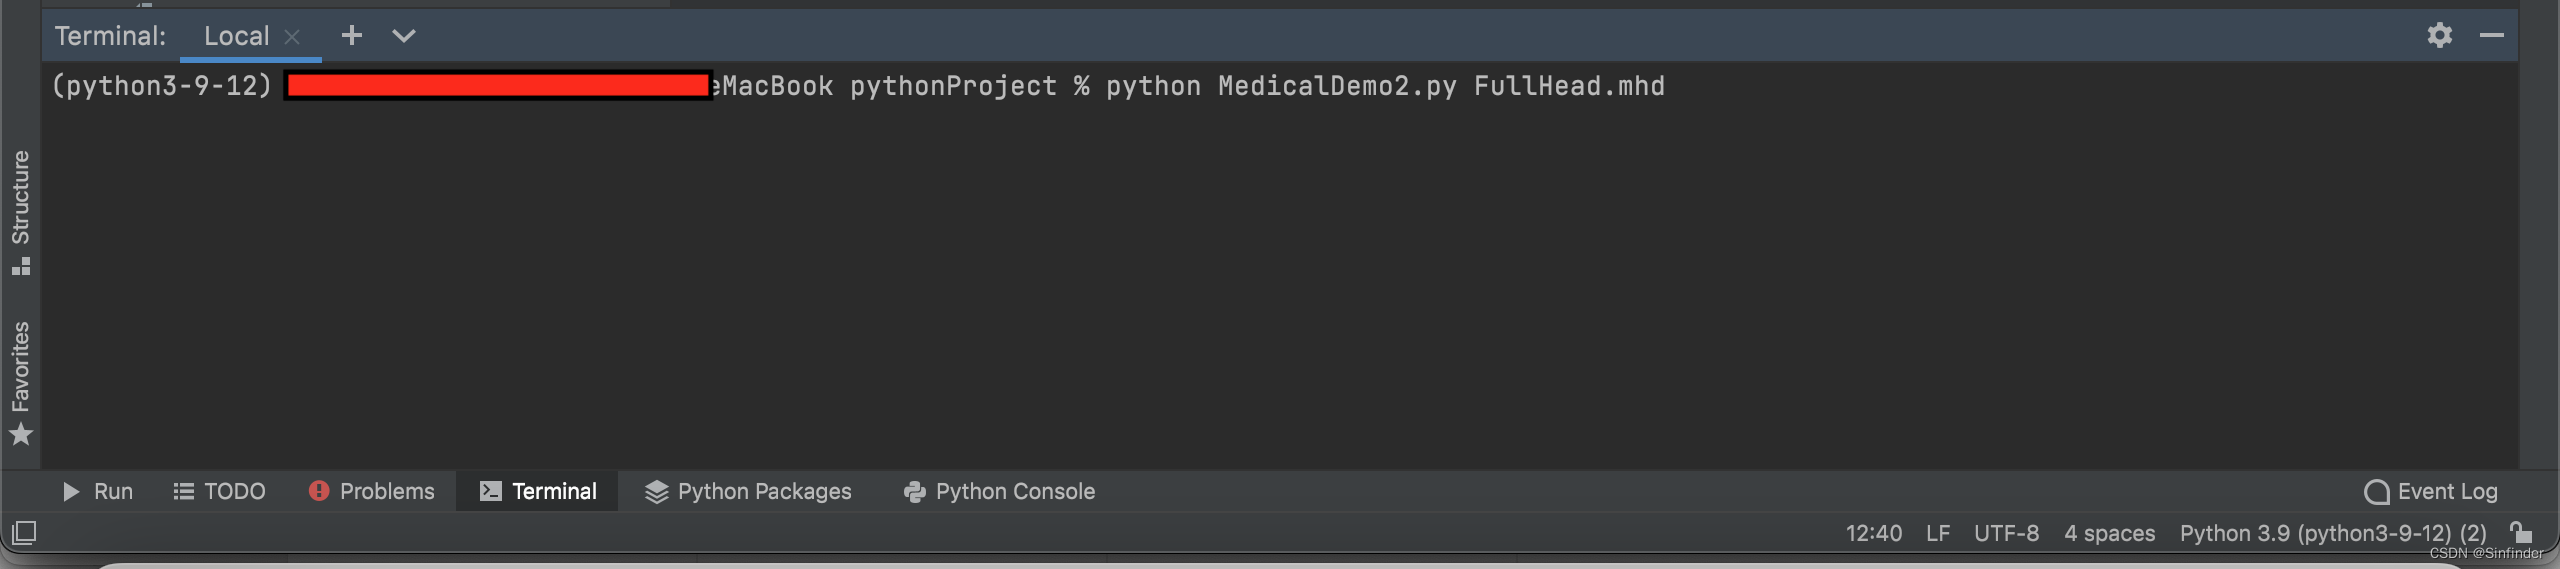 结果如下
结果如下
可能遇到的问题
1. 里面用到 argparse函数,所以不能直接 “Run”,要 Open in -->Terminal;因为 FullHead.mhd 这个参数需要输入。
或者将以下这行代码
parser.add_argument('filename', help='FullHead.mhd.')
替换为
parser.add_argument('--filename', default='FullHead.mhd', help='FullHead.mhd.')
这样就可以直接 “Run”了,应为已经默认输入 参数 'FullHead.mhd'
参考:argparse必选参数_weixin_34416649的博客-CSDN博客
python之parser.add_argument()用法——命令行选项、参数和子命令解析器_夏普通的博客-CSDN博客_parser.add_argument(
python之parser.add_argument()用法——命令行选项、参数和子命令解析器_夏普通的博客-CSDN博客_parser.add_argument(
import - 'required' is an invalid argument for positionals in python command - Stack Overflow
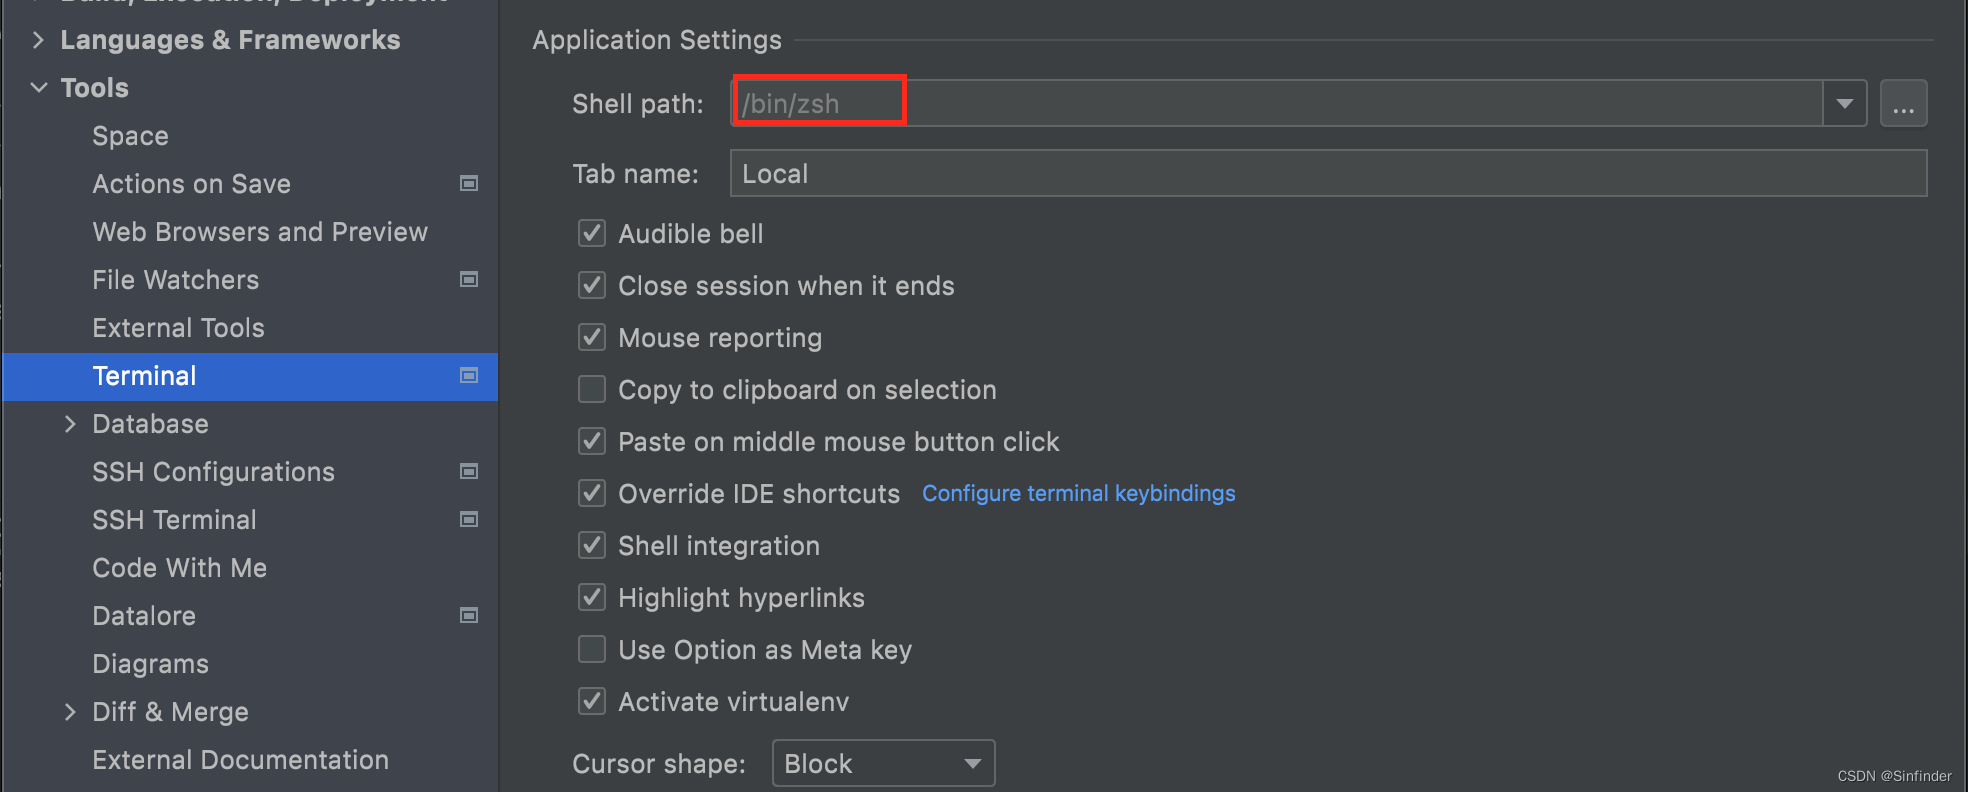
2. Terminal的问题。
Mac Pycharm中的Terminal(zsh)的python版本和终端python版本不同
参考:Mac-Pycharm中的Terminal(zsh)的python版本和终端python版本不同 - G0mini - 博客园
里面搞得有点复杂我只做了第2点
就是 pycharm->Preferences-->Tools-->Terminal-->Shell path 改成 /bin/zsh
3. 上面已经强调过了,就是FullHead.mhd(352字节)和 FullHead.raw (12.3M)这两个文件下载下来且保证正确,将这两个文件和 MedicalDemo2.py 放在同一目录下 两个文件都需要,文件名不要更改。
参考:vs+vtk读取.mhd格式文件出现ERROR:MetaImage cannot read data from file 问题。_CHENxiaoni_的博客-CSDN博客_vtk读取mhd文件
祝你成功!


 252
252


 被折叠的 条评论
为什么被折叠?
被折叠的 条评论
为什么被折叠?
 到【灌水乐园】发言


