


1:准备环境
backup 10.0.0.41
m01 10.0.0.61
2:下载软件
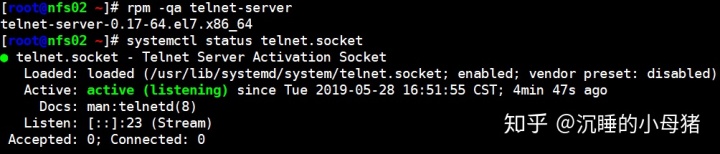
首先检查m01上有没有telnet软件:rpm -qa telnet
没有的话直接下载:yum install telnet-server -y
下载完毕启动服务:systemctl restart telnet.socket
查看是否开启服务是否开机自启:systemctl status telnet.socket
3:远程连接常用的工具
telnet
ssh
http:超文本传输协议
https:加密
4:ssh 对比 telnet
telnet
下载telnet : yum -y install telnet-server
启动服务:systemctl restart telnet.socket
客户端客服务端都要有下载telnet并开启服务才可以连接
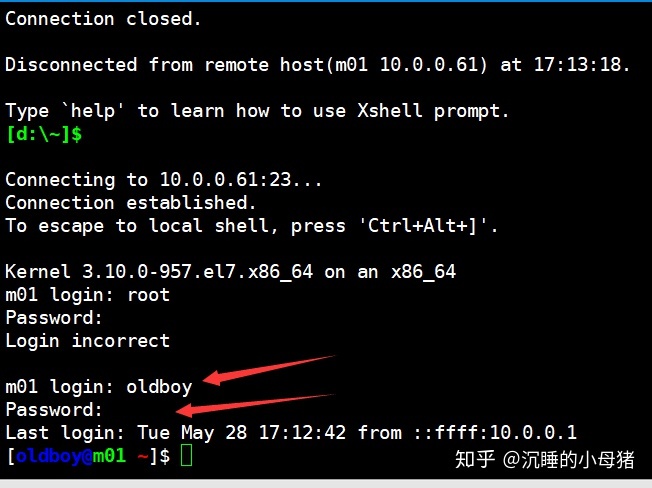
telnet 10.0.0.41
telnet默认不允许root用户连接,连接之前一定要先创建一个用户出来
[1]对比之前我们现在m01上先创建一个新用户oldboy,密码设置为123456,设置完毕后history -c把历史纪录删除

[2]visudo中第100行将oldboy设置一下登陆root不需
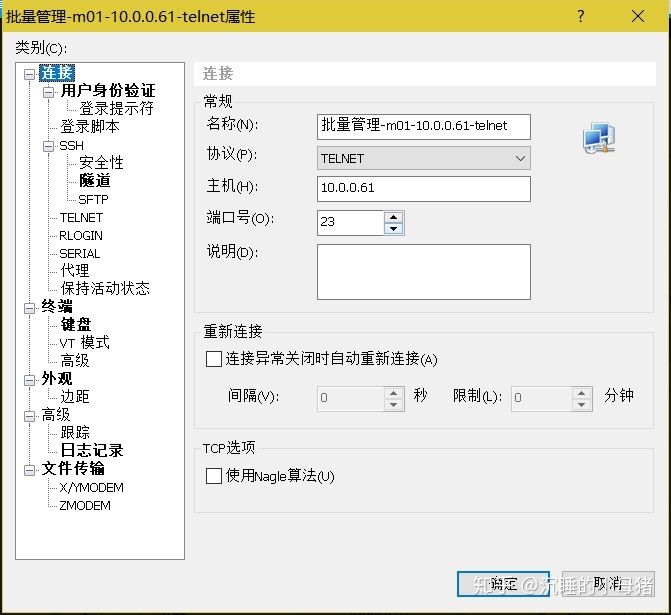
添加一个telnet 连接的模板机
5.用wireshark(windows+Linux)抓包 /tcpdump(linux)抓包
对应着本地连接的顺序
输入密码
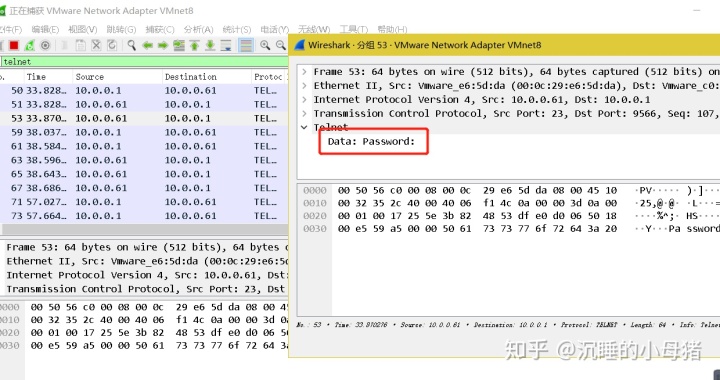
密码为123456
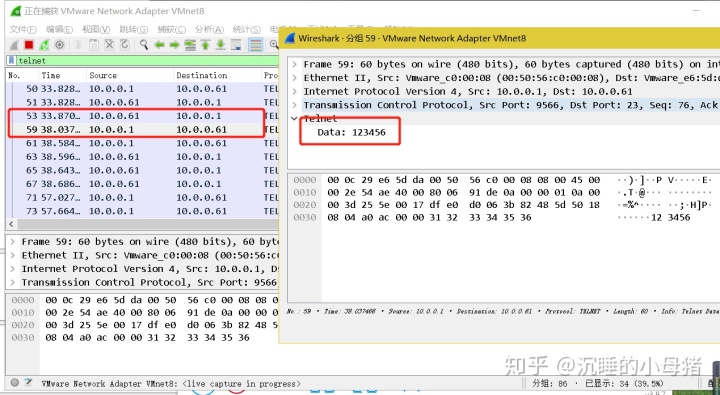
登录后显示的日期时间

显示PS1的变量

6.检查ssh软件是否安装
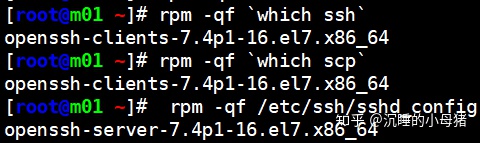
查看详细内容:
rpm -ql openssh
rpm -ql openssh-clients
rpm -ql openssh-server
第一次连接会出现以下情况
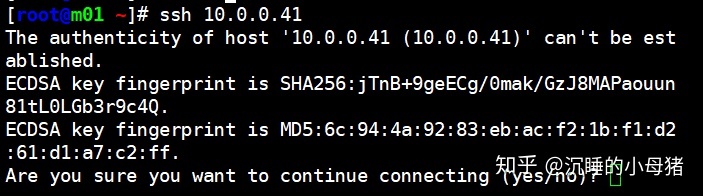
yes进入即可
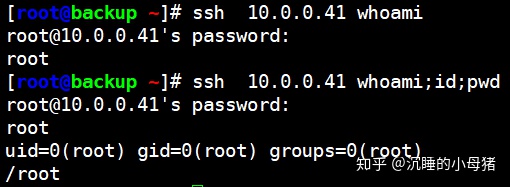
7.在客户端连接backup执行一条命令或多条命令
8:scp 远程传输数据
[root@m01 ~]# scp -P22 /etc/hosts backup:/tmp
hosts 100% 349 205.2KB/s 00:00
[ root@backup ~]# ll /tmp/
total 4
-rw-r--r-- 1 root root 349 May 27 16:50 hosts
9:sftp上传和下载
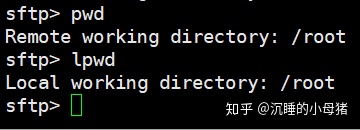
[root@backup ~]# sftp 10.0.0.41
root@10.0.0.41's password:
Connected to 10.0.0.41.
sftp> pwd
Remote working directory: /root
.put—从本地上传到服务端41
[root@m01 ~]# sftp 10.0.0.41
Connected to 10.0.0.41.
sftp> put /etc/hostname
Uploading /etc/hostname to /root/hostname
/etc/hostname 100% 6 7.6KB/s 00:00
sftp>
.get—从服务端41下载到本地
sftp> get /etc/hostname /opt/
Fetching /etc/hostname to /opt/hostname
/etc/hostname 100% 7 6.0KB/s 00:00
sftp>
.检查两端是否传输到位
m01:
[10:03 root@m01 ~]# cat /opt/hostname
backup
backup:
[10:04 root@backup ~]# cat hostname
m01
.连接指定端口号参数用 -P +端口号
[root@m01 ~]# sftp -P 22 10.0.0.41
root@10.0.0.41's password:
Connected to 10.0.0.41.
sftp> pwd
Remote working directory: /root 当前在root目录工作
.进入sftp传输模式后如何查看本地的文件目录信息?
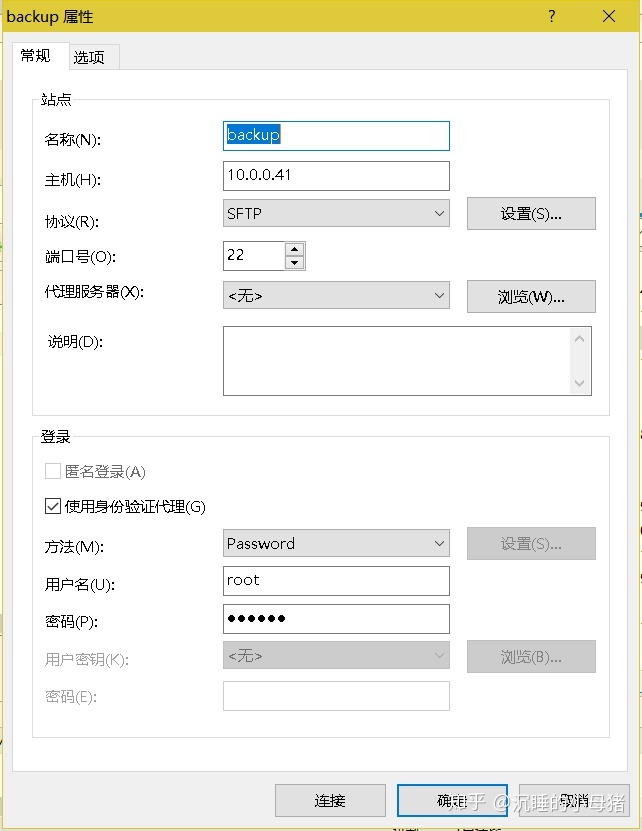
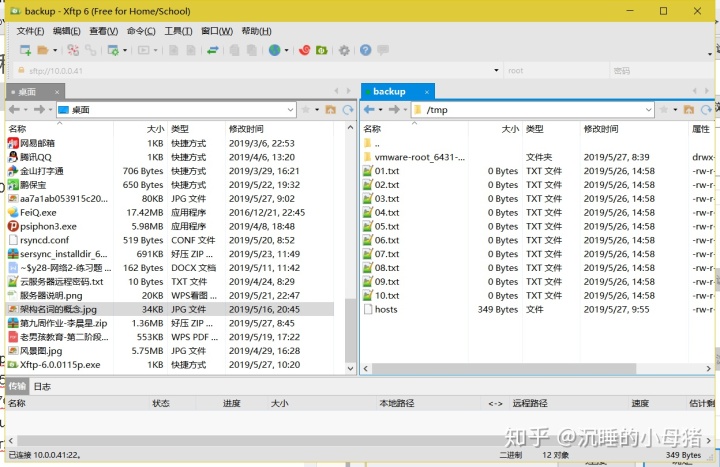
10.windows上的远程连接工具—xftp 6.exe
链接:https://pan.baidu.com/s/1AtiLrG9Ftp2DhrS11my8pw
提取码:ttgn
11.ssh服务端配置文件
[16:14 root@m01 ~]# vim /etc/ssh/sshd_config 目前只列出主要修改的内容
17 #Port 22 远程连接端口号
19 #ListenAddress 0.0.0.0 监听的地址 用户可以通过哪个地址(ip) 远程连接
监听本地网卡的ip地址
不同网段 不同端口
38 #PermitRootLogin yes 是否禁止root远程登录
64 #PermitEmptyPasswords no 是否准许空密码--必须关了
65 PasswordAuthentication yes 是否开启通过密码登录(认证)
开启密钥认证时可以打开
79 GSSAPIAuthentication no 解决ssh远程连接慢的问题
115 UseDNS no 解决ssh远程连接慢的问题
.修改ssh配置文件如下两行
[10:58 root@m01 ~]# egrep -i '^port|^permitroot' /etc/ssh/sshd_config
Port 52113
PermitRootLogin no
.指定内网IP连接,平滑重启sshd服务
ListenAddress 172.16.1.61(这里更改之后,只允许网段是172.16.1.61的可以连接)
[11:09 root@m01 ~]# ss -lntup|grep sshd
tcp LISTEN 0 128 *:22 *:* users:(("sshd",pid=7188,fd=3))
tcp LISTEN 0 128 :::22 :::* users:(("sshd",pid=7188,fd=4))
[11:10 root@m01 ~]# systemctl reload sshd.service
[11:10 root@m01 ~]# ss -lntup|grep sshd
tcp LISTEN 0 128 172.16.1.61:22 *:* users:(("sshd",pid=7188,fd=3))
12.秘钥连接
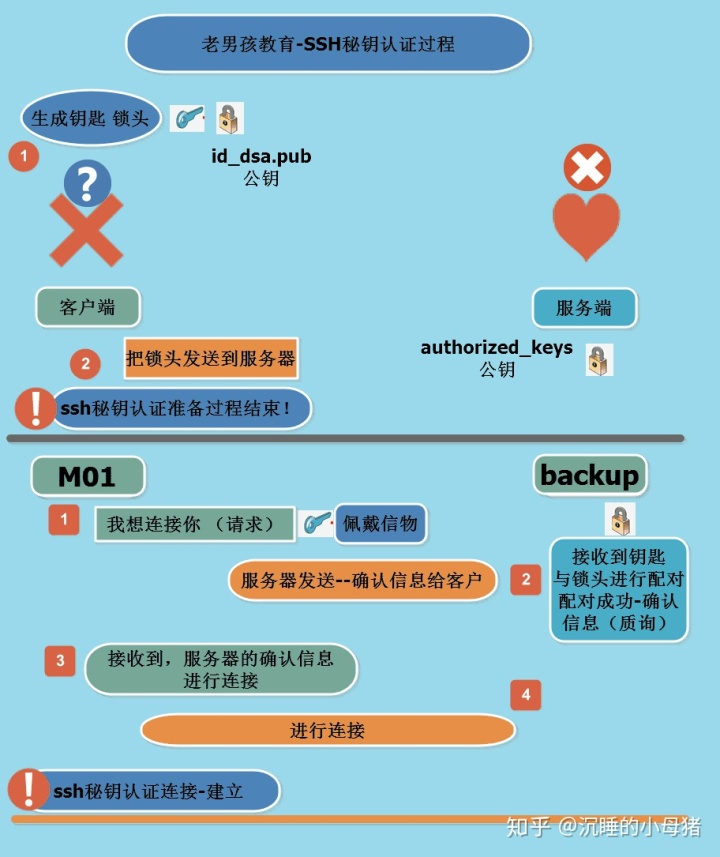
.SSH认证方式
密码认证
秘钥认证 .秘钥认证
单向的认证
免密登录 .步骤:
安装软件 sshpass pssh
客户端创建秘钥 ssh-keygen -t dsa
客户端发送秘钥 ssh-copy-id -i ~/.ssh/id_dsa.pub +ip地址
服务端的秘钥地址 ~/.ssh/authorized_keys1.安装软件,保证端口号是22
yum install -y sshpass pssh
[ root@m01 ~]# ss -lntup|grep sshd tcp LISTEN 0 128 *:22 *:* users:(("sshd",pid=7188,fd=3)) tcp LISTEN 0 128 :::22 :::* users:(("sshd",pid=7188,fd=4))
2.创建秘钥
ssh-keygen -t dsa
[ root@m01 ~]# ssh-keygen -t dsa 创建秘钥的命令
Generating public/private dsa key pair.
Enter file in which to save the key (/root/.ssh/id_dsa): 默认的存放路径
Enter passphrase (empty for no passphrase): 输入密钥密码
Enter same passphrase again: 再次输入密码Your identification has been saved in /root/.ssh/id_dsa. 你的私钥路径Your public key has been saved in /root/.ssh/id_dsa.pub. 你的公钥路径
The key fingerprint is:
SHA256:wsT45xD36AFN6onAidMbvLRJrj8dC0zaJIyrP6/RpJ0 root@m01
The key's randomart image is:
.查看密钥存放的目录
[root@m01 ~]# ll ~/.ssh/
total 12
-rw------- 1 root root 672 May 28 20:40 id_dsa 私钥
-rw-r--r-- 1 root root 598 May 28 20:40 id_dsa.pub 公钥
-rw-r--r-- 1 root root 697 May 28 20:05 known_hosts
.在客户端m01发送:
[ root@m01 ~]# ssh-copy-id -i ~/.ssh/id_dsa.pub 172.16.1.41
/usr/bin/ssh-copy-id: INFO: Source of key(s) to be installed: "/root/.ssh/id_dsa.pub"
/usr/bin/ssh-copy-id: INFO: attempting to log in with the new key(s), to filter out any that are already installed
/usr/bin/ssh-copy-id: INFO: 1 key(s) remain to be installed -- if you are prompted now it is to install the new keys
root@172.16.1.41's password:
Number of key(s) added: 1
Now try logging into the machine, with: "ssh '172.16.1.41'"
and check to make sure that only the key(s) you wanted were
.在客户端就可以免密连接了
[root@m01 ~]# ssh 172.16.1.41 hostname
backup
.服务端backup看一下秘钥的目录
~/.ssh/ 当前目录下的.ssh
[root@backup ~]# ll ~/.ssh/ total 8 -rw------- 1 root root 598 May 27 12:16 authorized_keys -rw-r--r-- 1 root root 683 May 27 11:12 known_hosts13.批量管理
Xshell
pssh
pssh
让多台机器执行同一条命令我们可以用pssh
参数
-h 指定被管理的主机列表
-P 显示屏幕输出
-A 用户的输入密码
1.检查是否安装
[root@m01 ~]# rpm -qa pssh
pssh-2.3.1-5.el7.noarch 2.创建一个文件,写入连接的ip和端口
[root@m01 ~]# vim hosts.txt
root@172.16.1.41:22
root@172.16.1.7:22 3.然后用pssh执行一条命令,看是否执行成功
[root@m01 ~]# pssh -Ph hosts.txt hostname
172.16.1.41: backup
[1] 12:46:40 [SUCCESS] root@172.16.1.41:22
172.16.1.7: web01
[2] 12:46:40 [SUCCESS] root@172.16.1.7:22
如果删除秘钥的话 用pssh推送失败
[root@m01 ~]# rm -rf .ssh/ *
[root@m01 ~]# pssh -Ph hosts.txt touch 888.txt
[1] 12:50:20 [FAILURE] root@172.16.1.41:22 Exited with error code 255
[2] 12:50:20 [FAILURE] root@172.16.1.7:22 Exited with error code 255
.用prsync传输也可以了 需要输入密码 但是不支持 -P参数[root@m01 ~]# prsync -A -azh hosts.txt /etc/hostname /tmp/
Warning: do not enter your password if anyone else has superuser
privileges or access to your account.
Password:
[1] 12:52:49 [SUCCESS] root@172.16.1.41:22
[2] 12:52:49 [SUCCESS] root@172.16.1.7:22
.用pssh查看一下推送到/tmp下的hostname[root@m01 ~]# pssh -A -Ph hosts.txt cat /tmp/hostname
Warning: do not enter your password if anyone else has superuser
privileges or access to your account.
Password:
172.16.1.7: m01
[1] 17:54:41 [SUCCESS] root@172.16.1.7:22
172.16.1.41: m01
[2] 17:54:41 [SUCCESS] root@172.16.1.41:22
测试后记得把秘钥分发到backup和web01
作者:linux丶晨星
链接:https://www.jianshu.com/p/b8f22d6389fc
来源:简书
简书著作权归作者所有,任何形式的转载都请联系作者获得授权并注明出处。
参考
- ^注意
- ^注意


 1638
1638

 被折叠的 条评论
为什么被折叠?
被折叠的 条评论
为什么被折叠?
 到【灌水乐园】发言


