cad打印样式ctb丢失_CAD打印样式表:STB与CTB之间有什么区别?

我们都知道CAD打印一般是通过打印样式表控制,但是对于打印样式表的设置可能还有很多细节不大明白。尤其是打印样式表的两种格式ctb 格式和stb格式之间有什么区别,很多人都犯迷糊。本文给大家详细介绍一下浩辰CAD制图软件中打印样式表中ctb和stb区别。

首先使用浩辰CAD制图软件分别打开两张使用CTB格式和STB格式的CAD图纸,然后打开图层管理器,就可以很明显地看出区别了,在使用CTB打印样式的图纸中,图层的“打印样式”一栏是灰色的,不能修改,显示的就是颜色编号,与图层颜色对应,例如设置为白色,样式就显示为color_7。而在使用STB的图中,“打印样式”默认为“Normal”或“普通”,并且是可以编辑的,单击后可以在对话框中选择STB文件中设置好的样式,如下图所示:

6f780444054ae2382512942ea3fe3306.png

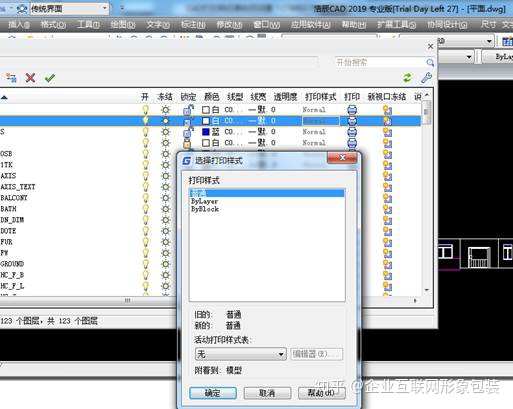
通过上述的比较大致就可以了解STB的用途了,用STB可以按样式来设置每个图层的打印输出的颜色和线宽设置,结合图层规范,设计单位可以比较容易控制打印效果。只要设计人员使用相同模板,并且严格按照规定将不同类型图形绘制在指定图层上,那打印输出的效果就能保证一致了。

对于普通设计人员来说,设置并使用STB的人比较少,STB通常是设计单位为控制打印效果,统一设置文件模板时使用,至少我了解到国内的情况是这样的,也不知道对不对。

以上就是浩辰CAD制图软件中CAD打印样式表STB与CTB之间的区别,希望对大家有所帮助!

  • 0
    点赞
  • 0
    收藏
    觉得还不错? 一键收藏
  • 0
    评论
C# ObjectARX 是 AutoCAD 的 .NET API,可以通过 C# 代码实现 AutoCAD 的二次开发。下面是按范围打印并设置打印样式表的示例代码: ```csharp using Autodesk.AutoCAD.Runtime; using Autodesk.AutoCAD.ApplicationServices; using Autodesk.AutoCAD.DatabaseServices; using Autodesk.AutoCAD.EditorInput; using Autodesk.AutoCAD.GraphicsInterface; using Autodesk.AutoCAD.PlottingServices; using Autodesk.AutoCAD.Publishing; namespace MyCommands { public class MyCommandsClass { [CommandMethod("MyPrint")] public void MyPrint() { Document doc = Application.DocumentManager.MdiActiveDocument; Database db = doc.Database; Editor ed = doc.Editor; // 获取打印范围 PromptPointResult ppr = ed.GetPoint("\n请指定打印范围的第一个角点:"); if (ppr.Status != PromptStatus.OK) return; Point3d pt1 = ppr.Value; ppr = ed.GetCorner("\n请指定打印范围的第二个角点:", pt1); if (ppr.Status != PromptStatus.OK) return; Point3d pt2 = ppr.Value; // 设置打印样式表 string styleSheetName = "MyStyleSheet"; if (!PlotSettingsValidator.StyleSheetExists(styleSheetName)) { PlotSettingsValidator.AddNewStyleSheet(styleSheetName); } PlotSettingsValidator.SetCurrentStyleSheet(styleSheetName); // 创建打印信息 PlotInfo pi = new PlotInfo(); pi.Layout = "*Model_Space"; pi.OverrideSettings = null; // 创建打印设备 PlotSettings ps = new PlotSettings(doc.Editor); ps.CopyFrom(pi); // 设置打印范围 ps.SetPlotWindowArea(pt1, pt2); // 设置打印样式 ps.PlotStyleName = "monochrome.ctb"; // 创建打印对象 PlotInfoValidator piv = new PlotInfoValidator(); piv.MediaMatchingPolicy = MatchingPolicy.MatchEnabled; piv.Validate(pi); // 打印 PlotEngine pe = PlotFactory.CreatePublishEngine(); pe.BeginPlot(null, null); pe.BeginDocument(pi, doc.Name, null, 1, true, null); pe.BeginPage(new PlotPageInfo(), pi, true, null); pe.SetPlotSettings(ps); pe.BeginGenerateGraphics(null); pe.EndGenerateGraphics(null); pe.EndPage(null); pe.EndDocument(null); pe.EndPlot(null); } } } ``` 以上代码实现了按指定范围打印并设置打印样式表。需要注意的是,代码中的打印范围是使用 `SetPlotWindowArea` 方法设置的,打印样式表使用 `PlotStyleName` 属性设置的。你可以根据自己的需要修改这些参数。

“相关推荐”对你有帮助么?

  • 非常没帮助
  • 没帮助
  • 一般
  • 有帮助
  • 非常有帮助
提交
评论
添加红包

请填写红包祝福语或标题

红包个数最小为10个

红包金额最低5元

当前余额3.43前往充值 >
需支付:10.00
成就一亿技术人!
领取后你会自动成为博主和红包主的粉丝 规则
hope_wisdom
发出的红包
实付
使用余额支付
点击重新获取
扫码支付
钱包余额 0

抵扣说明:

1.余额是钱包充值的虚拟货币,按照1:1的比例进行支付金额的抵扣。
2.余额无法直接购买下载,可以购买VIP、付费专栏及课程。

余额充值