


前言
在Android开发过程中,我发现很多安卓源代码里应用了设计模式,比较常用的有适配器模式(各种adapter),建造者模式(Alert Dialog的构建)等等。虽然我们对大多数设计模式都有所了解,但是在应用设计模式的这个方面,感觉很多人在这方面有所不足。所以这篇文章我们一起深入的理解Android中的建造者模式。
建造者模式(Builder Pattern)也叫生成器模式,其定义如下:
separate the construction of a complex object from its representation so that the same construction process can create different representations.将一个复杂对象的构建与它的标示分离,这样的话就可以使同样的构建过程可以创建不同的表示。
我的理解:就是把一个产品(对象)表示(展示)和构建(创建)过程分离开来,这样产品的构建流程相同却可以有不同的产品表示。
应用场景
这里举出Android中常见的例子:
android中的AlertDialog对话框的构建过程就是建造者模式的典型应用。
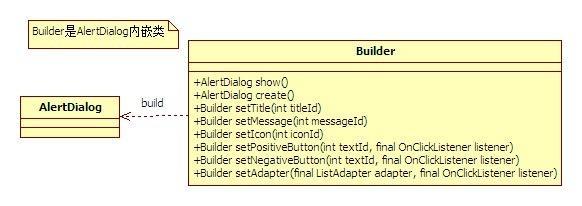
看一下Builder源码
public static class Builder {
private final AlertController.AlertParams P;
public Builder(Context context) {
this(context, resolveDialogTheme(context, 0));
}
public Builder(Context context, int themeResId) {
P = new AlertController.AlertParams(new ContextThemeWrapper(
context, resolveDialogTheme(context, themeResId)));
}
//各种set参数方法
setTitle()
...
...
...
/**
* Creates an {@link AlertDialog} with the arguments supplied to this
* builder.
*
* Calling this method does not display the dialog. If no additional
* processing is needed, {@link #show()} may be called instead to both
* create and display the dialog.
*/
public AlertDialog create() {
// Context has already been wrapped with the appropriate theme.
final AlertDialog dialog = new AlertDialog(P.mContext, 0, false);
P.apply(dialog.mAlert);
dialog.setCancelable(P.mCancelable);
if (P.mCancelable) {
dialog.setCanceledOnTouchOutside(true);
}
dialog.setOnCancelListener(P.mOnCancelListener);
dialog.setOnDismissListener(P.mOnDismissListener);
if (P.mOnKeyListener != null) {
dialog.setOnKeyListener(P.mOnKeyListener);
}
return dialog;
}
// 这个show方法是builder对象的,里面封装了create()和show()可以直接调取创建并显示对话框
public AlertDialog show() {
final AlertDialog dialog = create();
dialog.show();
return dialog;
}
}
分析源码可以看到内部类Builder是用来构建这个对话框的:
1、创建builder的时候,会把这个AlertController.AlertParams P;对象P创建new出来
2、在对bilder设置各种参数的时,这些参数都存在了对象P中
3、然后builder参数设置完毕后在调用create方法。
final AlertDialog dialog = new AlertDialog(P.mContext, 0, false);
P.apply(dialog.mAlert); // mAlert是外部类中的
这个方法中会首先调用外部类AlertDialog的构造方法,new出一个外部类对象,然后p.apply()方法会将P这个对象作为内部类的属性赋值给AlertController的对象mAlert。这样就完成了一次的构建。
下面是AlertDialog的部分源码
public class AlertDialog extends Dialog implements DialogInterface {
// 这个对象用来承接builder内部所设置的参数
private AlertController mAlert;
//以下几个构造方法决定只能通过内部类builder来构建
protected AlertDialog(Context context) {
this(context, 0);
}
protected AlertDialog(Context context, boolean cancelable, OnCancelListener cancelListener) {
this(context, 0);
setCancelable(cancelable);
setOnCancelListener(cancelListener);
}
protected AlertDialog(Context context, @StyleRes int themeResId) {
this(context, themeResId, true);
}
AlertDialog(Context context, @StyleRes int themeResId, boolean createContextThemeWrapper) {
super(context, createContextThemeWrapper ? resolveDialogTheme(context, themeResId) : 0,
createContextThemeWrapper);
mWindow.alwaysReadCloseOnTouchAttr();
mAlert = new AlertController(getContext(), this, getWindow());
}
}
总结
以上就是这篇文章的全部内容了,希望本文的内容对各位Android开发者们能有所帮助,如果有疑问大家可以留言交流。


 1246
1246


 被折叠的 条评论
为什么被折叠?
被折叠的 条评论
为什么被折叠?
 到【灌水乐园】发言


