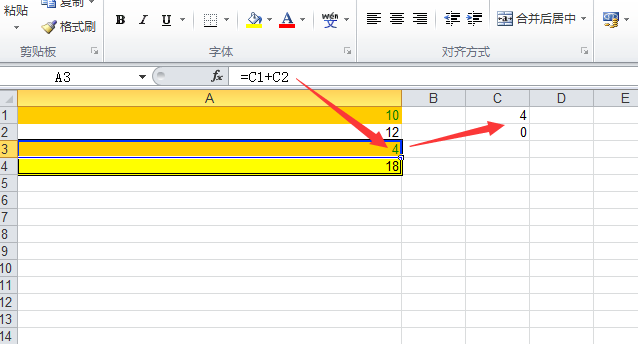
用EXCEL导出报表时,很多情况下,需要在EXCEL中用颜色区分各种数据, 当然可以在创建Cell的时候,直接赋值style 来实现,但还有一种方式,可以通过设置条件格式来实现。只要满足设定的规则,就显示不同的颜色等。
[/code]
下面这段代码例子就实现了这样一个功能。package com.yihaomen.poi.sample;
import java.io.*;
import org.apache.poi.ss.usermodel.*;
import org.apache.poi.hssf.usermodel.*;
import org.apache.poi.hssf.util.*;
import org.apache.poi.ss.usermodel.ComparisonOperator;
import org.apache.poi.ss.usermodel.IndexedColors;
import org.apache.poi.ss.util.CellRangeAddress;
public class CondictionRule {
public static void main(String[] args) throws Exception{
/* Create Workbook and Worksheet - Add Input Rows */
HSSFWorkbook my_workbook = new HSSFWorkbook();
HSSFSheet my_sheet = my_workbook.createSheet("Conditional_Formatting");
Row row = my_sheet.createRow(0);
Cell cell = row.createCell(0);
cell.setCellValue(new Double(10));
row = my_sheet.createRow(1);
cell = row.createCell(0);
cell.setCellValue(new Double(12));
row = my_sheet.createRow(2);
cell = row.createCell(0);
cell.setCellValue(new Double(13));
row = my_sheet.createRow(3);
cell = row.createCell(0);
cell.setCellValue(new Double(18));
/* Access conditional formatting facet layer */
HSSFSheetConditionalFormatting my_cond_format_layer = my_sheet.getSheetConditionalFormatting();
/* Create a Rule - Less than or Equal to */
HSSFConditionalFormattingRule my_rule = my_cond_format_layer.createConditionalFormattingRule(ComparisonOperator.LE, "10");
/* Define font formatting if rule is met */
HSSFFontFormatting my_rule_pattern = my_rule.createFontFormatting();
my_rule_pattern.setFontColorIndex(IndexedColors.GREEN.getIndex());
/* Set background fill to Gold*/
HSSFPatternFormatting fill_pattern = my_rule.createPatternFormatting();
fill_pattern.setFillBackgroundColor(IndexedColors.GOLD.index);
/* Define second conditional formatting rules - multiple conditions- greater than or equal to */
HSSFConditionalFormattingRule my_rule_2 = my_cond_format_layer.createConditionalFormattingRule(ComparisonOperator.GE, "13");
/* Format borders for all matching cells using HSSFBorderFormatting */
HSSFBorderFormatting border_pattern=my_rule_2.createBorderFormatting();
border_pattern.setBorderLeft(BorderFormatting.BORDER_DOUBLE);
border_pattern.setBorderRight(BorderFormatting.BORDER_DOUBLE);
border_pattern.setBorderTop(BorderFormatting.BORDER_DOUBLE);
border_pattern.setBorderBottom(BorderFormatting.BORDER_DOUBLE);
/* You can set border color too, by using relevant methods */
/* Set fill color to Green */
HSSFPatternFormatting fill_pattern_2 = my_rule_2.createPatternFormatting();
fill_pattern_2.setFillBackgroundColor(IndexedColors.YELLOW.index);
/* OK, we have defined mutliple rules. Time to attach two rules to same range. We create an array of rules now */
ConditionalFormattingRule [] multiple_rules = {my_rule,my_rule_2};
/* Create a Cell Range Address */
CellRangeAddress[] my_data_range = {CellRangeAddress.valueOf("A1:A4")};
/* Attach array of rules to the same range */
my_cond_format_layer.addConditionalFormatting(my_data_range,multiple_rules);
/* Write changes to the workbook */
FileOutputStream out = new FileOutputStream(new File("C:\\multiple_conditonal_formatting.xls"));
my_workbook.write(out);
out.close();
}
}
如果你用的是XSSF的话,用如下方式:
import java.io.*;
import org.apache.poi.ss.usermodel.*;
import org.apache.poi.hssf.usermodel.*;
import org.apache.poi.hssf.util.*;
import org.apache.poi.ss.usermodel.ComparisonOperator;
import org.apache.poi.ss.usermodel.IndexedColors;
import org.apache.poi.ss.util.CellRangeAddress;
public class MultipleRulesConditionalFormatting {
public static void main(String[] args) throws Exception{
/* Create Workbook and Worksheet - Add Input Rows */
HSSFWorkbook my_workbook = new HSSFWorkbook();
HSSFSheet my_sheet = my_workbook.createSheet("Conditional_Formatting");
Row row = my_sheet.createRow(0);
Cell cell = row.createCell(0);
cell.setCellValue(new Double(10));
row = my_sheet.createRow(1);
cell = row.createCell(0);
cell.setCellValue(new Double(12));
row = my_sheet.createRow(2);
cell = row.createCell(0);
cell.setCellValue(new Double(13));
row = my_sheet.createRow(3);
cell = row.createCell(0);
cell.setCellValue(new Double(18));
/* Access conditional formatting facet layer */
HSSFSheetConditionalFormatting my_cond_format_layer = my_sheet.getSheetConditionalFormatting();
/* Create a Rule - Less than or Equal to */
HSSFConditionalFormattingRule my_rule = my_cond_format_layer.createConditionalFormattingRule(ComparisonOperator.LE, "10");
/* Define font formatting if rule is met */
HSSFFontFormatting my_rule_pattern = my_rule.createFontFormatting();
my_rule_pattern.setFontColorIndex(IndexedColors.GREEN.getIndex());
/* Set background fill to Gold*/
HSSFPatternFormatting fill_pattern = my_rule.createPatternFormatting();
fill_pattern.setFillBackgroundColor(IndexedColors.GOLD.index);
/* Define second conditional formatting rules - multiple conditions- greater than or equal to */
HSSFConditionalFormattingRule my_rule_2 = my_cond_format_layer.createConditionalFormattingRule(ComparisonOperator.GE, "13");
/* Format borders for all matching cells using HSSFBorderFormatting */
HSSFBorderFormatting border_pattern=my_rule_2.createBorderFormatting();
border_pattern.setBorderLeft(BorderFormatting.BORDER_DOUBLE);
border_pattern.setBorderRight(BorderFormatting.BORDER_DOUBLE);
border_pattern.setBorderTop(BorderFormatting.BORDER_DOUBLE);
border_pattern.setBorderBottom(BorderFormatting.BORDER_DOUBLE);
/* You can set border color too, by using relevant methods */
/* Set fill color to Green */
HSSFPatternFormatting fill_pattern_2 = my_rule_2.createPatternFormatting();
fill_pattern_2.setFillBackgroundColor(IndexedColors.YELLOW.index);
/* OK, we have defined mutliple rules. Time to attach two rules to same range. We create an array of rules now */
ConditionalFormattingRule [] multiple_rules = {my_rule,my_rule_2};
/* Create a Cell Range Address */
CellRangeAddress[] my_data_range = {CellRangeAddress.valueOf("A1:A4")};
/* Attach array of rules to the same range */
my_cond_format_layer.addConditionalFormatting(my_data_range,multiple_rules);
/* Write changes to the workbook */
FileOutputStream out = new FileOutputStream(new File("C:\\multiple_conditonal_formatting.xls"));
my_workbook.write(out);
out.close();
}
}


 1397
1397


 被折叠的 条评论
为什么被折叠?


