


SpringBoot 整合 Mybatis 操作 Mysql 数据库
使用 Mybatis 操作数据库步骤
- 编写 Mapper 接口,用 @Mapper 标注
- 编写 Mapper.xml 文件,和Mapper 接口名称保持一致
- Mapper 接口和Mapper.xml 文件需要保持包名一致 (也可以通过在 application.yml 文件中配置包名路径)
- 在Mapper.xml 文件中CRUD方法需要和Mapper 接口 保持一致
添加相关Mysql 驱动, Mybatis 依赖
<!-- mysql数据库驱动 -->
    <dependency>
      <groupId>mysql</groupId>
      <artifactId>mysql-connector-java</artifactId>
    </dependency>

    <!-- 数据库连接池 -->
    <dependency>
      <groupId>com.alibaba</groupId>
      <artifactId>druid-spring-boot-starter</artifactId>
      <version>1.1.10</version>
    </dependency>

    <!-- spring 整合 mybatis -->
    <dependency>
      <groupId>org.mybatis.spring.boot</groupId>
      <artifactId>mybatis-spring-boot-starter</artifactId>
      <version>2.0.1</version>
      <exclusions>
        <exclusion>
          <groupId>org.mybatis</groupId>
          <artifactId>mybatis</artifactId>
        </exclusion>
      </exclusions>
    </dependency>
    <dependency>
      <groupId>org.mybatis</groupId>
      <artifactId>mybatis</artifactId>
      <version>3.5.0</version>
    </dependency>
    <dependency>
      <groupId>org.mybatis</groupId>
      <artifactId>mybatis-typehandlers-jsr310</artifactId>
      <version>1.0.1</version>
    </dependency>
application.yml 文件添加数据源配置
spring:
  ## 数据库配置
  datasource:
    name: moose
    url: jdbc:mysql://localhost:3306/moose?serverTimezone=GMT%2B8&useUnicode=true&&characterEncoding=UTF-8&&useSSL=false
    driver-class-name: com.mysql.cj.jdbc.Driver
    username: root
    password: 123456
    type: com.alibaba.druid.pool.DruidDataSource

## mybatis settings
mybatis:
  mapper-locations: classpath:/mapper/*.xml
  type-aliases-package: com.moose.operator.model.domain
  configuration:
    map-underscore-to-camel-case: true
编写 Mapper 接口
// 加上 @Mapper ,被 Spring 扫描,加入Spring 容器
@Mapper
public interface AccountMapper {

  /**
   * 插入 AccountDO 数据
   *
   * @param accountDO 账号信息
   * @return AccountDO
   * @throws Exception
   */
  void insertAccount(AccountDO accountDO) throws Exception;
}
创建表字段 t_account & t_password
-- ----------------------------
-- Table structure for t_account
-- ----------------------------
DROP TABLE IF EXISTS `t_account`;
CREATE TABLE `t_account` (
  `account_id` bigint(20) NOT NULL,
  `account_name` varchar(64) COLLATE utf8_bin NOT NULL DEFAULT '' COMMENT '用户名',
  `status` varchar(1) COLLATE utf8_bin DEFAULT '1' COMMENT '帐号启用状态:0->禁用;1->启用',
  `phone` varchar(11) COLLATE utf8_bin NOT NULL DEFAULT '' COMMENT '手机号',
  `create_time` datetime DEFAULT CURRENT_TIMESTAMP COMMENT '创建时间',
  `update_time` datetime DEFAULT CURRENT_TIMESTAMP ON UPDATE CURRENT_TIMESTAMP COMMENT '更新时间',
  UNIQUE KEY `uniq_account_id` (`account_id`),
  UNIQUE KEY `uniq_account_name` (`account_name`) USING BTREE,
  KEY `idx_account_id` (`account_id`)
) ENGINE=InnoDB DEFAULT CHARSET=utf8 COLLATE=utf8_bin COMMENT='账号表';

-- ----------------------------
-- Table structure for t_password
-- ----------------------------
DROP TABLE IF EXISTS `t_password`;
CREATE TABLE `t_password` (
  `password_id` bigint(20) NOT NULL COMMENT '密码ID',
  `account_id` bigint(20) NOT NULL COMMENT '账号ID',
  `password` varchar(64) COLLATE utf8_bin NOT NULL COMMENT '密码',
  `create_time` datetime DEFAULT CURRENT_TIMESTAMP COMMENT '创建时间',
  `update_time` datetime DEFAULT CURRENT_TIMESTAMP ON UPDATE CURRENT_TIMESTAMP COMMENT '更新时间',
  UNIQUE KEY `uniq_password_id` (`password_id`),
  UNIQUE KEY `uniq_account_id` (`account_id`),
  KEY `t_account_password_ibfk_1` (`account_id`),
  KEY `idx_password_id` (`password_id`),
  CONSTRAINT `t_account_password_ibfk_1` FOREIGN KEY (`account_id`) REFERENCES `t_account` (`account_id`)
) ENGINE=InnoDB DEFAULT CHARSET=utf8 COLLATE=utf8_bin COMMENT='密码表';
创建 AccountDO PasswordDO 和表字段一一映射
- AccountDO
@Data
@EqualsAndHashCode(callSuper = true)
public class AccountDO extends BaseDO {

  /**
   * 账号 Id
   */
  private Long accountId;

  /**
   * 账号
   */
  private String accountName;

  /**
   * 状态
   */
  private String status;

  /**
   * 手机号码
   */
  private String phone;
}- PasswordDO
@Data
public class PasswordDO extends BaseDO {

  private Long passwordId;

  private Long accountId;

  private String password;
}
在 resources 添加 Mapper 映射文件
AccountMapper.xml
<?xml version="1.0" encoding="UTF-8"?>
<!DOCTYPE mapper PUBLIC "-//mybatis.org//DTD Mapper 3.0//EN"
    "http://mybatis.org/dtd/mybatis-3-mapper.dtd">
<mapper namespace="com.moose.operator.mapper.AccountMapper">

  <resultMap id="BaseResultMap" type="com.moose.operator.model.domain.AccountDO">
    <id column="account_id" jdbcType="BIGINT" property="accountId"/>
    <result column="account_name" jdbcType="VARCHAR" property="accountName"/>
    <result column="status" jdbcType="VARCHAR" property="status"/>
    <result column="phone" jdbcType="VARCHAR" property="phone"/>
    <result column="create_time" jdbcType="TIMESTAMP" property="createTime"/>
    <result column="update_time" jdbcType="TIMESTAMP" property="updateTime"/>
  </resultMap>

  <sql id="Base_Column">
    account_id, account_name, phone, status, create_time, update_time
  </sql>

  <insert id="insertAccount" parameterType="com.moose.operator.model.domain.AccountDO">
    INSERT INTO
    t_account(account_id, account_name, phone)
    VALUES
    (#{accountId}, #{accountName}, #{phone})
  </insert>
</mapper>
PasswordMapper.xml
<?xml version="1.0" encoding="UTF-8"?>
<!DOCTYPE mapper PUBLIC "-//mybatis.org//DTD Mapper 3.0//EN"
    "http://mybatis.org/dtd/mybatis-3-mapper.dtd">
<mapper namespace="com.moose.operator.mapper.PasswordMapper">

  <insert id="insertPassword" parameterType="com.moose.operator.model.domain.PasswordDO">
    INSERT INTO t_password(account_id, password_id, password) VALUES (#{accountId}, #{passwordId}, #{password})
  </insert>

</mapper>
测试用例
@Slf4j
@RunWith(SpringRunner.class)
@SpringBootTest
public class AccountMapperTest {

  @Resource
  private AccountMapper accountMapper;

  @Resource
  private PasswordMapper passwordMapper;

  @Test
  public void testInsertAccount() throws Exception {

    AccountDO accountDO = new AccountDO();
    accountDO.setAccountId(98797898213L);
    accountDO.setAccountName("测试用户名");
    accountDO.setStatus("1");
    accountDO.setPhone("1569874569");

    PasswordDO passwordDO = new PasswordDO();
    passwordDO.setAccountId(accountDO.getAccountId());
    passwordDO.setPasswordId(54546714L);
    passwordDO.setPassword("123654789");

    accountMapper.insertAccount(accountDO);
    passwordMapper.insertPassword(passwordDO);
  }
}
为了测试方便,密码使用了明文,后期整合 SpringSecurity 可以使用 BCryptPasswordEncoder 对密码加密存储
查看数据库应保存成功


SpringBoot 实现注册功能
编写控制器
@Slf4j
@RestController
@RequestMapping(value = "/api/v1/account")
public class AccountController {

  @Resource
  private AccountService accountService;

  /**
   * spring security oauth2.0 to register
   */
  @PostMapping(value = "/register")
  public R<?> register(@Valid RegisterInfoVO registerInfoVO, BindingResult result,
      HttpServletRequest request) {
    return R.ok(accountService.register(request, registerInfoVO));
  }
}
注册核心逻辑
@Transactional(rollbackFor = Exception.class)
@Override
public Boolean register(HttpServletRequest request,
RegisterInfoVO registerInfo) {
String password = registerInfo.getPassword();
String rePassword = registerInfo.getRePassword();
String url = request.getRequestURL().toString();
String ip = request.getRemoteAddr();
log.info("register [ip {}], [url {}]", ip, url);
// 比对两次密码是否一致
if (!StringUtils.equals(password, rePassword)) {
throw new BusinessException(ResultCode.PASSWORD_ERROR);
}
// 查询对应 账号名称
String accountName = registerInfo.getAccountName();
AccountDO account = accountMapper.findByAccountName(accountName);
if (account != null) {
throw new BusinessException(ResultCode.ACCOUNT_NAME_EXITS);
}
// 查询手机号是否存在
String phone = registerInfo.getPhone();
account = accountMapper.findByPhone(phone);
if (account != null) {
throw new BusinessException(ResultCode.PHONE_EXITS);
}
try {
AccountDO accountDO = new AccountDO();
accountDO.setAccountId(snowflakeIdWorker.nextId());
accountDO.setAccountName(registerInfo.getAccountName());
accountDO.setPhone(registerInfo.getPhone());
PasswordDTO passwordDTO = new PasswordDTO();
passwordDTO.setAccountId(accountDO.getAccountId());
passwordDTO.setPasswordId(snowflakeIdWorker.nextId());
// 加密密码
passwordDTO.setPassword(passwordEncoder.encode(registerInfo.getPassword()));
accountMapper.insertAccount(accountDO);
passwordService.savePassword(passwordDTO);
UserInfoDO userInfoDO = new UserInfoDO();
userInfoDO.setPhone(phone);
userInfoDO.setUserId(snowflakeIdWorker.nextId());
userInfoDO.setUserName(accountName);
userInfoDO.setAccountId(accountDO.getAccountId());
userInfoDO.setAccountName(accountName);
userInfoDO.setGender(registerInfo.getGender());
userInfoDO.setAvatar(registerInfo.getAvatar());
userInfoDO.setCreateTime(LocalDateTime.now());
userInfoDO.setUpdateTime(LocalDateTime.now());
userInfoService.saveUserInfo(userInfoDO);
} catch (Exception e) {
log.info("register fail error [{}]", e.getMessage());
throw new BusinessException(ResultCode.REGISTER_FAIL);
}
return Boolean.TRUE;
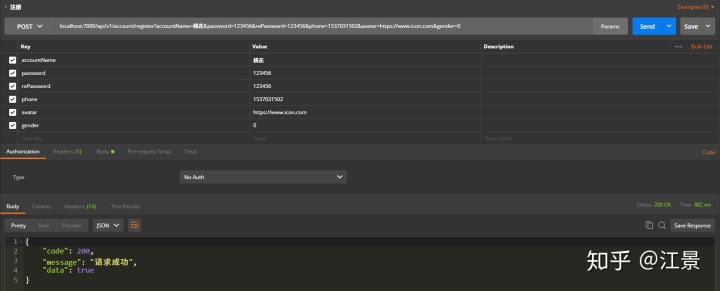
}PostMan 测试
localhost:7000/api/v1/account/register?accountName=江景&password=123456&rePassword=123456&phone=1537031501&avatar=https://www.icon.com&gender=1


 2783
2783


 被折叠的 条评论
为什么被折叠?
被折叠的 条评论
为什么被折叠?
 到【灌水乐园】发言


