


上一篇文章中我们使用wxPython实现了编辑器工具栏,不过还存在一些不足,接下来将对工具栏进行优化。
编辑器工具栏能够显示当前格式
工具栏的格式化按钮需要动态变换,能够显示出当前光标所在位置的格式。最终实现的效果如下图所示。
基本思路是:获取光标所在位置的文本格式,然后将对应的格式化参数显示在工具栏上面。
为了能够实时的获取当前格式,我们需要借助Quill编辑器提供的 selection-change 事件和 getFormat 方法,然后将获取到的格式传递给编辑器,如何传递呢?只需要在JavaScript方法里调用对应的Python方法即可。
获取文本格式
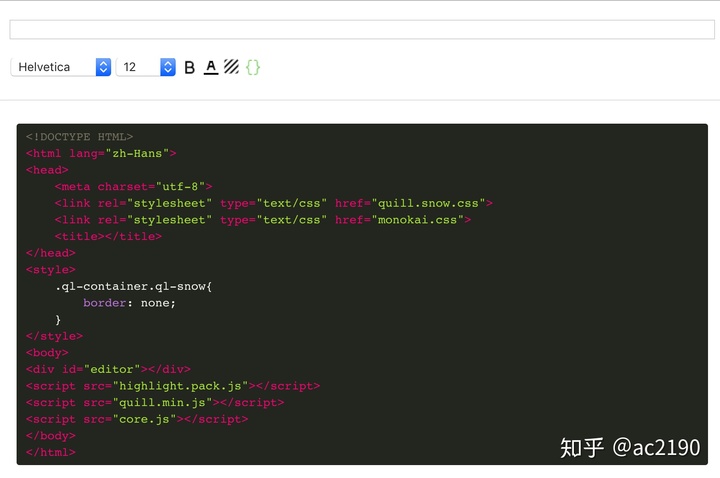
编辑 assets / text_editor / core.js,添加以下代码:
quill.on('selection-change', function(){
    pyOnFormatChanged(quill.getFormat());
});
当光标移动时,就会触发 selection-change 事件,并且用户连续输入文字时不会触发这个事件,十分方便。
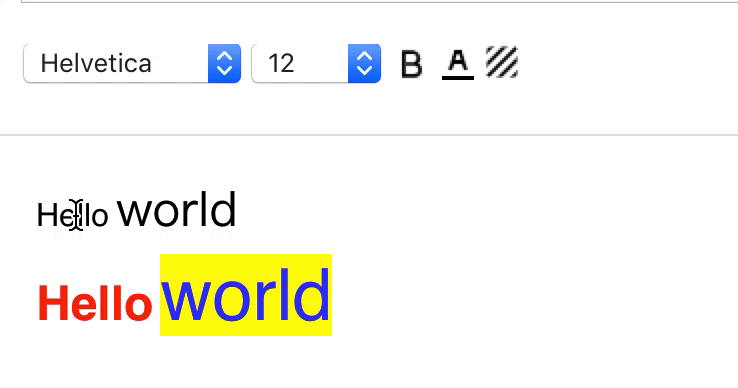
quill.getFormat() 方法返回的是当前文本格式,例如上图中最后面的 World 文本,对应的格式如下:
{'background': '#fefe0a', 'color': '#2f00fe', 'size': '36px'}pyOnFormatChanged 方法即对应的Python方法,实际上借助了 cefpython 提供的JavaScript 绑定功能。
编辑 views / text_editor.py 文件,在 __init__ 方法里面添加js绑定。
self.webview.set_js_bindings([('pyOnFormatChanged', self._on_format_changed)])并定义相应的方法:
def _on_format_changed(self, content_format):
    print(content_format)
再次运行 main.py ,然后输入任意文本并进行格式化操作(例如文字加粗,设置背景颜色等),移动光标时可以发现Python控制台显示了对应的文本格式。
显示文本格式
已经获取到了文本格式,接下来要做的就是让工具栏显示当前格式。
假设现在获取到的格式如下。
{'background': '#fb0106', 'bold': True, 'color': '#21fe06', 'font': 'sans-serif', 'size': '36px'}则对应的工具栏界面变化如下:
- 字体下拉框需要选中对应的 font 数据
- 字体大小下拉框需要选中对应的 size 数据
- 字体加粗按钮根据 bold 来切换相应的图片,如果为 True,则显示高亮图片
- 文本颜色按钮(由位图按钮和分割线组合而成)根据 color 来设置下方分割线的背景色
- 背景颜色按钮根据 background 来设置自身的背景色
完整实现
显然编辑器需要保留当前的文本格式,编辑 views / text_editor.py 文件:
class TextEditor(wx.Panel):
    def __init__(self, parent):
        super().__init__(parent, style=wx.BORDER_NONE)
        self._init_ui()
        self.webview.set_js_bindings([('pyOnFormatChanged', self._on_format_changed)])
        self.content_format = {
            'bold': False,
            'font': False,
            'size': False,
            'color': False,
            'background': False
        }
定义了一个 content_format 字段来保存当前的文本格式,所有的格式化元素初始值为 False,表示编辑器默认没有格式化。
然后修改 _on_format_changed 方法:
def _on_format_changed(self, content_format):
    changed_format = {}
    for key, val in self.content_format.items():
        format_val = content_format.pop(key, False)
        if format_val != val:
            self.content_format[key] = format_val
            changed_format[key] = format_val
    self.toolbar.display_format(changed_format)
当文本格式发生变化的时候,我们将当前的格式和编辑器上一次保存的格式进行比较,将发生变化的格式提取出来,保存到 changed_format 变量里面,交给编辑器工具栏来显示。
编辑 views / text_editor_toolbar.py 文件,定义 display_format 方法:
def display_format(self, changed_format):
    if 'bold' in changed_format:
        self._display_bold_format(changed_format.pop('bold'))
    if 'font' in changed_format:
        self._display_font_format(changed_format.pop('font'))
    if 'size' in changed_format:
        self._display_size_format(changed_format.pop('size'))
    if 'color' in changed_format:
        self._display_color_format(changed_format.pop('color'))
    if 'background' in changed_format:
        self._display_background_format(changed_format.pop('background'))
可以看到这里定义了很多的 _display_**_format 方法,这些方法的作用是显示文本格式,以 _display_bold_format 方法为例:
def _display_bold_format(self, format_val):
    bitmap = images.tool_bold_active.Bitmap if format_val else images.tool_bold.Bitmap
    self.tool_bold.SetBitmap(bitmap)
如果当前光标移动到了字体加粗的文本中,则整个流程如下:
- Quill编辑器的 selection-change 事件触发,于是调用了 pyOnFormatChanged 方法
- 因为 pyOnFormatChanged 实际上绑定的是 _on_format_changed 方法,所以后者会调用
- 经过比较之后,changed_format 的值为 { 'bold': True },作为参数传递给工具栏的 display_format 方法
- 最终调用了 _display_bold_format 方法,而且此方法的参数为 True,因此 bitmap 的值为 images.tool_bold_active
- 工具栏的字体加粗按钮因此高亮了
views / text_editor_toolbar.py 的完整代码如下:
import wx
import images
from .generic_bitmap_button import GenericBitmapButton


class _ToolColor(wx.Panel):
    def __init__(self, parent):
        super().__init__(parent)
        self._init_ui()
        self.display_color('#000000')

    def _init_ui(self):
        self.main_sizer = wx.BoxSizer(wx.VERTICAL)
        self.main_sizer.Add(GenericBitmapButton(self, 'tool_color'))
        self.color_indicator = wx.StaticLine(self, size=(-1, 2))
        self.main_sizer.Add(self.color_indicator, flag=wx.EXPAND)
        self.SetSizer(self.main_sizer)

    def display_color(self, color):
        self.color_indicator.SetBackgroundColour(color)


class _ToolBackground(wx.Panel):
    def __init__(self, parent):
        super().__init__(parent)
        self._init_ui()

    def _init_ui(self):
        self.main_sizer = wx.BoxSizer


class TextEditorToolbar(wx.Panel):
    def __init__(self, parent):
        super().__init__(parent)
        self.editor = parent
        self._init_ui()
        self._init_event()

    def _init_ui(self):
        self.main_sizer = wx.BoxSizer(wx.HORIZONTAL)

        self.tool_font_name = wx.Choice(self, choices=['Helvetica', 'Arial', 'sans-serif'])
        self.tool_font_size = wx.Choice(self, choices=['12', '13', '14', '16', '18', '24', '36', '48', '72'])
        self.tool_bold = GenericBitmapButton(self, 'tool_bold')
        self.tool_color = _ToolColor(self)
        self.tool_background = GenericBitmapButton(self, 'tool_background')

        self.main_sizer.AddSpacer(2)
        self.main_sizer.Add(self.tool_font_name, flag=wx.RIGHT, border=5)
        self.main_sizer.Add(self.tool_font_size, flag=wx.RIGHT, border=5)
        self.main_sizer.Add(self.tool_bold, flag=wx.RIGHT, border=5)
        self.main_sizer.Add(self.tool_color, flag=wx.RIGHT, border=5)
        self.main_sizer.Add(self.tool_background, flag=wx.RIGHT, border=5)

        self.SetSizer(self.main_sizer)

    def _init_event(self):
        self.tool_font_name.Bind(wx.EVT_CHOICE, self._on_font_name_selected)
        self.tool_font_size.Bind(wx.EVT_CHOICE, self._on_font_size_selected)
        self.tool_bold.Bind(wx.EVT_BUTTON, self._on_bold_clicked)
        self.tool_color.Bind(wx.EVT_BUTTON, self._on_fg_color_clicked)
        self.tool_background.Bind(wx.EVT_BUTTON, self._on_bg_color_clicked)

    def _on_font_name_selected(self, e):
        self.editor.format_content('font', e.String)

    def _on_font_size_selected(self, e):
        self.editor.format_content('size', f'{e.String}px')

    def _on_bold_clicked(self, e):
        format_val = not self.editor.content_format['bold']
        self.editor.format_content('bold', format_val)
        self._display_bold_format(format_val)

    def _on_fg_color_clicked(self, e):
        color = wx.GetColourFromUser(self, self.editor.content_format['color'] or '#000000').GetAsString(wx.C2S_HTML_SYNTAX)
        self.editor.format_content('color', color)
        self._display_color_format(color)

    def _on_bg_color_clicked(self, e):
        color = wx.GetColourFromUser(self, self.editor.content_format['background'] or '#ffffff').GetAsString(wx.C2S_HTML_SYNTAX)
        self.editor.format_content('background', color)
        self._display_background_format(color)

    def _display_bold_format(self, format_val):
        bitmap = images.tool_bold_active.Bitmap if format_val else images.tool_bold.Bitmap
        self.tool_bold.SetBitmap(bitmap)

    def _display_font_format(self, format_val):
        index = 0 if format_val is False else self.tool_font_name.GetItems().index(format_val)
        self.tool_font_name.SetSelection(index)

    def _display_size_format(self, format_val):
        index = 0 if format_val is False else self.tool_font_size.GetItems().index(format_val[:-2])
        self.tool_font_size.SetSelection(index)

    def _display_color_format(self, color):
        self.tool_color.display_color(color or '#000000')

    def _display_background_format(self, color):
        self.tool_background.SetBackgroundColour(color or '#ffffff')
        self.tool_background.Refresh()

    def display_format(self, changed_format):
        if 'bold' in changed_format:
            self._display_bold_format(changed_format.pop('bold'))
        if 'font' in changed_format:
            self._display_font_format(changed_format.pop('font'))
        if 'size' in changed_format:
            self._display_size_format(changed_format.pop('size'))
        if 'color' in changed_format:
            self._display_color_format(changed_format.pop('color'))
        if 'background' in changed_format:
            self._display_background_format(changed_format.pop('background'))
注意:上述代码使用了一些图片资源,需要将图片添加到 assets / images 目录下并运行 encode_bitmap_util.py 文件,详细的流程请参考:
ac2190:使用wxPython打造印象笔记(7)笔记列表之HeaderPanelzhuanlan.zhihu.com
views / text_editor.py 的完整代码如下:
import wx
import os
from .webview import Webview
from .text_editor_toolbar import TextEditorToolbar


class TextEditor(wx.Panel):
    def __init__(self, parent):
        super().__init__(parent, style=wx.BORDER_NONE)
        self._init_ui()
        self.webview.set_js_bindings([('pyOnFormatChanged', self._on_format_changed)])
        self.content_format = {
            'bold': False,
            'font': False,
            'size': False,
            'color': False,
            'background': False
        }

    def _init_ui(self):
        self.main_sizer = wx.BoxSizer(wx.VERTICAL)
        self._init_title()
        self._init_toolbar()
        self._init_webview()
        self.SetSizer(self.main_sizer)
        self.SetBackgroundColour('white')

    def _init_webview(self):
        root_path = os.path.abspath(os.path.dirname(os.path.dirname(__file__)))
        editor_url = f"file://{os.path.join(root_path, 'assets', 'text_editor', 'index.html')}"

        self.webview = Webview(self)
        self.webview.load_url(editor_url)
        self.main_sizer.Add(self.webview, flag=wx.EXPAND, proportion=1)

    def _init_title(self):
        self.main_sizer.AddSpacer(20)
        self.tc_title = wx.TextCtrl(self)
        self.main_sizer.Add(self.tc_title, flag=wx.EXPAND|wx.LEFT|wx.RIGHT,border=15)
        self.main_sizer.AddSpacer(20)

    def _init_toolbar(self):
        self.toolbar = TextEditorToolbar(self)
        self.main_sizer.Add(self.toolbar, flag=wx.EXPAND|wx.LEFT, border=15)

        line = wx.StaticLine(self, size=(-1, 1))
        line.SetBackgroundColour("#e5e5e5")
        self.main_sizer.Add(line, flag=wx.EXPAND|wx.TOP, border=25)

    def format_content(self, format_command, format_arg):
        self.webview.SetFocus()
        self.webview.run_js('quill.format', format_command, format_arg, 'user')
        self.content_format[format_command] = format_arg

    def _on_format_changed(self, content_format):
        changed_format = {}
        for key, val in self.content_format.items():
            format_val = content_format.pop(key, False)
            if format_val != val:
                self.content_format[key] = format_val
                changed_format[key] = format_val
        self.toolbar.display_format(changed_format)
运行 main.py,可以发现工具栏可以随着文本格式做出相应的调整了!
代码块和语法高亮
有时候我们需要在笔记中写代码,这时候就需要用到代码块功能了。Quill编辑器中,代码块对应的格式化参数为 code-block,所以我们首先要添加这个格式,修改 views / text_editor.py 文件,在初始化的时候,对 current_format 进行如下修改:
self.content_format = {
    'bold': False,
    'font': False,
    'size': False,
    'color': False,
    'background': False,
    'code-block': False
}
接下来编辑 views / text_editor_toolbar.py 将代码块按钮添加进来,并参照 tool_bold 添加相应的事件绑定。
# 修改_init_ui
self.tool_code_block = GenericBitmapButton(self, 'tool_code_block')

# 修改_init_event
self.tool_code_block.Bind(wx.EVT_BUTTON, self._on_code_block_clicked)

# 定义_on_code_block_clicked
def _on_code_block_clicked(self, e):
    format_val = not self.editor.content_format['code-block']
    self.editor.format_content('code-block',format_val)
    self._display_code_block_format(format_val)

# 修改display_format
if 'code-block' in changed_format:
    self._display_code_block_format(changed_format.pop('code-block'))

# 定义_display_code_block_format
def _display_code_block_format(self, format_val):
    bitmap = images.tool_code_block_active.Bitmap if format_val else images.tool_code_block.Bitmap
    self.tool_code_block.SetBitmap(bitmap)
再次运行 main.py,可以使用代码块功能了!

代码块已经添加了,语法高亮由该如何实现呢?
实际上Quill编辑器内置了 syntax 模块,我们需要启用它。编辑 assets / text_editor / core.js 文件:
var quill = new Quill('#editor', {
    modules: {
        syntax: true,
        toolbar: false,
    },
    theme: 'snow'
});
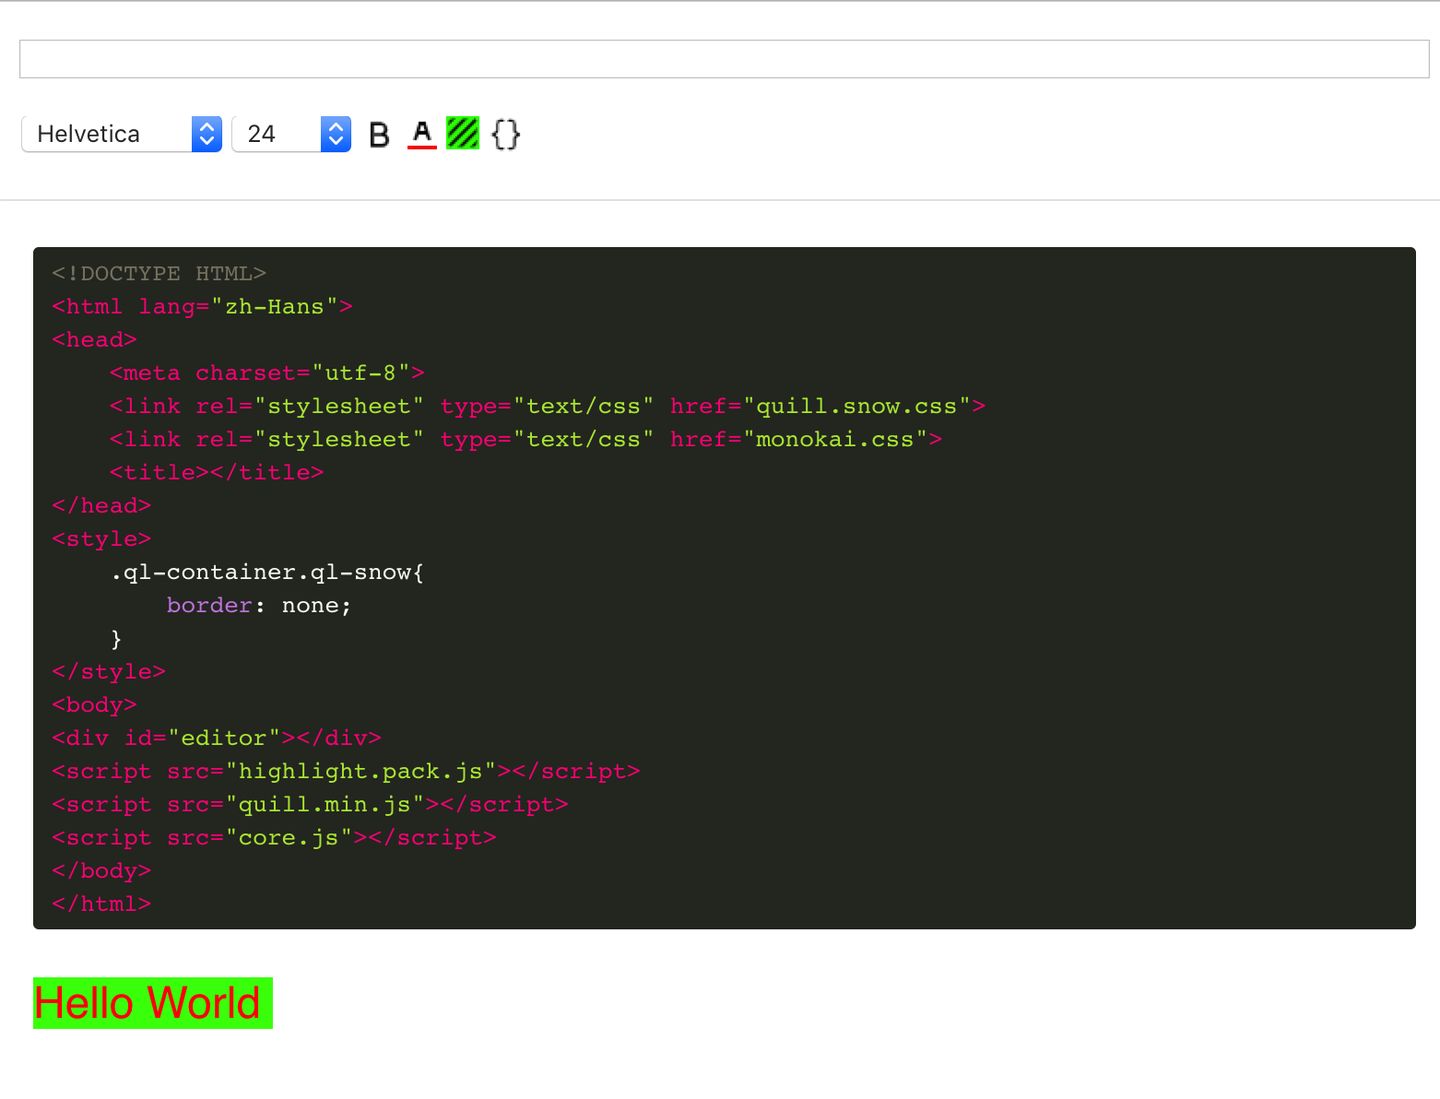
设置好了之后,还需要引入 highlight.js 这个语法高亮插件,下载地址是:https://highlightjs.org/download/,下载好了之后将压缩包解压,将其中的 highlight.pack.js 拷贝到 assets / text_editor 目录里面。
不同的语法高亮配色是通过css实现的,所以我们还需要一个css文件,我们在这里使用 monokai 配色,可以在 styles 文件夹中找到。我们将其也拷贝到 assets / text_editor 目录里面。(使用其他配色也可以,配色demo的地址为:https://highlightjs.org/static/demo/)
修改 assets / text_editor / index.html 文件,引入 highlight.pack.js 和 monokai.css。再次运行 main.py,语法高亮已经生效了!
总结
借助Quill编辑器提供的接口和相关模块,我们对编辑器工具栏进行了一些优化,现在工具栏能够实时的显示当前文本格式,并且具备了代码块高亮功能。
后面的文章中我们将连接数据库,处理真实的笔记数据,专注于笔记本的核心业务逻辑。


 555
555

 被折叠的 条评论
为什么被折叠?
被折叠的 条评论
为什么被折叠?
 到【灌水乐园】发言


