docker CPU限制参数
Option
Description
--cpus=
Specify how much of the available CPU resources a container can use. For instance, if the host machine has two CPUs and you set --cpus="1.5", the container is guaranteed at most one and a half of the CPUs. This is the equivalent of setting --cpu-period="100000" and --cpu-quota="150000". Available in Docker 1.13 and higher.
--cpu-period=
Specify the CPU CFS scheduler period, which is used alongside--cpu-quota. Defaults to 100 micro-seconds. Most users do not change this from the default. If you use Docker 1.13 or higher, use --cpusinstead.
--cpu-quota=
Impose a CPU CFS quota on the container. The number of microseconds per --cpu-period that the container is limited to before throttled. As such acting as the effective ceiling. If you use Docker 1.13 or higher, use --cpus instead.
--cpuset-cpus
Limit the specific CPUs or cores a container can use. A comma-separated list or hyphen-separated range of CPUs a container can use, if you have more than one CPU. The first CPU is numbered 0. A valid value might be 0-3 (to use the first, second, third, and fourth CPU) or 1,3 (to use the second and fourth CPU).
--cpu-shares
Set this flag to a value greater or less than the default of 1024 to increase or reduce the container’s weight, and give it access to a greater or lesser proportion of the host machine’s CPU cycles. This is only enforced when CPU cycles are constrained. When plenty of CPU cycles are available, all containers use as much CPU as they need. In that way, this is a soft limit. --cpu-shares does not prevent containers from being scheduled in swarm mode. It prioritizes container CPU resources for the available CPU cycles. It does not guarantee or reserve any specific CPU access.
① --cpus指示容器可以使用的CPU数量。改参数指定的是百分比,并不是具体的个数。比如:主机有4个逻辑CPU,限制容器—cpus=2,那么该容器最多可以使用的CPU时间是200%,但是4个CPU分配的时间可能是每个CPU各50%,而不一定是有其中2个CPU使用100%,而另2个CPU使用0%。
--cpus是docker 1.13之后才出来的参数,目的是替代--cpu-period和--cpu-quota两个参数,从而使配置更简单。
② --cpu-period表示的是设置CPU时间周期,默认值是100000,单位是us,即0.1s。
③ --cpu-quota指示容器可以使用的最大的CPU时间,配合--cpu-period值使用。如果—cpu-quota=200000,即0.2s。那就是说在0.1s周期内改容器可以使用0.2s的CPU时间,显然1个CPU是无法满足要求的,需要至少2个CPU才能满足。
④ --cpuset-cpus设置容器具体可以使用哪些个CPU。如--cpuset-cpus=”0,1,2”或者--cpuset-cpus=”0-2”,则容器会使用第0-2个CPU。
⑤ --cpu-shares,容器使用CPU的权重,默认值是1024,数值越大权重越大。该参数仅当有多个容器竞争同一个CPU时生效。对于单核CPU,如果容器A设置为--cpu-shares=2048,容器B设置为--cpus-shres=1024,仅当两个容器需要使用的CPU时间超过整个CPU周期的时候,容器A会被分配66%的CPU时间,容器B被分配33%的CPU时间,大约是2:1;对于多核CPU,仅当多个容器竞争同一个CPU的时候该值生效。
kubernetes对CPU限制
第一种:资源对象LimitRange限制POD和Container的资源

apiVersion: v1
kind: LimitRange
metadata:
name: mylimits
spec:
limits:
- max:
cpu: "2"
memory: 1Gi
min:
cpu: 200m
memory: 6Mi
type: Pod
- default:
cpu: 300m
memory: 200Mi
defaultRequest:
cpu: 200m
memory: 100Mi
max:
cpu: "2"
memory: 1Gi
min:
cpu: 100m
memory: 3Mi
type: Container

第二种:定义pod时候限制资源

spec:
containers:
- image: gcr.io/google_containers/serve_hostname
imagePullPolicy: Always
name: kubernetes-serve-hostname
resources:
limits:
cpu: "1"
memory: 512Mi
requests:
cpu: "1"
memory: 512Mi

如果两者都配置?
先匹配pod里的,再匹配namespace里。
有些时候, 我们大部分容器遵循一个规则就好, 但有一小部分有特殊需求, 这个时候, 小部分的就需要单独在容器的配置文件中指定. 这里有一点要注意的是, 单独在容器中配置的参数是不能大于指定的k8s资源限制, 否则会报错, 容器无法启动
PS: 对于一些java项目, 必须设置java虚拟机的参数, 而且这个参数不能大于容器设置的限定值, 否则容器会因为内存过大不停的重启
其中:
limits.cpu <==> --cpu-quota # docker inspect中的CpuQuota值
requests.cpu <==> --cpu-shares # docker inspect中的CpuShares值
实验对比
测试工具stress介绍
root@ustress-77b658748b-7856l:/# stress --help
`stress' imposes certain types of compute stress on your system
Usage: stress [OPTION [ARG]] ...
-?, --help show this help statement
--version show version statement
-v, --verbose be verbose
-q, --quiet be quiet
-n, --dry-run show what would have been done
-t, --timeout N timeout after N seconds
--backoff N wait factor of N microseconds before work starts
-c, --cpu N spawn N workers spinning on sqrt() #启动N个进程,每个进程最多占满一个CPU
-i, --io N spawn N workers spinning on sync()
-m, --vm N spawn N workers spinning on malloc()/free()
--vm-bytes B malloc B bytes per vm worker (default is 256MB)
--vm-stride B touch a byte every B bytes (default is 4096)
--vm-hang N sleep N secs before free (default none, 0 is inf)
--vm-keep redirty memory instead of freeing and reallocating
-d, --hdd N spawn N workers spinning on write()/unlink()
--hdd-bytes B write B bytes per hdd worker (default is 1GB)
Example: stress --cpu 8 --io 4 --vm 2 --vm-bytes 128M --timeout 10s
Note: Numbers may be suffixed with s,m,h,d,y (time) or B,K,M,G (size).
创建一个测试镜像
FROM ubuntu:latest
RUN apt-get update && \
apt-get install stress
docker build -t reg.99bill.com/99bill/ustress .
创建一个kubernetes中deployment对象
apiVersion: apps/v1
kind: Deployment
metadata:
labels:
appname: ustress
version: 0.0.6
name: ustress
namespace: default
spec:
replicas: 1
selector:
matchLabels:
appname: ustress
template:
metadata:
labels:
appname: ustress
version: 0.0.6
spec:
containers:
- image: reg.99bill.com/99bill/u-stress:latest
name: ustress
command: ['sh', '-c', 'stress -c 4']
resources:
limits:
cpu: 2 #实验修改值
memory: 1G
requests:
cpu: 1 #实验修改值
memory: 500M
terminationGracePeriodSeconds: 0
nodeName: 192.168.112.10
nodeSelector:
注:
① command: ['sh', '-c', 'stress -c 4'] 表示开启4个占用CPU的stress进程
② limits.cpu: 2 对应docker中"CpuQuota": 200000, "CpuPeriod": 100000默认值
③ requests.cpu:1对应docker中"CpuShares": 1024,
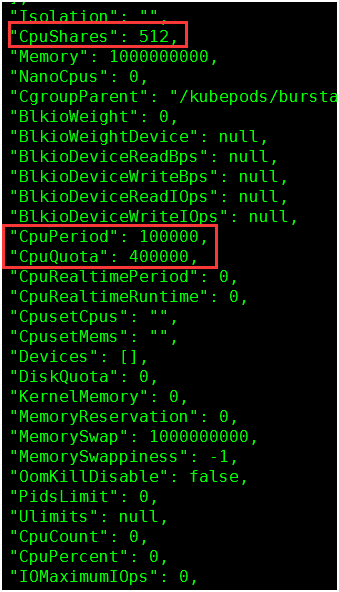
测试一:
limits.cpu: 4
requests.cpu: 0.5
结果验证:
1. 查看docker容器参数值:
docker inspect e22896246184
512 = 0.5 * 1024
400000 = 4 * 100000
2. docker stats查看容器CPU使用率
由于设置了CPUQuota是CpuPeriod的4倍,所以容器可以使用400% CPU

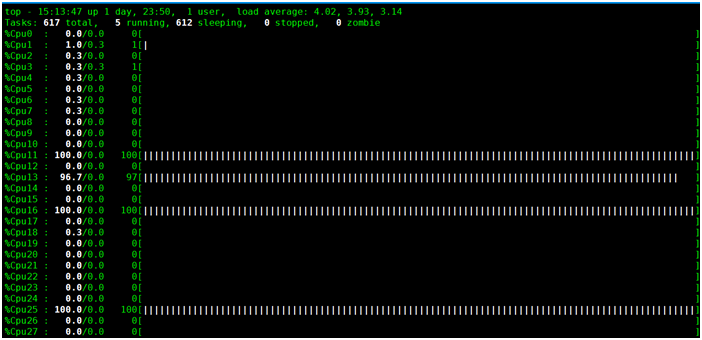
3. 使用top查看进程与CPU
使用top命令查看4个stress进程,每个占用100% CPU,总400%,可以看到有4个CPU被跑满。

实验二:
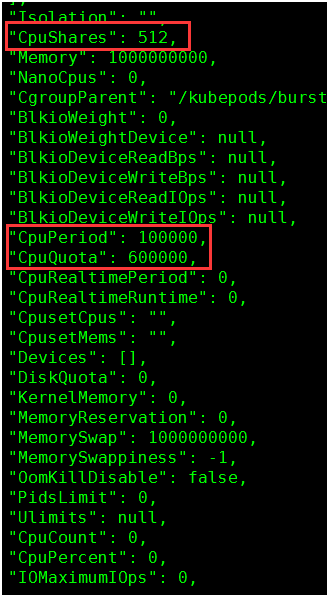
limits.cpu: 6
requests.cpu: 0.5
1. 查看docker容器参数值:
512 = 0.5 * 1024
600000 = 6 * 100000
2. docker stats查看容器CPU使用率
容器可以使用600%的CPU,现在只用400%

3. 使用top查看进程与CPU


实验三:
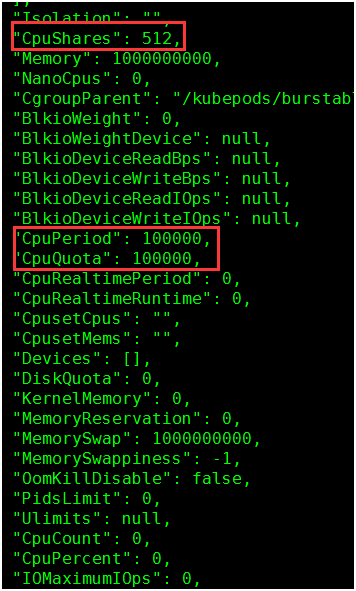
limits.cpu: 1
requests.cpu: 0.5
1. 查看docker容器参数值:
docker inspect e22896246184
512 = 0.5 * 1024
100000 = 1 * 100000
2. docker stats查看容器CPU使用率
使用时间等于CpuPeriod,占用100%

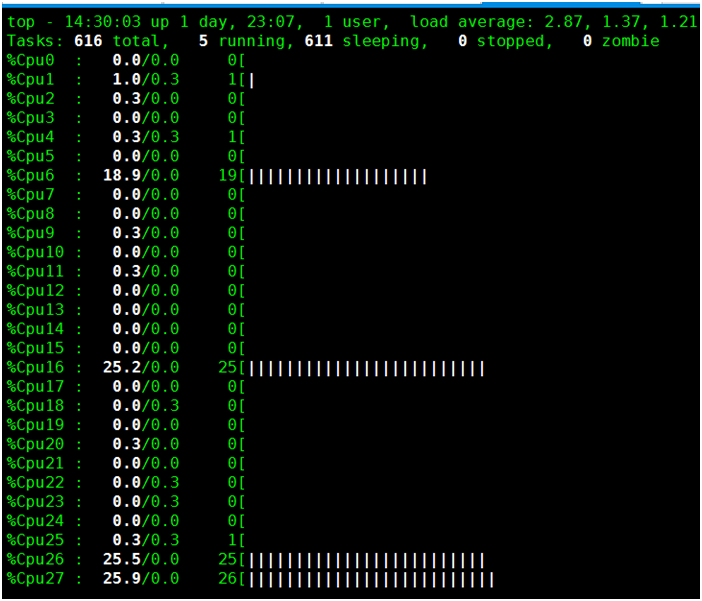
3. 使用top查看进程与CPU

从下图可以看到,有4个CPU分别使用25%,加起来是100%。所以limits.cpu:1并不一定表示容器只会占用1个CPU,而表示的是容器最多可以使用的CPU时间的比例。
实验四:
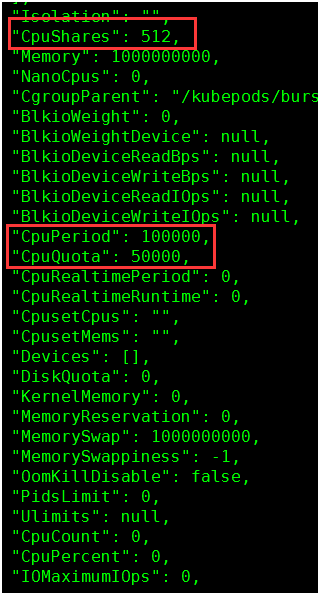
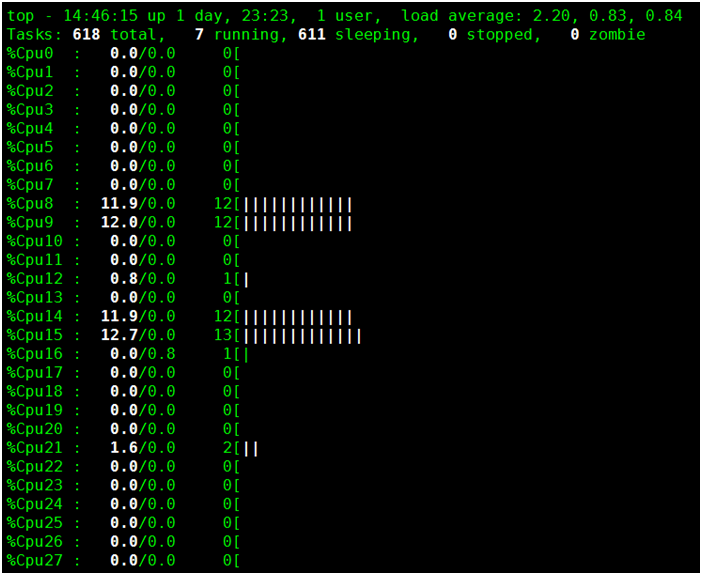
limits.cpu: 0.5
requests.cpu: 0.5
1. 查看docker容器参数值
2. docker stats查看容器CPU使用率

3. 使用top查看进程与CPU



 1987
1987


 被折叠的 条评论
为什么被折叠?


