


Qt 5.14.2 是跨平台应用开发框架 Qt 的最新版本,除了采用基于 C++11 的经典 Qt Widgets 进行桌面应用程序开发以外,还支持通过 Qt Quick 快速开发适用于移动端设备的用户界面,因为 Qt 5 底层图形渲染引擎基于 GPU 硬件加速,所以其能够保持与原生 C++ 近乎等同的运行效率。笔者计划通过两篇文章分别对这 2 种技术进行介绍,但是无论如何,在传统跨平台桌面应用开发领域,Qt Widgets 依然是 Qt5 最为基础与核心的内容。

虽然 Qt 6 发布在即,但是官方声明将会依然保持 API 的兼容与稳定性,因此本文依然基于当前最新的 Qt5 稳定版本撰写。全文将会分别对 Qt Widgets 当中使用较为频繁的窗口部件、布局管理、应用主窗口、事件系统、对象模型、风格与样式、国际化等部分内容进行深入介绍,同时展示完善的示例代码以及程序运行效果,并结合《QtQuick 篇》一文讲解混合编程相关的技术。
阅读全文完整带书签的版本,可以进入点击下面链接查阅笔者 GitHub 博客:
Qt 5 桌面应用程序开发指南 - QtWidgets 篇uinika.gitee.io欢迎大家关注公众号【IT圈】:Electronics, Embedded & Web
获取更多电子技术、嵌入式系统、Web开发相关的原创性文章:

Hello Qt
Qt Creator 是一个跨平台的的 Qt 集成开发环境,囊括了 C++ 代码编辑器、项目管理工具、上下文相关的帮助系统、图形化调试器、代码管理与浏览等一系列日常开发工具。本文使用的 Qt Creator 为最新的4.11.0版本。其主要由菜单栏、模式选择器、构建套件选择器、定位器、输出窗格、工作区等部分组成,具体界面布局如下图所示:
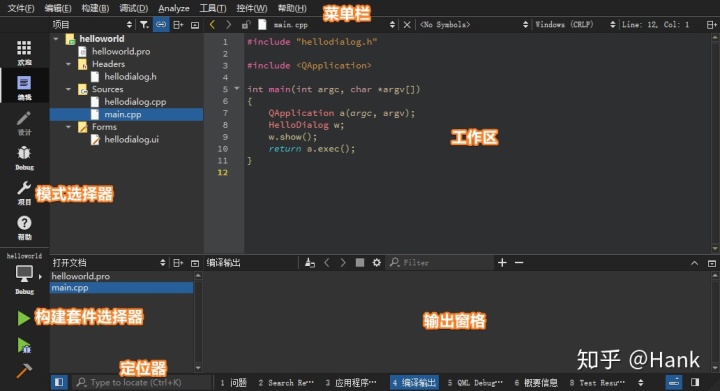
注意:可以通过【Ctrl + 鼠标滚轮】对工作区字体进行缩放,如果需要还原字体的默认设置,则直接接下快捷键【Ctrl + 0】即可。
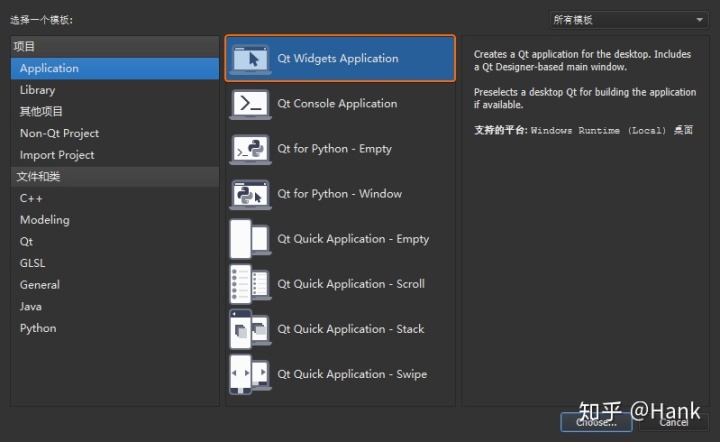
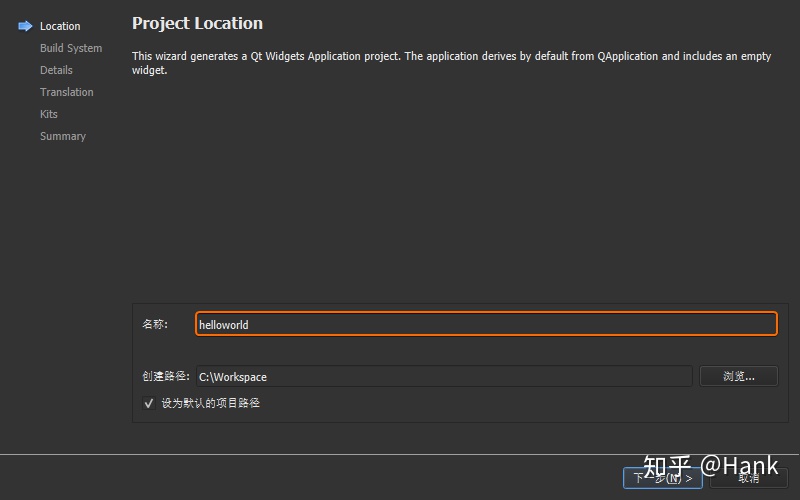
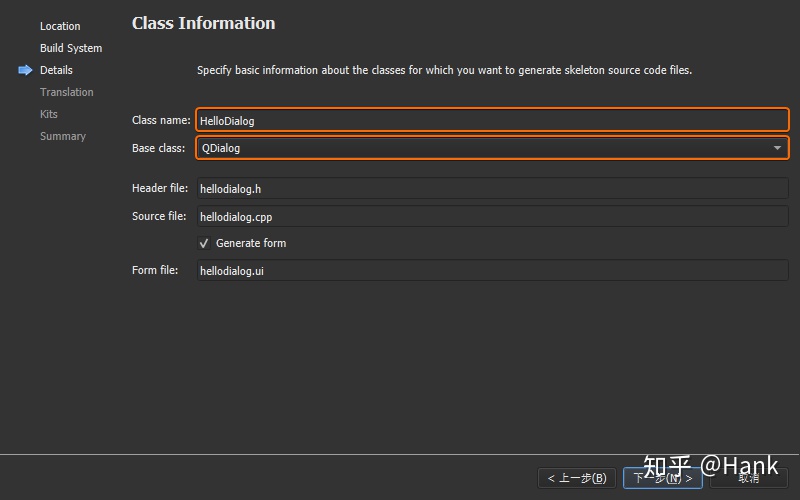
新建 Widgets 工程
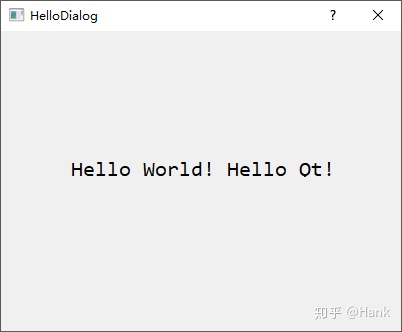
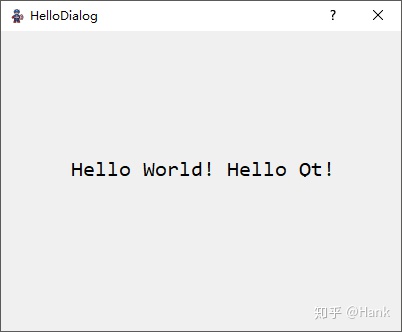
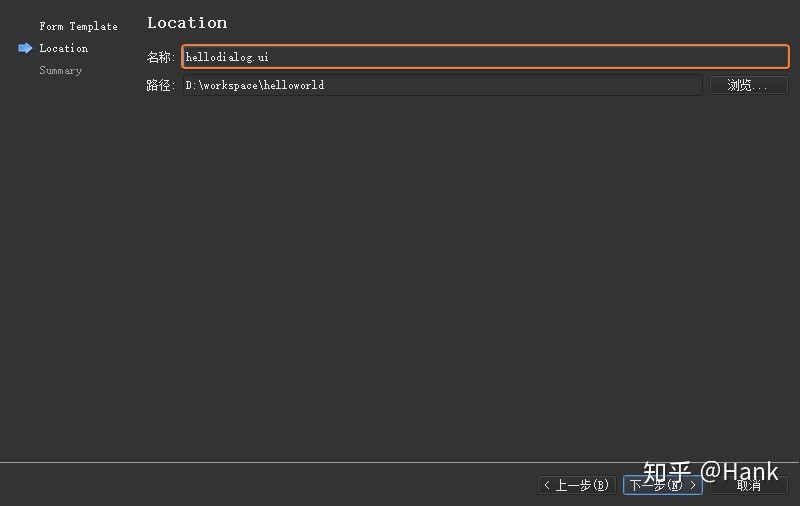
本小节将建立一个用于显示一个Hello World! Hello Qt!字符串的helloworld工程,从而体现一个 Qt Widgets 项目从创建、运行到发布的完整过程;然后从main.cpp主函数入手,到.ui图形界面文件,再到自定义的 C++ 类,逐步对示例当中的代码进行解析。
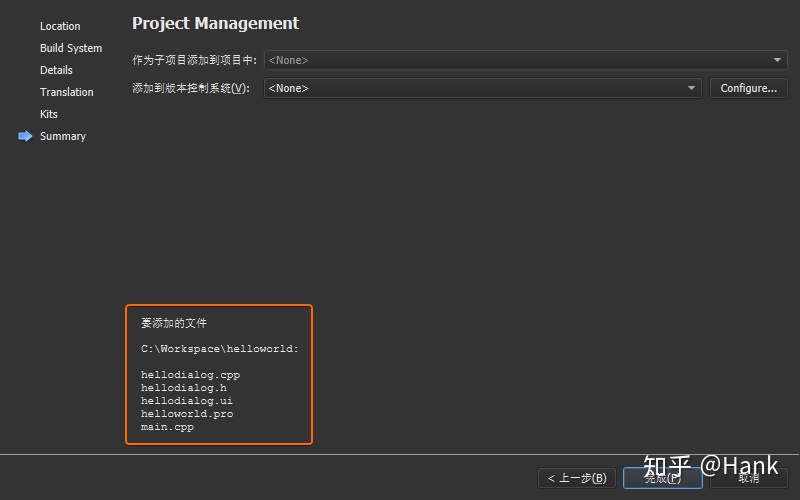
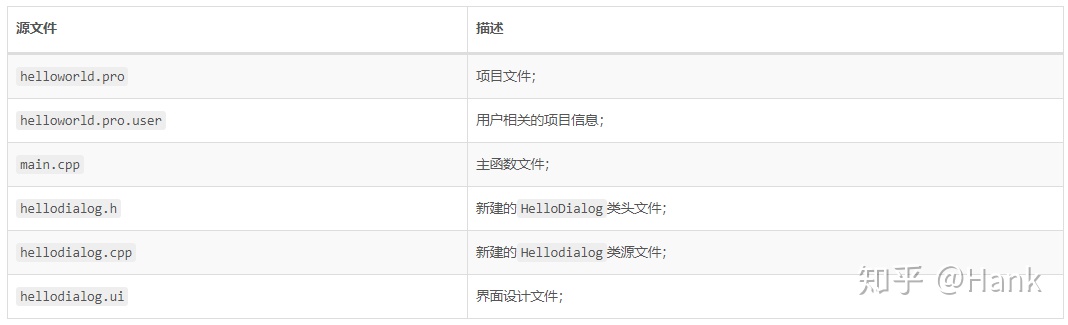
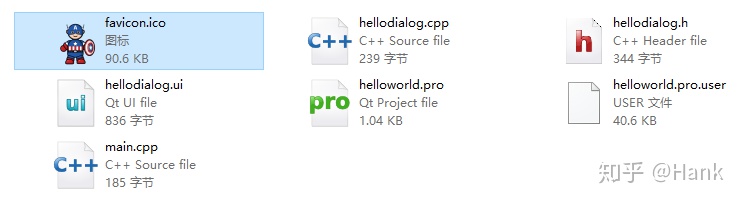
完成上述的工程创建步骤之后,打开工程所在的目录,可以看到生成了如下 6 个文件:
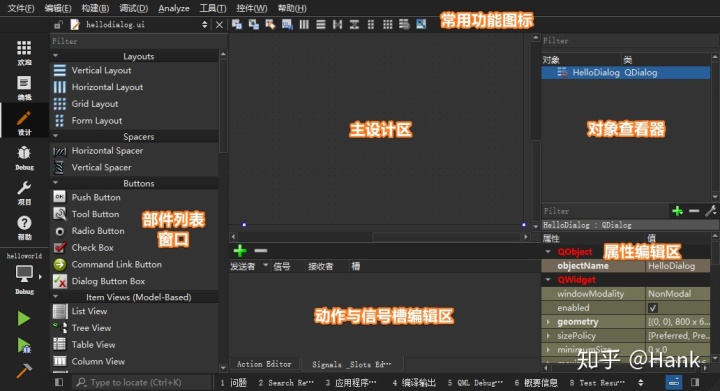
Qt Creator 当中双击上面列表中的hellodialog.ui文件即可进入【设计】模式,其功能区域分布如下图所示:
接下来,首先从【部件列表窗口】找到Label标签部件,然后按住鼠标左键将其拖动至【主设计区】,双击进入编辑状态并输入Hello World! Hello Qt!字符串,同时将外层HelloDialog对话框的宽高度分别设置为400 * 300,字体设置为大小16的Consolas,此时可以按下【Alt + Ctrl + R】快捷键可以对当前界面进行预览。
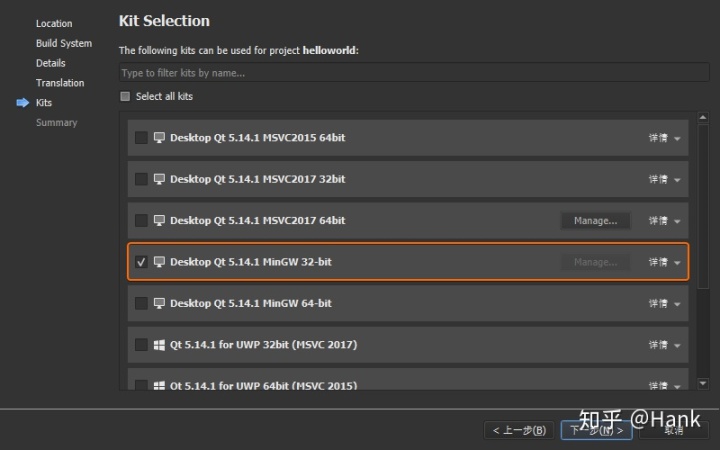
点击 Qt Creator 左下角的【构建套件选择器】,依次选择 Desktop Qt 5.14.2 MinGW 32-bit ➥ Release,然后按下【Ctrl+R】快捷键或者鼠标点击左下角运行按钮编译并运行当前程序。此时,会在工程所在目录生成一个名为build-helloworld-Desktop_Qt_5_14_2_MinGW_32_bit-Release的目录,其中release子目录下的helloworld.exe即是编译后输出的可执行程序,此时在操作系统当中鼠标双击运行该.exe文件,则会提示以下错误信息:
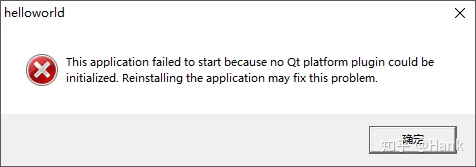
该问题是由于helloworld.exe程序无法找到 Qt 库、MinGW 32、其它第三方库 等.dll动态链接库依赖所导致,首先需要将 MinGW 32bit 所对应的D:softwareTechQt5.14.2mingw73_32bin和D:softwareTechQtToolsmingw730_32bin添加至系统环境变量PATH,然后将helloworld.exe复制到新建的D:WorkspaceQt-build目录下,然后进入命令行执行windeployqt命令:
λ windeployqt WorkspaceQt-build

D:WorkspaceQt-buildhelloworld.exe 32 bit, release executable
Adding Qt5Svg for qsvgicon.dll
Skipping plugin qtvirtualkeyboardplugin.dll due to disabled dependencies (Qt5Qml Qt5Quick).
Skipping plugin qtvirtualkeyboard_hangul.dll due to disabled dependencies (Qt5Qml Qt5Quick).
Skipping plugin qtvirtualkeyboard_openwnn.dll due to disabled dependencies (Qt5Qml Qt5Quick).
Skipping plugin qtvirtualkeyboard_pinyin.dll due to disabled dependencies (Qt5Qml Qt5Quick).
Skipping plugin qtvirtualkeyboard_tcime.dll due to disabled dependencies (Qt5Qml Qt5Quick).
Skipping plugin qtvirtualkeyboard_thai.dll due to disabled dependencies (Qt5Qml Qt5Quick).
Direct dependencies: Qt5Core Qt5Gui Qt5Widgets
All dependencies   : Qt5Core Qt5Gui Qt5Widgets
To be deployed     : Qt5Core Qt5Gui Qt5Svg Qt5Widgets
Updating Qt5Core.dll.
Updating Qt5Gui.dll.
Updating Qt5Svg.dll.
Updating Qt5Widgets.dll.
Updating libGLESv2.dll.
Updating libEGL.dll.
Updating D3Dcompiler_47.dll.
Updating opengl32sw.dll.
Updating libgcc_s_dw2-1.dll.
Updating libstdc++-6.dll.
Updating libwinpthread-1.dll.
Creating directory D:/Workspace/Qt-build/iconengines.
Updating qsvgicon.dll.
Creating directory D:/Workspace/Qt-build/imageformats.
Updating qgif.dll.
Updating qicns.dll.
Updating qico.dll.
Updating qjpeg.dll.
Updating qsvg.dll.
Updating qtga.dll.
Updating qtiff.dll.
Updating qwbmp.dll.
Updating qwebp.dll.
Creating directory D:/Workspace/Qt-build/platforms.
Updating qwindows.dll.
Creating directory D:/Workspace/Qt-build/styles.
Updating qwindowsvistastyle.dll.
Creating D:WorkspaceQt-buildtranslations...
Creating qt_ar.qm...
... ... ... ... ...
Creating qt_zh_TW.qm...
windeployqt 是一款用于 Windows 操作系统的 Qt 自动部署工具,可以自动补充动态链接库依赖,命令执行完成以后再次双击helloworld.exe即可正确的运行程序。
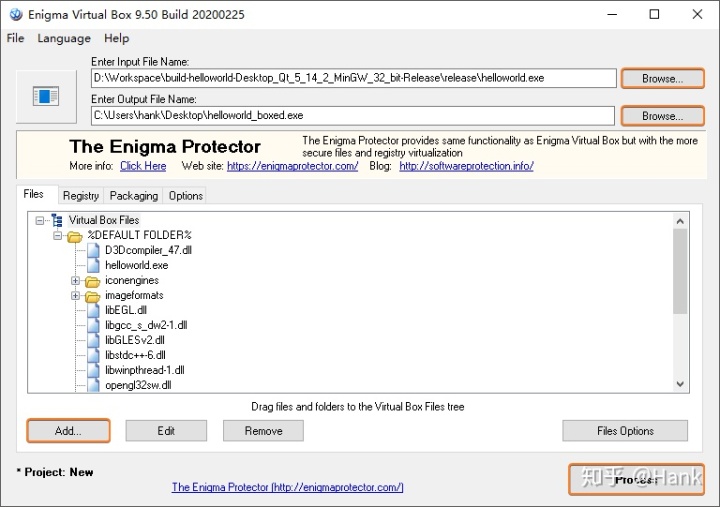
针对某些需要进行源码静态编译场景,出于方便的角度,可以考虑使用Enigma Virtual Box,该软件是一款文件与注册表虚拟化系统,允许将 Windows 注册表与多种类型的文件(.dll、.ocx、.avi、.mp3、.txt、.doc等)嵌入至一个独立的.exe可执行文件当中,并且在运行时不会产生任何的临时文件,从而实现类似于静态编译的效果:
程序发布时如果希望.exe拥有一个漂亮的图标,首先,需要添加一个.icon格式的位图文件到项目目录下面:
然后,打开helloworld.pro文件添加如下配置项:
RC_ICONS = favicon.ico;重新编译运行程序,可以发现应用程序的桌面图标以及启动后的左上角图标都被更新为刚才设置的图标:
如果需要自行将.png制作为.ico图片,则可以选用(ImageMagick)[https://imagemagick.org/index.php]进行创建,安装以后执行如下命令:
λ magick.exe convert icon-16.png icon-32.png icon-256.png icon.icomain.cpp 版实现
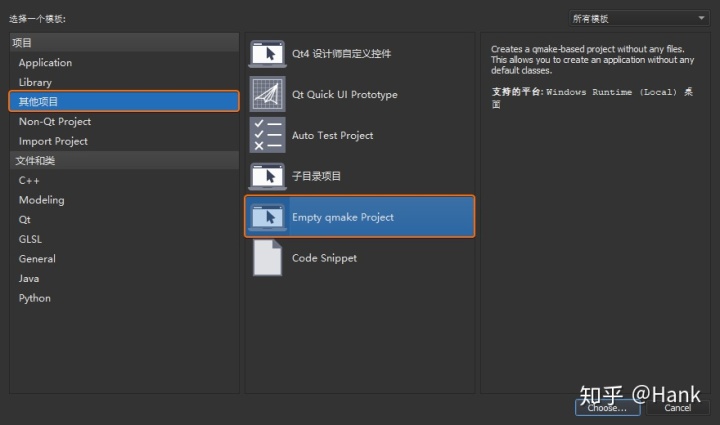
打开 Qt Creator 新建一个 Empty gmake Project 工程,并将其命名为helloworld。
完成之后,双击工程上的helloworld.pro工程配置文件,由于本示例当中使用的类都包含在widgets模块,所以需要添加下面的代码对其进行注册:
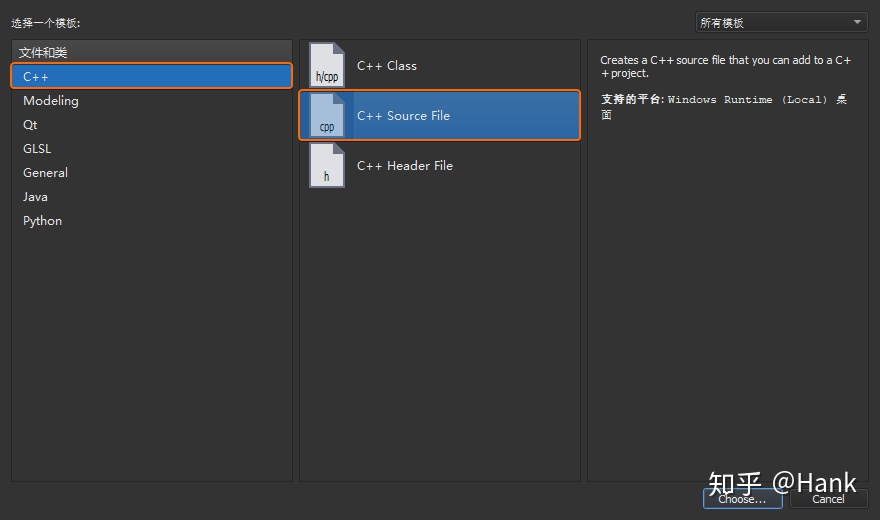
QT += widgets鼠标右键选择工程列表上的工程名称helloworld,在弹出的右键菜单上选择【Add New...】,然后选择【C++ Source File】新建一个main.cpp源文件:
向main.cpp里添加下面的源代码,然后点击 Qt Creator 左下角的【运行】按钮就可以观察到之前程序所展示的效果:
#include <QApplication>
#include <QDialog>
#include <QLabel>
#include <QFont>

int main(int argc, char * argv[]){
  QApplication app(argc, argv);

  /* 设置全局字体以及尺寸 */
  QFont font;
  font.setFamily("Consolas");
  font.setPixelSize(16);
  app.setFont(font);

  /* 设置对话框尺寸 */
  QDialog dialog;
  dialog.resize(400, 300);

  /* 设置标签文本与位置 */
  QLabel label(&dialog);
  label.move(100, 120);
  label.setText("Hello World! Hello Qt!");

  dialog.show();
  return app.exec();
}
事实上,我们也可以抛开 Qt Creator 提供的 IDE 环境,手动生成工程并编译代码。首先新建一个helloworld工程目录以及对应的main.cpp文件,然后进入helloworld执行qmake -project命令生成.pro工程配置文件:
C:Workspacehelloworld
λ qmake -project向helloworld.pro文件添加QT += widgets配置项,然后输入qmake命令生成编译所需的Makefile文件,以及相应的debug和release目录:
C:Workspacehelloworld
λ qmake

Info: creating stash file C:Workspacehelloworld.qmake.stash执行mingw32-make命令基于Makefile编译程序并将helloworld.exe程序输出至release目录:
C:Workspacehelloworld
λ mingw32-make

C:/Software/Tech/Qt/5.14.2/mingw73_32/bin/qmake.exe -o Makefile helloworld.pro
mingw32-make -f Makefile.Release
mingw32-make[1]: Entering directory 'C:/Workspace/helloworld'
g++ -c -fno-keep-inline-dllexport -O2 -Wall -Wextra -Wextra -fexceptions -mthreads -DUNICODE -D_UNICODE -DWIN32 -DMINGW_HAS_SECURE_API=1 -DQT_NO_DEBUG -DQT_WIDGETS_LIB -DQT_GUI_LIB -DQT_CORE_LIB -DQT_NEEDS_QMAIN -I. -I. -I../../Software/Tech/Qt/5.14.2/mingw73_32/include -I../../Software/Tech/Qt/5.14.2/mingw73_32/include/QtWidgets -I../../Software/Tech/Qt/5.14.2/mingw73_32/include/QtGui -I../../Software/Tech/Qt/5.14.2/mingw73_32/include/QtANGLE -I../../Software/Tech/Qt/5.14.2/mingw73_32/include/QtCore -Irelease -I../../Software/Tech/Qt/5.14.2/mingw73_32/mkspecs/win32-g++  -o release/main.o main.cpp
g++ -Wl,-s -Wl,-subsystem,windows -mthreads -o release/helloworld.exe release/main.o  C:/Software/Tech/Qt/5.14.2/mingw73_32/lib/libQt5Widgets.a C:/Software/Tech/Qt/5.14.2/mingw73_32/lib/libQt5Gui.a C:/Software/Tech/Qt/5.14.2/mingw73_32/lib/libQt5Core.a  -lmingw32 C:/Software/Tech/Qt/5.14.2/mingw73_32/lib/libqtmain.a -LC:/openssl/lib -LC:/Utils/my_sql/mysql-5.7.25-win32/lib -LC:/Utils/postgresql/pgsql/lib -lshell32
mingw32-make[1]: Leaving directory 'C:/Workspace/helloworld'
hellodialog.ui 版实现
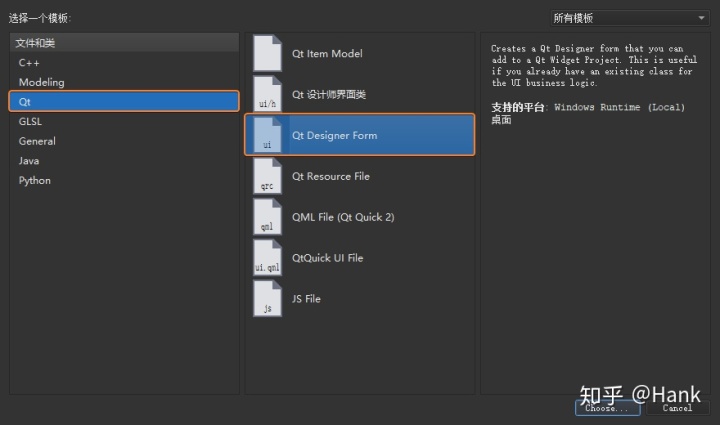
延用上一步的工程,根据如下步骤新建一个hellodialog.ui文件,并自动进入【设计】模式:

首先,将外层QDialog对话框的objectName属性名称修改为HelloDialog。然后,添加一个Label部件然后设置字体为14像素的Consolas,完成后保存并按下快捷键【Ctrl + 2】切换回【编辑】界面,此时可以看到.ui本质是一个 XML 文件:
<?xml version="1.0" encoding="UTF-8"?>
<ui version="4.0">
 <class>Dialog</class>
 <widget class="QDialog" name="Dialog">
  <property name="geometry">
   <rect>
    <x>0</x>
    <y>0</y>
    <width>400</width>
    <height>300</height>
   </rect>
  </property>
  <property name="windowTitle">
   <string>Dialog</string>
  </property>
  <widget class="QLabel" name="label">
   <property name="geometry">
    <rect>
     <x>90</x>
     <y>130</y>
     <width>221</width>
     <height>21</height>
    </rect>
   </property>
   <property name="font">
    <font>
     <family>Consolas</family>
     <pointsize>14</pointsize>
    </font>
   </property>
   <property name="text">
    <string>Hello World! Hello Qt!</string>
   </property>
  </widget>
 </widget>
 <resources/>
 <connections/>
</ui>
按下快捷键【Ctrl + Shift + B】或者鼠标点击 Qt Creator 左下角的【构建项目】按钮,会将hellodialog.ui解析为build-helloworld-Desktop_Qt_5_14_2_MinGW_32_bit-Release目录下的一个名为ui_hellodialog.h头文件:
#ifndef UI_HELLODIALOG_H
#define UI_HELLODIALOG_H

#include <QtCore/QVariant>
#include <QtWidgets/QApplication>
#include <QtWidgets/QDialog>
#include <QtWidgets/QLabel>

QT_BEGIN_NAMESPACE

class Ui_HelloDialog {
    public:
        QLabel *label;

    /* 设置界面 */
    void setupUi(QDialog *HelloDialog){
        /* 设置对话框部件名称与大小尺寸*/
        if (HelloDialog->objectName().isEmpty())
            HelloDialog->setObjectName(QString::fromUtf8("HelloDialog"));
        HelloDialog->resize(400, 300);

        /* 设置标签部件的名称、大小、位置 */
        label = new QLabel(HelloDialog);
        label->setObjectName(QString::fromUtf8("label"));
        label->setGeometry(QRect(90, 130, 221, 21));

        /* 设置字体格式与大小 */
        QFont font;
        font.setFamily(QString::fromUtf8("Consolas"));
        font.setPointSize(14);
        label->setFont(font);

        retranslateUi(HelloDialog);                     // 调用 retranslateUi(QDialog *Dialog)
        QMetaObject::connectSlotsByName(HelloDialog);   // 调用 QMetaObject 类的静态函数 connectSlotsByName(Dialog),使得部件可以基于对象名进行信号与槽的关联
    }

    /* 对窗口字符串进行编码转换 */
    void retranslateUi(QDialog *HelloDialog) {
        HelloDialog->setWindowTitle(QCoreApplication::translate("HelloDialog", "Dialog", nullptr));
        label->setText(QCoreApplication::translate("HelloDialog", "Hello World! Hello Qt!", nullptr));
    }
};

namespace Ui {
class HelloDialog: public Ui_HelloDialog {};
}

QT_END_NAMESPACE

#endif
从上面代码可以看出,Qt 在【设计】模式下实现的.ui文件,在编译过程当中会最终转换为.h头文件。接下来修改main.cpp的源代码,导入这个转换之后的.h头文件:
#include "ui_hellodialog.h"

int main(int argc, char *argv[]){
    QApplication app(argc, argv);

    QDialog dialog;
    Ui::HelloDialog ui;   // 采用 ui_hellodialog.h 中定义的 Ui_HelloDialog 类声明 ui 属性
    ui.setupUi(&dialog);  // 调用 Ui_HelloDialog 中定义的 setupUi() 函数
    dialog.show();

    return app.exec();
}
同样的,我们也可以直接借助命令行工具完成hellodialog.ui和main.cpp文件的编译,保留这两个文件并且清除其它的工程文件,然后打开命令行工具,使用uic命令将hellodialog.ui解析为ui_hellodialog.h头文件:
D:Workspacehelloworld
λ ls
hellodialog.ui  main.cpp

D:Workspacehelloworld
λ uic -o ui_hellodialog.h hellodialog.ui

D:Workspacehelloworld
λ ls
hellodialog.ui  main.cpp  ui_hellodialog.h
ui_hellodialog.h头文件解析完成之后,同样通过执行qmake -project命令生成helloworld.pro工程配置文件:
D:Workspacehelloworld
λ qmake -project

D:Workspacehelloworld
λ ls
hellodialog.ui helloworld.pro main.cpp ui_hellodialog.h向helloworld.pro文件添加QT += widgets配置项,然后输入qmake命令生成编译所需的 Makefile:
D:Workspacehelloworld
λ qmake
Info: creating stash file D:Workspacehelloworld.qmake.stash

D:Workspacehelloworld
λ ls
debug/          helloworld.pro  Makefile        Makefile.Release  ui_hellodialog.h
hellodialog.ui main.cpp Makefile.Debug release/依然运行mingw32-make命令基于 Makefile 编译程序并将helloworld.exe输出到release目录:
D:Workspacehelloworld
λ mingw32-make
mingw32-make -f Makefile.Release
mingw32-make[1]: Entering directory 'D:/Workspace/helloworld'
g++ -c -fno-keep-inline-dllexport -O2 -Wall -Wextra -Wextra -fexceptions -mthreads -DUNICODE -D_UNICODE -DWIN32 -DMINGW_HAS_SECURE_API=1 -DQT_NO_DEBUG -DQT_WIDGETS_LIB -DQT_GUI_LIB -DQT_CORE_LIB -DQT_NEEDS_QMAIN -I. -I. -I../../software/Tech/Qt/5.14.2/mingw73_32/include -I../../software/Tech/Qt/5.14.2/mingw73_32/include/QtWidgets -I../../software/Tech/Qt/5.14.2/mingw73_32/include/QtGui -I../../software/Tech/Qt/5.14.2/mingw73_32/include/QtANGLE -I../../software/Tech/Qt/5.14.2/mingw73_32/include/QtCore -Irelease -I. -I../../software/Tech/Qt/5.14.2/mingw73_32/mkspecs/win32-g++  -o release/main.o main.cpp
g++ -Wl,-s -Wl,-subsystem,windows -mthreads -o release/helloworld.exe release/main.o  D:/software/Tech/Qt/5.14.2/mingw73_32/lib/libQt5Widgets.a D:/software/Tech/Qt/5.14.2/mingw73_32/lib/libQt5Gui.a D:/software/Tech/Qt/5.14.2/mingw73_32/lib/libQt5Core.a  -lmingw32 D:/software/Tech/Qt/5.14.2/mingw73_32/lib/libqtmain.a -LC:/openssl/lib -LC:/Utils/my_sql/mysql-5.7.25-win32/lib -LC:/Utils/postgresql/pgsql/lib -lshell32
mingw32-make[1]: Leaving directory 'D:/Workspace/helloworld'

D:Workspacehelloworld
λ ls release
helloworld.exe*  main.o
hellodialog.cpp 版实现
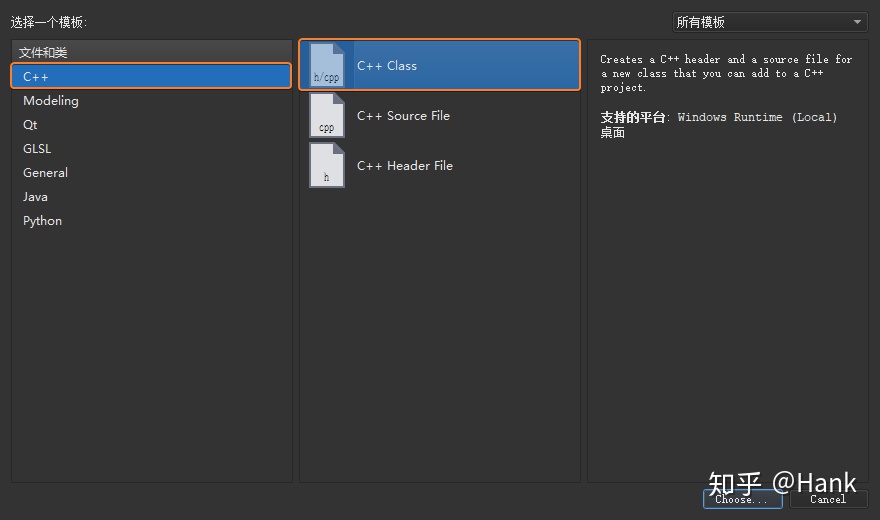
首先,打开 Qt Creator 新建一个 Empty gmake Project 工程,依然将其命名为helloworld。完成以后打开自动生成的helloworld.pro添加QT += widgets并保存。然后,在工程中新建一个 C++ Class 文件:
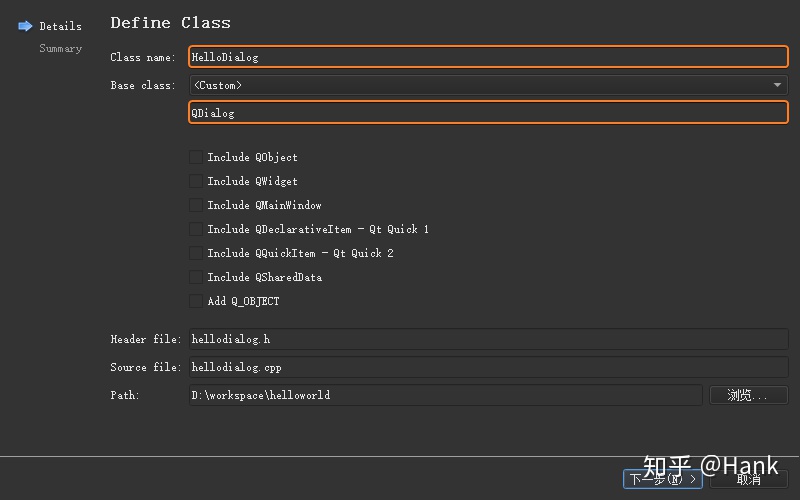
将该类的名称定义为HelloDialog,基类指定为QDialog,然后由 Qt Creator 自动生成相应的hellodialog.h和hellodialog.cpp源文件:
然后再添加一个main.cpp源文件,并且加入如下代码:
#include <QApplication>
#include "hellodialog.h"

int main(int argc, char *argv[]){
    QApplication app(argc, argv);
    HelloDialog dialog;
    dialog.show();
    return app.exec();
}
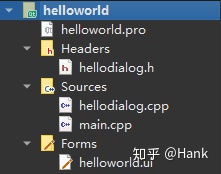
接着将上一小节建立的hellodialog.ui文件复制到当前目录,然后使用 Qt Creator 上的【添加现有文件...】将该.ui添加至当前工程,最终形成如下项目结构:
接下来,向hellodialog.h添加如下代码:
#ifndef HELLODIALOG_H
#define HELLODIALOG_H

#include <QDialog>

/* 定义命名空间 Ui,避免与与本文件当中声明的 HelloDialog 同名 */
namespace Ui {
  class HelloDialog;   // 前置声明 HelloDialog 类(由 ui_hellodialog.h 定义)以加快编译速度
}

/* 定义新的 HelloDialog 类,并继承 QDialog 类 */
class HelloDialog : public QDialog {
    Q_OBJECT           // 定义 Q_OBJECT 宏,以扩展 C++ 类的功能;例如:使用信号槽时,必须在类定义的开始位置声明该宏;

    public:
        explicit HelloDialog(QWidget *parent = 0);  // 显式构造函数,其参数用于指定父窗口,当前设置为 0 表示没有父窗口
        ~HelloDialog();                             // 析构函数

    private:
        Ui::HelloDialog *ui; // 定义 HelloDialog 类对象的指针
};

#endif
然后,继续向hellodialog.cpp添加下面的代码:
#include "hellodialog.h"
#include "ui_hellodialog.h"     // 包含 .ui 头文件

HelloDialog::HelloDialog(QWidget * parent) : QDialog(parent){
    ui = new Ui::HelloDialog;   // 创建 Ui::HelloDialog 对象
    ui->setupUi(this);          // 为当前类所代表的对话框创建图形界面
}

HelloDialog::~HelloDialog(){
    delete ui;
}
最后编译上述工程代码,可以观察到与前面小节相同的示例效果。
设计师界面类版实现
依然打开 Qt Creator 新建一个 Empty gmake Project 工程,同样将其命名为helloworld,然后添加QT += widgets保存,接下来在工程中新建一个 Qt 设计师界面类:
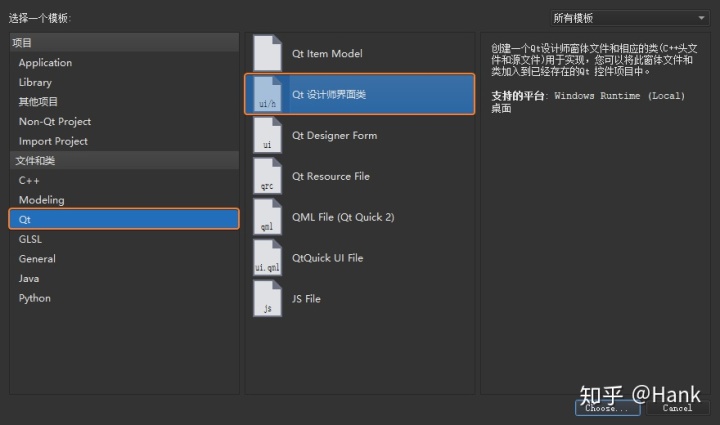
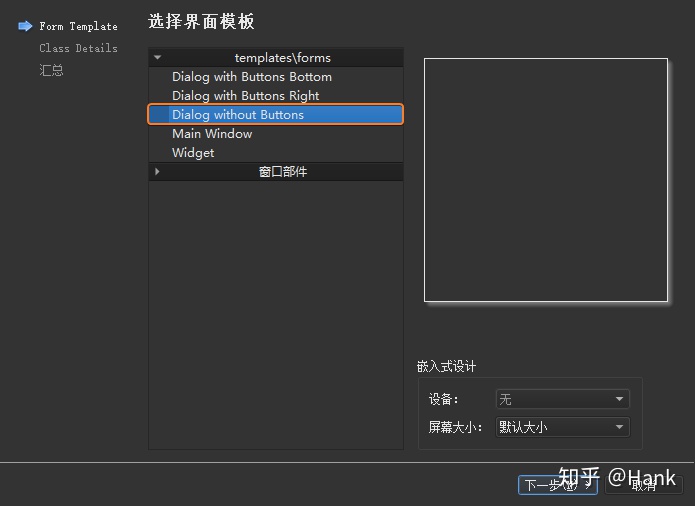
将界面模板选择为 Dialog without Buttons:
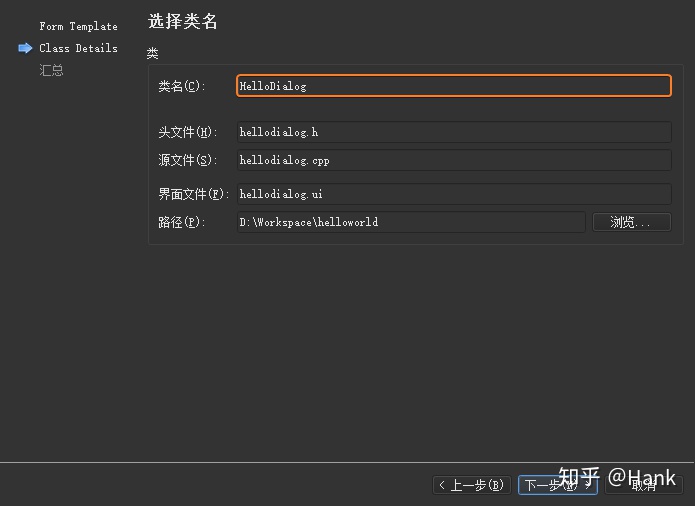
设置类名为HelloDialog,然后 Qt Creator 将会同时自动生成helloworld.ui、helloworld.h、helloworld.cpp源代码文件:
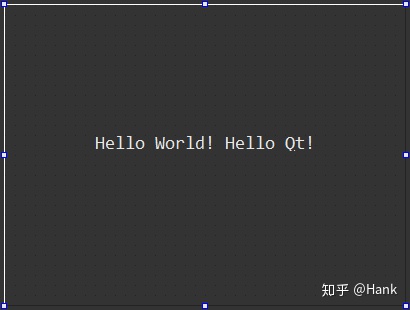
按下快捷键【Ctrl + 3】进入【设计】模式,鼠标拖拽一个Label部件并且修改其文本为Hello World! Hello Qt!与字体为16像素的Consolas。
接着往工程当中添加一个main.cpp源文件,并且加入如下代码:
#include <QApplication>
#include "hellodialog.h"

int main(int argc, char *argv[]){
    QApplication app(argc, argv);
    HelloDialog dialog;
    dialog.show();
    return app.exec();
}
本小节的内容就是前一小节操作的简化或者说自动化版本,因为 Qt 设计师界面类 本质上就是之前小节中 C++ 类与 .ui 文件的结合,Qt Creator 只是自动化的完成了源文件创建的步骤。
Qt Creator 定位器
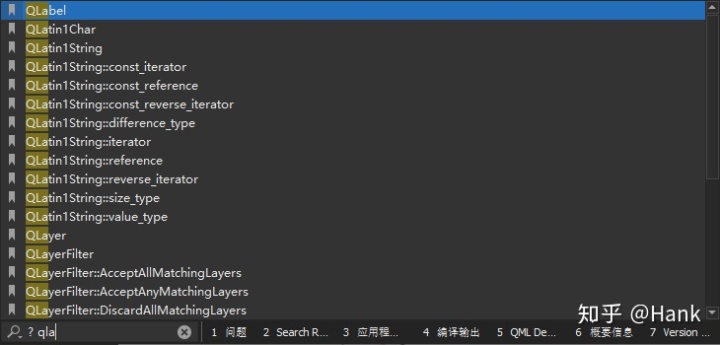
Qt Creator 与其它开源编辑器最大的不同之处在于,其在主界面左下方提供了一个定位器功能,可以方便的打开文件、定位到指定行、打开特定的帮助文档、查找项目中的函数等。定位器通过多种过滤器来实现不同的功能,按下快捷键【Ctrl + K】就会显示这些过滤器的前缀及其功能,使用的格式为前缀符号 待定位内容。
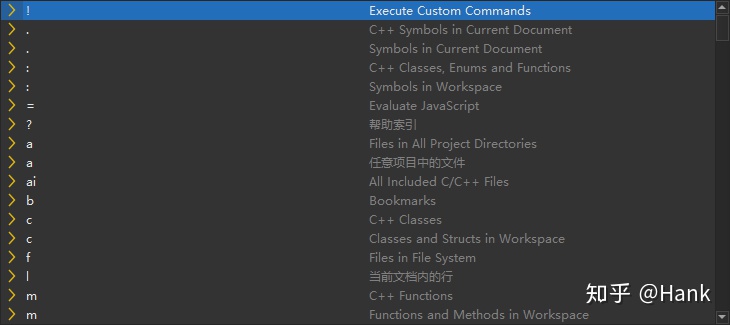
例如:在 Qt Creator 主界面按下【Ctrl + K】 进入定位器并输入l 8,即可跳转到编辑模式当前打开源文件的第 8 行。再次按下【Ctrl + K】 并且输入? qla,回车后即可打开QLabel的帮助文档。
窗口部件
Qt 小部件(Qt Widgets)是用于放置其它部件的容器,通常由 1 个框架和 1 个标题栏组成。常用的窗口类型有QWidget(基础窗口部件,所有窗口部件的基类)、QMainWindow(带有菜单栏和工具栏的主窗口类)、Dialog(各种对话框的基类)三种。
QWidget 基础窗口部件
QWidget类是所有用户界面对象的基类,它分别继承自QObject类(所有支持 Qt 对象模型的对象的基类)和QPaintDevice类(所有可以绘制的对象的基类),因此提供有界面绘制与用户输入处理等基本功能,如果需要设计自定义的窗口部件,则可以考虑继承QWidget及其子类。
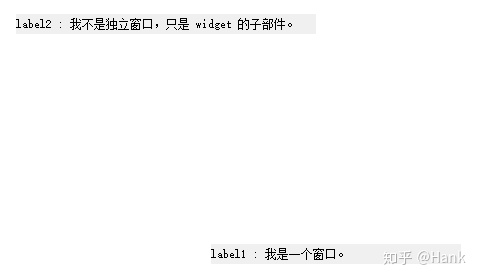
下面的程序当中定义了 1 个Qwidget类对象的指针变量widget,2 个QLabel对象指针label1和label2,其中label1没有父窗口,而label2被放置在widget父窗口内部:
#include <QtWidgets>

int main(int argc, char *argv[]) {
    QApplication a(argc, argv);

    /* 窗口,QWidget 类对象的 parent 参数默认为 0 */
    QWidget *widget = new QWidget();
    widget->setWindowTitle(QObject::tr("我是 widget"));   // 设置窗口标题

    /* 窗口,QLabel 类对象的 parent 参数默认为 0 */
    QLabel *label1 = new QLabel();
    label1->setWindowTitle(QObject::tr("我是 label"));
    label1->setText(QObject::tr("label1 : 我是一个窗口。"));   // 设置显示内容
    label1->resize(250, 20);   // 设置部件尺寸,以便显示完整内容

    /* label2 的 parent 参数为 widget */
    QLabel *label2 = new QLabel(widget);
    label2->setText(QObject::tr("label2 : 我不是独立窗口,只是 widget 的子部件。"));
    label2->resize(300, 20);

    /* 显示到屏幕 */
    label1->show();
    widget->show();

    int ret = a.exec();
    delete label1;
    delete widget;
    return ret;
}

注意:上面代码使用new操作符实例化类,但是并未使用delete进行释放,因为 Qt 里销毁父对象时会自动销毁子对象。例如指定label2的父部件为widget,所以执行delete widget就会自动销毁label2。
QWidget类的构造函数可以接收 2 个参数:
QWidget::QWidget(QWidget *parent = nullptr, Qt::WindowFlags f = Qt::WindowFlags())
QWidget *parent:如果值为nullptr,则该部件为一个窗口。如果值为其它部件,则此该部件将会成为子窗口。当父部件被删除时,该部件也将被删除;Qt::WindowFlags f:通常为0,可以将其设置为自定义窗口的框架(此时父窗口必须为nullptr),如果自定义框架,则需要采用 2 个窗口标志位之间的按位异或值;
例如:Qt::FramelessWindowHint可以生成一个无边框的窗口,Qt::WindowStaysOnTopHint用于让指定窗口停留在其它所有窗口最上层。
#include <QtWidgets>

int main(int argc, char *argv[]) {
    QApplication a(argc, argv);

    /* 窗口,QWidget 类对象的 parent 参数默认为 0 */
    QWidget *widget = new QWidget(0, Qt::Dialog | Qt::FramelessWindowHint);
    // ... ... ...

    /* 窗口,QLabel 类对象的 parent 参数默认为 0 */
    QLabel *label1 = new QLabel(0, Qt::SplashScreen | Qt::WindowStaysOnTopHint);
    // ... ... ...

    /* label2 的 parent 参数为 widget */
    QLabel *label2 = new QLabel(widget);
    // ... ... ...
}
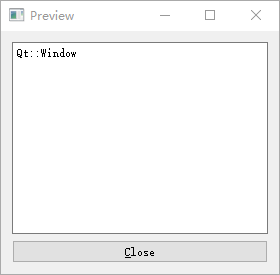
Qt Creator 提供的示例程序Window Flags Example演示了几乎所有的窗口类型,下图是这些示例的运行效果:
QWidget当中还提供了一个void QWidget::setWindowState(Qt::WindowStates windowState)函数用于设置窗口状态,其中参数Qt::WindowStates是用于设置当前窗口状态的枚举值:

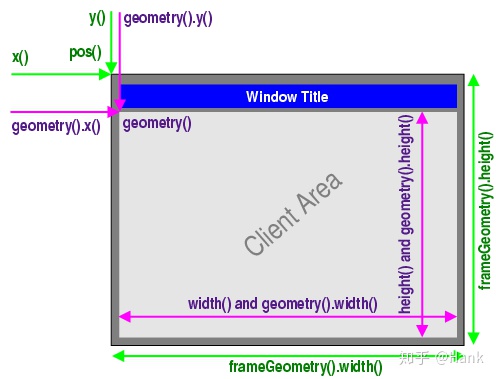
窗口几何结构是指窗口的大小尺寸以其出现的位置,默认情况下,窗口部件的尺寸等于其所包含子部件的大小尺寸;QWidget 提供了几个用于处理窗口几何结构的函数,其中一些函数作用于不包括窗口框架(Window Frame)的区域,例如:geometry()、width()、height()、rect()、size()。另一些的作用区域则包括窗口框架,例如:x()、y()、frameGeometry()、pos()、move()。
Debug 调试
本小节会在讲解窗口几何结构相关函数的同时,展现 Qt Creator 中程序调试相关的内容。
#include <QApplication>
#include <QWidget>

int main(int argc, char *argv[]) {
    QApplication a(argc, argv);
    QWidget widget;

    int x = widget.x();
    int y = widget.y();

    QRect geometry = widget.geometry();
    QRect frame = widget.frameGeometry();

    return a.exec();
}
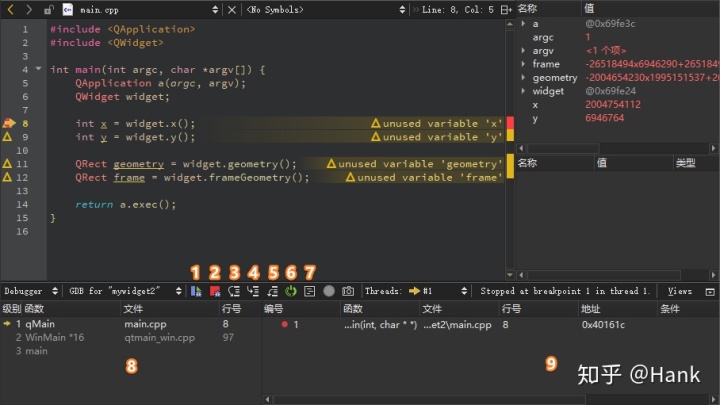
选中上面代码里的类或者函数名称,按下按键【F1】就可以查看到其对应的文档帮助信息,或者按下【F2】跳转到其源代码。单击鼠标右键在第 8 行设置断点,然后按下左下角【Start debugging of startup project】按钮或者按下快捷键【F5】进入调试模式界面:
- 【继续执行 Continue】:继续执行后面的代码,直至遇到下一个断点或者程序运行结束;
- 【停止调试 Stop】:按下该按钮以后立即结束调试;
- 【单步跳过 Step Over】:执行本行代码,然后指向下一行代码。
- 【单步进入 Step Into】:进入当前调用函数的内部;
- 【单步跳出 Step Out】:当进入函数内部时,用于跳出该函数,通常与【单步进入】配合使用;
- 【重启调试会话 Restarts】:重新启动当前的调试会话;
- 【显示对应汇编指令】:可以继续进行单步调试;
- 【堆栈视图】:显示从程序开始到断点位置,所有嵌套调用函数所在的源文件名称与行号。
- 【其他视图】:可选择多种视图,例如:用于显示局部变量及其类型和数值的局部变量和表达式视图(locals and Expressions);用来显示所有断点,并且添加或删除断点的断点视图(Breakpoints);显示所有线程以及当前所在线程的线程视图(Threads);用于管理保存当前调试状态的快照视图(Snapshots);
鼠标点击【单步进入 Step Into】按钮,或者按下【F11】快捷键,则堆栈视图中会显示geometry()函数在源代码当中的位置。接下来,单击【单步跳出 Step Out】按钮回到主函数断点处,然后持续单击【单步跳过 Step Over】按钮单步执行程序,同时查看局部变量和表达式视图中相应变量的变化情况。最后,当执行流程到达return a.exec()语句时,单击【停止调试 Stop】按钮结束本次调试。
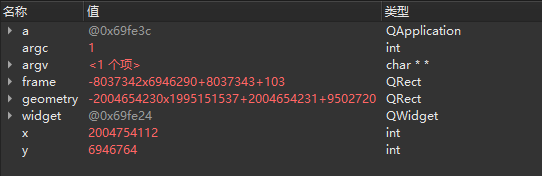
从上面变量监视器的动图当中可以观察到:x、y、geometry、frame这 4 个变量的初始值是一个随机数,调试完成以后x、y的值都为默认值0,而geometry = 640×480+0+0,frame = 639×479+0+0。这里造成x、y的值为0的原因是由于窗口没有能够显示。接下来在QWidget widget语句后面添加用于显示窗口的代码widget.show():
#include <QApplication>
#include <QWidget>

int main(int argc, char *argv[]) {
    QApplication a(argc, argv);
    QWidget widget;
    widget.show(); // 添加显示窗口代码

    int x = widget.x();
    int y = widget.y();

    QRect geometry = widget.geometry();
    QRect frame = widget.frameGeometry();

    return a.exec();
}
修改完成以后,再次进入调试模式,会发现窗口只会在任务栏显示了一个标题,此时继续单击【单步跳过 Step Over】。当程序运行到最后的return a.exec()语句时,再次单击【单步跳过 Step Over】以后,程序窗口终于得以完整呈显。出现这种现象的原因,是由于仅当程序进入主事件循环以后才可以接收事件,而widget.show()函数会触发一个显示事件,所以上面代码只会在完成a.exe()函数的调用,并且进入主事件循环以后才能被正常显示。
Qt 程序调试过程当中,还可以使用qDebug()函数将调试信息直接输出至控制台,请观察下面的示例代码:
#include <QApplication>
#include <QWidget>
#include <QDebug>

int main(int argc, char *argv[]) {
    QApplication a(argc, argv);

    QWidget widget;
    widget.resize(400, 300);       // 设置窗口大小尺寸(不包含边框)
    widget.move(200, 100);         // 设置窗口显示位置
    widget.show();

    int x = widget.x();
    qDebug("x: %d", x);            // 窗口位置 x 坐标值

    int y = widget.y();
    qDebug("y: %d", y);            // 窗口位置 y 坐标值

    QRect geometry = widget.geometry();
    QRect frame = widget.frameGeometry();
    qDebug() << "geometry: " << geometry << "frame: " << frame;

    return a.exec();
}
上面代码分别采用了qDebug()函数的 2 种输出方法:
- 将字符串作为参数传递给
qDebug()函数,这种方式不需要#include <QDebug>头文件,上面使用这种方法输出x和y的值; - 以输出流的方式让
qDebug()一次性输出多个值,必须添加#include <QDebug>头文件,上面代码采用该方式输出geometry和frame的值;
10:48:33: Starting D:Workspacebuild-mywidget2-Desktop_Qt_5_14_2_MinGW_32_bit-Debugdebugmywidget2.exe ...
x: 200
y: 100
geometry:  QRect(201,131 400x300) frame:  QRect(200,100 402x332)
10:48:37: D:Workspacebuild-mywidget2-Desktop_Qt_5_14_2_MinGW_32_bit-Debugdebugmywidget2.exe exited with code 0以输出流方式使用qDebug()时,还可以添加endl标识符让调试信息自动换行:
qDebug() << "geometry: " << geometry << endl << "frame: " << frame;
加入endl之后,geometry与frame将会分为两行进行显示:
geometry:  QRect(201,131 400x300)
frame:  QRect(200,100 402x332)
QDialog 对话框
本小节首先会讲述两种不同类型的对话框,然后分析一个由多窗口组成并且窗口间可以相互切换的程序,最后介绍 Qt 提供的几个标准对话框,并涉及信号和槽的初步知识。
模态与非模态
QDialog类是所有对话框的基类,对话框通常用于与用户进行简单的交互。根据能否与程序其它窗口进行交互,可以将对话框分为模态(Modal)和非模态的(Modeless)两类。
下面MyWidget类的构造函数当中,定义了一个QDialog类对象,并通过this参数指定其父窗口为MyWidget类对象,最后调用show()函数显示对话框。
#include "mywidget.h"
#include "ui_mywidget.h"
#include <QDialog>

/* MyWidget 构造函数 */
MyWidget::MyWidget(QWidget *parent) : QWidget(parent), ui(new Ui::MyWidget) {
    ui->setupUi(this);
    QDialog dialog(this);
    dialog.show();
}
/* 对象生命周期结束时调用 */
MyWidget::~MyWidget() {
    delete ui;
}
上述程序运行之后,会发现对话框一闪而过,然后屏幕只显示MyWidget父窗口。这是由于 C++ 函数中定义的变量,会在该函数执行完成后自动释放。因此,这里的dialog对象只会在该构造函数当中有效,该构造函数执行完成之后dialog就被自动销毁。避免这个问题,需要进行如下修改:
/* MyWidget 构造函数 */
MyWidget::MyWidget(QWidget *parent) : QWidget(parent), ui(new Ui::MyWidget) {
    ui->setupUi(this);
    QDialog *dialog = new QDialog(this);
    dialog->show();
}
上面代码使用了dialog对象的指针,并采用运算符new开辟了内存空间,再次运行程序就可以正常显示。
事实上,不采用指针也可以正常显示对话框,继续对上面的示例代码进行修改:
/* MyWidget 构造函数 */
MyWidget::MyWidget(QWidget *parent) : QWidget(parent), ui(new Ui::MyWidget) {
    ui->setupUi(this);
    QDialog dialog(this);
    dialog.exec();
}
再次运行程序,会发现首先弹出对话框,关闭之后才会再弹出MyWidget窗口,这种对话框就可以称为模态对话框,而之前的对话框则称为非模态对话框。
- 模态对话框:不能与程序中其它窗口进行交互,由对话框自身调用
exec()函数产生; - 非模态对话框:可以与程序内其它窗口交互,使用
new操作符进行创建,然后调用show()函数显示;
事实上,show()函数也可以用于建立模态对话框,只需在其前面调用setModal(true)函数即可:
/* MyWidget 构造函数 */
MyWidget::MyWidget(QWidget *parent) : QWidget(parent), ui(new Ui::MyWidget) {
    ui->setupUi(this);
    QDialog *dialog = new QDialog(this);
    dialog->setModal(true);   //
    dialog->show();
}
观察程序的运行,虽然生成的对话框是模态的,但是与调用exec()函数时的效果有所不同。因为MyWidget窗口也同时被显示出来,这是由于show()调用完毕之后,函数会立即将控制权交给调用者,程序可以继续往下执行。然而在调用exec()函数的时候,只有当对话框被关闭时才会返回。
上面代码中的setModal()函数用于设置以模态还是非模态方式打开对话框,默认为false,即对话框的show()展示为非模态;将该属性置为true等于将QWidget::windowModality设置为Qt::ApplicationModal。
注意:QWidget提供的setWindowModality()函数用于设置被模态部件阻塞的窗口,可以是Qt::NonModal(默认值,不阻塞任何窗口,即非模态)、Qt::WindowModal(阻塞其父窗口和所有祖先窗口以及子窗口)、Qt::ApplicationModal(阻塞当前应用程序的所有窗口)之一。
多窗口切换
Qt 采用信号槽机制来完成对象之间的通信,例如单击窗口上的按钮弹出对话框,那可以将该按钮的单击信号与槽中定义的对话框关联起来,单击按钮时就会发射信号,从而显示槽中定义的对话框。
/** main.cpp */
#include "mywidget.h"
#include <QApplication>

int main(int argc, char *argv[]) {
    QApplication a(argc, argv);

    MyWidget w;
    w.show();

    return a.exec();
}
向mywidget.ui界面添加 1 个Label(修改显示的文本内容我是主界面!)和 1 个Push Button(将object Name修改为showChildButton,显示文本内容为显示子窗口)。
<?xml version="1.0" encoding="UTF-8"?>
<ui version="4.0">
 <class>MyWidget</class>
 <widget class="QWidget" name="MyWidget">
  <property name="geometry">
   <rect>
    <x>0</x>
    <y>0</y>
    <width>400</width>
    <height>300</height>
   </rect>
  </property>
  <property name="windowTitle">
   <string>MyWidget</string>
  </property>
  <widget class="QPushButton" name="showChildButton">
   <property name="geometry">
    <rect>
     <x>150</x>
     <y>210</y>
     <width>75</width>
     <height>23</height>
    </rect>
   </property>
   <property name="text">
    <string>显示子窗口</string>
   </property>
  </widget>
  <widget class="QLabel" name="label">
   <property name="geometry">
    <rect>
     <x>80</x>
     <y>80</y>
     <width>141</width>
     <height>41</height>
    </rect>
   </property>
   <property name="text">
    <string>我是主界面!</string>
   </property>
  </widget>
 </widget>
 <layoutdefault spacing="6" margin="11"/>
 <resources/>
 <connections/>
</ui>然后在mywidget.h文件的MyWidget类定义的最后,用slot关键字声明一个槽:
/** mywidget.h */
#ifndef MYWIDGET_H
#define MYWIDGET_H

#include <QWidget>

namespace Ui {
    class MyWidget;
}

class MyWidget : public QWidget {
    Q_OBJECT

    public:
        explicit MyWidget(QWidget *parent = 0);
        ~MyWidget();

    private:
        Ui::MyWidget *ui;

    public slots:
        void showChildDialog();   // 声明一个可以在类外部进行调用的槽
};

#endif // MYWIDGET_H
鼠标选中showChildDialog()槽,按下快捷键【Alt + Enter】或者鼠标右键菜单里选择【Refactor】,在下面的弹出菜单上选择【在 mywidget.cpp 添加定义】项:
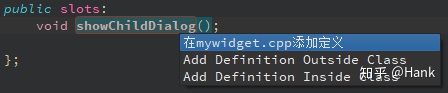
此时,编辑器会自动跳转至mywidget.cpp源文件,并且自动创建 1 个showChildDialog()槽,手动向其中添加对话框显示相关的代码,同时修改MyWidget类:
/** mywidget.cpp */
#include "mywidget.h"
#include "ui_mywidget.h"
#include <QDialog>

MyWidget::MyWidget(QWidget *parent) : QWidget(parent), ui(new Ui::MyWidget) {
    ui->setupUi(this);
    /* 连接信号与槽 */
    connect(ui->showChildButton, &QPushButton::clicked,
            this, &MyWidget::showChildDialog);
}

MyWidget::~MyWidget() {
    delete ui;
}

void MyWidget::showChildDialog() {
    QDialog *dialog = new QDialog(this);
    dialog->show();
}
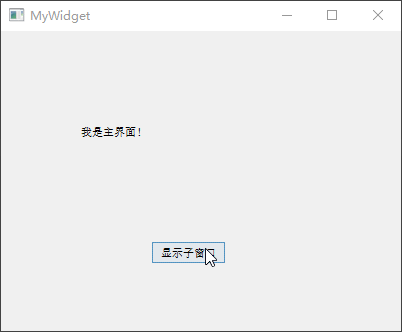
上面代码使用了connect()函数将按钮单击信号clicked()与新建的showChildDialog()槽关联在一起。clicked信号定义在QPushButton类当中,而connect()函数定义在QObject类当中,由于MyWidget类继承了QObject,所以可以直接进行使用。connect()函数的 4 个参数分别是发射信号的对象、发射的信号、接收信号的对象、接收信号的槽。运行程序,然后MyWidget主界面上的按钮,就会弹出一个dialog对话框。
上述信号与槽的关联方法称为手动关联,此外还有一种更为方便的自动关联,即将相关函数整合到槽命名当中,例如上面例子中的showChildDialog()槽可以重命名为on_showChildButton_clicked(),这样通过on_发射信号的部件名称_信号名称格式的命名风格,就能够省略connect()关联函数,实现信号与槽的自动关联。

首先,选中上面代码里的showChildDialog()函数名称,鼠标右键依次选择弹出菜单上的【Refactor -> Rename Symbol Under Cursor】或者直接按下【Ctrl + Shift + R】快捷键,在出现的替换栏中输入on_showChildButton_clicked(),再单击【Replace】按钮即可,此时mywidget.cpp源文件和mywidget.h头文件中的函数名称都进行批量修改。
/** mywidget.h */
#ifndef MYWIDGET_H
#define MYWIDGET_H

#include <QWidget>

namespace Ui {
    class MyWidget;
}

class MyWidget : public QWidget {
    Q_OBJECT

    public:
        explicit MyWidget(QWidget *parent = 0);
        ~MyWidget();

    private:
        Ui::MyWidget *ui;

    public slots:
        void on_showChildButton_clicked();   // 将 showChildDialog() 槽重命名为 on_showChildButton_clicked()
};

#endif // MYWIDGET_H
然后,删除mywidget.cpp当中MyWidget类构造函数里的connect方法:
/** mywidget.cpp */
#include "mywidget.h"
#include "ui_mywidget.h"
#include <QDialog>

MyWidget::MyWidget(QWidget *parent) : QWidget(parent), ui(new Ui::MyWidget) {
    ui->setupUi(this);
    /* 移除 connect() 关联函数 */
}

MyWidget::~MyWidget() {
    delete ui;
}

void MyWidget::on_showChildButton_clicked() {
    QDialog *dialog = new QDialog(this);
    dialog->show();
}
程序运行效果与之前一致,Qt 设计器生成的槽就采用自动方式生成,但是对于不在 Qt 设计器中添加的界面部件,就还额外要在调用setupUi()函数前定义该部件,而且还要手动调用setObjectName()函数指定部件的对象名称,这样才能完成自动关联。日常开发里,通常会选用显式声明connect()的手动方式。
接下来,再来定义一个带按钮的对话框,并在 Qt 设计器中进行信号与槽的关联,最终实现主界面与对话框的切换导航。
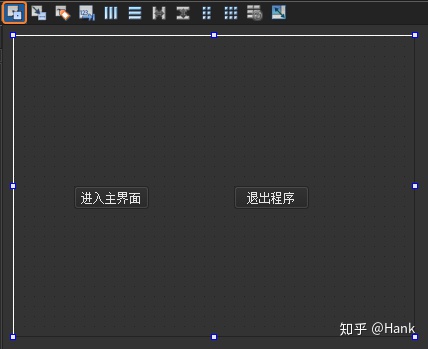
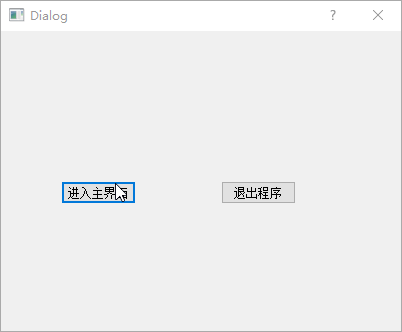
添加自定义对话框MyDialog,基于前面的项目添加Qt 设计师界面类,界面模板选择Dialog without Buttons,类名称修改为MyDialog,然后向窗口拖入【进入主界面】和【退出程序】两个 Push Button。
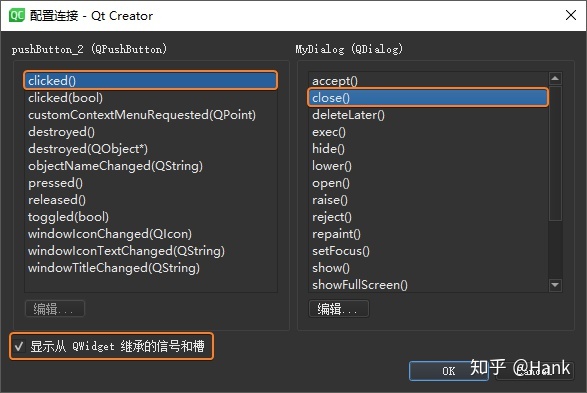
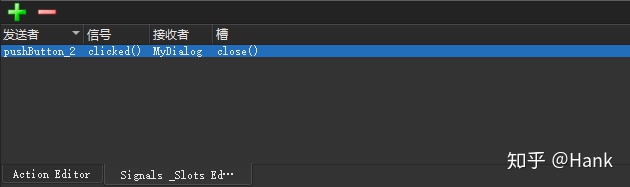
设计信号和槽,这里使用 Qt 设计器实现【退出程序】按钮的信号槽关联,单击 Qt Creator 顶部的【Edit Signals/Slots】图标或是按下快捷键【F4】,进入了信号槽编辑模式,鼠标左键选中【退出程序】并且拖动到窗口界面,然后松开鼠标左键,此时会弹出【配置连接】对话框。

选中对话框底部的【显示从 QWidget 继承的信号和槽】,然后选中左侧QPushButton栏中的信号clicked(),右侧QDialog栏中的槽close(),完成后单击【OK】按钮(此处还可以单击【编辑】按钮添加自定义槽,但是这样还需要在MyDialog类中实现自定义槽)。这样【退出程序】按钮的单击信号就与对话框内的关闭操作槽关联起来,如果需要取消关联,只需在信号槽编辑模式下选中关联,按下【Delete】键,或者鼠标右键点击【删除】即可。
此时,Qt Creator 底部的【信号槽编辑器】就可以观察到当前设置好的关联。当然,也可以直接在【信号槽编辑器】当中去建立关联,这与上面通过鼠标选中部件进行关联的操作等效。
完成全部信号槽关联工作以后按下【F3】按键或者鼠标单击【Edit Widgets】图标,回到部件编辑模式。紧接着关联【进入主界面】按钮的信号与槽,鼠标选择该按钮,选择右键菜单上的【转到槽...】,然后在弹出的对话框中选择clicked()信号,最后点击【OK】按钮。此时会自动切换到代码编辑模式,并且定位到自动生成的on_pushButton_clicked()槽:
void MyDialog::on_pushButton_clicked() {
    accept();
}
上面代码中的accept()函数是QDialog类当中的 1 个槽,对于使用exec()函数实现的模态对话框,调用该槽就会隐藏这个模态对话框,并返回QDialog::Accepted值用于判断当前按下的是哪个按钮;与之相对应,另一个reject()槽则可以返回QDialog::Rejected值,前面定义的【退出程序】按钮也可以关联到这个槽。接下来修改main.cpp源文件:
#include "mywidget.h"
#include <QApplication>
#include "mydialog.h"

int main(int argc, char *argv[]) {
    QApplication a(argc, argv);
    MyDialog dialog;                        // 新建 MyDialog 类对象

    if(dialog.exec() == QDialog::Accepted){   // 判断 dialog 的执行结果
        MyWidget w;
        w.show();                           // 如果按下【进入主界面】按钮,则显示主界面
        return a.exec();                    // 正常运行程序
    }

    else return 0;                          // 否则退出程序
}
上面代码在主函数当中建立了一个MyDialog对象,然后判断其exec()函数的返回值,如果当前按下【进入主界面】按钮,则返回值等于QDialog::Accepted,于是显示主界面并正常执行程序,如果不是则直接退出程序。进行到这里,代码已经可以从登录对话框进入主界面,再从主界面显示 1 个对话框。
接下来,实现从主界面重新进入登录界面的功能。双击mywidget.ui文件进入 Qt Creator 设计模式,向界面添加【重新登录】和【退出】两个 Push button,然后进入信号槽模式,将【退出】按钮的clicked()信号与MyWidget界面的close()槽关联。完成以后,再转到【重新登录】按钮的clicked()信号对应的槽,并进行如下修改:
#include "mywidget.h"
#include "ui_mywidget.h"
#include <QDialog>
#include "mydialog.h"   // 包含 MyDialog 类的头文件

MyWidget::MyWidget(QWidget *parent) : QWidget(parent), ui(new Ui::MyWidget) {
    ui->setupUi(this);
}

MyWidget::~MyWidget() {
    delete ui;
}

void MyWidget::on_showChildButton_clicked() {
    QDialog *dialog = new QDialog(this);
    dialog->show();
}

void MyWidget::on_pushButton_clicked() {
    close();           // 首先,关闭主界面(并未退出程序,只有在剩下最后 1 个主界面时,即没有父窗口的界面,才会真正退出)
    MyDialog dlg;      // 然后,新建 MyDialog 对象
    if(dlg.exec() == QDialog::Accepted)
        show();        // 最后,如果按下【进入主窗口】按钮,则再次显示主界面;否则,由于已经没有可显示的界面,程序将会退出
}
上述示例代码最终的运行效果如下面的动图所示:
标准对话框
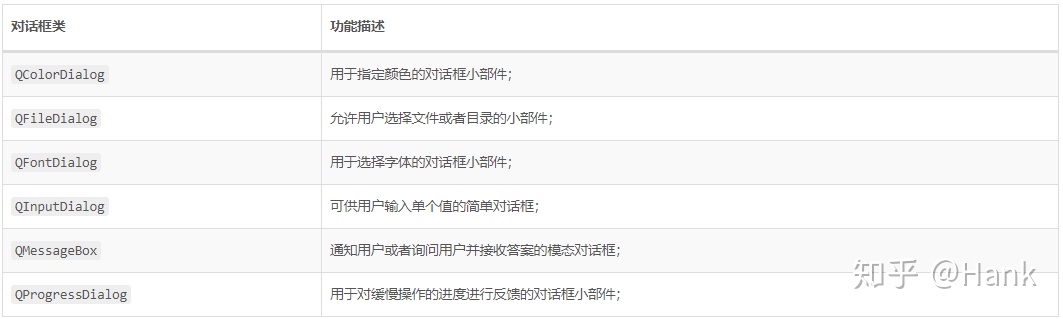
Qt 为文件、字体、颜色的选择操作,提供了如下开箱即用的对话框小部件,它们全部继承自QDialog类:
通过将各种小部件组合到QDialog当中,就可以轻松的创建各种自定义对话框,下面这 2 个类可以用于构建自定义的对话框:

新建一个名为demo的 Qt Widgets 工程,基类选择QWidget,类名称修改为MyWidget,项目完整源代码如下所示:
demo.pro
QT       += core gui

greaterThan(QT_MAJOR_VERSION, 4): QT += widgets

TARGET = mydialog2
TEMPLATE = app

SOURCES += main.cpp
        mywidget.cpp

HEADERS  += mywidget.h

FORMS    += mywidget.ui
main.cpp
/** main.cpp */
#include "mywidget.h"
#include <QApplication>

int main(int argc, char *argv[]) {
    QApplication a(argc, argv);
    MyWidget w;
    w.show();

    return a.exec();
}
mywidget.h
/** mywidget.h */
#ifndef MYWIDGET_H
#define MYWIDGET_H

#include <QWidget>
#include <QWizard>

class QErrorMessage; // 用于提供错误信息显示对话框

namespace Ui {
    class MyWidget;
}

class MyWidget : public QWidget {
    Q_OBJECT

    public:
        explicit MyWidget(QWidget *parent = 0);
        ~MyWidget();

    private slots:
        void on_pushButton_1_clicked();   // 颜色对话框
        void on_pushButton_2_clicked();   // 文件对话框
        void on_pushButton_3_clicked();   // 字体对话框
        void on_pushButton_4_clicked();   // 输入对话框
        void on_pushButton_5_clicked();   // 消息对话框
        void on_pushButton_6_clicked();   // 进度对话框
        void on_pushButton_7_clicked();   // 错误信息对话框
        void on_pushButton_8_clicked();   // 向导对话框

    private:
        Ui::MyWidget *ui;

        QErrorMessage *errordlg;          // QErrorMessage 错误信息私有变量

        /* 如下 3 个函数的返回值为 QWizardPage 类的指针,用于生成 3 个向导页面 */
        QWizardPage *createPage1();
        QWizardPage *createPage2();
        QWizardPage *createPage3();
};

#endif // MYWIDGET_H
mywidget.cpp
/** mywidget.cpp */
#include "mywidget.h"
#include "ui_mywidget.h"
#include <QDebug>
#include <QColorDialog>
#include <QFileDialog>
#include <QFontDialog>
#include <QInputDialog>
#include <QMessageBox>
#include <QProgressDialog>
#include <QErrorMessage>

MyWidget::MyWidget(QWidget *parent) : QWidget(parent), ui(new Ui::MyWidget) {
    ui->setupUi(this);
    errordlg = new QErrorMessage(this);
}

MyWidget::~MyWidget() {
    delete ui;
}

/* 颜色对话框 */
void MyWidget::on_pushButton_1_clicked() {
    /* 调用 QColorDialog 的静态函数显示颜色对话框,3 个参数分别用于设置初始颜色、指定父窗口、设置对话框标题 */
    // QColor color = QColorDialog::getColor(Qt::red, this, tr("颜色对话框"), QColorDialog::ShowAlphaChannel);   //

    QColorDialog dialog(Qt::red, this);               // 创建 QColorDialog 对象
    dialog.setOption(QColorDialog::ShowAlphaChannel); // 显示 alpha 选项
    dialog.exec();                                    // 以模态方式运行颜色对话框
    QColor color = dialog.currentColor();             // 获取当前的颜色
    qDebug() << "color: " << color;                   // 控制台打印颜色
}

/* 文件对话框 */
void MyWidget::on_pushButton_2_clicked() {
    /* getOpenFileName() 用于选择单个文件,4 个参数分别用于指定父窗口、对话框标题、默认打开的目录路径、文件类型过滤器(默认可选择所有文件,也可以使用;;设置多个过滤器)*/
    // QString fileName = QFileDialog::getOpenFileName(this, tr("文件对话框"), "D:", tr("图片文件(*png *jpg);;文本文件(*txt)"));

    /* 以模态方式运行可以选择多个文件的文件对话框,并返回当前选择的文件名称 */
    QStringList fileNames = QFileDialog::getOpenFileNames(this, tr("文件对话框"), "D:", tr("图片文件(*png *jpg)"));
    qDebug()<< "fileNames:" << fileNames;  // 控制台打印当前选择的文件名称
}

/* 字体对话框 */
void MyWidget::on_pushButton_3_clicked() {
    bool ok;                                        // 布尔型变量 ok 用于标记【OK】按钮是否被按下
    QFont font = QFontDialog::getFont(&ok, this);   // 调用 QFontDialog 类的静态函数 getFont() 获取选择的字体,第 1 个参数用于存放按钮状态

    if (ok) ui->pushButton_3->setFont(font);        // 如果按下【OK】按钮,就让【字体对话框】按钮使用新字体。
    else qDebug() << tr("没有选择字体!");           // 反之按下【Cancel】按钮,则控制台输出提示信息
}

/* 输入对话框 */
void MyWidget::on_pushButton_4_clicked() {
    bool ok;

    /* getText() 用于提供输入字符串的对话框,其 6 个参数分别用于指定父窗口、窗口标题、标签显示文本、输入字符串的显示模式、输入框默认字符串、获取按钮状态的布尔变量 */
    QString string = QInputDialog::getText(this, tr("输入字符串对话框"), tr("请输入用户名:"), QLineEdit::Normal, tr("admin"), &ok);
    if(ok) qDebug() << "string:" << string;
    /* getInt() 用于提供整型数值的输入,参数 100 表示默认数值,参数 -1000 和 1000 分别表示可输入的最小值和最大值,参数 10 表示箭头按钮每次变化 10 */
    int value1 = QInputDialog::getInt(this, tr("输入整数对话框"), tr("请输入-1000到1000之间的数值"), 100, -1000, 1000, 10, &ok);
    if(ok) qDebug() << "value1:" << value1;
    /* getDouble() 用于提供浮点数的输入,其中的参数 2 表示小数的位数 */
    double value2 = QInputDialog::getDouble(this, tr("输入浮点数对话框"), tr("请输入-1000到1000之间的数值"), 0.00, -1000, 1000, 2, &ok);
    if(ok) qDebug() << "value2:" << value2;
    QStringList items;
    items << tr("条目1") << tr("条目2");
    /* getItem() 用于提供一个条目的输入,其中参数 0 表示默认显示列表的第 0 个条目,参数 true 设置是否可以被修改 */
    QString item = QInputDialog::getItem(this, tr("输入条目对话框"), tr("请选择或输入一个条目"), items, 0, true, &ok);
    if(ok) qDebug() << "item:" << item;
}

/* 消息对话框,所包含静态方法的参数分别用于设置父窗口、标题栏、显示信息、包含的按钮(由 QMessageBox 类提供)*/
void MyWidget::on_pushButton_5_clicked() {
    /* question() 问题对话框 */
    int ret1 = QMessageBox::question(this, tr("问题对话框"), tr("您访问过我的博客吗?"), QMessageBox::Yes, QMessageBox::No);
    if(ret1 == QMessageBox::Yes) qDebug() << tr("问题!");
    /* information() 提示对话框 */
    int ret2 = QMessageBox::information(this, tr("提示对话框"), tr("这是我的博客地址:https://uinika.gitee.io/"), QMessageBox::Ok);
    if(ret2 == QMessageBox::Ok) qDebug() << tr("提示!");
    /* warning() 警告对话框 */
    int ret3 = QMessageBox::warning(this, tr("警告对话框"), tr("系统运行警告信息!"), QMessageBox::Abort);
    if(ret3 == QMessageBox::Abort) qDebug() << tr("警告!");
    /* critical() 危险错误对话框 */
    int ret4 = QMessageBox::critical(this, tr("危险错误对话框"), tr("系统运行出现危险错误!"), QMessageBox::YesAll);
    if(ret4 == QMessageBox::YesAll) qDebug() << tr("危险错误");
    /* about() 关于对话框 */
    QMessageBox::about(this, tr("关于对话框"), tr("关于我的博客:https://uinika.github.io/"));
}

/* 进度对话框 */
void MyWidget::on_pushButton_6_clicked() {
    QProgressDialog dialog(tr("文件复制进度"), tr("取消"), 0, 50000, this);
    dialog.setWindowTitle(tr("进度对话框"));      // 设置窗口标题
    dialog.setWindowModality(Qt::WindowModal);   // 设置对话框为模态
    dialog.show();

    /* 模拟复制进度 */
    for(int i=0; i<50000; i++) {
        dialog.setValue(i);                     // 设置进度条当前值
        QCoreApplication::processEvents();      // 避免界面冻结
        if(dialog.wasCanceled()) break;         // 如果按下【取消】按钮则中断操作
    }
    dialog.setValue(50000);                     // 显示 100%,上面 for 循环少加了 1
    qDebug() << tr("复制结束!");
}

/* 错误信息对话框 */
void MyWidget::on_pushButton_7_clicked() {
    errordlg->setWindowTitle(tr("错误信息对话框"));
    errordlg->showMessage(tr("这里是出错信息!"));   // 以非模态方式显示对话框
}

/* 向导对话框页面 1、2、3,基于 QWizardPage 类进行创建 */
QWizardPage * MyWidget::createPage1() {
    QWizardPage *page = new QWizardPage;
    page->setTitle(tr("介绍"));
    return page;
}
QWizardPage * MyWidget::createPage2() {
    QWizardPage *page = new QWizardPage;
    page->setTitle(tr("用户选择信息"));
    return page;
}
QWizardPage * MyWidget::createPage3() {
    QWizardPage *page = new QWizardPage;
    page->setTitle(tr("结束"));
    return page;
}

/* 向导对话框,基于进行创建 */
void MyWidget::on_pushButton_8_clicked() {
    /* 新建 QWizard 对象,并且设置窗口标题 */
    QWizard wizard(this);
    wizard.setWindowTitle(tr("向导对话框"));

    /* 添加向导页面并且展示,其参数为 QWizardPage 类型的指针 */
    wizard.addPage(createPage1());
    wizard.addPage(createPage2());
    wizard.addPage(createPage3());
    wizard.exec();
}
mywidget.ui
<?xml version="1.0" encoding="UTF-8"?>
<ui version="4.0">
 <class>MyWidget</class>
 <widget class="QWidget" name="MyWidget">
  <property name="geometry">
   <rect>
    <x>0</x>
    <y>0</y>
    <width>400</width>
    <height>300</height>
   </rect>
  </property>
  <property name="windowTitle">
   <string>MyWidget</string>
  </property>
  <widget class="QPushButton" name="pushButton_1">
   <property name="geometry">
    <rect>
     <x>60</x>
     <y>40</y>
     <width>75</width>
     <height>23</height>
    </rect>
   </property>
   <property name="text">
    <string>颜色对话框</string>
   </property>
  </widget>
  <widget class="QPushButton" name="pushButton_2">
   <property name="geometry">
    <rect>
     <x>240</x>
     <y>40</y>
     <width>75</width>
     <height>23</height>
    </rect>
   </property>
   <property name="text">
    <string>文件对话框</string>
   </property>
  </widget>
  <widget class="QPushButton" name="pushButton_3">
   <property name="geometry">
    <rect>
     <x>60</x>
     <y>90</y>
     <width>75</width>
     <height>23</height>
    </rect>
   </property>
   <property name="text">
    <string>字体对话框</string>
   </property>
  </widget>
  <widget class="QPushButton" name="pushButton_4">
   <property name="geometry">
    <rect>
     <x>240</x>
     <y>90</y>
     <width>75</width>
     <height>23</height>
    </rect>
   </property>
   <property name="text">
    <string>输入对话框</string>
   </property>
  </widget>
  <widget class="QPushButton" name="pushButton_5">
   <property name="geometry">
    <rect>
     <x>60</x>
     <y>140</y>
     <width>75</width>
     <height>23</height>
    </rect>
   </property>
   <property name="text">
    <string>消息对话框</string>
   </property>
  </widget>
  <widget class="QPushButton" name="pushButton_6">
   <property name="geometry">
    <rect>
     <x>240</x>
     <y>140</y>
     <width>75</width>
     <height>23</height>
    </rect>
   </property>
   <property name="text">
    <string>进度对话框</string>
   </property>
  </widget>
  <widget class="QPushButton" name="pushButton_7">
   <property name="geometry">
    <rect>
     <x>60</x>
     <y>190</y>
     <width>101</width>
     <height>23</height>
    </rect>
   </property>
   <property name="text">
    <string>错误信息对话框</string>
   </property>
  </widget>
  <widget class="QPushButton" name="pushButton_8">
   <property name="geometry">
    <rect>
     <x>240</x>
     <y>190</y>
     <width>91</width>
     <height>23</height>
    </rect>
   </property>
   <property name="text">
    <string>向导对话框</string>
   </property>
  </widget>
 </widget>
 <layoutdefault spacing="6" margin="11"/>
 <resources/>
 <connections/>
</ui>
阅读全文完整带书签的版本,可以进入点击下面链接查阅笔者 GitHub 博客:
Qt 5 桌面应用程序开发指南 - QtWidgets 篇uinika.gitee.io欢迎大家关注公众号【IT圈】:Electronics, Embedded & Web
获取更多电子技术、嵌入式系统、Web开发相关的原创性文章:


 885
885

 被折叠的 条评论
为什么被折叠?
被折叠的 条评论
为什么被折叠?
 到【灌水乐园】发言


