


摘要: 活体检测在各行各业应用比较广泛,如何实现一个活体检测系统呢?早期实现很困难,现在仅使用opencv即可实现,快来尝试一下吧。
什么是活体检测,为什么需要它?
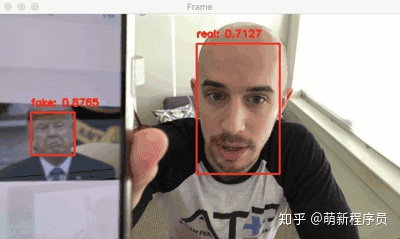
随着时代的发展,人脸识别系统的应用也正变得比以往任何时候都更加普遍。从智能手机上的人脸识别解锁、到人脸识别打卡、门禁系统等,人脸识别系统正在各行各业得到应用。然而,人脸识别系统很容易被“非真实”的面孔所欺骗。比如将人的照片放在人脸识别相机,就可以骗过人脸识别系统,让其识别为人脸。
为了使人脸识别系统更安全,我们不仅要识别出人脸,还需要能够检测其是否为真实面部,这就要用到活体检测了。
目前有许多活体检测方法,包括:
- 纹理分析(Texture analysis),包括计算面部区域上的局部二进制模式(LBP)并使用SVM将面部分类为真脸或假脸;
- 频率分析(Frequency analysis),例如检查面部的傅里叶域;
- 可变聚焦分析(ariable focusing analysis),例如检查两个连续帧之间的像素值的变化。
- 基于启发式的算法(Heuristic-based algorithms),包括眼球运动、嘴唇运动和眨眼检测;
- 光流算法(Optical Flow algorithms),即检查从3D对象和2D平面生成的光流的差异和属性;
- 3D脸部形状,类似于Apple的iPhone脸部识别系统所使用的脸部形状,使脸部识别系统能够区分真人脸部和其他人的打印输出的照片图像;
面部识别系统工程师可以组合上述方法挑选和选择适合于其特定应用的活体检测模型。但本教程将采用图像处理中常用方法——卷积神经网络(CNN)来构建一个能够区分真实面部和假面部的深度神经网络(称之为“LivenessNet”网络),将活体检测视为二元分类问题。
首先检查一下数据集。
活动检测视频

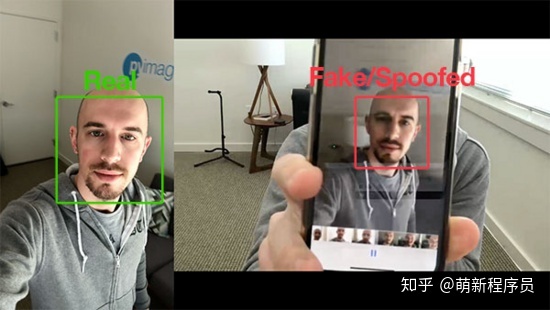
为了让例子更加简单明了,本文构建的活体检测器将侧重于区分真实面孔与屏幕上的欺骗面孔。且该算法可以很容易地扩展到其他类型的欺骗面孔,包括打印输出、高分辨率打印等。
活体检测数据集来源:
- iPhone纵向/自拍;
- 录制了一段约25秒在办公室里走来走去的视频;
- 重播了相同的25秒视频,iPhone重录视频;
- 获得两个示例视频,一个用于“真实”面部,另一个用于“假/欺骗”面部。
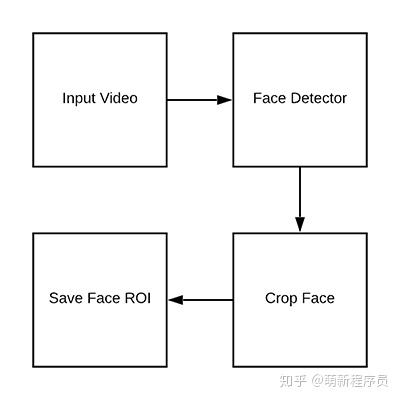
- 最后,将面部检测应用于两组视频,以提取两个类的单个面部区域。
项目结构
$ tree --dirsfirst --filelimit 10
.
├── dataset
│   ├── fake [150 entries]
│   └── real [161 entries]
├── face_detector
│   ├── deploy.prototxt
│   └── res10_300x300_ssd_iter_140000.caffemodel
├── pyimagesearch
│   ├── __init__.py
│   └── livenessnet.py
├── videos
│   ├── fake.mp4
│   └── real.mov
├── gather_examples.py
├── train_liveness.py
├── liveness_demo.py
├── le.pickle
├── liveness.model
└── plot.png

6 directories, 12 files
项目中主要有四个目录:
* dataset / :数据集目录,包含两类图像:
在播放脸部视频时,手机录屏得到的假脸;
face_detector /
pyimagesearch /
video/
另外还有三个Python脚本:
gather_examples.py:此脚本从输入视频文件中获取面部区域,并创建深度学习面部数据集;train_liveness.py:此脚本将训练LivenessNet分类器。训练会得到以下几个文件:
le .pickle liveness.model plot.pngliveness_demo.py:该演示脚本将启动网络摄像头以进行面部实时活体检测;
从训练数据集中检测和提取面部区域
数据目录:
dataset / fake /
dataset / real /
打开 gather_examples.py 文件并插入以下代码:
# import the necessary packages
import numpy as np
import argparse
import cv2
import os

# construct the argument parse and parse the arguments
ap = argparse.ArgumentParser()
ap.add_argument("-i", "--input", type=str, required=True,
    help="path to input video")
ap.add_argument("-o", "--output", type=str, required=True,
    help="path to output directory of cropped faces")
ap.add_argument("-d", "--detector", type=str, required=True,
    help="path to OpenCV's deep learning face detector")
ap.add_argument("-c", "--confidence", type=float, default=0.5,
    help="minimum probability to filter weak detections")
ap.add_argument("-s", "--skip", type=int, default=16,
    help="# of frames to skip before applying face detection")
args = vars(ap.parse_args())
首先导入所需的包:
第8-19行解析命令行参数:
input
output
detector
confidence
skip
之后加载面部检测器并初始化视频流:
# load our serialized face detector from disk
print("[INFO] loading face detector...")
protoPath = os.path.sep.join([args["detector"], "deploy.prototxt"])
modelPath = os.path.sep.join([args["detector"],
    "res10_300x300_ssd_iter_140000.caffemodel"])
net = cv2.dnn.readNetFromCaffe(protoPath, modelPath)

# open a pointer to the video file stream and initialize the total
# number of frames read and saved thus far
vs = cv2.VideoCapture(args["input"])
read = 0
saved = 0
此外还初始化了两个变量,用于读取的帧数以及循环执行时保存的帧数。
创建一个循环来处理帧
 最低0.47元/天 解锁文章


 918
918


 被折叠的 条评论
为什么被折叠?
被折叠的 条评论
为什么被折叠?
 到【灌水乐园】发言


