


1.模型结构
与Unet和segnet等典型的encoder+decoder网络不同, deeplabv1的训练和测试的输出有所不同.
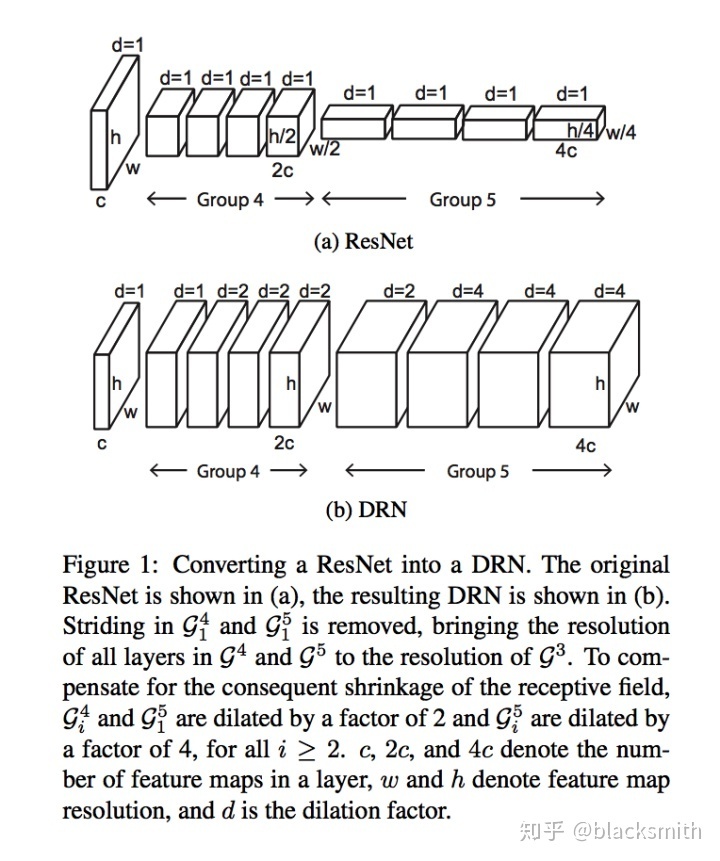
- deeplab的下采样的backbone是一个VGG-16, 然后为了使图像语义分割更准确,5 个 max-pooling 层中最后两个的stride=2改为 stride = 1,kernal = 3,最后卷积层的输出整体 stride 从 32x 下降至 8x。减少下采样的倍数意味着更少的图片语义信息的损失.
- 由于max_pooling层的下采样作用会使得后续特征图的感受野增大,这里为了保持感受野,便将后续的卷积其改成空洞卷积.参考 Uno Whoiam:空洞卷积(Dilated Convolution):有之以为利,无之以为用, 这个思想和DRN一致
3.最后的全连接层替换成
4.使用双线性插值上采样 8x 得到和原图大小一致的像素分类图。
class VGG16_LargeFOV(nn.Module):
    def __init__(self, num_classes=21, input_size=321, split='train', init_weights=True):
        super(VGG16_LargeFOV, self).__init__()
        self.input_size = input_size
        self.split = split
        self.features = nn.Sequential(
            ### conv1_1 conv1_2 maxpooling
            nn.Conv2d(3, 64, kernel_size=3, stride=1, padding=1),
            nn.ReLU(True),
            nn.Conv2d(64, 64, kernel_size=3, stride=1, padding=1),
            nn.ReLU(True),
            nn.MaxPool2d(kernel_size=3, stride=2, padding=1),

            ### conv2_1 conv2_2 maxpooling
            nn.Conv2d(64, 128, kernel_size=3, stride=1, padding=1),
            nn.ReLU(True),
            nn.Conv2d(128, 128, kernel_size=3, stride=1, padding=1),
            nn.ReLU(True),
            nn.MaxPool2d(kernel_size=3, stride=2, padding=1),

            ### conv3_1 conv3_2 conv3_3 maxpooling
            nn.Conv2d(128, 256, kernel_size=3, stride=1, padding=1),
            nn.ReLU(True),
            nn.Conv2d(256, 256, kernel_size=3, stride=1, padding=1),
            nn.ReLU(True),
            nn.Conv2d(256, 256, kernel_size=3, stride=1, padding=1),
            nn.ReLU(True),
            nn.MaxPool2d(kernel_size=3, stride=2, padding=1),


            ### conv4_1 conv4_2 conv4_3 maxpooling(stride=1)
            nn.Conv2d(256, 512, kernel_size=3, stride=1, padding=1),
            nn.ReLU(True),
            nn.Conv2d(512, 512, kernel_size=3, stride=1, padding=1),
            nn.ReLU(True),
            nn.Conv2d(512, 512, kernel_size=3, stride=1, padding=1),
            nn.ReLU(True),
            nn.MaxPool2d(kernel_size=3, stride=1, padding=1),

            ### conv5_1 conv5_2 conv5_3 (dilated convolution dilation=2, padding=2)
            ### maxpooling(stride=1)
            nn.Conv2d(512, 512, kernel_size=3, stride=1, padding=2, dilation=2),
            nn.ReLU(True),
            nn.Conv2d(512, 512, kernel_size=3, stride=1, padding=2, dilation=2),
            nn.ReLU(True),
            nn.Conv2d(512, 512, kernel_size=3, stride=1, padding=2, dilation=2),
            nn.ReLU(True),
            nn.MaxPool2d(kernel_size=3, stride=1, padding=1),
            ### average pooling
            nn.AvgPool2d(kernel_size=3, stride=1, padding=1),

            ### fc6 relu6 drop6
            nn.Conv2d(512, 1024, kernel_size=3, stride=1, padding=12, dilation=12),
            nn.ReLU(True),
            nn.Dropout2d(0.5),

            ### fc7 relu7 drop7 (kernel_size=1, padding=0)
            nn.Conv2d(1024, 1024, kernel_size=1, stride=1, padding=0),
            nn.ReLU(True),
            nn.Dropout2d(0.5),

            ### fc8
            nn.Conv2d(1024, num_classes, kernel_size=1, stride=1, padding=0)
        )

        if init_weights:
            self._initialize_weights()

    def forward(self, x):
        output = self.features(x)
        # 如果是测试阶段, 直接使用双线性插值上采样得到和原图大小一致的像素分类图
        if self.split == 'test':
            output = nn.functional.interpolate(output, size=(self.input_size, self.input_size), mode='bilinear', align_corners=True)
        return output

    def _initialize_weights(self):
        for m in self.named_modules():
            if isinstance(m[1], nn.Conv2d):
                if m[0] == 'features.38':
                    nn.init.normal_(m[1].weight.data, mean=0, std=0.01)
                    nn.init.constant_(m[1].bias.data, 0.0)


if __name__ == "__main__":
    model = VGG16_LargeFOV()
    x = torch.ones([2, 3, 513, 513])
    y = model(x)
    print(y.shape)
最后的特征图的大小torch.Size([2, 21, 65, 65])
2.训练过程:
对于训练过程,其实并没有decoder的过程,而是直接将label图片resize成和encoder的特征图大小,也就是原图8x下采样的大小, 用encoder的特征图和resize后的label图片来计算损失函数.
def resize_labels(labels, size):
"""
Downsample labels for 0.5x and 0.75x logits by nearest interpolation.
Other nearest methods result in misaligned labels.
-> F.interpolate(labels, shape, mode='nearest')
-> cv2.resize(labels, shape, interpolation=cv2.INTER_NEAREST)
"""
new_labels = []
for label in labels:
label = label.float().numpy()
label = Image.fromarray(label).resize(size, resample=Image.NEAREST)
new_labels.append(np.asarray(label))
new_labels = torch.LongTensor(new_labels)
return new_labels
def build_metrics(model, batch, device):
CEL = nn.CrossEntropyLoss(ignore_index=255).to(device)
image_ids, images, labels = batch
labels = resize_labels(labels, size=(65, 65)).to(device) #label进行resize
logits = model(images.to(device))
loss_seg = CEL(logits, labels)
preds = torch.argmax(logits, dim=1)
accuracy = float(torch.eq(preds, labels).sum().cpu()) / (len(image_ids) * logits.shape[2] * logits.shape[3])
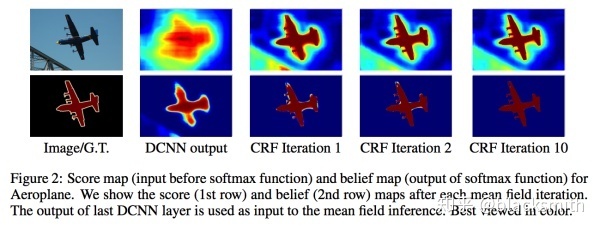
return loss_seg, accuracy3. 使用crf(条件随机场)对分类结果的后处理:
crf的作用是使得最后分类结果的边缘更加精细:
计算公式如下:
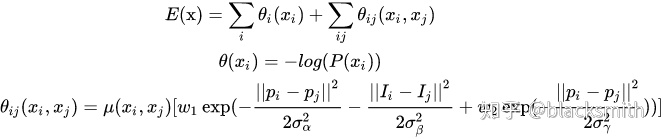
其中
可以这样简单理解: 在对一个像素做分类时,不光考虑 DCNN 输出的结果,还要考虑周围像素的意见尤其像素值比较接近的,这样得出的语义分割结果会有更好的边缘。
prob = post_processor(raw_image, probs[i].detach().cpu().numpy())

#其中
post_processor = crf.DenseCRF(
        iter_max=10,    # 10
        pos_xy_std=3,   # 3
        pos_w=3,        # 3
        bi_xy_std=140,  # 121, 140
        bi_rgb_std=5,   # 5, 5
        bi_w=5,         # 4, 5
    )


#这里用到了 pydensecrf模块来实现dense_crf
import numpy as np
import pydensecrf.densecrf as dcrf
import pydensecrf.utils as utils


class DenseCRF(object):
    def __init__(self, iter_max, pos_w, pos_xy_std, bi_w, bi_xy_std, bi_rgb_std):
        self.iter_max = iter_max
        self.pos_w = pos_w
        self.pos_xy_std = pos_xy_std
        self.bi_w = bi_w
        self.bi_xy_std = bi_xy_std
        self.bi_rgb_std = bi_rgb_std

    def __call__(self, image, probmap):
        C, H, W = probmap.shape

        U = utils.unary_from_softmax(probmap)
        U = np.ascontiguousarray(U)

        image = np.ascontiguousarray(image)

        d = dcrf.DenseCRF2D(W, H, C)
        d.setUnaryEnergy(U)
        d.addPairwiseGaussian(sxy=self.pos_xy_std, compat=self.pos_w)
        d.addPairwiseBilateral(
            sxy=self.bi_xy_std, srgb=self.bi_rgb_std, rgbim=image, compat=self.bi_w
        )

        Q = d.inference(self.iter_max)
        Q = np.array(Q).reshape((C, H, W))

        return Q


 1963
1963

 被折叠的 条评论
为什么被折叠?
被折叠的 条评论
为什么被折叠?
 到【灌水乐园】发言


