


一、自动装配原理
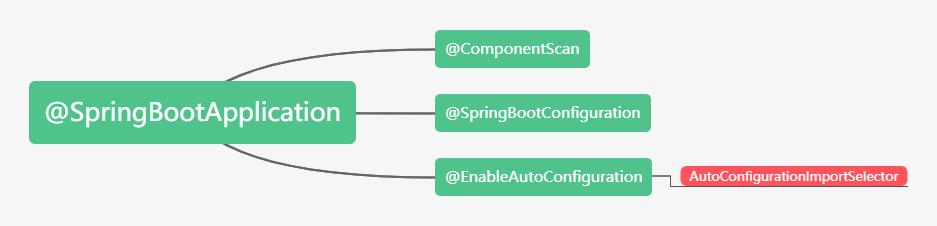
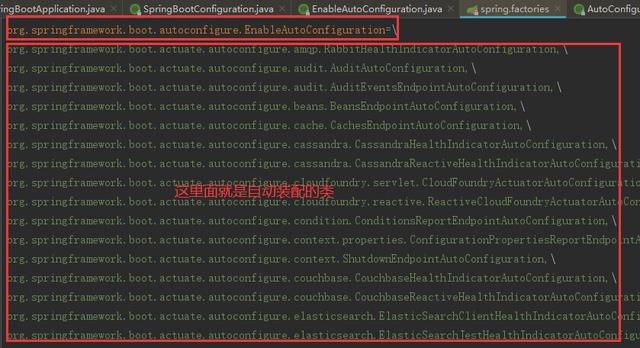
之前博文已经讲过,@SpringBootApplication继承了@EnableAutoConfiguration,该注解导入了AutoConfigurationImport Selector,这个类主要是扫描spring-boot-autoconfigure下面的META-INFspring.factories中的EnableAutoConfiguration对应的全类名,其中XXXAutoConfiguration都是一个个自动配置类。
自动装配原理具体参考:Spring Boot系列(二):Spring Boot自动装配原理解析
二、Spring Boot的jar启动
1、Spring Boot自动装配Tomcat组件
① EmbeddedWebServerFactoryCustomizerAutoConfiguration内嵌的Web容器工厂定制器自动装配类,装配了TomcatWebServerFactoryCustomizer组件
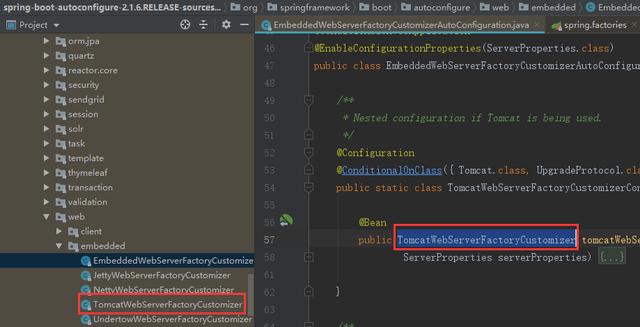
Tomcat工厂定制器TomcatWebServerFactoryCustomizer用来设置容器的属性,把ServerProperties中的属性设置到Tomcat容器的工厂中。

ServerProperties服务的属性类:

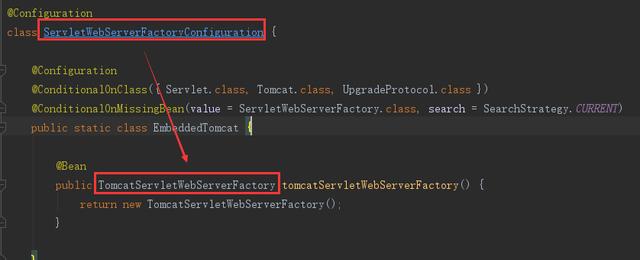
② ServletWebServerFactoryAutoConfiguration,ServletWeb工厂自动装配类,装配了如下四个组件
- ServletWebServerFactoryCustomizer:用来定制ServletWeb服务工厂
- TomcatServletWebServerFactoryCustomizer:用来定制TomcatServletWeb服务工厂
- ServletWebServerFactoryAutoConfiguration.BeanPostProcessorsRegistrar :后置处理器
- ServletWebServerFactoryConfiguration:用来配置TomcatServletWeb服务工厂
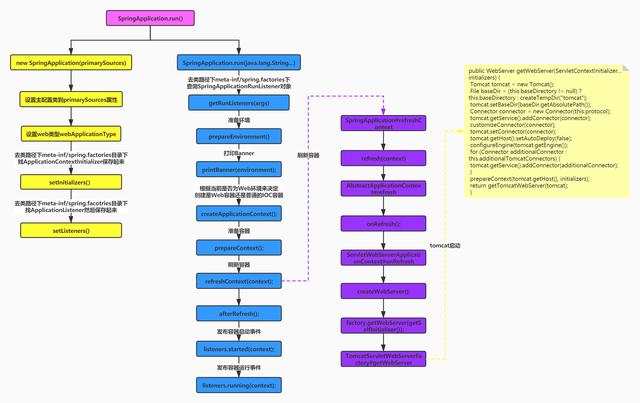
2、SpringApplication.run启动流程
① new SpringApplication(primarySources),创建了一个SpringApplication

public SpringApplication(ResourceLoader resourceLoader, Class>... primarySources) { this.resourceLoader = resourceLoader; Assert.notNull(primarySources, "PrimarySources must not be null"); //设置主配置类 我们自己写的Spring Boot的启动类 this.primarySources = new LinkedHashSet<>(Arrays.asList(primarySources)); //设置web应用的类型 this.webApplicationType = WebApplicationType.deduceFromClasspath(); //设置容器初始化器(ApplicationContextInitializer类型的) setInitializers((Collection) getSpringFactoriesInstances(ApplicationContextInitializer.class)); //把监听器设置到SpringApplication中[ApplicationListener] setListeners((Collection) getSpringFactoriesInstances(ApplicationListener.class)); //设置主配置类 this.mainApplicationClass = deduceMainApplicationClass(); }② SpringApplication的run方法:
主要流程:
第一:创建容器对象
第二:去META-INFO/spring.factories中获取SpringApplicationRunListener监听器(事件发布监听器)
第三:发布容器starting事件(通过spring的事件多播器)
第四:封装命令行参数
第五:准备容器环境
第六:打印Springboot的图标
第七:根据webApplicationType来创建容器
第八:准备容器上下文
第九:发布容器启动事件
第十:发布容器运行事件
public ConfigurableApplicationContext run(String... args) { StopWatch stopWatch = new StopWatch(); stopWatch.start(); //容器对象 ConfigurableApplicationContext context = null; Collection exceptionReporters = new ArrayList<>(); configureHeadlessProperty(); //去META-INFO/spring.factories中获取SpringApplicationRunListener监听器(事件发布监听器) SpringApplicationRunListeners listeners = getRunListeners(args); //发布容器starting事件(通过spring的事件多播器) listeners.starting(); try { //封装命令行参数 ApplicationArguments applicationArguments = new DefaultApplicationArguments(args); /** * 准备容器环境 * 1: 获取或者创建环境 * 2:把命令行参数设置到环境中 * 3:通过监听器发布环境准备事件 */ ConfigurableEnvironment environment = prepareEnvironment(listeners, applicationArguments); configureIgnoreBeanInfo(environment); //打印Springboot的图标 Banner printedBanner = printBanner(environment); //创建容器根据webApplicationType来创建容器(通过反射创建) context = createApplicationContext(); exceptionReporters = getSpringFactoriesInstances(SpringBootExceptionReporter.class, new Class[] { ConfigurableApplicationContext.class }, context); /** * 准备上下文 * 1:把环境设置到容器中 * 2: 循环调用ApplicationContextInitializer进行容器初始化工作 * 3: 发布容器上下文准备完成事件 * 4: 注册关于Springboot特性的相关单例Bean * 5: 发布容器上下文加载完毕事件 */ prepareContext(context, environment, listeners, applicationArguments, printedBanner); refreshContext(context); //运行ApplicationRunner和CommandLineRunner afterRefresh(context, applicationArguments); stopWatch.stop(); if (this.logStartupInfo) { new StartupInfoLogger(this.mainApplicationClass).logStarted(getApplicationLog(), stopWatch); } //发布容器启动事件 listeners.started(context); //运行ApplicationRunner和CommandLineRunner callRunners(context, applicationArguments); } catch (Throwable ex) { //出现异常调用异常分析保护类进行分析 handleRunFailure(context, ex, exceptionReporters, listeners); throw new IllegalStateException(ex); } try { //发布容器运行事件 listeners.running(context); } catch (Throwable ex) { handleRunFailure(context, ex, exceptionReporters, null); throw new IllegalStateException(ex); } return context; }③ org.springframework.boot.SpringApplication#refreshContext
④ org.springframework.boot.SpringApplication#refresh
⑤ org.springframework.context.support.AbstractApplicationContext#refresh
到了AbstractApplicationContext#refresh方法,之前讲过Spring IoC源码解析讲过该方法的12大步,这里就不细说,详细可以参考:Spring系列(三):Spring IoC源码解析,里面说过有一步就是onRefresh(),这个方法默认是空的,由子类根据自身需要去实现
⑥ org.springframework.boot.web.servlet.context.ServletWebServerApplicationContext#onRefresh
该onRefresh方法分2步
第一:super.onRefresh(); 调用父类的onRefresh()
第二:createWebServer();创建Web服务,很重要,很重要,很重要!!!
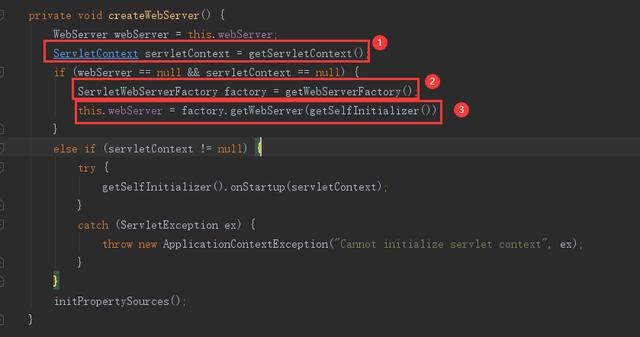
⑦ createWebServer()方法
第一:ServletContext servletContext = getServletContext(); 获取Servlet的上下文
第二:ServletWebServerFactory factory = getWebServerFactory();获取Tomcat的Web服务工厂
第三:this.webServer = factory.getWebServer(getSelfInitializer()); 创建一个Web服务器
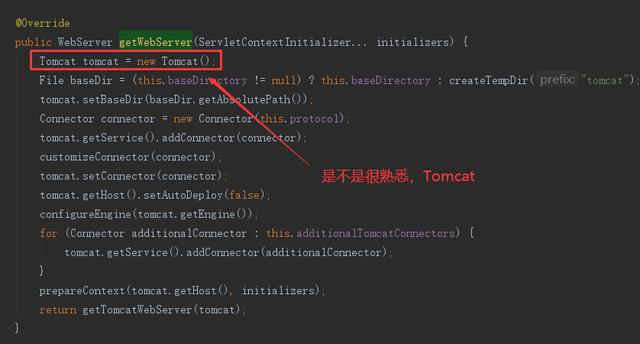
⑧ TomcatServletWebServerFactory#getWebServer()方法,主要用于创建一个Tomcat Web容器
到此我们知道Spring Boot的启动通过Spring IoC的refresh中的的onRefresh()带动了Tomcat的启动,跟我们之前我们学Spring Mvc的时候刚好相反,Spring Mvc的是Tomcat的启动带动了Spring容器的启动;
三、普通Web工程启动
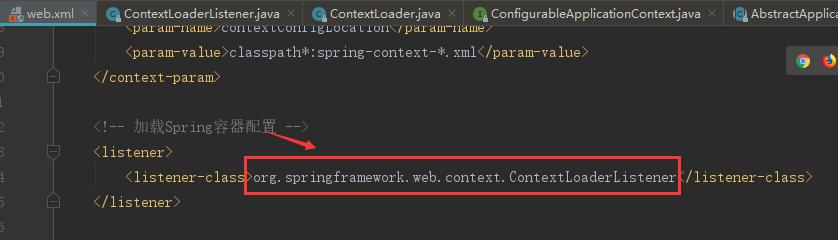
1、普通的web工程,我们找到web.xml,会发现都配置了如下的加载Spring的配置。
2、Tomcat启动的时候会调用该上下文加载的的监听器的contextInitialized方法,我们进入到该方法:

3、进入初始化Web应用上下文initWebApplicationContext方法中:
- this.context = createWebApplicationContext(servletContext);
- configureAndRefreshWebApplicationContext(cwac, servletContext);
4、进去到configureAndRefreshWebApplicationContext(cwac, servletContext)方法中:
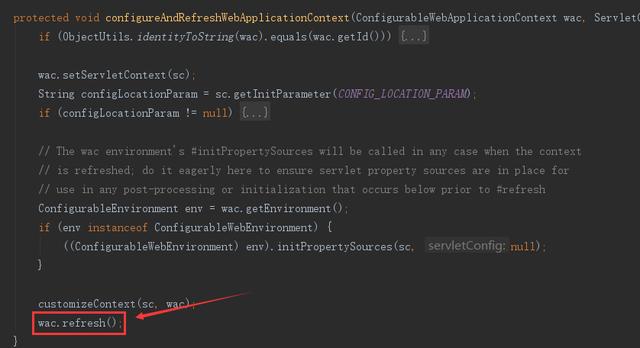
5、进入到refresh方法实际就到了org.springframework.context.support.AbstractApplicationContext#refresh的方法
这个方法很熟悉了,Spring IoC的refresh的12大步;
四、Spring Boot启动流程图
分类: spring boot
最后,咱给小编:
1. 点赞+关注
2. 点头像关注后多多评论,转发给有需要的朋友。
谢谢!!


 462
462


 被折叠的 条评论
为什么被折叠?
被折叠的 条评论
为什么被折叠?
 到【灌水乐园】发言


