


wxPython实现Frame之间的跳转/更新的一种方法
wxPython是Python中重要的GUI框架,下面通过自己的方法实现模拟类似PC版微信登录,并跳转到主界面(朋友圈)的流程。
(一)项目目录
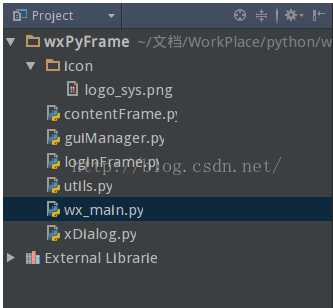
【说明】
icon: 保存项目使用的图片资源
wx_main.py : 项目入口文件,运行此文件可以看见效果。
loginFrame.py:登录的界面的Frame定义绘制文件
contentFrame.py:登录成功之后的界面Frame定义绘制文件
guiManager.py:界面创建和管理
utils.py:工具类,其中定义了一个获取icon文件夹中文件全路径的工具函数
xDialog.py:定义了有两项输入项的Dialog的样式
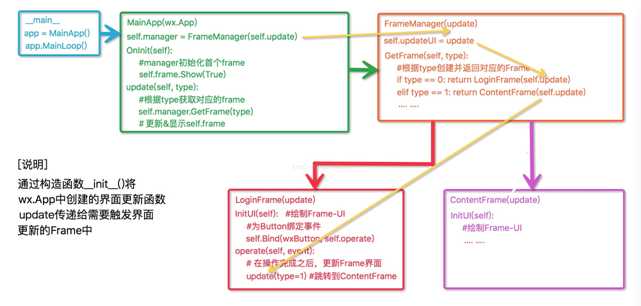
(二)项目流程图
【说明】
wxPython的应用入口是在wx.App()实现的,在OnInit()函数中创建要显示的Frame对象,在wx.App子类中实现界面刷新的函数update(),并将其传递给新创建的Frame对象,在Frame需要触发Frame更新的时候,通过这个回调函数update()来通知wx.App()进行Frame的更新。
(三)效果演示
略
(四)项目代码
(4-1)wx_main.py
1 #coding=utf-8
2
3 importwx4 importguiManager as FrameManager5
6 classMainAPP(wx.App):7
8 defOnInit(self):9 self.manager =FrameManager.GuiManager(self.UpdateUI)10 self.frame =self.manager.GetFrame(0)11 self.frame.Show()12 returnTrue13
14 defUpdateUI(self, type):15 self.frame.Show(False)16 self.frame =self.manager.GetFrame(type)17 self.frame.Show(True)18
19 defmain():20 app =MainAPP()21 app.MainLoop()22
23 if __name__ == ‘__main__‘:24 main()
(4-2)guiManager.py
1 #coding=utf-8
2 importloginFrame3 importcontentFrame4
5 classGuiManager():6 def __init__(self, UpdateUI):7 self.UpdateUI =UpdateUI8 self.frameDict = {} #用来装载已经创建的Frame对象
9
10 defGetFrame(self, type):11 frame =self.frameDict.get(type)12
13 if frame isNone:14 frame =self.CreateFrame(type)15 self.frameDict[type] =frame16
17 returnframe18
19 defCreateFrame(self, type):20 if type ==0:21 return loginFrame.LoginFrame(parent=None, id=type, UpdateUI=self.UpdateUI)22 elif type == 1:23 return contentFrame.ContentFrame(parent=None, id=type, UpdateUI=self.UpdateUI)
(4-3)loginFrame.py
1 #coding=utf-8
2 importwx3 #导入wxPython中的通用Button
4 importwx.lib.buttons as wxButton5
6 from utils importload_image7 importxDialog8
9 classLoginFrame(wx.Frame):10 def __init__(self, parent=None, id=-1, UpdateUI=None):11 wx.Frame.__init__(self, parent, id, title=‘登录界面‘, size=(280, 400), pos=(500, 200))12
13 self.UpdateUI =UpdateUI14 self.InitUI() #绘制UI界面
15
16 defInitUI(self):17 panel =wx.Panel(self)18
19 logo_sys = wx.Image(load_image(‘logo_sys.png‘), wx.BITMAP_TYPE_ANY).ConvertToBitmap()20 wx.StaticBitmap(panel, -1, logo_sys, pos=(90, 90), size=(100, 100))21
22 logo_title = wx.StaticText(panel, -1, ‘天马行空‘, pos=(120, 210))23 logo_title.SetForegroundColour(‘#0a74f7‘)24 titleFont = wx.Font(13, wx.DEFAULT, wx.BOLD, wx.NORMAL, True)25 logo_title.SetFont(titleFont)26
27 button_Login = wxButton.GenButton(panel, -1, ‘登录‘, pos=(40, 270), size=(200, 40), style=wx.BORDER_MASK)28 button_Login.SetBackgroundColour(‘#0a74f7‘)29 button_Login.SetForegroundColour(‘white‘)30 self.Bind(wx.EVT_BUTTON, self.loginSys, button_Login)31
32
33 defloginSys(self, event):34 dlg = LoginDialog(self.loginFunction, ‘#0a74f7‘)35 dlg.Show()36
37 defloginFunction(self, account, password):38 print ‘接收到用户的输入:‘, account, password39 self.UpdateUI(1) #更新UI-Frame
40
41 classLoginDialog(xDialog.InputDialog):42 def __init__(self, func_callBack, themeColor):43 xDialog.InputDialog.__init__(self, ‘登录系统‘, func_callBack, themeColor)
(4-4)contentFrame.py
1 #coding=utf-8
2 importwx3
4 classContentFrame(wx.Frame):5 def __init__(self, parent=None, id=-1, UpdateUI=None):6 wx.Frame.__init__(self, parent, -1, title=‘天马行空的朋友圈‘, size=(400, 400), pos=(500, 200))7
8 self.UpdateUI =UpdateUI9 self.InitUI() #绘制UI
10
11 defInitUI(self):12
13 panel =wx.Panel(self)14 wx.StaticText(panel, -1, u‘欢迎您的到来!‘, pos=(30, 30))
(4-5)xDialog.py
1 #coding=utf-8
2
3 importwx4
5 classInputDialog(wx.Dialog):6 def __init__(self, title, func_callBack, themeColor):7 wx.Dialog.__init__(self, None, -1, title, size=(300, 200))8 self.func_callBack =func_callBack9 self.themeColor =themeColor10
11 self.InitUI() #绘制Dialog的界面
12
13 defInitUI(self):14 panel =wx.Panel(self)15
16 font = wx.Font(14, wx.DEFAULT, wx.BOLD, wx.NORMAL, True)17
18 accountLabel = wx.StaticText(panel, -1, ‘账号‘, pos=(20, 25))19 accountLabel.SetForegroundColour(self.themeColor)20 accountLabel.SetFont(font)21
22 self.accountInput = wx.TextCtrl(panel, -1, u‘‘, pos=(80, 25), size=(180, -1))23 self.accountInput.SetForegroundColour(‘gray‘)24 self.accountInput.SetFont(font)25
26 passwordLabel = wx.StaticText(panel, -1, ‘密码‘, pos=(20, 70))27 passwordLabel.SetFont(font)28 passwordLabel.SetForegroundColour(self.themeColor)29
30 self.passwordInput = wx.TextCtrl(panel, -1, u‘‘, pos=(80, 70), size=(180, -1), style=wx.TE_PASSWORD)31 self.passwordInput.SetForegroundColour(self.themeColor)32 self.passwordInput.SetFont(font)33
34 sureButton = wx.Button(panel, -1, u‘登录‘, pos=(20, 130), size=(120, 40))35 sureButton.SetForegroundColour(‘white‘)36 sureButton.SetBackgroundColour(self.themeColor)37 #为【确定Button】绑定事件
38 self.Bind(wx.EVT_BUTTON, self.sureEvent, sureButton)39
40 cancleButton = wx.Button(panel, -1, u‘取消‘, pos=(160, 130), size=(120, 40))41 cancleButton.SetBackgroundColour(‘black‘)42 cancleButton.SetForegroundColour(‘#ffffff‘)43 #为【取消Button】绑定事件
44 self.Bind(wx.EVT_BUTTON, self.cancleEvent, cancleButton)45
46 defsureEvent(self, event):47 account =self.accountInput.GetValue()48 password =self.passwordInput.GetValue()49 #通过回调函数传递数值
50 self.func_callBack(account, password)51 self.Destroy() #销毁隐藏Dialog
52
53 defcancleEvent(self, event):54 self.Destroy() #销毁隐藏Dialog
(4-6)utils.py
1 #coding=utf-8
2 importos.path3
4 main_dir = os.path.split(os.path.abspath(__file__))[0]5
6 #返回icon中文件的系统文件路径
7 defload_image(file):8 filePath = os.path.join(main_dir, ‘icon‘, file)9 return filePath
荡的,不是本人作品
原文地址:https://www.cnblogs.com/qdzj/p/8974688.html


 2314
2314


 被折叠的 条评论
为什么被折叠?
被折叠的 条评论
为什么被折叠?
 到【灌水乐园】发言


