


前言
通常我们将用户界面描述为一种状态。一个状态定义了一组属性的改变,并且会在一定的条件下被触发。另外在这些状态转化的过程中可以有一个过渡,定义了这些属性的动画或者一些附加的动作。当进入一个新的状态时,动作也可以被执行。
状态
在QML中,使用State元素来定义状态,需要与基础元素对象Item的states序列属性连接,状态通过它的状态名来鉴别,由组成它的一系列简单的属性来改变元素。默认的状态在初始化元素属性时定义,并命名为“”(一个空的字符串)。
可以通过给一个元素分配新的状态属性名来改变状态,例如:
Item { id: root states: [ State { name: "go" PropertyChanges { ... } }, State { name: "stop" PropertyChanges { ... } } ]}另一种切换属性的方法是使用状态元素的when属性。when属性能够被设置为一个表达式的结果,当结果为true时,状态被使用。
Item { id: root states: [ ... ] Button { id: goButton ... onClicked: root.state = "go" }}红绿灯的实现
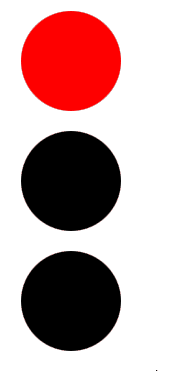
我们都知道马路上的红绿灯上有红绿黄三个信号灯,且两个信号灯不会同时亮,我们通过状态的改变来实现一个简单的红绿灯。为了简单起见,我们使用三个包含圆边的矩形框,设置圆的半径为宽度的一半,宽度与高度相同。我们使鼠标区域覆盖整个界面,并且在鼠标点击时进行状态的切换来改变灯的颜色。
import QtQuick 2.3import QtQuick.Window 2.2Window { id: root visible: true width: 640 height: 480 Item { anchors.fill: parent Rectangle { id: redlight x: 25; y: 15 width: 100; height: width radius: width / 2 color: "black" } Rectangle { id: greenlight x: 25; y: 135 width: 100; height: width radius: width / 2 color: "black" } Rectangle { id: yellowlight x: 25; y: 255 width: 100; height: width radius: width / 2 color: "black" } state: "red" states: [ State { name: "red" PropertyChanges { target: redlight; color: "red" } PropertyChanges { target: greenlight; color: "black" } PropertyChanges { target: yellowlight; color: "black" } }, State { name: "green" PropertyChanges { target: redlight; color: "black" } PropertyChanges { target: greenlight; color: "green" } PropertyChanges { target: yellowlight; color: "black" } }, State { name: "yellow" PropertyChanges { target: redlight; color: "black" } PropertyChanges { target: greenlight; color: "black" } PropertyChanges { target: yellowlight; color: "yellow" } } ] MouseArea { anchors.fill: parent onClicked: { if (parent.state == "red") parent.state = "green"; else if (parent.state == "green") parent.state = "yellow"; else if (parent.state == "yellow") parent.state = "red"; } } }}运行效果如下:

上面我们已经成功实现了红绿灯的效果。但是为了让用户界面看起来更加的自然,我们下面将使用动画效果来增加一些过渡。一个过渡也能被状态的改变触发。
过渡
一系列的过渡能够加入任何元素中,一个过渡由状态的改变触发执行。你可以使用属性的from:和to:来定义状态改变的过渡。这两个属性就像一个过滤器,当过滤器为true时,过渡生效。你也可以使用“”来表示任何状态。
接下来我们来改造一下上面的例子,在其中添加一个灯光改变的动画。在过渡中我们给每个灯添加两个颜色的动画,这个动画将按照状态的描述来改变属性,每个动画支持1000。
import QtQuick 2.3import QtQuick.Window 2.2Window { id: root visible: true width: 640 height: 480 Item { anchors.fill: parent Rectangle { id: redlight x: 25; y: 15 width: 100; height: width radius: width / 2 color: "black" } Rectangle { id: greenlight x: 25; y: 135 width: 100; height: width radius: width / 2 color: "black" } Rectangle { id: yellowlight x: 25; y: 255 width: 100; height: width radius: width / 2 color: "black" } state: "red" states: [ State { name: "red" PropertyChanges { target: redlight; color: "red" } PropertyChanges { target: greenlight; color: "black" } PropertyChanges { target: yellowlight; color: "black" } }, State { name: "green" PropertyChanges { target: redlight; color: "black" } PropertyChanges { target: greenlight; color: "green" } PropertyChanges { target: yellowlight; color: "black" } }, State { name: "yellow" PropertyChanges { target: redlight; color: "black" } PropertyChanges { target: greenlight; color: "black" } PropertyChanges { target: yellowlight; color: "yellow" } } ] transitions: [ Transition { from: "red" to: "green" ColorAnimation { target: redlight; properties: "color"; duration: 1000 } ColorAnimation { target: greenlight; properties: "color"; duration: 1000 } }, Transition { from: "green" to: "yellow" ColorAnimation { target: greenlight; properties: "color"; duration: 1000 } ColorAnimation { target: yellowlight; properties: "color"; duration: 1000 } }, Transition { from: "yellow" to: "red" ColorAnimation { target: yellowlight; properties: "color"; duration: 1000 } ColorAnimation { target: redlight; properties: "color"; duration: 1000 } } ] MouseArea { anchors.fill: parent onClicked: { if (parent.state == "red") parent.state = "green"; else if (parent.state == "green") parent.state = "yellow"; else if (parent.state == "yellow") parent.state = "red"; } } }}运行效果如下:


 551
551

 被折叠的 条评论
为什么被折叠?
被折叠的 条评论
为什么被折叠?
 到【灌水乐园】发言


