


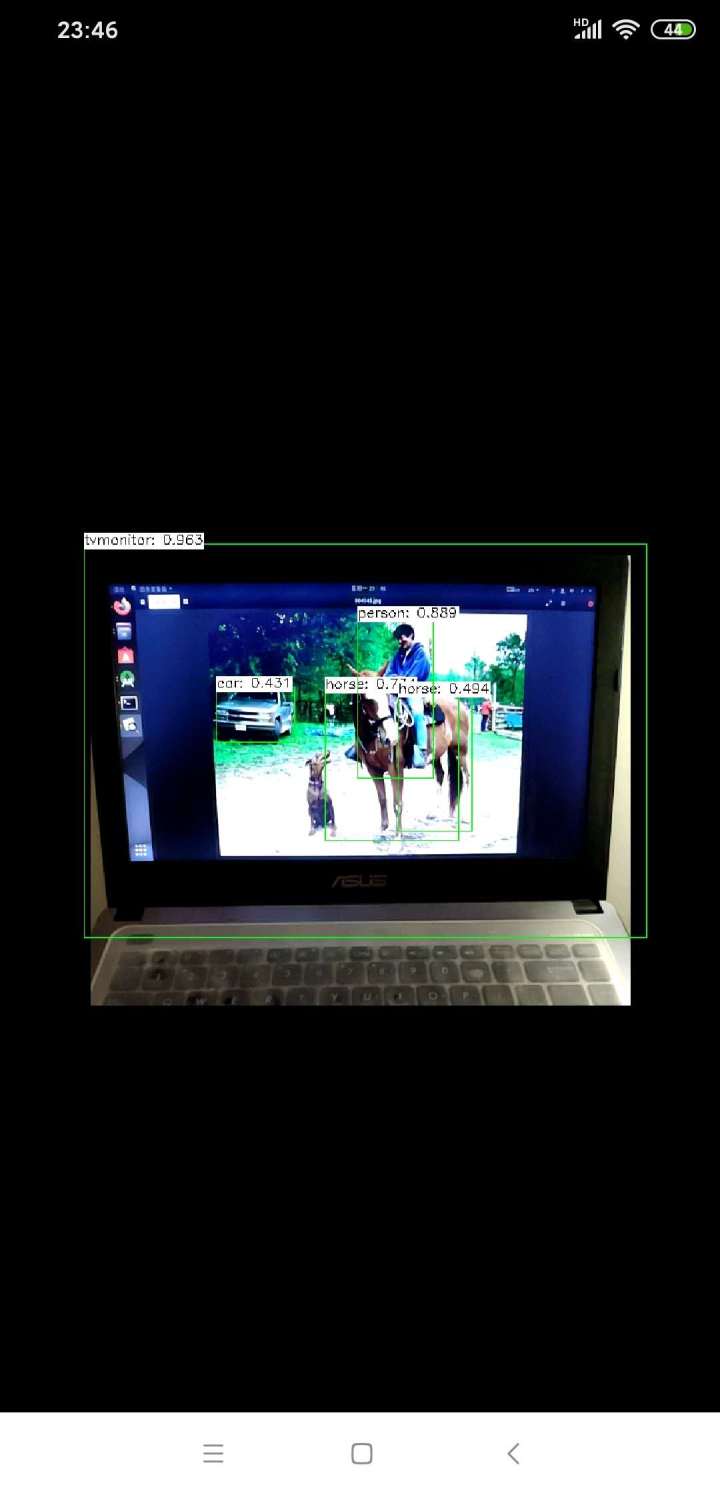
opencv添加了dnn模块后,可以使用dnn进行深度学习网络部署推理,支持常用的深度学习框架,如caffe、tf、torch、mxnet、darknet等,本文主要是使用opencv的dnn模块,移植训练好的caffe model到安卓手机上,主要参照官放教程(https://docs.opencv.org/3.4.0/d0/d6c/tutorial_dnn_android.html),以及自己的一些改动。
准备工作:
1.环境:ubuntu18.04,andriod studio,OpenCV-android-sdk3.4.9(Releases · opencv/opencv);
2.pc上训练好的网络模型,这里我使用的是caffe版的ssd_mobilenet_v1,下载地址https://github.com/chuanqi305/MobileNet-SSD;
实现步骤如下:
1.打开Android Studio,新建一个工程,命名ssd_mobilenet,选择最低的安卓版本;
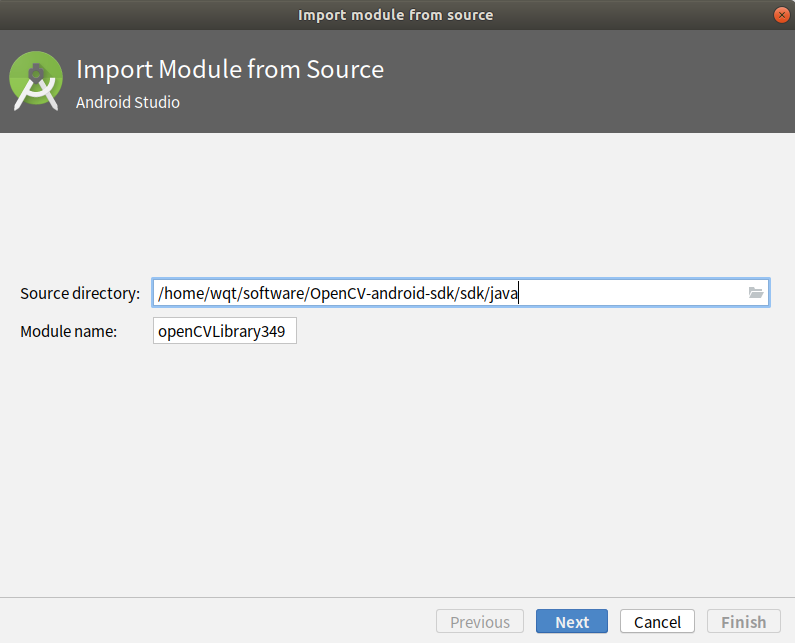
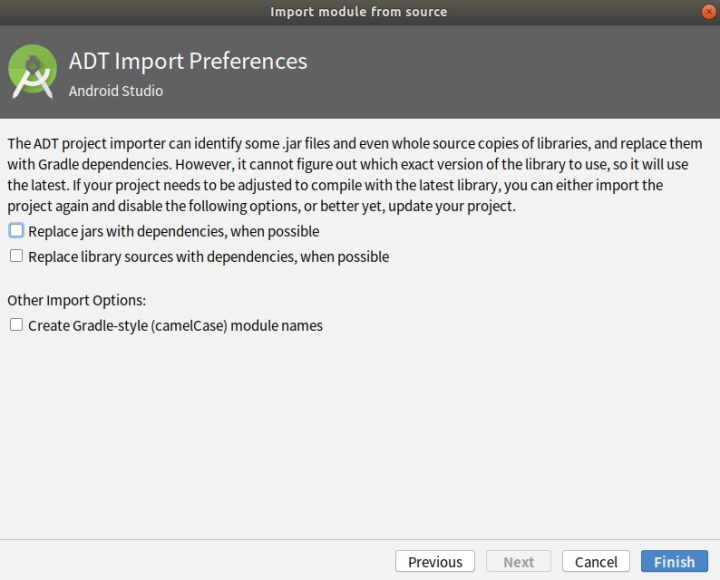
2.添加opencv库,File->New->Import,选择路径OpenCV-android-sdk/sdk/java;
- 打开./app/build.gradle和./openCVLibrary349/build.gradle:
修改 compileSdkVersion 、 buildToolsVersion 、minSdkVersion 和targetSdkVersion (根据自己的环境修改)
compileSdkVersion 14 -> compileSdkVersion 30
buildToolsVersion "28.0.3" -> buildToolsVersion "30.0.0"
minSdkVersion 8 -> minSdkVersion 23
targetSdkVersion 21 -> targetSdkVersion 30
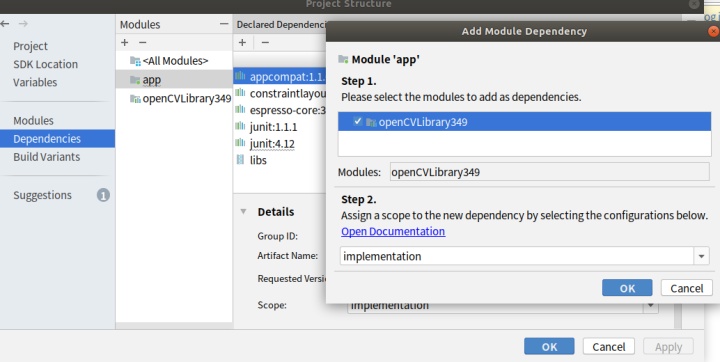
File->Project Structure. 添加 OpenCV module :
- 删除./ssd_mobilenet/openCVLibrary349/src/main/AndroidManifest.xml文件中的,<uses-sdk android:minSdkVersion="8" android:targetSdkVersion="21" /> :
- 复制./OpenCV-android-sdk/sdk/native/libs文件夹到./ssd_mobilenet/app/src/main下,并命名为jniLibs:
- 在./ssd_mobilenet/app/build.gradle的andriod节点中添加(OpenCV for Android(2):在Android中运行深度网络MobileNet-SSD):
sourceSets {
    main {
        jniLibs.srcDirs = ['src/main/jniLibs']
    }
}
3.make a sample
- 修改
app/src/main/res/layout/activity_main.xml:
<?xml version="1.0" encoding="utf-8"?>
<androidx.constraintlayout.widget.ConstraintLayout xmlns:android="http://schemas.android.com/apk/res/android"
    xmlns:app="http://schemas.android.com/apk/res-auto"
    xmlns:tools="http://schemas.android.com/tools"
    android:layout_width="match_parent"
    android:layout_height="match_parent"
    tools:context=".MainActivity">

    <org.opencv.android.JavaCameraView
        android:id="@+id/CameraView"
        android:layout_width="match_parent"
        android:layout_height="match_parent"
        android:visibility="visible" />

</androidx.constraintlayout.widget.ConstraintLayout>- 将下载好的MobileNetSSD_deploy.caffemodel和MobileNetSSD_deploy.prototxt复制到./ssd_mobilenet/app/src/main/assets下,没有assets就手动新建一个;
- 修改
/app/src/main/AndroidManifest.xml:
<?xml version="1.0" encoding="utf-8"?>
<manifest xmlns:android="http://schemas.android.com/apk/res/android"
    xmlns:dist="http://schemas.android.com/apk/distribution"
    package="com.example.ssd_mobilenet">

    <dist:module dist:instant="true" />

    <application
        android:allowBackup="true"
        android:icon="@mipmap/ic_launcher"
        android:label="@string/app_name"
        android:roundIcon="@mipmap/ic_launcher_round"
        android:supportsRtl="true"
        android:theme="@style/Theme.AppCompat.NoActionBar">  <!--Full screen mode-->
        <activity android:name=".MainActivity">
            android:screenOrientation="landscape">  <!--Screen orientation-->
            <intent-filter>
                <action android:name="android.intent.action.MAIN" />

                <category android:name="android.intent.category.LAUNCHER" />
            </intent-filter>
        </activity>
    </application>

    <!--Allow to use a camera-->
    <uses-permission android:name="android.permission.CAMERA"/>
    <uses-feature android:name="android.hardware.camera" android:required="false"/>
    <uses-feature android:name="android.hardware.camera.autofocus" android:required="false"/>
    <uses-feature android:name="android.hardware.camera.front" android:required="false"/>
    <uses-feature android:name="android.hardware.camera.front.autofocus" android:required="false"/>

</manifest>- 修改
app/src/main/java/org/opencv/samples/opencv_mobilenet/MainActivity.java,修改onResume()函数,直接将opencv库打包进apk中,而不使用opencv manager(Android studio中在用opencv时不使用opencv manager),增加Imgproc.warpAffine()函数,使摄像头正向拍摄:
package com.example.ssd_mobilenet;
import android.content.Context;
import android.content.res.AssetManager;
import android.os.Bundle;
//import android.support.v7.app.AppCompatActivity;
import androidx.appcompat.app.AppCompatActivity;
import android.util.Log;
import org.opencv.android.BaseLoaderCallback;
import org.opencv.android.CameraBridgeViewBase;
import org.opencv.android.CameraBridgeViewBase.CvCameraViewFrame;
import org.opencv.android.CameraBridgeViewBase.CvCameraViewListener2;
import org.opencv.android.LoaderCallbackInterface;
import org.opencv.android.OpenCVLoader;
import org.opencv.core.Core;
import org.opencv.core.Mat;
import org.opencv.core.Point;
import org.opencv.core.Scalar;
import org.opencv.core.Size;
import org.opencv.dnn.Net;
import org.opencv.dnn.Dnn;
import org.opencv.imgproc.Imgproc;
import java.io.BufferedInputStream;
import java.io.File;
import java.io.FileOutputStream;
import java.io.IOException;
public class MainActivity extends AppCompatActivity implements CameraBridgeViewBase.CvCameraViewListener2 {
    // Initialize OpenCV manager.
    private BaseLoaderCallback mLoaderCallback = new BaseLoaderCallback(this) {
        @Override
        public void onManagerConnected(int status) {
            switch (status) {
                case LoaderCallbackInterface.SUCCESS: {
                    Log.i(TAG, "OpenCV loaded successfully");
                    mOpenCvCameraView.enableView();
                    break;
                }
                default: {
                    super.onManagerConnected(status);
                    break;
                }
            }
        }
    };
    @Override
    public void onResume() {
        super.onResume();
//        OpenCVLoader.initAsync(OpenCVLoader.OPENCV_VERSION, this, mLoaderCallback);

        if (!OpenCVLoader.initDebug()) {
            Log.d(TAG, "Internal OpenCVlibrary not found. Using OpenCV Manager for initialization");
            OpenCVLoader.initAsync(OpenCVLoader.OPENCV_VERSION, this,mLoaderCallback);
        }
        else {
            Log.d(TAG, "OpenCV libraryfound inside package. Using it!");
            mLoaderCallback.onManagerConnected(LoaderCallbackInterface.SUCCESS);
        }

    }
    @Override
    protected void onCreate(Bundle savedInstanceState) {
        super.onCreate(savedInstanceState);
        setContentView(R.layout.activity_main);
        // Set up camera listener.
        mOpenCvCameraView = (CameraBridgeViewBase)findViewById(R.id.CameraView);
        mOpenCvCameraView.setVisibility(CameraBridgeViewBase.VISIBLE);
        mOpenCvCameraView.setCvCameraViewListener(this);

        mOpenCvCameraView.setCameraIndex(CameraBridgeViewBase.CAMERA_ID_BACK);
//        mOpenCvCameraView.setCameraIndex(CameraBridgeViewBase.CAMERA_ID_FRONT);
        //CAMERA_ID_FRONT 前置摄像头 CAMERA_ID_BACK 为后置摄像头
    }
    // Load a network.
    public void onCameraViewStarted(int width, int height) {
        String proto = getPath("MobileNetSSD_deploy.prototxt", this);
        String weights = getPath("MobileNetSSD_deploy.caffemodel", this);
        net = Dnn.readNetFromCaffe(proto, weights);
        Log.i(TAG, "Network loaded successfully");
    }
    public Mat onCameraFrame(CameraBridgeViewBase.CvCameraViewFrame inputFrame) {
        java.text.DecimalFormat myformat=new java.text.DecimalFormat("0.000");
        final int IN_WIDTH = 300;
        final int IN_HEIGHT = 300;
        final float WH_RATIO = (float)IN_WIDTH / IN_HEIGHT;
        final double IN_SCALE_FACTOR = 0.007843;
        final double MEAN_VAL = 127.5;
        final double THRESHOLD = 0.2;
        // Get a new frame
        Mat frame1 = inputFrame.rgba();

        Mat frame = new Mat();
        Mat rotateMat = Imgproc.getRotationMatrix2D(new Point(frame1.rows()/2,frame1.cols()/2), -90, 1);
        Imgproc.warpAffine(frame1, frame, rotateMat, frame.size());

        Imgproc.cvtColor(frame, frame, Imgproc.COLOR_RGBA2RGB);
        // Forward image through network.
        Mat blob = Dnn.blobFromImage(frame, IN_SCALE_FACTOR,
                new Size(IN_WIDTH, IN_HEIGHT),
                new Scalar(MEAN_VAL, MEAN_VAL, MEAN_VAL), false);
        net.setInput(blob);
        Mat detections = net.forward();
        int cols = frame.cols();
        int rows = frame.rows();

        detections = detections.reshape(1, (int)detections.total() / 7);
        for (int i = 0; i < detections.rows(); ++i) {
            double confidence = detections.get(i, 2)[0];
            if (confidence > THRESHOLD) {
                int classId = (int)detections.get(i, 1)[0];
                int xLeftBottom = (int)(detections.get(i, 3)[0] * cols);
                int yLeftBottom = (int)(detections.get(i, 4)[0] * rows);
                int xRightTop   = (int)(detections.get(i, 5)[0] * cols);
                int yRightTop   = (int)(detections.get(i, 6)[0] * rows);
                // Draw rectangle around detected object.
                Imgproc.rectangle(frame, new Point(xLeftBottom, yLeftBottom),
                        new Point(xRightTop, yRightTop),
                        new Scalar(0, 255, 0));
                String label = classNames[classId] + ": " + myformat.format(confidence);
                int[] baseLine = new int[1];
                Size labelSize = Imgproc.getTextSize(label, Core.FONT_HERSHEY_SIMPLEX, 0.5, 1, baseLine);
                // Draw background for label.
                Imgproc.rectangle(frame, new Point(xLeftBottom, yLeftBottom - labelSize.height),
                        new Point(xLeftBottom + labelSize.width, yLeftBottom + baseLine[0]),
                        new Scalar(255, 255, 255), Core.FILLED);
                // Write class name and confidence.
                Imgproc.putText(frame, label, new Point(xLeftBottom, yLeftBottom),
                        Core.FONT_HERSHEY_SIMPLEX, 0.5, new Scalar(0, 0, 0));
            }
        }
        return frame;
    }
    public void onCameraViewStopped() {}
    // Upload file to storage and return a path.
    private static String getPath(String file, Context context) {
        AssetManager assetManager = context.getAssets();
        BufferedInputStream inputStream = null;
        try {
            // Read data from assets.
            inputStream = new BufferedInputStream(assetManager.open(file));
            byte[] data = new byte[inputStream.available()];
            inputStream.read(data);
            inputStream.close();
            // Create copy file in storage.
            File outFile = new File(context.getFilesDir(), file);
            FileOutputStream os = new FileOutputStream(outFile);
            os.write(data);
            os.close();
            // Return a path to file which may be read in common way.
            return outFile.getAbsolutePath();
        } catch (IOException ex) {
            Log.i(TAG, "Failed to upload a file");
        }
        return "";
    }
    private static final String TAG = "OpenCV/Sample/MobileNet";
    private static final String[] classNames = {"background",
            "aeroplane", "bicycle", "bird", "boat",
            "bottle", "bus", "car", "cat", "chair",
            "cow", "diningtable", "dog", "horse",
            "motorbike", "person", "pottedplant",
            "sheep", "sofa", "train", "tvmonitor"};
    private Net net;
    private CameraBridgeViewBase mOpenCvCameraView;
}


 1542
1542


 被折叠的 条评论
为什么被折叠?
被折叠的 条评论
为什么被折叠?
 到【灌水乐园】发言


