对于开发者而言,配置环境往往都是一件麻烦事,尤其是各个项目环境不一致,又难以统一开发环境的情况最为棘手。此时,往往可以将各个项目的环境打包成 Docker 进行使用,以此部署到同一台服务器上。本篇文章就将介绍 Docker 的是什么以及如何使用 Docker。
1. 什么是 Docker
官方文档:链接,中文文档:链接
Docker 属于 Linux 容器的一种封装,提供简单易用的容器使用接口(Docker 与虚拟机不同,无需占用过多资源,自身大小由所添加的组件决定,速度更快,且)。Docker 相当于一个虚拟环境容器,可以将你的开发环境、代码、配置文件等一并打包到这个容器中,并发布和应用到任意平台中。
Docker 中主要有三大概念:镜像(Image),容器(Container),仓库(Repository)。(此处概念的解释来源于:Docker —— 从入门到实践)
- 镜像(Image)
类似于虚拟机中的镜像,是一个包含有文件系统的面向Docker引擎的只读模板。任何应用程序运行都需要环境,而镜像就是用来提供这种运行环境的。例如一个Ubuntu镜像就是一个包含Ubuntu操作系统环境的模板,同理在该镜像上装上Apache软件,就可以称为Apache镜像。 - 容器(Container)
类似于一个轻量级的沙盒,可以将其看作一个极简的Linux系统环境(包括root权限、进程空间、用户空间和网络空间等),以及运行在其中的应用程序。Docker引擎利用容器来运行、隔离各个应用。容器是镜像创建的应用实例,可以创建、启动、停止、删除容器,各个容器之间是是相互隔离的,互不影响。注意:镜像本身是只读的,容器从镜像启动时,Docker在镜像的上层创建一个可写层,镜像本身不变。 - 仓库(Repository)
类似于代码仓库,这里是镜像仓库,是Docker用来集中存放镜像文件的地方。注意与注册服务器(Registry)的区别:注册服务器是存放仓库的地方,一般会有多个仓库;而仓库是存放镜像的地方,一般每个仓库存放一类镜像,每个镜像利用tag进行区分,比如Ubuntu仓库存放有多个版本(12.04、14.04等)的Ubuntu镜像。
2. Docker 的安装和卸载
Docker 分为 CE 和 EE 两大版本。CE 即社区版(免费,支持周期 7 个月),EE 即企业版,强调安全,付费使用,支持周期 24 个月。Docker CE 分为 stable, test, 和 nightly 三个更新频道。每六个月发布一个 stable 版本 (18.09, 19.03, 19.09…)。
- 安装 Docker
官方支持三种安装方法:Install using the repository,Install from a package,Install using the convenience script。
其中,本文展示的用脚本自动安装的方式,在 Ubuntu 的终端上执行如下命令即可:
安装完毕后,可以通过docker version和docker run heloo-world进行验证,其验证结果分别如下:
其中,本文展示的用脚本自动安装的方式,在 Ubuntu 的终端上执行如下命令即可:
$ curl -fsSL https://get.docker.com -o get-docker.sh
$ sudo sh get-docker.sh
运行结果如下所示:
$ sudo sh get-docker.sh
# Executing docker install script, commit: 6bf300318ebaab958c4adc341a8c7bb9f3a54a1a
Warning: the "docker" command appears to already exist on this system.

If you already have Docker installed, this script can cause trouble, which is
why we're displaying this warning and provide the opportunity to cancel the
installation.

If you installed the current Docker package using this script and are using it
again to update Docker, you can safely ignore this message.

You may press Ctrl+C now to abort this script.
+ sleep 20
+ sh -c apt-get update -qq >/dev/null
+ sh -c apt-get install -y -qq apt-transport-https ca-certificates curl >/dev/null
+ sh -c curl -fsSL "https://download.docker.com/linux/ubuntu/gpg" | apt-key add -qq - >/dev/null
+ sh -c echo "deb [arch=amd64] https://download.docker.com/linux/ubuntu xenial stable" > /etc/apt/sources.list.d/docker.list
+ sh -c apt-get update -qq >/dev/null
+ [ -n  ]
+ sh -c apt-get install -y -qq --no-install-recommends docker-ce >/dev/null
+ sh -c docker version
Client: Docker Engine - Community
 Version:           19.03.0
 API version:       1.40
 Go version:        go1.12.5
 Git commit:        aeac949
 Built:             Wed Jul 17 18:16:07 2019
 OS/Arch:           linux/amd64
 Experimental:      false

Server: Docker Engine - Community
 Engine:
  Version:          19.03.0
  API version:      1.40 (minimum version 1.12)
  Go version:       go1.12.5
  Git commit:       aeac949
  Built:            Wed Jul 17 18:14:42 2019
  OS/Arch:          linux/amd64
  Experimental:     false
 containerd:
  Version:          1.2.6
  GitCommit:        894b81a4b802e4eb2a91d1ce216b8817763c29fb
 runc:
  Version:          1.0.0-rc8
  GitCommit:        425e105d5a03fabd737a126ad93d62a9eeede87f
 docker-init:
  Version:          0.18.0
  GitCommit:        fec3683
If you would like to use Docker as a non-root user, you should now consider
adding your user to the "docker" group with something like:

sudo usermod -aG docker your-user

Remember that you will have to log out and back in for this to take effect!

WARNING: Adding a user to the "docker" group will grant the ability to run
         containers which can be used to obtain root privileges on the
         docker host.
         Refer to https://docs.docker.com/engine/security/security/#docker-daemon-attack-surface
         for more information.
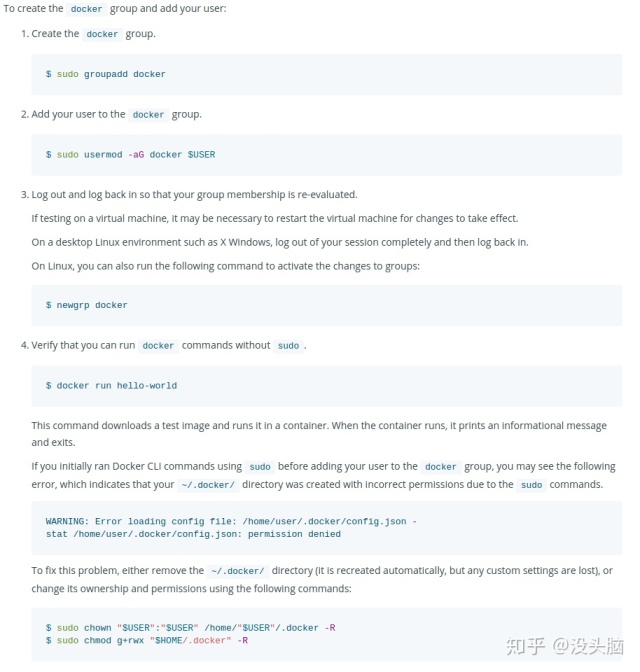
默认情况下,docker 命令会使用 Unix socket 与 Docker 引擎通讯。而只有 root 用户和 docker 组的用户才可以访问 Docker 引擎的 Unix socket。出于安全考虑,一般 Linux 系统上不会直接使用 root 用户。因此,更好地做法是将需要使用 docker 的用户加入 docker 用户组。
建立 docker 组:
$ sudo groupadd docker
将当前用户加入 docker 组:
$ sudo usermod -aG docker $USER
将当前用户加入 docker 组后,退出当前终端并重新登录,可以进行之前的测试。(如果还不行,使用命令newgrp docker即可)

- 卸载 Docker
卸载 Docker CE 包
$ sudo apt-get purge docker-ce
卸载本机所有的镜像、容器、卷以及配置文件。
$ sudo rm -rf /var/lib/docker
(若仍无法删除,可以使用 dpkg -l | grep docker查询docker相关的软件包,再利用 sudo apt remove --purge 进行指定删除)
3. Docker 中关于镜像的基本操作
如果在使用过程中发现拉取 Docker 镜像十分缓慢,可以配置 Docker 国内镜像加速。
- 获取镜像
通常情况下,人们都是通过 Docker Hub 获取别人已经搭建好的镜像。在 Docker Hub 上,许多用户建立各自的仓库,存放了不同的镜像。标准的 Docker Hub 的Docker 镜像名称为:<user name>/<repo name>:<tag name>(有些公司发布镜像仅包括 repo name 和 tag name)。
在 Docker Hub 上查询到目标镜像后,可以用相关命令进行获取:
docker pull [选项] [Docker Registry 地址[:端口号]/]仓库名[:标签]举例:
docker pull nvidia/cuda:10.0-cudnn7-runtime-ubuntu16.04 - 创建镜像
一般来说,有两种方式定制镜像:使用他人搭建好的镜像,新建容器,在其内部搭建所需环境并使用docker commit命令将该容器保存成镜像;编写 Dockerfile 文件,使用docker build命令创建镜像(推荐使用)。举例: - 方法一:(参考 monkut/Ubuntu1604py36Dockerfile)
# crete container to run
$ docker run -it nvidia/cuda:10.0-cudnn7-runtime-ubuntu16.04

# install python 3
root@1e8d4c82f288:/# apt-get update
root@1e8d4c82f288:/# apt-get install python3
root@1e8d4c82f288:/# apt-get install python3-pip
root@1e8d4c82f288:/# apt-get install libboost-all-dev
root@1e8d4c82f288:/# apt-get install cmake
root@1e8d4c82f288:/# apt-get install wget
root@1e8d4c82f288:/# apt-get install -y libglib2.0-0 libsm6 libxext6 libxrender-dev

# install anaconda
root@1e8d4c82f288:/# wget https://mirrors.tuna.tsinghua.edu.cn/anaconda/archive/Anaconda3-5.1.0-Linux-x86_64.sh
root@1e8d4c82f288:/# chmod +x Anaconda3-5.1.0-Linux-x86_64.sh
root@1e8d4c82f288:/# ./Anaconda3-5.1.0-Linux-x86_64.sh
root@1e8d4c82f288:/# source ~/.bashrc

# create environments by conda
root@1e8d4c82f288:/# conda create -n test python=3.6
root@1e8d4c82f288:/# source activate test

# install PyTorch and Torchvision
root@1e8d4c82f288:/# pip install https://download.pytorch.org/whl/cu100/torch-1.1.0-cp36-cp36m-linux_x86_64.whl
root@1e8d4c82f288:/# pip install https://download.pytorch.org/whl/cu100/torchvision-0.3.0-cp36-cp36m-linux_x86_64.whl

# install gRPC
root@1e8d4c82f288:/# pip install grpcio
root@1e8d4c82f288:/# pip install grpcio-tools
root@1e8d4c82f288:/# pip install protobuf

# install other package
root@1e8d4c82f288:/# pip install yacs
root@1e8d4c82f288:/# pip install argparse
root@1e8d4c82f288:/# pip install face-alignment
root@1e8d4c82f288:/# pip install dlib

# save checkpoint
docker commit -a "putao(putao@dm-ai.cn)" -m "Facial Expression Classification" 78c21ac6275d facical_expression_cls:v1
docker save -o facial_expression_cls.tar facial_expression_cls:v1

# load image
docker load --input facial_expression_cls.tar- 方法二:
先编写 Dockerfile:
MAINTAINER putao (putao@dm-ai.cn)

RUN apt-get update && apt-get install -y --no-install-recommends
    sudo
    git
    bzip2
    python3
    python3-pip
    libboost-all-dev
    cmake
    wget

RUN wget https://mirrors.tuna.tsinghua.edu.cn/anaconda/archive/Anaconda3-5.1.0-Linux-x86_64.sh &&
    chmod +x Anaconda3-5.1.0-Linux-x86_64.sh &&
    bash Anaconda3-5.1.0-Linux-x86_64.sh -b &&
    rm Anaconda3-5.1.0-Linux-x86_64.sh

ENV PATH=/root/anaconda3/bin:$PATH
ENV CONDA_AUTO_UPDATE_CONDA=false

RUN conda create -n test python=3.6

# source activate test
ENV PATH /root/anaconda3/envs/test/bin:$PATH
RUN echo %PATH

# COPY requirements.txt .
# RUN pip install -r requirements.txt
# RUN pip install https://download.pytorch.org/whl/cu100/torch-1.1.0-cp36-cp36m-linux_x86_64.whl
# RUN pip install https://download.pytorch.org/whl/cu100/torchvision-0.3.0-cp36-cp36m-linux_x86_64.whl

RUN pip install
    torch==1.1.0
    torchvision==0.3.0
    grpcio
    grpcio-tools
    protobuf
    yacs
    argparse
    face-alignment==1.0.0
    dlib==19.17.0

接着,利用编写好的 Dockerfile,进行构建:docker build -t putao/facial_expression_cls:py3.6_pytorch1.1.0 .。- 常用命令
列出镜像:docker images
删除镜像:docker rmi <IMAGE>
重命名镜像:docker tag <old REPOSITORY>:<old TAG> or <IMAGE ID> <new REPOSITORY>:<new TAG>
登录 Docker Hub:docker login` <web>(默认登录 Docker Hub)
上传镜像:docker push <REPOSITORY>:<TAG>
4. Docker 中关于容器的基本操作
- 启动容器
- 新建容器并运行
通过命令docker run利用指定镜像创建容器,并执行相应命令。
常用命令参数:
docker run [OPTIONS] IMAGE [COMMAND] [ARG...]
-a stdin: 指定标准输入输出内容类型,可选 STDIN/STDOUT/STDERR 三项
-d: 后台运行容器,并返回容器ID
-i: 以交互模式运行容器,通常与 -t 同时使用
-t: 为容器重新分配一个伪输入终端,通常与 -i 同时使用
-P: 随机端口映射,容器内部端口随机映射到主机的高端口
-p: 指定端口映射,格式为:主机(宿主)端口:容器端口
-v: 绑定一个卷,格式为:本机绑定目录:容器内部绑定目录
--name: 对所新建容器进行命名
--rm: 容器终止后,自动删除容器文件(容器终止后默认保留容器文件)
当利用 docker run 来创建容器时,Docker 在后台运行的标准操作包括:
1. 检查本地是否存在指定的镜像,不存在就从公有仓库下载
2. 利用镜像创建并启动一个容器
3. 分配一个文件系统,并在只读的镜像层外面挂载一层可读写层
4. 从宿主主机配置的网桥接口中桥接一个虚拟接口到容器中去
5. 从地址池配置一个 ip 地址给容器
6. 执行用户指定的应用程序
7. 执行完毕后容器被终止- 重新启动已被终止容器
先通过命令docker ps -a查看容器ID。
再通过命令docker start <CONTAINER ID>重新启动已被终止的指定容器。
- 终止容器
利用命令docker stop <CONTAINER NAME/ID>。
若是利用 -it 在容器内部进行操作,仅需输入 exit 即可。 - 删除容器
利用命令docker kill <CONTAINER NAME/ID>。
若想将所有容器删除,可以输入命令docker container prune。 - 常用命令
列出容器:docker container ls -a
5. 安装 Nvidia-Docker
# 添加软件仓库
curl -s -L https://nvidia.github.io/nvidia-docker/gpgkey |
sudo apt-key add -
distribution=$(. /etc/os-release;echo $ID$VERSION_ID)
curl -s -L https://nvidia.github.io/nvidia-docker/$distribution/nvidia-docker.list |
sudo tee /etc/apt/sources.list.d/nvidia-docker.list
sudo apt-get update

# 安装 nvidia-docker2 并重新加载docker配置
sudo apt-get install -y nvidia-docker2
sudo pkill -SIGHUP dockerd

# 使用 nvidia/cuda 镜像进行测试
nvidia-docker run --rm nvidia/cuda nvidia-smi
参考资料:
- Docker 入门教程
- Docker —— 从入门到实践
- 全面易懂的Docker指令大全
- 只要一小时,零基础入门Docker
- Docker 安装后 报 Cannot connect to the Docker daemon at unix:///var/run/docker.sock. Is the docker daemon running? 解决办法
- 下载Ubuntu镜像时,i386 和 amd64 的区别
- 如何在ubuntu 中彻底删除docker
- Docker run 命令
- 使用Docker搭建Anaconda Python3.6的练习环境
- Docker镜像推送(push)到Docker Hub
- docker/nvidia-docker 操作指南
如果你看到了这篇文章的最后,并且觉得有帮助的话,麻烦你花几秒钟时间点个赞,或者受累在评论中指出我的错误。谢谢!
作者信息:知乎:没头脑CSDN:Code_MartGithub:Tao Pu


 675
675


 被折叠的 条评论
为什么被折叠?


