


上个星期,拿到xavier之后,直接用python部署了pytorch模型小试了一把。出来的检测效果还凑合,但是速度贼慢,下面链接是上次发的视频。
Xavier车道线检测算法小试牛刀
上次的模型经过tensorRT加速之后,速度提升非常明显,然后再将python实现的功能转为C++实现,又进一步提升帧率。
后台有同学问我实现细节,所以这里我简单介绍一下这个车道线检测模型的开发过程。
一、车道线算法选型
要求:保证检测精度的同时,在xavier平台上满足实时性
可能满足要求的车道线检测算法
1、LaneNet[1] 《Real-Time LaneDtection Networks for Autonomous Driving》 github链接[2]
2、 SAD[3] 《Learning Lightweight Lane Detection CNNs by Self Atrention Distillation》 github链接[4]
3、[PiNet]https://arxiv.org/abs/2002.06604()《Key Points Estimation and Point Instance Segmentation Approach for Lane Detection》 github链接[5]
1、LaneNet的尝试
LaneNet算法主要是分为两个阶段。第一个阶段是使用CNN做语义分割,得到分割图像。第二个阶段是在分割图像上做车道线检测。
尝试过使用TuSimple的数据集训练LaneNet,在分割输出图像上,效果不错。
但是在拿到分割图像之后,还需要进一步的去做车道线检测,原论文中给出的方法是先使用一个聚类算法将不同的车道线进行区分,然后再通过一个HNet变换到up-view视角去检测车道线。
我的实验只尝试到分割网络这里就暂停了,因为到分割网络
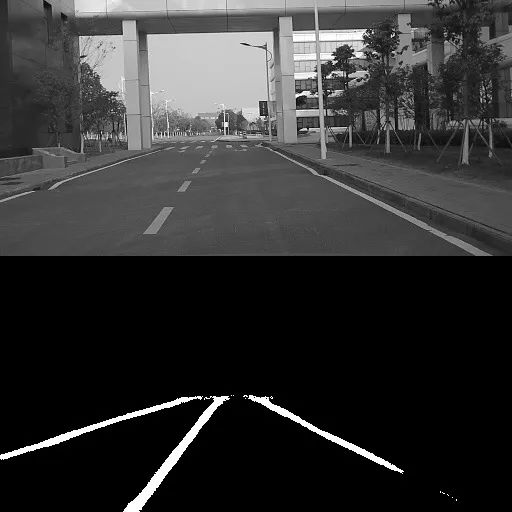
这里的inference耗时已经不能满足实时性要求。后续内容还比较多。
2、SAD
主干网络使用ERFNet[6]使用分割方法做车道线检测。速度确实非常快,但是实际效果不是很好,程序运行起来之后,车道线会比较飘。所以就放弃了这个方法。
3、PiNet
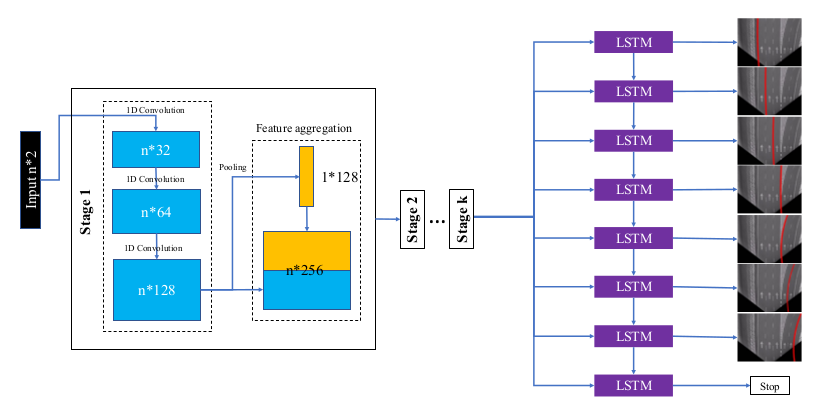
PiNet算法的主要思想和LaneNe的分割思想不同。其主要是将车道线用点表示,很自然地将车道线检测问题转换为了点回归问题。一般而言,land
mark回归算法复杂度是要比segmentation算法复杂度要低的。
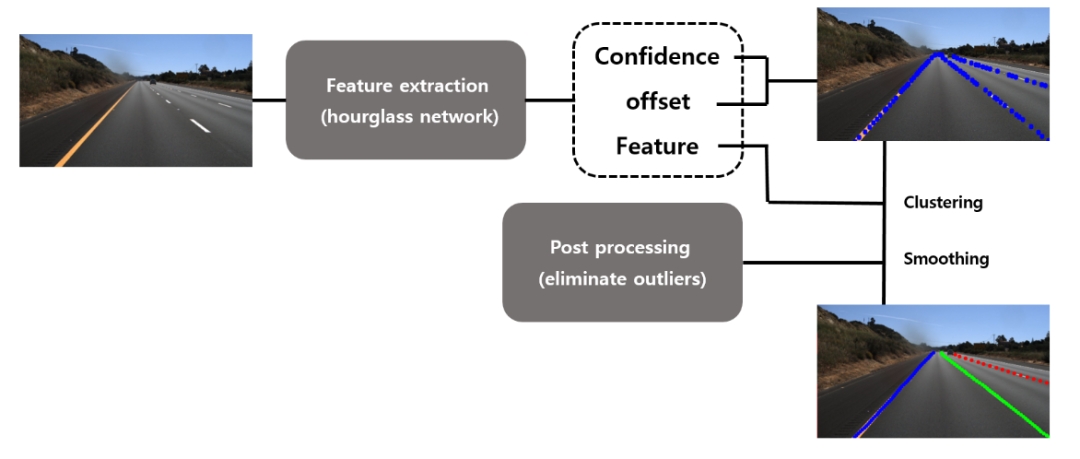
PiNet算法也可以被分为两个阶段。第一个阶段是landmark回归,得到一系列的点。第二个阶段使用聚类算法区分不同车道线上的点和去掉一部分多余的点。
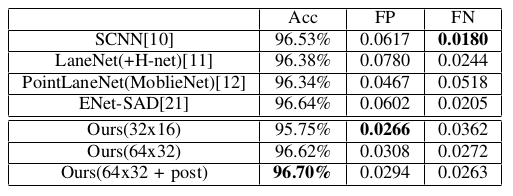
从论文中的数据来看,作者在TuSimple test数据集上进行测试,其精度是要比LaneNet精度高一些的。
但是在论文中,作者已经说了
The test hardward is NVIDIA RTX 2080ti
The proposed method can run about 30 frames per second without the post processing, and if the post processing isapplied, whole module works about 10 frames per second
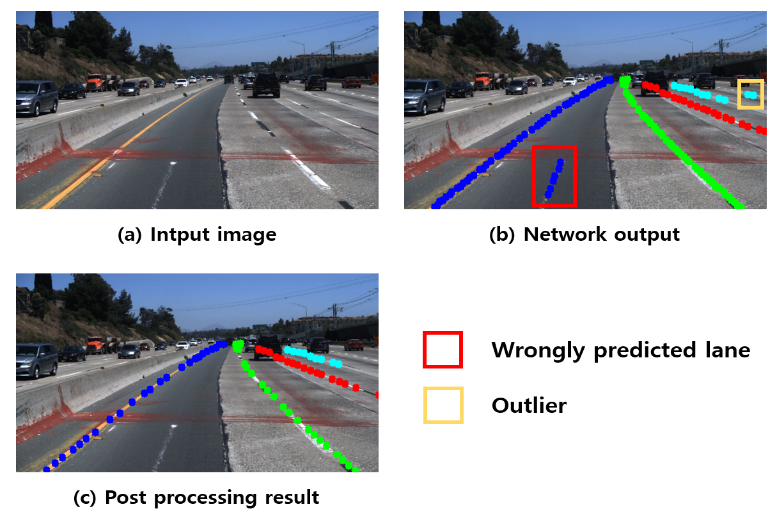
也就是说在2080Ti上运行cnn的inference,在没有后处理的情况下只能达到30FPS。在有后处理的情况下只能达到10FPS。后处理的时间比inference的时间还要多。
通过阅读原作者的代码,所有的代码全部使用python完成,后处理的python代码只有功能实现,没有做计算优化处理。
•尝试直接在xavier运行python代码
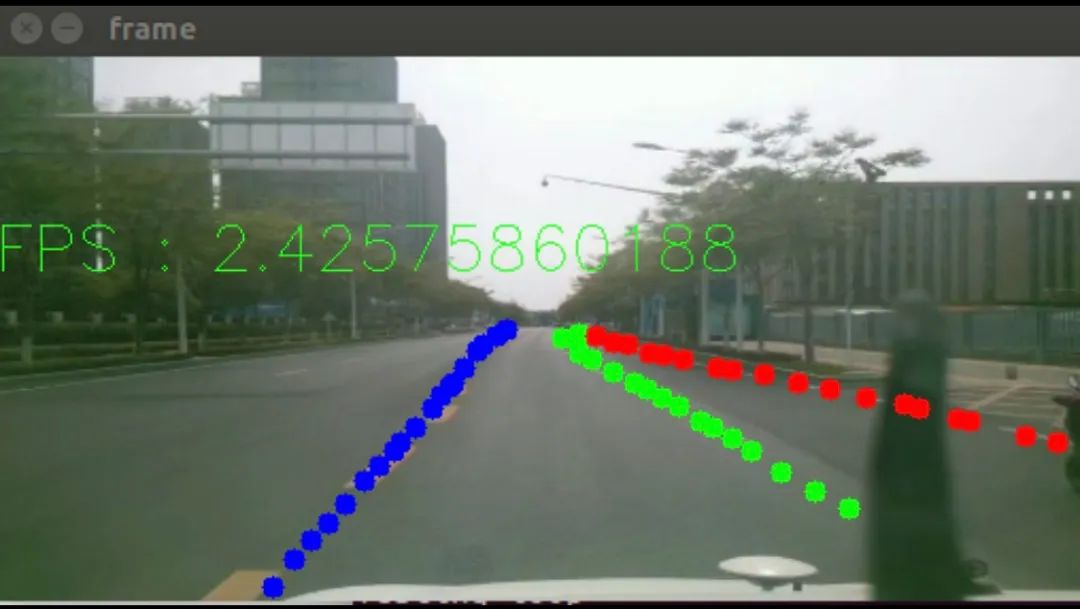
得到结果只有2FPS
通过打印每个阶段耗时和资源占用量发现。inference耗时150ms左右,后处理耗时300ms左右,然后GPU计算资源使用率不到15%
•尝试将pytorch模型转为libtorch模型使用C++部署
在xavier编译pytorch源码,得到libtorch的动态库
将模型通过tracing转为 Torch Script
import torchimport torchvision# 模型实例model = PiNet()# forward的数据example = imgInput()# 通过tracing转换模型traced_script_module = torch.jit.trace(model, example)#保存转换之后的模型traced_script_module.save("traced_resnet_model.pt")转换完模型之后,使用c++代码直接部署
测试耗时发现,inference耗时130ms左右,并没有明显的改善
但是后处理部分使用c++重写python部分的代码之后,耗时可以降低到20ms以内
所以这个时候的耗时瓶颈完全存在于forward上面了
•尝试使用pytorch转onnx再转TRT
pytorch和版本和onnx的版本是绑定在一起的,固定版本的pytorch只能转换为固定版本的onnx。然后onnx版本和TRT版本也是有一定对应关系的。
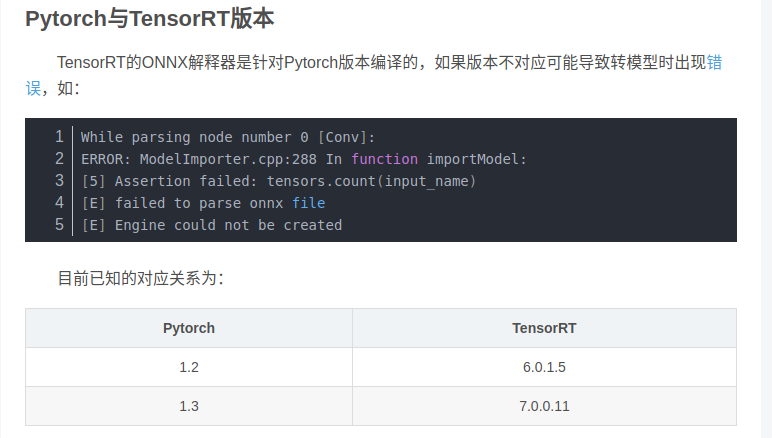
由于xavier上TRT版本是5.0.6.3,所以在训练使用pytorch的版本选择上选择了pytorch1.0
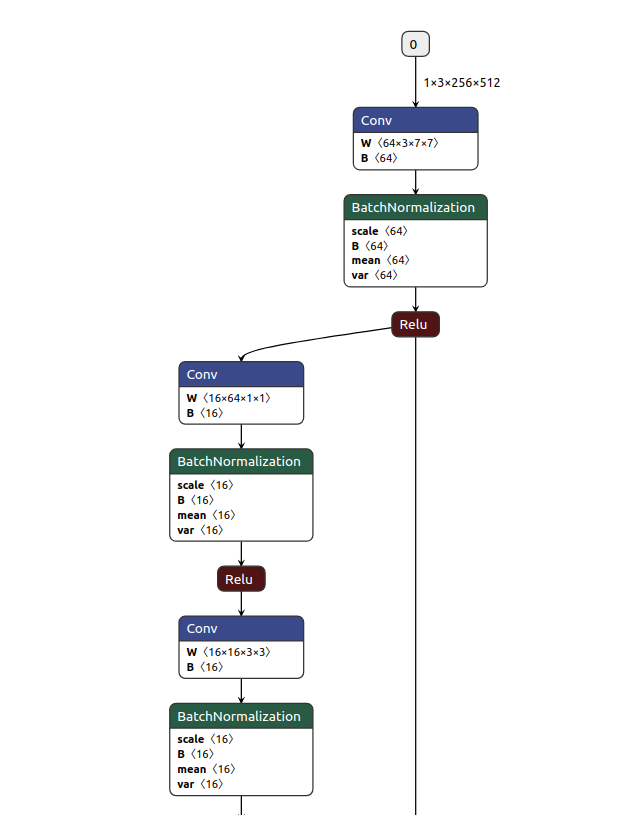
下图是pytorch模型输入

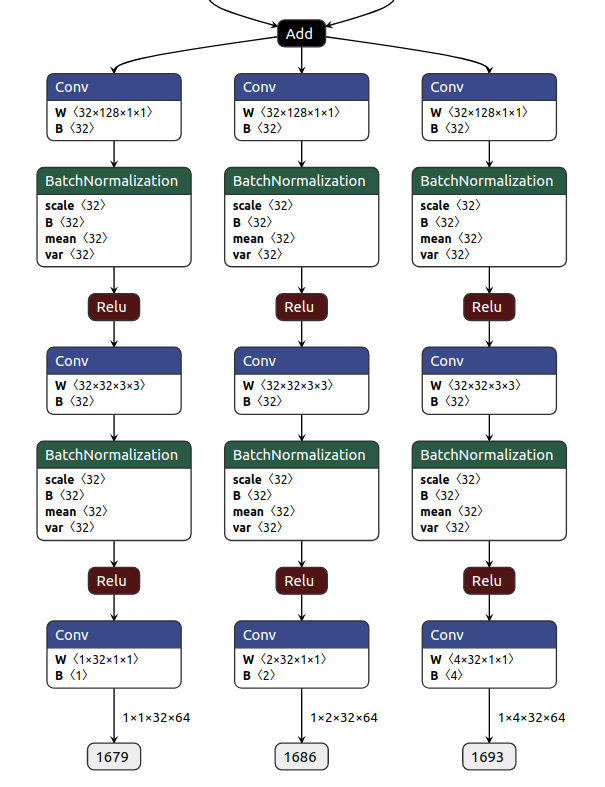
下图是pytorch模型输出

pytorch转onnx
import torchimport cv2lane_agent.evaluate_mode()test_image = cv2.imread(test_image_file)test_image = cv2.resize(test_image, (512, 256)) / 255.0test_image = np.rollaxis(test_image, axis=2, start=0)test_image = np.array([test_image])result = lane_agent.predict_lanes_test(test_image)inputs = torch.from_numpy(test_image).float() inputs = Variable(inputs).cuda()onnx_file = 'net_onnx/model_pi.onnx'torch.onnx.export(lane_agent.lane_detection_network, inputs, onnx_file)onnx转tensorRT
engine = ONNX_build_engine(onnx_file)with open(engine_file_path, "wb") as f: f.write(engine.serialize())tensorRT转换测试
# 通过onnx文件,构建TensorRT运行引擎context = engine.create_execution_context()#分配内存zeor_image = np.empty((1 , 3 , 256 , 512), dtype=np.float32)ravel = zeor_image.ravel().astype(np.float32)bindings = []it_size = ravel.dtype.itemsizeprint(it_size)d_input = cuda.mem_alloc(1 * ravel.size * ravel.dtype.itemsize)bindings.append(int(d_input))d_output_1431 = cuda.mem_alloc( 1 * 1 * 32 * 64 * ravel.dtype.itemsize )bindings.append(int(d_output_1431))d_output_1438 = cuda.mem_alloc( 1 * 2 * 32 * 64 * ravel.dtype.itemsize )bindings.append(int(d_output_1438))d_output_1445 = cuda.mem_alloc( 1 * 4 * 32 * 64 * ravel.dtype.itemsize )bindings.append(int(d_output_1445))d_output_1679 = cuda.mem_alloc( 1 * 1 * 32 * 64 * ravel.dtype.itemsize )bindings.append(int(d_output_1679))d_output_1686 = cuda.mem_alloc( 1 * 2 * 32 * 64 * ravel.dtype.itemsize )bindings.append(int(d_output_1686))d_output_1693 = cuda.mem_alloc( 1 * 4 * 32 * 64 * ravel.dtype.itemsize )bindings.append(int(d_output_1693))#读图片draw_image = cv2.resize(frame, (512, 256))#预处理test_image = cv2.resize(frame, (512, 256)) / 255.0test_image = np.rollaxis(test_image, axis=2, start=0)test_image = np.array([test_image])ravel = test_image.ravel().astype(np.float32)# pycuda操作缓冲区stream = cuda.Stream()# 将输入数据放入devicecuda.memcpy_htod_async(d_input, ravel, stream)# 执行模型context.execute_async(1, bindings, stream.handle, None)# 将预测结果从从缓冲区取出cuda.memcpy_dtoh_async(output_1431, d_output_1431, stream)cuda.memcpy_dtoh_async(output_1438, d_output_1438, stream)cuda.memcpy_dtoh_async(output_1445, d_output_1445, stream)cuda.memcpy_dtoh_async(output_1679, d_output_1679, stream)cuda.memcpy_dtoh_async(output_1686, d_output_1686, stream)cuda.memcpy_dtoh_async(output_1693, d_output_1693, stream)# 线程同步stream.synchronize()从pytorch转换完onnx之后,输入层和输出层的名字全部都是被数字所替代
如下是onnx模型输入
如下是onnx的模型输出,输出节点全部是使用数字代替
最后使用转换的tensorRT模型部署工程
模型inference时间大约在15ms左右
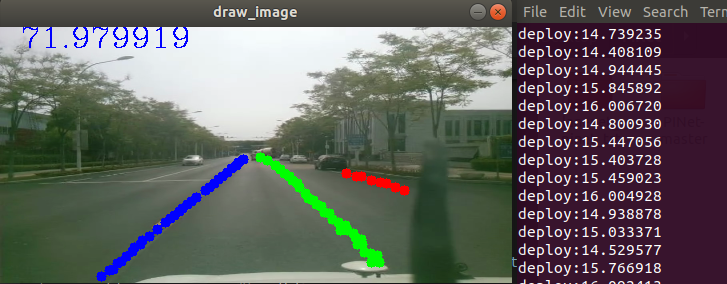
gpu资源占用从50%-75%之间浮动

总结
•PiNet网路模型虽然小,但是直接部署的话,其inference时间却是很大的•使用c++的API部署pytorch模型,解决不了根本性的时间问题•xavier上使用tensorRT加速,效果非常明显,并且没有明显的精度下降•pytorch模型转onnx,onnx转tensorRT,需要注意版本之间的关系
References
[1] LaneNet: *https://arxiv.org/abs/1802.05591*[2] github链接: *https://github.com/MaybeShewill-CV/lanenet-lane-detection*[3] SAD: [https://arxiv.org/pdf/1908.00821.pdf](https://links.jianshu.com/go?to=https%3A%2F%2Farxiv.org%2Fpdf%2F1908.00821.pdf)[4] github链接: https://github.com/cardwing/Codes-for-Lane-Detection[5] github链接: https://github.com/koyeongmin/PINet[6] ERFNet: https://github.com/cardwing/Codes-for-Lane-Detection/tree/master/ERFNet-CULane-PyTorch


 690
690


 被折叠的 条评论
为什么被折叠?
被折叠的 条评论
为什么被折叠?
 到【灌水乐园】发言


