


我的实验结果:原预测人体骨架模型在服务器泰坦上需要22ms,加速后需要10-11ms,RT加快了1倍,准确度下降1%以内(fp32格式加速,int8是最快的)。
tensorRT
tensorRT guide 网址: 点击这里
tensorflow 模型预测加速指导: 点击这里
介绍
tensorRT核心库是使用c++去加速NVIDIA生产的GPU。它可以加速的框架模型有:
tensorflow、Caffe、Pytorch、MXNet等。
其中,tensorflow已经将TensorRT接口能够很好的包容,可以使用TensorFlow框架内就可以利用tensorRT进行模型的加速。
工作原理
tensorRT利用训练好的模型,提取网络的定义的结构,进行针对不同平台的优化以及生成一个推理引擎。主要的优化模型工作集中在:
1)估计你的图结构中,没有用到的输出layer。
2)融合卷积操作、bias和ReLU操作。
3)把有相似参数的操作和有相同输入源的tensor聚合
4)通过直接将layer的输出对应到最终的destination,这样融合了级联层。
如果必要的话,tensorRT可能会更改权重。
当使用8bit的整型类型做inference时,它使用“校准”操作决定动态的激活操作和合适的量化因子。
提供的接口类型
tensorRT目前提供c++和python的接口。因为python提供了numpy和torch等数据处理工具,所以一般使用python进行机器学习。
安装
按照我们服务器上的安装步骤,总结为:
CUDA
cuda版本必须是9.0或者10.0
cudnn版本最好是7.3.1
tensorflow
安装有tensorflow
pycuda
pip install ‘pycuda>=2018.1.1’
一般pip默认安装最新的,我在安装的时候是最新的,调用没有出错。
其他安装包
- 下载TensorRT。
点击这里下载TensorRT。
用你的Nvidia账号登录后,下载tensorRT4,如图所示:
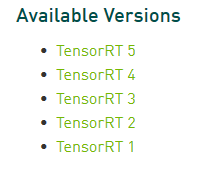
我选择RT4的原因是因为我的服务器始终提示缺少RT4的文件,只能下载RT4。RT4和新出的RT6有很多API已经更改,参考本文档时请注意。
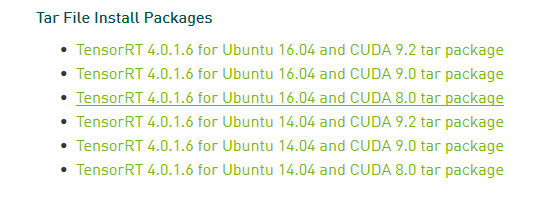
下载tar文件,对应你的系统。
安装指令
解压
tar xzvf TensorRT-XXXXXXXXXXXXXX.tar
导入环境
export LD_LIBRARY_PATH=$LD_LIBRARY_PATH:/root/TC184610137/TensorRT-4.0.2.6/lib
进入python目录
cd TensorRT-4.0.2.6/python
如果是pip
sudo pip install TensorRT-4.0.2.6-py2.py3-none-any.whl
如果是pip3
sudo pip3 install TensorRT-4.0.2.6-py2.py3-none-any.whl
安装uff
cd TensorRT-4.0.2.6/uff
pip3 install uff-0.5.5-py2.py3-none-any.whl
pip install uff-0.5.5-py3-py3-none-any.whl
安装graphsurgeon
cd TensorRT-4.0.2.6/graphsurgeon
pip install graphsurgeon-0.3.2-py2.py3-none-any.whl
测试
打开python的交互式窗口
import tensorrt as trt
import uff as uff
都没有报错即可,
用我们的代码做个栗子:
首先把你的pb模型文件导入到内存中:

使用接口进行模型转换:(注意RT6版本已经更换了这个API,可以查看评论修改):

warning:注意你的tf的default_graph是你刚导入的那个文件,可以按照我这个例子在导入前加上Graph().as_default()
一般这几个参数就够用了,第一个参数是你的pb模型,第二个是输出结点名字(是个list类型),第三个是输入的batch,第四个是内存,例子是8GB。第五个参数是tensor内置的精度:“FP32、FP16以及INT8”,越小理论上加速效果越快。
最后一个参数是最小的融合结点数,我看官网例子都是3。

然后把转换后的TensorRT图变为默认的tensorflow图。第一个参数是tensorrt图,第二个是你的输出结点。
sess那个是可以指定你的tensorflow会话,tensorflow内置引擎占多大内存,RT引擎占多大内存,RT占得越多,你的模型转换成RT速度越快。
上面的gpu_options可以这样设定:

0.2指的是本次会话tensorflow分配显卡20%的内存(剩下的给RT利用(RT那里必须制定剩下的用多少,这里用8G))。
然后你就可以使用会话run起来啦:

本次实验利用FP32加快预测速度1倍哦。(22ms~10ms)
c++ API
如果需要进行预测,需要使用IExecutionContext对象。为了创造IExecutionContext对象,你需要创造ICudaEngine。
这个engine可以通过以下两种方式进行:
- 通过读取用户的模型知道网络的定义。这种情况下,engine可以选择序列化并且保存下来为以后接着使用。
- 通过从磁盘直接读取序列化后的引擎。这种情况下,性能会更好,因为转换模型和创建中间对象的步骤可以跳过。
大概的使用步骤
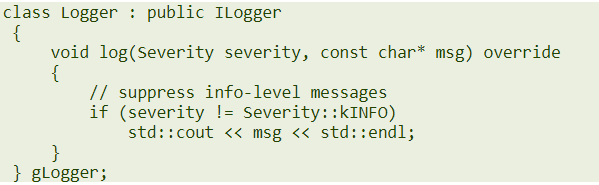
ILogger类型的对象需要被全局创造。它是tensorRT API各种方法的参数。
下面这个图片是个简单的创造logger的示例:
一个全局的TensorRT API方法叫做createInferBuilder(gLogger)。下面图片是IBuilder的示例(用ilogger创造iBuilder):

网络可以使用creatNetwork方法创造一个iNetworkDefinition的对象。

然后需要对模型的网络进行解释和转换,需要用到parse。Iparse里有一个parse()方法可以读取模型文件和填充网络。

一个经常使用的parse是使用iNetwork的定义作为输入。

方法1:上面的步骤你会发现还没有创造tensorRT里面的引擎engine。可以通过iBuilder的buildCudaEngine()方法创造iCudaEngine。然后对应engine方法1,你需要序列化:

然后就可以创造可执行上下文进行预测。

方法2:createInferRuntime(gLogger)创造一个iRuntime对象类型。
如果序列化的步骤被保存到用户的模型文件中,可以跳过一些创造引擎的步骤。
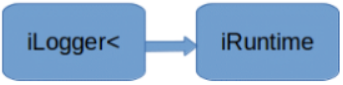
引擎runtime的内置方法deserializeCudaEngine()创造。
使用c++创造一个网络定义
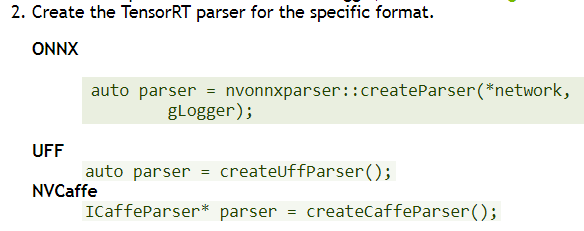
进行预测的第一个步骤就是需要从你的模型中创造TensorRT模型。使用TensorRT的parser库可以实现导入模型。
下面的这些格式支持泛化的模型:

使用API直接定义模型,这需要使用API的一些方法定义网络图中的每一层。
在做预测时,需要告诉tensorRT你的输入和输出tensor。这样tensorRT才能够进行优化网络结构。使用ITensor::setName()可以确定tensor的名字。在运行的时候,engine会使用指针指向输入和输出tensor的存储区。
tensorRT定义网络结构的重要层次是它包含指向模型权重的指针,通过builder拷贝到了优化引擎。如果网络通过parse创造,parse会自动指向模型权重的存储区,所以在预测运行的时候parse不能被删除。
直接使用API定义网络结构,使用这种方式的前提是网络的权重已经加载到了机子的内存里,当网路创造好后可以使用权重。
例子:创造一个简单的网络,

1、创造builder和network:
导入你的模型
1、创造builder和network。
IBuilder* builder=createInferBuilder(gLogger);
nvinfer1::INetworkDefinition* network=builder->createNetwork();
- 创造parse
- 使用parse导入模型填充网络。
parser->parse(args);
导入caffe和tensorflow、ONNX模型,可以参考官网的指导。
https://docs.nvidia.com/deeplearning/sdk/tensorrt-developer-guide/index.html#create_network_c
创造engine
有了网络结构后可以创造engine了。builder有两个重要的属性,分别是batchsize和worksize。
使用builder object建立引擎。
1、builder->setMaxBatchSize(maxBatchSize);
2、builder->setMaxWorkspaceSize(1 << 20);
3、ICudaEngine* engine = builder->buildCudaEngine(*network);
释放空间:
engine->destroy();
network->destroy();
builder->destroy();
序列化模型
序列化和反序列化是可以自由选择的,使用序列化模型的主要原因是使用读取模型定义网络再创造engine是很耗时的操作,序列化后可以避免每次 都需要重新建立engine。
当engine建立了之后,可以将其序列化保存下来为以后使用。
注意:序列化的模型在不同的模型和tensorRT的版本之间是不能够相互使用的。
序列化:
IHostMemory *serializedModel=engine->serialize();
serializedModel->destroy();
反序列化:
IRuntime* runtime = createInferRuntime(glogger);
ICudaEngine* engine = runtime->deserializeCudaEngin(modelData,modelSize,
nullptr)
进行预测
1、IExecutionContext *context = engine->createExecutionContext();
2、int inputIndex = engine.getBindingIndex(INPUT_BLOB_NAME);
int outputIndex = engine.getBindingIndex(OUTPUT_BLOB_NAME);
3、void* buffers[2];
buffers[inputIndex] = inputbuffer;
buffers[outputIndex] = outputBuffer;
4、context.enqueue(batchSize, buffers, stream, nullptr);
本次实验使用的主要的函数接口(python)tensorRT6已移除,更换的新接口请查看评论:
通过这个借口,可以直接将你的pb 模型转换为tensorRT模型,返回的是优化后的rt模型。
def create_inference_graph(input_graph_def,
outputs,
max_batch_size=1,
max_workspace_size_bytes=2 << 20,
precision_mode="fp32",
minimum_segment_size=3,
is_dynamic_op=False,
maximum_cached_engines=1,
cached_engine_batch_sizes=None
use_calibration=True,
rewriter_config=None,
input_saved_model_dir=None,
input_saved_model_tags=None,
output_saved_model_dir=None,
session_config=None):
"""Python wrapper for the TRT transformation.
input_graph_def
This parameter is the GraphDef object that contains the model to be transformed.
outputs
This parameter lists the output nodes in the graph. Tensors which are not marked as outputs are considered to be transient values that may be optimized away by the builder.
max_batch_size
This parameter is the maximum batch size that specifies the batch size for which TensorRT will optimize. At runtime, a smaller batch size may be chosen. At runtime, larger batch size is not supported.
max_workspace_size_bytes
TensorRT operators often require temporary workspace. This parameter limits the maximum size that any layer in the network can use. If insufficient scratch is provided, it is possible that TensorRT may not be able to find an implementation for a given layer.
precision_mode
TF-TRT only supports models trained in FP32, in other words all the weights of the model should be stored in FP32 precision. That being said, TensorRT can convert tensors and weights to lower precisions during the optimization. The precision_mode parameter sets the precision mode; which can be one of fp32, fp16, or int8. Precision lower than FP32, meaning FP16 and INT8, would improve the performance of inference. The FP16 mode uses Tensor Cores or half precision hardware instructions, if possible. The INT8 precision mode uses integer hardware instructions.
minimum_segment_size
This parameter determines the minimum number of TensorFlow nodes in a TensorRT engine, which means the TensorFlow subgraphs that have fewer nodes than this number will not be converted to TensorRT. Therefore, in general smaller numbers such as 5 are preferred. This can also be used to change the minimum number of nodes in the optimized INT8 engines to change the final optimized graph to fine tune result accuracy.
is_dynamic_op
If this parameter is set to True, the conversion and building the TensorRT engines will happen during the runtime, which would be necessary if there are tensors in the graphs with unknown initial shapes or dynamic shapes. For more information, see Static Or Dynamic Mode.
Note: Conversion during runtime may increase the latency, depending on your model and how you use it.
maximum_cached_engines
In dynamic mode, this sets the maximum number of cached TensorRT engines per TRTEngineOp. For more information, see Static Or Dynamic Mode.
cached_engine_batch_sizes
The list of batch sizes used to create cached engines, only used when is_dynamic_op is True. The length of the list should be smaller than maximum_cached_engines, and the dynamic TensorRT op will use this list to determine the batch sizes of the cached engines, instead of making the decision while in progress. This is useful when we know the most common batch size(s) the application is going to generate.
cached_engine_batches
The batch sizes used to pre-create cached engines.
use_calibration
This argument is ignored if precision_mode is not INT8.
- If set to True, a calibration graph will be created to calibrate the missing ranges. The calibration graph must be converted to an inference graph using calib_graph_to_infer_graph() after running calibration.
- If set to False, quantization nodes will be expected for every tensor in the graph (excluding those which will be fused). If a range is missing, an error will occur.
Note: Accuracy may be negatively affected if there is a mismatch between which tensors TensorRT quantizes and which tensors were trained with fake quantization.
rewriter_config
A RewriterConfig proto to append the TensorRTOptimizer to. If None, it will create one with default settings.
input_saved_model_dir
The directory to load the SavedModel containing the input graph to transform. Used only when input_graph_def is None.
input_saved_model_tags
A list of tags used to identify the MetaGraphDef of the SavedModel to load.
output_saved_model_dir
If not None, construct a SavedModel using the returned GraphDef and save it to the specified directory. This option only works when the input graph is loaded from a SavedModel, in other words, when input_saved_model_dir is specified and input_graph_def is None.
session_config
The ConfigProto used to create a Session. If not specified, a default ConfigProto will be used.
- Returns:
- New GraphDef with TRTEngineOps placed in graph replacing subgraphs.
- Raises:
- ValueError: If the provided precision mode is invalid.
- RuntimeError: If the returned status message is malformed.


 1506
1506


 被折叠的 条评论
为什么被折叠?
被折叠的 条评论
为什么被折叠?
 到【灌水乐园】发言


