


插件是扩展QGIS功能的好方法。您可以使用Python编写插件,范围从添加简单按钮到高级工具包。本教程将概述设置开发环境,设计插件的用户界面以及编写与QGIS交互的代码所涉及的过程。请阅读Python编程入门(QGIS3)教程以熟悉基础知识。
注意
如果要构建一个新插件,我强烈建议您构建一个处理插件,而不是本教程中描述的GUI插件。有关详细信息,请参见 构建处理插件(QGIS3)。
任务概述
我们将开发一个简单插件,该插件将允许用户选择矢量层并将其属性写入CSV文件。Save Attributes
获取工具
Qt
Qt是一个软件开发框架,用于开发在Windows,Mac,Linux以及各种移动操作系统上运行的应用程序。QGIS本身是使用Qt框架编写的。对于插件开发,我们将使用名为Qt Creator的应用程序来设计插件的接口。
从Qt脱机安装程序下载并安装Qt Creator安装程序。确保在下载页面上选择Qt Creator。请注意,您将必须创建一个免费的Qt帐户来安装该软件包。
注意
Windows上用于QGIS的OSGeo4w安装程序包括Qt Designer程序的副本,该程序是Qt Creator的轻量级版本,非常适合构建插件。您可以跳过下载Qt Creator并从C:\ OSGeo4W64 \ bin \ qgis-designer使用它。

Qt的Python绑定
由于我们正在使用Python开发插件,因此我们需要为Qt安装python绑定。安装它们的方法将取决于您使用的平台。对于构建插件,我们需要pyrcc5命令行工具。
视窗
相关的pyhon绑定包含在Windows上的QGIS安装中。但是要从plugin文件夹中使用它们,我们需要指出QGIS安装的路径。
创建具有以下内容的Windows批处理文件(扩展名为.bat),并将其另存为您的计算机上compile.bat。稍后我们将把该文件复制到plugin文件夹。如果您在其他路径下安装了QGIS,请C:\OSGeo4W64\bin\用您的路径替换。
@echo off
call "C:\OSGeo4W64\bin\o4w_env.bat"
call "C:\OSGeo4W64\bin\qt5_env.bat"
call "C:\OSGeo4W64\bin\py3_env.bat"
@echo on
pyrcc5 -o resources.py resources.qrc
苹果电脑
安装Homebrew软件包管理器。PyQt通过运行以下命令来安装软件包:
brew install pyqtLinux
根据您的分发,找到并安装
python-qt5软件包。在基于Ubuntu和Debian的发行版上,您可以运行以下命令:
sudo apt-get install python-qt5注意
您可能会发现QGIS已经安装了此软件包。
文本编辑器或Python
任何类型的软件开发都需要一个好的文本编辑器。如果您已经拥有喜欢的文本编辑器或IDE(集成开发环境),则可以在本教程中使用它。否则,每个平台都会为文本编辑器提供多种免费或付费选项。选择一个适合您的需求。
本教程在Windows上使用Notepad ++编辑器。
视窗
Notepad ++是一个很好的Windows免费编辑器。下载并安装Notepad ++编辑器。
注意
如果您使用的是Notepad ++,请确保进入设置‣首选项‣标签设置并启用按空格替换。Python对空格非常敏感,此设置将确保制表符和空格得到正确处理。
Plugin Builder插件
有一个有用的QGIS插件,名为,可为该插件创建所有必需的文件和样板代码。查找并安装插件。有关如何安装插件的更多详细信息,请参见使用插件。Plugin BuilderPlugin Builder
插件Reloader插件
这是另一个允许插件迭代开发的帮助程序插件。使用此插件,您可以更改插件代码并将其反映在QGIS中,而不必每次都重新启动QGIS。查找并安装插件。有关如何安装插件的更多详细信息,请参见使用插件。Plugin Reloader
注意
插件重新加载器是一个实验性插件。如果找不到,请确保在“插件管理器”设置中选中了“同时显示实验性插件”。
程序
打开QGIS。转到插件‣插件构建器‣插件构建器。

您将看到带有表单的QGIS Plugin Builder对话框。您可以在表单中填写与我们的插件有关的详细信息。的类名称将是Python类的含插件的逻辑名称。这也是包含所有插件文件的文件夹的名称。输入
SaveAttributes作为类名。该插件名称是根据该插件将出现在名称 插件管理器。输入名称为。在描述字段中添加描述。该模块名称将是插件的主要蟒蛇文件的名称。输入为Save Attributessave_attributes。保留版本号不变,并在相应的字段中输入您的姓名和电子邮件地址。单击下一步。

在About对话框中输入插件的简短描述,然后单击Next。

选择从模板selector`。菜单项的文本值将是用户如何在QGIS菜单中找到您的插件的方式。输入为。该菜单场将决定您的插件项目在QGIS增加。由于我们的插件用于矢量数据,因此选择。单击下一步。
Tool button with dialogSave Attributes as CSVVector
插件构建器将提示您输入要生成的文件类型。保留默认选择,然后单击下一步。

由于我们不打算发布该插件,因此您可以将Bug tracker,Repository和Home页面值保留为默认值。选中底部的将插件标记为实验框,然后点击下一步。

系统将提示您选择插件的目录。现在,将其保存到您可以轻松在计算机上找到的目录中,然后点击生成。

接下来,按生成按钮。创建插件模板后,您将看到一个确认对话框。

注意
您可能会提示您在路径中找不到pyrcc5。您可以忽略此消息。
在使用新创建的插件之前,我们需要编译
resources.qrc由Plugin Builder创建的文件。该文件是Qt资源系统的一部分,该系统引用了插件中使用的所有二进制文件。对于此插件,它将仅具有插件图标。编译此文件将生成可在插件中使用的应用程序代码,而与插件运行于哪个平台无关。请遵循特定于平台的说明进行此步骤。
Windows
现在,您可以将compile.bat文件(在开头的Qt的python绑定期间创建的)复制到plugin文件夹中。复制后,双击该文件以运行它。如果运行成功,您将resources.py在文件夹中看到一个名为的新文件。

注意
如果此步骤失败,则可以cmd.exe使用cd命令启动并浏览到插件文件夹。通过运行运行批处理文件compile.bat以查看错误。
Mac和Linux
您将需要先安装pb_tool。打开一个终端并通过pip安装它。
sudo pip3 install pb_tool
打开终端并转到插件目录,然后键入。这将运行我们作为“ Qt的Python绑定”部分安装的命令。pb_tool compilepyrcc5
pb_tool compile
QGIS中的插件存储在一个特殊的文件夹中。我们必须先将插件目录复制到该文件夹,然后才能使用它。在QGIS中,转到设置‣用户配置文件‣打开活动配置文件文件夹,找到当前的配置文件文件夹。

在配置文件文件夹中,将plugin文件夹复制到python‣plugins子文件夹。

现在,我们准备开始看看我们创建的全新插件。关闭QGIS,然后再次启动。转到插件‣管理和安装插件,然后在已安装标签中启用插件 。
Save Attributes
您会注意到,插件工具栏中有一个新图标,并且在Vector‣Save Attributes‣Save Attributes as CSV`下有一个新菜单项。选择它以启动插件对话框。

您会注意到一个名为Save Attributes的新空白对话框。关闭此对话框。

现在,我们将设计对话框并向其中添加一些用户界面元素。打开程序,然后转到文件‣打开文件或项目。
Qt Creator
浏览到插件目录并选择
save_attributes_dialog_base.ui文件。点击打开。
注意
Windows隐藏该AppData文件夹,因此您可能在文件选择器对话框中看不到该文件夹。您可以从其父目录中输入AppData“文件名”提示以将其打开。
您将在插件中看到空白对话框。您可以从对话框的左侧面板中拖放元素。我们将添加Combo Box类型的Input Widgets。将其拖动到插件对话框。

调整组合框的大小并调整其大小。现在,在对话框上拖动标签类型的显示小部件。

19.单击标签文本,然后输入。
Select a layer
20.通过转到文件‣保存save_attributes_dialog_base.ui来保存此文件。请注意,组合框对象的名称为
comboBox。要使用python代码与此对象进行交互,我们将不得不使用此名称来引用它。
21.让我们重新加载插件,以便我们可以在对话框窗口中看到更改。转到插件‣插件重新加载器‣选择要重新加载的插件。选择
SaveAttributes在配置插件reloader对话框。
22.单击重新加载插件按钮以加载最新版本的插件。单击“将属性另存为CSV”按钮以打开新设计的对话框。

23.让我们向插件添加一些逻辑,该逻辑将用QGIS中加载的图层填充组合框。转到插件目录,然后
save_attributes.py在文本编辑器中加载文件。首先,在文件顶部插入其他导入内容:从 qgis.core 导入 QgsProject然后向下滚动到末尾并找到
run(self)方法。单击工具栏按钮或选择插件菜单项时,将调用此方法。在该方法的开头添加以下代码。此代码获取QGIS中加载的图层,并将其comboBox从插件对话框添加到对象中。# Fetch the currently loaded layerslayers = QgsProject.instance().layerTreeRoot().children()# Clear the contents of the comboBox from previous runsself.dlg.comboBox.clear()# Populate the comboBox with names of all the loaded layersself.dlg.comboBox.addItems([layer.name() for layer in layers])

返回QGIS主窗口,单击“重新加载插件”按钮重新加载插件。要测试此新功能,我们必须在QGIS中加载一些图层。加载了一些图层后,通过转到Vector‣Save Attributes‣Save Attributes as CSV来启动插件。您将看到我们的组合框现在已填充QGIS中加载的图层名称。

让我们添加其余的用户界面元素。切换回Qt Creator并加载
save_attributes_dialog_base.ui文件。添加一个Label显示小部件,并将文本更改为。添加一个类型的Input Widget,它将显示用户选择的输出文件路径。接下来,添加按钮类型 ,并将按钮标签更改为。注意,我们将不得不使用与之交互的小部件的对象名称。保存文件。Select output fileLineEditPush Button...
现在,当用户单击
...按钮并在行编辑小部件中显示选择路径时,我们将添加python代码以打开文件浏览器。save_attributes.py在文本编辑器中打开文件。添加QFileDialog到QtWidgets文件顶部的导入列表。

添加一个
select_output_file使用以下代码的新方法。此代码将打开文件浏览器,并使用用户选择的文件路径填充行编辑小部件。注意,如何getSaveFileName返回带有文件名和使用的过滤器的元组。
def select_output_file(self):
  filename, _filter = QFileDialog.getSaveFileName(self.dlg, "Select   output file ","", '*.csv')self.dlg.lineEdit.setText(filename)
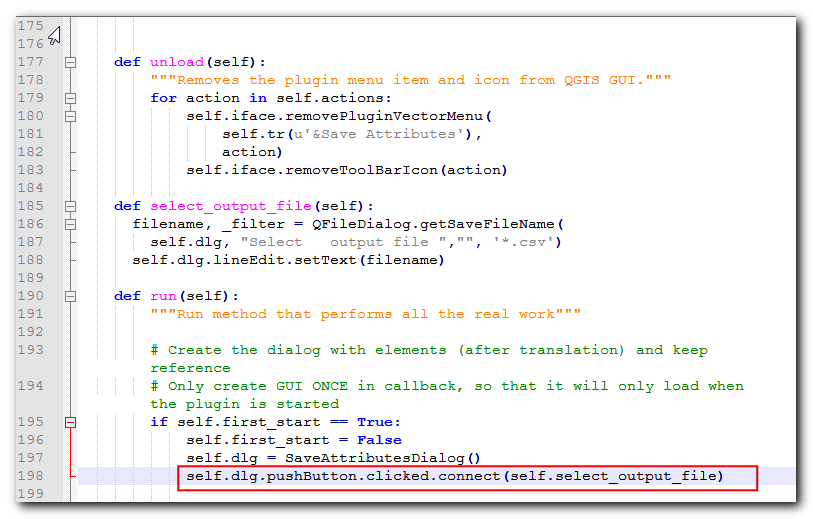
现在我们需要添加代码,以便在单击...按钮 时
select_output_file调用method。向下滚动到该run方法,然后在初始化对话框的块中添加以下行。此代码会将select_output_file方法连接到clicked按钮小部件的信号。
self.dlg.pushButton.clicked.connect(self.select_output_file)
29.返回QGIS,重新加载插件并运行它。如果一切正常,您将可以单击该...按钮,然后从磁盘中选择一个输出文本文件。

30.当您在插件对话框上单击“确定”时,什么也没有发生。那是因为我们还没有添加逻辑来从图层中提取属性信息并将其写入文本文件。现在,我们已经准备就绪,可以完成所有工作。在run方法中找到它说的地方pass。将其替换为下面的代码。可以在《 Python编程入门》(QGIS3)中找到此代码的说明。
filename = self.dlg.lineEdit.text()with open(filename, 'w') as output_file:
  selectedLayerIndex = self.dlg.comboBox.currentIndex()
  selectedLayer = layers[selectedLayerIndex].layer()
  fieldnames = [field.name() for field in selectedLayer.fields()]# write header
  line = ','.join(name for name in fieldnames) + '\n'
  output_file.write(line)# wirte feature attributesfor f in selectedLayer.getFeatures():
    line = ','.join(str(f[name]) for name in fieldnames) + '\n'
    output_file.write(line)
31.我们还有最后一件事要补充。当操作成功完成时,我们应该向用户指示相同的内容。在QGIS中向用户发出通知的首选方法是通过self.iface.messageBar().pushMessage()方法。将添加Qgis到qgis.core文件顶部的导入列表中,并在run方法末尾添加以下代码。
self.iface.messageBar().pushMessage("Success", "Output file written at " + filename,
  level=Qgis.Success, duration=3)

现在我们的插件已准备就绪。重新加载插件并尝试一下。您会发现所选的输出文本文件将具有矢量层的属性。

您可以压缩插件目录并与您的用户共享。他们可以将内容解压缩到其插件目录中,然后试用您的插件。如果这是一个真实的插件,则可以将其上传到QGIS插件存储库,以便所有QGIS用户都可以找到并下载您的插件。
注意
该插件仅用于演示目的。请勿发布此插件或将其上传到QGIS插件存储库。
以下是完整save_attributes.py文件,仅供参考。
# -*- coding: utf-8 -*-"""/*************************************************************************** SaveAttributes                                 A QGIS plugin This plugin saves the attributes of the selected vector layer as a CSV file. Generated by Plugin Builder: http://g-sherman.github.io/Qgis-Plugin-Builder/                              -------------------        begin                : 2019-03-28        git sha              : $Format:%H$        copyright            : (C) 2019 by Ujaval Gandhi        email                : ujaval@spatialthoughts.com ***************************************************************************//*************************************************************************** *                                                                         * *   This program is free software; you can redistribute it and/or modify  * *   it under the terms of the GNU General Public License as published by  * *   the Free Software Foundation; either version 2 of the License, or     * *   (at your option) any later version.                                   * *                                                                         * ***************************************************************************/"""from PyQt5.QtCore import QSettings, QTranslator, qVersion, QCoreApplicationfrom PyQt5.QtGui import QIconfrom PyQt5.QtWidgets import QAction, QFileDialogfrom qgis.core import QgsProject, Qgis# Initialize Qt resources from file resources.pyfrom .resources import *# Import the code for the dialogfrom .save_attributes_dialog import SaveAttributesDialogimport os.pathclass SaveAttributes:"""QGIS Plugin Implementation."""def __init__(self, iface):"""Constructor.        :param iface: An interface instance that will be passed to this class            which provides the hook by which you can manipulate the QGIS            application at run time.        :type iface: QgsInterface        """# Save reference to the QGIS interfaceself.iface = iface# initialize plugin directoryself.plugin_dir = os.path.dirname(__file__)# initialize locale
        locale = QSettings().value('locale/userLocale')[0:2]
        locale_path = os.path.join(self.plugin_dir,'i18n','SaveAttributes_{}.qm'.format(locale))if os.path.exists(locale_path):self.translator = QTranslator()self.translator.load(locale_path)if qVersion() > '4.3.3':
                QCoreApplication.installTranslator(self.translator)# Declare instance attributesself.actions = []self.menu = self.tr(u'&Save Attributes')# Check if plugin was started the first time in current QGIS session# Must be set in initGui() to survive plugin reloadsself.first_start = None# noinspection PyMethodMayBeStaticdef tr(self, message):"""Get the translation for a string using Qt translation API.        We implement this ourselves since we do not inherit QObject.        :param message: String for translation.        :type message: str, QString        :returns: Translated version of message.        :rtype: QString        """# noinspection PyTypeChecker,PyArgumentList,PyCallByClassreturn QCoreApplication.translate('SaveAttributes', message)def add_action(self,
        icon_path,
        text,
        callback,
        enabled_flag=True,
        add_to_menu=True,
        add_to_toolbar=True,
        status_tip=None,
        whats_this=None,
        parent=None):"""Add a toolbar icon to the toolbar.        :param icon_path: Path to the icon for this action. Can be a resource            path (e.g. ':/plugins/foo/bar.png') or a normal file system path.        :type icon_path: str        :param text: Text that should be shown in menu items for this action.        :type text: str        :param callback: Function to be called when the action is triggered.        :type callback: function        :param enabled_flag: A flag indicating if the action should be enabled            by default. Defaults to True.        :type enabled_flag: bool        :param add_to_menu: Flag indicating whether the action should also            be added to the menu. Defaults to True.        :type add_to_menu: bool        :param add_to_toolbar: Flag indicating whether the action should also            be added to the toolbar. Defaults to True.        :type add_to_toolbar: bool        :param status_tip: Optional text to show in a popup when mouse pointer            hovers over the action.        :type status_tip: str        :param parent: Parent widget for the new action. Defaults None.        :type parent: QWidget        :param whats_this: Optional text to show in the status bar when the            mouse pointer hovers over the action.        :returns: The action that was created. Note that the action is also            added to self.actions list.        :rtype: QAction        """
        icon = QIcon(icon_path)
        action = QAction(icon, text, parent)
        action.triggered.connect(callback)
        action.setEnabled(enabled_flag)if status_tip is not None:
            action.setStatusTip(status_tip)if whats_this is not None:
            action.setWhatsThis(whats_this)if add_to_toolbar:# Adds plugin icon to Plugins toolbarself.iface.addToolBarIcon(action)if add_to_menu:self.iface.addPluginToVectorMenu(self.menu,
                action)self.actions.append(action)return actiondef initGui(self):"""Create the menu entries and toolbar icons inside the QGIS GUI."""
        icon_path = ':/plugins/save_attributes/icon.png'self.add_action(
            icon_path,
            text=self.tr(u'Save Attributes as CSV'),
            callback=self.run,
            parent=self.iface.mainWindow())# will be set False in run()self.first_start = Truedef unload(self):"""Removes the plugin menu item and icon from QGIS GUI."""for action in self.actions:self.iface.removePluginVectorMenu(self.tr(u'&Save Attributes'),
                action)self.iface.removeToolBarIcon(action)def select_output_file(self):
      filename, _filter = QFileDialog.getSaveFileName(self.dlg, "Select   output file ","", '*.csv')self.dlg.lineEdit.setText(filename)def run(self):"""Run method that performs all the real work"""# Create the dialog with elements (after translation) and keep reference# Only create GUI ONCE in callback, so that it will only load when the plugin is startedif self.first_start == True:self.first_start = Falseself.dlg = SaveAttributesDialog()self.dlg.pushButton.clicked.connect(self.select_output_file)# Fetch the currently loaded layers
        layers = QgsProject.instance().layerTreeRoot().children()# Clear the contents of the comboBox and lineEdit from previous runsself.dlg.comboBox.clear()self.dlg.lineEdit.clear()# Populate the comboBox with names of all the loaded layersself.dlg.comboBox.addItems([layer.name() for layer in layers])# show the dialogself.dlg.show()# Run the dialog event loop
        result = self.dlg.exec_()# See if OK was pressedif result:
          filename = self.dlg.lineEdit.text()with open(filename, 'w') as output_file:
            selectedLayerIndex = self.dlg.comboBox.currentIndex()
            selectedLayer = layers[selectedLayerIndex].layer()
            fieldnames = [field.name() for field in selectedLayer.fields()]# write header
            line = ','.join(name for name in fieldnames) + '\n'
            output_file.write(line)# wirte feature attributesfor f in selectedLayer.getFeatures():
              line = ','.join(str(f[name]) for name in fieldnames) + '\n'
              output_file.write(line)self.iface.messageBar().pushMessage("Success", "Output file written at " + filename,
            level=Qgis.Success, duration=3)
END

点击下方“阅读原文”查看更多


 802
802

 被折叠的 条评论
为什么被折叠?
被折叠的 条评论
为什么被折叠?
 到【灌水乐园】发言


