


zap日志框架分了三篇来讲解:使用篇 ,源码篇,性能篇。
流程分析
我们先看一个 logger.Error("logger", zap.String("name", "修华师")) 会走哪些代码
/**
入口方法,参数信息如下:
msg:消息
fields :结构字段信息,可以是0-N个
*/
func (log *Logger) Error(msg string, fields ...Field) {
//校验是否需要输出 ErrorLevel 日志
if ce := log.check(ErrorLevel, msg); ce != nil {
//write 日志
ce.Write(fields...)
}
}
/**
校验方法,参数信息如下:
lvl:要检验的日志级别,这里传入的是:ErrorLevel
msg :日志消息
*/
func (log *Logger) check(lvl zapcore.Level, msg string) *zapcore.CheckedEntry {
//定义skip,这是为了打印日志caller的信息(通过runtime.Caller(skip))获取
const callerSkipOffset = 2
//如果lvl<定义的日志级别,则直接返回
if lvl < zapcore.DPanicLevel && !log.core.Enabled(lvl) {
return nil
}
// 封装日志entry,包含了日志的基本信息:time,level,msg,name
ent := zapcore.Entry{
LoggerName: log.name,
Time: time.Now(),
Level: lvl,
Message: msg,
}
//从对象池中取出CheckedEntry信息,并将core对象和上面的entry对象赋值给CheckedEntry对象,有兴趣的可以点进去看下
ce := log.core.Check(ent, nil)
willWrite := ce != nil
// 定义输出后的行为,如果是PanicLevel,FatalLevel 输出完日志后,直接退出
//如果是DPanicLevel,则只有在定义了development=true的环境下,才会退出
switch ent.Level {
case zapcore.PanicLevel:
ce = ce.Should(ent, zapcore.WriteThenPanic)
case zapcore.FatalLevel:
ce = ce.Should(ent, zapcore.WriteThenFatal)
case zapcore.DPanicLevel:
if log.development {
ce = ce.Should(ent, zapcore.WriteThenPanic)
}
}
if !willWrite {
return ce
}
// 将错误输出赋值给CheckedEntry对象
ce.ErrorOutput = log.errorOutput
//是否需要输出调用者信息,如:行号,文件等
if log.addCaller {
ce.Entry.Caller = zapcore.NewEntryCaller(runtime.Caller(log.callerSkip + callerSkipOffset))
if !ce.Entry.Caller.Defined {
fmt.Fprintf(log.errorOutput, "%v Logger.check error: failed to get callern", time.Now().UTC())
log.errorOutput.Sync()
}
}
//是否需要将调用者信息记录到stack中,
if log.addStack.Enabled(ce.Entry.Level) {
ce.Entry.Stack = Stack("").String
}
return ce
}
/**
写日志,参数信息如下:
fields :结构字段信息,可以是0-N个
*/
func (ce *CheckedEntry) Write(fields ...Field) {
if ce == nil {
return
}
//是否是二次输出,如果是,则会警告是Unsafe,直接返回
//之所以这么做是为了避免从对象池中拿到的CheckedEntry做了多次的write
if ce.dirty {
if ce.ErrorOutput != nil {
fmt.Fprintf(ce.ErrorOutput, "%v Unsafe CheckedEntry re-use near Entry %+v.n", time.Now(), ce.Entry)
ce.ErrorOutput.Sync()
}
return
}
ce.dirty = true
var err error
//开始输出,zap可以允许有多个输出终端,所以会有多个core的情况,关于core的定义,我们在后面会详细讲解
for i := range ce.cores {
//Write(ce.Entry, fields),输出entry和fields
//输出的终端是有用户定义,具体的例子参考上一篇:使用篇(1)
err = multierr.Append(err, ce.cores[i].Write(ce.Entry, fields))
}
//如果发生错误,则输出到ErrorOutput(在定义core时,定义了ouput,默认是os.Stderr)
if ce.ErrorOutput != nil {
if err != nil {
fmt.Fprintf(ce.ErrorOutput, "%v write error: %vn", time.Now(), err)
ce.ErrorOutput.Sync()
}
}
should, msg := ce.should, ce.Message
//回收CheckedEntry
putCheckedEntry(ce)
//判断是否需要退出,should实在上面的 check 方法终端赋值的
switch should {
case WriteThenPanic:
panic(msg)
case WriteThenFatal:
exit.Exit()
}
}
上面的代码基本上展示了输出日志的整个流程,还是非常简单的,下面对zap的模块做一些分析,体会一下zap的设计之美。
结构
Level
日志级别的定义,不做过多阐述,需要注意的是,zap特有的日志级别:DPanicLevel,此日志级别在开发环境下(设置了Logger.development=true),会将panic日志打印出来,然后发出panic。但是在非开发环境下,只会打印panic日志,不会退出
type Level int8
const (
// DebugLevel logs are typically voluminous, and are usually disabled in
// production.
DebugLevel Level = iota - 1
// InfoLevel is the default logging priority.
InfoLevel
// WarnLevel logs are more important than Info, but don't need individual
// human review.
WarnLevel
// ErrorLevel logs are high-priority. If an application is running smoothly,
// it shouldn't generate any error-level logs.
ErrorLevel
// DPanicLevel logs are particularly important errors. In development the
// logger panics after writing the message.
DPanicLevel
// PanicLevel logs a message, then panics.
PanicLevel
// FatalLevel logs a message, then calls os.Exit(1).
FatalLevel
_minLevel = DebugLevel
_maxLevel = FatalLevel
)
Logger
Logger是一个结构体,定义了与输出相关的基本信息,比如:name,stack,core等,我们可以看到这些属性都是不对外公开的,所以不能直接初始化结构体。zap为我们提供了New,Build两种方式来初始化Logger。除了core以外,其他的都可以通过Option来设置,这里先留个印象,后面会看到如何设置。
type Logger struct {
    //core:定义了输出日志核心接口
    core zapcore.Core
    development bool
    name        string
    //错误输出终端,注意区别于zapcore中的输出,这里一般是指做运行过程中,发生错误记录日志(如:参数错误,未定义错误等),默认是os.Stderr
    errorOutput zapcore.WriteSyncer
    //是否输出调用者的信息
    addCaller bool
    //需要记录stack信息的日志级别
    addStack  zapcore.LevelEnabler
    //调用者的层级:用于指定记录哪个调用者信息
    callerSkip int
}
zap为我们提供了几个默认的Logger初始化方法
方式一:自定义的new方法,我们我们 使用篇就是使用的这个方法,代码很简单。我们再说上文提到的errorOutput,其输出的终端就是os.Stderr
func New(core zapcore.Core, options ...Option) *Logger {
    if core == nil {
        return NewNop()
    }
    log := &Logger{
        core:        core,
        errorOutput: zapcore.Lock(os.Stderr),
        addStack:    zapcore.FatalLevel + 1,
    }
    return log.WithOptions(options...)
}
需要注意的参数里面有个Option数组,我们看下Option接口的定义,其中自定义的函数类型:optionFunc 实现了该接口,这种设计思路值得我们借鉴,类似于java中的匿名函数,可以有效的避免代码的冗余,进一步的凸显简洁之美,同时避免了上面的func New(core zapcore.Core, options ...Option) *Logger,一大串的参数定义(如果不是Option,我们可能会定义出这样的函数 func New(core zapcore.Core, xx int,xx string,xx Caller,...))。
以下代码在:
options.go文件,文件中还提供了几个Option方法
type Option interface {
apply(*Logger)
}
// optionFunc wraps a func so it satisfies the Option interface.
type optionFunc func(*Logger)
func (f optionFunc) apply(log *Logger) {
f(log)
}
我们看下zap提供几个Option实现,使用方法就:将其传到的上面的New方法中,就可以完成Logger的定义,这些有一个共同特点:设置Logger的基本属性
//设置成开发模式
func Development() Option {
return optionFunc(func(log *Logger) {
log.development = true
})
}
//自定义错误输出路径
func ErrorOutput(w zapcore.WriteSyncer) Option {
return optionFunc(func(log *Logger) {
log.errorOutput = w
})
}
//Logger的结构化字段,每条日志都会打印这些Filed信息
func Fields(fs ...Field) Option {
return optionFunc(func(log *Logger) {
log.core = log.core.With(fs)
})
}
//日志添加调用者信息
func AddCaller() Option {
return WithCaller(true)
}
func WithCaller(enabled bool) Option {
return optionFunc(func(log *Logger) {
log.addCaller = enabled
})
}
//设置skip,用户runtime.Caller的参数
func AddCallerSkip(skip int) Option {
return optionFunc(func(log *Logger) {
log.callerSkip += skip
})
}
//设置stack
func AddStacktrace(lvl zapcore.LevelEnabler) Option {
return optionFunc(func(log *Logger) {
log.addStack = lvl
})
}
zap还为我们添加了hook,让我们在每次打印日志的时候,可以调用hook方法:比如可以统计打印日志的次数、统计打印字段等
func Hooks(hooks ...func(zapcore.Entry) error) Option {
    return optionFunc(func(log *Logger) {
        log.core = zapcore.RegisterHooks(log.core, hooks...)
    })
}
方式二:构造器模式,为我们提供了开箱即用的Logger对象,并且区分了不同环境
//开发环境下的Logger
func NewDevelopment(options ...Option) (*Logger, error) {
    return NewDevelopmentConfig().Build(options...)
}
//生产环境下的Logger
func NewProduction(options ...Option) (*Logger, error) {
    return NewProductionConfig().Build(options...)
}
//测试环境下的Logger
func NewExample(options ...Option) *Logger {
    encoderCfg := zapcore.EncoderConfig{
        MessageKey:     "msg",
        LevelKey:       "level",
        NameKey:        "logger",
        EncodeLevel:    zapcore.LowercaseLevelEncoder,
        EncodeTime:     zapcore.ISO8601TimeEncoder,
        EncodeDuration: zapcore.StringDurationEncoder,
    }
    core := zapcore.NewCore(zapcore.NewJSONEncoder(encoderCfg), os.Stdout, DebugLevel)
    return New(core).WithOptions(options...)
}
不同的构造方式,唯一不同的就是Config,我们来看下Config的定义,具体NewDevelopmentConfig(),NewProductionConfig(),的实现,可自行看源码
type Config struct {
    Level AtomicLevel `json:"level" yaml:"level"`
    Development bool `json:"development" yaml:"development"`
    DisableCaller bool `json:"disableCaller" yaml:"disableCaller"`
    DisableStacktrace bool `json:"disableStacktrace" yaml:"disableStacktrace"`
    Sampling *SamplingConfig `json:"sampling" yaml:"sampling"`
    //取值:json,console,代表两种输出格式
    Encoding string `json:"encoding" yaml:"encoding"`
    //定义了输出样式
    EncoderConfig zapcore.EncoderConfig `json:"encoderConfig" yaml:"encoderConfig"`
    //日志的输出路径
    OutputPaths []string `json:"outputPaths" yaml:"outputPaths"`
    //错误日志的输入路径
    ErrorOutputPaths []string `json:"errorOutputPaths" yaml:"errorOutputPaths"`
    //初始化的Fields,每行日志都会爱上这些Field
    InitialFields map[string]interface{} `json:"initialFields" yaml:"initialFields"`
}
zapcore.EncoderConfig:定义了输出的样式,比如Key,调用者样式等
type EncoderConfig struct {
    //*Key:设置的是在结构化输出时,value对应的key
    MessageKey    string `json:"messageKey" yaml:"messageKey"`
    LevelKey      string `json:"levelKey" yaml:"levelKey"`
    TimeKey       string `json:"timeKey" yaml:"timeKey"`
    NameKey       string `json:"nameKey" yaml:"nameKey"`
    CallerKey     string `json:"callerKey" yaml:"callerKey"`
    StacktraceKey string `json:"stacktraceKey" yaml:"stacktraceKey"`
    //日志的结束符
    LineEnding    string `json:"lineEnding" yaml:"lineEnding"`
    //Level的输出样式,比如 大小写,颜色等
    EncodeLevel    LevelEncoder    `json:"levelEncoder" yaml:"levelEncoder"`
    //日志时间的输出样式
    EncodeTime     TimeEncoder     `json:"timeEncoder" yaml:"timeEncoder"`
    //消耗时间的输出样式
    EncodeDuration DurationEncoder `json:"durationEncoder" yaml:"durationEncoder"`
    //Caller的输出样式,比如 全名称,短名称
    EncodeCaller   CallerEncoder   `json:"callerEncoder" yaml:"callerEncoder"`
    // Unlike the other primitive type encoders, EncodeName is optional. The
    // zero value falls back to FullNameEncoder.
    EncodeName NameEncoder `json:"nameEncoder" yaml:"nameEncoder"`
}
可以看到,上面都应了json,yaml的tag,也就是说我们可以通过配置文件来初始化这些Config,对开发者非常的友好。
zapcore
zapcore是一个接口,之所以定义成接口,是因为zap需要提供不同的实现,做到接口与实现解耦,充分体现了面向接口编程的设计思路
我们先看这个接口定义:
type Core interface {
//level接口:是用来根据日志级别判断日志是否应该输出
LevelEnabler
//添加结构化字段的方法
With([]Field) Core
//从对象池取出CheckedEntry对象,并关联输出实体entry和core信息
Check(Entry, *CheckedEntry) *CheckedEntry
//写入日志的方法
Write(Entry, []Field) error
//刷新到终端的方法
Sync() error
}
在zap包中,我们可以看到core有如下的实现:
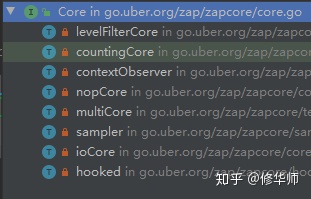
下面的例子我们使用的是:mutiCore,ioCore
//声明一个mutiCore,输出到多个终端
core := zapcore.NewTee(
    // 每个终端都是由ioCore来实现
    zapcore.NewCore(zapcore.NewConsoleEncoder(config), zapcore.AddSync(infoWriter), infoLevel),
    zapcore.NewCore(zapcore.NewConsoleEncoder(config), zapcore.AddSync(warnWriter), warnLevel),
    zapcore.NewCore(zapcore.NewJSONEncoder(config), zapcore.NewMultiWriteSyncer(zapcore.AddSync(os.Stdout)), logLevel),
)
接下来我们对每个Core做一个简单的分析
ioCore
底层实现,其他的core实现基本上都依赖于ioCore,我们先来看ioCore的结构体定义
type ioCore struct {
    LevelEnabler
    enc Encoder
    out WriteSyncer
}
LevelEnabler继承Enabled(Level) bool方法。enc Encoder定义是日志的输出格式:- zapcore.NewConsoleEncoder 非结构化日志
- zapcore.NewJSONEncoder 结构化日志
- 为了线程问题,我们在里面可以看到大量的clone方法,这一点值得我们借鉴
在运行过程中,我们可能会对logger,core对象做一些With操作,如果不做clone,则会改变其他的调用行为,这就属于脏数据
func (c *ioCore) With(fields []Field) Core {
    clone := c.clone()
    addFields(clone.enc, fields)
    return clone
}
func (c *ioCore) clone() *ioCore {
    return &ioCore{
        LevelEnabler: c.LevelEnabler,
        enc:          c.enc.Clone(),
        out:          c.out,
    }
}
hooked
hooked,顾名思义,就是为我们提供钩子方法,前面有提到过,我们先看他的定义
type hooked struct {
    Core
    funcs []func(Entry) error
}
Core:组合了其他的Core,比如:multiCore,ioCore等funcs: 钩子方法,在Write时,会调用该方法。源代码如下:
func (h *hooked) Write(ent Entry, _ []Field) error {
    var err error
    for i := range h.funcs {
        err = multierr.Append(err, h.funcs[i](ent))
    }
    return err
}
我们看看如何使用这个hook
logger = zap.New(core, zap.AddCaller(), zap.AddStacktrace(zap.WarnLevel), zap.Hooks(func(entry zapcore.Entry) error {//定义钩子函数
        fmt.Println("hooked called")
        return nil
    }))
//打印日志
logger.Info("logger", zap.String("name", "修华师"))
打印的结果是
{"level":"INFO","ts":"2020-05-18 15:20:56","file":"test/main.go:35","msg":"logger","name":"修华师"}
hooked called
multiCore
这是一个组合Core,他的定义就是:
type multiCore []Core
这样就实现了可以往多个终端打印,我们看multiCore的初始化方法,很简单
func NewTee(cores ...Core) Core {
    switch len(cores) {
    case 0:
        return NewNopCore()
    case 1:
        return cores[0]
    default:
        return multiCore(cores)
    }
}
在看他的Write方法,就是循环Core,然后Write
func (mc multiCore) Write(ent Entry, fields []Field) error {
    var err error
    for i := range mc {
        err = multierr.Append(err, mc[i].Write(ent, fields))
    }
    return err
}
zap还为我们提供了如下的Core,这里就一一介绍了,读者可以自己看,都非常的简单
nopCore:什么也不做countingCore:看名字就很清楚了,只负责计数
encoder
json的编码器,为了提升性能,zap自己通过字符串拼接的方式来组装json字符串,可见其用工很足。具体可以看zapcore.EncodeEntry方法,代码很长,这里就不贴了,关键是很容易懂。
结语
整个源码读下来,会发现zap使用了大量的对象组合+接口,从解耦的角度上来说,这是非常值得我们学习的。最后,贴一张zap的结构图,方便我们加深理解。

这篇已经很长很长了,我知道读者的时间很宝贵,所以先到这里,下次我们再从性能的角度来分析zap,看看zap为了性能做了哪些功课。
还有不太了解的地方,欢迎留言,我们一起成长!
相关阅读
zap日志框架-使用篇(1)
zap日志框架-性能篇(3)


 890
890


 被折叠的 条评论
为什么被折叠?
被折叠的 条评论
为什么被折叠?
 到【灌水乐园】发言


