


一.体系架构
在Keepalived + amoeba高可用负载均衡架构中,keepalived负责实现High-availability (HA) 功能控制前端机VIP(虚拟网络地址),当有设备发生故障时,热备服务器可以瞬间将VIP自动切换过来,实际运行中体验只有2秒钟切换时间,
通过amoeba mysql中间件对master和slave进行读写分离,主master负责写,两台slave负责读,备master负责实时同步主master的数据
二. 优点
- 读写分离
- mysql slave支持横向扩展,提高性能
- 数据库内容支持定期备份,在发生重大操作失误后可以进行回退操作
- mysql master热备,能在master出现问题后自动切换到另一台备份master上继续使用
三. 系统环境
两台负载机器安装:centos7.2+docker+amoeba+keepalived,分别命名为:MYSQL_MASTER,MYSQL_BACKUP。
多台mysql slave,这里使用两台
服务器 操作系统 IP地址 安装软件
MYSQL_MASTER Centos 7.2 64位 10.141.1.31 docker+amoeba+keepalived
MYSQL_BACKUP Centos 7.2 64位 10.141.1.5 docker+amoeba+keepalived
MYSQL_SLAVE_1 Centos 7.2 64位 10.141.1.12 docker+mysql
MYSQL_SLAVE_2 Centos 7.2 64位 10.141.1.25 docker+mysql
虚拟IP 10.141.1.8
四. 搭建环境
1. 主机准备
全部主机执行命令
setenforce 0 #关闭selinux
sed -i 's/SELINUX=enforcing/SELINUX=disabled/g' /etc/selinux/config
systemctl stop firewalld #关闭防火墙
systemctl stop iptables #关闭iptables
2. docker安装(全部主机执行命令)
a. 在线安装
参考: (https://docs.docker.com/install/linux/docker-ce/centos/#uninstall-old-versions)
yum install docker
b. 离线二进制安装:
参考:(https://www.jianshu.com/p/46b9a351f749)
3. 安装mysql(全部安装)
a. 拉取镜像
docker pull mysql:5.7b. 修改mysql配置文件,vim mysqld.cnf
[mysqld]pid-file = /var/run/mysqld/mysqld.pidsocket = /var/run/mysqld/mysqld.sockdatadir = /var/lib/mysql#log-error = /var/log/mysql/error.log# By default we only accept connections from localhost#bind-address = 127.0.0.1# Disabling symbolic-links is recommended to prevent assorted security riskssymbolic-links=0log-bin=mysql-binserver_id = 11 #备份写12,不能一样auto-increment-offset = 1 #备份mysql填写0auto-increment-increment = 2 c. 启动mysql
docker run --name mysql -e MYSQL_ROOT_PASSWORD=1234 -p 3306:3306 -v /${PWD}/mysqld.cnf:/etc/mysql/mysql.conf.d/mysqld.cnf -d mysql:5.7
4. 设置mysql双主多从
a. 赋权
(1)master给backup和两个slave增加复制账号
grant replication slave on *.* to 'repl'@'10.141.1.5' identified by '123456';
grant replication slave on *.* to 'repl'@'10.141.1.12' identified by '123456';
grant replication slave on *.* to 'repl'@'10.141.1.25' identified by '123456';
flush privileges;
(2)backup给master和两个slave增加复制账号
grant replication slave on *.* to 'repl'@'10.141.1.31' identified by '123456';grant replication slave on *.* to 'repl'@'10.141.1.12' identified by '123456';grant replication slave on *.* to 'repl'@'10.141.1.25' identified by '123456';flush privileges;(3)设置backup同步master
show master status; #在master执行,记住File和Position 值change master to master_host='10.141.1.31',master_port=3306,master_user='repl',master_password='123456',master_log_file='mysql-bin.000003',master_log_pos=1207; #在backup执行,master_log_file为上面的File值,master_log_pos为Position 值start slave; #启动show slave statusG; 查看Slave_IO_Running和Slave_SQL_Running两个值为yes即成功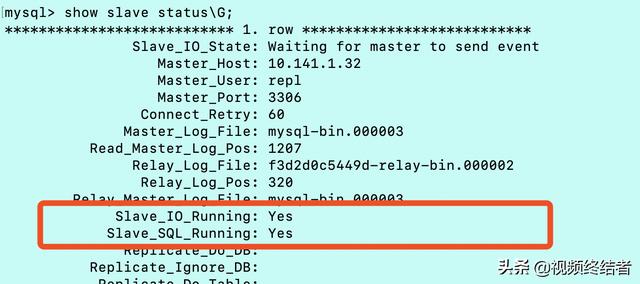
image.png
(4)设置master同步backup
show master status; #在backup执行,记住File和Position 值change master to master_host='10.141.1.5',master_port=3306,master_user='repl',master_password='123456',master_log_file='mysql-bin.000003',master_log_pos=1050; #在master执行,master_log_file为上面的File值,master_log_pos为Position 值start slave; #启动show slave statusG; 查看Slave_IO_Running和Slave_SQL_Running两个值为yes即成功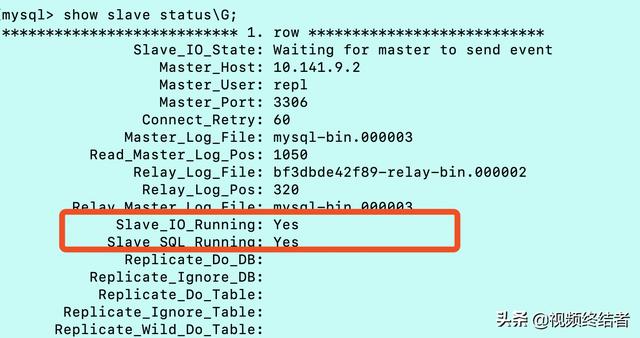
image.png
(5)设置slave同步master
show master status; #在master执行,记住File和Position 值
change master to master_host='10.141.1.8',master_port=3306,master_user='repl',master_password='123456',master_log_file='mysql-bin.000003',master_log_pos=1207; #在backup执行,master_log_file为上面的File值,master_log_pos为Position 值
start slave; #启动
show slave statusG; 查看Slave_IO_Running和Slave_SQL_Running两个值为yes即成功
5. 读写分离
a. 分配amoeba账号,全部执行
grant all on *.* to 'amoeba'@'%' identified by '123';b. 启动amoeba服务
docker run --name amoeba -it -d -p 8066:8066 -v /${PWD}/conf:/usr/local/amoeba/conf commanderhu/amoeba
启动后修改conf下的amoeba.xml ,dbServers.xml 文件,然后重启
docker restart amoeba
c. 测试
mysql -uamoeba -p123 -P8066 -h10.141.1.8show databases;6. keepalived安装配置
参考(https://www.jianshu.com/p/72dfd4d4cf9bc)
master配置
! Configuration File for keepalived
global_defs {
notification_email {
acassen@firewall.loc
failover@firewall.loc
sysadmin@firewall.loc
}
notification_email_from Alexandre.Cassen@firewall.loc
smtp_server 192.168.200.1
smtp_connect_timeout 30
router_id LVS_DEVEL
vrrp_skip_check_adv_addr
#vrrp_strict
vrrp_garp_interval 0
vrrp_gna_interval 0
}
vrrp_script chk_mysql_port { #检测mysql服务是否在运行。有很多方式,比如进程,用脚本检测等等
script "/root/chk_mysql.sh" #这里通过脚本监测
interval 2 #脚本执行间隔,每2s检测一次
weight -10 #脚本结果导致的优先级变更,检测失败(脚本返回非0)则优先级 -5
fall 2 #检测连续2次失败才算确定是真失败。会用weight减少优先级(1-255之间)
rise 1 #检测1次成功就算成功。但不修改优先级
}
vrrp_instance VI_1 {
state MASTER
#nopreempt
notify_master /root/to_master.sh
unicast_src_ip 10.141.1.29
unicast_peer {
10.141.1.24
}
interface eth0
virtual_router_id 58
priority 100
advert_int 1
authentication {
auth_type PASS
auth_pass 1111
}
virtual_ipaddress {
10.141.1.8
}
track_script {
chk_mysql_port
}
}
slave配置
! Configuration File for keepalivedglobal_defs { notification_email { acassen@firewall.loc failover@firewall.loc sysadmin@firewall.loc } notification_email_from Alexandre.Cassen@firewall.loc smtp_server 192.168.200.1 smtp_connect_timeout 30 router_id LVS_DEVEL vrrp_skip_check_adv_addr #vrrp_strict vrrp_garp_interval 0 vrrp_gna_interval 0}vrrp_script chk_mysql_port { #检测mysql服务是否在运行。有很多方式,比如进程,用脚本检测等等 script "/root/chk_mysql.sh" #这里通过脚本监测 interval 2 #脚本执行间隔,每2s检测一次 weight -10 #脚本结果导致的优先级变更,检测失败(脚本返回非0)则优先级 -5 fall 2 #检测连续2次失败才算确定是真失败。会用weight减少优先级(1-255之间) rise 1 #检测1次成功就算成功。但不修改优先级}vrrp_instance VI_1 { state BACKUP notify_master /root/to_master.sh #nopreempt unicast_src_ip 10.141.1.24 unicast_peer { 10.141.1.29 } interface eth0 virtual_router_id 58 priority 95 advert_int 1 authentication { auth_type PASS auth_pass 1111 } virtual_ipaddress { 10.141.1.8 } track_script { chk_mysql_port }}slave变master执行的脚本
re=`mysql -h10.141.1.29 -uroot -p1234 -e "show master status;" | grep -v File`echo $rebinlog=`echo $re | awk '{print $1}'`position=`echo $re | awk '{print $2}'`echo $binlog ------ $positionmysql -h10.141.1.30 -uroot -p1234 -e "stop slave;change master to master_host='10.141.1.8',master_port=3306,master_user='repl',master_password='123456',master_log_file='$binlog',master_log_pos=$position;start slave;show slave statusG;"mysql -h10.141.1.4 -uroot -p1234 -e "stop slave;change master to master_host='10.141.1.8',master_port=3306,master_user='repl',master_password='123456',master_log_file='$binlog',master_log_pos=$position;start slave;show slave statusG;"检查脚本
counter=$(netstat -na|grep "LISTEN"|grep "3306"|wc -l)if [ "${counter}" -eq 0 ]; then #systemctl stop keepalived exit 1fi


 526
526


 被折叠的 条评论
为什么被折叠?
被折叠的 条评论
为什么被折叠?
 到【灌水乐园】发言


