


以单张图片为例,将一张图片分别用Pillow和Opencv读入,然后转换为numpy的数组
image 读取图片
1. Pillow方式
from PIL import Image
im = Image.open('./sunrise354.jpg')
type(im)
PIL.JpegImagePlugin.JpegImageFile
im.size
(203, 153)
Pillow是以二进制的方式读入保存的,转为numpy格式要利用asarray的方法。
im.size 返回的是 width,height
注意点:1. im.size 返回的是图片的像素大小,不涉及通道channel的问题
2. 将image对象,转成numpy格式
import numpy as np
im_pillow = np.asarray(im)
im_pillow.shape
(153, 203, 3)
注意点:numpy读到的是 height,width,channel
总结:那为啥im.size和 im_pillow.shape 返回的顺序都不一样呢? 一个是width,height, 一个是 height width。 这里其实比较好理解, 因为 numpy是从数组的角度,行和列,所以先height,后width, 而im.size 是从像素的角度, 比如1920* 1080 就是宽高比喽。
2.Opencv方式
opencv读入图片后,就是以Numpy数组的形式来保存数据的。
import cv2
im_cv2 = cv2.imread("./sunrise354.jpg")
type(im_cv2)
numpy.ndarray
im_cv2.shape
(153, 203, 3)
im_cv2 直接返回的就是numpy格式的数据,im_cv2.shape 是 (153, 203, 3)唯一需要注意的是,通道的顺序,PIL是 RGB, 而CV2是BGR,模型训练时的通道顺序需与预测的通道顺序要保持一致。也就是说使用 Pillow 训练,使用OpenCV 读入图片直接进行预测的话,不会报错,但结果会不正确,所以大家一定要注意。
所以,通常情况下 我们要这样做:
import cv2
import numpy as np

# Load the image using cv2.imread()
img = cv2.imread("image.jpg", cv2.IMREAD_COLOR)

# Swap the BGR order to RGB order
img_rgb = cv2.cvtColor(img, cv2.COLOR_BGR2RGB)
要将cv2打开的图片保存为RGB顺序,可以使用以下代码:
import cv2

# 加载图像
image = cv2.imread("path/to/image.png")

# 将图像从BGR格式转换为RGB格式
image = cv2.cvtColor(image, cv2.COLOR_BGR2RGB)

# 保存图像
cv2.imwrite("path/to/save/image.png", image)
3. 配合图片上传
import numpy as np
import cv2
from flask import Flask, request, jsonify

app = Flask(__name__)

@app.route('/upload', methods=['POST'])
def upload():
    # 获取上传的文件
    file = request.files['file']

    # 将文件的内容读取为 numpy 数组
    file_content = file.read()
    np_array = np.fromstring(file_content, np.uint8)

    # 将 numpy 数组解码为图像
    image = cv2.imdecode(np_array, cv2.IMREAD_COLOR)

    # 返回图片的宽度、高度和通道数
    return jsonify(
        width=image.shape[1],
        height=image.shape[0],
        channels=image.shape[2]
    )

if __name__ == '__main__':
    app.run()
在这个例子中,我们首先使用 Flask 来创建一个应用程序,并创建了一个名为 upload 的端点来上传文件。
在处理文件时,我们使用 file.read() 函数将文件的内容读取为二进制字符串,并使用 np.fromstring() 函数将其转换为 numpy 数组。
然后,我们使用 cv2.imdecode() 函数将 numpy 数组解码为图像,后续的处理与之前相同。
最后,我们返回图像的宽度、高度和通道数。
请注意,这种方法可能会对一些不支持内存操作的环境产生压力,并且需要确保上传的文件是图像。
另外一种方式
import cv2
from flask import Flask, request, jsonify

app = Flask(__name__)

@app.route('/upload', methods=['POST'])
def upload():
    # 获取上传的文件
    file = request.files['file']

    # 将文件保存到服务器中
    file_path = 'uploads/' + file.filename
    file.save(file_path)

    # 使用 OpenCV 加载图片
    image = cv2.imread(file_path)

    # 返回图片的宽度、高度和通道数
    return jsonify(
        width=image.shape[1],
        height=image.shape[0],
        channels=image.shape[2]
    )

if __name__ == '__main__':
    app.run()
这个是先保存图片,再打开图片的。
3. plt.imshow()
要把数据压缩到[0,1]之间或者[0,255之间],因为你的数据类型此时可能是float64的
ccc = np.concatenate((im_pillow_c1,zeros),axis=2)
ccc.dtype
dtype('float64')
解决方式:1.img = img.astype(‘int8’) 2. img = img/255
方式:
出了这样一个:
Clipping input data to the valid range for imshow with RGB data ([0…1] for floats or [0…255] for integers).
答案在此:
This warning message usually appears when the input image data is out of range for the imshow() function in Python.
If the input data is in the form of floats, the valid range is [0, 1]. If the input data is in the form of integers, the valid range is [0, 255].
To fix this issue, you can rescale your input image data to fit into the valid range by multiplying the image data by a scalar value. For example, if your input image data is in the range [0, 255], you can divide it by 255 to scale it down to the range [0, 1] for floats.
import matplotlib.pyplot as plt
import numpy as np

# Loading the image data
img = plt.imread('image.jpg')

# Scaling the image data to fit into the valid range
img = img / 255.0
# 或者 img = img.astype('int8')
# Displaying the image
plt.imshow(img)
plt.show()
# By scaling the image data to fit into the valid range, the imshow() function will not display the warning  # message anymore.
在 Python 中,如果要在图像上进行操作,则通常需要按照以下规则将图像的像素值缩放到特定的范围内:
对于像素值的存储方式为浮点数(float)的图像,像素值的范围通常是 [0, 1]。
对于像素值的存储方式为整数(int)的图像,像素值的范围通常是 [0, 255]。
在进行某些图像操作时,必须将像素值的范围缩放到特定的范围内。例如,图像增强、预处理、归一化等操作通常需要将像素值缩放到 [0, 1] 范围内进行处理。
另一方面,一些图像可视化操作,例如显示图像、保存图像等则不需要进行像素值的范围缩放,可以直接使用原始的像素值进行处理。
需要注意的是,将像素值缩放到特定范围内时,可能会发生舍入误差等问题,因此,有时候我们需要在图像处理的过程中,手动计算像素值的范围,并进行相应的缩放处理。
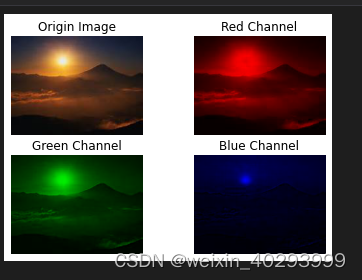
4.掰开了揉碎了看图片
R,G,B三色图分别储存起来
im_pillow_c1 = im_pillow[:,:,0]
im_pillow_c2 = im_pillow[:,:,1]
im_pillow_c3 = im_pillow[:,:,2]
zeros = np.zeros((im_pillow.shape[0], im_pillow.shape[1], 2))
zeros.shape
(153, 203, 2)
构建zeros的图片像素模板,这样以来就可以合成单色图片了。
im_pillow_c1.shape
直接的concatentate会报错,
im_pillow_c1_3ch = np.concatenate((im_pillow_c1,zeros),axis=2)
im_pillow_c1_3ch.shape
---------------------------------------------------------------------------
AxisError                                 Traceback (most recent call last)
/tmp/ipykernel_4451/1297695537.py in
----> 1 im_pillow_c1_3ch = np.concatenate((im_pillow_c1,zeros),axis=2)
      2 im_pillow_c1_3ch.shape

~/.local/lib/python3.8/site-packages/numpy/core/overrides.py in concatenate(*args, **kwargs)

AxisError: axis 2 is out of bounds for array of dimension 2
少一个维度,就填一个维度了啊
im_pillow_c1 = im_pillow_c1[:,:,np.newaxis]
im_pillow_c1.shape
添加一个维度的操作,在numpy上用 np.newaxis.
这个操作在你看深度学习相关代码的时候经常会看到,只不过 PyTorch 中的函数名unsqueeze(), TensorFlow 的话是与 NumPy 有相同的名字,直接使用 tf.newaxis 就可以了。
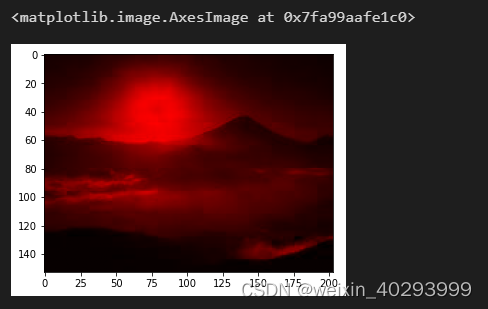
plt.imshow(im_pillow_c1_3ch/255)
R红色通道的图片:
也可以直接复制:
im_pillow_c2_3ch = np.zeros(im_pillow.shape)
im_pillow_c2_3ch[:,:,1] = im_pillow_c2
im_pillow_c3_3ch = np.zeros(im_pillow.shape)
im_pillow_c3_3ch[:,:,2] = im_pillow_c3
from matplotlib import pyplot as plt
plt.subplot(2, 2, 1)
plt.title('Origin Image')
plt.imshow(im_pillow)
plt.axis('off')
plt.subplot(2, 2, 2)
plt.title('Red Channel')
plt.imshow(im_pillow_c1_3ch.astype(np.uint8))
plt.axis('off')
plt.subplot(2, 2, 3)
plt.title('Green Channel')
plt.imshow(im_pillow_c2_3ch.astype(np.uint8))
plt.axis('off')
plt.subplot(2, 2, 4)
plt.title('Blue Channel')
plt.imshow(im_pillow_c3_3ch.astype(np.uint8))
plt.axis('off')
plt.savefig('./rgb_pillow.png', dpi=150)
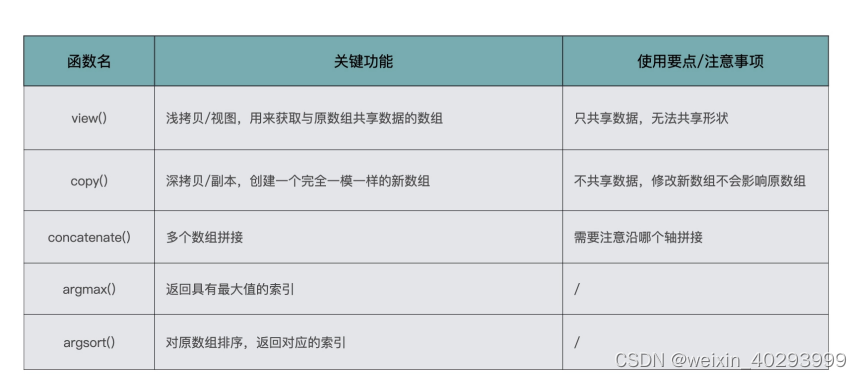
其它重要的函数:
probs = np.array([1,2,3,4,0,5])
np.argmax(probs)
5
np.argsort(probs)
array([4, 0, 1, 2, 3, 5])
倒序排序
probs_idx_sort = np.argsort(-probs)
probs_idx_sort
array([5, 3, 2, 1, 0, 4])
5. 练习
给定数组 scores,形状为(256,256,2),scores[: , :, 0] 与 scores[:, :, 1]对应位置元
素的和为 1,现在我们要根据 scores 生产数组 mask,要求 scores 通道 0 的值如果大于
通道 1 的值,则 mask 对应的位置为 0,否则为 1。
scores 如下,你可以试试用代码实现:
scores = np.random.rand(256, 256, 2)
scores[:,:,1] = 1 - scores[:,:,0]
np.random.rand is a NumPy function that generates an array of random float numbers between 0 and 1.
答案:
方法1:
mask = scores[:,:,0] < scores[:,:,1]
mask.astype('int')
方法2:
result = np.argmax(scores,axis=2)
总结:
本文主要解决用PIL模块打开图片并转成numpy格式后发生的事,你可能忽略了,已经图片上传后的操作,用opencv打开,送入模型, 深入对通道的理解


 1922
1922


 被折叠的 条评论
为什么被折叠?
被折叠的 条评论
为什么被折叠?
 到【灌水乐园】发言


