


目录
-
MMPose是什么
1.1 整体架构与设计
1.1.1 配置文件
1.1.2 数据
1.1.2.1 数据集元信息
1.1.2.2 数据集
1.1.2.3 数据流水线
1.1.2.4 数据增强
1.1.2.5 数据变换
1.1.2.5 数据编码
1.1.2.5 数据打包
1.1.3 模型
1.1.3.1 前处理器(DataPreprocessor)
1.1.3.2 主干网络(Backbone)
1.1.3.3 颈部模块(Neck)
1.1.3.4 预测头(Head) -
编解码器
2.1 编码器
2.1.1 Heatmap-based
2.1.2 RLE ( Regression-based)
2.1.3 SimCC (SimCC-based )
2.1.3.1 坐标编码
2.1.3.2 坐标解码
2.2 解码器
2.3 常见用法
2.3.1 定义编解码器
2.3.2 生成训练目标
2.3.3 模型头部 -
评价准则
-
HRNet
4.1 简介
4.2 证明高分辨率 feature map 的表征能力
4.3 HRNet网络结构设计
4.4 HRNet版本
1. MMPose是什么
MMPose 是一款基于 Pytorch 的姿态估计开源工具箱,是 OpenMMLab 项目的成员之一,包含了丰富的 2D 多人姿态估计、2D 手部姿态估计、2D 人脸关键点检测、133关键点全身人体姿态估计、动物关键点检测、服饰关键点检测等算法以及相关的组件和模块。
MMPose 由 8 个主要部分组成,apis、structures、datasets、codecs、models、engine、evaluation 和 visualization。
-
apis 提供用于模型推理的高级 API
-
structures 提供 bbox、keypoint 和 PoseDataSample 等数据结构
-
datasets 支持用于姿态估计的各种数据集
transforms 包含各种数据增强变换
-
codecs
提供姿态编解码器:编码器用于将姿态信息(通常为关键点坐标)编码为模型学习目标(如热力图),解码器则用于将模型输出解码为姿态估计结果 -
models 以模块化结构提供了姿态估计模型的各类组件
pose_estimators 定义了所有姿态估计模型类
data_preprocessors 用于预处理模型的输入数据
backbones 包含各种骨干网络
necks 包含各种模型颈部组件
heads 包含各种模型头部
losses 包含各种损失函数 -
engine 包含与姿态估计任务相关的运行时组件
hooks 提供运行时的各种钩子
-
evaluation 提供各种评估模型性能的指标
-
visualization 用于可视化关键点骨架和热力图等信息
1.1 整体架构与设计
-
一般来说,开发者在项目开发过程中经常接触内容的主要有五个方面:
通用:环境、钩子(Hook)、模型权重存取(Checkpoint)、日志(Logger)等
数据:数据集、数据读取(Dataloader)、数据增强等
训练:优化器、学习率调整等
模型:主干网络、颈部模块(Neck)、预测头模块(Head)、损失函数等(Loss)
评测:评测指标(Metric)、评测器(Evaluator)等 -
其中通用、训练和评测相关的模块往往由训练框架提供,开发者只需要调用和调整参数,不需要自行实现,开发者主要实现的是数据和模型部分。
1.1.1 配置文件
-
在MMPose中,我们通常 python 格式的配置文件,用于整个项目的定义、参数管理。
-
所有新增的模块都需要使用注册器(Registry)进行注册,并在对应目录的 init.py 中进行
import,以便能够使用配置文件构建其实例。
1.1.2 数据
-
MMPose 数据的组织主要包含三个方面:
数据集元信息
数据集
数据流水线
1.1.2.1 数据集元信息
-
元信息指具体标注之外的数据集信息。姿态估计数据集的元信息通常包括:关键点和骨骼连接的定义、对称性、关键点性质(如关键点权重、标注标准差、所属上下半身)等。这些信息在数据处理、模型训练和测试中有重要作用。在
MMPose 中,数据集的元信息使用 python 格式的配置文件保存,位于 $MMPOSE/configs/base/datasets
目录下。 -
在 MMPose
中使用自定义数据集时,需要增加对应的元信息配置文件。以COCO数据集($MMPOSE/configs/base/datasets/coco.py)为例:
dataset_info = dict(
    dataset_name='coco',
    paper_info=dict(
        author='Lin, Tsung-Yi and Maire, Michael and '
        'Belongie, Serge and Hays, James and '
        'Perona, Pietro and Ramanan, Deva and '
        r'Doll{\'a}r, Piotr and Zitnick, C Lawrence',
        title='Microsoft coco: Common objects in context',
        container='European conference on computer vision',
        year='2014',
        homepage='http://cocodataset.org/',
    ),
    keypoint_info={
        0:
        dict(name='nose', id=0, color=[51, 153, 255], type='upper', swap=''),
        1:
        dict(
            name='left_eye',
            id=1,
            color=[51, 153, 255],
            type='upper',
            swap='right_eye'),
        2:
        dict(
            name='right_eye',
            id=2,
            color=[51, 153, 255],
            type='upper',
            swap='left_eye'),
        3:
        dict(
            name='left_ear',
            id=3,
            color=[51, 153, 255],
            type='upper',
            swap='right_ear'),
        4:
        dict(
            name='right_ear',
            id=4,
            color=[51, 153, 255],
            type='upper',
            swap='left_ear'),
        5:
        dict(
            name='left_shoulder',
            id=5,
            color=[0, 255, 0],
            type='upper',
            swap='right_shoulder'),
        6:
        dict(
            name='right_shoulder',
            id=6,
            color=[255, 128, 0],
            type='upper',
            swap='left_shoulder'),
        7:
        dict(
            name='left_elbow',
            id=7,
            color=[0, 255, 0],
            type='upper',
            swap='right_elbow'),
        8:
        dict(
            name='right_elbow',
            id=8,
            color=[255, 128, 0],
            type='upper',
            swap='left_elbow'),
        9:
        dict(
            name='left_wrist',
            id=9,
            color=[0, 255, 0],
            type='upper',
            swap='right_wrist'),
        10:
        dict(
            name='right_wrist',
            id=10,
            color=[255, 128, 0],
            type='upper',
            swap='left_wrist'),
        11:
        dict(
            name='left_hip',
            id=11,
            color=[0, 255, 0],
            type='lower',
            swap='right_hip'),
        12:
        dict(
            name='right_hip',
            id=12,
            color=[255, 128, 0],
            type='lower',
            swap='left_hip'),
        13:
        dict(
            name='left_knee',
            id=13,
            color=[0, 255, 0],
            type='lower',
            swap='right_knee'),
        14:
        dict(
            name='right_knee',
            id=14,
            color=[255, 128, 0],
            type='lower',
            swap='left_knee'),
        15:
        dict(
            name='left_ankle',
            id=15,
            color=[0, 255, 0],
            type='lower',
            swap='right_ankle'),
        16:
        dict(
            name='right_ankle',
            id=16,
            color=[255, 128, 0],
            type='lower',
            swap='left_ankle')
    },
    skeleton_info={
        0:
        dict(link=('left_ankle', 'left_knee'), id=0, color=[0, 255, 0]),
        1:
        dict(link=('left_knee', 'left_hip'), id=1, color=[0, 255, 0]),
        2:
        dict(link=('right_ankle', 'right_knee'), id=2, color=[255, 128, 0]),
        3:
        dict(link=('right_knee', 'right_hip'), id=3, color=[255, 128, 0]),
        4:
        dict(link=('left_hip', 'right_hip'), id=4, color=[51, 153, 255]),
        5:
        dict(link=('left_shoulder', 'left_hip'), id=5, color=[51, 153, 255]),
        6:
        dict(link=('right_shoulder', 'right_hip'), id=6, color=[51, 153, 255]),
        7:
        dict(
            link=('left_shoulder', 'right_shoulder'),
            id=7,
            color=[51, 153, 255]),
        8:
        dict(link=('left_shoulder', 'left_elbow'), id=8, color=[0, 255, 0]),
        9:
        dict(
            link=('right_shoulder', 'right_elbow'), id=9, color=[255, 128, 0]),
        10:
        dict(link=('left_elbow', 'left_wrist'), id=10, color=[0, 255, 0]),
        11:
        dict(link=('right_elbow', 'right_wrist'), id=11, color=[255, 128, 0]),
        12:
        dict(link=('left_eye', 'right_eye'), id=12, color=[51, 153, 255]),
        13:
        dict(link=('nose', 'left_eye'), id=13, color=[51, 153, 255]),
        14:
        dict(link=('nose', 'right_eye'), id=14, color=[51, 153, 255]),
        15:
        dict(link=('left_eye', 'left_ear'), id=15, color=[51, 153, 255]),
        16:
        dict(link=('right_eye', 'right_ear'), id=16, color=[51, 153, 255]),
        17:
        dict(link=('left_ear', 'left_shoulder'), id=17, color=[51, 153, 255]),
        18:
        dict(
            link=('right_ear', 'right_shoulder'), id=18, color=[51, 153, 255])
    },
    joint_weights=[
        1., 1., 1., 1., 1., 1., 1., 1.2, 1.2, 1.5, 1.5, 1., 1., 1.2, 1.2, 1.5,
        1.5
    ],
    sigmas=[
        0.026, 0.025, 0.025, 0.035, 0.035, 0.079, 0.079, 0.072, 0.072, 0.062,
        0.062, 0.107, 0.107, 0.087, 0.087, 0.089, 0.089
    ])
1.1.2.2 数据集
- 在 MMPose 中使用自定义数据集时,我们推荐将数据转化为已支持的格式(如 COCO 或
MPII),并直接使用我们提供的对应数据集实现。如果这种方式不可行,则用户需要实现自己的数据集类。 - MMPose 中的大部分 2D 关键点数据集以 COCO 形式组织,为此我们提供了基类
BaseCocoStyleDataset。我们推荐用户继承该基类,并按需重写它的方法(通常是 init() 和
_load_annotations() 方法),以扩展到新的 2D 关键点数据集。 - 在 MMPose 中 bbox 的数据格式采用 xyxy,而不是 xywh,这与 MMDetection 等其他 OpenMMLab
成员保持一致。为了实现不同 bbox
格式之间的转换,mmpose提供了丰富的函数:bbox_xyxy2xywh、bbox_xywh2xyxy、bbox_xyxy2cs等。这些函数定义在$MMPOSE/mmpose/structures/bbox/transforms.py。 - 如果自定义数据集无法被 BaseCocoStyleDataset 支持,你需要直接继承 MMEngine 中提供的 BaseDataset
基类。具体方法请参考相关文档
1.1.2.3 数据流水线
- 一个典型的数据流水线配置如下:
# pipelines
train_pipeline = [
    dict(type='LoadImage', file_client_args=file_client_args),
    dict(type='GetBBoxCenterScale'),
    dict(type='RandomFlip', direction='horizontal'),
    dict(type='RandomHalfBody'),
    dict(type='RandomBBoxTransform'),
    dict(type='TopdownAffine', input_size=codec['input_size']),
    dict(type='GenerateTarget', target_type='heatmap', encoder=codec),
    dict(type='PackPoseInputs')
]
test_pipeline = [
    dict(type='LoadImage', file_client_args=file_client_args),
    dict(type='GetBBoxCenterScale'),
    dict(type='TopdownAffine', input_size=codec['input_size']),
    dict(type='PackPoseInputs')
]
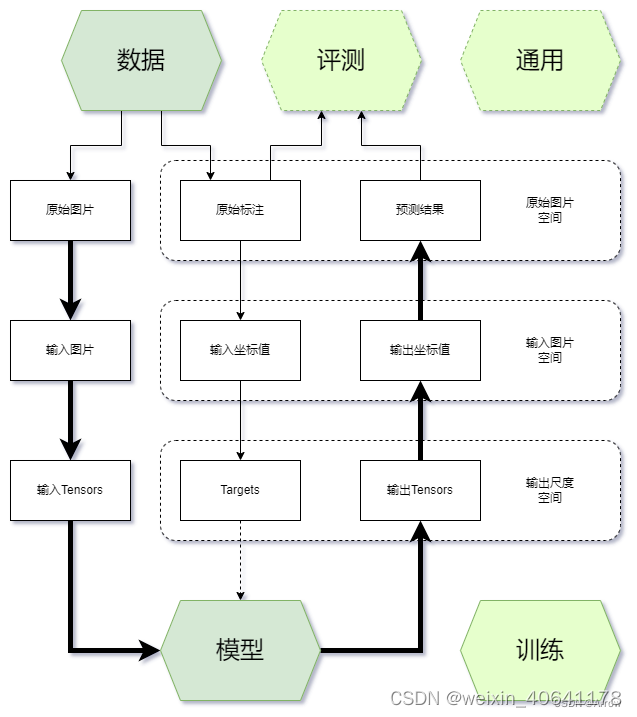
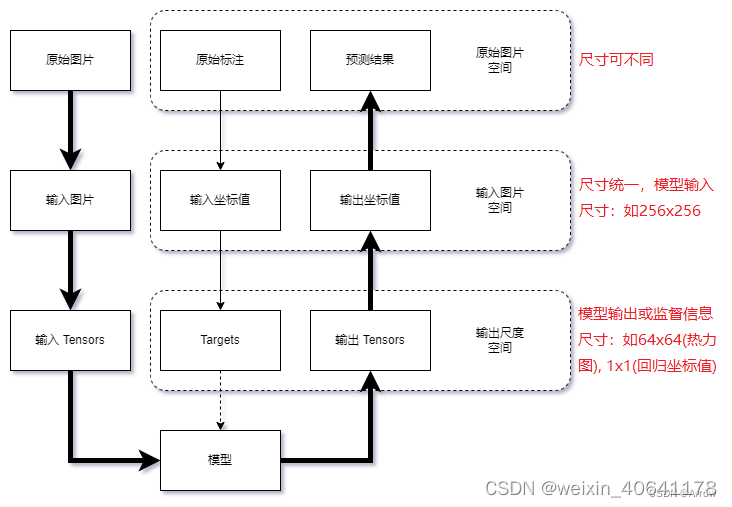
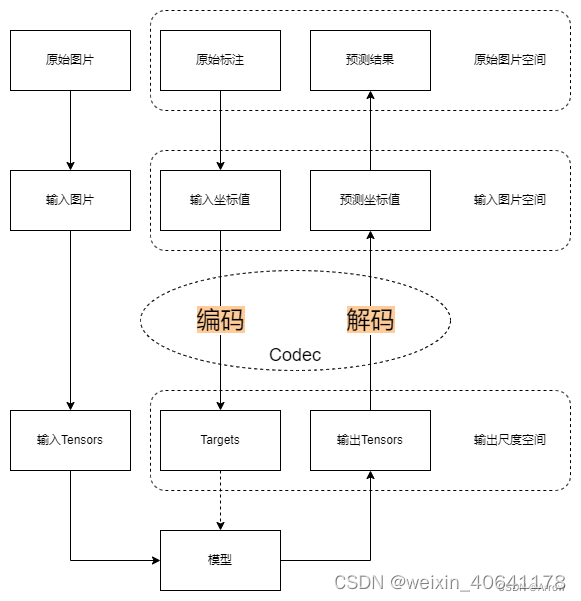
- 在关键点检测任务中,数据一般会在三个尺度空间中变换:
原始图片空间:图片存储时的原始空间,不同图片的尺寸不一定相同
输入图片空间:模型输入的图片尺度空间,所有图片和标注被缩放到输入尺度,如 256x256,256x192 等
输出尺度空间:模型输出和训练监督信息所在的尺度空间,如64x64(热力图),1x1(回归坐标值)等 - 数据在三个空间中变换的流程如图所示:
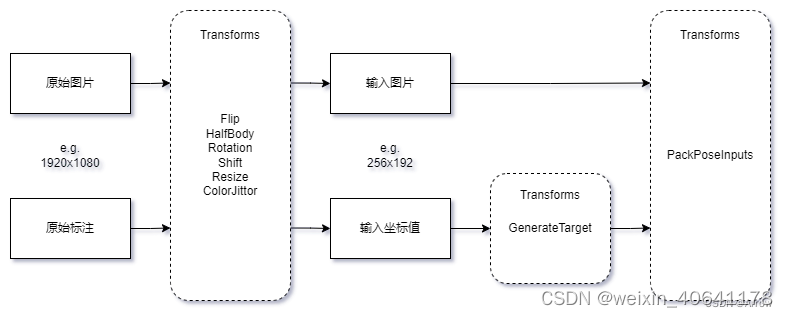
- 在MMPose中,数据变换所需要的模块在$MMPOSE/mmpose/datasets/transforms目录下,它们的工作流程如图所示:
 ##### 1.1.2.4 数据增强
 - 数据增强中常用的变换存放在 $MMPOSE/mmpose/datasets/transforms/common_transforms.py
中,如 RandomFlip、RandomHalfBody 等。 - 对于 top-down 方法,Shift、Rotate、Resize 操作由 RandomBBoxTransform来实现;对于
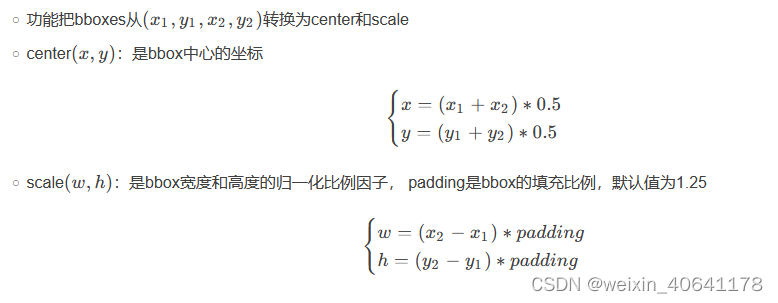
bottom-up 方法,这些则是由 BottomupRandomAffine 实现。 - 值得注意的是,大部分数据变换都依赖于 bbox_center 和 bbox_scale,它们可以通过 GetBBoxCenterScale
来得到 - GetBBoxCenterScale(由bbox_xyxy2cs具体实现):
 ##### 1.1.2.5 数据变换
 - 我们使用仿射变换,将图像和坐标标注从原始图片空间变换到输入图片空间。这一操作在 top-down 方法中由 TopdownAffine完成,在 bottom-up 方法中则由 BottomupRandomAffine 完成。
1.1.2.5 数据变换
-
在模型训练时,数据从原始空间变换到输入图片空间后,需要使用 GenerateTarget
来生成训练所需的监督目标(比如用坐标值生成高斯热图),我们将这一过程称为编码(Encode),反之,通过高斯热图得到对应坐标值的过程称为解码(Decode)。 -
在 MMPose 中,我们将编码和解码过程集合成一个编解码器(Codec),在其中实现 encode() 和 decode()。
-
目前 MMPose 支持生成以下类型的监督目标:
heatmap: 高斯热图
keypoint_label: 关键点标签(如归一化的坐标值)
keypoint_xy_label: 单个坐标轴关键点标签
heatmap+keypoint_label: 同时生成高斯热图和关键点标签
multiscale_heatmap: 多尺度高斯热图 -
生成的监督目标会按以下关键字进行封装:
heatmaps:高斯热图
keypoint_labels:关键点标签(如归一化的坐标值)
keypoint_x_labels:x 轴关键点标签
keypoint_y_labels:y 轴关键点标签
keypoint_weights:关键点权重 -
实现函数
@TRANSFORMS.register_module()
class GenerateTarget(BaseTransform):
    """Encode keypoints into Target.

    The generated target is usually the supervision signal of the model
    learning, e.g. heatmaps or regression labels.

    Required Keys:

        - keypoints
        - keypoints_visible
        - dataset_keypoint_weights

    Added Keys (depends on the args):
        - heatmaps
        - keypoint_labels
        - keypoint_x_labels
        - keypoint_y_labels
        - keypoint_weights

    Args:
        encoder (dict | list[dict]): The codec config for keypoint encoding
        target_type (str): The type of the encoded form of the keypoints.
            Should be one of the following options:

            - ``'heatmap'``: The encoded should be instance-irrelevant
                heatmaps and will be stored in ``results['heatmaps']``
            - ``'multilevel_heatmap'`` The encoded should be a list of
                heatmaps and will be stored in ``results['heatmaps']``.
                Note that in this case, ``self.encoder`` should also be
                a list, and each encoder encodes a single-level heatmaps.
            - ``'keypoint_label'``: The encoded should be instance-level
                labels and will be stored in ``results['keypoint_label']``
            - ``'keypoint_xy_label'``: The encoed should be instance-level
                labels in x-axis and y-axis respectively. They will be stored
                in ``results['keypoint_x_label']`` and
                ``results['keypoint_y_label']``
            - ``'heatmap+keypoint_label'``: The encoded should be heatmaps and
                keypoint_labels, will be stored in ``results['heatmaps']``
                and ``results['keypoint_label']``
        use_dataset_keypoint_weights (bool): Whether use the keypoint weights
            from the dataset meta information. Defaults to ``False``
    """

    def __init__(self,
                 encoder: MultiConfig,
                 target_type: str,
                 use_dataset_keypoint_weights: bool = False) -> None:
        super().__init__()
        self.encoder_cfg = deepcopy(encoder)
        self.target_type = target_type
        self.use_dataset_keypoint_weights = use_dataset_keypoint_weights

        if self.target_type == 'multilevel_heatmap':
            if not isinstance(self.encoder_cfg, list):
                raise ValueError(
                    'The encoder should be a list if target type is '
                    '"multilevel_heatmap"')
            self.encoder = [
                KEYPOINT_CODECS.build(cfg) for cfg in self.encoder_cfg
            ]
        else:
            self.encoder = KEYPOINT_CODECS.build(self.encoder_cfg)

    def transform(self, results: Dict) -> Optional[dict]:

        if results.get('transformed_keypoints', None) is not None:
            # use keypoints transformed by TopdownAffine
            keypoints = results['transformed_keypoints']
        elif results.get('keypoints', None) is not None:
            # use original keypoints
            keypoints = results['keypoints']
        else:
            raise ValueError(
                'GenerateTarget requires \'transformed_keypoints\' or'
                ' \'keypoints\' in the results.')

        keypoints_visible = results['keypoints_visible']

        if self.target_type == 'heatmap':
            heatmaps, keypoint_weights = self.encoder.encode(
                keypoints=keypoints, keypoints_visible=keypoints_visible)

            results['heatmaps'] = heatmaps
            results['keypoint_weights'] = keypoint_weights

        elif self.target_type == 'keypoint_label':
            keypoint_labels, keypoint_weights = self.encoder.encode(
                keypoints=keypoints, keypoints_visible=keypoints_visible)

            results['keypoint_labels'] = keypoint_labels
            results['keypoint_weights'] = keypoint_weights

        elif self.target_type == 'keypoint_xy_label':
            x_labels, y_labels, keypoint_weights = self.encoder.encode(
                keypoints=keypoints, keypoints_visible=keypoints_visible)

            results['keypoint_x_labels'] = x_labels
            results['keypoint_y_labels'] = y_labels
            results['keypoint_weights'] = keypoint_weights

        elif self.target_type == 'heatmap+keypoint_label':
            heatmaps, keypoint_labels, keypoint_weights = self.encoder.encode(
                keypoints=keypoints, keypoints_visible=keypoints_visible)

            results['heatmaps'] = heatmaps
            results['keypoint_labels'] = keypoint_labels
            results['keypoint_weights'] = keypoint_weights

        elif self.target_type == 'multilevel_heatmap':
            heatmaps = []
            keypoint_weights = []

            for encoder in self.encoder:
                _heatmaps, _keypoint_weights = encoder.encode(
                    keypoints=keypoints, keypoints_visible=keypoints_visible)
                heatmaps.append(_heatmaps)
                keypoint_weights.append(_keypoint_weights)

            results['heatmaps'] = heatmaps
            # keypoint_weights.shape: [N, K] -> [N, n, K]
            results['keypoint_weights'] = np.stack(keypoint_weights, axis=1)

        else:
            raise ValueError(f'Invalid target type {self.target_type}')

        # multiply meta keypoint weight
        if self.use_dataset_keypoint_weights:
            results['keypoint_weights'] *= results['dataset_keypoint_weights']

        return results

    def __repr__(self) -> str:
        """print the basic information of the transform.

        Returns:
            str: Formatted string.
        """
        repr_str = self.__class__.__name__
        repr_str += (f'(encoder={str(self.encoder_cfg)}, ')
        repr_str += (f'(target_type={str(self.target_type)}, ')
        repr_str += ('use_dataset_keypoint_weights='
                     f'{self.use_dataset_keypoint_weights})')
        return repr_str
- 值得注意的是,由于对 top-down 和 bottom-up
的数据格式进行了统一,所以标注信息中会新增一个维度来代表同一张图里的不同目标(如人),格式为:
[batch_size, num_instances, num_keypoints, dim_coordinates]
- top-down:[B, 1, K, D]
- Bottom-up: [B, N, K, D]
- 当前已经支持的编解码器定义在 $MMPOSE/mmpose/codecs 目录下,如果你需要自定新的编解码器,可以前往编解码器了解更多详情
1.1.2.6数据打包
-
数据经过前处理变换后,最终需要通过 PackPoseInputs 打包成数据样本。该操作定义在
$MMPOSE/mmpose/datasets/transforms/formatting.py 中。 -
打包过程会将数据流水线中用字典 results 存储的数据转换成用 MMPose 所需的标准数据结构, 如
InstanceData,PixelData,PoseDataSample 等。 -
具体而言,我们将数据样本内容分为 gt(标注真值) 和 pred(模型预测)两部分,它们都包含以下数据项:
instances(numpy.array):实例级别的原始标注或预测结果,属于原始尺度空间
instance_labels(torch.tensor):实例级别的训练标签(如归一化的坐标值、关键点可见性),属于输入尺度空间
fields(torch.tensor):像素级别的训练标签(如高斯热图)或预测结果,属于输出尺度空间 -
PoseDataSample 底层实现的例子:
    def get_pose_data_sample(self, multilevel: bool = False):
        # meta
        pose_meta = dict(
            img_shape=(600, 900),  # [h, w, c]
            crop_size=(256, 192),  # [h, w]
            heatmap_size=(64, 48),  # [h, w]
        )
        # gt_instances
        gt_instances = InstanceData()
        gt_instances.bboxes = torch.rand(1, 4)
        gt_instances.keypoints = torch.rand(1, 17, 2)
        gt_instances.keypoints_visible = torch.rand(1, 17)

        # pred_instances
        pred_instances = InstanceData()
        pred_instances.keypoints = torch.rand(1, 17, 2)
        pred_instances.keypoint_scores = torch.rand(1, 17)

        # gt_fields
        if multilevel:
            # generate multilevel gt_fields
            metainfo = dict(num_keypoints=17)
            sizes = [(64, 48), (32, 24), (16, 12)]
            heatmaps = [np.random.rand(17, h, w) for h, w in sizes]
            masks = [torch.rand(1, h, w) for h, w in sizes]
            gt_fields = MultilevelPixelData(
                metainfo=metainfo, heatmaps=heatmaps, masks=masks)
        else:
            gt_fields = PixelData()
            gt_fields.heatmaps = torch.rand(17, 64, 48)

        # pred_fields
        pred_fields = PixelData()
        pred_fields.heatmaps = torch.rand(17, 64, 48)

        data_sample = PoseDataSample(
            gt_instances=gt_instances,
            pred_instances=pred_instances,
            gt_fields=gt_fields,
            pred_fields=pred_fields,
            metainfo=pose_meta)

        return data_sample
1.1.3 模型
-
在 MMPose 1.0中,模型由以下几部分构成:
预处理器(DataPreprocessor):完成图像归一化和通道转换等前处理
主干网络 (Backbone):用于特征提取
颈部模块(Neck):GAP,FPN 等可选项
预测头(Head):用于实现核心算法功能和损失函数定义 -
我们在 $MMPOSE/models/pose_estimators/base.py 下为姿态估计模型定义了一个基类
BasePoseEstimator,所有的模型(如 TopdownPoseEstimator)都需要继承这个基类,并重载对应的方法。 -
在模型的 forward() 方法中提供了三种不同的模式:
mode == ‘loss’:返回损失函数计算的结果,用于模型训练
mode == ‘predict’:返回输入尺度下的预测结果,用于模型推理
mode == ‘tensor’:返回输出尺度下的模型输出,即只进行模型前向传播,用于模型导出 -
开发者需要在 PoseEstimator 中按照模型结构调用对应的 Registry ,对模块进行实例化。以 top-down 模型为例:
@MODELS.register_module()
class TopdownPoseEstimator(BasePoseEstimator):
    """Base class for top-down pose estimators.

    Args:
        backbone (dict): The backbone config
        neck (dict, optional): The neck config. Defaults to ``None``
        head (dict, optional): The head config. Defaults to ``None``
        train_cfg (dict, optional): The runtime config for training process.
            Defaults to ``None``
        test_cfg (dict, optional): The runtime config for testing process.
            Defaults to ``None``
        data_preprocessor (dict, optional): The data preprocessing config to
            build the instance of :class:`BaseDataPreprocessor`. Defaults to
            ``None``.
        init_cfg (dict, optional): The config to control the initialization.
            Defaults to ``None``
    """

    _version = 2

    def __init__(self,
                 backbone: ConfigType,
                 neck: OptConfigType = None,
                 head: OptConfigType = None,
                 train_cfg: OptConfigType = None,
                 test_cfg: OptConfigType = None,
                 data_preprocessor: OptConfigType = None,
                 init_cfg: OptMultiConfig = None):
        super().__init__(data_preprocessor, init_cfg)

        self.backbone = MODELS.build(backbone)

        if neck is not None:
            self.neck = MODELS.build(neck)

        if head is not None:
            self.head = MODELS.build(head)

        self.train_cfg = train_cfg if train_cfg else {}
        self.test_cfg = test_cfg if test_cfg else {}

        # Register the hook to automatically convert old version state dicts
        self._register_load_state_dict_pre_hook(self._load_state_dict_pre_hook)
1.1.3.1 前处理器(DataPreprocessor)
- 从 MMPose 1.0 开始,在模型中添加了新的前处理器模块,用以完成图像归一化、通道顺序变换等操作。这样做的好处是可以利用 GPU
等设备的计算能力加快计算,并使模型在导出和部署时更具完整性。 - 在配置文件中,一个常见的 data_preprocessor 如下:
data_preprocessor=dict(
        type='PoseDataPreprocessor',
        mean=[123.675, 116.28, 103.53],
        std=[58.395, 57.12, 57.375],
        bgr_to_rgb=True),
- 它会将输入图片的通道顺序从 bgr 转换为 rgb,并根据 mean 和 std 进行数据归一化。
1.1.3.2 主干网络(Backbone)
- MMPose 实现的主干网络存放在 $MMPOSE/mmpose/models/backbones 目录下。
- 在实际开发中,开发者经常会使用预训练的网络权重进行迁移学习,这能有效提升模型在小数据集上的性能。 在 MMPose 中,只需要在配置文件
backbone 的 init_cfg 中设置:
init_cfg=dict(
    type='Pretrained',
    checkpoint='PATH/TO/YOUR_MODEL_WEIGHTS.pth'),
其中 checkpoint 既可以是本地路径,也可以是下载链接。因此,如果你想使用 Torchvision 提供的预训练模型(比如ResNet50),可以使用:
init_cfg=dict(
    type='Pretrained',
    checkpoint='torchvision://resnet50')
-
除了这些常用的主干网络以外,你还可以从 MMClassification 等其他 OpenMMLab
项目中方便地迁移主干网络,它们都遵循同一套配置文件格式,并提供了预训练权重可供使用。 -
需要强调的是,如果你加入了新的主干网络,需要在模型定义时进行注册:
@MODELS.register_module()
class YourBackbone(BaseBackbone):
- 同时在 $MMPOSE/mmpose/models/backbones/init.py 下进行 import,并加入到 all
中,才能被配置文件正确地调用。init.py的内容如下:
from .alexnet import AlexNet
from .cpm import CPM
from .hourglass import HourglassNet
from .hourglass_ae import HourglassAENet
from .hrformer import HRFormer
from .hrnet import HRNet
from .litehrnet import LiteHRNet
from .mobilenet_v2 import MobileNetV2
from .mobilenet_v3 import MobileNetV3
from .mspn import MSPN
from .pvt import PyramidVisionTransformer, PyramidVisionTransformerV2
from .regnet import RegNet
from .resnest import ResNeSt
from .resnet import ResNet, ResNetV1d
from .resnext import ResNeXt
from .rsn import RSN
from .scnet import SCNet
from .seresnet import SEResNet
from .seresnext import SEResNeXt
from .shufflenet_v1 import ShuffleNetV1
from .shufflenet_v2 import ShuffleNetV2
from .swin import SwinTransformer
from .tcn import TCN
from .v2v_net import V2VNet
from .vgg import VGG
from .vipnas_mbv3 import ViPNAS_MobileNetV3
from .vipnas_resnet import ViPNAS_ResNet

__all__ = [
    'AlexNet', 'HourglassNet', 'HourglassAENet', 'HRNet', 'MobileNetV2',
    'MobileNetV3', 'RegNet', 'ResNet', 'ResNetV1d', 'ResNeXt', 'SCNet',
    'SEResNet', 'SEResNeXt', 'ShuffleNetV1', 'ShuffleNetV2', 'CPM', 'RSN',
    'MSPN', 'ResNeSt', 'VGG', 'TCN', 'ViPNAS_ResNet', 'ViPNAS_MobileNetV3',
    'LiteHRNet', 'V2VNet', 'HRFormer', 'PyramidVisionTransformer',
    'PyramidVisionTransformerV2', 'SwinTransformer'
]
1.1.3.3 颈部模块(Neck)
-
颈部模块通常是介于主干网络和预测头之间的模块,在部分模型算法中会用到,常见的颈部模块有:
Global Average Pooling (GAP)
Feature Pyramid Networks (FPN) -
$MMPOSE/mmpose/models/necks/init.py的内容如下:
from .fpn import FPN
from .gap_neck import GlobalAveragePooling
from .posewarper_neck import PoseWarperNeck

__all__ = ['GlobalAveragePooling', 'PoseWarperNeck', 'FPN']
1.1.3.4 预测头(Head)
-
通常来说,预测头是模型算法实现的核心,用于控制模型的输出,并进行损失函数计算。
-
MMPose 中 Head 相关的模块定义在 $MMPOSE/mmpose/models/heads
目录下,开发者在自定义预测头时需要继承我们提供的基类 BaseHead,并重载以下三个方法对应模型推理的三种模式:forward()
predict()
loss() -
$MMPOSE/mmpose/models/heads/init.py的内容如下:
from .base_head import BaseHead
from .heatmap_heads import (CPMHead, HeatmapHead, MSPNHead, SimCCHead,
                            ViPNASHead)
from .regression_heads import (DSNTHead, IntegralRegressionHead,
                               RegressionHead, RLEHead)

__all__ = [
    'BaseHead', 'HeatmapHead', 'CPMHead', 'MSPNHead', 'ViPNASHead',
    'RegressionHead', 'IntegralRegressionHead', 'SimCCHead', 'RLEHead',
    'DSNTHead'
]
-
predict:
输出:返回的是输入图片尺度下的结果,因此需要调用 self.decode() 对网络输出进行解码,这一过程实现在 BaseHead 中已经实现,它会调用编解码器提供的 decode() 方法来完成解码。另外,在 predict() 中进行测试时增强。在进行预测时,一个常见的测试时增强技巧是进行翻转集成。即,将一张图片先进行一次推理,再将图片水平翻转进行一次推理,推理的结果再次水平翻转回去,对两次推理的结果进行平均。这个技巧能有效提升模型的预测稳定性。
下面是在 RegressionHead 中定义 predict() 的例子:
    def predict(self,
                feats: Tuple[Tensor],
                batch_data_samples: OptSampleList,
                test_cfg: ConfigType = {}) -> Predictions:
        """Predict results from outputs."""

        if test_cfg.get('flip_test', False):
            # TTA: flip test -> feats = [orig, flipped]
            assert isinstance(feats, list) and len(feats) == 2
            flip_indices = batch_data_samples[0].metainfo['flip_indices']
            input_size = batch_data_samples[0].metainfo['input_size']
            _feats, _feats_flip = feats

            _batch_coords = self.forward(_feats)
            _batch_coords_flip = flip_coordinates(
                self.forward(_feats_flip),
                flip_indices=flip_indices,
                shift_coords=test_cfg.get('shift_coords', True),
                input_size=input_size)
            batch_coords = (_batch_coords + _batch_coords_flip) * 0.5
        else:
            batch_coords = self.forward(feats)  # (B, K, D)

        batch_coords.unsqueeze_(dim=1)  # (B, N, K, D)
        preds = self.decode(batch_coords)

        return preds
2. 编解码器
-
在关键点检测任务中,根据算法的不同,需要利用标注信息,生成不同格式的训练目标,比如归一化的坐标值、一维向量、高斯热图等。同样的,对于模型输出的结果,也需要经过处理转换成标注信息格式。我们一般将标注信息到训练目标的处理过程称为编码,模型输出到标注信息的处理过程称为解码。
-
编码和解码是一对紧密相关的互逆处理过程。在 MMPose
早期版本中,编码和解码过程往往分散在不同模块里,使其不够直观和统一,增加了学习和维护成本。 -
MMPose 1.0 中引入了新模块编解码器(Codec) ,将关键点数据的编码和解码过程进行集成,以增加代码的友好度和复用性。
-
编解码器在工作流程中所处的位置如下所示:
-
一个编解码器主要包含两个部分:
编码器
解码器
2.1 编码器
-
编码器主要负责将处于输入图片尺度的坐标值,编码为模型训练所需要的目标格式,主要包括:
归一化的坐标值:用于 Regression-based 方法 (直接预测每个关键点的位置坐标) 一维向量:用于 SimCC-based 方法 高斯热图:用于 Heatmap-based 方法(针对每个关键点预测一张热力图,预测出现在每个位置上的分数) -
以 Regression-based 方法的编码器为例:
@abstractmethod
def encode(
    self,
    keypoints: np.ndarray,
    keypoints_visible: Optional[np.ndarray] = None
) -> Tuple[np.ndarray, np.ndarray]:
    """Encoding keypoints from input image space to normalized space.

    Args:
        keypoints (np.ndarray): Keypoint coordinates in shape (N, K, D)
        keypoints_visible (np.ndarray): Keypoint visibilities in shape
            (N, K)

    Returns:
        tuple:
        - reg_labels (np.ndarray): The normalized regression labels in
            shape (N, K, D) where D is 2 for 2d coordinates
        - keypoint_weights (np.ndarray): The target weights in shape
            (N, K)
    """

    if keypoints_visible is None:
        keypoints_visible = np.ones(keypoints.shape[:2], dtype=np.float32)

    w, h = self.input_size
    valid = ((keypoints >= 0) &
             (keypoints <= [w - 1, h - 1])).all(axis=-1) & (
                 keypoints_visible > 0.5)

    reg_labels = (keypoints / np.array([w, h])).astype(np.float32)
    keypoint_weights = np.where(valid, 1., 0.).astype(np.float32)

    return reg_labels, keypoint_weights
-
参数说明:
N:instance number
K:keypoint number
D:keypoint dimension
L:embedding tag dimension
[w, h]:image size
[W, H]:heatmap size
sigma:The sigma value of the Gaussian heatmap
2.1.1 Heatmap-based
-
Heatmap-based方法为每个关节生成似然热图(likelihood heatmap),并使用argmax 或
soft-argmax 操作把关节定位到一个点。 -
2D heatmap生成为一个二维高斯分布,其中心为标注的关节位置,通过为每个位置分配概率值来抑制false
positive并平滑训练过程。 -
量化误差来源:通过2D高斯分布生成高斯热图作为标签,监督模型输出,通过L2
loss来进行优化。而这种方法下得到的Heatmap尺寸往往是小于图片原尺寸的,因而最后通过argmax得到的坐标放大回原图,会承受不可避免的量化误差。 -
heatmap-based的不足:
计算量大
存储量大
扩展到3D或4D(空间+时间)成本高
难以把heatmap布署到one-state方法中
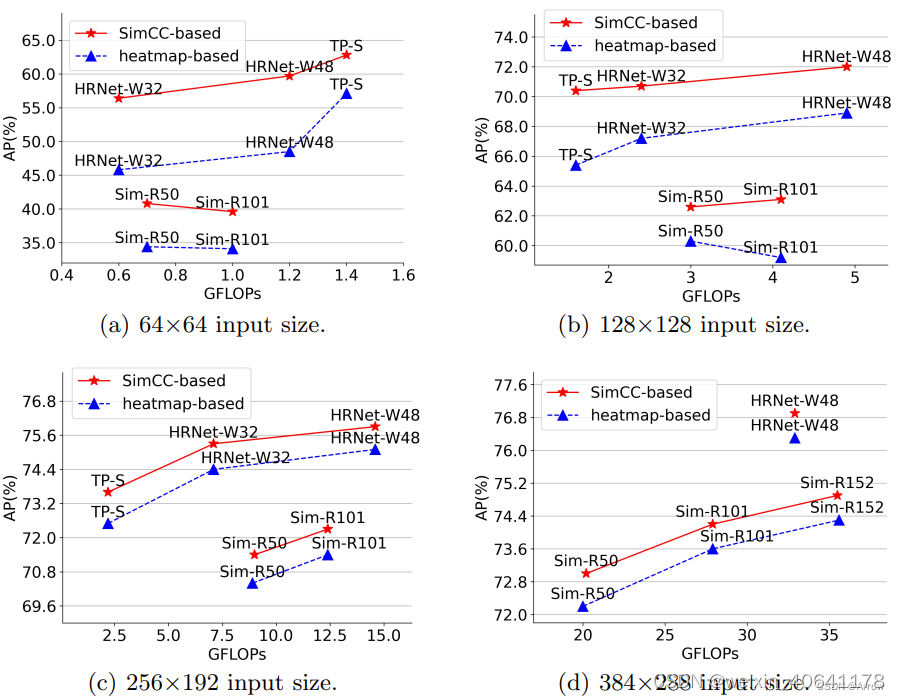
低分辨率输入的性能受到限制:即在低分辨率图片上掉点严重:对于HRNet-W48,当输入分辨率从256x256降到64x64,AP会从75.1掉到48.5
为了提高特征图分辨率以获得更高的定位精度,需要多个计算量大的上采样层:为了提升精度,需要多个上采样层来将特征图分辨率由低向高进行恢复:通常来说上采样会使用转置卷积来获得更好的性能,但相应的计算量也更大,骨干网络输出的特征图原本通道数就已经很高了,再上采样带来的开销是非常庞大的
需要额外的后处理来减小尺度下降带来的量化误差:如DARK修正高斯分布,用argmax获取平面上的极值点坐标等 -
基于heatmap的方法有:
Openpose: realtime multiperson 2d pose estimation using part affinity fields (2019)
Learning delicate local representations for multi-person pose estimation (2020)
Cascaded pyramid network for multi-person pose estimation (2018)
Higherhrnet: Scaleaware representation learning for bottom-up human pose estimation (2020)
Rethinking on multi-stage networks for human pose estimation (2019)
TokenPose: Learning keypoint tokens for human pose estimation (2021)
Rethinking the heatmap regression for bottom-up human pose estimation (2020)
Stacked hourglass networks for human pose estimation (2016)
HRNet:Deep high-resolution representation learning for human pose estimation (2019)
SimpleBaseline: Simple baselines for human pose estimation and tracking (2018)
Transpose: Towards explainable human pose estimation by transformer (2020)
Distribution-aware coordinate representation for human pose estimation (2020)
The devil is in the details: Delving into unbiased data processing for human pose estimation (2020)
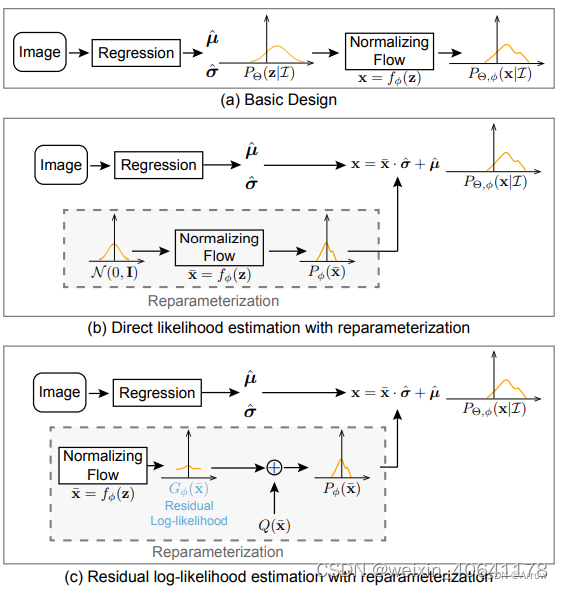
2.1.2 RLE ( Regression-based)
RLE:Residual Log-likelihood Estimation (残差对数似然估计)
DLE:Direct Likelihood Estimation
RLE是一种regression-based的方法。 具体来说,RLE 学习分布的变化而不是未参考的基础分布,以促进训练过程。
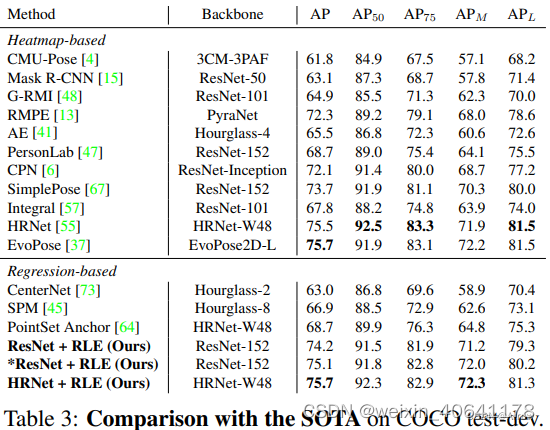
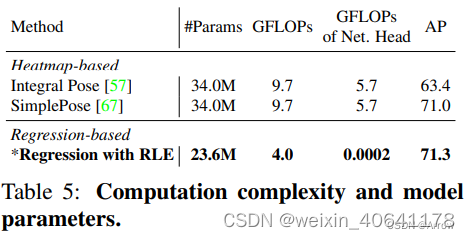
RLE的优势:其性能和计算量均优于heatmap-based方法

-
标准Regression-based方法直接将输入映射到输出关节坐标,这对于各种人体姿态估计任务和实时应用来说是灵活高效的,尤其是在边缘设备上。一个标准的热图头(3
个反卷积层)的成本是 ResNet-50 主干的 1.4 倍 FLOP,而回归头仅花费相同主干的 1/20000 FLOP。 -
标准Regression-based的不足:
回归的性能较差
在遮挡、运动模糊和截断等具有挑战性的情况下,真实标签本质上是模棱两可的。通过利用似然热图,基于热图的方法对这些歧义具有鲁棒性。 但是RLE之前的回归方法容易受到这些嘈杂标签的影响。

2.1.3 SimCC (SimCC-based )
-
SimCC:Simple Coordinate Classification
-
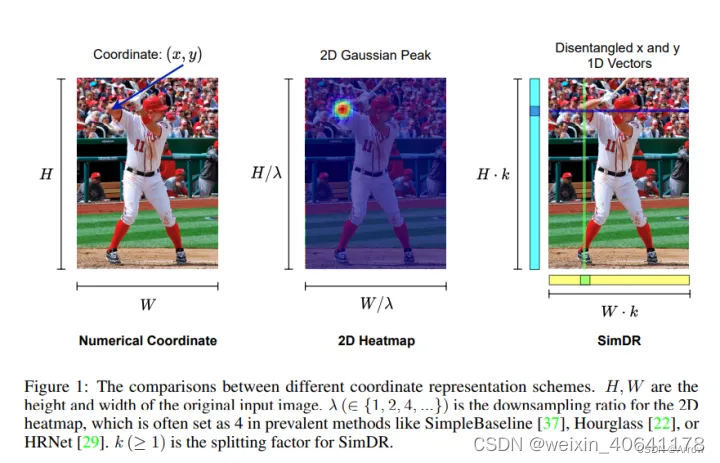
核心思想:SimCC将 HPE(Human Poes Estimation)
重新定义为水平和垂直坐标的两个分类任务。将每个像素均匀地划分为多个 bin,从而实现亚像素定位精度和减少量化误差。将关键点坐标(x,
y)用两条独立的、长度等于或高于原图片尺寸的一维向量进行表征 -
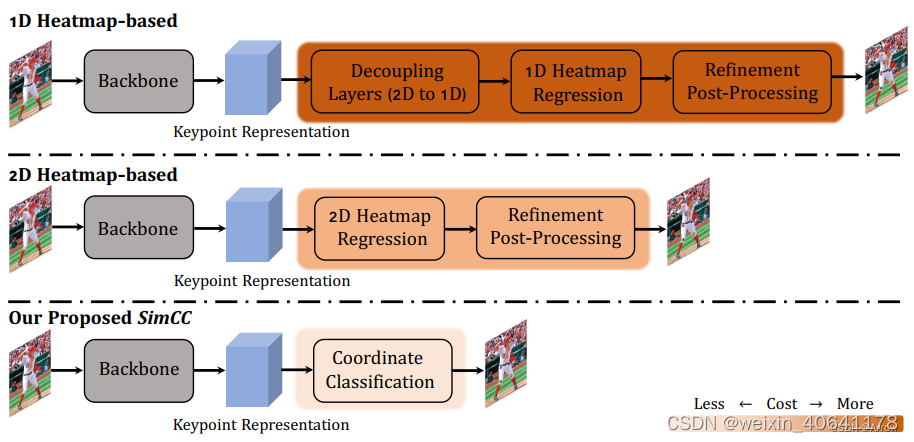
方法比较
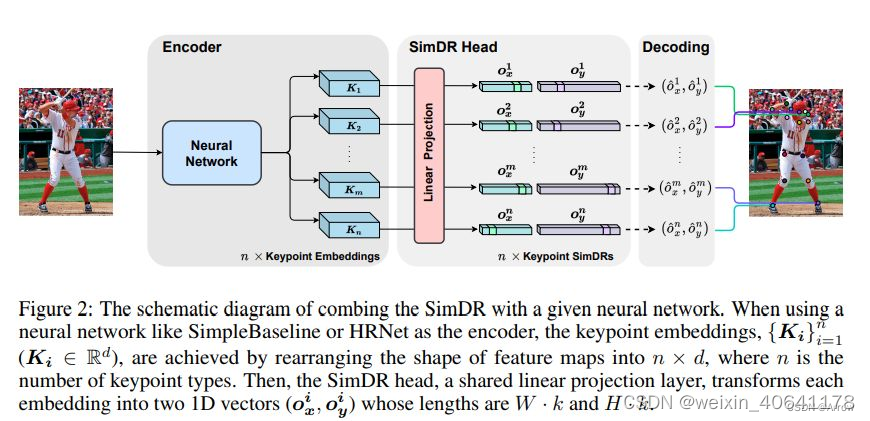
 SimDR就是SimCC
-
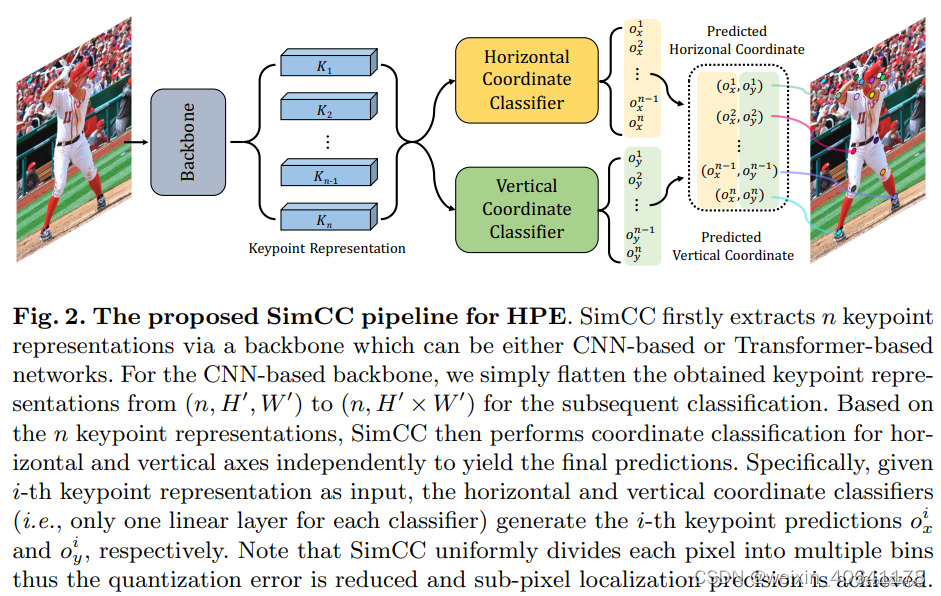
网络组成:由一个backbone和两个分类head组成
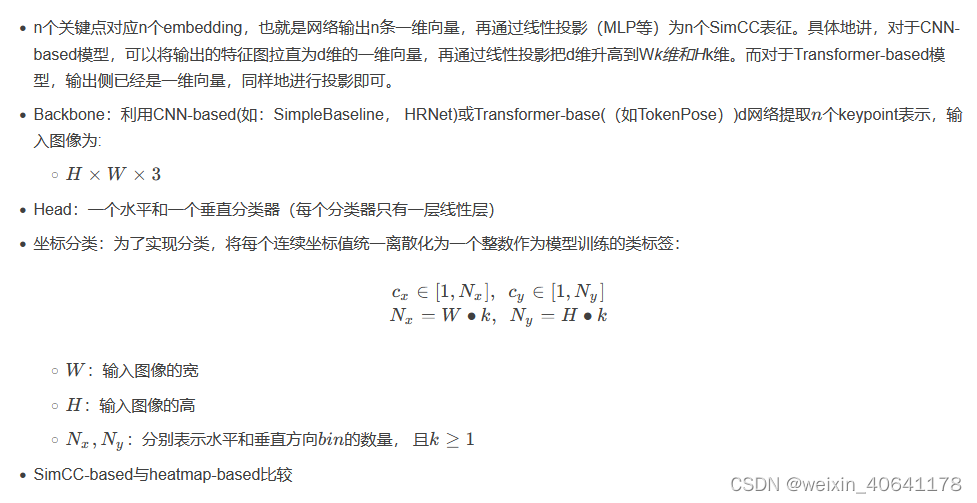
2.1.3.1 坐标编码
- 关键点的 x x x和 y y y坐标通过两条独立的一维向量来进行表征,通过一个缩放因子 k ( ≥ 1 ) k(\ge1)
k(≥1),得到的一维向量长度也将大于等于图片边长。对于第 p p p个关键点,其编码后的坐标将表示为:

- 缩放因子k的作用是将定位精度增强到比单个像素更小的级别
2.1.3.1 坐标编码
- 假设模型输出两条一维向量,很自然地,预测点的坐标计算方法为:
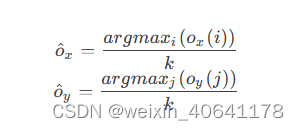
- 即:一维向量上最大值点所在位置除以缩放因子还原到图片尺度。
- heatmap-based经历了 λ \lambda λ次下采样的高斯热图,量化误差级别为 [ 0 , λ / 2 ) [0,
\lambda/2) [0,λ/2),而SimCC的量化误差级别为 [ 0 , 1 / 2 k ) [0, 1/2k) [0,1/2k)。
2.2 解码器
- 解码器主要负责将模型的输出解码为输入图片尺度的坐标值,处理过程与编码器相反。
- 以 Regression-based 方法的解码器为例:
def decode(self, encoded: np.ndarray) -> Tuple[np.ndarray, np.ndarray]:
    """Decode keypoint coordinates from normalized space to input image
    space.

    Args:
        encoded (np.ndarray): Coordinates in shape (N, K, D)

    Returns:
        tuple:
        - keypoints (np.ndarray): Decoded coordinates in shape (N, K, D)
        - scores (np.ndarray): The keypoint scores in shape (N, K).
            It usually represents the confidence of the keypoint prediction

    """

    if encoded.shape[-1] == 2:
        N, K, _ = encoded.shape
        normalized_coords = encoded.copy()
        scores = np.ones((N, K), dtype=np.float32)
    elif encoded.shape[-1] == 4:
        # split coords and sigma if outputs contain output_sigma
        normalized_coords = encoded[..., :2].copy()
        output_sigma = encoded[..., 2:4].copy()
        scores = (1 - output_sigma).mean(axis=-1)
    else:
        raise ValueError(
            'Keypoint dimension should be 2 or 4 (with sigma), '
            f'but got {encoded.shape[-1]}')

    w, h = self.input_size
    keypoints = normalized_coords * np.array([w, h])

    return keypoints, scores
- 默认情况下,decode() 方法只提供单个目标数据的解码过程,你也可以通过 batch_decode() 来实现批量解码提升执行效率。
2.3 常见用法
-
在 MMPose 配置文件中,主要有三处涉及编解码器:
定义编解码器
生成训练目标
模型头部
2.3.1 定义编解码器
- 以回归方法生成归一化的坐标值为例,在配置文件中,我们通过如下方式定义编解码器:
codec = dict(type='RegressionLabel', input_size=(192, 256))
2.3.2 生成训练目标
- 在数据处理阶段生成训练目标时,需要传入编解码器用于编码:
dict(type='GenerateTarget', target_type='keypoint_label', encoder=codec)
2.3.3 模型头部
- 在 MMPose 中,我们在模型头部对模型的输出进行解码,需要传入编解码器用于解码:
head=dict(
    type='RLEHead',
    in_channels=2048,
    num_joints=17,
    loss=dict(type='RLELoss', use_target_weight=True),
    decoder=codec
)
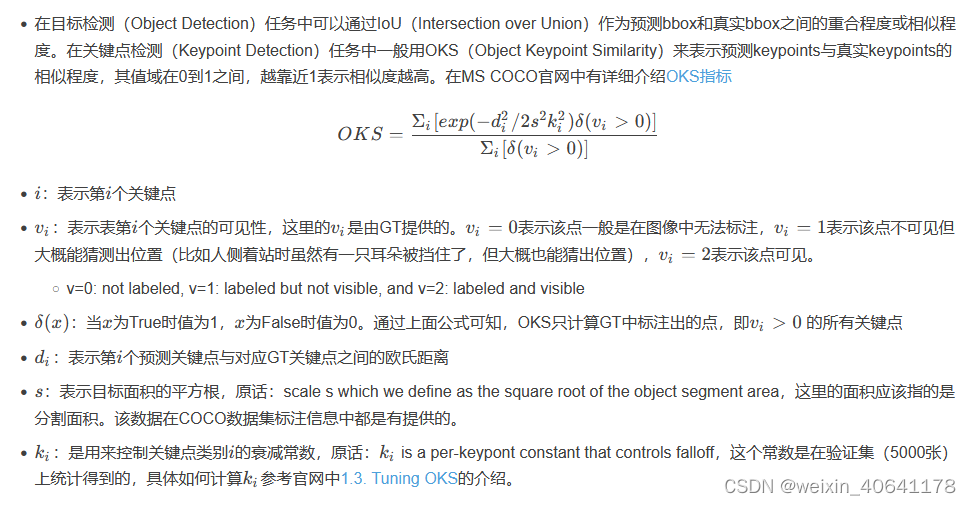
3. 评价准则
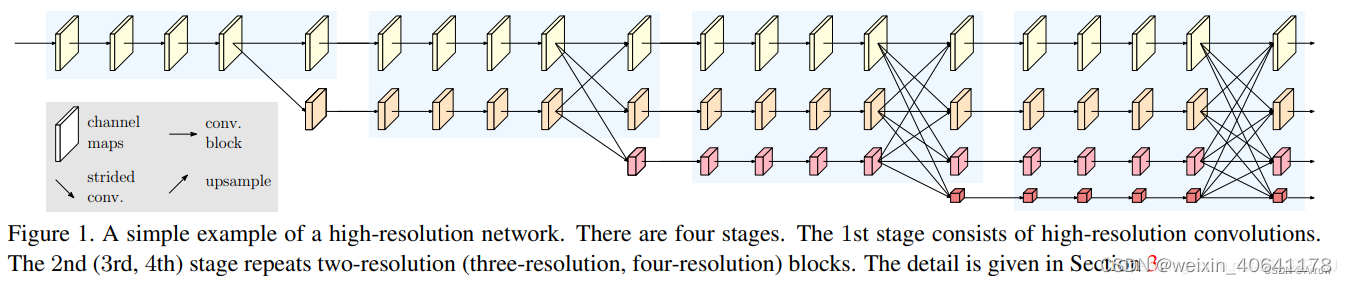
4. HRNet
4.1 简介
-
在人体姿态识别这类的任务中,需要生成一个高分辨率的 heatmap 来进行关键点检测。
-
HRNet的创新点:
将高低分辨率之间的链接由串联改为并联。
在整个网络结构中都保持了高分辨率的表征 (最上边那个通路)。
在高低分辨率中引入了交互来提高模型性能。
在模型的整个过程中,保存高分辨率表征的同时使用让不同分辨率的 feature map 进行特征交互。
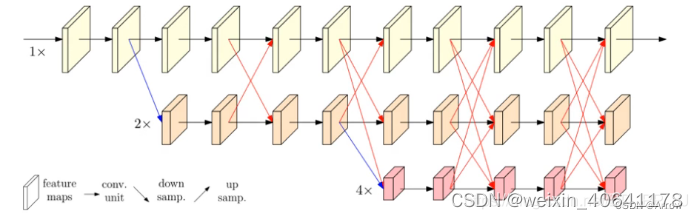
4.2 证明高分辨率 feature map 的表征能力

-
1x:代表不进行降维
-
2x:代表分辨率变为原来一半
-
4x:代表分辨率变为原来四分之一
-
W32、W48 中的 32、48: 代表最高分辨率卷积的通道数
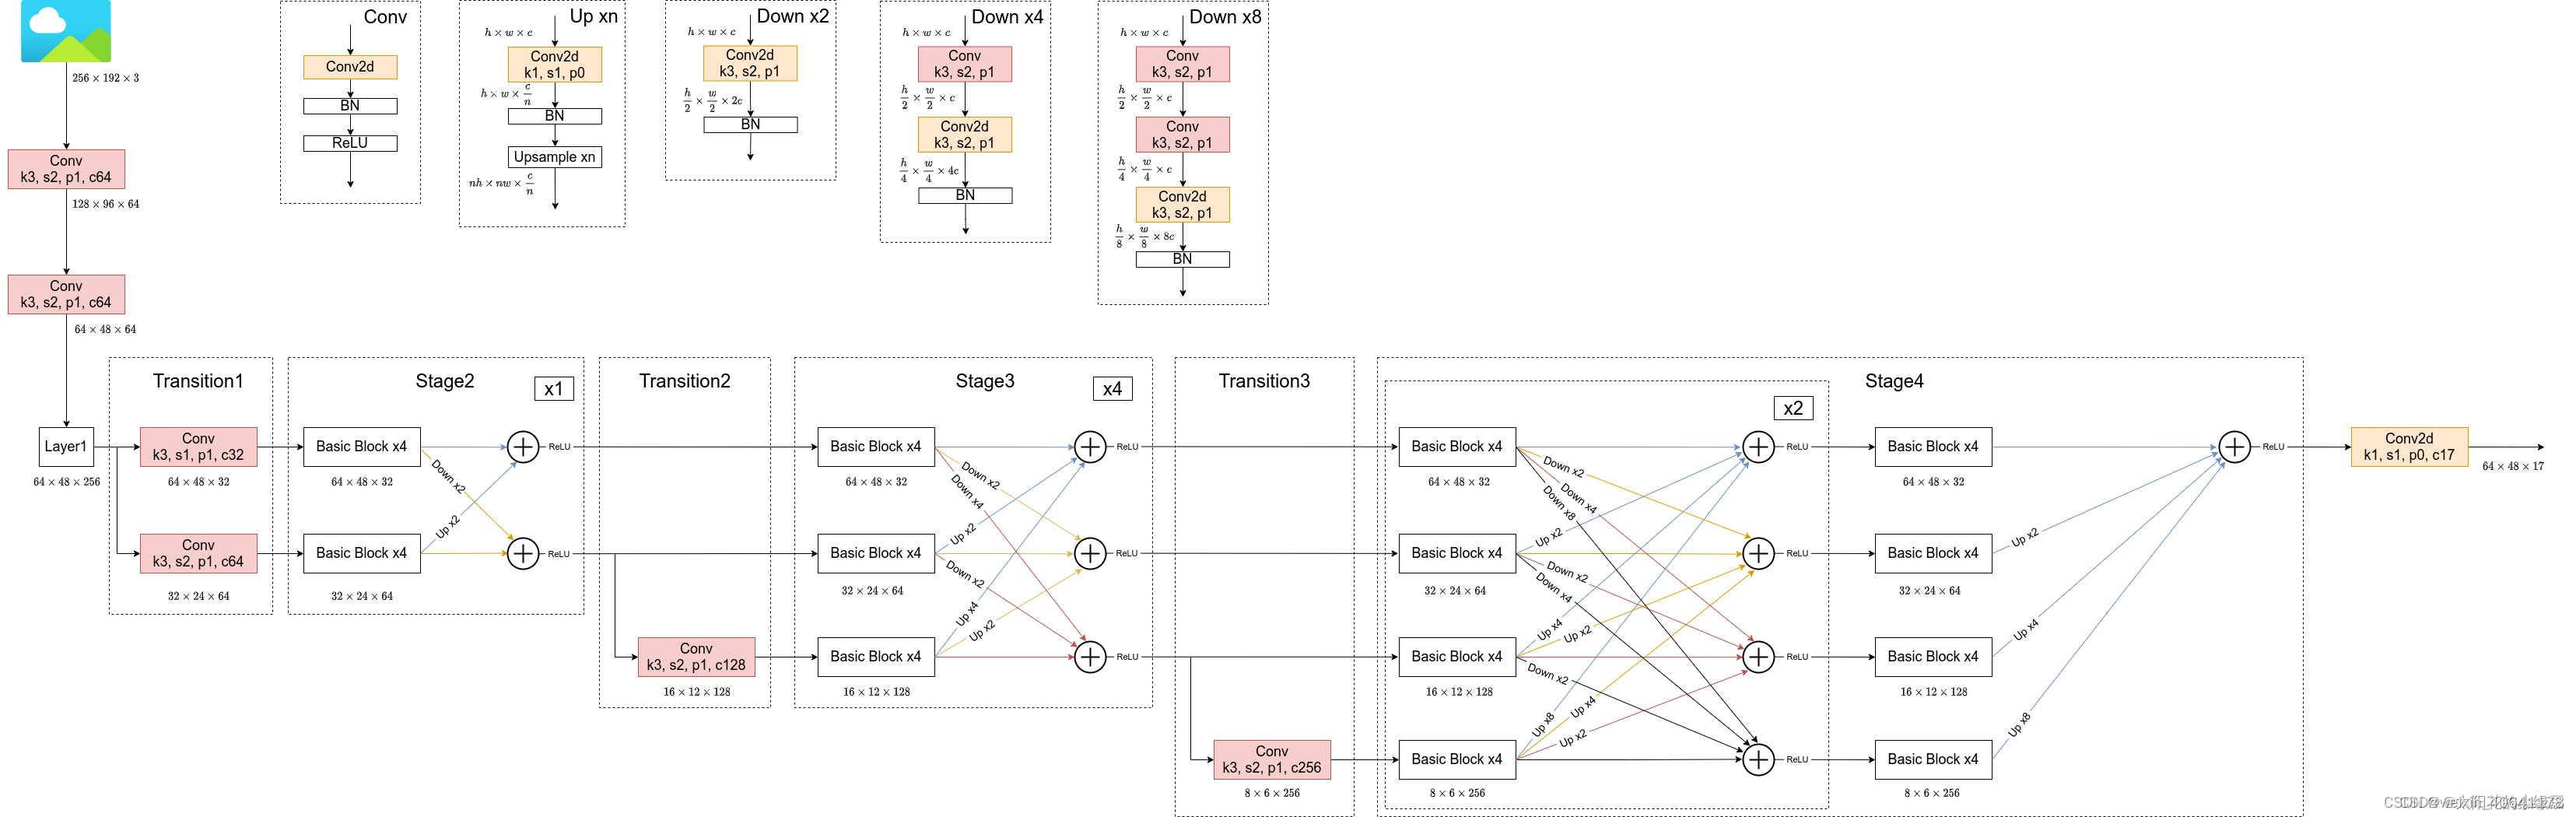
4.3 HRNet网络结构设计

- 将不同分辨率的 feature map 进行并联
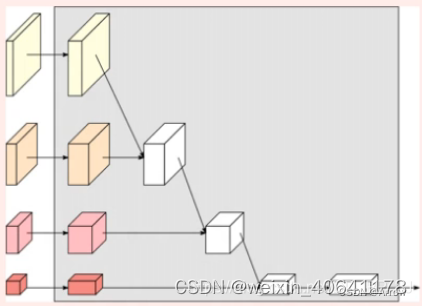
- 在并联的基础上,添加不同分辨率 feature map 之间的交互 (fusion)

- 具体 fusion 的方法如下图所示:
 同分辨率的层直接复制
需要升分辨率的使用 bilinear upsample + 1x1 卷积将 channel 数统一
需要降分辨率的使用 strided 3x3 卷积 (至于为何要用 strided 3x3 卷积,这是因为卷积在降维的时候会出现信息损失,使用 strided 3x3 卷积是为了通过学习的方式,降低信息的损耗。所以这里没有用 maxpool 或者组合池化。)
三个 feature map 融合的方式是相加
- 完整的网络结构
- BasicBlock:
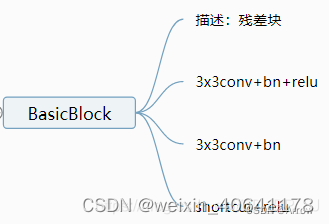 `def conv3x3(in_planes, out_planes, stride=1):
“”“3x3 convolution with padding”“”
return nn.Conv2d(in_planes, out_planes, kernel_size=3, stride=stride,
padding=1, bias=False)
class BasicBlock(nn.Module):
expansion = 1
def __init__(self, inplanes, planes, stride=1, downsample=None):
    super(BasicBlock, self).__init__()
    self.conv1 = conv3x3(inplanes, planes, stride)
    self.bn1 = nn.BatchNorm2d(planes, momentum=BN_MOMENTUM)
    self.relu = nn.ReLU(inplace=True)
    self.conv2 = conv3x3(planes, planes)
    self.bn2 = nn.BatchNorm2d(planes, momentum=BN_MOMENTUM)
    self.downsample = downsample
    self.stride = stride

def forward(self, x):
    residual = x

    out = self.conv1(x)
    out = self.bn1(out)
    out = self.relu(out)

    out = self.conv2(out)
    out = self.bn2(out)

    if self.downsample is not None:
        residual = self.downsample(x)

    out += residual
    out = self.relu(out)

    return out
`
Bottleneck:
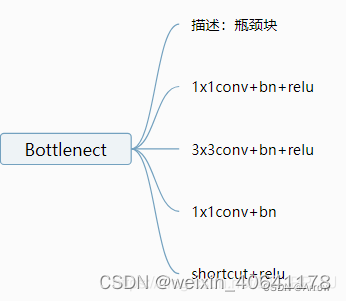 `class Bottleneck(nn.Module):
expansion = 4
def __init__(self, inplanes, planes, stride=1, downsample=None):
    super(Bottleneck, self).__init__()
    self.conv1 = nn.Conv2d(inplanes, planes, kernel_size=1, bias=False)
    self.bn1 = nn.BatchNorm2d(planes, momentum=BN_MOMENTUM)
    self.conv2 = nn.Conv2d(planes, planes, kernel_size=3, stride=stride,
                           padding=1, bias=False)
    self.bn2 = nn.BatchNorm2d(planes, momentum=BN_MOMENTUM)
    self.conv3 = nn.Conv2d(planes, planes * self.expansion, kernel_size=1,
                           bias=False)
    self.bn3 = nn.BatchNorm2d(planes * self.expansion,
                              momentum=BN_MOMENTUM)
    self.relu = nn.ReLU(inplace=True)
    self.downsample = downsample
    self.stride = stride

def forward(self, x):
    residual = x

    out = self.conv1(x)
    out = self.bn1(out)
    out = self.relu(out)

    out = self.conv2(out)
    out = self.bn2(out)
    out = self.relu(out)

    out = self.conv3(out)
    out = self.bn3(out)

    if self.downsample is not None:
        residual = self.downsample(x)

    out += residual
    out = self.relu(out)

    return out
`
4.4 HRNet版本
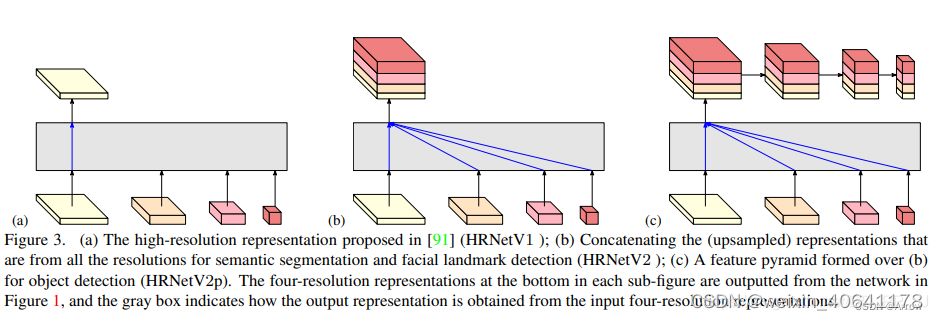
- (a) 图展示的是 HRNetV1 的特征选择,只使用分辨率最高的特征图。
- (b)图展示的是 HRNetV2 的特征选择,将所有分辨率的特征图 (小的特征图进行 upsample) 进行
concate,主要用于语义分割和面部关键点检测。 - © 图展示的是 HRNetV2p 的特征选择,在 HRNetV2 的基础上,使用了一个特征金字塔,主要用于目标检测网络。
- (d) 上图展示的也是 HRNetV2,采用上图的融合方式,主要用于训练分类网络
参考:
[HRNet网络简介](https://blog.csdn.net/qq_37541097/article/details/124346626)
[HRNet代码](https://gitcode.com/WZMIAOMIAO/deep-learning-for-image-processing/tree/master/pytorch_keypoint/HRNet?utm_source=csdn_github_accelerator&isLogin=1)
[打通多个视觉任务的全能 Backbone:HRNet (论文原作者)](http://giantpandacv.com/academic/%E7%AE%97%E6%B3%95%E7%A7%91%E6%99%AE/%E5%B0%BD%E8%A7%88%E5%8D%B7%E7%A7%AF%E7%A5%9E%E7%BB%8F%E7%BD%91%E7%BB%9C/HRNet/)
[\[MMPose理解\]](https://blog.csdn.net/MyArrow/article/details/127493615)


 553
553

 被折叠的 条评论
为什么被折叠?
被折叠的 条评论
为什么被折叠?
 到【灌水乐园】发言


