


图像分割一直是图像处理中一项棘手的问题。图像分割算法从大的方面讲可以分为两类:
而GraphCut和GrabCut就是属于第二类图像分割算法。
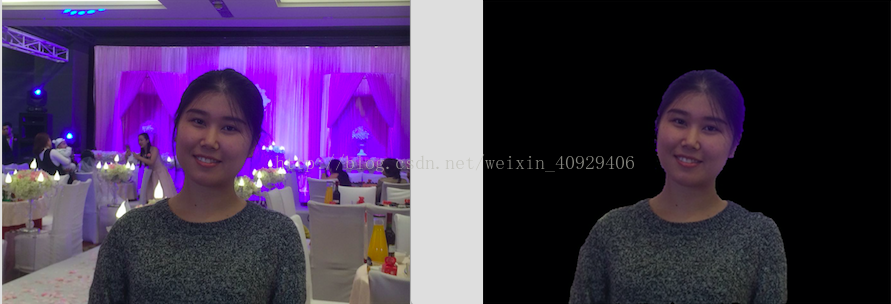
没有用GraphCut的源码。opencv有GrabCut的一个例程。我稍作了一点操作上的修改而已。这个算法的效率不是很高,迭代了45次左右。刚开始没有添加种子点,后面需要。会丢失一些细节的(当然)。
源码:
#include "opencv2/highgui/highgui.hpp"
#include "opencv2/imgproc/imgproc.hpp"

#include <iostream>

using namespace std;
using namespace cv;

static void help()
{
    cout << "\nThis program demonstrates GrabCut segmentation -- select an object in a region\n"
            "and then grabcut will attempt to segment it out.\n"
            "Call:\n"
            "./grabcut <image_name>\n"
            "\nSelect a rectangular area around the object you want to segment\n" <<
         "\nHot keys: \n"
                 "\tESC - quit the program\n"
                 "\tr - restore the original image\n"
                 "\tn - next iteration\n"
                 "\n"
                 "\tleft mouse button - set rectangle\n"
                 "\n"
                 "\tCTRL+left mouse button - set GC_BGD pixels\n"
                 "\tSHIFT+left mouse button - set CG_FGD pixels\n"
                 "\n"
                 "\tCTRL+right mouse button - set GC_PR_BGD pixels\n"
                 "\tSHIFT+right mouse button - set CG_PR_FGD pixels\n" << endl;
}

//GC_BGD    = 0,  //!< an obvious background pixels
//GC_FGD    = 1,  //!< an obvious foreground (object) pixel
//GC_PR_BGD = 2,  //!< a possible background pixel
//GC_PR_FGD = 3   //!< a possible foreground pixel
const Scalar RED = Scalar(0,0,255);
const Scalar PINK = Scalar(230,130,255);
const Scalar BLUE = Scalar(255,0,0);
const Scalar LIGHTBLUE = Scalar(255,255,160);
const Scalar GREEN = Scalar(0,255,0);
Mat resSave;

//CTRL键
const int BGD_KEY = CV_EVENT_FLAG_CTRLKEY;
//SHIFT键
const int FGD_KEY = CV_EVENT_FLAG_SHIFTKEY;

//产生一个mask comMask中为1或3的会在binMask中保留
static void getBinMask( const Mat& comMask, Mat& binMask )
{
    if( comMask.empty() || comMask.type()!=CV_8UC1 )
        CV_Error( CV_StsBadArg, "comMask is empty or has incorrect type (not CV_8UC1)" );
    if( binMask.empty() || binMask.rows!=comMask.rows || binMask.cols!=comMask.cols )
        binMask.create( comMask.size(), CV_8UC1 );
    binMask = comMask & 1;
}

class GCApplication
{
public:
    //NOT_SET代表还没有开始绘图
    //IN_PROCESS代表正在绘图
    //SET代表绘图完成
    enum{ NOT_SET = 0, IN_PROCESS = 1, SET = 2 };
    static const int radius = 2;
    static const int thickness = -1;

    void reset();
    void setImageAndWinName( const Mat& _image, const string& _winName );
    void showImage() const;
    void mouseClick( int event, int x, int y, int flags, void* param );
    int nextIter();
    void saveimg();
    int getIterCount() const { return iterCount; }
    void clearRec();

private:
    void setRectInMask();
    void setLblsInMask( int flags, Point p, bool isPr );

    //这里的窗口名称和图片名称都是地址
    const string* winName;
    const Mat* image;
    Mat mask;
    Mat bgdModel, fgdModel;


    //表示绘制的矩形、确定、可能的景的状态
    uchar rectState, lblsState, prLblsState;
    bool isInitialized;

    Rect rect;
    vector<Point> fgdPxls, bgdPxls, prFgdPxls, prBgdPxls;
    int iterCount;
};
void GCApplication::clearRec(){
    rectangle( resSave, Point( rect.x, rect.y ), Point(rect.x + rect.width, rect.y + rect.height ), Scalar(0, 0, 0), 2);
}
void GCApplication::saveimg(){
    imwrite("newme.jpeg", resSave);
}
void GCApplication::reset()
{
    if( !mask.empty() )
        mask.setTo(Scalar::all(GC_BGD));

    bgdPxls.clear(); fgdPxls.clear();
    prBgdPxls.clear();  prFgdPxls.clear();

    isInitialized = false;
    rectState = NOT_SET;
    lblsState = NOT_SET;
    prLblsState = NOT_SET;
    iterCount = 0;
}

void GCApplication::setImageAndWinName( const Mat& _image, const string& _winName  )
{
    if( _image.empty() || _winName.empty() )
        return;
    image = &_image;
    winName = &_winName;
    mask.create( image->size(), CV_8UC1);
    reset();
}

void GCApplication::showImage() const
{
    if( image->empty() || winName->empty())
        return;
    Mat res;
    Mat binMask;
    if( !isInitialized )
        image->copyTo( res );
    else
    {
        //如果有掩膜,掩膜的部分不会改变
        getBinMask( mask, binMask );
        image->copyTo( res, binMask );
    }

    vector<Point>::const_iterator it;
    //背景是蓝色的 不确定的背景是浅蓝
    //前景是红色的 不确定的前景是粉红
    for( it = bgdPxls.begin(); it != bgdPxls.end(); ++it )
        circle( res, *it, radius, BLUE, thickness );
    for( it = fgdPxls.begin(); it != fgdPxls.end(); ++it )
        circle( res, *it, radius, RED, thickness );
    for( it = prBgdPxls.begin(); it != prBgdPxls.end(); ++it )
        circle( res, *it, radius, LIGHTBLUE, thickness );
    for( it = prFgdPxls.begin(); it != prFgdPxls.end(); ++it )
        circle( res, *it, radius, PINK, thickness );

    //每一次imshow之前,res都更新了,变成了原图(如果没有mask)
    //这样就有了矩形框的更新,而且,前一次的矩形框会消失
    //因为矩形框是直接在原图上画的!!!!!
    //终于找到了这个方法。
    if( rectState == IN_PROCESS || rectState == SET )
        rectangle( res, Point( rect.x, rect.y ), Point(rect.x + rect.width, rect.y + rect.height ), GREEN, 2);
    imshow( *winName, res );
    res.copyTo(resSave);
    return;
}

void GCApplication::setRectInMask()
{
    assert( !mask.empty() );
    //先全0
    mask.setTo( GC_BGD );
    rect.x = max(0, rect.x);
    rect.y = max(0, rect.y);
    rect.width = min(rect.width, image->cols-rect.x);
    rect.height = min(rect.height, image->rows-rect.y);
    (mask(rect)).setTo( Scalar(GC_PR_FGD) );
}

void GCApplication::setLblsInMask( int flags, Point p, bool isPr )
{
    vector<Point> *bpxls, *fpxls;
    uchar bvalue, fvalue;
    if( !isPr )
    {
        //取地址 bpxls和bgdPxls同时改变
        //在画完矩形之前 这个Vector都是空的
        //画完之后开始给景打标签,Vector不为空
        bpxls = &bgdPxls;
        fpxls = &fgdPxls;
        bvalue = GC_BGD;
        fvalue = GC_FGD;
    }
    else
    {
        bpxls = &prBgdPxls;
        fpxls = &prFgdPxls;
        bvalue = GC_PR_BGD;
        fvalue = GC_PR_FGD;
    }
    //记住这种用法 代表flags==BGD_KEY CTRL
    if( flags & BGD_KEY )
    {
        //保存
        bpxls->push_back(p);
        //绘圆
        circle( mask, p, radius, bvalue, thickness );
    }
    //SHIFT
    if( flags & FGD_KEY )
    {
        fpxls->push_back(p);
        circle( mask, p, radius, fvalue, thickness );
    }
}

void GCApplication::mouseClick( int event, int x, int y, int flags, void* )
{
    // TODO add bad args check
    switch( event )
    {
        case CV_EVENT_LBUTTONDOWN: // set rect or GC_BGD(GC_FGD) labels
        {
            bool isb = (flags & BGD_KEY) != 0,
                    isf = (flags & FGD_KEY) != 0;
            if( rectState == NOT_SET && !isb && !isf )
            {
                //没有按下CTRL SHIFT; 绘制矩形
                rectState = IN_PROCESS;
                rect = Rect( x, y, 1, 1 );
            }
            //矩形画完!了 标前后景
            if ( (isb || isf) && rectState == SET )
                lblsState = IN_PROCESS;
        }
            break;
        case CV_EVENT_RBUTTONDOWN: // set GC_PR_BGD(GC_PR_FGD) labels
        {
            bool isb = (flags & BGD_KEY) != 0,
                    isf = (flags & FGD_KEY) != 0;
            if ( (isb || isf) && rectState == SET )
                prLblsState = IN_PROCESS;
        }
            break;
        case CV_EVENT_LBUTTONUP:
            if( rectState == IN_PROCESS )
            {
                rect = Rect( Point(rect.x, rect.y), Point(x,y) );
                rectState = SET;
                setRectInMask();
                //这个时候还没有标前后景
                assert( bgdPxls.empty() && fgdPxls.empty() && prBgdPxls.empty() && prFgdPxls.empty() );
                showImage();
            }
            if( lblsState == IN_PROCESS )
            {
                setLblsInMask(flags, Point(x,y), false);
                lblsState = SET;
                showImage();
            }
            break;
        case CV_EVENT_RBUTTONUP:
            if( prLblsState == IN_PROCESS )
            {
                setLblsInMask(flags, Point(x,y), true);
                prLblsState = SET;
                showImage();
            }
            break;
        case CV_EVENT_MOUSEMOVE:
            if( rectState == IN_PROCESS )
            {
                rect = Rect( Point(rect.x, rect.y), Point(x,y) );
                assert( bgdPxls.empty() && fgdPxls.empty() && prBgdPxls.empty() && prFgdPxls.empty() );
                showImage();
            }
            else if( lblsState == IN_PROCESS )
            {
                setLblsInMask(flags, Point(x,y), false);
                showImage();
            }
            else if( prLblsState == IN_PROCESS )
            {
                setLblsInMask(flags, Point(x,y), true);
                showImage();
            }
            break;
    }
}

int GCApplication::nextIter()
{
    if( isInitialized ) {
        grabCut(*image, mask, rect, bgdModel, fgdModel, 1);
    }
    else
    {
        if( rectState != SET )
            return iterCount;

        if( lblsState == SET || prLblsState == SET )
            grabCut( *image, mask, rect, bgdModel, fgdModel, 1, GC_INIT_WITH_MASK );
        else
            grabCut( *image, mask, rect, bgdModel, fgdModel, 1, GC_INIT_WITH_RECT );
        //mask会保存图片?
        //mask.copyTo(Newme);

        isInitialized = true;
    }
    iterCount++;
    //每次迭代以前清空之前的种子像素,会有新的mask
    bgdPxls.clear(); fgdPxls.clear();
    prBgdPxls.clear(); prFgdPxls.clear();

    return iterCount;
}

GCApplication gcapp;

static void on_mouse( int event, int x, int y, int flags, void* param )
{
    gcapp.mouseClick( event, x, y, flags, param );
}

int main( int argc, char** argv )
{
//    if( argc!=2 )
//    {
//        help();
//        return 1;
//    }
//    string filename = argv[1];
    string filename = "../me.jpeg";
    if( filename.empty() )
    {
        cout << "\ncouldn't read in " << argv[1] << endl;
        return 1;
    }
    Mat image = imread( filename, 1 );
    resize(image, image, Size(int(image.cols/1.3), int(image.rows/1.3)), NULL, NULL, 1);
    if( image.empty() )
    {
        cout << "\n couldn't read image filename " << filename << endl;
        return 1;
    }

    help();

    const string winName = "image";
    //如果不是autosize,坐标点会出现问题诶...
    namedWindow( winName, WINDOW_AUTOSIZE );
    setMouseCallback( winName, on_mouse, 0 );

    gcapp.setImageAndWinName( image, winName );
    gcapp.showImage();

    for(;;)
    {
        int c = waitKey(0);
        switch( (char) c )
        {
            //16进制27:Esc
            case '\x1b': {
                cout << "Exiting ..." << endl;
                goto exit_main;
            }
            case 'r': {
                cout << endl;
                gcapp.reset();
                gcapp.showImage();
            }
                break;
            case 'n': {
                int iterCount = gcapp.getIterCount();
                cout << "<" << iterCount << "... ";
                int newIterCount = gcapp.nextIter();
                if (newIterCount > iterCount) {
                    gcapp.showImage();
                    cout << iterCount << ">" << endl;
                } else {
                    cout << "rect must be determined>" << endl;
                }
            }
                break;
            case 's': {
                //把矩形去掉
                gcapp.clearRec();
                cout<<"saving"<<endl;
                gcapp.saveimg();
            }
                break;

        }

    }

    exit_main:
    destroyWindow( winName );
    return 0;
}


 2414
2414

 被折叠的 条评论
为什么被折叠?
被折叠的 条评论
为什么被折叠?
 到【灌水乐园】发言


