


 文章讲述了用户在安装ChatWithRTX时遇到下载依赖项失败的问题,通过修改安装程序中的提示信息,确认conda环境并逐个排查依赖项,最终发现是网络问题和镜像源设置导致。作者成功解决了TrtLLM和Cudnn的安装问题,并分享了解决方案。
背景:
- 硬件完全符合chat with rtx要求;
- 有挂梯子,且已经设置了全局;
- 杀毒软件已关,Windows defender的实时保护已关;
- 安装路径是默认路径,没有修改;
遇到的问题:
安装chat with rtx总是在downloading dependencies...失败,且无任何log可以分析
解决步骤:
1. 修改安装程序的打印信息,帮助我们分析问题出现在哪一步
根据参考帖子[1],打开\RAG\RAG.nvi,里面设置了整个安装过程的步骤,以及每个过程的提示信息,可以看到154~188行,是整个安装过程需要下载的依赖项,Rag、Torch、Cudnn、Tensor、CudnnUninstall、Trtllm这六项,这六项提示信息都是"downloading dependencies...",所以需要把这块改一下,如下方代码,把dependencies的首字母改了,这样就可以根据提示信息判断是哪个依赖项下载有问题
<custom phase="execRag_PIPCmd" action="ExecuteCommand" when="install" progress="300" installText="downloading aependencies...">
      <properties>
        <string name="ExecCommand" value="${{Rag_PIPCmd}}"/>
      </properties>
    </custom>

    <custom phase="execTorch_PIPCmd" action="ExecuteCommand" when="install" progress="100" installText="downloading bependencies...">
      <properties>
        <string name="ExecCommand" value="${{Torch_PIPCmd}}"/>
      </properties>
    </custom>

    <custom phase="execCudnn_PIPCmd" action="ExecuteCommand" when="install" progress="50" installText="downloading cependencies...">
      <properties>
        <string name="ExecCommand" value="${{Cudnn_PIPCmd}}"/>
      </properties>
    </custom>

    <custom phase="execTensor_PIPCmd" action="ExecuteCommand" when="install" progress="50" installText="downloading dependencies...">
      <properties>
        <string name="ExecCommand" value="${{Tensor_PIPCmd}}"/>
      </properties>
    </custom>

    <custom phase="execCudnnUninstall_PIPCmd" action="ExecuteCommand" when="install" progress="50" installText="downloading eependencies...">
      <properties>
        <string name="ExecCommand" value="${{CudnnUninstall_PIPCmd}}"/>
      </properties>
    </custom>

    <custom phase="execTrtLLM_PIPCmd" action="ExecuteCommand" when="install" progress="100" installText="downloading fependencies...">
      <properties>
        <string name="ExecCommand" value="${{TrtLLM_PIPCmd}}"/>
      </properties>
    </custom>
2. 确认能否正常进入conda环境,依赖项都要在conda中安装
我是一上来就有问题,根据参考帖子[2],安装步骤具体执行的代码都存放在\RAG\string.dat中,下载依赖项的步骤则在50~55行,如下方的代码
<string name="Rag_PIPCmd" value="${{MiniCondaEnvActivate}} && pip install -r "${{RagExtractionPath}}\${{RAG_FileName}}\requirements.txt" --extra-index-url https://download.pytorch.org/whl/nightly/cu121"/>
<string name="TrtLLM_PIPCmd" value="${{MiniCondaEnvActivate}} && pip install tensorrt_llm==0.7.0 --extra-index-url https://pypi.nvidia.com --extra-index-url https://download.pytorch.org/whl/cu121"/>
<string name="Torch_PIPCmd" value="${{MiniCondaEnvActivate}} && pip install torch==2.1.0+cu121 --extra-index-url https://pypi.nvidia.com --extra-index-url https://download.pytorch.org/whl/nightly/cu121 --extra-index-url https://download.pytorch.org/whl/cu121" />
<string name="Cudnn_PIPCmd" value="${{MiniCondaEnvActivate}} && pip install nvidia-cudnn-cu11==8.9.4.25 --no-cache-dir --extra-index-url https://mirrors.aliyun.com/pypi/simple" />
<string name="Tensor_PIPCmd" value="${{MiniCondaEnvActivate}} && pip install --pre --extra-index-url https://pypi.nvidia.com/ tensorrt==9.2.0.post12.dev5 --no-cache-dir" />
<string name="CudnnUninstall_PIPCmd" value="${{MiniCondaEnvActivate}} && pip uninstall -y nvidia-cudnn-cu11" />以上代码为xml格式,name存放的是执行的命令的名字,value则是具体的操作,可以通过自己写bat文件去单步执行,除了这个命令本身,还要设置一些变量,我已经整理好了,如下方的代码,注意其中的路径要替换为自己的才行
set LocalUserAppData=C:\Users\shuo.liu\AppData\Local
set InstallationFolder=%LocalUserAppData%\NVIDIA\ChatWithRTX
set InstallLocation=%InstallationFolder%
set RagInstallerCache=%InstallLocation%\Cache
set CommonAppData=C:\ProgramData
set MiniCondaPath=%CommonAppData%\MiniConda
set MinicondaEnv=env_nvd_rag
set MinicondaEnvPath=%InstallLocation%\%MinicondaEnv%
set MiniCondaActivateCmd=%MiniCondaPath%\Scripts\activate.bat
set RagExtractionPath=%InstallLocation%\RAG
set RAG_FileName=trt-llm-rag-windows-main

@REM "%MiniCondaActivateCmd%" "%MinicondaEnvPath%" && pip install -r "%RagExtractionPath%\%RAG_FileName%\requirements.txt" --extra-index-url https://download.pytorch.org/whl/nightly/cu121
@REM "%MiniCondaActivateCmd%" "%MinicondaEnvPath%" && pip install tensorrt_llm==0.7.0 --extra-index-url https://mirrors.aliyun.com/pypi/simple --extra-index-url https://pypi.nvidia.com --extra-index-url https://download.pytorch.org/whl/cu121
"%MiniCondaActivateCmd%" "%MinicondaEnvPath%" && pip install nvidia-cudnn-cu11==8.9.4.25 --no-cache-dir --extra-index-url https://mirrors.aliyun.com/pypi/simple
运行之后我发现我连conda都进不去,经过排查才发现,虽然安装程序自动安装了miniConda,但是没有把miniConda的路径配置到环境变量中,这里可以先在cmd中输入conda -V,如果没有正确版本输出,再输入path,检查一下环境变量是否正确设置,没有的话就手动设置一下

3. 逐个依赖项安装排查问题
我主要有两个依赖项有问题,第一个是Trt_llm,第二个是Cudnn。
Trt_llm问题如下图,总是提示我下载的安装包和requirement中的哈希值对不上,我也不知道怎么回事,但是加了国内的镜像源下载就好了,镜像源加法可以参考帖子[1]。

Cudnn问题如下图,提示urllib3\response.py有问题,经过分析,定位问题应该是网络不稳定造成的,那么还是加一个国内的镜像源,问题就解决了。
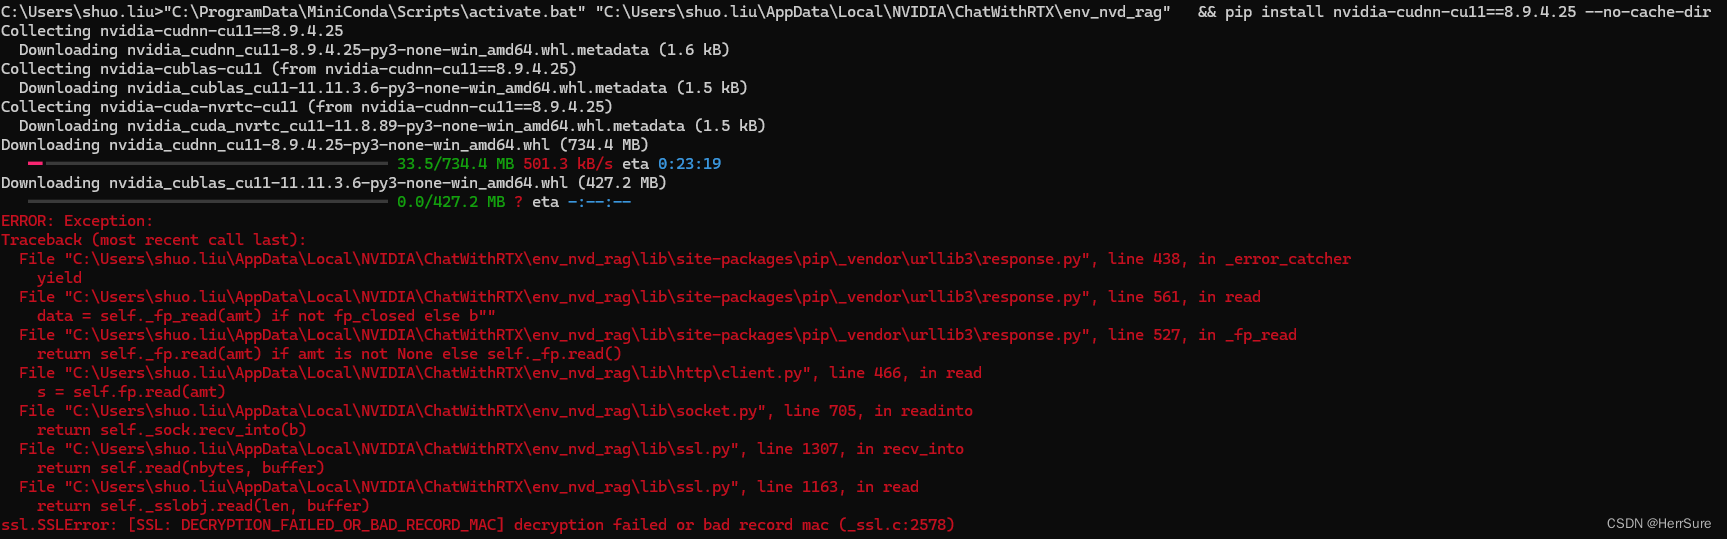
还有个需要注意的点,加了国内镜像源,代理就可以关掉了,否则下载有可能自动又找到外网去。单步安装外有问题的依赖,再打开全局代理,执行安装程序即可。pip install重复执行是不会产生冗余的,如果已经安装过,它会自动跳过。
结果
设置好了conda的环境,解决了有问题的依赖项的安装,chat with rtx就正常安装上了!


 1万+
1万+

 被折叠的 条评论
为什么被折叠?
被折叠的 条评论
为什么被折叠?
 到【灌水乐园】发言


