


 文章详细阐述了Android12中ServiceManager的启动流程,包括初始化、BpBinder的创建、Service的注册与获取服务的过程。重点讨论了BpBinder如何通过BnServiceManager与Server端进行通信,涉及BpInterface、BnInterface、IPCThreadState和BinderCallback的交互机制。
系列文章
Android 12 S Native Service的创建流程
Android 12 S Binder原理之BpBinder,BnBinder以及IInterface介绍
Android 12 S 自定义Hal服务selinux权限添加
Android 12 S 自定义Native服务selinux权限添加
Android 12 S 自定义native服务访问java服务
ServiceManager是Binder通信的核心部分,提供服务注册以及查询的功能。在 Android 11 之前的版本里,它是直接使用 open、mmap、ioctl 等 api 与 binder 驱动交互。而从 Android 11 开始,ServiceManager放弃使用这些较底层的接口,转向 libbinder 库和 AIDL。
目录
目录
4.4 interface_cast以及asInterface实现介绍
5. 其他服务通过IServicManager注册/获取服务
5.1.1 其他服务向ServiceManager中添加服务例子
5.1.3 mTheRealServiceManager赋值过程
5.1.4 IServiceManager的addService介绍,从Bp->Bn完整过程
5.1.5 Client端BpServiceManager的remote()->transact中的remote()介绍
5.1.6 Client端BpBinder的transact介绍
5.1.7 Server端是如何知道/dev/binder中有数据变化并进行读取的
5.1.8 ServiceManager中的BinderCallback继承的LooperCallback原理介绍
5.1.9 ServiceManager中的BinderCallback介绍
5.1.10 ServiceManager中的BinderCallback中的handleEvent的后续流程
5.1.11 Server端BnServiceManager的onTransact介绍
5.2.3 IServiceManager中getServerice流程 Bp->Bn
1. rc文件解析
ServiceManager由init通过rc文件启动,rc内容如下:frameworks/native/cmds/servicemanager/servicemanager.rc
service servicemanager /system/bin/servicemanager
    class core animation
    user system
    group system readproc
    critical//表明这个Service对设备至关重要,如果Service在四分钟内退出超过4次,则设备将重启进入recovery模式
    //onrestart在重启时执行一条命令。
    onrestart restart apexd
    onrestart restart audioserver
    onrestart restart gatekeeperd
    onrestart class_restart main
    onrestart class_restart hal
    onrestart class_restart early_hal
    writepid /dev/cpuset/system-background/tasks
    shutdown critical//设置Service进程的关闭行为
2. ServiceManager类图
2.1 ServiceManager目录介绍
ServiceManager位于以下目录
frameworks/native/cmds/servicemanager/
Access.cpp
Access.h
Android.bp
main.cpp
ServiceManager.cpp
ServiceManager.h
servicemanager.rc
TEST_MAPPING
test_sm.cpp
vndservicemanager.rc
2.2 ServiceManager类图介绍
ServiceManager的类图如下:
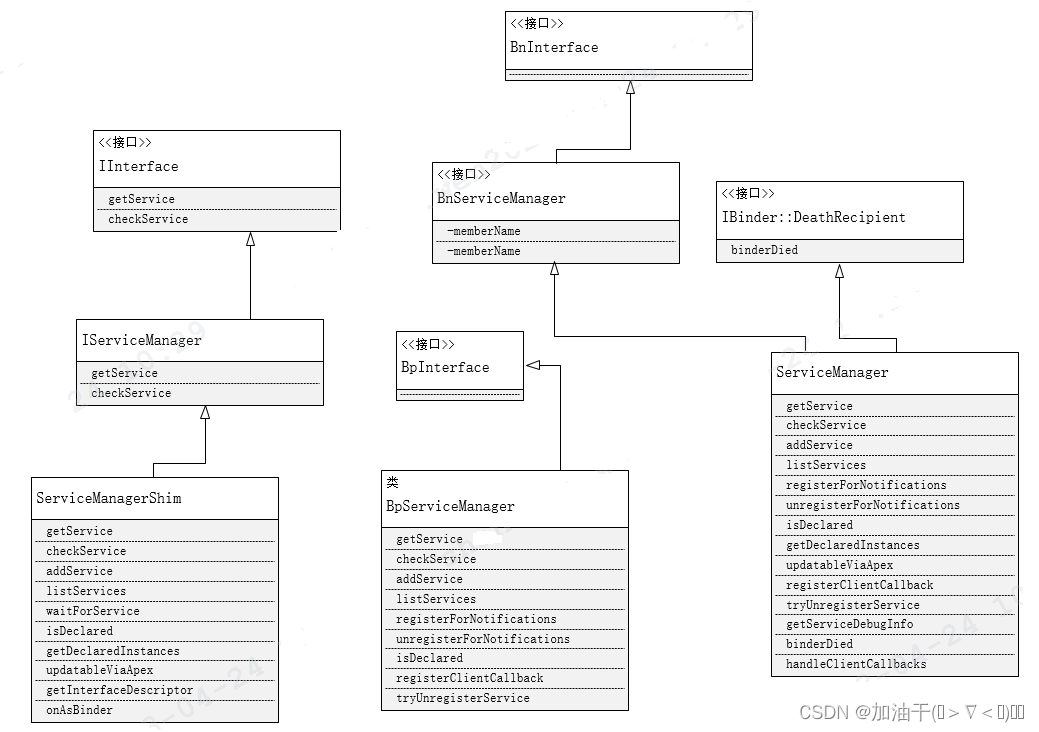
2.3 Bn,Bp端具体实现文件的路径介绍
BpServiceManager的实现在如下目录,在这个aidl目录下还自动生成了其他相关文件out/soong/.intermediates/frameworks/native/libs/binder/libbinder/android_arm64_armv8XXX/gen/aidl/android/os
BnClientCallback.h
BnServiceDebugInfo.h
BpClientCallback.h
BpServiceDebugInfo.h
IClientCallback.cpp
IServiceCallback.cpp
IServiceManager.cpp
ServiceDebugInfo.cpp
BnServiceCallback.h
BnServiceManager.h
BpServiceCallback.h
BpServiceManager.h
IClientCallback.h
IServiceCallback.h
IServiceManager.h
ServiceDebugInfo.h
其中BnServiceManager为Server端,它的实现类名为ServiceManager.cpp
3. ServiceManager启动流程
3.1 启动入口
ServiceManager为服务端,它启动后首先调用的是main函数,这块目录如下所示
frameworks/native/cmds/servicemanager/main.cpp
int main(int argc, char** argv) {
    if (argc > 2) {
        LOG(FATAL) << "usage: " << argv[0] << " [binder driver]";
    }
    //从servicemanager.rc中可看到,启动servicemanager时没有多余的参数,所以次数arvc=1,则driver为"/dev/binder"。
    const char* driver = argc == 2 ? argv[1] : "/dev/binder";

    //打开并映射binder驱动, open mmap 和以前的binder不同的地方
    sp<ProcessState> ps = ProcessState::initWithDriver(driver);
    //设置thread poll的最大线程数量
    ps->setThreadPoolMaxThreadCount(0);
    //设置调用限制,FATAL_IF_NOT_ONEWA意思是:在阻塞调用时中止进程
    //oneway 限制,ServiceManager发起的 Binder 调用必须是单向,否则打印堆栈日志提示
    ps->setCallRestriction(ProcessState::CallRestriction::FATAL_IF_NOT_ONEWAY);
    //实例化ServiceManager, Access为鉴权
    sp<ServiceManager> manager = sp<ServiceManager>::make(std::make_unique<Access>());
    if (!manager->addService("manager", manager, false /*allowIsolated*/, IServiceManager::DUMP_FLAG_PRIORITY_DEFAULT).isOk()) {
        LOG(ERROR) << "Could not self register servicemanager";
    }
    //设置全局变量给IPCThreadState
    IPCThreadState::self()->setTheContextObject(manager);
    //将自己设置为管理员,handle是0
    ps->becomeContextManager();
    //准备looper
    sp<Looper> looper = Looper::prepare(false /*allowNonCallbacks*/);
    //以前是 binder_loop死 循环接收驱动的消息,现在是 通知驱动BC_ENTER_LOOPER,监听驱动fd,有消息时回调到handleEvent处理binder调用
    BinderCallback::setupTo(looper);
    //服务的注册监听相关
    ClientCallbackCallback::setupTo(looper, manager);
    //无限循环等待消息
    while(true) {
        looper->pollAll(-1);
    }

    // should not be reached
    return EXIT_FAILURE;
}
3.2 initWithDriver介绍
frameworks/native/libs/binder/ProcessState.cpp
sp<ProcessState> ProcessState::initWithDriver(const char* driver)
{
    //返回一个ProcessState的对象的sp
    return init(driver, true /*requireDefault*/);
}
3.3 ProcessState::init介绍
frameworks/native/libs/binder/ProcessState.cpp
sp<ProcessState> ProcessState::init(const char *driver, bool requireDefault)
{
    [[clang::no_destroy]] static sp<ProcessState> gProcess;
    [[clang::no_destroy]] static std::mutex gProcessMutex;

    if (driver == nullptr) {
        std::lock_guard<std::mutex> l(gProcessMutex);
        return gProcess;
    }

    [[clang::no_destroy]] static std::once_flag gProcessOnce;
    //call_once确保函数或代码片段在多线程环境下,只需要执行一次
    std::call_once(gProcessOnce, [&](){
        //判断/dev/binder是否可读,成功0,失败-1.
        if (access(driver, R_OK) == -1) {
            ALOGE("Binder driver %s is unavailable. Using /dev/binder instead.", driver);
            driver = "/dev/binder";
        }

        std::lock_guard<std::mutex> l(gProcessMutex);
        //实例化ProcessState
        gProcess = sp<ProcessState>::make(driver);
    });

    if (requireDefault) {
        // Detect if we are trying to initialize with a different driver, and
        // consider that an error. ProcessState will only be initialized once above.
        LOG_ALWAYS_FATAL_IF(gProcess->getDriverName() != driver,
                            "ProcessState was already initialized with %s,"
                            " can't initialize with %s.",
                            gProcess->getDriverName().c_str(), driver);
    }

    return gProcess;
}
3.4 ProcessState的构造函数介绍
frameworks/native/libs/binder/ProcessState.cpp
ProcessState::ProcessState(const char *driver)
    : mDriverName(String8(driver))
    //open driver
    , mDriverFD(open_driver(driver))
    , mVMStart(MAP_FAILED)
    , mThreadCountLock(PTHREAD_MUTEX_INITIALIZER)
    , mThreadCountDecrement(PTHREAD_COND_INITIALIZER)
    , mExecutingThreadsCount(0)
    , mWaitingForThreads(0)
    , mMaxThreads(DEFAULT_MAX_BINDER_THREADS)
    , mStarvationStartTimeMs(0)
    , mThreadPoolStarted(false)
    , mThreadPoolSeq(1)
    , mCallRestriction(CallRestriction::NONE)
{
    if (mDriverFD >= 0) {
        // mmap the binder, providing a chunk of virtual address space to receive transactions.
        //虚拟内存映射,最终调用 binder_mmap() 函数
        //映射的内存大小:

       //#define BINDER_VM_SIZE ((1 * 1024 * 1024) - sysconf(_SC_PAGE_SIZE) * 2)
        //和普通应用大小一样大1M-2 页
        mVMStart = mmap(nullptr, BINDER_VM_SIZE, PROT_READ, MAP_PRIVATE | MAP_NORESERVE, mDriverFD, 0);


//在计算机存储容量的上下文中,1M通常表示1兆字节(1,048,576字节),而1页通常指的是虚拟内存或物理内存中的一页大小,其大小取决于操作系统和硬件架构。

如果假设一页的大小为4KB(4096字节),那么1M(1兆字节)将包含 1,048,576 字节 / 4,096 字节 = 256 个页。


        if (mVMStart == MAP_FAILED) {
            // *sigh*
            ALOGE("Using %s failed: unable to mmap transaction memory.\n", mDriverName.c_str());
            close(mDriverFD);
            mDriverFD = -1;
            mDriverName.clear();
        }
    }

#ifdef __ANDROID__
    LOG_ALWAYS_FATAL_IF(mDriverFD < 0, "Binder driver '%s' could not be opened.  Terminating.", driver);
#endif
}
3.5 open_driver介绍
frameworks/native/libs/binder/ProcessState.cpp
static int open_driver(const char *driver)
{
    //打开/dev/binder, 以读写方式,以及为新建的文件描述符使能 close-on-exec(执行exec时关闭) 标志,避免文件描述符无意间泄漏给了fork创建的子进程
    int fd = open(driver, O_RDWR | O_CLOEXEC);
    if (fd >= 0) {
        int vers = 0;
        //获取 Binder 版本,最终调用 binder_ioctl() 函数
        status_t result = ioctl(fd, BINDER_VERSION, &vers);
        if (result == -1) {
            ALOGE("Binder ioctl to obtain version failed: %s", strerror(errno));
            close(fd);
            fd = -1;
        }
        if (result != 0 || vers != BINDER_CURRENT_PROTOCOL_VERSION) {
          ALOGE("Binder driver protocol(%d) does not match user space protocol(%d)! ioctl() return value: %d",
                vers, BINDER_CURRENT_PROTOCOL_VERSION, result);
            close(fd);
            fd = -1;
        }
        size_t maxThreads = DEFAULT_MAX_BINDER_THREADS;
        //设置最大threads数量
        result = ioctl(fd, BINDER_SET_MAX_THREADS, &maxThreads);
        if (result == -1) {
            ALOGE("Binder ioctl to set max threads failed: %s", strerror(errno));
        }
        uint32_t enable = DEFAULT_ENABLE_ONEWAY_SPAM_DETECTION;
        //设置oneway
        result = ioctl(fd, BINDER_ENABLE_ONEWAY_SPAM_DETECTION, &enable);
        if (result == -1) {
            ALOGD("Binder ioctl to enable oneway spam detection failed: %s", strerror(errno));
        }
    } else {
        ALOGW("Opening '%s' failed: %s\n", driver, strerror(errno));
    }
    return fd;
}
3.6 ServiceManager启动总流程图
上述流程整理成流程图如下,可以看到是在initWithDriver中做了open, ioctl以及mmap操作。

4. IServicManager相关介绍
4.1 IServiceManager的目录介绍
IServiceManager的代码位于如下目录
frameworks/native/libs/binderAndroid.bp
Binder.cpp
BpBinder.cpp
IInterface.cpp
IPCThreadState.cpp
IServiceManager.cpp
Parcel.cpp
ProcessState.cppframeworks/native/libs/binder/aidl/android/os/
IClientCallback.aidl
IServiceCallback.aidl
IServiceManager.aidl
ServiceDebugInfo.aidl
4.2 IServiceManager的bp介绍
IServiceManager被编译到libbinder.so中,它引用了libbinder_aidl,上层ServiceManager Service中用到的aidl文件引用的也是这个libbinder_aidl。
frameworks/native/libs/binder/Android.bp
cc_library {
name: "libbinder",

// for vndbinder

vendor_available: true, vndk: { enabled: true, },
...
    srcs: [
        "Binder.cpp",
        "BpBinder.cpp",
        "IInterface.cpp",
        "IPCThreadState.cpp",
        "IServiceManager.cpp",
...

        ":libbinder_aidl",//引用aidl文件
],
    aidl: {//输出aidl头文件

        export_aidl_headers: true,

    },
},
// AIDL interface between libbinder and framework.jar
filegroup {
    name: "libbinder_aidl",
    srcs: [//aidl文件
        "aidl/android/os/IClientCallback.aidl",
        "aidl/android/os/IServiceCallback.aidl",
        "aidl/android/os/IServiceManager.aidl",
        "aidl/android/os/ServiceDebugInfo.aidl",
    ],
    path: "aidl",
}
IServiceManager基于AIDL和libbinder,类ServiceManagerShim继承了IServiceManager,Client端的请求都是由ServiceManagerShim进行转发。因为Client端获取IServiceManager对象是通过defaultServiceManager()方法获取到的。
4.3 defaultServiceManager介绍
defaultServiceManager实现如下,可以看到最后返回的是ServiceManagerShim对象指针,所以说Client端的请求都是由ServiceManagerShim进行转发。
frameworks/native/libs/binder/IServiceManager.cpp
sp<IServiceManager> defaultServiceManager()
{
    std::call_once(gSmOnce, []() {
        sp<AidlServiceManager> sm = nullptr;
        while (sm == nullptr) {
            //拿到客户端BpServiceManager(new BpBinder(0))的实例
            sm = interface_cast<AidlServiceManager>(ProcessState::self()->getContextObject(nullptr));
            if (sm == nullptr) {
                ALOGE("Waiting 1s on context object on %s.", ProcessState::self()->getDriverName().c_str());
                sleep(1);
            }
        }
        //new ServiceManagerShim,拿到BpServiceManager
        gDefaultServiceManager = sp<ServiceManagerShim>::make(sm);
    });

    return gDefaultServiceManager;
}
接着说defaultServiceManager中是如何拿到bp端binder对象的, 通过ProcessState::self()->getContextObject(nullptr) 获取到了BpBinder(0),再通过interface_cast拿到了BpServiceManager。
frameworks/native/libs/binder/ProcessState.cpp
sp<IBinder> ProcessState::getContextObject(const sp<IBinder>& /*caller*/)
{
//获取handler为0的IBinder
    sp<IBinder> context = getStrongProxyForHandle(0);
...
    return context;
}

sp<IBinder> ProcessState::getStrongProxyForHandle(int32_t handle)
{
    sp<IBinder> result;
    //加锁
    AutoMutex _l(mLock);
    handle_entry* e = lookupHandleLocked(handle);
    if (e != nullptr) {
        IBinder* b = e->binder;
        if (b == nullptr || !e->refs->attemptIncWeak(this)) {
            if (handle == 0) {
                IPCThreadState* ipc = IPCThreadState::self();
                CallRestriction originalCallRestriction = ipc->getCallRestriction();
                //设置调用限制
                ipc->setCallRestriction(CallRestriction::NONE);

                Parcel data;
                //PING_TRANSACTION
                status_t status = ipc->transact(
                        0, IBinder::PING_TRANSACTION, data, nullptr, 0);

                ipc->setCallRestriction(originalCallRestriction);
                //如果object死亡,就返回空
                if (status == DEAD_OBJECT)
                   return nullptr;
            }
            //new BpBinder(0)
            sp<BpBinder> b = BpBinder::create(handle);
            e->binder = b.get();
            if (b) e->refs = b->getWeakRefs();
            result = b;
        } else {
...
        }
    }
    //返回客户端BpBinder
    return result;
}
4.4 interface_cast以及asInterface实现介绍
interface_cast是怎么实现的呢?来看看源码是如何的。在interface_cast函数中返回的是asInterface,也就是new一个Bp代理对象并返回。在服务定义的时候,是要有如下声明的。
DECLARE_META_INTERFACE(CustomizeManagerService);
IMPLEMENT_META_INTERFACE(CustomizeManagerService, NATIVESERVICE_NAME);
frameworks/native/libs/binder/include/binder/IInterface.h
template<typename INTERFACE>
inline sp<INTERFACE> interface_cast(const sp<IBinder>& obj)
{
    return INTERFACE::asInterface(obj);
}
//在服务中声明
#define DECLARE_META_INTERFACE(INTERFACE)
    static ::android::sp<I##INTERFACE> asInterface(                     \
            const ::android::sp<::android::IBinder>& obj);
//在服务中声明
#define IMPLEMENT_META_INTERFACE(INTERFACE, NAME)
   ::android::sp<I##INTERFACE> I##INTERFACE::asInterface(              \
            const ::android::sp<::android::IBinder>& obj)               \
    {                                                                   \
        ::android::sp<I##INTERFACE> intr;                               \
        if (obj != nullptr) {                                           \
            intr = ::android::sp<I##INTERFACE>::cast(                   \
                obj->queryLocalInterface(I##INTERFACE::descriptor));    \
            if (intr == nullptr) {                                      \
                //new Bp的代理对象并返回
                intr = ::android::sp<Bp##INTERFACE>::make(obj);         \
            }                                                           \
        }                                                               \
        return intr;                                                    \
    }
4.5 IServiceManager其他接口介绍
IServiceManager中定义了一些接口,它继承IInterface,故Client端以及Server端的函数接口都要和这些接口保持一致,并且要在Server端有具体实现。
frameworks/native/libs/binder/IServiceManager.cpp
#include <binder/IServiceManager.h>
#include <android/os/BnServiceCallback.h>
#include <android/os/IServiceManager.h>
//ServiceManagerShim继承IServiceManager
class ServiceManagerShim : public IServiceManager
{
public:
    explicit ServiceManagerShim (const sp<AidlServiceManager>& impl);

    sp<IBinder> getService(const String16& name) const override;
    sp<IBinder> checkService(const String16& name) const override;
    status_t addService(const String16& name, const sp<IBinder>& service,
                        bool allowIsolated, int dumpsysPriority) override;
    Vector<String16> listServices(int dumpsysPriority) override;
    sp<IBinder> waitForService(const String16& name16) override;
    bool isDeclared(const String16& name) override;
    Vector<String16> getDeclaredInstances(const String16& interface) override;
    std::optional<String16> updatableViaApex(const String16& name) override;
    IBinder* onAsBinder() override {
        return IInterface::asBinder(mTheRealServiceManager).get();
    }
};
frameworks/native/libs/binder/include/binder/IServiceManager.h
class IServiceManager : public IInterface
...
5. 其他服务通过IServicManager注册/获取服务
5.1: 注册服务
5.1.1 其他服务向ServiceManager中添加服务例子
先看一个注册服务的例子,如下图所示,可以看到注册服务是通过IServiceManager的addService接口的。
sp<ProcessState> proc(ProcessState::self());
//获取BpServiceManager指针
sp<IServiceManager> sm = defaultServiceManager();

sp<CustomizeManagerService> mService = new CustomizeManagerService();
//通过IServiceManager注册服务
sm->addService(String16(NATIVESERVICE_NAME), mService, false);

ProcessState::self()->startThreadPool();
IPCThreadState::self()->joinThreadPool();
5.1.2 Client端中addService介绍
本例中,CustomizeManagerService服务通过IServiceManager注册服务的时候,是通过defaultServiceManager()接口获取到BpServiceManager的对象指针的,再通过addService接口将服务添加进去,addService代码如下:
frameworks/native/libs/binder/IServiceManager.cpp
status_t ServiceManagerShim::addService(const String16& name, const sp<IBinder>& service,
                                        bool allowIsolated, int dumpsysPriority)
{
    //mTheRealServiceManager为BpServiceManager
    Status status = mTheRealServiceManager->addService(
        String8(name).c_str(), service, allowIsolated, dumpsysPriority);
    return status.exceptionCode();
}
5.1.3 mTheRealServiceManager赋值过程
mTheRealServiceManager是怎么来的?来看下mTheRealServiceManager的赋值过程
frameworks/native/libs/binder/IServiceManager.cpp
//两者等价
using AidlServiceManager = android::os::IServiceManager;

// From the old libbinder IServiceManager interface to IServiceManager.
class ServiceManagerShim : public IServiceManager
{
...
//变量声明
    sp<AidlServiceManager> mTheRealServiceManager;
};

sp<IServiceManager> defaultServiceManager()
{
...
        sp<AidlServiceManager> sm = nullptr;
        while (sm == nullptr) {
            sm = interface_cast<AidlServiceManager>(ProcessState::self()->getContextObject(nullptr));
...
        }
        //此处将sm传入了,即也就赋值给了mTheRealServiceManager
        gDefaultServiceManager = sp<ServiceManagerShim>::make(sm);
...
}

ServiceManagerShim::ServiceManagerShim(const sp<AidlServiceManager>& impl)
 : mTheRealServiceManager(impl)//impl赋给mTheRealServiceManager
{}5.1.4 IServiceManager的addService介绍,从Bp->Bn完整过程
out/soong/.intermediates/frameworks/native/libs/binder/libbinder/android_arm64_armv8-a_shared/gen/aidl/android/os/IServiceManager.cpp
#include <android/os/IServiceManager.h>
#include <android/os/BpServiceManager.h>
namespace android {
namespace os {
DO_NOT_DIRECTLY_USE_ME_IMPLEMENT_META_INTERFACE(ServiceManager, "android.os.IServiceManager")
}  // namespace os
}  // namespace android
#include <android/os/BpServiceManager.h>
#include <android/os/BnServiceManager.h>
#include <binder/Parcel.h>
#include <android-base/macros.h>
BpServiceManager::BpServiceManager(const ::android::sp<::android::IBinder>& _aidl_impl)
    : BpInterface<IServiceManager>(_aidl_impl){
}
1. 先走Bp的addService方法
::android::binder::Status BpServiceManager::addService(const ::std::string& name, const ::android::sp<::android::IBinder>& service, bool allowIsolated, int32_t dumpPriority) {
  ::android::Parcel _aidl_data;
  _aidl_data.markForBinder(remoteStrong());
  ::android::Parcel _aidl_reply;
  ::android::status_t _aidl_ret_status = ::android::OK;
  ::android::binder::Status _aidl_status;
  //标注远程服务名称,getInterfaceDescriptor为远程服务端接口描述
  _aidl_ret_status = _aidl_data.writeInterfaceToken(getInterfaceDescriptor());
  if (((_aidl_ret_status) != (::android::OK))) {
    goto _aidl_error;
  }
  _aidl_ret_status = _aidl_data.writeUtf8AsUtf16(name);
  if (((_aidl_ret_status) != (::android::OK))) {
    goto _aidl_error;
  }
  _aidl_ret_status = _aidl_data.writeStrongBinder(service);
  if (((_aidl_ret_status) != (::android::OK))) {
    goto _aidl_error;
  }
  _aidl_ret_status = _aidl_data.writeBool(allowIsolated);
  if (((_aidl_ret_status) != (::android::OK))) {
    goto _aidl_error;
  }
  _aidl_ret_status = _aidl_data.writeInt32(dumpPriority);
  if (((_aidl_ret_status) != (::android::OK))) {
    goto _aidl_error;
  }
  2. 调用transact方法,与服务端进行通信,此处remote()后面会解释
  _aidl_ret_status = remote()->transact(BnServiceManager::TRANSACTION_addService, _aidl_data, &_aidl_reply, 0);
  if (UNLIKELY(_aidl_ret_status == ::android::UNKNOWN_TRANSACTION && IServiceManager::getDefaultImpl())) {
     return IServiceManager::getDefaultImpl()->addService(name, service, allowIsolated, dumpPriority);
  }
  if (((_aidl_ret_status) != (::android::OK))) {
    goto _aidl_error;
  }
  _aidl_ret_status = _aidl_status.readFromParcel(_aidl_reply);
  if (((_aidl_ret_status) != (::android::OK))) {
    goto _aidl_error;
  }
  if (!_aidl_status.isOk()) {
    return _aidl_status;
  }
  _aidl_error:
  _aidl_status.setFromStatusT(_aidl_ret_status);
  return _aidl_status;
}
}  // namespace os
}  // namespace android

namespace android {
namespace os {
BnServiceManager::BnServiceManager()
{
  ::android::internal::Stability::markCompilationUnit(this);
}
3. 走Bn端的onTransact
::android::status_t BnServiceManager::onTransact(uint32_t _aidl_code, const ::android::Parcel& _aidl_data, ::android::Parcel* _aidl_reply, uint32_t _aidl_flags) {
  ::android::status_t _aidl_ret_status = ::android::OK;
  switch (_aidl_code) {
4. 根据Bp端的transact中关键字走进此处case
  case BnServiceManager::TRANSACTION_addService:
  {
    ::std::string in_name;
    ::android::sp<::android::IBinder> in_service;
    bool in_allowIsolated;
    int32_t in_dumpPriority;
    if (!(_aidl_data.checkInterface(this))) {
      _aidl_ret_status = ::android::BAD_TYPE;
      break;
    }
    _aidl_ret_status = _aidl_data.readUtf8FromUtf16(&in_name);
    if (((_aidl_ret_status) != (::android::OK))) {
      break;
    }
    _aidl_ret_status = _aidl_data.readStrongBinder(&in_service);
    if (((_aidl_ret_status) != (::android::OK))) {
      break;
    }
    _aidl_ret_status = _aidl_data.readBool(&in_allowIsolated);
    if (((_aidl_ret_status) != (::android::OK))) {
      break;
    }
    _aidl_ret_status = _aidl_data.readInt32(&in_dumpPriority);
    if (((_aidl_ret_status) != (::android::OK))) {
      break;
    }
    5. 调用Bn端的getService方法
    ::android::binder::Status _aidl_status(addService(in_name, in_service, in_allowIsolated, in_dumpPriority));
    _aidl_ret_status = _aidl_status.writeToParcel(_aidl_reply);
    if (((_aidl_ret_status) != (::android::OK))) {
      break;
    }
    if (!_aidl_status.isOk()) {
      break;
    }
  }
...
}  // namespace os
}  // namespace android
5.1.5 Client端BpServiceManager的remote()->transact中的remote()介绍
从第2步可看到是通过调用remote()->transact(BnServiceManager::TRANSACTION_getService, _aidl_data, &_aidl_reply, 0)来进行下一步通信的。
remote()是什么呢?从它的实现可以看出它就是mRemote。
frameworks/native/libs/binder/include/binder/Binder.h
 class BpRefBase : public virtual RefBase
{
    inline IBinder* remote() const { return mRemote; }
    IBinder* const          mRemote;
};
mRemote是在如下方法中被赋值的,可以看到o.get()赋值给了mRemote。
frameworks/native/libs/binder/include/binder/IInterface.h
BpRefBase::BpRefBase(const sp<IBinder>& o)
    : mRemote(o.get()), mRefs(nullptr), mState(0)
{... }
那哪里进行BpRefBase的实例化呢?从如下可以看到在BpInterface的构造函数中将入参remote赋值给了BpRefBase。
frameworks/native/libs/binder/include/binder/IInterface.htemplate<typename INTERFACE> inline BpInterface<INTERFACE>::BpInterface(const sp<IBinder>& remote) : BpRefBase(remote) {}在如下文件中可看到,BpServiceManager继承了BpInterface,那BpServiceManager是在哪里实例化的呢,在上述defaultServiceManager解释中可以很明确的看到,传入的入参是BpBinder.
/out/soong/.intermediates/frameworks/native/libs/binder/libbinder/android_arm64_armv8-a_shared/gen/aidl/android/os/BpServiceManager.h
#include <binder/IBinder.h>
#include <binder/IInterface.h>
#include <utils/Errors.h>
#include <android/os/IServiceManager.h>
namespace android {
namespace os {
class BpServiceManager : public ::android::BpInterface<IServiceManager> {
...
};  // class BpServiceManager
}  // namespace os
}  // namespace android
由上面可知,remote()就是BpBinder。这样也就走进了BpBinder的transact方法中。
5.1.6 Client端BpBinder的transact介绍
frameworks/native/libs/binder/BpBinder.cpp
status_t BpBinder::transact(
    uint32_t code, const Parcel& data, Parcel* reply, uint32_t flags)
{
...
        status_t status;
...
            status = IPCThreadState::self()->transact(binderHandle(), code, data, reply, flags);
...
    return DEAD_OBJECT;
}
frameworks/native/libs/binder/IPCThreadState.cpp
status_t IPCThreadState::transact(int32_t handle,
                                  uint32_t code, const Parcel& data,
                                  Parcel* reply, uint32_t flags)
{
... //cmd为BC_TRANSACTION
    err = writeTransactionData(BC_TRANSACTION, flags, handle, code, data, nullptr);
...
        if (reply) {
            err = waitForResponse(reply);
        } else {
            Parcel fakeReply;
            err = waitForResponse(&fakeReply);
        }
...
}

status_t IPCThreadState::writeTransactionData(int32_t cmd, uint32_t binderFlags,
    int32_t handle, uint32_t code, const Parcel& data, status_t* statusBuffer)
{
    binder_transaction_data tr;

    tr.target.ptr = 0; /* Don't pass uninitialized stack data to a remote process */
    tr.target.handle = handle;
    tr.code = code;
    tr.flags = binderFlags;
    tr.cookie = 0;
    tr.sender_pid = 0;
    tr.sender_euid = 0;

    const status_t err = data.errorCheck();
    if (err == NO_ERROR) {
        tr.data_size = data.ipcDataSize();
        tr.data.ptr.buffer = data.ipcData();
        tr.offsets_size = data.ipcObjectsCount()*sizeof(binder_size_t);
        tr.data.ptr.offsets = data.ipcObjects();
    } else if (statusBuffer) {
        tr.flags |= TF_STATUS_CODE;
        *statusBuffer = err;
        tr.data_size = sizeof(status_t);
        tr.data.ptr.buffer = reinterpret_cast<uintptr_t>(statusBuffer);
        tr.offsets_size = 0;
        tr.data.ptr.offsets = 0;
    } else {
        return (mLastError = err);
    }
//cmd为BC_TRANSACTION
    mOut.writeInt32(cmd);
    mOut.write(&tr, sizeof(tr));

    return NO_ERROR;
}

status_t IPCThreadState::waitForResponse(Parcel *reply, status_t *acquireResult)
{
...     //和Driver通信
        if ((err=talkWithDriver()) < NO_ERROR) break;
...
}
5.1.6 Client端talkWithDriver介绍
status_t IPCThreadState::talkWithDriver(bool doReceive)
{
...//和/dev/binder进行通信, fd为mProcess->mDriverFD
if (ioctl(mProcess->mDriverFD, BINDER_WRITE_READ, &bwr) >= 0)
err = NO_ERROR;
else
...
}
至此,Client端数据流已经结束,那Server端是如何知道/dev/binder中有数据变化并进行读取的呢?
5.1.7 Server端是如何知道/dev/binder中有数据变化并进行读取的
3: ServiceManager启动流程 中可以看到,在Server端启动时,注册了两个callback,其中一个是BinderCallback,Server端是通过BinderCallback知道/dev/binder中的数据变化,并通知ServerManager进行读取的。
5.1.8 ServiceManager中的BinderCallback继承的LooperCallback原理介绍
BinderCallback继承了LooperCallback,而LooperCallback可以看下C++层中Handler的原理实现,就会知道LooperCallback的作用了。Handler中有两个重要函数,分别是addFd以及handleEvent。
system/core/libutils/include/utils/Looper.h
class LooperCallback : public virtual RefBase {
...
virtual int handleEvent(int fd, int events, void* data) = 0;
};class Looper : public RefBase {
public:
int addFd(int fd, int ident, int events, Looper_callbackFunc callback, void* data);
int addFd(int fd, int ident, int events, const sp<LooperCallback>& callback, void* data);...
addFd函数在调用时, 传入一个需要添加的fd到对应Looper的epoll事件监听池中,对fd中感兴趣的事件进行监听,监听的结果会返回到传入的监听器中。
handleEvent函数是用于处理指定的文件描述符poll事件,就是在looper中epoll_wait之后,当我们增加的fd有数据就会调用这个函数。
5.1.9 ServiceManager中的BinderCallback介绍
下面看一下Server端的BinderCallback是怎么做的。
frameworks/native/cmds/servicemanager/main.cpp
class BinderCallback : public LooperCallback {
public:
    static sp<BinderCallback> setupTo(const sp<Looper>& looper) {
        sp<BinderCallback> cb = sp<BinderCallback>::make();

        int binder_fd = -1;
        //这个binder_fd是哪个fd呢
        IPCThreadState::self()->setupPolling(&binder_fd);
        LOG_ALWAYS_FATAL_IF(binder_fd < 0, "Failed to setupPolling: %d", binder_fd);
        //向looper中添加binder_fd,并传入callback监听器
        int ret = looper->addFd(binder_fd,
                                Looper::POLL_CALLBACK,
                                Looper::EVENT_INPUT,
                                cb,
                                nullptr /*data*/);
        LOG_ALWAYS_FATAL_IF(ret != 1, "Failed to add binder FD to Looper");

        return cb;
    }
    //当binder_fd有变化时,会回调该函数
    int handleEvent(int /* fd */, int /* events */, void* /* data */) override {
        //收到变化时,调用此函数
        IPCThreadState::self()->handlePolledCommands();
        return 1;  // Continue receiving callbacks.
    }
};
frameworks/native/libs/binder/IPCThreadState.cpp
status_t IPCThreadState::setupPolling(int* fd) { ... //此处对fd进行了赋值 *fd = mProcess->mDriverFD; return 0; }上面代码可以看出在BinderCallback的setupTo方法中,调用了addFd方法,并将mProcess->mDriverFD赋值给binder_fd并传入了looper中,这样就和上面talkWithDriver中的fd完全一致了,即当mProcess->mDriverFD中的内容发生了变化时,就会调用handleEvent方法通知Server端ServiceManager。
mDriverFD具体是哪个节点的fd呢,mDriverFD是在ProcessState执行构造函数时执行open_driver(driver)方法时进行赋值的。
ProcessState::ProcessState(const char *driver)
: mDriverName(String8(driver))
, mDriverFD(open_driver(driver))
open_driver在上面有讲解到,它是main.cpp中执行ProcessState::initWithDriver(driver)方法后实例化ProcessState时调用到的,而这个传入的driver就是"/dev/binder"。至此,是不是更加理解Binder原理了呢。
frameworks/native/cmds/servicemanager/main.cpp
const char* driver = argc == 2 ? argv[1] : "/dev/binder";
sp<ProcessState> ps = ProcessState::initWithDriver(driver);frameworks/native/libs/binder/ProcessState.cpp
static int open_driver(const char *driver)
{
//driver就是"/dev/binder"
int fd = open(driver, O_RDWR | O_CLOEXEC);
...
return fd;
}
讲的东西越来越多了,小伙伴们如果不理解,请多多看几遍哦。
至此,Server端ServiceManager已经知道/dev/binder中的共享内存中已有内容变化,那就要开始真正的读取操作了。
5.1.10 ServiceManager中的BinderCallback中的handleEvent的后续流程
BinderCallback中handleEvent中调用了IPCThreadState::self()->handlePolledCommands().
frameworks/native/libs/binder/IPCThreadState.cpp
status_t IPCThreadState::handlePolledCommands()
{
status_t result;do {
result = getAndExecuteCommand();
} while (mIn.dataPosition() < mIn.dataSize());processPendingDerefs();
flushCommands();
return result;
}frameworks/native/libs/binder/IPCThreadState.cpp
status_t IPCThreadState::getAndExecuteCommand()
{
status_t result;
int32_t cmd;result = talkWithDriver();
if (result >= NO_ERROR) {
...
cmd = mIn.readInt32();//cmd为BR_TRANSACTION,前面有解说
...result = executeCommand(cmd);
...
}sp<BBinder> the_context_object;
status_t IPCThreadState::executeCommand(int32_t cmd)
{
...
switch ((uint32_t)cmd) {
case BR_TRANSACTION:
{
...} else {
//sp<ServiceManager> manager = sp<ServiceManager>::make(std::make_unique<Access>());
//IPCThreadState::self()->setTheContextObject(manager);//将manager设置给了the_context_object,所以the_context_object就是Server端ServerManager对象
//调用BBinder的transact
error = the_context_object->transact(tr.code, buffer, &reply, tr.flags);
}
...
}
frameworks/native/libs/binder/Binder.cpp
status_t BBinder::transact(
uint32_t code, const Parcel& data, Parcel* reply, uint32_t flags)
{
status_t err = NO_ERROR;
switch (code) {
...
err = onTransact(code, data, reply, flags);
break;
}
binder.h - OpenGrok cross reference for /bionic/libc/kernel/uapi/linux/android/binder.h
enum binder_driver_return_protocol {
  BR_ERROR = _IOR('r', 0, __s32),
  BR_OK = _IO('r', 1),
  BR_TRANSACTION_SEC_CTX = _IOR('r', 2, struct binder_transaction_data_secctx),
  BR_TRANSACTION = _IOR('r', 2, struct binder_transaction_data),
...
};
enum binder_driver_command_protocol {
  BC_TRANSACTION = _IOW('c', 0, struct binder_transaction_data),
...
};
在Android的Binder通信机制中,
BR_TRANSACTION和BC_TRANSACTION都是用于定义Binder通信中的消息类型的宏,但它们有着不同的作用和用途。
BR_TRANSACTION = _IOR('r', 2, struct binder_transaction_data):
BR_TRANSACTION是一个宏,用于定义一个读取操作的IO控制码(IO Request),表示从用户空间读取数据到内核空间。'r'表示操作的方向,即从用户空间到内核空间的读取操作。2是一个标识符,用于指定操作的具体类型或通道。struct binder_transaction_data是与该IO操作相关联的数据结构,用于描述Binder事务的详细信息,如请求数据、响应数据等。BC_TRANSACTION = _IOW('c', 0, struct binder_transaction_data):
BC_TRANSACTION也是一个宏,用于定义一个写入操作的IO控制码,表示从内核空间写入数据到用户空间。'c'表示操作的方向,即从内核空间到用户空间的写入操作。0是一个标识符,用于指定操作的具体类型或通道。通常,不同的标识符可以表示不同类型的Binder操作。struct binder_transaction_data是与该IO操作相关联的数据结构,用于描述从内核传递到用户空间的Binder事务的详细信息。区别总结:
- 方向:
BR_TRANSACTION是读取操作,从用户空间到内核空间;而BC_TRANSACTION是写入操作,从内核空间到用户空间。- IO控制码类型:
_IOR和_IOW分别用于指定读取和写入操作。- 标识符:它们使用不同的标识符(第三个参数)来表示不同类型的Binder操作。
- 用途:
BR_TRANSACTION用于定义从用户空间到内核空间的读取操作的消息类型;BC_TRANSACTION则用于定义从内核空间到用户空间的写入操作的消息类型。
5.1.11 Server端BnServiceManager的onTransact介绍
最终调用到了BnServiceManager的onTransact方法,也就是上面的第3步。
out/soong/.intermediates/frameworks/native/libs/binder/libbinder/android_arm64_armv8-a_shared/gen/aidl/android/os/BnServiceManager.h
#include <binder/IInterface.h>
#include <android/os/IServiceManager.h>
namespace android {
namespace os {
class BnServiceManager : public ::android::BnInterface<IServiceManager> {
...
::android::status_t onTransact(uint32_t _aidl_code, const ::android::Parcel& _aidl_data, ::android::Parcel* _aidl_reply, uint32_t _aidl_flags) override;...
frameworks/native/libs/binder/include/binder/IInterface.h
class BnInterface : public INTERFACE, public BBinderframeworks/native/libs/binder/include/binder/Binder.h
class BBinder : public IBinder
{...
virtual status_t onTransact( uint32_t code,
const Parcel& data,
Parcel* reply,
uint32_t flags = 0);...
5.1.12 Server端的addService介绍
当执行到第5步时也就走进了Bn端frameworks/native/cmds/servicemanager/ServiceManager.cpp中,也就是走进了Bn服务端的代码实现里。
frameworks/native/cmds/servicemanager/ServiceManager.cpp
Status ServiceManager::addService(const std::string& name, const sp<IBinder>& binder, bool allowIsolated, int32_t dumpPriority) {
auto ctx = mAccess->getCallingContext();
...
//将服务的名字等添加到结构体中
// Overwrite the old service if it existsmNameToService[name] = Service {
.binder = binder,
.allowIsolated = allowIsolated,
.dumpPriority = dumpPriority,
.debugPid = ctx.debugPid,
};
...
return Status::ok();
}5.1.13 Server端的添加服务列表map介绍
mNameToService的声明如下,也就是说,最终service添加到了map中
frameworks/native/cmds/servicemanager/ServiceManager.h
using ServiceMap = std::map<std::string, Service>;
ServiceMap mNameToService;struct Service {
sp<IBinder> binder; // not null
bool allowIsolated;
int32_t dumpPriority;
bool hasClients = false; // notifications sent on true -> false.
bool guaranteeClient = false; // forces the client check to true
pid_t debugPid = 0; // the process in which this service runs// the number of clients of the service, including servicemanager itself
ssize_t getNodeStrongRefCount();
};
5.2 获取服务
5.2.1 通过IServiceManager获取服务例子
获取服务例子如下,也是通过IServiceManager去获取到对应的服务对象的。
sp<IServiceManager> sm = defaultServiceManager();
//获取服务
sp<ICustomizeManagerService> mService = ICustomizeManagerService::asInterface(sm->getService(String16("customizeManagerservice")));
if(mService != NULL)
{
    //获取到服务的binder对象,然后调用服务的接口
    mService.customize();
}
asInterface是如何实现的呢?在上文中有讲解过,可以翻一下看看。
5.2.2 Client端getService接口介绍
getService接口中,如果服务未启动,则会去启动服务,但最多等待5s。
frameworks/native/libs/binder/IServiceManager.cpp
sp<IBinder> ServiceManagerShim::getService(const String16& name) const
{
    sp<IBinder> svc = checkService(name)
......
    //有5s超时机制
    constexpr int64_t timeout = 5000;
    int64_t startTime = uptimeMillis();
    ......
    int n = 0;
    while (uptimeMillis() - startTime < timeout) {
        n++;
        usleep(1000*sleepTime);

        sp<IBinder> svc = checkService(name);
        if (svc != nullptr) {
            ALOGI("Waiting for service '%s' on '%s' successful after waiting %" PRIi64 "ms",
                  String8(name).string(), ProcessState::self()->getDriverName().c_str(),
                  uptimeMillis() - startTime);
...
}

sp<IBinder> ServiceManagerShim::checkService(const String16& name) const
{
    sp<IBinder> ret;
    //checkService
    if (!mTheRealServiceManager->checkService(String8(name).c_str(), &ret).isOk()) {
        return nullptr;
    }
    return ret;
}
5.2.3 IServiceManager中getServerice流程 Bp->Bn
#include <android/os/BpServiceManager.h>
#include <android/os/BnServiceManager.h>
#include <binder/Parcel.h>
#include <android-base/macros.h>
namespace android {
namespace os {
BpServiceManager::BpServiceManager(const ::android::sp<::android::IBinder>& _aidl_impl)
    : BpInterface<IServiceManager>(_aidl_impl){
}
1. Bp端getService
::android::binder::Status BpServiceManager::getService(const ::std::string& name, ::android::sp<::android::IBinder>* _aidl_return) {
  ::android::Parcel _aidl_data;
  _aidl_data.markForBinder(remoteStrong());
  ::android::Parcel _aidl_reply;
  ::android::status_t _aidl_ret_status = ::android::OK;
  ::android::binder::Status _aidl_status;
  _aidl_ret_status = _aidl_data.writeInterfaceToken(getInterfaceDescriptor());
  if (((_aidl_ret_status) != (::android::OK))) {
    goto _aidl_error;
  }
2. write name
  _aidl_ret_status = _aidl_data.writeUtf8AsUtf16(name);
  if (((_aidl_ret_status) != (::android::OK))) {
    goto _aidl_error;
  }
3. BpBinder->transact
  _aidl_ret_status = remote()->transact(BnServiceManager::TRANSACTION_getService, _aidl_data, &_aidl_reply, 0);
  if (UNLIKELY(_aidl_ret_status == ::android::UNKNOWN_TRANSACTION && IServiceManager::getDefaultImpl())) {
     return IServiceManager::getDefaultImpl()->getService(name, _aidl_return);
  }
  if (((_aidl_ret_status) != (::android::OK))) {
    goto _aidl_error;
  }
  _aidl_ret_status = _aidl_status.readFromParcel(_aidl_reply);
  if (((_aidl_ret_status) != (::android::OK))) {
    goto _aidl_error;
  }
  if (!_aidl_status.isOk()) {
    return _aidl_status;
  }
  _aidl_ret_status = _aidl_reply.readNullableStrongBinder(_aidl_return);
  if (((_aidl_ret_status) != (::android::OK))) {
    goto _aidl_error;
  }
  _aidl_error:
  _aidl_status.setFromStatusT(_aidl_ret_status);
  return _aidl_status;
}
}  // namespace os
}  // namespace android

#include <android/os/BnServiceManager.h>
#include <binder/Parcel.h>
#include <binder/Stability.h>
namespace android {
namespace os {
BnServiceManager::BnServiceManager()
{
  ::android::internal::Stability::markCompilationUnit(this);
}
4.Bn->onTransact
::android::status_t BnServiceManager::onTransact(uint32_t _aidl_code, const ::android::Parcel& _aidl_data, ::android::Parcel* _aidl_reply, uint32_t _aidl_flags) {
  ::android::status_t _aidl_ret_status = ::android::OK;
  switch (_aidl_code) {
  case BnServiceManager::TRANSACTION_getService:
  {
    ::std::string in_name;
    ::android::sp<::android::IBinder> _aidl_return;
    if (!(_aidl_data.checkInterface(this))) {
      _aidl_ret_status = ::android::BAD_TYPE;
      break;
    }
5. read name
    _aidl_ret_status = _aidl_data.readUtf8FromUtf16(&in_name);
    if (((_aidl_ret_status) != (::android::OK))) {
      break;
    }
6.调用Bn端实现类getService
    ::android::binder::Status _aidl_status(getService(in_name, &_aidl_return));
    _aidl_ret_status = _aidl_status.writeToParcel(_aidl_reply);
    if (((_aidl_ret_status) != (::android::OK))) {
      break;
    }
    if (!_aidl_status.isOk()) {
      break;
    }
7.将reply write进去
    _aidl_ret_status = _aidl_reply->writeStrongBinder(_aidl_return);
    if (((_aidl_ret_status) != (::android::OK))) {
      break;
    }
  }
  break;
...
5.2.4 Server端getService介绍
最终会调用到Bn端。
Bn服务端
frameworks/native/cmds/servicemanager/ServiceManager.cpp
Status ServiceManager::checkService(const std::string& name, sp<IBinder>* outBinder) {
    *outBinder = tryGetService(name, false);
    return Status::ok();
}


sp<IBinder> ServiceManager::tryGetService(const std::string& name, bool startIfNotFound) {
    auto ctx = mAccess->getCallingContext();

    sp<IBinder> out;
    Service* service = nullptr;
//去mNameToService查找name名字的service
    if (auto it = mNameToService.find(name); it != mNameToService.end()) {
        service = &(it->second);

        if (!service->allowIsolated) {
            uid_t appid = multiuser_get_app_id(ctx.uid);
            bool isIsolated = appid >= AID_ISOLATED_START && appid <= AID_ISOLATED_END;

            if (isIsolated) {
                return nullptr;
            }
        }
        out = service->binder;
    }

    if (!mAccess->canFind(ctx, name)) {
        return nullptr;
    }

    if (!out && startIfNotFound) {
//启动服务
        tryStartService(name);
    }

    if (out) {
        // Setting this guarantee each time we hand out a binder ensures that the client-checking
        // loop knows about the event even if the client immediately drops the service
        service->guaranteeClient = true;
    }

    return out;
}


 1439
1439

 被折叠的 条评论
为什么被折叠?
被折叠的 条评论
为什么被折叠?
 到【灌水乐园】发言


