


2018-10.29
了解控制台,输出,数据类型
<!DOCTYPE html>
<html lang="en">
<head>
<meta charset="UTF-8">
<title>Title</title>
</head>
<body>
<!--输出-->
<script>
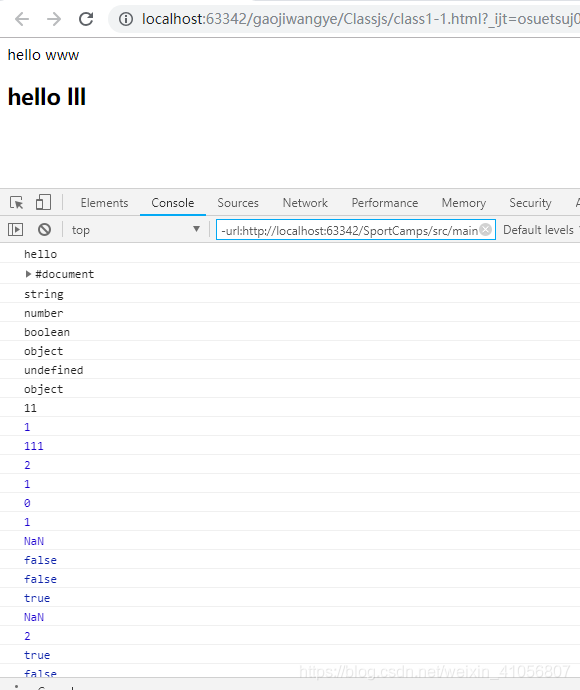
alert("hello world");//alert窗口还有confirm和prompt
document.write("hello www");
document.write("<h2>hello lll</h2>");
console.log("hello");//控制台输出日志。控制台是测试调控的作用,与用户无关
console.dir(document);//输出对象
</script>
<!--数据类型-->
<script>
var bar="hello world~";
var foo=9.6;
var bl=true;//true=1,false=0
//输出
console.log(typeof bar);//typeof类型 //写法二 console.log(typeof (bar));
console.log(typeof foo);
console.log(typeof bl);
console.log(typeof document);
console.log(typeof wangshuwei);
console.log(typeof null);//object
console.log("1"+1);//自动类型转换。数字转字符串.11
console.log("2"-1);//字符串转数值1
console.log("11"+2-1);//111
console.log(1+true);//2
console.log(1+false);//1
console.log(1-true);//0
console.log(1-false);//1
console.log(1-"true");//NAN
console.log(isNaN(9.6));//false
console.log(isNaN(false));//false
console.log(isNaN(NaN));//true
console.log(typeof 8%3);
console.log(8%3);
console.log(8%2==false);
console.log(8%2===false);//数值相等,数据类型相等
</script>
</body>
</html>
程序设计
question:输出和7无关的数组(100内)如7,17,27,28,70,71,72这些会被筛选出来
<!DOCTYPE html>
<html lang="en">
<head>
<meta charset="UTF-8">
<title>Title</title>
<!--程序结构-->
<style>
div{
div{
width: 50px;
height: 50px;
float: left;
border: 1px solid #eee;
margin: 7px;
font-size: 20px;
line-height: 50px;
text-align: center;
}
}
</style>
</head>
<body>
<script>
// var sum=0;
// for(var i=1;i<=100;i++){
// sum+=i;
// }
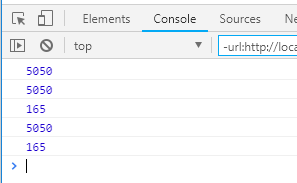
// console.log(sum);//5050
//
for (var i=1;i<=100;i++){
if (i<=70){
if(i%7==0||i%10==7||i/10==7){
document.write("<div>"+"guo"+" </div>");
}
else
document.write("<div>"+i+"</div>");
}else if(i>70&&i<=80){
document.write("<div>"+"guo"+" </div>");
}else if(i>80&&i<=100){
if(i%7==0||i%10==7||i/10==7){
document.write("<div>"+"guo"+" </div>");
}
else
document.write("<div>"+i+"</div>");
}
}
</script>
</body>
</html>

for和while循环
<!DOCTYPE html>
<html lang="en">
<head>
    <meta charset="UTF-8">
    <title>function</title>
</head>
<body>
<script>
    console.log(sum());
    function sum() {
        var tem=0;
        for (var i=0;i<=100;i++){
            tem+=i;
        }
        return tem;
    }
   // sum(10);
    console.log(sum());
</script>

<script>
    function sum1(m,n) {
        var tem1=0;
        for (var i=m;i<=n;i++){
            tem1+=i;
        }
        return tem1;
    }
    // sum1(10,20);
    console.log(sum1(10,20));
</script>

<script>
    function sum2() {
        var tem=0;
        var num=1;
        while(num<101) {
            tem+=num;
            num++;
        }
        return tem;
    }
    console.log(sum2());
</script>

<script>
    function sum3(m,n) {
        var tem1=0;
        var num=10;
        while(num<21) {
            tem1+=num;
            num++;
        }
        return tem1;
    }
    // sum1(10,20);
    console.log(sum3());
</script>
</body>
</html>
2018-11.1
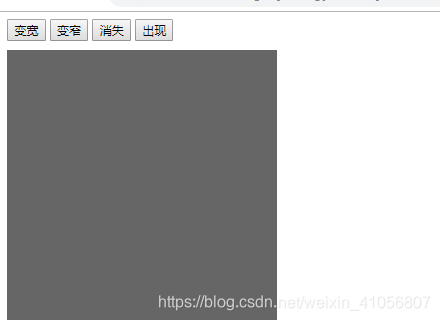
event事件
- box.style.width=“800px”;变宽
- box.style.width=“100px”;变窄
- box.style.display=“none”;消失(隐藏)
- box.style.display=“block”;出现
<!DOCTYPE html>
<html lang="en">
<head>
    <meta charset="UTF-8">
    <title>event基础</title>
    <style>
        #box{
            width: 300px;
            height: 300px;
            background-color: #666666;
            margin-top: 10px;
        }
    </style>
    <!--应用-->
</head>
<body>
<button onclick="bk()">变宽</button>
<button onclick="bz()">变窄</button>
<button onclick="hide()">消失</button>
<button onclick="appear()">出现</button>
<div id="box"></div>
<script>
    var box =document.getElementById('box');
    console.log(box);
    function bk() {
        box.style.width="800px";
    }
    function bz() {
        box.style.width="100px";
    }
    function hide() {
        box.style.display="none";
    }
    function appear() {
        box.style.display="block";
    }
</script>
</body>
</html>
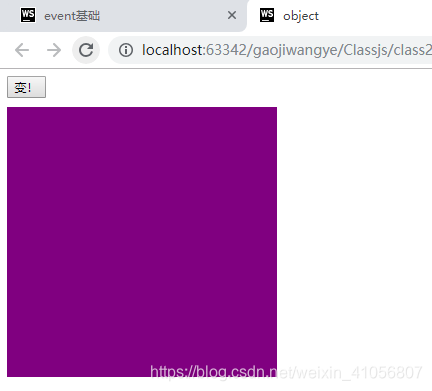
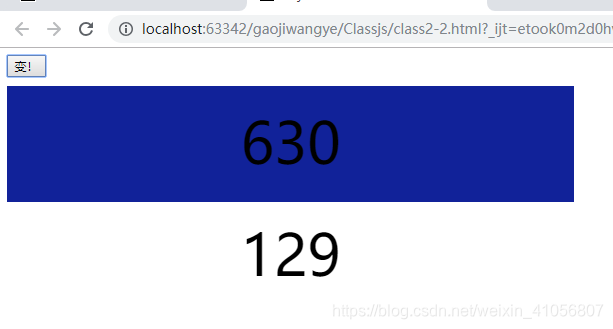
随机数
- box.innerHTML=“wangshuwei”;//修改文本内容
- box.innerHTML=Math.random();//0-1
- box.innerHTML=Math.random()*100;//0-100
- var w= box.innerHTML=Math.floor(Math.random()*300)+400;//300-700的随机数
- var h= box.innerHTML=Math.floor(Math.random()*900)+100;//最大899+100
<!DOCTYPE html>
<html lang="en">
<head>
    <meta charset="UTF-8">
    <title>object</title>
    <style>
        #box{
            width: 300px;
            height: 300px;
            background-color: purple;
            margin-top: 10px;
            font-size: 2em;
            text-align: center;
            line-height: 125px;
        }
    </style>
</head>
<body>
<button onclick="change()">变!</button>
<div id="box"></div>
<script>
    // window.onload=function () {
    //     var a=b=5;
    // }
    // console.log(typeof a);//undefined
    // console.log(typeof b);//undefined
    //全局变量
    function change() {
        var box=document.getElementById("box");//推荐使用双引号
        console.log(box);
        // alert("hello");
        // document.write("hello");
        // box.innerHTML="wangshuwei";
        // box.innerHTML=Math.random();//0-1
        // box.innerHTML=Math.random()*100;//0-100

        // box.innerHTML=Math.random()*300+400;
       var w= box.innerHTML=Math.floor(Math.random()*300)+400;//300-700的随机数
       //100-999
        var h= box.innerHTML=Math.floor(Math.random()*900)+100;//最大899+100
        box.innerHTML=w+"<br>"+h;
        box.style.width=w+"px";//每次随机宽度
        box.style.height=h+"px";
        box.style.backgroundColor="#"+h;
        box.style.fontSize=parseInt(w/10)+"px";
    }
</script>
</body>
</html>
点击后随机输出两个数字并且背景的大小和颜色也会改变

2018-11.5
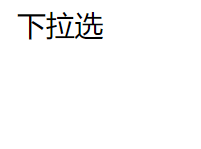
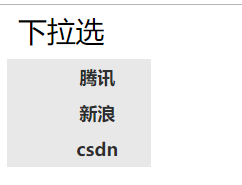
上节课练习题:
- 下拉选
<!DOCTYPE html>
<html lang="en">
<head>
    <meta charset="UTF-8">
    <title>Title</title>
    <!--js下拉菜单或tab选项卡-->
    <style>
        #menu{
            position: relative;
            width: 100px;
            height: 36px;
        }
        #box{
            position: absolute;
            top: 36px;
            width: 120px;
            height: 120px;
            /*left: -12px;*/
            background: #e8e8e8;
            display: none;
        }
        .xiala{
            width: 120px;
            height: 36px;
            text-align: center;
            padding: 0;
            margin: 0;
            font-size: 2em;
        }
        ul{
            list-style: none;
        }
        li{
            width: 120px;
            list-style: none;
            font-size: 20px;
            height: 40px;
            line-height: 40px;
            text-align: center;
        }
        a{
            text-decoration: none;
            color: #2e2e2e;
            font-weight: bold;

        }
    </style>
    <script>
        function showmenu() {
            var box = document.getElementById("box");
            box.style.display="block";
        }
        function hidemenu() {
            var box = document.getElementById("box");
            box.style.display="none";
        }
    </script>
</head>
<body>
    <div id="menu" onmouseover="showmenu()" onmouseout="hidemenu()">
        <div class="xiala">下拉选</div>
        <ul id="box">
            <li><a href="">腾讯</a></li>
            <li><a href="">新浪</a></li>
            <li><a href="">csdn</a></li>
        </ul>
    </div>
</body>
</html>
加载后:
鼠标放到div上
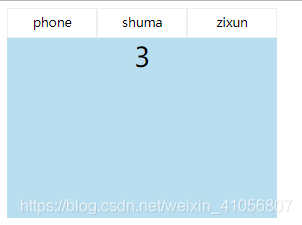
- 列表项
<!DOCTYPE html>
<html lang="en">
<head>
    <meta charset="UTF-8">
    <title>Title</title>
    <!--tab选项卡-->
    <style>
        ul{
            padding: 0;
            margin: 0;
            list-style: none;
        }
        #yuan-tab{
            width: 300px;
        }
        .tab-top{
            height: 33px;
        }
        .tab-top li{
            border: 1px solid #eeeeee;
            width: 98px;
            height: 31px;
            text-align: center;
            line-height: 31px;
            font-size: 14px;
            float: left;
        }
        .tab-content{
            height: 200px;
            font-size: 30px;
            text-align: center;
            clear: both;
            background-color: #b9def0;
        }
        .none{
            display: none;
        }
    </style>
    <script>
        function showtab(n) {
            var t1=document.getElementById("tab1");
            var t2=document.getElementById("tab2");
            var t3=document.getElementById("tab3");
            t1.style.display="none";
            t2.style.display="none";
            t3.style.display="none";
            if (n==1)
                t1.style.display="block";
            if(n==2)
                t2.style.display="block";
            if (n==3)
                t3.style.display="block";
        }
    </script>
</head>
<body>
    <div id="yuan-tab">
        <div class="tab-top">
            <ul>
                <li onmouseover="showtab(1)">phone</li>
                <li onmouseover="showtab(2)">shuma</li>
                <li onmouseover="showtab(3)">zixun</li>
            </ul>
        </div>
        <div id="tab1" class="tab-content">1</div>
        <div id="tab2"  class="tab-content none">2</div>
        <div id="tab3"  class="tab-content none">3</div>
    </div>
</body>
</html>
每次鼠标滑过不同的div会显示不同的数字


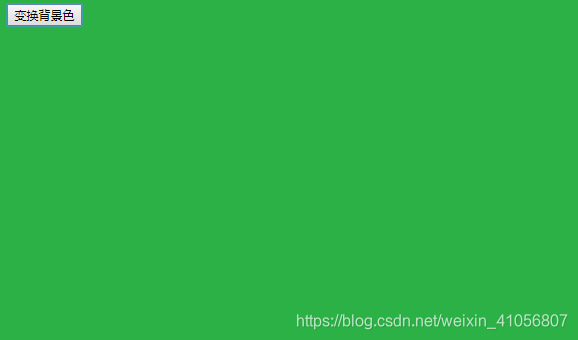
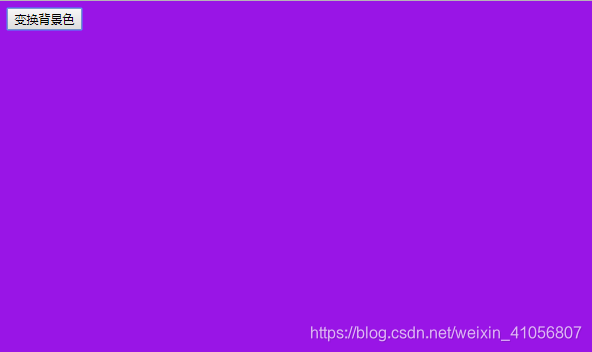
- 全屏背景颜色改变
<!DOCTYPE html>
<html lang="en">
<head>
    <meta charset="UTF-8">
    <title>Title</title>
    <!--全随机颜色——数组-->
    <script>
        function randomColor() {
            var arrNum=["0","1","2","3","4","5","6","7","8","9","a","b","c","d","e","f"];
            var arrFirst="#";
            var index;
            for (var i=0;i<6;i++){
                index=Math.floor(Math.random()*16);
                arrFirst+=arrNum[index];
            }
            return arrFirst;
        }
    </script>
</head>
<body>
<input type="submit" value="变换背景色" onclick="changeColor()">
<script>
    function changeColor() {
        document.bgColor=randomColor();
    }
</script>
</body>
</html>
初始状态
每次点击按钮会改变背景颜色
2018-11.5
数组
- 定义数组
//1.定义数组
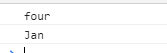
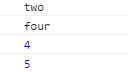
var arr = ["two","four",4,5];
var arr2=new Array();
arr2[0]="Jan";
console.log(arr[1]);
console.log(arr2[0]);
- 数组长度
  //1.定义数组
    var arr = ["two","four",4,5];
    var arr2=new Array();
    arr2[0]="Jan";
    console.log(arr[1]);
    console.log(arr2[0]);

    //2.数组长度
    console.log(arr.length);
    console.log(arr2.length);

    var arr3=new Array(5);//固定数组长度
    console.log(arr3.length);

- 输出数组2种方式
//1.定义数组
var arr = ["two","four",4,5];
var arr2=new Array();
arr2[0]="Jan";
console.log(arr[1]);
console.log(arr2[0]);
//3.输出数组2种
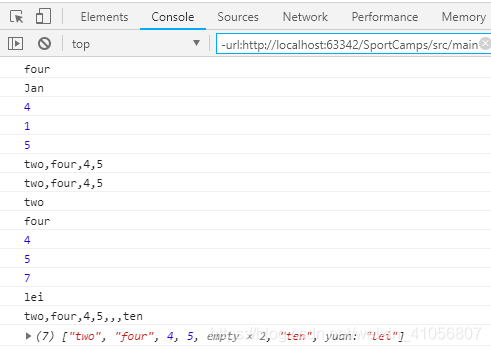
console.log(arr.join());
console.log(arr.toString());

- 数组循环,这里只写了一种for循环
 var arr = ["two","four",4,5];
 //4.数组循环——for
    for (var i=0;i<arr.length;i++){
        console.log(arr[i]);
    }
完整代码
<!DOCTYPE html>
<html lang="en">
<head>
    <meta charset="UTF-8">
    <title>Title</title>
</head>
<body>
<script>
    //1.定义数组
    var arr = ["two","four",4,5];
    var arr2=new Array();
    arr2[0]="Jan";
    console.log(arr[1]);
    console.log(arr2[0]);

    //2.数组长度
    console.log(arr.length);
    console.log(arr2.length);

    var arr3=new Array(5);//固定数组长度
    console.log(arr3.length);

    //3.输出数组2种
    console.log(arr.join());
    console.log(arr.toString());

    //4.数组循环——for
    for (var i=0;i<arr.length;i++){
        console.log(arr[i]);
    }
    arr[6]="ten";
    console.log(arr.length);

    arr["yuan"]="lei";
    // 可以输出
    console.log(arr["yuan"]);
    // 大多数循环循环不能把他循环粗来
    console.log(arr.toString());
    console.log(arr);
</script>
</body>
</html>
有关数组的操作
- arr.push(“23”);
- arr.pop();
- arr.shift();
- arr.unshift(“three”);
- console.log(arr.indexOf(“three”));
<!DOCTYPE html>
<html lang="en">
<head>
<meta charset="UTF-8">
<title>Title</title>
</head>
<body>
<script>
//1.定义数组
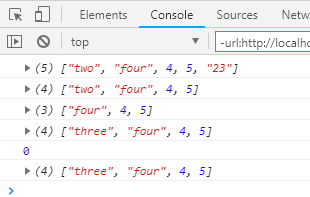
var arr = ["two","four",4,5];
// 单项链表-栈
arr.push("23");//加在队尾
console.log(arr);
arr.pop();//删除队尾最后一个
console.log(arr);
arr.shift();//把数组的第一个元素从其中删除,并返回第一个元素的值。
console.log(arr);
arr.unshift("three");//把这个元素作为第一个元素,添加到数组中
console.log(arr);
console.log(arr.indexOf("three"));//索引_返回数组项的下标
console.log(arr);
</script>
</body>
</html>
有关数组的方法
- arr.slice(1,5);从第一个元素(数组下标1)截取5个,包括1不包括5
- arr.splice(3,1);从第三个开始取,取一个(从0开始计数)
- 构造函数 console.log(arr.constructor);
<!DOCTYPE html>
<html lang="en">
<head>
<meta charset="UTF-8">
<title>Title</title>
</head>
<body>
<script>
//1.定义数组
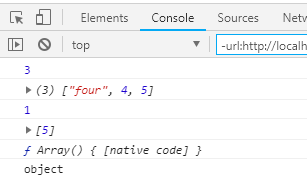
var arr = ["two","four",4,5];
//数组的方法
// 从第一个元素(数组下标1)截取5个,包括1不包括5
var narr = arr.slice(1,5);
console.log(narr.length);
console.log(narr);
// 从第三个开始取,取一个(从0开始计数)
var narr2=arr.splice(3,1);
console.log(narr2.length);
console.log(narr2);
//上面两个方法都返回新数组
//构造函数
console.log(arr.constructor);
console.log(typeof arr);//object
</script>
</body>
</html>
传递数据json
- 对象内可以定义方法
- 对象内的this是指该对象,必须通过this在对象的方法中调用该对象的属性
<!DOCTYPE html>
<html lang="en">
<head>
<meta charset="UTF-8">
<title>object</title>
</head>
<body>
<script>
// 传递数据json
var obj={
name:"yuan",
gender:"male",
sayname:function () {//对象内可以定义方法
//对象内的this是指该对象,必须通过this在对象的方法中调用该对象的属性
console.log("hello"+" "+this.name);
}
};
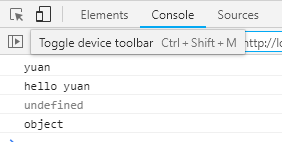
console.log(obj.name);
console.log(obj.sayname());
console.log(typeof obj);
</script>
</body>
</html>
值类型:数值,布尔,string字符串,null,undefined
引用类型:对象,数组,函数
<!DOCTYPE html>
<html lang="en">
<head>
    <meta charset="UTF-8">
    <title>对象本质</title>
</head>
<body>
<script>
    var obj1= new Object();
    obj1.value=88;
    obj2=obj1;
    obj2.value=66;

 	// var obj2=new Object();
    // obj2.value=66;
    // obj2=obj1;

    console.log(obj2.value);
    console.log(obj1.value);
</script>
</body>
</html>
作用域(全局和局部)
①
<!DOCTYPE html>
<html lang="en">
<head>
<meta charset="UTF-8">
<title>作用域</title>
</head>
<body>
<script>
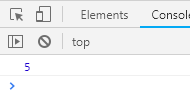
var foo=5;
function main() {
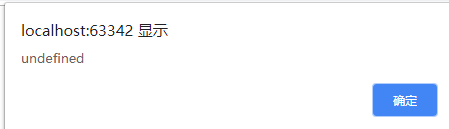
alert(foo);//undefined
var foo=2;
}
main();
</script>
</body>
</html>
<!DOCTYPE html>
<html lang="en">
<head>
    <meta charset="UTF-8">
    <title>作用域</title>
</head>
<body>
<script>
    var foo1=5;
    function main1() {

        var foo1=2;
        alert(foo1);
    }
    main1();
</script>
</body>
</html>
<!DOCTYPE html>
<html lang="en">
<head>
<meta charset="UTF-8">
<title>作用域</title>
</head>
<body>
<script>
(function () {
var a=b=5;
})();
// console.log(a);//undefined
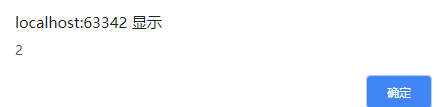
console.log(b);//5 b是全局变量
</script>
</body>
</html>
<!DOCTYPE html>
<html lang="en">
<head>
<meta charset="UTF-8">
<title>作用域</title>
</head>
<body>
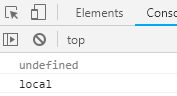
<script>
var s="global";
function t() {
console.log(s);//undefined
var s="local";
console.log(s);//local
}
t();
</script>
</body>
</html>
<!DOCTYPE html>
<html lang="en">
<head>
<meta charset="UTF-8">
<title>作用域</title>
</head>
<body>
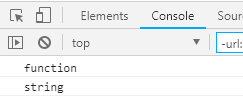
<script>
(function () {
var f;//声明
console.log(typeof f);
function f() {
}
f="f";//赋值 优先级比声明高——变量声明提升
console.log(typeof f);
})();
</script>
</body>
</html>
2018-11.9
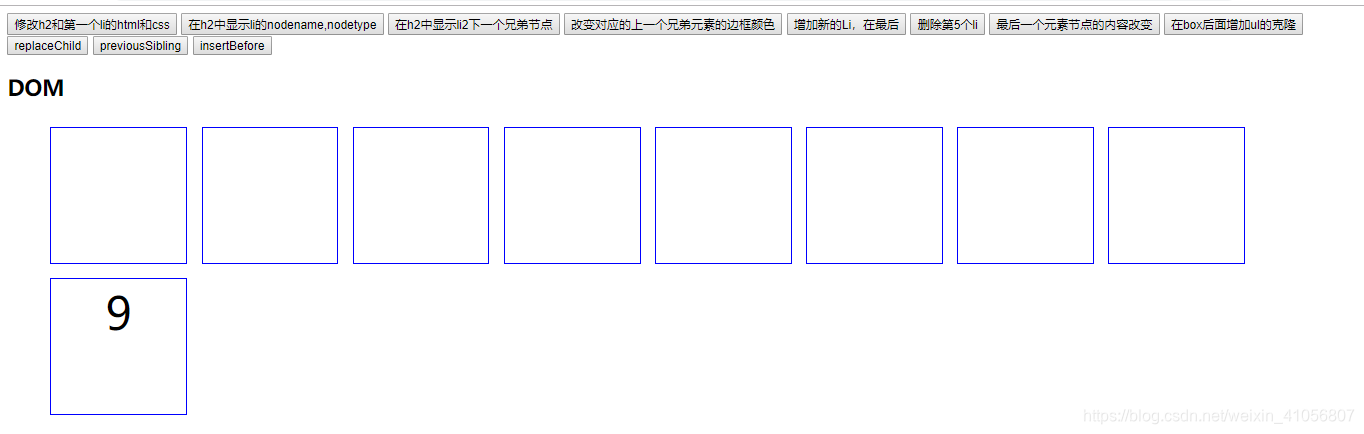
了解DOM元素节点的操作
代码:
<!DOCTYPE html>
<html lang="en">
<head>
    <meta charset="UTF-8">
    <title>Title</title>
    <style>
        .list {
            list-style: none;
            margin-top: 10px;
        }

        .list > li {
            width: 150px;
            height: 150px;
            border: 1px solid #0000FF;
            float: left;
            text-align: center;
            margin: 8px;
            line-height: 75px;
            font-size: 50px;
        }
    </style>

</head>
<body>
<div id="box">
    <button>修改h2和第一个li的html和css</button>
    <button>在h2中显示li的nodename,nodetype</button>
    <button>在h2中显示li2下一个兄弟节点</button>
    <button>改变对应的上一个兄弟元素的边框颜色</button>
    <button>增加新的Li,在最后</button>
    <button>删除第5个li</button>
    <button>最后一个元素节点的内容改变</button>
    <button>在box后面增加ul的克隆</button>
    <button>replaceChild</button>
    <button>previousSibling</button>
    <button>insertBefore</button>

    <h2>DOM</h2>
    <ul class="list" id="list">
        <li id="fineprint"></li>
        <li></li>
        <li></li>
        <li></li>
        <li></li>
        <li></li>
        <li></li>
        <li></li>
        <li id="headline">9</li>
        <!--<li></li>-->
        <!--<li></li>-->
    </ul>
</div>
<script>
    var box = document.querySelector("#box");//获得box,可查类,标签,返回数组
    //var box=document.getElementById("box");方法2
    //找到第一个指定的选择器
    console.log(box);
    var btn = box.getElementsByTagName("button");//查标签名如li,button
    //      btn是数组 collection
    var btn = box.querySelectorAll("button");//返回值是数组
    console.log(btn);
    var ul = box.getElementsByClassName("list")[0];
    //该方法再Html5规范中才提出,有浏览器兼容,返回值是一个集合
    console.log(ul);
    var li = ul.querySelectorAll("li");
    console.log(li);

    var h2 = box.querySelector("h2");
    btn[0].onclick = function () {
        h2.innerText = "你点击了第一个按钮";
        li[0].innerHTML = "*";
        li[0].boderColor = "blue";
        h2.style.cssText = "color:#fff;background:#c00";
    }
    btn[1].onclick = function () {

        h2.innerHTML = li[1].nodeName + " " + li[1].nodeType;//结点名,类型
        //NOdetype1元素结点,2属性节点,3文本节点
    }
    btn[2].onclick = function () {
        h2.innerText = li[2].nextSibling;//nextSibling下一个兄弟节点
        //在chrome和firefox和高版本的ie中,下一个兄弟元素是文本节点
        //,在低版本的ie中,下一个兄弟元素是Li
        //如果除去li之间的回车换行,则下一个兄弟元素li
    }
    btn[3].onclick = function () {
        li[3].previousElementSibling.style.borderColor = "red";//上一个元素兄第。不考虑文本节点

    }
    btn[4].onclick = function () {
        var nli = document.createElement("li");//创建一个Li元素
        nli.innerText = ul.getElementsByTagName("li").length + 1;
        ul.appendChild(nli);//在ul的最后增加nli,在前面增加insertBefore
    }
    btn[5].onclick = function () {
        li[5].parentNode.removeChild(li[5]);
        //删除一定要通过父节点删除
//					ul.removeChild(li[5]);
    }
    btn[6].onclick = function () {
        ul.lastElementChild.innerHTML = "last";
        //最后一个元素节点
    }
    btn[7].onclick = function () {
        box.appendChild(ul.cloneNode(true));
        //clonNode克隆节点,1表示子元素也同时克隆,true儿子也要
    }
    btn[8].onclick = function () {
        var list = document.getElementById("list");
        var message = document.getElementById("fineprint");
        var announcement = document.getElementById("headline");
        list.replaceChild(announcement,message);
    }
    btn[9].onclick = function () {
         h2.innerText = li[2].previousSibling;//在h2中显示li2上一个兄弟节点
    }
    btn[10].onclick = function () {
        var nli = document.createElement("li");//创建一个Li元素
        nli.innerText = ul.getElementsByTagName("li").length +1;
        ul.insertBefore(nli,li[0]);//在ul的最后增加nli,在前面增加insertBefore

    }
</script>

</body>
</html>
手风琴 ——DOM应用(1)
<!DOCTYPE html>
<html lang="en">
<head>
    <meta charset="UTF-8">
    <title>手风琴        ——DOM应用(1)</title>

    <style>
        dl,dd,dt{
            padding: 0;
            margin: 0;
        }
        .acd{
            width: 300px;
            border: 1px solid #269abc;
            /*内容决定高度*/
        }
        .acd > dt{
            line-height: 32px;
            height: 32px;
            text-align: center;
            font-size: 14px;
            color: #e8e8e8;
            background-color: #00e;
            border-bottom: 2px solid #2e2e2e;
            font-weight: bold;
        }
        .acd > dd{
            height: 200px;

            display: none;
        }
        .acd >.cur{
            background-color: #030;
            font-size: 14px;
        }
        .acd>dd:first-of-type{
            display: block;
        }
    </style>
</head>
<body>
<!--定义列表-->
<dl class="acd">
    <dt class="cur">H5</dt>
    <dd>这里是HTML5的描述</dd>
    <dt>CSS3</dt>
    <dd>这里是CSS3的描述</dd>
    <dt>JS</dt>
    <dd>这里是JavaScript的描述</dd>
    <dt>ES6</dt>
    <dd>这里是ES6的描述</dd>
    <dt>AJAX</dt>
    <dd>这里是AJAX的描述</dd>
</dl>
<script>
    // var acd = document.getElementsByClassName()
    var acd = document.querySelector(".acd");
    console.log(acd);
    var dt = acd.getElementsByTagName("dt");//类数组
    // var dd = acd.getElementsByTagName("dd");//类数组
    var dd =acd.querySelectorAll("dd");//数组

    for (var i=0;i<dt.length;i++){
        dt[i].onmouseover = function () {
            for (var j=0;j<dd.length;j++){
                dd[j].style.display="none";//隐藏所有

                dt[j].className="";
            }
            this.nextElementSibling.style.display="block";

            this.className="cur";
            // this.className+="cur";

        }
    }
</script>
</body>
</html>


Tab选项卡
<!DOCTYPE html>
<html lang="en">
<head>
    <meta charset="UTF-8">
    <title>Tab</title>
    <style>
        .tab{
            width: 482px;
        }
        .ttitle{
            height: 32px;
            border-bottom: 1px solid #c00;
        }
        .ttitle span{
            width: 120px;
            height: 32px;
            float: left;
            /*浮动时行内元素变盒子元素*/
            line-height: 32px;
            font-size: 14px;
            text-align: center;
        }
        .ttitle>.cur{
            border: 1px solid #c00;
            border-bottom: none;
            color: #2e2e2e;
            font-size: 14px;
            font-weight: bold;
            background-color: #fff;
        }
        .tc{
            height: 300px;
            border: 1px solid #c00;
            border-top: none;
            font-size: 24px;
            line-height: 300px;
            text-align: center;
            display: none;
        }

        .show{
            display: block;
        }
    </style>
</head>
<body>
<div class="tab">
    <div class="ttitle">
        <span class="cur">China</span>
        <span>Foreign</span>
        <span>video</span>
        <span>video</span>
    </div>
    <div class="tc show">tc1</div>
    <div class="tc">tc2</div>
    <div class="tc">tc3</div>
    <div class="tc">tc4</div>

</div>

<script>
    var tab = document.querySelector(".tab");
    var ttitle = tab.querySelector(".ttitle");
    var span= ttitle.getElementsByTagName("span");
    var tc = tab.querySelectorAll(".tc");

    for (var i=0;i<span.length;i++){
        span[i].index = i;
        span[i].onmouseover = function () {
            for (var j=0;j<span.length;j++){
                tc[j].style.display = "none";
                span[j].className="";
            }

            tc[this.index].style.display = "block";//tc内变化
            this.className="cur";
        }
    }
</script>
</body>
</html>


2018-11.15
实现多个手风琴效果
<!DOCTYPE html>
<html lang="en">
<head>
    <meta charset="UTF-8">
    <title>手风琴        ——DOM应用(1)</title>

    <style>
        dl,dd,dt{
            padding: 0;
            margin: 0;
        }
        .acd{
            width: 300px;
            border: 1px solid #269abc;
            /*内容决定高度*/
        }
        .acd > dt{
            line-height: 32px;
            height: 32px;
            text-align: center;
            font-size: 14px;
            color: #e8e8e8;
            background-color: #00e;
            border-bottom: 2px solid #2e2e2e;
            font-weight: bold;
        }
        .acd > dd{
            height: 200px;

            display: none;
        }
        .acd >.cur{
            background-color: #030;
            font-size: 14px;
        }
        .acd>dd:first-of-type{
            display: block;
        }
    </style>
</head>
<body>
<!--定义列表-->
<dl class="acd">
    <dt class="cur">H5</dt>
    <dd>这里是HTML5的描述</dd>
    <dt>CSS3</dt>
    <dd>这里是CSS3的描述</dd>
    <dt>JS</dt>
    <dd>这里是JavaScript的描述</dd>
    <dt>ES6</dt>
    <dd>这里是ES6的描述</dd>
    <dt>AJAX</dt>
    <dd>这里是AJAX的描述</dd>
</dl>

<dl class="acd" style="margin-top: 100px">
    <dt class="cur">H5</dt>
    <dd>这里是HTML5的描述</dd>
    <dt>CSS3</dt>
    <dd>这里是CSS3的描述</dd>
    <dt>JS</dt>
    <dd>这里是JavaScript的描述</dd>
    <dt>ES6</dt>
    <dd>这里是ES6的描述</dd>
    <dt>AJAX</dt>
    <dd>这里是AJAX的描述</dd>
</dl>
<script>
    var acd = document.querySelectorAll(".acd");
    console.log(acd);
    var dt = document.getElementsByTagName("dt");//类数组
    var dd = document.querySelectorAll("dd");//数组
    for (var i=0;i<dt.length;i++){
        dt[i].onmouseover = function () {
            for (var j=0;j<dd.length;j++){
                dd[j].style.display="none";//隐藏所有
                dt[j].className="";
            }
            console.log(this);
            this.nextElementSibling.style.display="block";
            this.className="cur";
            // this.className+="cur";
        }
    }
</script>
</body>
</html>


实现多个tab选项卡
<!DOCTYPE html>
<html lang="en">
<head>
    <meta charset="UTF-8">
    <title>Tab</title>
    <style>
        .tab{
            width: 482px;
            /*height: 334px;*/
        }
        .ttitle{
            height: 32px;
            border-bottom: 1px solid #c00;
        }
        .ttitle span{
            width: 120px;
            height: 32px;
            float: left;
            /*浮动时行内元素变盒子元素*/
            line-height: 32px;
            font-size: 14px;
            text-align: center;
        }
        .ttitle>.cur{
            border: 1px solid #c00;
            border-bottom: none;
            color: #2e2e2e;
            font-size: 14px;
            font-weight: bold;
            background-color: #fff;
        }
        .tc{
            height: 300px;
            border: 1px solid #c00;
            border-top: none;
            font-size: 24px;
            line-height: 300px;
            text-align: center;
            display: none;
        }

        .show{
            display: block;
        }
    </style>
</head>
<body>
<div class="tab">
    <div class="ttitle">
        <span class="cur">China</span>
        <span>Foreign</span>
        <span>video</span>
        <span>video</span>
    </div>
    <div class="tc show">tc1</div>
    <div class="tc">tc2</div>
    <div class="tc">tc3</div>
    <div class="tc">tc4</div>

</div>
<div class="tab">
    <div class="ttitle" style="margin-top: 200px">
        <span class="cur">China</span>
        <span>Foreign</span>
        <span>video</span>
        <span>video</span>
    </div>
    <div class="tc show">tc1</div>
    <div class="tc">tc2</div>
    <div class="tc">tc3</div>
    <div class="tc">tc4</div>

</div>
<script>
    var tab = document.querySelectorAll(".tab");
    var ttitle = document.querySelectorAll(".ttitle");
    var span= document.getElementsByTagName("span");
    var tc = document.querySelectorAll(".tc");


    for (var i=0;i< 4;i++){
        span[i].index = i;
        span[i].onmouseover = function () {
            for (var j=0;j<4;j++){
                tc[j].style.display = "none";
                span[j].className="";
            }
            tc[this.index].style.display = "block";//tc内变化
            this.className="cur";

        }
    }

    for (var i=4;i< 8;i++){
        span[i].index = i;
        span[i].onmouseover = function () {
            for (var j=4;j<8;j++){
                tc[j].style.display = "none";
                span[j].className="";
            }
            tc[this.index].style.display = "block";//tc内变化
            this.className="cur";
        }
    }

</script>
</body>
</html>

捕获还是冒泡事件
- dom2addeventlistener
- true捕获事件,false冒泡事件
- 可以批量增加事件
- 冒泡先响应子元素从下到上。都是从捕获到冒泡但是捕获是否响应可以自几决定。
- 捕获先响应父元素从上到下。
停止冒泡——一个方法必须要通过参数实现e.stopPropagation();
冒泡
<!DOCTYPE html>
<html lang="en">
<head>
<meta charset="UTF-8">
<title>事件</title>
<script>
</script>
</head>
<body>
<div id="box">
<h2><em>冒泡</em>还是捕获</h2>
</div>
<script>
var box= document.getElementById("box");
var h2= box.getElementsByTagName("h2")[0];//类数组
var em = h2.getElementsByTagName("em")[0];
//冒泡
console.log(em);
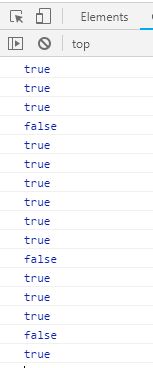
box.addEventListener("click",function () {
alert("box");
},false);//false是默认值——冒泡,true是捕获
h2.addEventListener("click",function () {
alert("h2");
},false);//false是默认值——冒泡,true是捕获
em.addEventListener("click",emf);//emf引用函数,emf()是函数的执行
function emf(e) {
alert("em");
//停止冒泡
// e.stopPropagation();
}
</script>
</body>
</html>
效果:
点击冒泡:
点击捕获:
现在把停止的函数从注释中打开( e.stopPropagation();)就点击冒泡就只有一个em了也就是停止了。
只有冒泡才能停止,停止冒泡!捕获没有!
捕获
<!DOCTYPE html>
<html lang="en">
<head>
    <meta charset="UTF-8">
    <title>事件</title>

    <script>

    </script>
</head>
<body>
<div id="box">
    <h2><em>冒泡</em>还是捕获</h2>

</div>
<script>
    var box= document.getElementById("box");
    var h2= box.getElementsByTagName("h2")[0];//类数组
    var em = h2.getElementsByTagName("em")[0];
    //捕获
    console.log(em);
    box.addEventListener("click",function () {
        alert("box");
    },true);//false是默认值——冒泡,true是捕获

    h2.addEventListener("click",function () {
        alert("h2");
    },true);//false是默认值——冒泡,true是捕获

    em.addEventListener("click",emf);//emf引用函数,emf()是函数的执行
    function emf() {
        alert("em");
    }
</script>
</body>
</html>
点击冒泡:
点击捕获:

手机事件
<!DOCTYPE html>
<html lang="en">
<head>
    <meta charset="UTF-8">
    <title>手机事件</title>
    <style>
        html{
            height: 100%;
        }
        body{
            height: 100%;
        }
        #box{
            height: 100%;
            background-color: #b9def0;
            font-size: 88px;
        }
        h2,body{
            margin: 0;
            padding: 0;
        }
    </style>
</head>
<body>
<div id="box">
    <h2>手机事件</h2>
</div>
<script>
    var box = document.querySelector("#box");
    var h2 = box.querySelector("h2");
    box.addEventListener("touchastart",ts);
    box.addEventListener("touchmove",tm);
    box.addEventListener("touchend",te);
    function ts(e) {
        h2.innerText="touchstart";
    }
    function tm(e) {
        // h2.innerText="touchmove";
        var touch = e.targetTouches[0];
        //手指在屏幕的位置
        var x = Math.floor(touch.pageX);
        var y = Math.floor(touch.pageY);
        h2.innerText=x+" "+y
    }
    function te(e) {
        h2.innerText="touchend";
    }

</script>
</body>
</html>
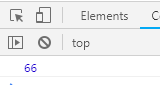
谷歌打开手机模式可以查看效果
得到焦点和失去焦点
<!DOCTYPE html>
<html lang="en">
<head>
    <meta charset="UTF-8">
    <title>Title</title>
    <style>
        #box{
            width: 500px;
            height: 6000px;
            border: 1px solid #b9def0;
            margin: 200px auto;
            padding: 100px;
        }
    </style>
</head>
<body>
<div id="box">
    <h2>事件</h2>
    <input type="text" value="请输入">
</div>
<script>
    var box = document.querySelector("#box");
    var h2 = box.querySelector("h2");
    var input = box.querySelector("input");
    //得到焦点
    // 表单placeholder
    input.onfocus = function () {
        this.value="focus";
    }
    //失去焦点
    input.onblur = function () {
        this.value="请输入...";
    }
    window.onscroll=function () {
        //兼容性写法,滚动条距上滚动的距离。滚动一定高度显示或隐藏菜单栏的效果
        var st = document.body.scrollTop||document.documentElement.scrollTop;
        console.log(st);
    }
    box.onmousemove=function (e) {
        // page相对页面,offset相对盒子这个父元素的距离
        h2,innerHTML=e.pageX+" "+e.pageY+"<br>"+e.offsetX+" "+e.offsetY;
    }

</script>
</body>
</html>
点击文本框的时候是得到焦点——
鼠标离开文本框
作业:
1.一个盒子,鼠标在盒子的左半部分的时候背景是蓝色,右边背景是绿色

<!DOCTYPE html>
<html lang="en">
<head>
    <meta charset="UTF-8">
    <title>Title</title>
    <style>
        #box{
            width: 500px;
            height: 6000px;
            border: 1px solid #b9def0;
            margin: 200px auto;
            padding: 100px;
        }
    </style>
</head>
<body>
<div id="box">
    <h2>事件</h2>
    <input type="text" value="请输入">
</div>
<script>
    var box = document.querySelector("#box");
    var h2 = box.querySelector("h2");
    var input = box.querySelector("input");

    box.onmousemove=function (e) {
        // page相对页面,offset相对盒子这个父元素的距离
        h2.innerHTML=e.pageX+" "+e.pageY+"<br>"+e.offsetX+" "+e.offsetY;
        var width=500;
        // client,
        if (e.offsetX<width/2){
            box.style.backgroundColor='blue';
        } else {
            box.style.backgroundColor='green';
        }
    }
</script>
</body>
</html>


作业2
一个盒子,鼠标在盒子的左半部分的时候左边显示左箭头,右盒子右边的时候右边显示右箭头
<!DOCTYPE html>
<html lang="en">
<head>
    <meta charset="UTF-8">
    <title>Title</title>
    <style>
        #box{
            width: 500px;
            height: 600px;
            background-color: #b9def0;
            margin: 200px auto;

        }
        .left{
            float: left;
            width: 250px;
            height: 100%;
            background-color: green;
        }
        .right{
            float: right;
            width: 250px;
            height: 100%;
            background-color: #8c8c8c;
        }
        .left,.right{
            font-size: 5em;
            text-align: center;
            font-weight: bold;
            line-height: 600px;
            display: none;
        }
    </style>
</head>
<body>
<div id="box">
    <div class="left">< -</div>
    <div class="right">- ></div>
</div>
<script>
    var box = document.querySelector("#box");
    var _left=document.getElementsByClassName("left")[0];
    var _right =document.getElementsByClassName("right")[0];
    box.onmousemove=function (e) {
        var width=500;
        if (e.offsetX<width/2){
            _left.style.display='block';
            _right.style.display='none';
        } else {
            _left.style.display='none';
            _right.style.display='block';
        }
    }
</script>
</body>
</html>
左边
右边


2018-11.19
js底层至少——原型链
prototype
prototype/面向对象
<!DOCTYPE html>
<html lang="en">
<head>
    <meta charset="UTF-8">
    <title>prototype/面向对象</title>
    <!--prototype对象共有的方法-->
</head>
<body>
<script>
    function  obj( ){
        this.a=0;
        this.fn=function(){
            console.log("fn");
        }
    }
    var o=new obj( );
    //o是对象的实例,obj是对象,类。
    console.log(o.a);//0
    o.fn();//fn
    console.dir(o);//obj包括a属性和fn这个函数还有_proto_这个属性
    console.log(o);//obj
    console.log(o.__proto__);//{constructor: ƒ}构造器,constructor: ƒ obj( ),__proto__: Object
    console.dir(obj);//ƒ obj( ),prototype: {constructor: ƒ},__proto__: ƒ ()
    console.log(obj.prototype);//{constructor: ƒ}
    console.log(obj.prototype==o.__proto__);//true函数的prototype和他的对象的_proto_一样
    //对象的实例prototype,等于对象实例的__proto__
    console.log(o instanceof obj);//obj instanceof Object函数;// true 实例obj在不在Object构造函数中(instanceof运算符用来判断一个构造函数的prototype属性所指向的对象是否存在另外一个要检测对象的原型链上)
    console.log(o.constructor);
    console.log(o.constructor==obj);//true//o是对象的实例==obj是对象,类。

    // prototype是属于对象的,不是实例
    obj.prototype.b=2;
    console.log(o.b);//o.constructor中也会增加b的属性

    //增加新的 方法,prototype定义的属性和方法是给整个类定义的方法属性。
    obj.prototype.hello=function () {
        console.log("hello");
    }
    o.hello();//hello

    o.b=3;
    console.log(o.b);//3

    var o2 = new obj();
    console.log(o2.b);//2
</script>

</body>
</html>

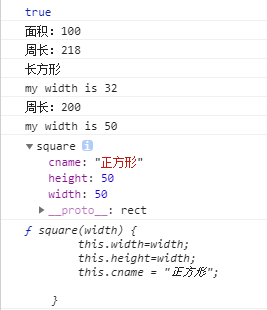
长方形(正方形继承长方形)
<!DOCTYPE html>
<html lang="en">
<head>
    <meta charset="UTF-8">
    <title>长方形</title>
    <!--js底层至少——原型链-->
</head>
<body>
<script>
    function rect(width,height) {
        this.width=width;
        this.height=height;//给类定义属性

        //给类定义方法
        this.zhouchang=function () {
            console.log("周长:"+2 * (this.width+this.height));
        }
        this.mianji=function () {
            console.log("面积:"+this.width*this.height);
        }
    }
    //实例化
    var rect1=new rect(10,10);
    var rect2 = new rect(32,77);
    console.log(rect1 instanceof rect);//true
    rect1.mianji();
    rect2.zhouchang();

    //扩展
    rect.prototype.cname="长方形";
    rect.prototype.sayWidth=function () {
        console.log("my width is "+this.width);
    }
    console.log(rect1.cname);
    rect2.sayWidth();


    //继承——有父对象的属性和方法
    function square(width) {
        this.width=width;
        this.height=width;
        this.cname = "正方形";

    }
    square.prototype=new rect();//把 rectangle方法和属性全部都给了square
    //新建正方形
    var square1= new square(50);
    square1.zhouchang();
    square1.sayWidth();

    console.log(square1);
    console.log(square);
    console.log(square1.__proto__);//相当于square的prototype,名字是rect()。指向正方形的方法

    console.log(square1.__proto__.__proto__);//相当于rect的prototype。指向父元素的prototype。rect()

    console.log(square1.__proto__.__proto__.__proto__);//指向rect的父元素的prototype即object

    console.log(square1.__proto__);//指向正方形的prototype的rect.prototype
    // console.log(square1.__proto__==rect.prototype);//obejct没有父元素,为null
    console.log(square1.__proto__.__proto__==rect.prototype);
    //_proto_的指向,
    // //对于实例,其指向其对应对象的prototype
    //对于对象,其指向其父对象的prototype

    console.log(rect.prototype);//所有的属性和方法
    console.log(rect.prototype==ob)
    // 判断一个变量是不是长方形
    console.log(square1 instanceof square);

    // ???????????????????????
    // 第二种继承方法
    function Square(width) {
        // 调用其他的方法call和apply
        rect.call(this,width,width);借调继承Rect
        rect.apply(this,[width,width]);//把宽度作为第二个参数以数组形式。改变this含义,rect方法的this是square里的this。来调用外边的方法
    }
    var square2 = new Square(20);
    square2.zhouchang();
    square2.sayWidth();
    //saywidth不能继承prototype

</script>
</body>
</html>

2018-11.23
正则表达式
<!DOCTYPE html>
<html lang="en">
<head>
    <meta charset="UTF-8">
    <title>正则表达式</title>
</head>
<body>
<script>
    var v = /[abc]/.test("a");
    console.log(v);//true
    // test:字符串中是否含有符合该正则表达式的内容true——false
    var v = /[abc]/.test("ad");
    console.log(v);//true
    var v = /[abc]d/.test("ad");
    console.log(v);//ad/bd/cd//true
    var v = /[^abc]d/.test("ad");
    console.log(v);//^不是abc//false
    var v = /[^abc]/.test("er");
    console.log(v);//true
    var v=/[a*bd]/.test("aaabd");
    console.log(v);//true *前的出现0次或一次以上
    var a=/[a+bd]/.test("bd");
    console.log(a);//false +前的出现1到多个
    var v=/[ab]?d/.test("ad");//ab只能选择一个
    console.log(v);//false
    var v=/a{3,6}/.test("aaaabd");
    console.log(v);//true

    var v=/\d{3,4}-\d{7,8}/.test("123-1234567");
    console.log(v);//true

    var v=/\d{3,4}-$\d{7,8}/.test("123-1234567");
    console.log(v);//flase

    var v=/\¥\d+\.?\d*/.test("¥12.5");//\d+出现多个,\.转义,?出现0或1次,\d*前的出现0次或一次以上
    console.log(v);//true

    var v=/\¥\d+\.?\d*/.test("¥12.");//\d+出现多个,\.转义,?出现0或1次,\d*前的出现0次或一次以上
    console.log(v);//true这里的弊端点后什么都没有也是true

    var v=/^[ab]d$/.test("ad");//\以a开始d结束
    console.log(v);
    var v=/^[ab]d$/.test("acd");//\以a开始d结束
    console.log(v);//false
    var v=/^[^ab]d$/.test("cd");//\以a开始d结束
    console.log(v);//true
</script>
</body>
</html>
<!DOCTYPE html>
<html lang="en">
<head>
<meta charset="UTF-8">
<title>Title</title>
</head>
<body>
<script>
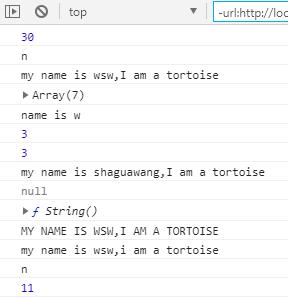
var str="my name is wsw,I am a tortoise";
console.log(str.length);//30算空格
str[3]="m";
console.log(str[3]);//n
console.log(str);//my name is wsw,I am a tortoise
var sarr=str.split(" ");//把字符串分开,用空格
console.log(sarr);//["my", "name", "is", "wsw,I", "am", "a", "tortoise"]
console.log(str.substring(3,12));//3到12【3,12)//name is w
console.log(str.search("name"));//返回他在字符串的位置//3
console.log(str.search(/[mn]ame/));
var nstr=str.replace("wsw","shaguawang");//只能替换一次
console.log(nstr);//my name is shaguawang,I am a tortoise
var nstr=str.replace(/wang/ig,"shaguawang");
//g是全局,可以替换所有,i是忽略大小写
//原字符串不变,产生新字符串
var marr=str.match(/wang/ig);//匹配
console.log(marr);
console.dir(String);
console.log(str.toUpperCase());//都变成大写
console.log(str.toLowerCase());//小写
console.log(str.charAt(3));//第三个字符//1,2,3
console.log(str.indexOf("wsw"));//从后往前(不算空格)
</script>
</body>
</html>
2018-11.26
定时器
- offsetHeightoffsetHeight盒子的高度,包括padding和border
- setTimeout定时器
- timer=window.setInterval(donghua,10);//第一种 只执行一次
- 此时没有停止,需要一个来关闭定时器,因为高度不能为负值 clearInterval(timer);
- ad.style.height=h+“px”;
<!DOCTYPE html>
<html lang="en">
<head>
    <meta charset="UTF-8">
    <title>定时器</title>
    <script>

    </script>
    <style>
        body{
            padding: 0;
            margin: 0;
        }
        #ad{
            height: 300px;
            background-color: greenyellow;
        }
    </style>
</head>
<body>
<div id="ad">

</div>
<script>
    var ad=document.getElementById("ad");
    var h=ad.offsetHeight;//offsetHeightoffsetHeight盒子的高度,包括padding和border
    console.log(h);//300带padding和border的高度(此时没有padding和border)
    var timer;

    //定时器
    setTimeout(function () {
        // ad.style.display="none";
        timer=window.setInterval(donghua,10);//第一种 只执行一次
        // timer=window.setInterval(donghua,5);变快
        //第二种 动画效果


    },3000);
    function donghua() {//每10ms执行一次这个操作
        // ad.style.height=--h+"px";
        // console.log(h);//此时没有停止,需要一个来关闭定时器,因为高度不能为负值
        if(h<0)
        {
            clearInterval(timer);
        }
        else
        {
            h=h-2
            ad.style.height=h+"px";
            console.log(h)
        }

    }
</script>
</body>
</html>
3s后消失


效果:
函数bc:文本框变长
函数bd:文本框变短
onfocus:得到焦点
onblur:失去焦点
<!DOCTYPE html>
<html lang="en">
<head>
    <meta charset="UTF-8">
    <title>Title</title>
    <style>
        #s{
            width: 100px;
            margin-left: 200px;
            /*border: none;*/
        }
    </style>
</head>
<body>
<div id="search">
    <input type="text" id="s">
</div>

<script>
    // 获得元素属性
    var search=document.querySelector("#search");
    //找到s_文本输入框
    var s=search.querySelector("#s");
    var w=s.offsetWidth-4;
	console.log(w);//103 _没有设置的时候border:none
    var ml=200;

    var timer1,timer2;
    //增加事件
    s.onfocus=function(){
        clearInterval(timer2)
        timer1=setInterval(bc,10);

    };
    s.onblur=function(){
        if(s.value==""){
            clearInterval(timer1);
            timer2=setInterval(bd,5)
        }

    };
    function bc()
    {
        if(w<250)
        {
            w=w+1;
            s.style.width=w+"px";
        }
        else{
            clearInterval(timer1)
        }
    }
    function bd(){
        if(w>100)
        {
            w=w-1;
            s.style.width=w+"px";
        }
        else{
            clearInterval(timer2)
        }
    }
</script>

</body>
</html>
得到焦点后:
失去焦点:


现在想让文本框向左移动
- s.style.marginLeft=–ml+“px”;//向左移动
- s.style.marginLeft=++ml+“px”;
<!DOCTYPE html>
<html lang="en">
<head>
    <meta charset="UTF-8">
    <title>Title</title>
    <style>
        #s{
            width: 100px;
            margin-left: 200px;
            /*border: none;*/
        }
    </style>
</head>
<body>
<div id="search">
    <input type="text" id="s">
</div>

<script>
    var search=document.querySelector("#search");
    var s=search.querySelector("#s");
    var w=s.offsetWidth-4;
    var ml=200;
    var timer1,timer2;
    s.onfocus=function(){
        clearInterval(timer2)
        timer1=setInterval(bc,10);

    }
    s.onblur=function(){
        if(s.value==""){
            clearInterval(timer1);
            timer2=setInterval(bd,5)
        }

    }
    function bc()
    {
        if(w<250)
        {
            w=w+1;
            s.style.width=w+"px";
            s.style.marginLeft=--ml+"px";//向左移动
        }
        else{
            clearInterval(timer1)
        }
    }
    function bd(){
        if(w>100)
        {
            w=w-1;
            s.style.width=w+"px";
            s.style.marginLeft=++ml+"px";
        }
        else{
            clearInterval(timer2)
        }
    }
</script>

</body>
</html>
得到焦点


2018-11.29
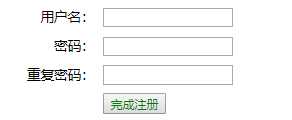
表单form校验
- 边输入边检查
- 美观
- 书写错误提示用户的时候温和
-
后台访问表单靠name,
-
action服务器响应文件php/server/nodejs开放接口
<form action="http://www.baidu.com" id="fm" name="fm" method="post">
注意:只有两个元素是HTML和JavaScript中不一样的。HTML中for——js中For。HTML中class——js中className
- for中内容是id
<label for="user">用户名:</label>
<input type="text" id="user" name="user" class="input">
- script写在form表单下面,所以执行次数:1之后结束,网页加载完毕执行一次
var user=document.getElementsByName("user")[0];//只有form表单有name,只能找表单var pwd=document.fm.pwd;//fm是form的name,pwd是控件name- 失去焦点时触发——onchange,表单控件发生变化(效果和onblur)
<!DOCTYPE html>
<html lang="en">
<head>
<meta charset="UTF-8">
<title>表单form校验</title>
<!--边输入边检查,-->
<!--美观-->
<!--书写错误提示用户的时候温和-->
<style>
ul{
list-style: none;
}
#fm li{
/*清浮*/
height: 32px;
line-height: 32px;
}
#fm label{
width: 150px;
text-align: right;
padding-right: 10px;
font-size: 15px;
float: left;
}
.input{
width: 140px;
float: left;
margin-top: 5px;
color: #269abc;
}
.error{
/*width: 120px;*/
float: left;
padding-left: 9px;
color: red;
font-weight: bold;
font-size: 12px;
display: none;
}
#fm li:last-child input{
margin-left: 160px;
color: green;
}
</style>
</head>
<body>
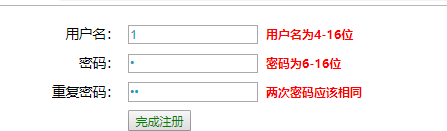
<form action="http://www.baidu.com" id="fm" name="fm" method="post" onsubmit="return checkform()">
<!--后台访问表单靠name-->
<!--action服务器响应文件php.server.nodejs开放接口-->
<ul>
<li>
<!--HTML中for——js中For-->
<!--HTML中class——jsclassName-->
<!--for里的内容是id-->
<label for="user">用户名:</label>
<input type="text" id="user" name="user" class="input">
<span class="error">用户名为4-16位</span>
</li>
<li>
<label for="pwd">密码:</label>
<input type="password" id="pwd" name="pwd" class="input">
<span class="error">密码为6-16位</span>
</li>
<li>
<label for="pwd2">重复密码:</label>
<input type="password" id="pwd2" name="pwd2" class="input">
<span class="error">两次密码应该相同</span>
</li>
<li>
<input type="submit" value="完成注册">
</li>
</ul>
</form>
<script>
// 执行次数:1之后结束,网页加载完毕执行一次
var fm=document.getElementById("fm");
var user=document.getElementsByName("user")[0];//只有form表单有name,只能找表单
var pwd=document.fm.pwd;//fm是form的name,pwd是控件name
var pwd2=fm.querySelector("#pwd2");
var span = fm.getElementsByClassName("error");
// console.log(span);//HTMLCollection(3) [span.error, span.error, span.error]
// 失去焦点时触发——onchange,表单控件发生变化
//检查用户名
//代码复用
user.onchange=checkuser;//函数的引用。不能写checkuser()
function checkuser() {
if (user.value.length>6&&user.value.length<14){
span[0].style.display="none";//正确隐藏错误
return 1;
} else {
span[0].style.display="block";
}
}
//检查密码
//函数的引用。不能写checkuser()
pwd.onchange=checkpwd;
function checkpwd() {
if (pwd.value.length>4&&pwd.value.length<16){
span[1].style.display="none";//正确隐藏错误
return 1;
} else {
span[1].style.display="block";
return 0;
}
}
pwd2.onchange=checkpwd2;
function checkpwd2() {
if (pwd2.value==pwd.value){
span[2].style.display="none";//正确隐藏错误
return 1;
} else {
span[2].style.display="block";
return 0;
}
}
function checkform() {
var rs=checkuser()*checkpwd()*checkpwd2();//检查是否有错误
if (rs==0) return false;
else return true;
}
</script>
</body>
</html>
2018-12.3
表单验证练习
(模拟博客园注册页面)
onchange="checkEmail(this);邮箱<span class="error"></span>错误提示- DOM获取元素
var registerForm=document.getElementById("registerForm");
    // var Email=document.getElementById("Email");
    var PhoneNum=document.getElementById("PhoneNum");
    var Password=document.getElementById("Password");
    var ConfirmPassword=document.getElementById("ConfirmPassword");

    var span = registerForm.getElementsByClassName("error");
var re = /^[a-zA-Z0-9_.-]+@[a-zA-Z0-9-]+(\.[a-zA-Z0-9-]+)*\.[a-zA-Z0-9]{2,6}$/;邮箱验证if (PhoneNum.value.length==11){电话号码if (Password.value.length>=8&&Password.value.length<16){密码设置if (ConfirmPassword.value==Password.value){确认密码
完整代码——表单验证
<!DOCTYPE html>
<html lang="en">
<head>
    <meta charset="UTF-8">
    <title></title>
    <link rel="stylesheet" href="css/bootstrap.css">
    <link rel="stylesheet" href="css/bootstrap-theme.css">
    <style>
        input[name=IsPhone] {
            display: none
        }

        .form-padding {
            padding-right: 65px
        }

        .form-space-top {
            height: 25px
        }

        .title-top {
            padding: 0;
            font-size: 21px
        }

        .register-sign {
            margin-top: 20px;
            text-align: center;
            font-size: 13px
        }

        .look-agreeon {
            text-decoration: underline
        }

        .space-line-height {
            height: 20px
        }

        .side-img-box {
            height: 300px;
            position: relative;
            padding-left: 0;
            margin-top: 22px
        }

        .side-line {
            position: absolute;
            height: 100%;
            left: -20px;
            padding: 15px 0 15px 0
        }

        .side-line > div {
            width: 1px;
            height: 100%;
            background-color: #eee
        }

       img {
            position: relative;
           width: 100%;
           top: 59%;
            transform: translateY(-50%);
            border-radius: 8px
        }

        .mobile-control-wrap {
            display: flex
        }

        .country-code {
            width: 52px;
            text-align: right
        }

        .mobile-num {
            margin-left: 10px
        }
        .field-validation-error{
            display: none;
        }
    </style>
</head>
<body>
<div class="container body-box" style="height: 567px;">
<div class="hidden-xs title-top col-sm-12">
    注册新用户
    <hr class="head-hr">
</div>

<div class="form-wrap">
    <form class="form-horizontal col-sm-8 form-padding" role="form" id="registerForm" name="registerForm" method="post" onsubmit="return false">
        <div class="form-space-top hidden-xs"></div>
        <!--每一行-->
        <!--邮箱-->
        <div class="form-group">
            <div class="col-sm-2 control-label">
                <label class="w4-2" for="Email">邮箱</label>
            </div>
            <div class="col-sm-10 has-feedback">
                <input class="form-control Email input-validation-error" onchange="checkEmail(this);" placeholder="需要通过邮件激活帐户" type="email" id="Email" name="Email" value="">
                <div class="text-danger field-validation-error">
                    <span id="Email-error" class="error">邮箱格式错误</span>
                </div>
            </div>
        </div>
        <!--手机号码-->
        <div class="form-group">
            <div class="col-sm-2 control-label">
                <label class="w4-4" for="PhoneNum">手机号码</label>
            </div>
            <div class="col-sm-10 has-feedback">
                <div class="mobile-control-wrap">
                    <input class="form-control country-code" type="text" id="CountryCode" name="CountryCode" value="+86">
                    <input class="form-control mobile-num" placeholder="激活帐户需要手机短信验证" type="text" id="PhoneNum" name="PhoneNum" value="">
                    <div class="text-danger">
                        <span  class="error">手机号码为11位!</span>
                    </div>
                </div>

            </div>
        </div>
        <!--登录名称-->
        <div class="form-group">
            <div class="col-sm-2 control-label">
                <label class="w4-4" for="LoginName">登录名称</label>
            </div>

            <div class="col-sm-10 has-feedback">
                <input class="form-control" placeholder="登录用户名,不少于4个字符" type="text" id="LoginName" name="LoginName" value="">
                <span class="text-danger" ></span>
                    <!--<span id="LoginName-error" class="">登录用户名已被使用!</span>-->
            </div>

        </div>
        <!--显示名称-->
        <div class="form-group">
            <div class="col-sm-2 control-label">
                <label class="w4-4" for="DisplayName">显示名称</label>
            </div>
            <div class="col-sm-10 has-feedback">
                <input class="form-control" placeholder="即昵称,不少于2个字符" type="text" data-val="true" id="DisplayName" name="DisplayName" value="" >
                <!--<span class="text-danger">-->
                    <!--<span id="DisplayName-error" class="">显示名称已被使用!</span>-->
                <!--</span>-->
            </div>
        </div>
        <!--密码-->
        <div class="form-group">
            <div class="col-sm-2 control-label">
                <label class="w4-2" for="Password">密码</label>
            </div>
            <div class="col-sm-10 has-feedback">
                <input class="form-control" placeholder="至少8位,不少于16位" type="password"
                     id="Password" name="Password" >
                <div class="text-danger" >
                    <span id="Password-error" class="error">至少8位,不多于16位</span>
                </div>
            </div>
        </div>
        <!--确认密码-->
        <div class="form-group">
            <div class="col-sm-2 control-label">
                <label class="w4-4" for="ConfirmPassword">确认密码</label>
            </div>
            <div class="col-sm-10 has-feedback">
                <input class="form-control valid" placeholder="请输入确认密码" type="password" id="ConfirmPassword" name="ConfirmPassword">
                <div class="text-danger">
                    <span  class="error">两次密码输入不一致</span>
                </div>
                <span class="glyphicon form-control-feedback"></span>
            </div>
        </div>

        <!--注册按钮-->
        <div class="form-group">
            <div class="col-sm-offset-2 col-sm-10">
                <button id="submitBtn" type="submit" class="btn center-block">
                    <span class="ladda-label">注册</span>
                </button>
            </div>
        </div>
        <!--协议提示-->
        <div class="col-sm-offset-2 register-sign">
            <span class="k">*</span> “注册” 按钮,即表示您同意并愿意遵守 <a class="look-agreeon" target="_blank" href="//passport.cnblogs.com/agreement.html">用户协议</a>。
        </div>
        <!--hidden-->
    </form>
    <div class="hidden-xs col-sm-4 side-img-box">
        <div class="side-line">
            <div></div>
        </div>
        <img src="img/pic.jpg">
    </div>
</div>
</div>
<script>
    var registerForm=document.getElementById("registerForm");
    // var Email=document.getElementById("Email");
    var PhoneNum=document.getElementById("PhoneNum");
    var Password=document.getElementById("Password");
    var ConfirmPassword=document.getElementById("ConfirmPassword");

    var span = registerForm.getElementsByClassName("error");
    // var emailStr = Email.value;
    // Email.onchange=checkEmail(emailStr);
    function checkEmail(str) {
        var emailStr = str.value;
        // var re = /^[A-Za-z0-9\u4e00-\u9fa5]+@[a-zA-Z0-9_-]+(\.[a-zA-Z0-9_-]+)+$/;
        // var re=/^[a-zA-Z0-9_-]+@[a-zA-Z0-9_-]+(\.[a-zA-Z0-9_-]+)+$/;
        // var re=/^[a-zA-Z0-9]+@[a-zA-Z0-9]+\.[a-zA-Z0-9]+$/;
        var re = /^[a-zA-Z0-9_.-]+@[a-zA-Z0-9-]+(\.[a-zA-Z0-9-]+)*\.[a-zA-Z0-9]{2,6}$/;
        if (re.test(emailStr)) {
            // alert("ok");
            // console.log(1);
            span[0].style.display="none";//正确隐藏错误
            return 1;
        } else {
            // console.log(2);
            console.log(span);
            span[0].style.display="block";
            span[0].parentNode.style.display="block";

        }
    }

    PhoneNum.onchange=checknum;
    function checknum() {
        if (PhoneNum.value.length==11){
            span[1].style.display="none";//正确隐藏错误
            return 1;
        } else {
            span[1].style.display="block";
            span[1].parentNode.style.display="block";
            return 0;
        }
    }

    Password.onchange=checkpwd;
    function checkpwd() {
        if (Password.value.length>=8&&Password.value.length<16){
            span[2].style.display="none";//正确隐藏错误
            return 1;
        } else {
            span[2].style.display="block";
            span[2].parentNode.style.display="block";
            return 0;
        }
    }

    ConfirmPassword.onchange=checkpwd2;
    function checkpwd2() {
        if (ConfirmPassword.value==Password.value){
            span[3].style.display="none";//正确隐藏错误
            return 1;
        } else {
            span[3].style.display="block";
            span[3].parentNode.style.display="block";
            return 0;
        }
    }
</script>
</body>
</html>
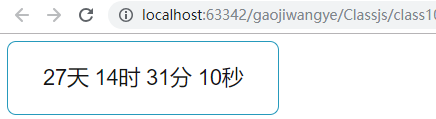
指定日期倒计时
<!DOCTYPE html>
<html lang="en">
<head>
    <meta charset="UTF-8">
    <title>js倒计时</title>
    <style>
        div{
            width: 300px;
            height: 80px;
            line-height: 80px;
            text-align: center;
            font-family:Helvetica, Microsoft YaHei, Arial, sans-serif;
            font-size:24px;
            margin-bottom:5px;
            color:#151515;
            border: 1px solid #269abc;
            border-radius: 10px 10px;
        }
    </style>
    <script type="text/javascript">
        function countTime() {
            var date = new Date();//获取当前时间
            var now = date.getTime();

            var endDate = new Date("2019-1-1 00:00:00");//设置截止时间
            var end = endDate.getTime();

            var leftTime = end-now;//时间差

            var d,h,m,s;//定义变量 d,h,m,s保存倒计时的时间
            if (leftTime>=0) {
                d = Math.floor(leftTime/1000/60/60/24);
                h = Math.floor(leftTime/1000/60/60%24);
                m = Math.floor(leftTime/1000/60%60);
                s = Math.floor(leftTime/1000%60);
            }

            document.getElementById("_d").innerHTML = d+"天";
            document.getElementById("_h").innerHTML = h+"时";
            document.getElementById("_m").innerHTML = m+"分";
            document.getElementById("_s").innerHTML = s+"秒";

            setTimeout(countTime,1000);

        }
    </script>
</head >
<body onload = "countTime()">
<div>
    <span id="_d">00</span>
    <span id="_h">00</span>
    <span id="_m">00</span>
    <span id="_s">00</span>
</div>

</body>
</html>


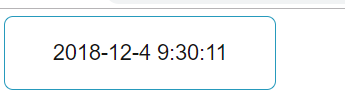
显示当前时间
<!DOCTYPE html>
<html lang="en">
<head>
    <meta charset="UTF-8">
    <title>Title</title>
    <style>
        div{
            width: 300px;
            height: 80px;
            line-height: 80px;
            text-align: center;
            font-family:Helvetica, Microsoft YaHei, Arial, sans-serif;
            font-size:24px;
            margin-bottom:5px;
            color:#151515;
            border: 1px solid #269abc;
            border-radius: 10px 10px;
        }
    </style>
</head>
<body>
<div id="show"></div>
<script>
    window.onload = function() {
        var show = document.getElementById("show");
        setInterval(function() {
            var time = new Date();   // 程序计时的月从0开始取值后+1
            var m = time.getMonth() + 1;
            var t = time.getFullYear() + "-" + m + "-"
                + time.getDate() + " " + time.getHours() + ":"
                + time.getMinutes() + ":" + time.getSeconds();
            show.innerHTML = t;
        }, 1000);
    };
</script>
</body>
</html>
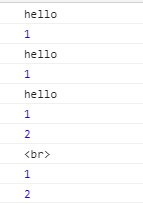
闭包_立即 执行函数
<!DOCTYPE html>
<html lang="en">
<head>
    <meta charset="UTF-8">
    <title>闭包_立即 执行函数</title>
</head>
<body>
<script>
    function a() {
        var n=0;//一个类实现共享——同static
        console.log("hello");
        return function () {
            console.log(++n);
        };
    }
    var b=a();//b变成这个函数的引用,初始化2.执行 console.log("hello");。之后b执行不再打印hello,实现闭包
    b();//1

    a()();//hello 1

    a()();//hello 1

    b();//2
    console.log("<br>");
</script>
<script>
    var add=(function () {
        var n=0;
        return function () {
            console.log(++n);
        }
    })();

    add();//1
    add();//2
    // 闭包函数被赋给应全局变量,这导致闭包函数始终在内存中,而闭包函数的存在依赖于a,因此a也始终在内存中,不会在调用结束后,被垃圾回收机制回收
</script>
</body>
</html>
获取浏览器url中查询字符串中的参数
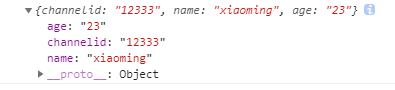
测试地址:http:///www.xx.com/study/misc.trim.html?channelid=12333&name=xiaoming&age=23
<!DOCTYPE html>
<html lang="en">
<head>
    <meta charset="UTF-8">
    <title>Title</title>
    <!--获取浏览器url中查询字符串中的参数?-->
    <!--测试地址:http:///www.xx.com/study/misc.trim.html?channelid=12333&name=xiaoming&age=23-->
</head>
<body>
<script>

    var str="http://www.xx.com/study/misc.trim.html?channelid=12333&name=xiaoming&age=23";
    //逻辑在function中,return返回值不用输出console
    parseURL(str);//调用
    function parseURL(url) {
        var parts=url.split("?");//分割,按问好分割
        if (parts[0]==url)  return "";//

        var rs={};//返回json进行解析
        var paras=parts[1].split("&");
        // console.log(paras);//(3) ["channelid=12333", "name=xiaoming", "age=23"]
        for (var i=0;i<paras.length;i++){
            var arg = paras[i].split("=");
            rs[arg[0]] = arg[1];

        }
        return rs;
    }
    var href =parseURL(str);
    console.log(href);

    // var href1=new parseURL(str);
    // console.log(href1.toString());
</script>
</body>
</html>


 1万+
1万+


 被折叠的 条评论
为什么被折叠?
被折叠的 条评论
为什么被折叠?
 到【灌水乐园】发言


