


使用fer2013数据集,卷积神经网络实现人脸表情识别
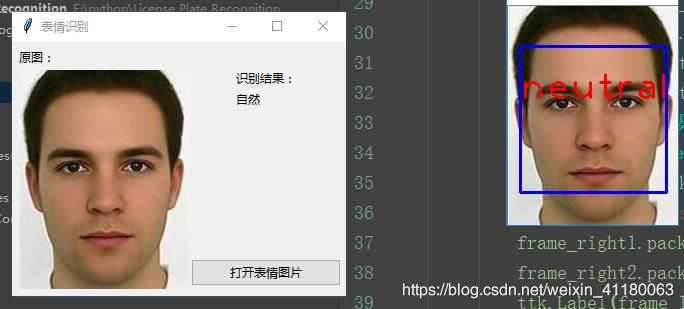
python与CNN实现,有GUI界面,支持摄像头实时识别和手动选取图片识别,GUI界面选取图片进行识别实现效果如下图

摄像头实时读取并识别表情结果如下图:


GUI界面代码如下:
import tkinter as tk
from tkinter.filedialog import *
from tkinter import ttk
import cv2
from PIL import Image, ImageTk
import time
from Picture_Expression import demo
import numpy as np
import tensorflow as tf

class Surface(ttk.Frame):
    pic_path = ""
    viewhigh = 300
    viewwide = 300
    update_time = 0
    thread = None
    thread_run = False
    camera = None


    def __init__(self, win):
        ttk.Frame.__init__(self, win)
        frame_left = ttk.Frame(self)
        frame_right1 = ttk.Frame(self)
        frame_right2 = ttk.Frame(self)
        win.title("表情识别")
        win.state("zoomed")
        self.pack(fill=tk.BOTH, expand=tk.YES, padx="5", pady="5")
        frame_left.pack(side=LEFT,expand=1,fill=BOTH)
        frame_right1.pack(side=TOP,expand=1,fill=tk.Y)
        frame_right2.pack(side=RIGHT,expand=0)
        ttk.Label(frame_left, text='原图:').pack(anchor="nw")
        from_pic_ctl = ttk.Button(frame_right2, text="打开表情图片", width=20, command=self.from_pic)
        self.image_ctl = ttk.Label(frame_left)
        self.image_ctl.pack(anchor="nw")
        self.roi_ctl = ttk.Label(frame_right1)
        self.roi_ctl.grid(column=0, row=1, sticky=tk.W)
        ttk.Label(frame_right1, text='识别结果:').grid(column=0, row=2, sticky=tk.W)
        self.r_ctl = ttk.Label(frame_right1, text="")
        self.r_ctl.grid(column=0, row=3, sticky=tk.W)
        from_pic_ctl.pack(anchor="se", pady="5")

    def get_imgtk(self, img_bgr):
        img = cv2.cvtColor(img_bgr, cv2.COLOR_BGR2RGB)
        im = Image.fromarray(img)
        imgtk = ImageTk.PhotoImage(image=im) # 文本框里插入图片
        wide = imgtk.width()
        high = imgtk.height()
        if wide > self.viewwide or high > self.viewhigh:
            wide_factor = self.viewwide / wide
            high_factor = self.viewhigh / high
            factor = min(wide_factor, high_factor)
            wide = int(wide * factor)
            if wide <= 0:
                wide = 1
            high = int(high * factor)
            if high <= 0:
                high = 1
            imgtk = ImageTk.PhotoImage(image=im)
        return imgtk

    def show_roi(self, text):
        if text :
            self.r_ctl.configure(text=str(text))
            self.update_time = time.time()
        elif self.update_time + 8 < time.time():
            self.roi_ctl.configure(state='disabled')
            self.r_ctl.configure(text="")

    def from_pic(self):
        self.thread_run = False
        self.pic_path = askopenfilename(title="选择识别图片", filetypes=[("jpg图片", "*.jpg")])
        img = cv2.imread(self.pic_path )
        img_1 = cv2.imdecode(np.fromfile(self.pic_path, dtype=np.uint8), cv2.IMREAD_COLOR)
        print(self.pic_path)
        if self.pic_path:
            self.imgtk = self.get_imgtk(img_1) # 将读取的图片插入调整大小并显示
            self.image_ctl.configure(image=self.imgtk)

            text = demo(img_1,FLAGS.checkpoint_dir, FLAGS.show_box)
            self.show_roi(text)
        print("run end")

def close_window():
    print("destroy")
    if surface.thread_run :
        surface.thread_run = False
        surface.thread.join(2.0)
    win.destroy()

if __name__ == '__main__':
    win=tk.Tk()
    surface = Surface(win)
    win.protocol('WM_DELETE_WINDOW', close_window)
    win.mainloop()
整个系统实现了从训练,到识别的整体流程,想要代码,可加v:mql13148


 9191
9191


 被折叠的 条评论
为什么被折叠?
被折叠的 条评论
为什么被折叠?
 到【灌水乐园】发言


