一、开启jpa审计

EnableJpaAuditingConfig.java

package com.imddy.tehuoexch.config;

import org.springframework.context.annotation.Configuration;
import org.springframework.data.jpa.repository.config.EnableJpaAuditing;

@EnableJpaAuditing
@Configuration
public class EnableJpaAuditingConfig {

}
  • 1.
  • 2.
  • 3.
  • 4.
  • 5.
  • 6.
  • 7.
  • 8.
  • 9.
  • 10.


二、在Entity对象添加对应属性和注解

在Entity对象添加对应属性

其中最主要的四个字段分别记录创建⼈、创建时间、最后修改⼈、最后修改时间。

    @CreatedDate
    @Basic
    @Column(name = "create_time", updatable = false)
    private LocalDateTime createTime;
    @LastModifiedDate
    @Basic
    @Column(name = "update_time")
    private LocalDateTime updateTime;
  • 1.
  • 2.
  • 3.
  • 4.
  • 5.
  • 6.
  • 7.
  • 8.
    @CreatedBy
    @Basic
    @Column(name = "create_by")
    private String createBy;

    @LastModifiedBy
    @Basic
    @Column(name = "update_by")
    private String updateBy;
  • 1.
  • 2.
  • 3.
  • 4.
  • 5.
  • 6.
  • 7.
  • 8.
  • 9.

还需要在Entity对象上天@EntityListeners

还需要在Entity对象上天@EntityListeners(AuditingEntityListener.class) 

@EntityListeners(AuditingEntityListener.class)
  • 1.


三、实现 AuditorAware 接⼝

实现 AuditorAware 接⼝,告诉 JPA 当前的⽤户是谁。

public class MyAuditorAware implements AuditorAware<Integer> {

    /**
     * 需要实现 AuditorAware 接⼝,返回当前的⽤户 ID
     */
    @Override
    public Optional<Integer> getCurrentAuditor() {
        return Optional.of(new Random().nextInt());
    }
}
  • 1.
  • 2.
  • 3.
  • 4.
  • 5.
  • 6.
  • 7.
  • 8.
  • 9.
  • 10.
public class CustomAuditor implements AuditorAware<String> {

    @Override
    public Optional<String> getCurrentAuditor() {
        // 这里可以添加自定义逻辑来返回当前的审计人员,比如从当前登录用户中获取
        return Optional.of("Custom Auditor");
    }
}
  • 1.
  • 2.
  • 3.
  • 4.
  • 5.
  • 6.
  • 7.
  • 8.
@Component
public class AuditorAwareImpl implements AuditorAware<Long> {
    /**
     * 返回当前用户ID,insert和update操作会调用该方法自动赋值
     */
    @Override
    public Optional<Long> getCurrentAuditor() {
        // 获取当前用户Id,具体获取逻辑请自行实现
        Long userId = 1L;
        return Optional.ofNullable(userId);
    }
}
  • 1.
  • 2.
  • 3.
  • 4.
  • 5.
  • 6.
  • 7.
  • 8.
  • 9.
  • 10.
  • 11.
  • 12.

这⾥关键的⼀步,是实现 AuditorAware 接⼝的⽅法,如下所示:

public interface AuditorAware<T> {
    T getCurrentAuditor(); 
}
  • 1.
  • 2.
  • 3.

这里其实可以通过SpringSecurityUtils.工具类来获取用户或者说获取用户ID。

我们需要开启 JPA 的 Auditing 功能(默认没开启)。这⾥需要⽤到的注解是 @EnableJpaAuditing,我们在第一步已经开启了。只有涉及到用户审计才需要编写AuditorAware<T>的实现类,这里可以配置下开启并把AuditorAware配置进来。代码如下:

@Configuration
@EnableJpaAuditing
public class JpaConfiguration {

    @Bean
    @ConditionalOnMissingBean(name = "myAuditorAware")
    MyAuditorAware myAuditorAware() {
        return new MyAuditorAware();
    }

}
  • 1.
  • 2.
  • 3.
  • 4.
  • 5.
  • 6.
  • 7.
  • 8.
  • 9.
  • 10.
  • 11.


四、在实体里面实现 Auditable 接口(第二种方式)

在 User 实体Entity对象,修改如下:

@Entity
@Data
@Builder
@AllArgsConstructor
@NoArgsConstructor
@EntityListeners(AuditingEntityListener.class)
public class User implements Auditable<Integer, Long, LocalDateTime> {

    @Id
    @GeneratedValue(strategy = GenerationType.AUTO)
    private Long id;
    private String name;
    private String email;
    @Enumerated(EnumType.STRING)
    private SexEnum sex;
    private Integer age;
    private boolean deleted;

    @CreatedBy
    private Integer createUserId;
    @CreatedDate
    private LocalDateTime createdDate;
    @LastModifiedBy
    private Integer lastModifiedUserId;
    @LastModifiedDate
    private LocalDateTime lastModifiedDate;

    @Override
    public Optional<Integer> getCreatedBy() {
        return Optional.ofNullable(this.createUserId);
    }

    @Override
    public void setCreatedBy(Integer createdBy) {
        this.createUserId = createdBy;
    }

    @Override
    public Optional<LocalDateTime> getCreatedDate() {
        return Optional.ofNullable(this.createdDate);
    }

    @Override
    public void setCreatedDate(LocalDateTime creationDate) {
        this.createdDate = creationDate;
    }

    @Override
    public Optional<Integer> getLastModifiedBy() {
        return Optional.ofNullable(this.lastModifiedUserId);
    }

    @Override
    public void setLastModifiedBy(Integer lastModifiedBy) {
        this.lastModifiedUserId = lastModifiedBy;
    }

    @Override
    public void setLastModifiedDate(LocalDateTime lastModifiedDate) {
        this.lastModifiedDate = lastModifiedDate;
    }

    @Override
    public Optional<LocalDateTime> getLastModifiedDate() {
        return Optional.ofNullable(this.lastModifiedDate);
    }

    @Override
    public boolean isNew() {
        return id == null;
    }
}
  • 1.
  • 2.
  • 3.
  • 4.
  • 5.
  • 6.
  • 7.
  • 8.
  • 9.
  • 10.
  • 11.
  • 12.
  • 13.
  • 14.
  • 15.
  • 16.
  • 17.
  • 18.
  • 19.
  • 20.
  • 21.
  • 22.
  • 23.
  • 24.
  • 25.
  • 26.
  • 27.
  • 28.
  • 29.
  • 30.
  • 31.
  • 32.
  • 33.
  • 34.
  • 35.
  • 36.
  • 37.
  • 38.
  • 39.
  • 40.
  • 41.
  • 42.
  • 43.
  • 44.
  • 45.
  • 46.
  • 47.
  • 48.
  • 49.
  • 50.
  • 51.
  • 52.
  • 53.
  • 54.
  • 55.
  • 56.
  • 57.
  • 58.
  • 59.
  • 60.
  • 61.
  • 62.
  • 63.
  • 64.
  • 65.
  • 66.
  • 67.
  • 68.
  • 69.
  • 70.
  • 71.
  • 72.

与第⼀种⽅式的差异是,这⾥我们要去掉上⾯说的四个注解,并且要实现接⼝ Auditable 的⽅法,代码会变得很冗余和啰唆。

⽽其他都不变,我们再跑⼀次刚才的测试⽤例,发现效果是⼀样的。从代码的复杂程度来看,这种⽅式我不推荐使⽤。那么我们再看⼀下第三种⽅式。


五、利用@MappedSuperclass 注解(第三种方式)

对象的多态的时候提到过这个注解,它主要是⽤来解决公共 BaseEntity 的问题,⽽且其代表的是继承它的每⼀个类都是⼀个独⽴的表。

我们先看⼀下 @MappedSuperclass 的语法

@Documented
@Target({TYPE})
@Retention(RUNTIME)
public @interface MappedSuperclass {
}
  • 1.
  • 2.
  • 3.
  • 4.
  • 5.

注解⾥⾯什么都没有,其实就是代表了抽象关系,即所有⼦类的公共字段⽽已。那么接下来我们看⼀下实例。

第⼀步:创建⼀个 BaseEntity,⾥⾯放⼀些实体的公共字段和注解。

@Data
@MappedSuperclass
@EntityListeners(AuditingEntityListener.class)
public class BaseEntity {
    
    @CreatedBy
    protected Integer createUserId;
    @CreatedDate
    protected LocalDateTime createdDate;
    @LastModifiedBy
    protected Integer lastModifiedUserId;
    @LastModifiedDate
    protected LocalDateTime lastModifiedDate;
}
  • 1.
  • 2.
  • 3.
  • 4.
  • 5.
  • 6.
  • 7.
  • 8.
  • 9.
  • 10.
  • 11.
  • 12.
  • 13.
  • 14.

注意: BaseEntity ⾥⾯需要⽤上⾯提到的四个注解,并且加上 @EntityListeners(AuditingEntityListener.class),这样所有的⼦类就不需要加了。

实际⼯作中,BaseEntity 可能还更复杂⼀点,⽐如说把 ID 和 @Version 加进去,会变成如下形式:

@Data
@MappedSuperclass
@EntityListeners(AuditingEntityListener.class)
public class BaseEntity {

    @Id
    @GeneratedValue(strategy = GenerationType.AUTO)
    protected Long id;
    @Version
    protected Long version;
    protected boolean deleted;
    
    @CreatedBy
    protected Integer createUserId;
    @CreatedDate
    protected LocalDateTime createdDate;
    @LastModifiedBy
    protected Integer lastModifiedUserId;
    @LastModifiedDate
    protected LocalDateTime lastModifiedDate;
}
  • 1.
  • 2.
  • 3.
  • 4.
  • 5.
  • 6.
  • 7.
  • 8.
  • 9.
  • 10.
  • 11.
  • 12.
  • 13.
  • 14.
  • 15.
  • 16.
  • 17.
  • 18.
  • 19.
  • 20.
  • 21.

第⼆步:实体直接继承 BaseEntity 即可。

@Entity
@Data
@Builder
@AllArgsConstructor
@NoArgsConstructor
@EntityListeners(AuditingEntityListener.class)
public class User extends BaseEntity {
    
    private String name;
    private String email;
    @Enumerated(EnumType.STRING)
    private SexEnum sex;
    private Integer age;

}
  • 1.
  • 2.
  • 3.
  • 4.
  • 5.
  • 6.
  • 7.
  • 8.
  • 9.
  • 10.
  • 11.
  • 12.
  • 13.
  • 14.
  • 15.

这样的话,User 实体就不需要关⼼太多,我们只关注⾃⼰需要的逻辑即可,如下:

去掉了 @EntityListeners(AuditingEntityListener.class);

去掉了 @CreatedBy、@CreatedDate、@LastModifiedBy、@LastModifiedDate 四个注解的公共字段。

接着我们再跑⼀下上⾯的测试⽤例,发现效果还是⼀样的。


六、Auditing 的实现原理

第⼀步:还是从 @EnableJpaAuditing ⼊⼿分析。

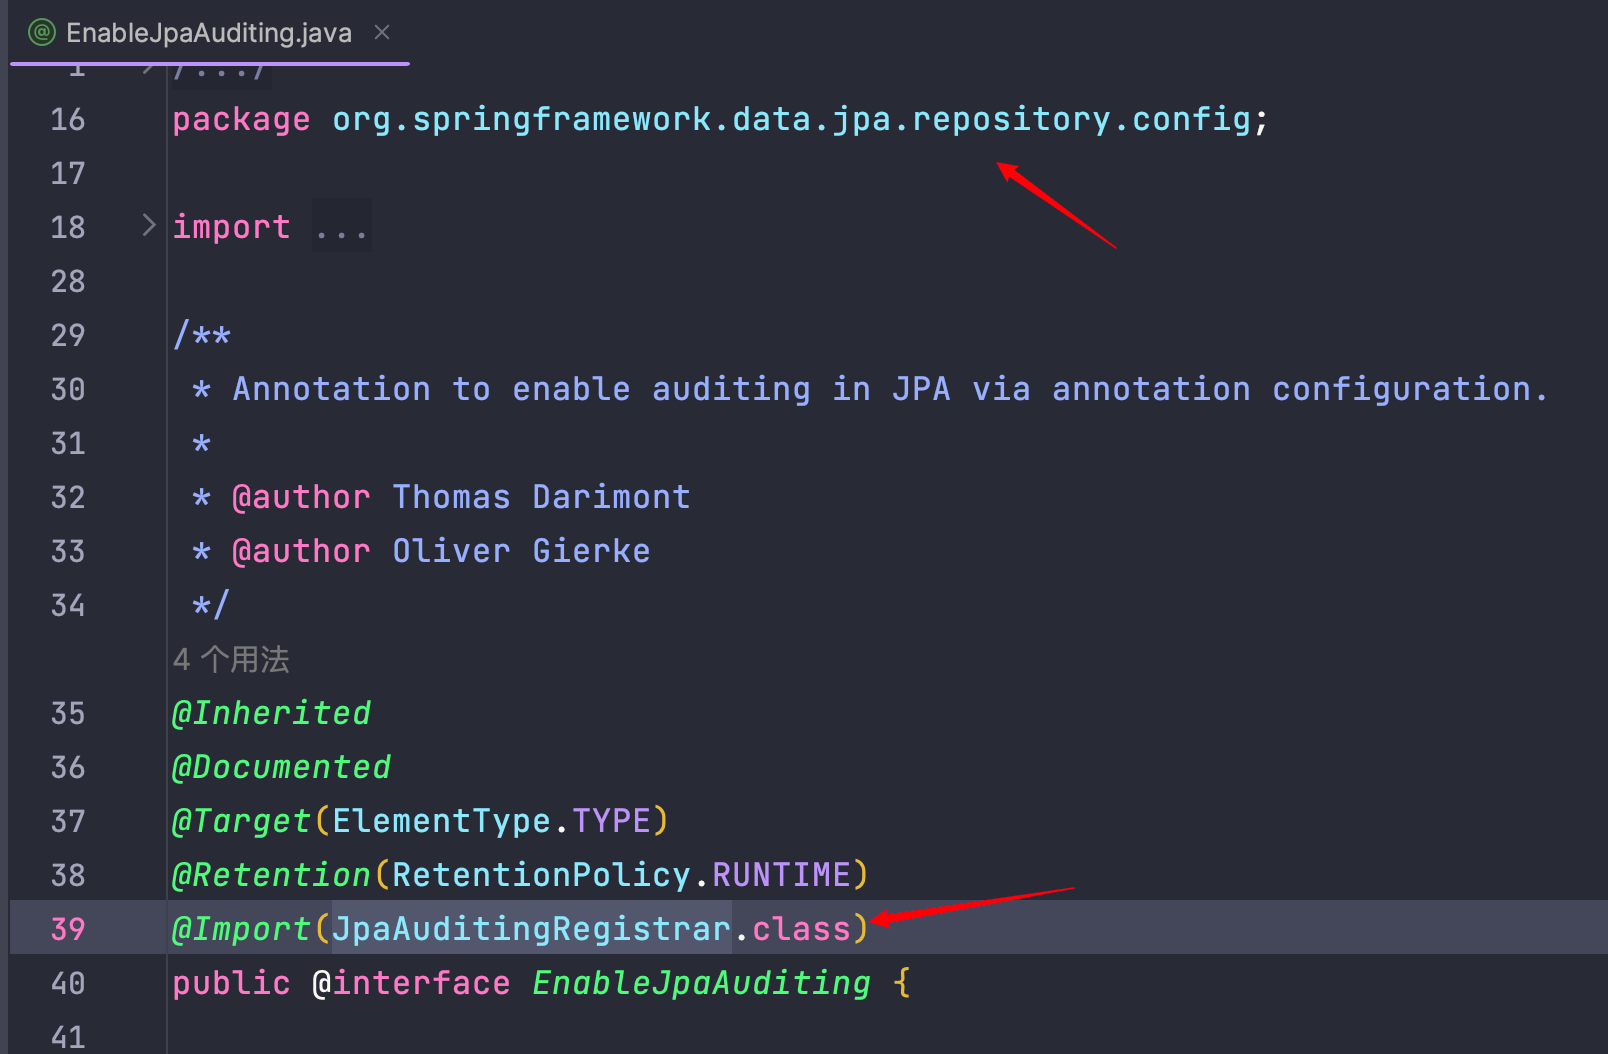
我们前⾯讲了它的使⽤⽅法,这次我们分析⼀下其加载原理,看下⾯的图:
springboot的jpa审计Auditing_当前用户

通过包名可以知道,⾸先 Auditing 这套封装是 Spring Data JPA 实现的,⽽不是 Java Persistence API 规定的,其注解⾥⾯还有⼀项重要功能就是 @Import(JpaAuditingRegistrar.class) 这个类,它帮我们处理 Auditing 的逻辑。

我们看其源码,⼀步⼀步地 debug 下去可以发现如下所示:

springboot的jpa审计Auditing_Data_02

进⼀步进⼊到如下⽅法中:

springboot的jpa审计Auditing_当前用户_03

可以看到 Spring 容器给 AuditingEntityListener.class 注⼊了⼀个 AuditingHandler 的处理类。

第⼆步:打开 AuditingEntityListener.class 的源码分析 debug ⼀下。

@Configurable
public class AuditingEntityListener {

	private @Nullable ObjectFactory<AuditingHandler> handler;


	public void setAuditingHandler(ObjectFactory<AuditingHandler> auditingHandler) {

		Assert.notNull(auditingHandler, "AuditingHandler must not be null!");
		this.handler = auditingHandler;
	}


	@PrePersist
	public void touchForCreate(Object target) {

		Assert.notNull(target, "Entity must not be null!");

		if (handler != null) {

			AuditingHandler object = handler.getObject();
			if (object != null) {
				object.markCreated(target);
			}
		}
	}


	@PreUpdate
	public void touchForUpdate(Object target) {

		Assert.notNull(target, "Entity must not be null!");

		if (handler != null) {

			AuditingHandler object = handler.getObject();
			if (object != null) {
				object.markModified(target);
			}
		}
	}
}
  • 1.
  • 2.
  • 3.
  • 4.
  • 5.
  • 6.
  • 7.
  • 8.
  • 9.
  • 10.
  • 11.
  • 12.
  • 13.
  • 14.
  • 15.
  • 16.
  • 17.
  • 18.
  • 19.
  • 20.
  • 21.
  • 22.
  • 23.
  • 24.
  • 25.
  • 26.
  • 27.
  • 28.
  • 29.
  • 30.
  • 31.
  • 32.
  • 33.
  • 34.
  • 35.
  • 36.
  • 37.
  • 38.
  • 39.
  • 40.
  • 41.
  • 42.

从源码我们可以看到,AuditingEntityListener 的实现还是⽐较简单的,利⽤了 Java Persistence API ⾥⾯的@PrePersist、@PreUpdate 回调函数,在更新和创建之前通过 AuditingHandler 添加了⽤户信息和时间信息。

定义自定义监听器类

自定义监听器会用到以下几种注解,可以监听数据库操作的不同时机。

@PostLoad,实体对象查询之后
@PrePersist,实体对象保存之前
@PostPersist,实体对象保存之后
@PreUpdate,实体对象修改之前
@PostUpdate,实体对象修改之后
@PreRemove,实体对象删除之前
@PostRemove,实体对象删除之后
  • 1.
  • 2.
  • 3.
  • 4.
  • 5.
  • 6.
  • 7.

以下是CustomEntityAuditingListener类的实现代码,使用了@PrePersist@PreUpdate两个注解。

public class CustomEntityAuditingListener {
    @PrePersist
    private void prePersist(BaseEntity entity) {
        // 获取当前用户,具体获取逻辑请自行实现
        SysUser current = new SysUser();

        entity.setCreatorId(current.getId());
        entity.setCreator(current.getUsername());
        entity.setLastModifierId(current.getId());
        entity.setLastModifier(current.getUsername());
    }

    @PreUpdate
    private void preUpdate(BaseEntity entity) {
        // 获取当前用户,具体获取逻辑请自行实现
        SysUser current = new SysUser();

        entity.setLastModifierId(current.getId());
        entity.setLastModifier(current.getUsername());
    }
}
  • 1.
  • 2.
  • 3.
  • 4.
  • 5.
  • 6.
  • 7.
  • 8.
  • 9.
  • 10.
  • 11.
  • 12.
  • 13.
  • 14.
  • 15.
  • 16.
  • 17.
  • 18.
  • 19.
  • 20.
  • 21.

使用的话,需要在Entity对象添加对应EntityListers注解包含自定义的监听类

@Entity
@EntityListeners({AuditingEntityListener.class, CustomEntityAuditingListener.class})
  • 1.
  • 2.


老是被删除找不到,我写到51cto博客里。方便下次查找。